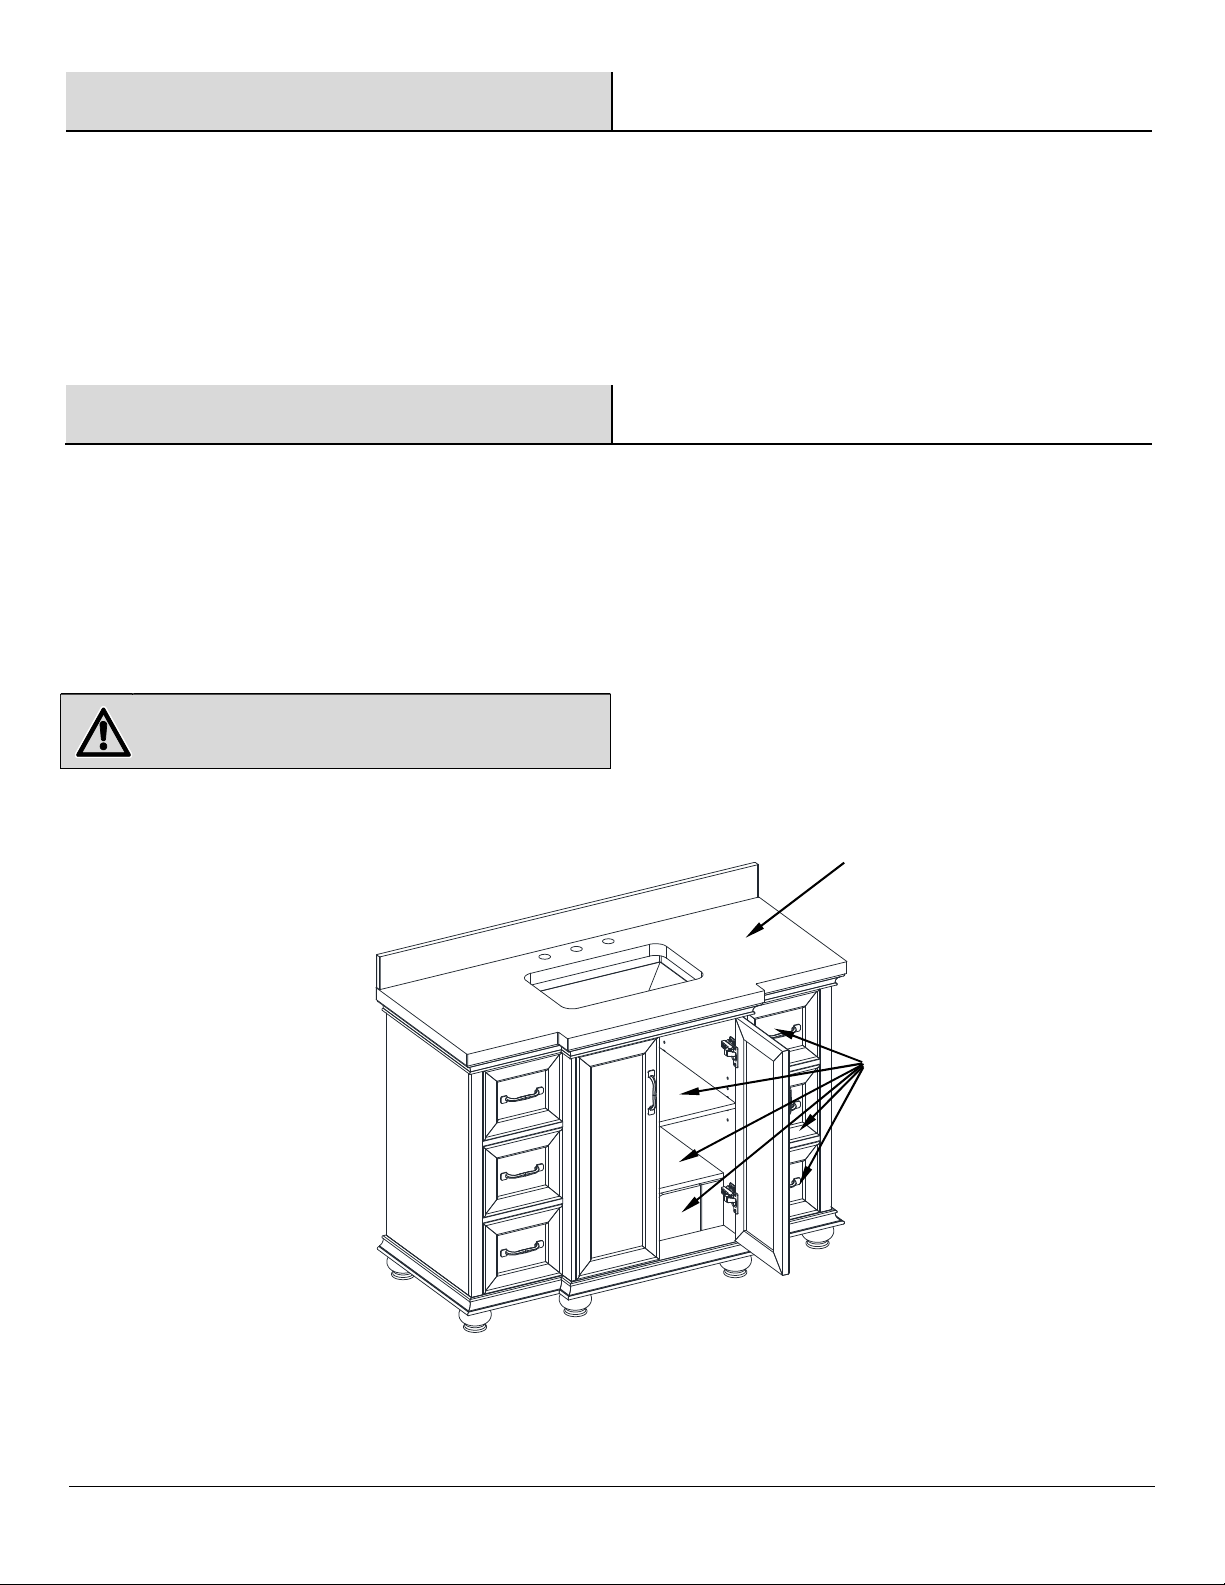
Thomasville Ellamar THMSVL48CVDG User manual

Model # THMSVL48CVDG
THMSVL48CVW
Date: 2021-03-10 Rev. 0001-A
USE AND CARE GUIDE
48” VANITY
Customer Service: 1-866-942-5362 English, French and Spanish
Monday - Friday, 8:30 a.m. - 4:30 p.m. PST
(Toll-free in U.S. and Canada only)
E-mail: parts@whalenfurniture.com
www.whalenfurniture.com

2
Table of Contents
Table of Contents .......................................................... 2
Safety Information ......................................................... 2
Warranty ......................................................................... 3
Limited Lifetime Warranty ............................................................. 4
Minnesota Residents .................................................... 3
Minnesota residents ...................................................................... 3
Pre-Assembly ................................................................ 4
Planning Assembly ....................................................................... 4
Tools required .............................................................................. 4
Hardware Included ....................................................................... 4
Package Contents ........................................................................ 5
Assembly ....................................................................... 6
Care and Cleaning ...................................................... 10
Maintenance & Consumer Responsibilities ............. 10
Service Parts ............................................................... 11
Safety Information
□ Please read and understand these instructions before
assembling and using this product. Save these instructions for
future reference.
MAXIMUM RECOMMENDED WEIGHT LOADS
WARNING:
Do not stand on the vanity. Use the vanity on
level
ground. Exceeding the maximum weight limits will compromise the
integrity of the vanity structure and could cause the vanity to fail.
Maximum load 200 lb.
(90.71 kg)
Maximum load 30 lb.
(13.6 kg)

3
Warranty
LIMITED LIFETIME WARRANTY
This product is warranted to the original purchaser. If there is a failure in this unit due to defects in materials or workmanship, the manufacturer will
repair or replace this item at our discretion without charge. Warranty is void if product has been assembled incorrectly, misused, abused by
overloading, altered in any way or damaged due to accident. This warranty is not transferable and does not cover chipping, flaking, scratches, rust,
dents, or other damages to the surfaces of this product. Responsibility of the manufacturer is limited to repair or replacement of this product. The
manufacturer is not responsible for consequential, incidental, or other damages or losses resulting from product failure.
This warranty is in lieu of all other expressed warranties. Some states do not allow the exclusion or limitation of incidental or consequential damages,
so the above limitation may not apply to you. This warranty gives you specific legal rights and you may have other rights which vary from state to
state.
Minnesota Residents
MINNESOTA RESIDENTS
"IMPORTANT HEALTH NOTICE.
SOME OF THE BUILDING MATERIALS USED IN THIS HOME (OR THESE BUILDING MATERIALS)
EMIT FORMALDEHYDE. EYE, NOSE, AND THROAT IRRITATION, HEADACHE, NAUSEA AND A
VARIETY OF ASTHMA-LIKE SYMPTOMS, INCLUDING SHORTNESS OF BREATH, HAVE BEEN
REPORTED AS A RESULT OF FORMALDEHYDE EXPOSURE. ELDERLY PERSONS AND YOUNG
CHILDREN, AS WELL AS ANYONE WITH A HISTORY OF ASTHMA, ALLERGIES, OR LUNG PROBLEMS,
MAY BE AT GREATER RISK. RESEARCH IS CONTINUING ON THE POSSIBLE LONG-TERM EFFECTS OF
EXPOSURE TO FORMALDEHYDE.
REDUCED VENTILATION MAY ALLOW FORMALDEHYDE AND OTHER CONTAMINANTS TO
ACCUMULATE IN THE INDOOR AIR. HIGH INDOOR TEMPERATURES AND HUMIDITY RAISE
FORMALDEHYDE LEVELS. WHEN A HOME IS TO BE LOCATED IN AREAS SUBJECT TO EXTREME
SUMMER TEMPERATURES, AN AIR-CONDITIONING SYSTEM CAN BE USED TO CONTROL INDOOR
TEMPERATURE LEVELS. OTHER MEANS OF CONTROLLED MECHANICAL VENTILATION CAN BE
USED TO REDUCE LEVELS OF FORMALDEHYDE AND OTHER INDOOR AIR CONTAMINANTS.
IF YOU HAVE ANY QUESTIONS REGARDING THE HEALTH EFFECTS OF FORMALDEHYDE,
CONSULT YOUR DOCTOR OR LOCAL HEALTH DEPARTMENT."

4
PLANNING ASSEMBLY
Compare all parts with the Hardware Included and Package Contents list. If any part appears missing or damaged, do not assemble this product and
contact the Customer Service Team at 1-866-942-5362.
TOOLS REQUIRED
Phillips
screwdriver
Drill
Bit
Silicone
compou
n
d
Level
Stud finder
HARDWARE INCLUDED
NOTE: Hardware not shown to actual size.
Pre-Assembly
Part
Description
Quantity
AA
Touch
-
up Pen
1
AA
(
not included for Item #THMSVL48CVW
)

5
Pre-Assembly (continued)
PACKAGE CONTENTS
Part
Description
Quantity
A
Vanity Top
1
B
Vanity Base
1
C
Backsplash
1
D
Feet
6
B
A
C
D

6
A
B
Assembly
1 Feet Assembly & Removing Packaging Material
□ Attach suppot leg (D) to bottom of vanity base (B) and screw the pre-assembled bolt into place.
□ Remove stone top and the packaging material under the stone top.
2 Stone Top Assembly
□ apply a thin bead of silicone compound (not included) to the top of the vanity base ( B ).
□ Align the back of the vanity base ( B ) and put the stone top ( A ) on the vanity base ( B ).
B
Silicone
A
B
D

7
Assembly
3 Adjustable Level
□
In case of uneven floors, floor levelers are provided at the bottom of
the vanity.
If necessary, adjust floor levelers by hand to correct
tilting and/or level doors.
4 Water Supply Lines and Drain Assembly Guide
□ Mark wall for vanity placement and note the location of the water supply lines and drain on the back panel of vanity.
□ Move vanity (B) into proper place against the wall.
□ Install faucet, drain and supply lines (none included) to vanity top (A) according to the instructions supplied with those items.
A
B

8
B
Assembly
5 Backsplash Assembly
□
To mount the backsplash (C) to the wall, apply a thin bead of silicone compound (not included) to the unpolished back side an
d bottom
of the backsplash (C). Position backsplash (C) as shown onto vanity top (A) and against the wall. Clean any excess silicone compound
before allowing to dry.
6 Adjustable shelf
□
Note: The adjustable shelves are pre
-
installed for shipping.
If the shelf position is not to your
liking, you will need to reposition the shelf
by following the steps below:
a. Look under the shelf, and locate the wood screws holding the shelf to the shelf supports.
b. Remove the wood screws from each shelf support with a Phillips screwdriver (not included).
c. Remove the adjustable shelf from the vanity (B).
d. Remove the shelf supports from the vanity (B) and re-position them in the desired location. Make sure you place the shelf supports
in the same level so the shelf is not tilted.
e. Place the adjustable shelf back onto the shelf supports.
f. Using the Phillips screwdriver, reinstall the wood screws through the shelf supports and into the shelf.
C
A
Silicone

9
Assembly
7 Hinge Adjustment For Door Alignment
□ If the doors preassembled to vanity base (B) require adjustment, follow the below options as needed:
□ To adjust door up or down, loosen screws (a), adjust door and retighten screws.
□ To adjust door left and right, turn screw (b) in or out.
□ To adjust door in and out, loosen screw (c), adjust door and retighten screw.
8 Adjust drawer
□
If you need to remove the drawer, please press the Release Levers on the mechanisms
pre
-
attached underneath the drawer kit at both
ends.
□ If necessary, you can push the Adjustment Clips on the bottom mechanisms to adjust the top and bottom gaps of the drawer.
B
Adjustment Clip
Release Lever

10
Care and Cleaning
□ Dust the vanity regularly with a soft, non-lint producing cloth or household dusting product.
□ You can clean the vanity with a gentle, non-abrasive household cleaner. Make sure to dry the wood immediately with a soft cloth or towel.
□ Tips for using touch-up pen (AA): For scratches, stroke in direction of scratch; for worn areas, stroke in direction of wood grain. Rub excess
colorant promptly with a soft cloth.
□ Keep product away from direct sunlight as it may damage the finish.
□ Please clean all fluids from the stone surface to prevent stains. we strongly suggest that red wine spills be wiped off immediately to prevent
permanent damage to the stone surface.
Maintenance & Consumer Responsibilities
Stone countertops are surprisingly resilient to stains and scratches. However, as a preventative measure, any spills on the stone surfaces should be
wiped up within a reasonable amount of time. Don’t let liquid sit on the stone overnight. Stones are most prone to staining by oil and acid, so be sure
to blot these spills up as soon as they happen. Follow up by cleaning the stone with a mild non-abrasive soap and water.
In bathrooms specifically, stone tends to attract soap scum, just like man-made tile. Rinse vanity top with clean, hot water frequently.
The use of sealers is also a powerful preventative measure. Your stone was sealed at the factory, but reapplication is necessary over time. How
often is determined by the quality of the sealer used, and the frequency of use. We recommend using a penetrating non-toxic sealer for bath areas,
but a food-safe sealer is is typically not necessary.
If stains and scratches do occur, there are many things you can do as a consumer to remove them. Remove oil based stains with acetone, mineral
spirits, or ammonia. Organic stains like coffee, tea, or juice can be removed with hydrogen peroxide, mixed with a few drops of ammonia.
Water spots or rings are the most common problem with bath vanities, and are caused by minerals left behind when water evaporates. These can be
removed by buffing the spots gently with 00 gauge steel wool. Likewise, small nicks and scratches can often be removed the same way. Larger
scratches, chips, and resilient stains may require professional help. Please contact your local stonemason for details.
Remember the following list of DOs and DON’Ts:
□ DO use preventative cleaning measures to keep your stone pristine.
□ DO use sealers, applied according to the product specific directions.
□ DO blot spills quickly, and wash with mild soap and warm water.
□ DON’T use harsh bathroom cleaners or grout cleaners on any natural stone.
□ DON’T worry if you get a significant stain or scratch that your stone investment is ruined. Virtually anything can be fixed with professional
help.

11
Service Parts
Part Description Quantity
C Backsplash 1
D Feet 6
E Inner Drawer 1
F Drawer 6
G Left Door 1
H Right Door 1
I Adjustable Shelf 1
J Handle with Bolt 8
K Slow Close Hinge 4
L 12in Drawer Slides 1
M Leveler 6
N Shelf Support with Screw 4
O 14in Drawer Slides 6
AA Touch-up Pen 1
C
E
F
I
K
H
J
M
AA
L
N
D
G
O

Modèle # THMSVL48CVDG
THMSVL48CVW
Date: 2021-03-10 Rév. 0001-A
GUIDE D'UTILISATION ET D'ENTRETIEN
MEUBLE-LAVABO DE 1,22M (48PO)
Service à la clientèle : 1-866-942-5362 anglais, français et espagnol
Du lundi au vendredi, entre 8 h 30 et 16 h 30, heure du Pacifique
(Sans frais aux États-Unis et au Canada seulement)
Courriel : parts@whalenfurniture.com
www.whalenfurniture.com

2
Table des matières
Table des matières ........................................................ 2
Mesures de sécurité ...................................................... 2
Garantie .......................................................................... 3
Garantie limitée à vie .................................................................... 3
Minnesota ....................................................................... 3
Résidents du minnesota ............................................................... 3
Pré-assemblage ............................................................. 4
Planification d'assemblage ........................................................... 4
Outils nécessaires ........................................................................ 4
Matériel inclus .............................................................................. 4
Contenu ........................................................................................ 5
Assemblage ................................................................... 6
Soins et entretien ........................................................ 10
Entretien et responsabilités du client ....................... 10
Pièces de rechange .................................................... 11
Mesures de sécurité
□ Veuillez lire et comprendre ces instructions avant le montage et
l'utilisation de cette console. Conservez ces instructions pour une
utilisation future.
CHARGES MAXIMUM RECOMMANDEES
AVERTISSEMENT :
Ne vous tenez pas debout sur le meuble
-
lavabo. Placez le meuble-lavabo sur un sol plat. Si le poids
maximum est dépassé, cela compromettra l’intégrité de la
structure du meublelavabo
et celui
-
ci pourrait se détériorer
.
Charge maximale 200 lb.
(90.71 kg)
Charge maximale 30 lb.
(13.6 kg)

3
Garantie
GARANTIE LIMITEE A VIE
Ce produit de Whalen est garanti à l’acheteur initial. En cas de bris de l’unité dû à un défaut des matériaux ou de la fabrication, Whalen Storage
réparera ou remplacera cet article, à sa discrétion, sans frais. La garantie est nulle si le produit a été mal assemblé, mal utilisé, abusé par une
surcharge, modifié de quelque manière que ce soit ou endommagé par accident. La présente garantie n’est pas transférable et ne couvre pas
l’écaillage, les rayures, la rouille, le bosselage ou tout autre dommage aux surfaces du produit. La responsabilité de Whalen Storage se limite à
réparer ou remplacer ce produit. Whalen Storage n’est pas responsable des dommages indirects, accessoires ou autres ou de la perte résultant du
défaut du produit.
La présente garantie tient lieu de toute autre garantie expresse. Certaines régions ne permettent pas l’exclusion ou la limite des dommages indirects
ou accessoires. Dans un tel cas, la limite précédente pourrait ne pas s’appliquer. La présente garantie vous donne des recours légaux particuliers et
vous pourriez avoir d’autres droits qui varient selon la région.
Minnesota
RÉSIDENTS DU MINNESOTA
"AVIS DE SANTÉ IMPORTANT.
CERTAINS DES MATÉRIAUX DE CONSTRUCTION UTILISÉS DANS CETTE MAISON (OU CES
MATÉRIAUX DE CONSTRUCTION) ÉMETTENT DU FORMALDÉHYDE. UNE IRRITATION DES YEUX, DU
NEZ ET DE LA GORGE, DES MAUX DE TÊTE, DES NAUSÉES ET UNE VARIÉTÉ DE SYMPTÔMES
APPARENTÉS À L’ASTHME, Y COMPRIS L’ESSAI DE RESPIRATION, ONT ÉTÉ SIGNALÉ À LA SUITE
D’UNE EXPOSITION AU FORMALDÉHYDE. LES PERSONNES ÂGÉES ET LES JEUNES ENFANTS, AINSI
QUE TOUTE PERSONNE AYANT DES ANTÉCÉDENTS D’ASTHME, D’ALLERGIES OU DE PROBLÈMES
PULMONAIRES, PEUVENT FAIRE FACE À DES RISQUES PLUS IMPORTANTS. LA RECHERCHE SE
CONTINUE SUR LES EFFETS POSSIBLES À LONG TERME DE L’EXPOSITION AU FORMALDÉHYDE.
UNE VENTILATION RÉDUITE PEUT PERMETTRE AU FORMALDÉHYDE ET AUTRES
CONTAMINANTS DE S’ACCUMULER DANS L’AIR INTÉRIEUR. LES TEMPÉRATURES INTÉRIEURES
ÉLEVÉES ET L’HUMIDITÉ ÉLEVENT LES NIVEAUX DE FORMALDÉHYDE. LORSQU’UNE MAISON DOIT
ÊTRE SITUÉE DANS DES ZONES SOUMISES À DES TEMPÉRATURES D’ÉTÉ EXTRÊMES, UN SYSTÈME
DE CLIMATISATION PEUT ÊTRE UTILISÉ POUR CONTRÔLER LES NIVEAUX DE TEMPÉRATURE
INTÉRIEURE. D’AUTRES MOYENS DE VENTILATION MÉCANIQUE CONTRÔLÉE PEUVENT ÊTRE
UTILISÉS POUR RÉDUIRE LES NIVEAUX DE FORMALDÉHYDE ET D’AUTRES CONTAMINANTS DE
L’AIR INTÉRIEUR.
SI VOUS AVEZ DES QUESTIONS CONCERNANT LES EFFETS DU FORMALDÉHYDE SUR LA SANTÉ,
CONSULTEZ VOTRE MÉDECIN OU VOTRE DÉPARTEMENT DE SANTÉ LOCAL."

4
PLANIFICATION D'ASSEMBLAGE
Comparez les pièces avec les listes de matériel inclus et le contenu du colis. Si une pièce quelconque serait manquante ou endommagée, ne pas utiliser le produit et
contacter le Service à la clientèle au 1-866-942-5362.
OUTILS NECESSAIRES
Tournevis à
Pointe cruciforme
Perceuse
Mèche
composé de
silicone
Niveaul
Détecteur de montant
MATERIEL INCLUS
REMARQUE : Matériel non représenté à la taille réelle.
Pré-assemblage
Pièce
Description
Quantité
AA
Crayon de retouche
1
AA (non inclus avec l’article #THMSVL48CVW)

5
Pré-assemblage (suite)
CONTENU
Pièce
Description
Quantité
A
Comptoir de meuble
-
lavabo
1
B
Meuble
-
lavabo
1
C
Dosseret
1
D
Pied
6
A
B
D
C

6
Assemblage
1 Assemblage pied et retrait du matériel d’emballage
□ Fixez le piètement (D) à la base de la coiffeuse (B) et vissez les boulons préassemblés à leur place.
□ Retirez le dessus en pierre et le matériau d’emballage sous le dessus en pierre.
2 Assemblage supérieur en pierre
□ Appliquer un mince cordon de mastic silicone (non inclus) sur le dessus de la base de vanité (B).
□ Alignez l’arrière de la base de vanité (B) et mettez le dessus en pierre (A) sur la base de vanité (B).
B
A
B
A
Silicone
B
D

7
Assemblage
3 Réglage du niveau
□
Si votre plancher est
inégal, utilisez les patins réglables situés au bas du
meuble
-
lavabo. Au besoin, ajustez les patins réglables à la
main pour corriger l’inclinaison ou pour mettre les portes de niveau.
4 Guide d’installation des conduits d’alimentation en eau et du drain
□
Marquez le mur à l’endroit où vous installerez le meuble
-
lavabo et notez l’emplacement des conduites d’alimentation en eau et du drain
sur le panneau arrière du meuble-lavabo.
□ Placez le meuble-lavabo (B) contre le mur à l’endroit désiré.
□ Installez le robinet, le drain et les conduites d’alimentation (non inclus) au comptoir de meuble-lavabo (A) selon les instructions pour
l’installation fournies avec ces articles.
B
A

8
Assemblage
5 Installation du dosseret
□
Pour installer le dosseret (C) au mur, appliquez un mince trait de composé de silicone (non inclus) sur les surfaces arrière
et inférieure
non polies du dosseret (C). Placez le dosseret (C) sur le comptoir du meuble-lavabo (A) et contre le mur. Éliminez tout excédent de
composé de silicone, puis laissez sécher.
6 Tablette réglables
□
Remarque : Les tablette réglables sont préinstallée aux fins de livraison. Si elle n’est pas positionnée à l’endroit souhaité
, vous devrez
la déplacer en suivant les étapes ci-dessous :
a. Sous la tablette, repérez les vis à bois retenant la tablette aux supports de tablette.
b. Retirez les vis à bois de chaque support de tablette à l’aide d’un tournevis cruciforme (non inclus).
c. Retirez la tablette réglable de la base du meuble-lavabo (B).
d. Retirez les supports de tablette de la base du meuble-lavabo (B) et replacez-les à l’endroit désiré. Assurez-vous que les supports
de tablette se trouvent au même niveau afin que la tablette ne soit pas inclinée.
e. Posez la tablette réglable sur les supports de tablette.
f. Replacez les vis à bois dans les supports de tablette et dans la tablette à l’aide d’un tournevis cruciforme.
C
A
Silicone
B

9
Assemblage
7 réglage de la charnière pour l’alignement de la porte
□
Si le réglage des portes
préassemblées à la base du meuble
-
lavabo (B)
s
’
avère nécessaire, choisissez l
’
une des options ci
-
dessous en
fonction du besoin :
□ Pour déplacer la porte vers le haut ou vers le bas, desserrez les vis (a), ajustez la porte, puis resserrez les vis.
□ Vissez ou dévissez la vis (b) pour déplacer la porte vers la droite ou la gauche.
□ Pour déplacer la porte vers l’avant ou vers l’arrière, desserrez la vis (c), ajustez la porte, puis resserrez la vis.
8 Ajustement du tiroir
□ Si vous devez retirer le tiroir, veuillez appuyer sur les leviers de déclenchement des mécanismes préfixés sous le kit du
tiroir aux deux extrémités.
□ Si nécessaire, vous pouvez pousser les clips de réglage sur les mécanismes du bas pour ajuster les espaces supérieurs et
inférieurs du tiroir.
Clip d'ajustement
Levier de déblocage
B
This manual suits for next models
1
Table of contents
Languages:
Other Thomasville Bathroom Fixture manuals

Thomasville
Thomasville Bradford THMSVL48FVJ User manual

Thomasville
Thomasville McGinnis THMSVL48FVW User manual

Thomasville
Thomasville McGinnis THMSVL36FVW User manual

Thomasville
Thomasville Bradford THMSVL36FVJ User manual

Thomasville
Thomasville Ellamar THMSVL60CVDG User manual

Thomasville
Thomasville Portage THMSVL36BVB User manual

Thomasville
Thomasville Bradford THMSVL30FVJ User manual

Thomasville
Thomasville Amherst THMSVL48AVB User manual

Thomasville
Thomasville McGinnis THMSVL30FVW User manual

Thomasville
Thomasville Bradford THMSVL60FVJ User manual