Thorne BEES ON A BUDGET W.B.C. BEEHIVE User manual

Thornes are committed to providing excellent quality beekeeping equipment. We have been making
beehives for over 100 years now and are in our third, fourth and fifth generations. Many of our staff are
enthusiastic beekeepers with years of knowledge and experience in the industry. All our full size hives
are made from Canadian Western Red Cedar and the Budget range usually from British Western Red
Cedar. Whilst Cedar does not require preservative, having its own camphor type oils, we recommend the
use of an insecticide free Wood Paint, especially designed for beehives. As an alternative, you can use
exterior oil. Whether treated or not, your new Thorne beehive should give you many years of trouble-free
service.
We also have a dedicated email address if you need help or advice, specifically with beekeeping.
CONGRATULATIONS ON BUYING A
BEES ON A BUDGET W.B.C. BEEHIVE
The complete W.B.C. beehive comprises of:
• Solid Floor and Entrance Slides
• Cavity Lath
• Brood Body
• 10 x DN4 frames with standard wired foundation
• Dummy board
• Slotted Steel Queen Excluder
• 2 x Supers
• 22 x SN4 frames with standard wired foundation
• 3 x pairs of runners
• Crownboard with two porter bee escapes
• 3 x Lifts (1 x with porch)
• Plastic cone escapes and brass name plate
• Gabled roof
• All nails, screws, pins and glue
PART LIST FOR THORNE’S BUDGET W.B.C. BEEHIVE
We have a YouTube channel: www.youtube.com/thornebeehives
This shows videos on how to assemble your beehive as well as many other useful videos.
Our website is also full of hints tips and PDF documents on how to assemble each part of your beehive.
You can find them at: www.thorne.co.uk/assembly-instructions
REMEMBER DO NOT GLUE OR NAIL ANYTHING UNTIL YOU ARE SURE THE HIVE PART HAS
BEEN PUT TOGETHER CORRECTLY.
ASSEMBLY INSTRUCTIONS
E.H. THORNE (Beehives) Ltd.
Beehive Business Park, Rand, Nr. Wragby, Lincolnshire, LN8 5NJ

E.H. THORNE (Beehives) Ltd.
Beehive Business Park, Rand, Nr. Wragby, Lincolnshire, LN8 5NJ
BEES ON A BUDGET W.B.C. BEEHIVE
Once all the hive parts have been assembled, the hive can be put together as follows:
The solid floor with legs, brood, queen excluder,
super/s and crowboard go together on top of
each other as shown here. Then the lifts go over
these, first the one with the porch, then two
more, and your roof on top.
WHAT BIT GOES WHERE IN THE HIVE?
We also have a YouTube video demonstrating this. Follow this link
https://youtu.be/u43U0y1nD74 or snap the QR code.
If you do have any queries about assembling your hive or beekeeping in general please call us on 01673
Crownboard
Super
Queen Excluder
Brood
Solid Floor

WHERE TO GET YOUR FIRST COLONY
There are several ways to get your first colony of bees. Local beekeepers can provide bees which will
be well adapted to the area and they should make sure they are reasonable to handle and free from
disease. Commercial breeders and equipment suppliers select for yield and docility and will also take
care to ensure that colonies are free from disease. In either case, it is recommended that you start
with a nucleus (a small colony with 6 frames of bees). Because it is small, there are fewer bees and it is
easier to manage. As it grows during the season, so should your confidence. You can purchase bees on
our website here: www.thorne.co.uk/bees
If you are offered a swarm to start beekeeping, you should treat them with caution. Swarms can carry
disease and may have poor temperament.
CHOOSING AN APIARY SITE
Most beekeepers keep a few hives ‘at the bottom of the garden’. This may be convenient for the
beekeeper but might not be the best place for the bees. Factors worth considering when choosing an
apiary site:
• Is there sufficient forage to support the bees and produce a surplus?
• Is the location adjacent to a public thoroughfare?
• Is the site protected from the prevailing wind, frost and flooding?
• Is the site easily accessible at all times?
• Is there an adequate supply of water close by?
• Is there sufficient space for expansion?
INSTALLING BEES IN YOUR NEW HIVE
1. Prepare the site and make sure all hive parts are ready for the bees.
2. Place the travelling box (that the bees came in) onto the floor with the entrance facing in the desired
direction and remove the entrance seal. Leave the box for at least 24 hours for the bees to settle to
their new location.
3. Choose a fine, warm day to transfer the bees to their new hive. Light your smoker and put on your
protective clothing.
4. Move the box with the bees to the side. Place the floor and brood body from your new hive onto the
stand. Any flying bees will start to return to the original site and will go into the hive.
5. Remove the lid from the travelling box. Smoke gently. Check the bees on the underside of the lid in
case the queen is there (unlikely but possible) and then shake the bees off the lid into the new hive.
Place the lid to one side.
6. Remove a frame from one side of the travelling box, taking care to avoid crushing bees. Put the
frame into the new hive at one side. Remove each of the remaining frames from the box and transfer
them into the hive. Keep the frames in the same order and orientation. It is best to transfer the six
frames into the centre of the brood body.
7. Once all the frames have been transferred, give the travelling box a sharp shake over the hive to
transfer any bees remaining in the box to the hive. Place frames with foundation either side of the
frames with bees, filling the hive with a dummy board at one side and then put the crownboard in
place.
8. Feed the bees a sugar water syrup 1kg sugar to 1litre water using a feeder on top of the hive. The
colony will have to draw out the foundation into complete honeycombs which can then be used for
brood rearing or food storage.
E.H. THORNE (Beehives) Ltd.
Beehive Business Park, Rand, Nr. Wragby, Lincolnshire, LN8 5NJ
BEES ON A BUDGET W.B.C. BEEHIVE

FIRST YEAR – SEASONAL GUIDE
January – Check mouseguards are still in place and that there is ventilation. Check for woodpecker
damage. Check on stored combs for wax moth. Pay subscription to local Beekeepers Association. Look
for details on our winter sale.
February – Carry out repairs before season starts. Heft the hives to check for stores and give them
fondant (not syrup) if they are short.
March – Remove mouseguards. Continue checking for stores. Watch for early pollen being gathered and
feed pollen pattie if scarce. If warm enough, feed 1:1 sugar syrup.
April – First full inspection, check for worker brood, eggs and young larvae. Do a disease inspection.
Mark queen. Remove old combs and replace with foundation. Put supers on hives before honey flow.
May – Monitor varroa levels and apply control methods as necessary to reduce mite numbers. Begin
swarm control inspections and carry out control. Extract oil seed rape honey.
June – Check colonies do not get hungry during ‘June Gap’. Feed if necessary. Continue varroa
monitoring.
July – Usually height of honey flow. Put on supers. Harvest the crop.
August – Speak to local association about coordinating varroa treatment.
September – Feed each colony with strong syrup (2 parts sugar to 1-part water). Do a disease
inspection.
October – Check colony is ready for winter with a good queen, plenty of young workers, good health
and plenty of stores. Ensure hives are weathertight. Fit mouseguards.
November – Protect stored combs against wax moth by fumigating with Sulphur strips.
December – Put your feet up and read a beekeeping book. Try candlemaking for Christmas. Heft
colonies to check for weight and feed fondant if necessary. Treat with oxalic acid when colonies are
broodless.
E.H. THORNE (Beehives) Ltd.
Beehive Business Park, Rand, Nr. Wragby, Lincolnshire, LN8 5NJ
BEES ON A BUDGET W.B.C. BEEHIVE
Newburgh
Rand
Windsor
Stockbridge
South Molton
THORNES OF SCOTLAND
Newburgh Industrial Estate
Cupar Road
Newburgh
Fife
KY14 6HA
01337 842596
THORNES OF DEVON
Quince Honey Farm
Aller Cross
South Molton
EX36 3RD
01769 573086
THORNES OF WINDSOR
Oakley Green Farm
Oakley Green
Windsor
Berkshire
SL4 4PZ
01753 830256
THORNES OF STOCKBRIDGE
Chilbolton Down Farm
Chilbolton Down
Stockbridge
Hampshire
SO20 6BU
01264 810916
ASSEMBLY INSTRUCTIONS
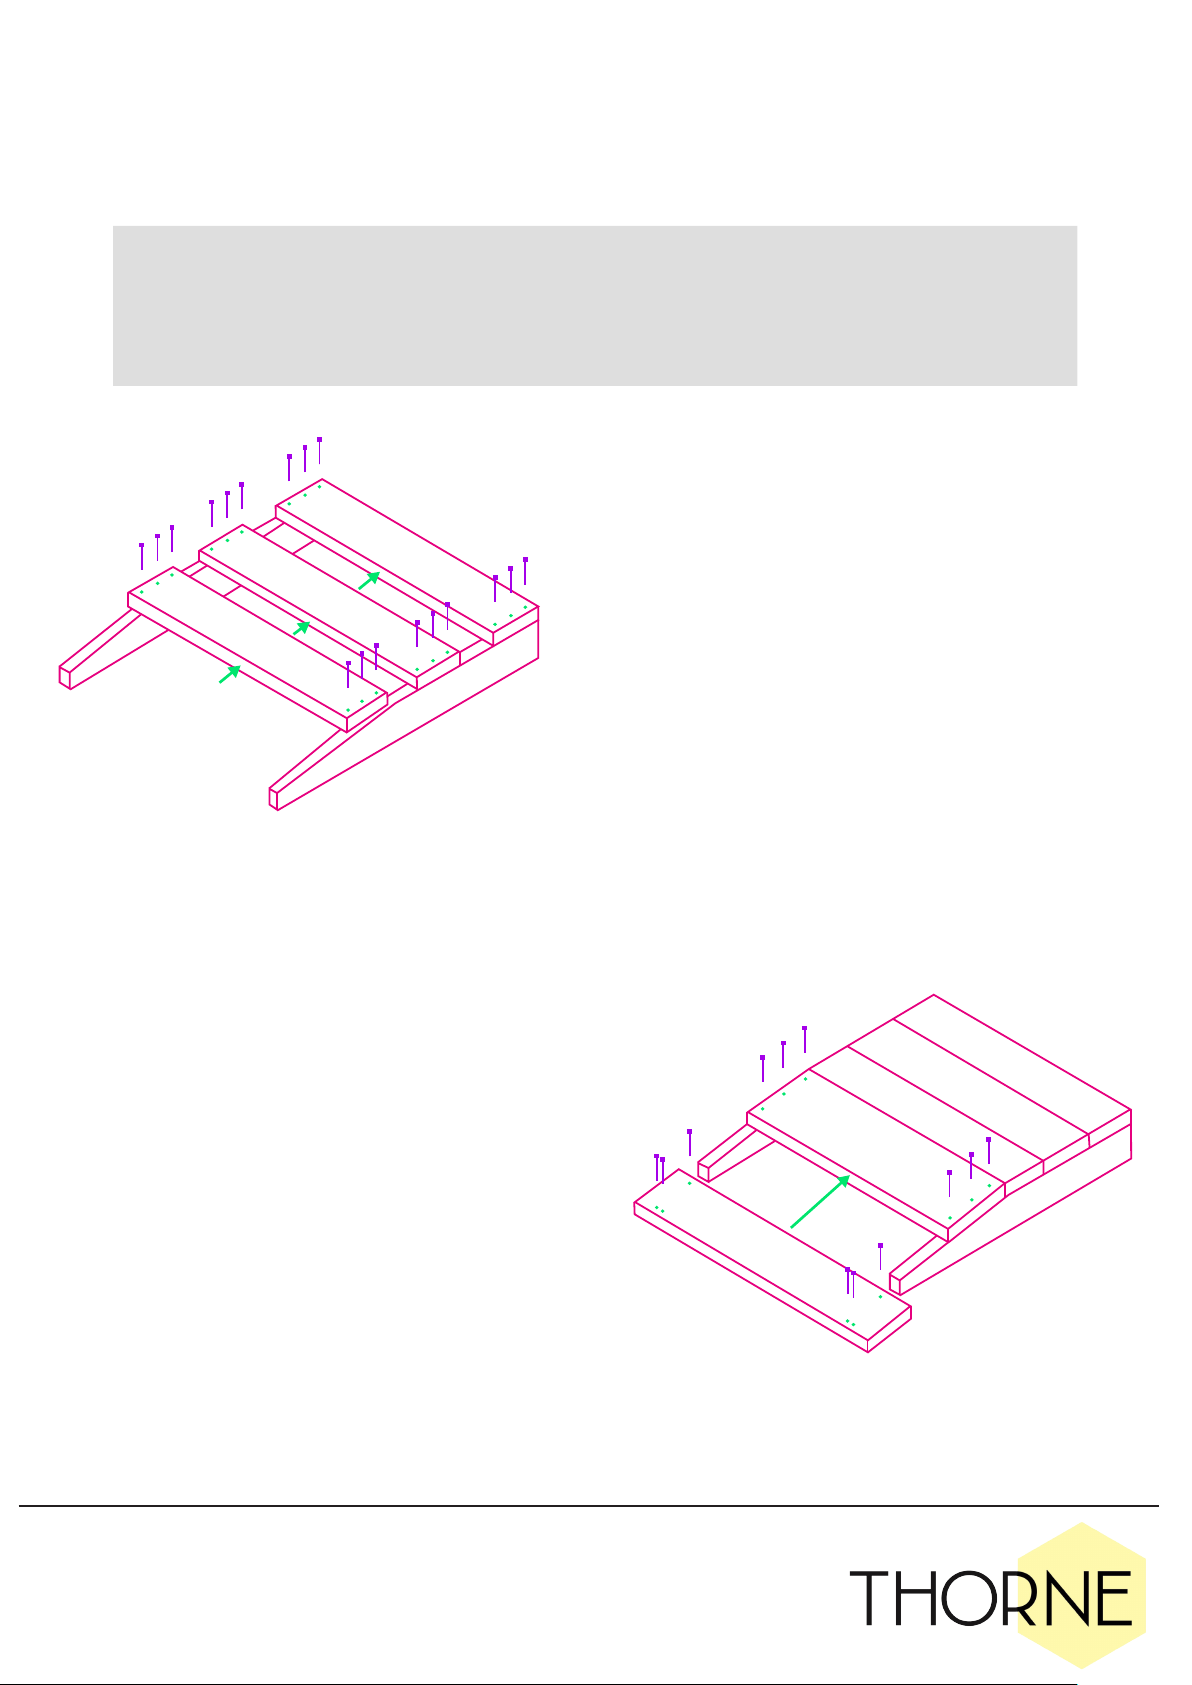
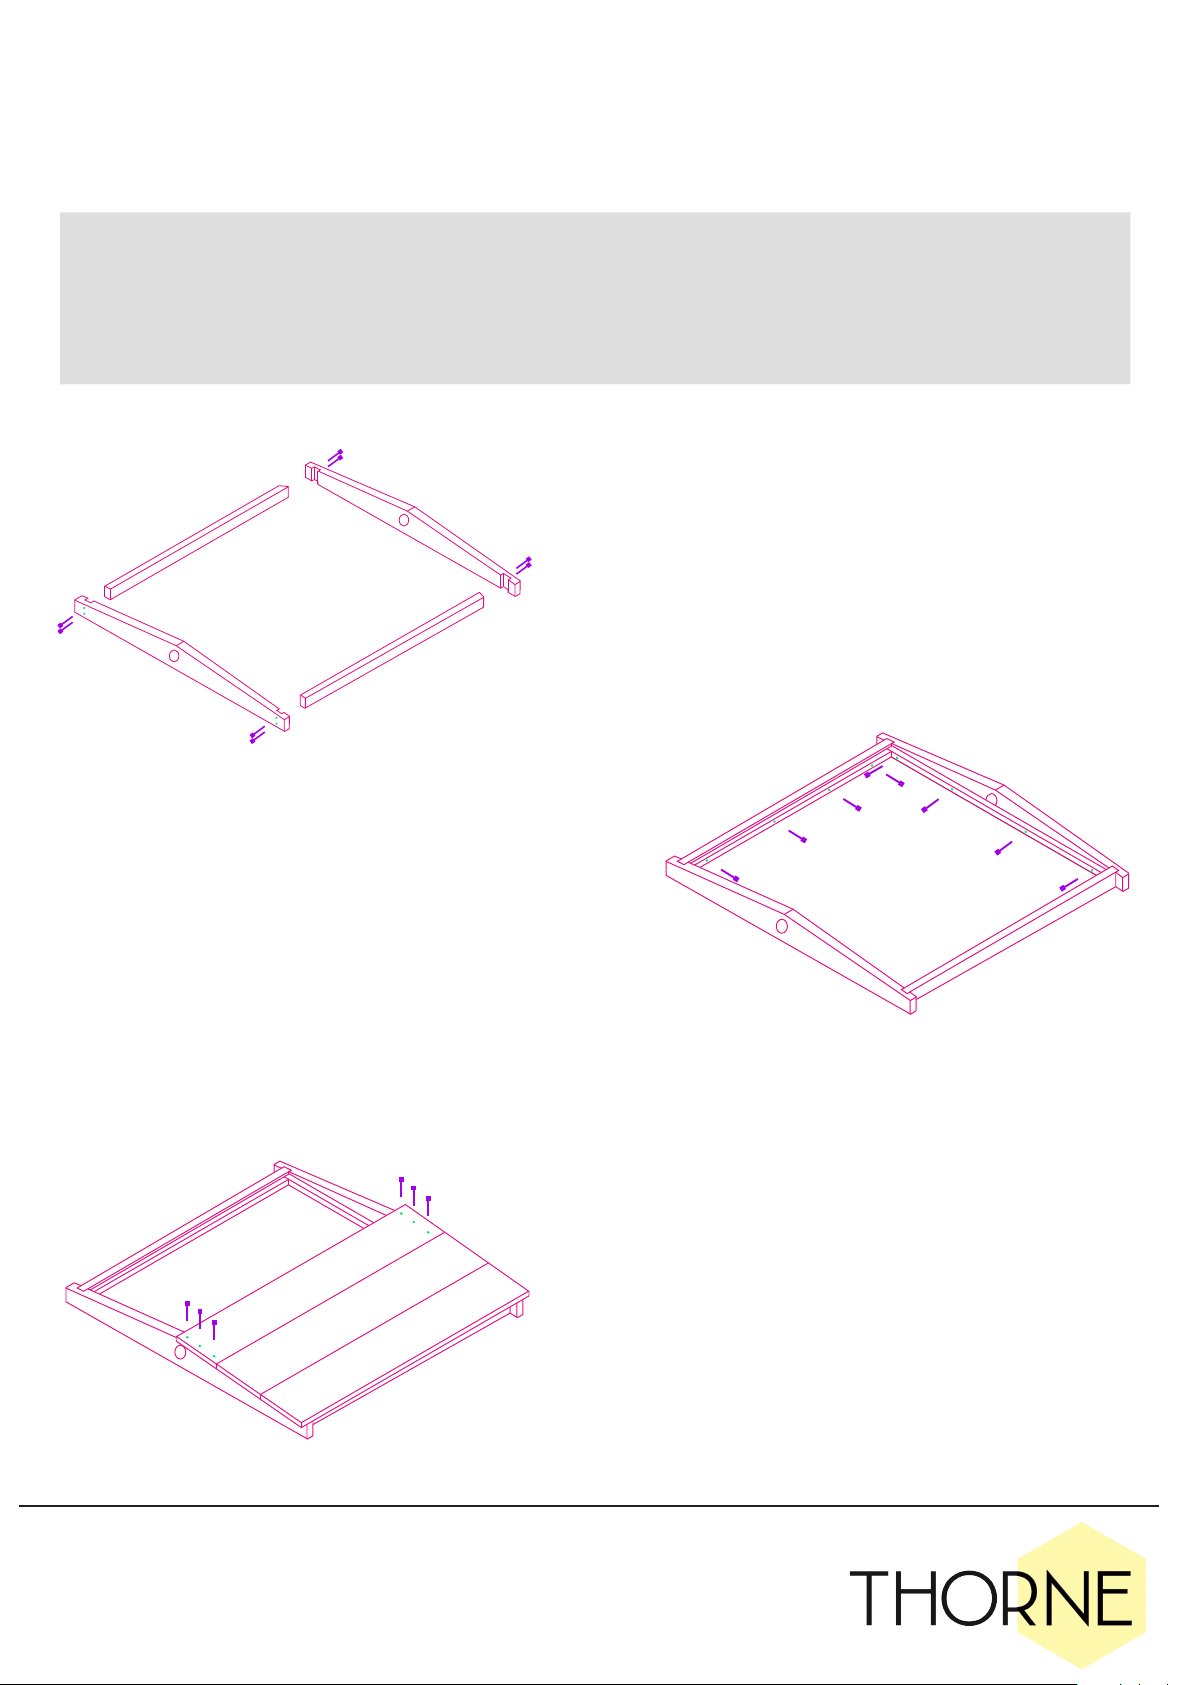
BUDGET W.B.C. FLOOR
Included: 5 x Floorboards, 2 x Joists, 2 x Wedges, 2 x Stays, 4 x Legs,
Glue, 14 x 1” Nails, 34 x 1½” Nails, 4 x 2” Nails, 8 x Screws
Tools needed: Hammer, Punch/Rampin, Set Square, Drill,
Electric Screwdriver, Tape Measure, Pencil
2.
2A. This next step requires the 2 remaining
floorboards. You will also need another 8 x 1½”
nails and 4 x 1” nails.
2B. Starting with the narrower floorboard,
one edge will be beveled, this beveled edge
will butt up to the last board you attached to
the joists. Glue and nail in place as with the
previous 3 boards.
2C. The last board you are left with will be
wider than the others. Make sure you leave
equal over hang either side and nail as shown
in diagram. 1 x 1½” nail either side at the top,
and then 2 x 1” nails to attatched the board to
the end of the joist underneath.
1A. For this first step you will need 18 x 1½” nails,
the 2 joists and the 3 smaller floorboards.
1B. Start by placing the joists on a flat surface,
as pictured, and apply glue along the top of
the joist. Starting at the higher end, and place
on the first floorboard. Nail in your first nail on
each side and make sure everything is square
before continuing. Once you are sure it is
square, carry on nailing so you have a total of 3
nails in each side of your first floorboard.
1C. Move onto the next floorboard, making sure
you apply glue to the joist and the floorboard
you have just attatched that this one will
butt up to. Nail in 3 nails on each end of the
floorboard. Repeat this one more time for the
third floorboard.
1.
E.H. THORNE (Beehives) Ltd.
Beehive Business Park, Rand, Nr. Wragby, Lincolnshire, LN8 5NJ
3. 3A. You will need the 2 wedges, 10 x 1” nails and a
rampin or nail punch also.
3B. Line up the wedges as shown in the diagram
making sure they are the right way round and flush
with the join between the third and forth board. Glue,
then nail 3 nails in the top of each wedge, making
sure not to hit nails you have already inserted, and
that the nails do not pretrud on the underneath.
3C. Then nail 2 nails into each the rebates as show
in the diagram. This is easily done with a rampkin, or
part nail in with a hammer and finish with a punch.
4.
4A. For this step you will need the 2 stays and 4 x 2”
nails.
4B. Glue and nail the shorter, square stay at the
back, in line with the end of the joists, 1 x 2” nail in
each end.
4C. Then measure from the back of the floor along
the joist 18” (457mm) and mark on both joists. Line
up the longer, recangular stay with these marks and
glue and nail into place so overhang lines up with
wider floorboard.
E.H. THORNE (Beehives) Ltd.
Beehive Business Park, Rand, Nr. Wragby, Lincolnshire, LN8 5NJ
5. 5A. This last step requires 4 x legs, 8 x 1½” nails and
8 x screws.
5B. Now you have your stays in place, each leg
should slot into the corners. Use 2 screws to
attached each leg, it might be easier to pre-drill
the holes in the joist.
5C. Once the legs are screwed in place, nails 2 x
1½” nails through the stays and into the legs as show
in the diagram.
BUDGET W.B.C. FLOOR continued...
ASSEMBLY INSTRUCTIONS
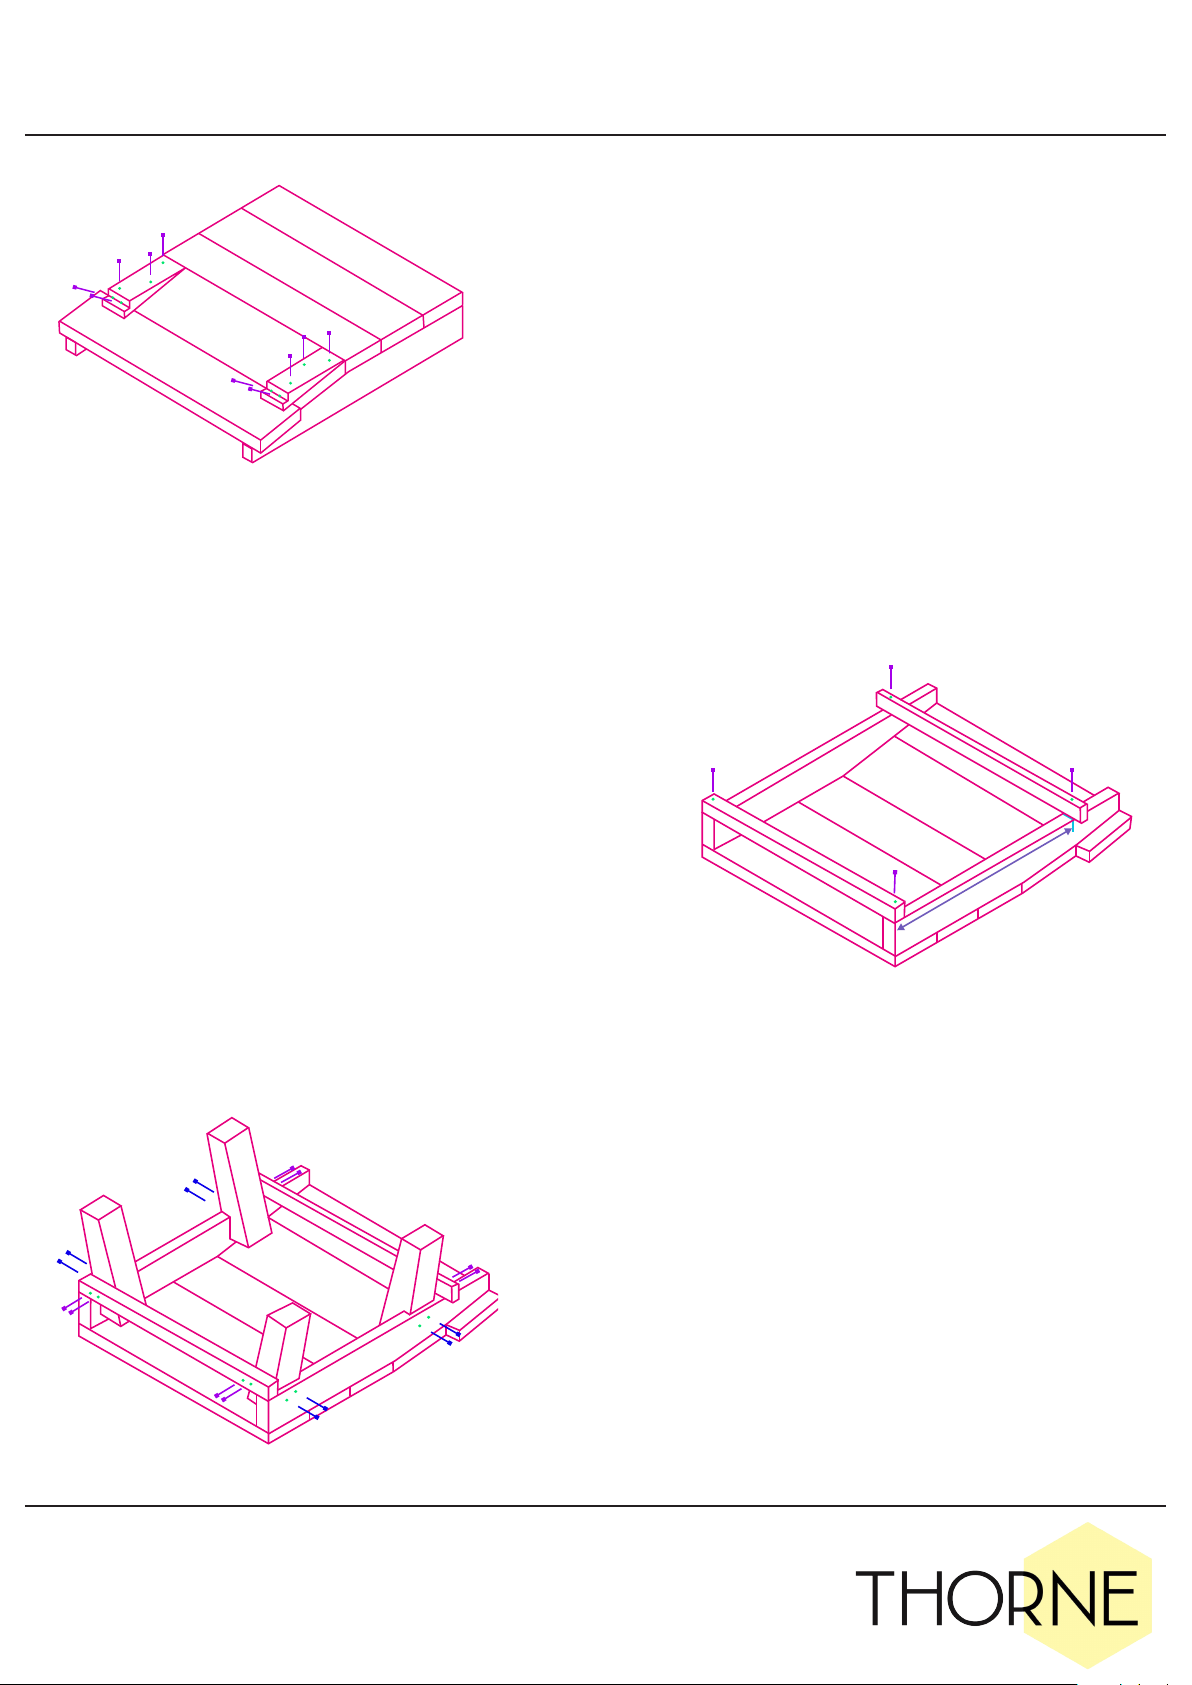
BUDGET W.B.C. LIFT & PORCH
Included: 4 x Walls, 4 x Laths, 1 x Porch, 1 x Porch Roof, Thorne Name Plate,
Glue, 20 x 1” Nails, 35 x 1½” Nails, 3 x Screws, 6 x Brass Pins
Tools needed: Hammer, Set Square, Electric Screwdriver
E.H. THORNE (Beehives) Ltd.
Beehive Business Park, Rand, Nr. Wragby, Lincolnshire, LN8 5NJ
1A. For this first step you will need 32 x 1½” nails and
4 x walls. The walls will all have a slope to them with
bevelled top and bottom edges. Make sure you you
have these the right way round so they are sloping in
toward the top of the lift and thus ensuring the tops
and bottoms are horizontal.
2B. Slot the walls together and nail into place with 8
x 1½” nails on each corner in the configuration shown
in the diagram.
CHECK THE BOX IS SQUARE BEFORE MOVING ONTO
THE NEXT STEP.
1.
3A. Lastly, you will add the porch and porch roof
to one of the lifts. You will need both parts of the
porch, 3 x screws and 3 x 1½” nails. Start with your
lift on a flat surface, line up the porch flat inline
with the bottom of the lift, so it is centered, and
screw into place.
3B. Next take the porch roof piece, so that the rain
channel is facing up, place onto the porch so it is
inline with it and butt up to the wall of the lift, and
nail into place with 3 x 1½” nails.
3C. Finish off the lift and porch with the Thorne
name plates, fixing it with 6 x brass pins.
3.
2. Next you will need 20 x 1” nails and 4 x laths.
These laths should be nailed inside the lift, a laths
depth (½”) up from bottom of the lift wall. You can
use one of the laths as a guide. Tuck the first lath
into one of the corners, so that the next lath can
tuck into that one, and so on round the inside of
the lift. Nail these in place with 5 x 1” nails per
lath.
2.
REPEAT STEPS 1 AND 2 UNTIL YOU HAVE 3 LIFTS

ASSEMBLY INSTRUCTIONS
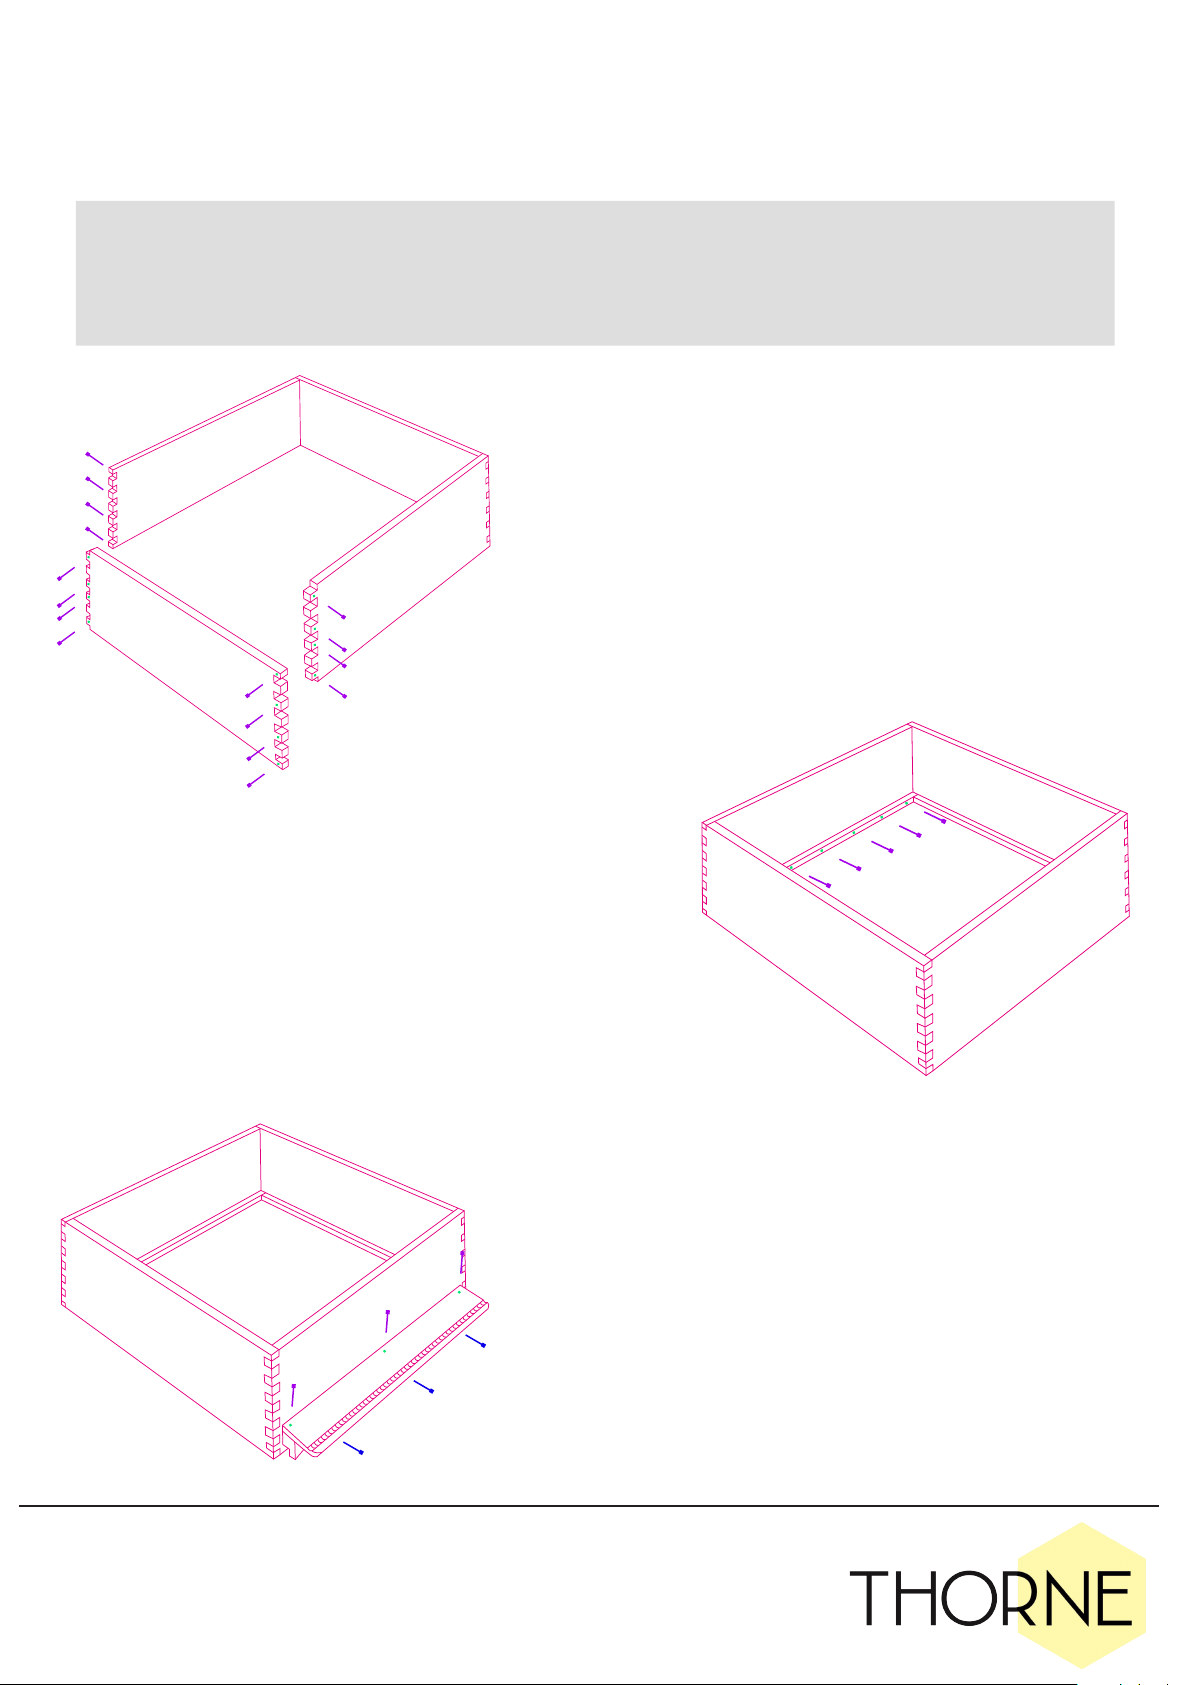
BUDGET W.B.C. BROOD OR SUPER
Included: 2 x Outer Walls, 2 x Inner Walls, 4 x Square Laths, 2 x Rectangular
Laths, 2 x Runners, Glue, 10 x Brass Pins, 24 x 1” Nails, 32 x 1½” Nails
Tools needed: Hammer, Set Square, Tape Measure, Pencil
E.H. THORNE (Beehives) Ltd.
Beehive Business Park, Rand, Nr. Wragby, Lincolnshire, LN8 5NJ
1. 1. Firstly you need 2 x runners, 10 x pins and 2 x inner walls. The inner
walls are the smaller ones without the grooves. Attach one runner to
each wall along one of the longer sides, like shown in the diagram,
using 5 x pins per runner.
2.
2. Next, take 2 x outside walls, and
measure 7/16” (11mm) down from the
top of each groove and mark.
3A. For this step you will need 16 x 1½” nails
and all 4 walls. Run a line of glue down
the grooves and attach the inner walls to
the outer walls, making sure the top of the
runners line up with the marks you made in
step 2.
3B. Fix these together by nailing through
the outer wall, into the end of inner wall,
with 1½” nails. Use 4 nails per corner on the
brood, and 3 nails for a super.
CHECK THE BOX IS SQUARE BEFORE
MOVING ONTO THE NEXT STEP.
3.
4.
4A. You will now need 4 x square laths,
8 x 1½” nails and 16 x 1” nails. Glue and
position the laths in the cavities created
by the longer outer wall, the top one in
line with the top of the inner wall, and the
bottom one in line with the outer wall.
4B. Using the 1½” nails, nail through the
outer wall and into the end of the lath,
repeat on each end of each lath.
4C. Next fix the top laths from the outside
using 4 x ” nails for each top lath. Then
nail the bottom laths from the inside,
again using 4 x 1” nails for each lath.
E.H. THORNE (Beehives) Ltd.
Beehive Business Park, Rand, Nr. Wragby, Lincolnshire, LN8 5NJ
BUDGET W.B.C. BROOD OR SUPER continued...
5.
5. The final step for your brood/super
is to fix the rectangular laths onto the
upper outside of the box, so they are
flush with the outside walls. Glue and
fix into place with 7 x 1” nails per lath in
the configuration shown in the diagram.
ASSEMBLY INSTRUCTIONS
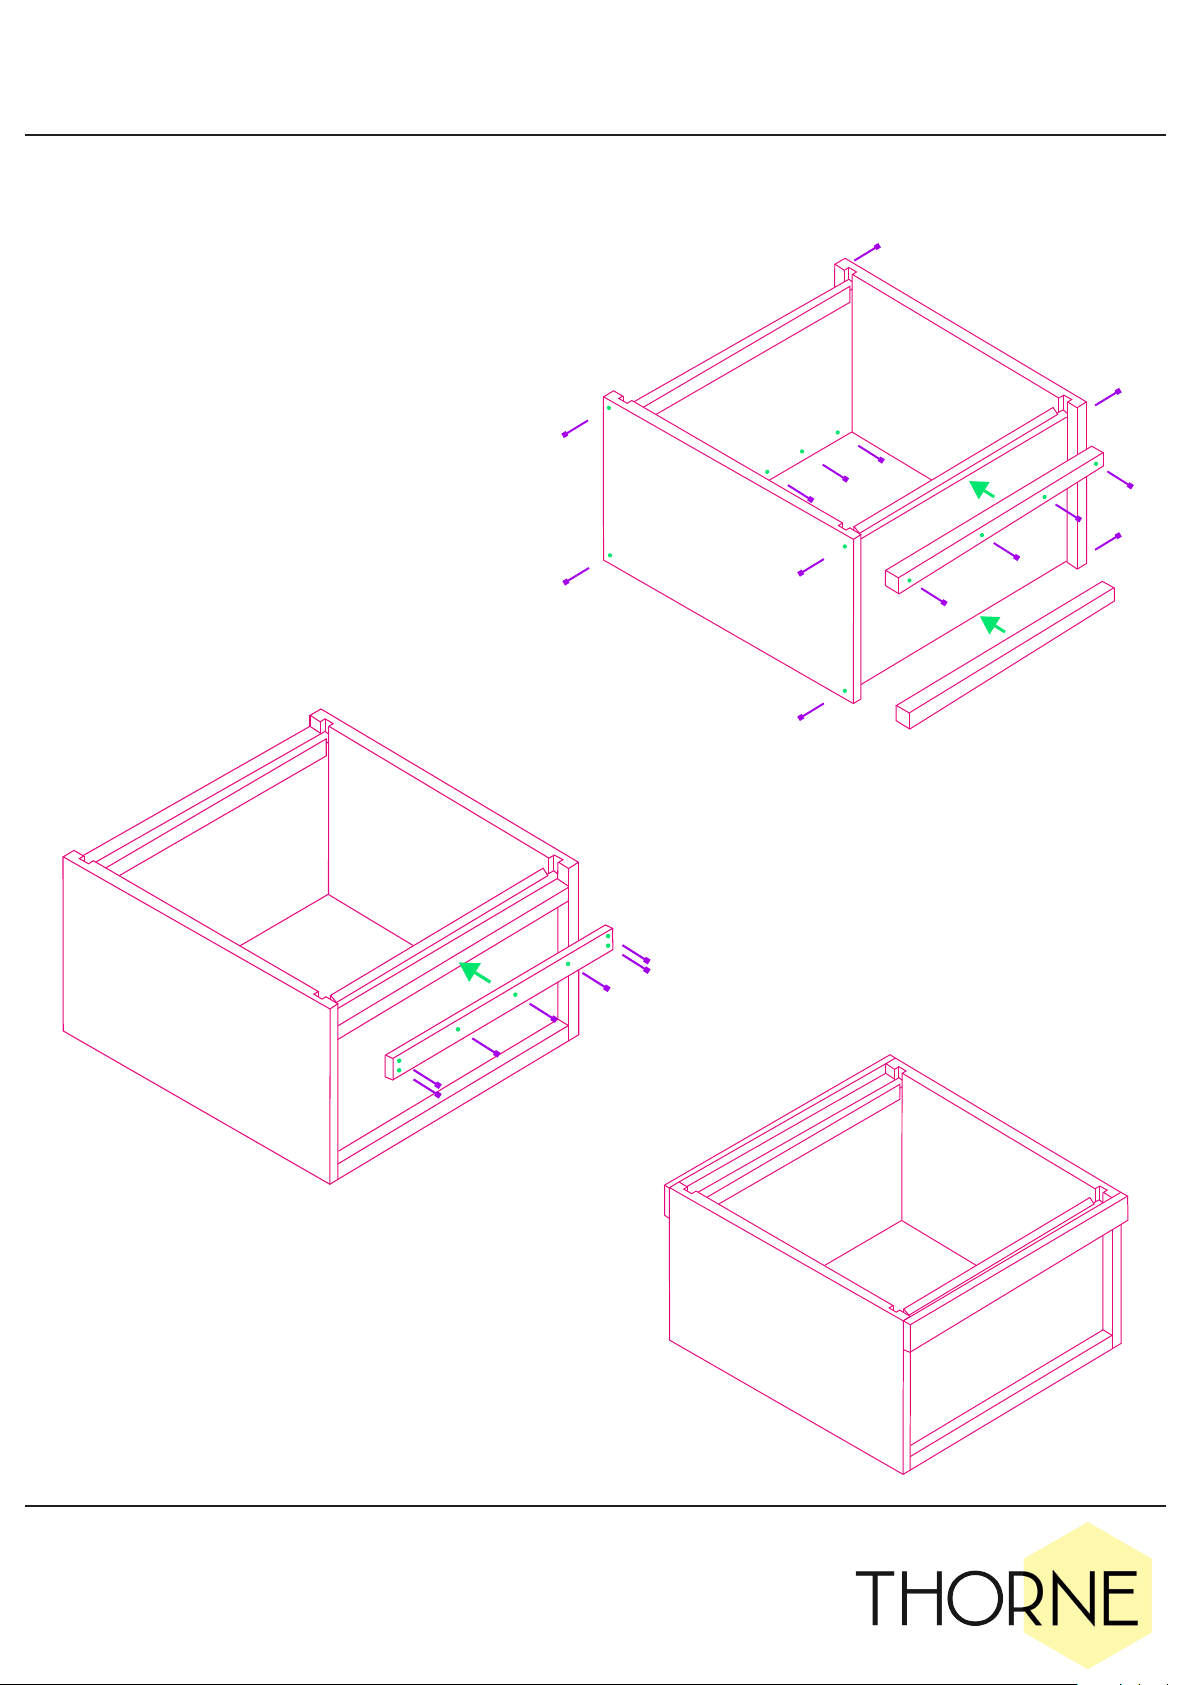
BUDGET W.B.C. ROOF
Included: 2 x Gable Ends, 2 x Joists, 4 x Laths, 4 or 6 x Roof Boards, 2 x
Roof Metals, 1 x Roof Ridge, 2 x Plastic Cone Escapes, Glue, 8 x Escutcheon
Pins, 68 x 1” Nails, 20 x 1” Wire Nails, 8 x 1½” Nails, 4 x 2” Nails
Tools needed: Hammer, Set Square, Punch, Drill, Pencil, Clear Silicone
E.H. THORNE (Beehives) Ltd.
Beehive Business Park, Rand, Nr. Wragby, Lincolnshire, LN8 5NJ
1. 1. Firstly you will need 2 x gable ends, 2 x
joists and 8 x 1½” nails. Make sure you have
the joists the right way round so that the bevel
edge is at the top and in line with the slope of
the gable ends. Glue and nail in place with 2
x 1½” nails per corner. It may be easier to mark
and pre-drill these holes.
2.
3.
2. Next you will need 4 x laths and 16 x 1” nails.
Attach the longer laths to the gable ends a laths
depth (½”) up from bottom using glue then 4 x 1”
nails (make sure these go in at a slight angle).
Then repeat with the other 2 laths onto the joist
side, again a laths depth (½”) up from bottom using
glue and 4 x 1” nails (again at a slight angle).
CHECK THE FRAME IS SQUARE BEFORE
MOVING ONTO THE NEXT STEP.
3A. You now need the roof boards, your hive will
come with either 4 or 6 of these. The diagram
shows the 6 board option, 3 on each side. With
the 6 board option, you will have 2 boards with
a single bevel edge, 2 boards with two straight
sides and 2 boards with the rain channel.
3B. Get the boards with the single beveled
edge and line this up with the apex of the gable
making sure the over hang is equal on each side,
glue and nail into place with 3 x 1” nails each
end. It might be easier to mark a line where you
nails need to go to make sure you are hitting the
gable end underneath. Continued on next page...

E.H. THORNE (Beehives) Ltd.
Beehive Business Park, Rand, Nr. Wragby, Lincolnshire, LN8 5NJ
BUDGET W.B.C. ROOF continued...
4.
5.
3. 3C. Now attached the board with the two straight
edges, again gluing (including along the edge of
the board you just fixed down) and nail with 3 x 1”
nails at each end.
3D. The last board will be the one with the rain
channel, the rain channel should be facing down
and at the edge of the roof. Glue and nail in place
with 3 x 1” nails at each end, plus 4 x 1” nails along
the edge, as shown in the diagram. Again it might
be easier to measure and draw a pencil line where
these nails need to go to hit the joist underneath.
3E. Repeat on the other side. Once you have all
roof boards in place, run a bead of clear silicone
along the apex on the top and underneath.
4. You now need the 2 x roof metals and 20 x 1” wire
nails. Position the metals one at a time onto the roof
boards and nail into place. You will find it easier to
use a rampin to create dents for your nails. (If you
have opted for the copper roof, you may feel the
need to drill the holes) Use 3 x nails on the shorter
ends, and 4 x nails on the longer ends.
5. Next add the roof ridge along the apex of the
roof, nail into place with 2 x 2” nails at each end
making sure you miss the circular holes and still
hit the gable end underneath, again you might
find it easier to measure and mark where the nails
should go.
6A. Once you have the roof ridge in place, nail
the ridge from the underneath with 8 x 1” nails.
6B. Lastly, attach the cone escapes in place over
the circular holes using 4 x escutcheon pins per
escape.
6.
Other Thorne Farm Equipment manuals

Popular Farm Equipment manuals by other brands

Farm King
Farm King Allied 80 Series Operator and parts manual

Jumil
Jumil 4200SH Operator's manual

Original inside
Original inside EUROTOP 701 A Operator's manual

CrustBuster
CrustBuster 4600 Series Operation maintenance manual & parts list

Nelson
Nelson S7 instructions

aivituvin
aivituvin AIR 18 instruction manual


REIST INDUSTRIES
REIST INDUSTRIES RR48 Operator and parts manual

GREAT PLAINS
GREAT PLAINS Yield-Pro 3PYPA Original instructions

Kubota
Kubota TE8511C Operator's manual

Raven
Raven SmarTrax installation manual

Lipco
Lipco Reversing Harrow UF 80L Translation of the original instructions

Priefert
Priefert RC98SCOREAI operating instructions