manuals.online logo
Brands
  1. Home
  2. •
  3. Brands
  4. •
  5. Thule
  6. •
  7. Automobile Accessories
  8. •
  9. Thule 756744 User manual

Thule 756744 User manual

Wiringkit
756744
Touran 03/03
Touran 11/06
Touran 08/10
10/06
07/10
VW
87271056 / 21.03.2011 / Änderungen vorbehalten Seite 1/26
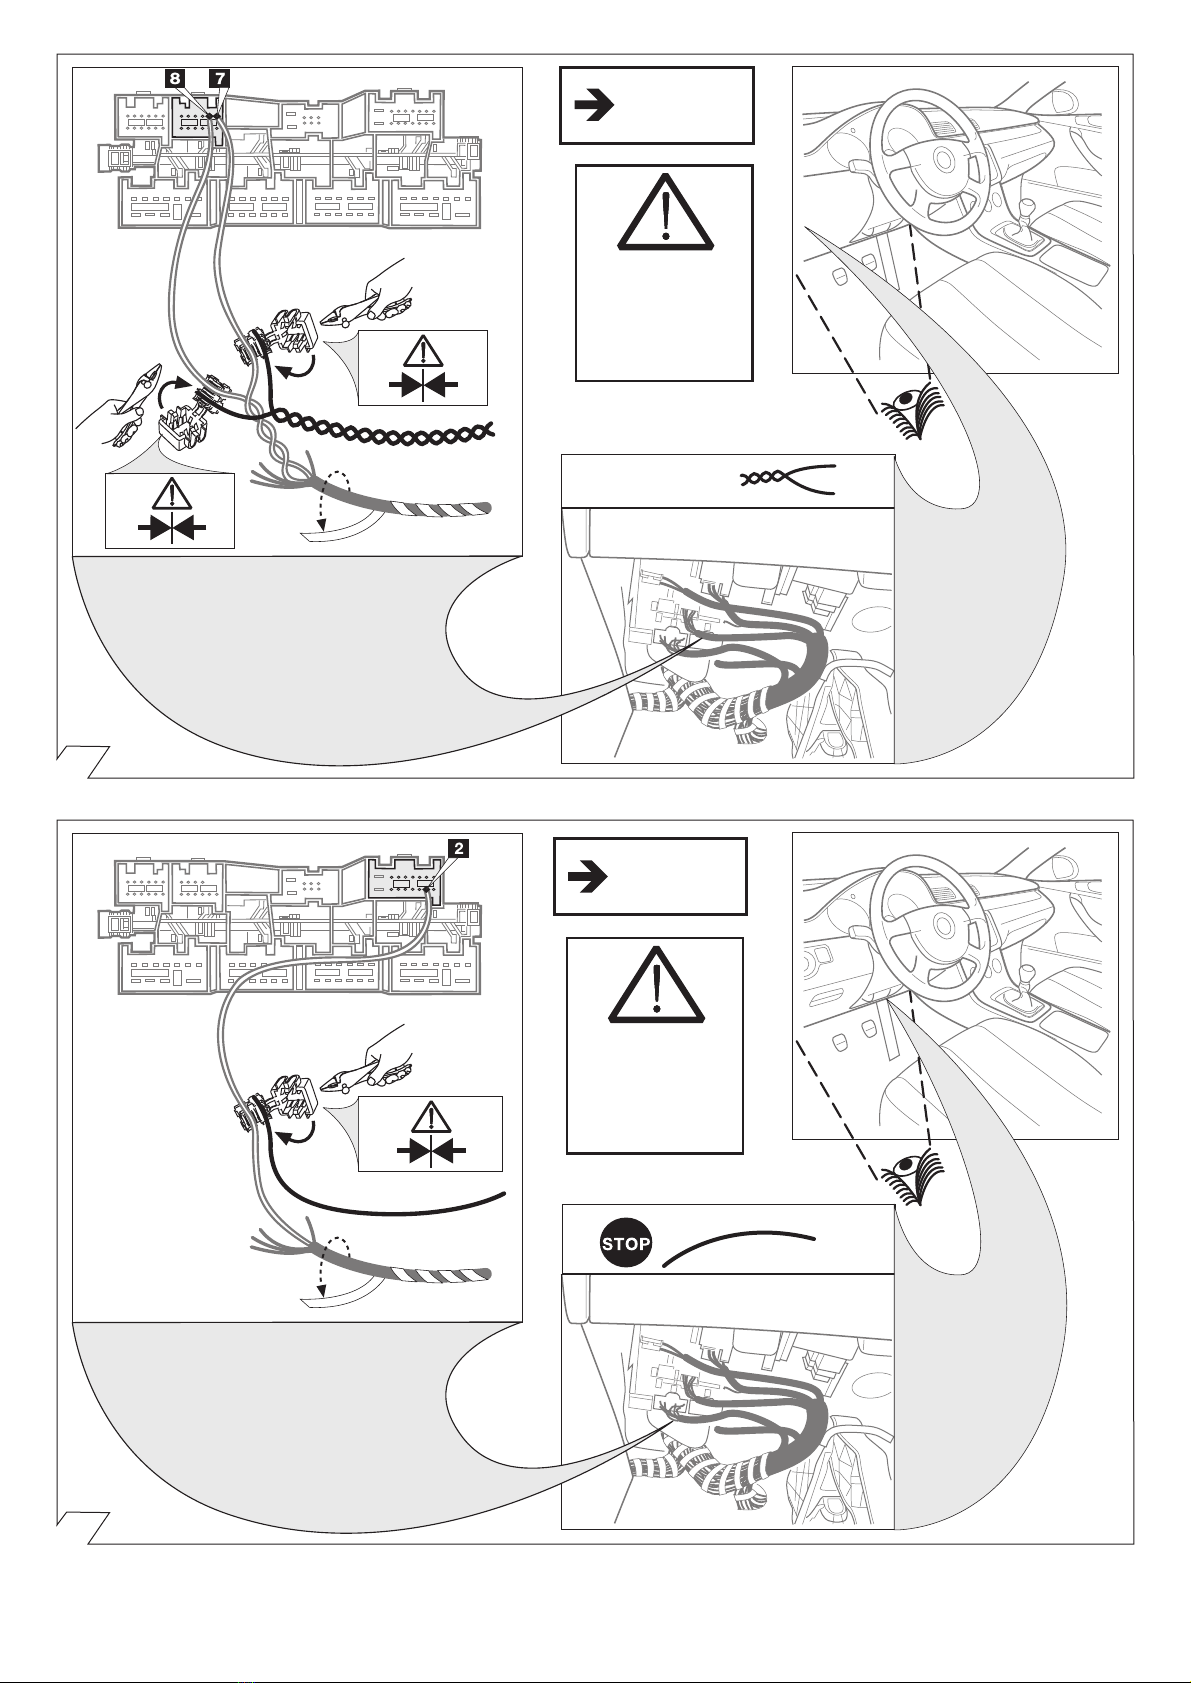
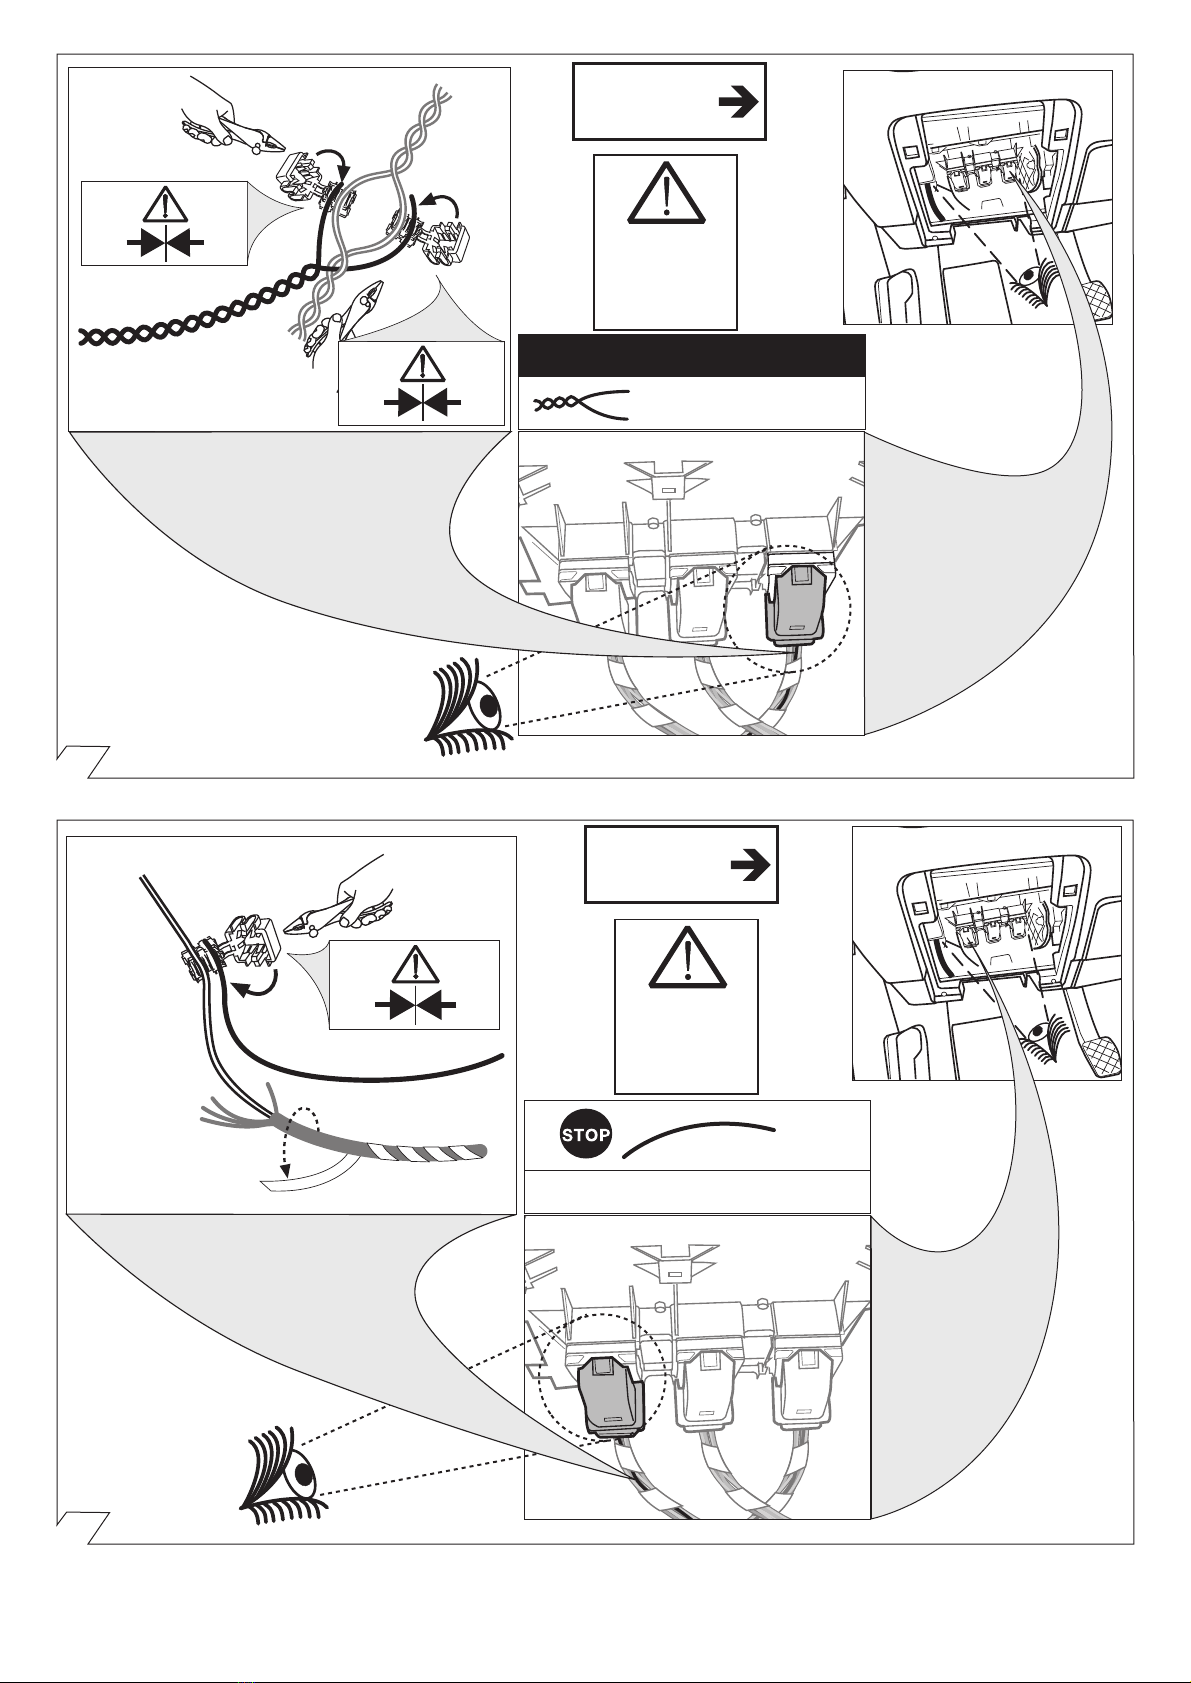
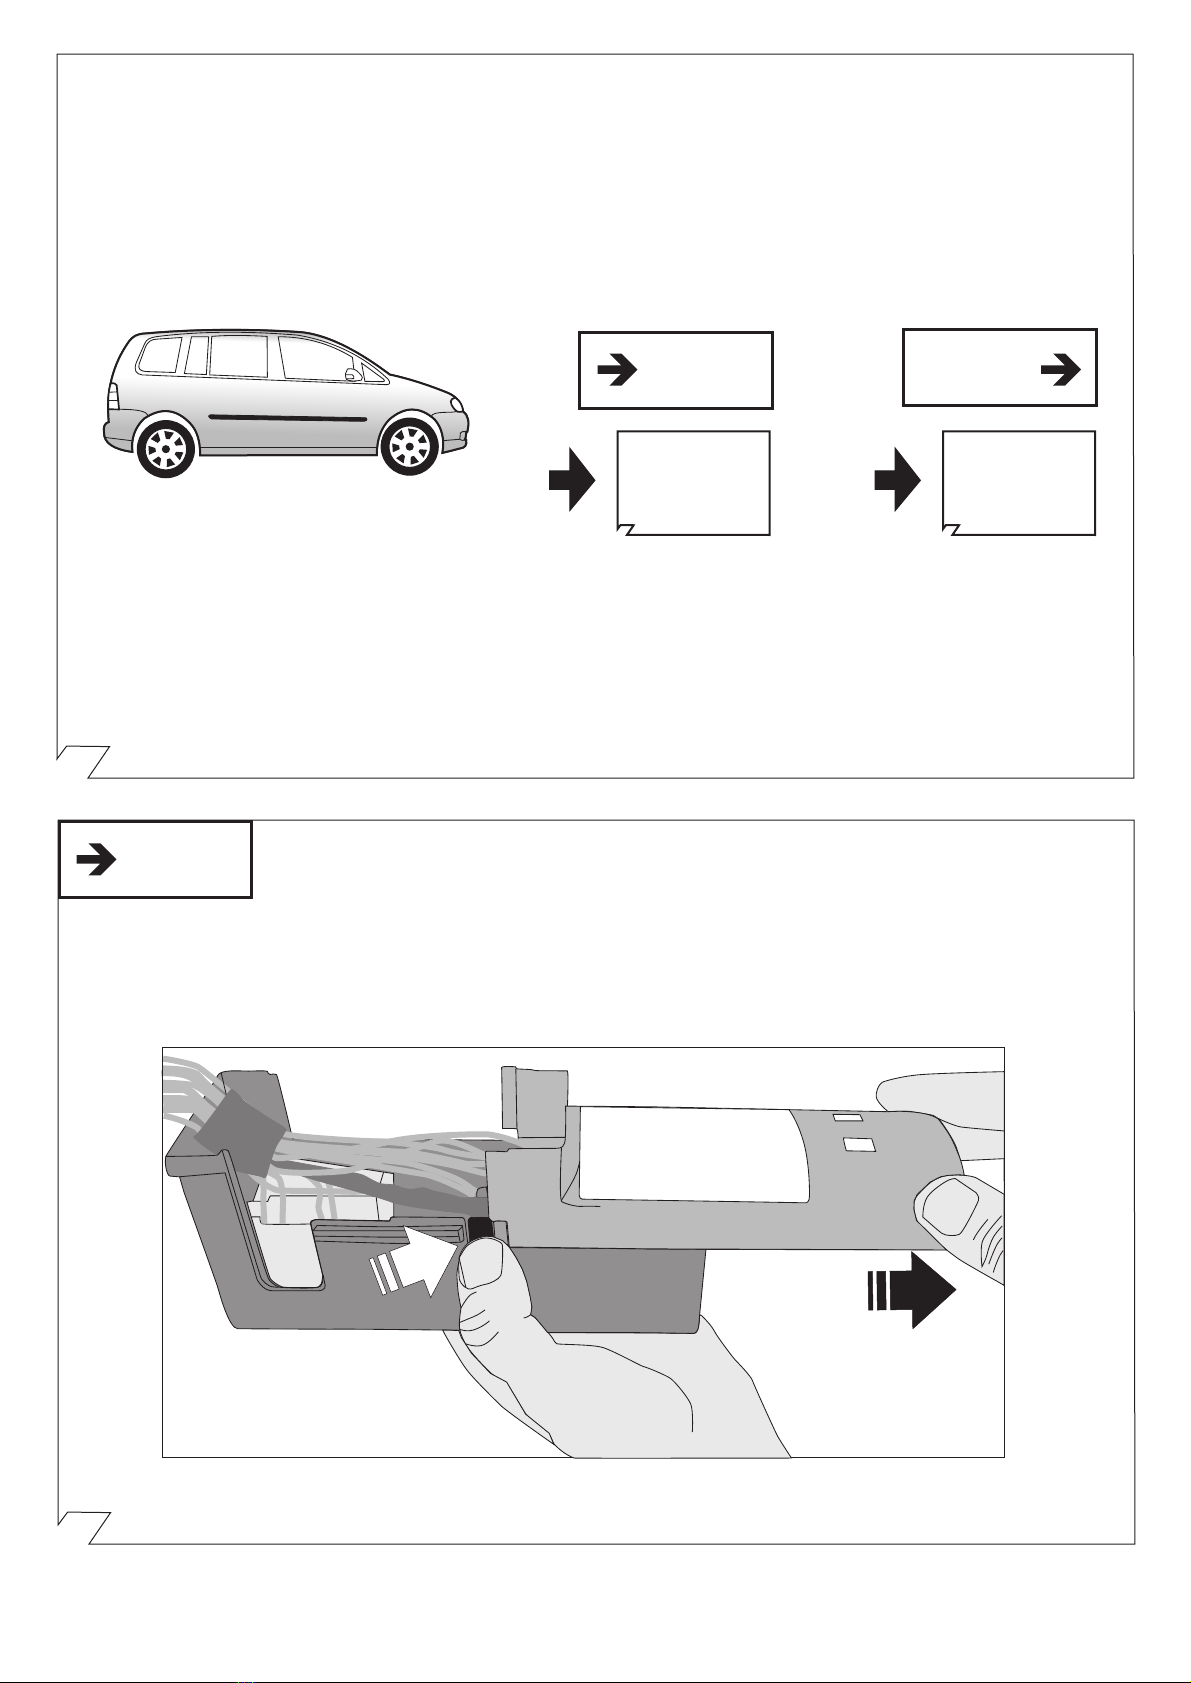
Installation of the towing electrics kit must be undertaken by a specialist
workshop or an appropriately qualified person. Before starting work,
you must read the installation in-structions through completely. After
installing the towing electrics kit, the installation instructions should
be kept with the vehicle service documentation.
All claims under the guarantee will lapse in case of improper use or modification
of the towing electrics kit or any of its component parts. When driving without
a trailer or load carrier, any adapter installed must be removed from the
electrical socket. We reserve the right to alter the design, content or colour.
We accept no liability for any errors in these instructions. All details and
illustrations are non-binding.
De inbouw van deze elektroset moet door een vakwerkplaats of door
een overeenkomstig gekwalificeerde persoon gebeuren. Vóór aanvang
van alle montagewerkzaamheden absoluut de montagehandleiding
volledig doorlezen. Na inbouw van de elektroset dient de
montagehandleiding bij de servicedocumenten van het voertuig te
worden gelegd!
Bij ondeskundige toepassing of wijziging van de elektroset c.q. van de daarin
zittende componenten vervalt elke aanspraak op fabrieksgarantie. Tijdens het
rijden zonder aanhanger of ladingdrager moeten evtl. gebruikte adapters altijd
uit de stekkerdoos worden verwijderd. Wijzigingen met betrekking tot
constructie, uitvoering, kleur alsmede vergissing voorbehouden. Alle opgaven
en afbeeldingen niet-bindend.
Bij aanhangers zonder mistachterlicht dient dit achteraf te worden gemonteerd.
Wij verlenen generlei fabrieksgarantie voor technische c.q. elektronische
wijzigingen die na de eerste inbedrijfstelling van de elektroset door de
voertuigfabrikant worden uitgevoerd en bijvoorbeeld leiden tot foutieve functies
van de stekkerdoos van de aanhanger of diens periferie!
De aanhangermodule kan niet worden gediagnosticeerd! Mochten
diagnoseprocessen van de kant van de fabrikant c.q. op software steunende
testmechanismen foutprotocollen genereren die direct of indirect in verband
staan met het gebruik van de aanhanger, dan dient de aanhangermodule te
worden losgekoppeld van de kabelset voor de aanhangerstekkerdoos en dient
het diagnoseproces nogmaals te worden gestart!
WICHTIG!
IMPORTANT!
Le montage du faisceau doit être effectué par un atelier spécialisé ou
par une personne qualifiée en la matière. Avant le début des travaux,
lire impérativement les instructions de montage dans leur intégralité.
Après le montage du faisceau, joindre les instructions de montage aux
documents du véhicule.
Un usage inapproprié ou des modifications du faisceau, ou des pièces qui le
composent, entraînent l’expiration de tout droit à la garantie. Lors d’une conduite
sans remorque ou porteur de charge, les adaptateurs utilisés doivent, le cas
échéant, toujours être enlevés de la prise de courant. Sous réserve de modifications
de constructions, équipement, couleurs ou erreur. Données et illustrations sous
toute réserve.
Pour les remorques qui ne sont pas équipés avec feux anti-brouillard arrière, il
devrait être installé.
Nous n’assumons aucune responsabilité ni garantie pour les modifications
techniques et électroniques ayant été effectuées après la première mise en service
du kit de connexion électrique par le constructeur automobile et ayant mené par
exemple à des mauvais fonctionnements de la prise de remorque ou de sa
périphérie.
Le module remorque ne contient pas de fonction diagnostic! Au cas où des
processus de diagnostic définis par le fabricant ou des mécanismes de contrôle
assistés par ordinateur devaient générer des messages d’erreur directement ou
indirectement en rapport avec le fonctionnement de la remorque, il est impératif
pour la prise de remorque de détacher le module remorque du groupe électrique
et d’initier une nouvelle procédure de diagnostic.
IMPORTANT!
IMPORTANTE!¡IMPORTANTE!BELANGRIJK!
Der Einbau dieses Elektrosatzes muß von einer Fachwerkstatt oder
einer entsprechend qualifizierten Person durchgeführt werden. Vor
Beginn aller Montagearbeiten unbedingt die Einbauanleitung komplett
durchlesen. Nach Einbau des Elektrosatzes ist die Einbauanleitung
den Serviceunterlagen des Fahrzeuges beizulegen!
Bei unsachgemäßer Anwendung oder Veränderung des Elektrosatzes bzw.
der darin befindlichen Bauteile erlischt jeder Anspruch auf Gewährleistung.
Beim Fahren ohne Anhänger oder Ladungsträger müssen ggf. verwendete
Adapter immer aus der Steckdose entfernt werden. Änderungen bezüglich
Konstruktion, Ausstattung, Farbe sowie Irrtum vorbehalten. Alle Angaben und
Abbildungen unverbindlich.
Bei Anhängern ohne Nebelschlussleuchte sollte diese nachgerüstet werden.
Für technische bzw. elektronische Änderungen, welche nach erstmaliger
Inbetriebnahme des Elektrosatzes vom Fahrzeughersteller durchgeführt werden
und beispielsweise zu Fehlfunktionen der Anhängersteckdose oder deren
Peripherie führen, übernehmen wir keinerlei Gewährleistung!
Das Anhängermodul ist nicht diagnosefähig! Sollten herstellerseitige
Diagnoseprozesse bzw. softwaregestützte Prüfmechanismen Fehlerprotokolle
generieren, welche direkt oder indirekt mit Anhängerbetrieb in Zusammenhang
stehen, ist das Anhängermodul vom Leitungssatz für die Anhängersteckdose
zu trennen und ein nochmaliger Diagnosevorgang zu starten!
In case of missing a rear fog lamp on the trailer, it should be retrofitted.
We accept no responsibility and give no guarantee for technical and electrical
modifications made after the initial operation of the towing electrics kit by the
vehicle manufacturer and which may lead, for example to malfunction of the
trailer socket or its peripheries.
The trailer module is not diagnostics-capable. If the manufacturer’s diagnostics
processes or software-supported test mechanisms generate error reports
directly or indirectly linked with trailer operation, the trailer module must be
disconnected from the leads to the trailer socket and a new diagnostic process
initiated.
L’installazione del kit elettrico deve essere effettuata da un’officina o
da personale specializzato. Prima di iniziare tutti i lavori di montaggio,
leggere da cima a fondo le istruzioni. Dopo aver installato il kit elettrico
si prega di allegare le istruzioni di montaggio ai documenti di
manutenzione del veicolo!
In caso di uso improprio o di modifiche del kit elettrico e delle componenti del
medesimo, ogni diritto di garanzia decade. Durante la guida senza rimorchio
o portacarichi, togliere sempre gli adattatori dalla presa di corrente. Con riserva
di modifiche relative a costruzione, equipaggiamento, colore e salvo errori.
Tutte le indicazioni e illustrazioni non sono vincolanti.
In caso di rimorchi non corredati di luce retronebbia, questa dovrebbe essere
istallata.
Per le modiche tecniche ed elettroniche eseguite dopo la prima messa in
funzione del kit elettrico da parte del costruttore del veicolo, e che portano,
per esempio, a un malfun-zionamento della presa del rimorchio o della sua
periferia, non ci assumiamo alcuna responsabilità!
Il modulo del rimorchio non è idoneo alla diagnosi! Nel caso in cui processi
diagnostici o apparecchiature di prova controllate da software dovessero
generare dei protocolli d’errore in rapporto diretto o indiretto con l’uso del
rimorchio, si deve staccare il modulo del rimorchio dal conduttore per la presa
del rimorchio, e avviare nuovamente la diagnosi!
El montaje del equipo eléctrico deberá llevarse a cabo en un taller
especializado o por parte de una persona correspondientemente
calificada. Antes de comenzar cualquier trabajo de montaje es
imprescindible haberse leído las instrucciones de montaje por completo.
¡Después de haber realizado el montaje del equipo eléctrico deben
adjuntarse las instrucciones de montaje a los documentos de servicio
del vehículo!
En caso de una utilización inadecuada o de una modificación del equipo
eléctrico o de los componentes incluidos respectivamente se extinguirá
cualquier derecho de garantía. En caso de conducir sin remolque o sin
portacargas deberán sacarse siempre del enchufe los adaptadores que hayan
podido ser utilizados. Queda reservado el derecho de modificaciones con
respecto a la construcción, el equipamiento, el color y de errores. Todas las
informaciones y reproducciones se entienden sin compromiso.
Al tratarse de remolques sin luz antiniebla trasera, esta debería ser reequipada.
¡No asumiremos ninguna clase de garantía por modificaciones técnicas o
electrónicas respectivamente que se lleven a cabo después de la primera
puesta en funcionamiento del equipo eléctrico por parte del fabricante del
vehículo y que puedan provocar por ejemplo un mal funcionamiento del enchufe
del remolque o de los correspondientes componentes periféricos!
¡El módulo para el remolque no puede someterse a un diagnóstico! En caso
de que los procesos de diagnóstico por parte del fabricante o que los
mecanismos de comprobación asistidos por software generen informes de
errores que estén directa o indirectamente relacionados con el servicio con
remolque, deberá separarse el módulo para el remolque de los cables de
conexión para el enchufe del remolque e iniciarse un nuevo proceso de
diagnóstico!
87271056 / 21.03.2011 / Änderungen vorbehalten Seite 2/26
16-40 3,
11-12
5-10
MANUAL
3x 10x 5x
3x
2x
2x
15A
2x
20A
4x
87271056 / 21.03.2011 / Änderungen vorbehalten Seite 3/26
MANUAL
WICHTIG! IMPORTANT! IMPORTANT! IMPORTANTE! ¡IMPORTANTE! BELANGRIJK!
90010216
Um Störungen und
Schäden am Bordnetz zu
vermeiden, muss die
Massepolklemme
unbedingt vor Beginn
aller Arbeiten von der
Fahrzeugbatterie getrennt
werden!
Insbesondere bei Arbeiten
und Anschlüssen am
CAN-Datenbus kann bei
nicht abgeklemmter
Batterie sowohl das
Anhängermodul als auch
das fahrzeugseitige
Bordnetzsteuergerät
beschädigt werden!
Bitte Herstellervor-
schriften beim Ab- und
Anklemmen der
Fahrzeugbatterie
beachten!
¡Para evitar fallos y
defectos en el sistema
eléctrico de a bordo es
imprescindible separar
al terminal de puesta a
tierra de la batería del
vehículo antes de reali-
zar cualquier trabajo!
¡Particularmente al realizar
trabajos y conexiones al
bus de datos CAN puede
estropearse tanto el
módulo para remolques
como el regulador del
sistema eléctrico de a
bordo del vehículo si no
se ha desconectado la
batería!
¡Rogamos observar las
instrucciones del
fabricante al conectar y
desconectar la batería del
vehículo!
In order to avoid mal-
functions and damage to
the vehicle’s electrical
system the earth terminal
must be disconnected
from the vehicle’s battery
before starting work!
Both the trailer module
and the vehicle’s control
unit for the electrical
system can be damaged
during work on the CAN
data bus connections if
the battery is not
disconnected!
Please pay attention to
the manufacturer’s
instructions when
disconnecting and
reconnecting the vehicle’s
battery!
Afin d’éviter tout dys-
fonctionnement ou
endom-magement du
circuit de bord, il est
indispensable de
débrancher la pince de
masse de la batterie du
véhicule avant le début
de toute opération!
En particulier s’il s’agit de
travaux et de
branchements effectués
sur le bus de données
CAN, si la batterie n’est
pas débranchée, le
module remorque aussi
bien que le dispositif de
commande de circuit de
bord du véhicule risquent
d’être endommagés!
Veuillez respecter les
directives du fabricant lors
du branchement et du
débranchement de la
batterie du véhicule!
Per evitare disturbi e
danni alla rete di
distribuzione elettrica,
l’espansione polare a
massa deve essere
assolutamente scollegata
dalla batteria del veicolo
prima dell’inizio dei
lavori!
In particolare durante i
lavori e gli allacciamenti
al bus di dati CAN, se la
batteria non è scollegata
si possono danneggiare
sia la centralina rimorchio,
sia la centralina della rete
di distribuzione elettrica
del veicolo!
Attenersi alle indicazioni
del costruttore per
scollegare e ricollegare la
batteria del veicolo!
Om storingen en schade
aan de elektrische
bedrading te vermijden
moet de massapoolklem
absoluut vóór aanvang van
alle werkzaamheden
worden losge-koppeld van
de voertuigaccu!
Vooral bij werkzaamheden
aan en aansluitingen op de
CAN-databus kan zowel de
aanhangermodule als de
voertuigzijdige regeleenheid
voor de elektrische
installatie beschadigd
worden, als de accu niet
ontkoppeld is!
Fabrieksvoorschriften bij
het vast- en loskoppelen
van de voertuigaccu in acht
nemen a.u.b.!
+
-
Werkzeuge - Tools - Outils - Utensile - Herramientas - Werktuigen
1
87271056 / 21.03.2011 / Änderungen vorbehalten Seite 4/26
a
b
c
Optional
2
3
87271056 / 21.03.2011 / Änderungen vorbehalten Seite 5/26
90500234
Ausgangsseite wählen
Choose direction
4
5
67
89
5/58-R
6/54
1/L
4/R
2
ISO 11446
3/31
BK/WT
WT
BK/GN
BR
GY/RD
BK/RD
7/58-L
8
12
11
13
9
10
GY/BK
BL/RD
RD
RD/BR
YL
YL/BR
21W
42W
21W
52W
63W
52W
42W
240W
180W
Belegung der Steckdose / Maximale Ausgangsleistung
Socket configuration / Maximum power output
Correspondance des contacts de la prise / Puissance de sortie maximale
Abbinamento della presa / Uscita di alimentazione massima
Indeling van de stekkerdoos / maximaal uitgangsvermogen
10
9
B+30
everse
1-8
87271056 / 21.03.2011 / Änderungen vorbehalten Seite 6/26
90270295
90270320
90270322
Wichtig!
Unbedingt Hinweise
aus Bild 1 beachten!
Important!
Please note
informations in
picture 1!
X00000000
ooooooooooooooooo
x0_0/00.0000
07/10 08/10
16 - 17 18 - 59
20 - 59
90270323
RD/YL
RD/BL
RD
OR/GN
RD/BK
OR/BR
10
12
13 14
15
11
87271056 / 21.03.2011 / Änderungen vorbehalten Seite 7/26
07/10
BK/RD
90270341
RD/BK
BK/RD
BK/RD RD/BK
Bordnetzsteuergerät Position "E"
Steckgehäuse 16-polig (BK)
Kammer 2
Network control unit position "E"
16 pin connector (BK)
chamber 2
HG
DC B A
E
F
Wichtig!
Unbedingt Hinweise
aus Bild 1 beachten!
Important! Please
note informations
in picture 1!
OR/BR
OR/GN
CAN-Data Wire
90270340
07/10
OR/GN
OR/BR
OR/BR
OR/GN
OR/BR OR/BR
OR/GN OR/GN
Bordnetzsteuergerät Position "G"
Steckgehäuse 12-polig (BK)
Kammern 7+8
Network control unit position "G"
12 pin connector (BK)
chambers 7+8
HG
DC B A
E
F
Wichtig!
Unbedingt Hinweise
aus Bild 1 beachten!
Important! Please
note informations
in picture 1!
16
17
87271056 / 21.03.2011 / Änderungen vorbehalten Seite 8/26
Wichtig!
Unbedingt Hinweise
aus Bild 1 beachten!
Important! Please
note informations
in picture 1!
OR/BR (Kammer/ chamber 16)
OR/GN (Kammer / chamber 15)
CAN-Data Wire
OR/BROR/BR
OR/BR
OR/GN
OR/GN
OR/BR
OR/GNOR/GN
Network control unit
52 pin connector (BR)
Bordnetzsteuergerät
Steckgehäuse 52-polig (BR)
08/10
BK/RD Kammer 45
BK/RD chamber 45
RD/BK
BK/RD
RD/BK
BK/RD RD/BK
BK/RD
Bordnetzsteuergerät
Steckgehäuse 52-polig (BK)
Network control unit
52 pin connector (BK)
Wichtig!
Unbedingt Hinweise
aus Bild 1 beachten!
Important! Please
note informations
in picture 1!
08/10
18
19
87271056 / 21.03.2011 / Änderungen vorbehalten Seite 9/26
2009 2009
21 - 31 32 - 59
2009
90220104
Drücken!
push!
... und hinausziehen!
... and slide out!
Deckel von Sicherungskasten entfernen!
remove fuse box cover!
41 - 59
20
21
87271056 / 21.03.2011 / Änderungen vorbehalten Seite 10/26
B+/30
3 freie Steckplätze vorhanden?
3 free chambers available?
B+/30
Weniger als 3 freie Steckplätze vorhanden?
less than 3 free chambers available?
23
24 - 31
90270372
15A
20A
15A
20A
RD/YL
2x
RD/BL
RD
RD/BL
RD/YL
RD
B+/30
Sekundärverriegelung
öffnen!
Open
secondary lock!
90270373
41 - 59
41 - 59
22
23
87271056 / 21.03.2011 / Änderungen vorbehalten Seite 11/26
RD
B+/30
Freien Steckplatz für Leitung RD nutzen!
(Dauerplus Anhängersteckdose)
Use unoccupied plug-in position for the red wire!
(current power supply trailer socket)
Sekundärverriegelung
öffnen!
Open
secondary lock!
90270374
Sicherungen / fuses 51 + 52
52
51
90270375
Kammern/chambers 51 + 52
52
51
Einzelleitung von Kammer 51
Single wire out of chamber 51
Einzelleitung von Kammer 52
Single wire out of chamber 52
1.
3.
Einzelleitungen aus den
Kammern 51 + 52
entnehmen!
Remove single wires out
of chambers 51 + 52!
2.
90270376
24
25
26
87271056 / 21.03.2011 / Änderungen vorbehalten Seite 12/26
RD/YL 2.5 mm2
RD/BL 2.5 mm2
RD/YL 2.5 mm2
RD/BL 2.5 mm2
Kammer/chamber 52
Kammer/chamber 51
90270377
RD/YL 1.5 mm
2
RD/BL 1.5 mm
2
RD/YL 1.5 mm
2Farbgleich in freie
Kammern stecken!
RD/YL
RD/BL
RD/BL 1.5 mm
2
Freie Sicherungssteckplätze
suchen!
Locate unoccupied
fuse plug-in positions! 1.
Connect equal colours
into the fuse chambers!
Farbgleich in freie
Kammern stecken!
Connect equal colours
into the fuse chambers!
Sekundärverriegelung
schliessen!
Close
secondary lock!
3.
2.
90270378
27
28
87271056 / 21.03.2011 / Änderungen vorbehalten Seite 13/26
90270379
90270380
29
30
2009
15A
20A
15A
20A
51 52
+
2x
RD/BL
RD/YL
RD
90270381
31
32
87271056 / 21.03.2011 / Änderungen vorbehalten Seite 14/26
... und hinausziehen!
... and slide out!
Deckel von
Sicherungskasten
entfernen!
remove fuse box cover!
2009
RD/BL 2.5 mm
RD/BL 1.5 mm
RD/YL 2.5 mm
2.
1. 3.
RD/YL 1.5 mm
33
RD
B+/30
Freien Steckplatz für Leitung RD nutzen!
(Dauerplus Anhängersteckdose)
Use unoccupied plug-in position for the red wire!
(current power supply trailer socket)
90270374
34
35
87271056 / 21.03.2011 / Änderungen vorbehalten Seite 15/26
Deckel von
Sicherungskasten
schliessen!
close fuse box cover!
RD/YL
RD/BL
RD/YL
RD/BL
2 freie Steckplätze suchen
search 2 free chambers
RD/YL
RD/BL
o
1. 2. 3.
45
36
37
38
39
87271056 / 21.03.2011 / Änderungen vorbehalten Seite 16/26
90270295
20A
20A
RD
15A
15A
2x RD/YL
RD/BL
15A
MANUAL
SERVICE
VW
VW
SERVICE
VW
VW
90270310
MANUAL
40
41
42 43
POS.
RD/YL
RD
RD/BL
90270325
POS.
RD/YL
RD/BL
RD
15A
15A
20A
MANUAL
B+30
44
YL/BR
YL
+
+
Erweiterungsatz / Extension kit:
Bitte fragen sie ihren Händler!
Please ask your local dealer!
OPTIONAL
87271056 / 21.03.2011 / Änderungen vorbehalten Seite 17/26
MANUAL
90500004
MANUAL
90270309
Folgende Beleuchtungsfunktionen
des Anhängers werden nicht bei allen Zugfahrzeugen
mit Tagesfahrlichtschaltung unterstützt:
• Schlussleuchten
• Begrenzungsleuchten
• Kennzeichenbeleuchtung
Zur Aktivierung dieser Funktionen muss Stand-
oder Abblendlicht eingeschaltet werden!
The following lamp functions for the trailer
are not supported by all towing vehicles
with DRL circuit:
• Rear lights
• Side lights
• Numberplate lights
The parking lights or dimmed headlights
must be switched on to activate this function!
Les fonctions d’éclairage suivantes
de la remorque ne sont pas activables s
ur tous les véhicules de traction équipés
de feux de circulation de jour:
• Feux arrières
• Feux d’encombrement
• Éclairage de la plaque minéralogique
Pour activer ces fonctions, les feux de position
ou de croisement doivent être allumés!
Le seguenti funzioni per l’illuminazione
del rimorchio non sono supportate da tutte
le motrici con circuito di luci diurne:
• luci posteriori
• luci d’ingombro
• illuminazione targa
Per attivare queste funzioni devono essere
accese le luci di posizione o gli anabbaglianti!
De volgende verlichtingsfuncties
van de aanhanger worden niet bij
alle trekkende voertuigen met
daglichtschakeling ondersteund:
• Achterlichten
• Spatbordlampen
• Kentekenverlichting
Ter activering van deze functies moet
parkeer- of dimlicht worden ingeschakeld!
No todos los vehículos tractores con conmutación
de luz de marcha diurna ofrecen un soporte para
las siguientes funciones de iluminaición del remolque:
• Luces traseras
• Luces de gálibo
• Iluminación de la matrícula
¡Para activar estas funciones deberán encenderse
las luces de posición o las luces de cruce!
Codierung Steuergerät Seite 20-21 22-23 24-25
Code Control unit page 20-21 22-23 24-25
Codage dispositif de commande page 20-21 22-23 24-25
Codifica dispositivo di controllo pagina
20-21 22-23 24-25
Bedieningsapparaat coderen pagina 20-21 22-23 24-25
Contralor de codificacion pagina 20-21 22-23 24-25
2009 2009 07/10 08/10
47
45 46
87271056 / 21.03.2011 / Änderungen vorbehalten Seite 18/26
90500544
P
90500542
P
90270343
90500507
everse
48
49
50 51
52 53
OPTIONAL
Part-no.
50400516
Permanentpower supply Chargingwire for
trailerbattery
Dauerstrom Ladeleitung
everse
PIN 9 PIN 10
Trailer Simulator
for 7- and 13-pin
Sockets
Optional: Adapter socket
13-pin 7-pin
Bitte fragen sie ihren Händler!
Please ask your local dealer!
87271056 / 21.03.2011 / Änderungen vorbehalten Seite 19/26
Anhängerbetrieb konfigurieren / Set up trailer operation
2009
HINWEIS:
Sollte sich die fahrzeugseitige
Nebelschlußleuchte nicht automatisch im
Anhängerbetrieb abschalten, muß
ergänzend zur oben genannten
Konfiguration die Zentralelektrik wie folgt
codiert werden:
• Fahrzeug Eigendiagnose
• 09 Elektronische Zentralelektrik
• 007 Codierung (Dienst 1A)
• Bordnetz-SG Codierung lang
• Byte 8 - Bit-Muster x1xxxxxx
(x = die vorhandenen Werte im Eingabefeld
übernehmen,
Freischaltung der Gespannstabilisierung
Bei Geführte Fehlersuche Sprung:
Funktions-/ Bauteilauswahl
• Fahrwerk
• Bremsanlage
• 01 – Eigendiagnosefähige Systeme
• ABS
• Funktionen
• Anpassung – J104 mit Gespannstabilisierung
• Weiter
• Anpassung – J104 mit Gespannstabilisierung
• Prüfprogramm starten, den Anweisungen
Folge leisten und Fragen beantworten!
Achtung: Wird im Rahmen des Prüfprogramms
eine Frage mit NEIN beantwortet,
kann die Gespannstabilisierung nicht aktiviert
werden!
Codierung bitte wie folgt durchführen:
• Fahrzeug-Eigendiagnose
• Gateway-Verbauliste
• 19 – Diagnoseinterface für Datenbus
• Codierung (Dienst 1A) \ Lange Codierung
lesen /schreiben
• 69 – Anhängerfunktion ( auf codiert schalten!)
Fahrzeuge mit rückwärtigen Einparkhilfe
Nach erfolgter Freischaltung wird im
Anhängerbetrieb auch die rückwärtige
NOTE:
If the vehicle's rear fog lamp does not switch
off automatically in trailer mode the following
code must be entered in addition to the
aforementioned configuration of the central
electrical system:
• Vehicle self-diagnosis
• 09 Electronic central electrical system
• 007 Coding (service 1A)
• Vehicle's electrical system controller coding
long
• Byte 8 - bit pattern x1xxxxxx
(x = accept the default values in the input field
for this purpose activate input mode (BIN) !)
Release the towing vehicle and trailer
stabilisation!
With guided troubleshooting Skip:
Function / component selection
• Chassis
• Brake system
• 01 – Self-diagnosing systems
• ABS
• Functions
• Adaptation – J104 with towing vehicle and
trailer
stabilisation
• Next
• Adaptation – J104 with towing vehicle and
trailer
stabilisation
• Start test program, follow instructions and
answer
questions!
Warning: If you answer a test program
question with NO the towing vehicle and
trailer stabilisation cannot be activated!
Please effect coding as follows:
• Vehicle self-diagnosis
• Gateway assembly list
• 19 – diagnosis interface for data bus
• Coding (service 1A) \ Read / write long coding
• 69 – trailer function ( switch to
coded!)
Vehicles with park assist system
After the effected connection, the rear park
assist system will also automatically be
AVERTISSEMENT:
Si le feu brouillard arrière monté sur le
véhicule ne s’éteint pas automatiquement
durant le fonctionnement avec remorque, il
faut compléter la configuration ci-dessus
en codant l’électricité centrale comme suit:
• autodiagnostic du véhicule
• 09 Électricité centrale électronique
• 007 Codage (service 1A)
• Codage dispositif de commande circuit de
bord long
• Modèle Byte 8 bits x1xxxxxx
(x = reprendre les valeurs dans le champ de
Activation de la stabilisation de l’attelage
À «Dépistage guidé des erreurs» sauter:
sélection de la fonction ou de la pièce
• Châssis
• Dispositif de freinage
• 01 – systèmes à autodiagnostic
• ABS
• Fonctions
• Adaptation – J104 avec stabilisation de
l’attelage
• Suite
• Adaptation – J104 avec stabilisation de
l’attelage
• Lancer le logiciel de vérification, suivre les
instructions
et répondre aux questions!
Attention: si on répond NON à une question
dans le cadre du logiciel de vérification, la
stabilisation de l’attelage ne peut pas être
activée!
Veuillez effectuer le codage comme il suit:
• autodiagnostic du véhicule
• liste d’assemblage gateway
• 19 – interface de diagnostic pour
bus de données
• codage (service 1A) \ lire / écrire un code
long
• 69 – mode remorque ( commuter à
encodé!)
Véhicules avec système d’aide au parking
Fahrzeuge mit PLA (Parklenkassistent)
• Fahrzeug-Eigendiagnose
• 10 Parklenkassistent
• 008 Codierung (Dienst 22)
• Byte 0 - Bit-Muster xxxxxxx1
(x = die vorhandenen Werte im Eingabefeld
übernehmen,
dazu Eingabemodus (BIN) einschalten!)
• mit OK bestätigen!
Vehicles with Parallel Park Assist
• Vehicle self-diagnosis
• 10 parallel park assist
• 008 Coding (service 22)
• Byte 0 - bit pattern xxxxxxx1
(x = accept the default values in the input field
for this purpose activate input mode (BIN) !)
• confirm with OK !
Véhicules avec “Parallel Park Assist”
• autodiagnostic du véhicule
• 10 parallel park assist
• 008 Codage (service 22)
• Modèle Byte 0 bits xxxxxxx1
(x = reprendre les valeurs dans le champ de
saisie
et allumer le mode saisie (BIN)!)
• Confirmer en appuyant sur OK
54
87271056 / 21.03.2011 / Änderungen vorbehalten Seite 20/26

Other Thule Automobile Accessories manuals

Thule 1549 User manual

Thule

Thule 1549 User manual

Thule XSPORTER PRO User manual

Thule

Thule XSPORTER PRO User manual

Thule Passage 910 User manual

Thule

Thule Passage 910 User manual

Thule 121 Guide

Thule

Thule 121 Guide

Thule 1203 User manual

Thule

Thule 1203 User manual

Thule 45050 User manual

Thule

Thule 45050 User manual

Thule 1376 User manual

Thule

Thule 1376 User manual

Thule Pacific 100 User manual

Thule

Thule Pacific 100 User manual

Thule 285 User manual

Thule

Thule 285 User manual

Thule 260 User manual

Thule

Thule 260 User manual

Thule Rapid System 1053 User manual

Thule

Thule Rapid System 1053 User manual

Thule ProRide 598001 User manual

Thule

Thule ProRide 598001 User manual

Thule QUICKDRAW RACHET TIE-DOWNS 855 User manual

Thule

Thule QUICKDRAW RACHET TIE-DOWNS 855 User manual

Thule 101 Guide

Thule

Thule 101 Guide

Thule 832 User manual

Thule

Thule 832 User manual

Thule Rapid System 1663 User manual

Thule

Thule Rapid System 1663 User manual

Thule 1499 User manual

Thule

Thule 1499 User manual

Thule 1726 User manual

Thule

Thule 1726 User manual

Thule 897xt HULLAVATOR User manual

Thule

Thule 897xt HULLAVATOR User manual

Thule 1527 User manual

Thule

Thule 1527 User manual

Thule 1245 User manual

Thule

Thule 1245 User manual

Thule 1648 User manual

Thule

Thule 1648 User manual

Thule Kit 2032 User manual

Thule

Thule Kit 2032 User manual

Thule Kit 1170 User manual

Thule

Thule Kit 1170 User manual

Popular Automobile Accessories manuals by other brands

Funkwerk Audio 2000 operating manual

Funkwerk

Funkwerk Audio 2000 operating manual

Mini Mania Mount Gen 3 Pro Series installation guide

Mini Mania

Mini Mania Mount Gen 3 Pro Series installation guide

MAGINON RC-200 instruction manual

MAGINON

MAGINON RC-200 instruction manual

TST TST-770 Series Installation & operation manual

TST

TST TST-770 Series Installation & operation manual

Great day TRUCK'N BUDDY Instructions for installation and use

Great day

Great day TRUCK'N BUDDY Instructions for installation and use

egton Sunvisor Bluetooth Handsfree Car Kit user manual

egton

egton Sunvisor Bluetooth Handsfree Car Kit user manual

Phonocar 4/087 programming

Phonocar

Phonocar 4/087 programming

ERKUL SKI CARRIER Assembly instructions

ERKUL

ERKUL SKI CARRIER Assembly instructions

STO N SHO SNS 152 Installation procedures

STO N SHO

STO N SHO SNS 152 Installation procedures

STO N SHO SNS 311 Installation procedures

STO N SHO

STO N SHO SNS 311 Installation procedures

Directed DS4+ installation guide

Directed

Directed DS4+ installation guide

RBO RBO8042 product manual

RBO

RBO RBO8042 product manual

Warn 79840 installation instructions

Warn

Warn 79840 installation instructions

Redarc BCDCMB-009 manual

Redarc

Redarc BCDCMB-009 manual

Brodit ProClip 852947 manual

Brodit

Brodit ProClip 852947 manual

Carson Volunteer SC-1022 specification

Carson

Carson Volunteer SC-1022 specification

ACV 381178-35 installation manual

ACV

ACV 381178-35 installation manual

Active Controls ActiveStart ACS50 Series Installation, operation & application guide

Active Controls

Active Controls ActiveStart ACS50 Series Installation, operation & application guide

manuals.online logo
manuals.online logoBrands
  • About & Mission
  • Contact us
  • Privacy Policy
  • Terms and Conditions

Copyright 2025 Manuals.Online. All Rights Reserved.