6
FRANÇAIS 03W-096000
8. Quand la minuterie est activée, appuyer ADJ pour la suspendre.
9. Quand la minuterie est suspendue, appuyer sur ADJ pour la redémarrer ou
appuyer sur SET pour retourner la minuterie à sa durée d’origine.
10. Quand l’alarme sonne, appuyer sur TOUT bouton pour éteindre la sonnerie,
faute de quoi elle s’arrêtera dans environ 10 secondes.
11. Si aucun bouton n’est appuyé, la minuterie commencera à compter vers
le haut à partir du zéro et continuera pendant jusqu’à 24 heures. Appuyer
sur ADJ pour suspendre la minuterie, et appuyer sur SET pour remettre la
minuterie à sa durée d’origine.
Remarque : Quand il reste 30 secondes à la minuterie, un seul bip sera émis.
Quand il restera 10 secondes avant la n de la durée de la minuterie, la montre
émettra un bip toutes les secondes pendant le compte à rebours.
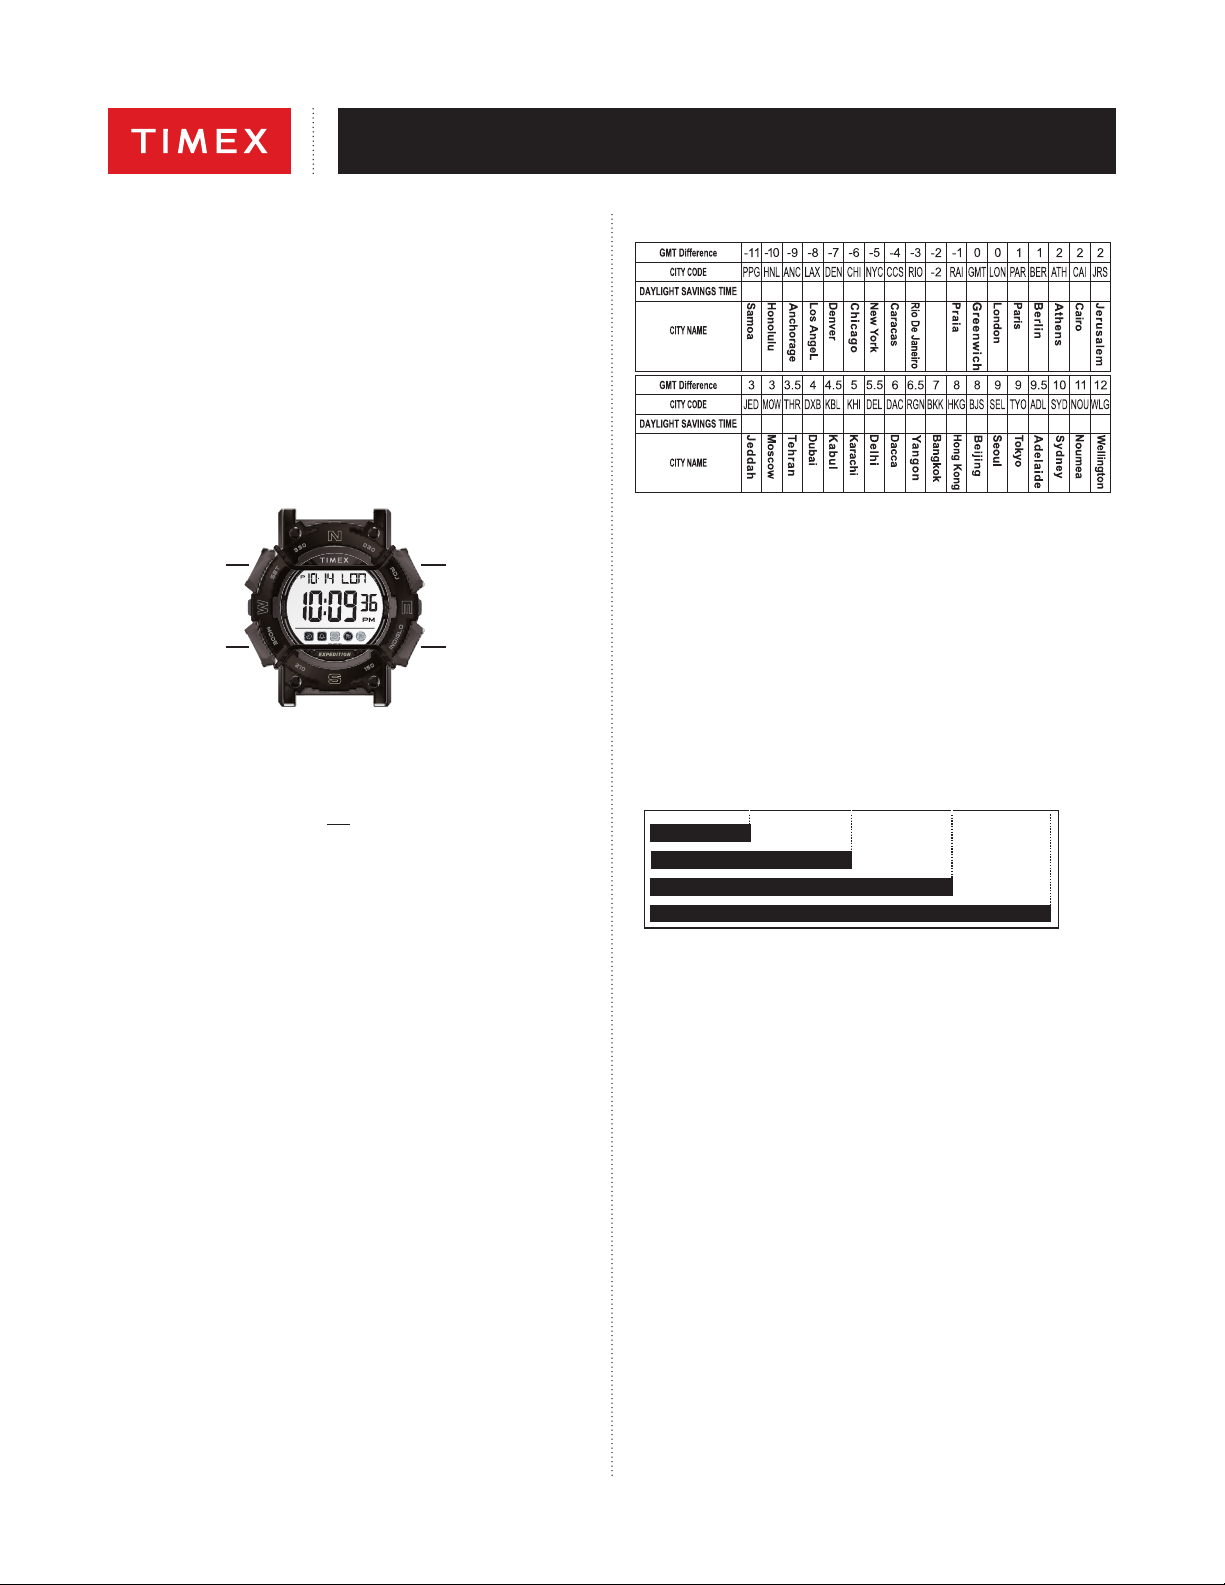
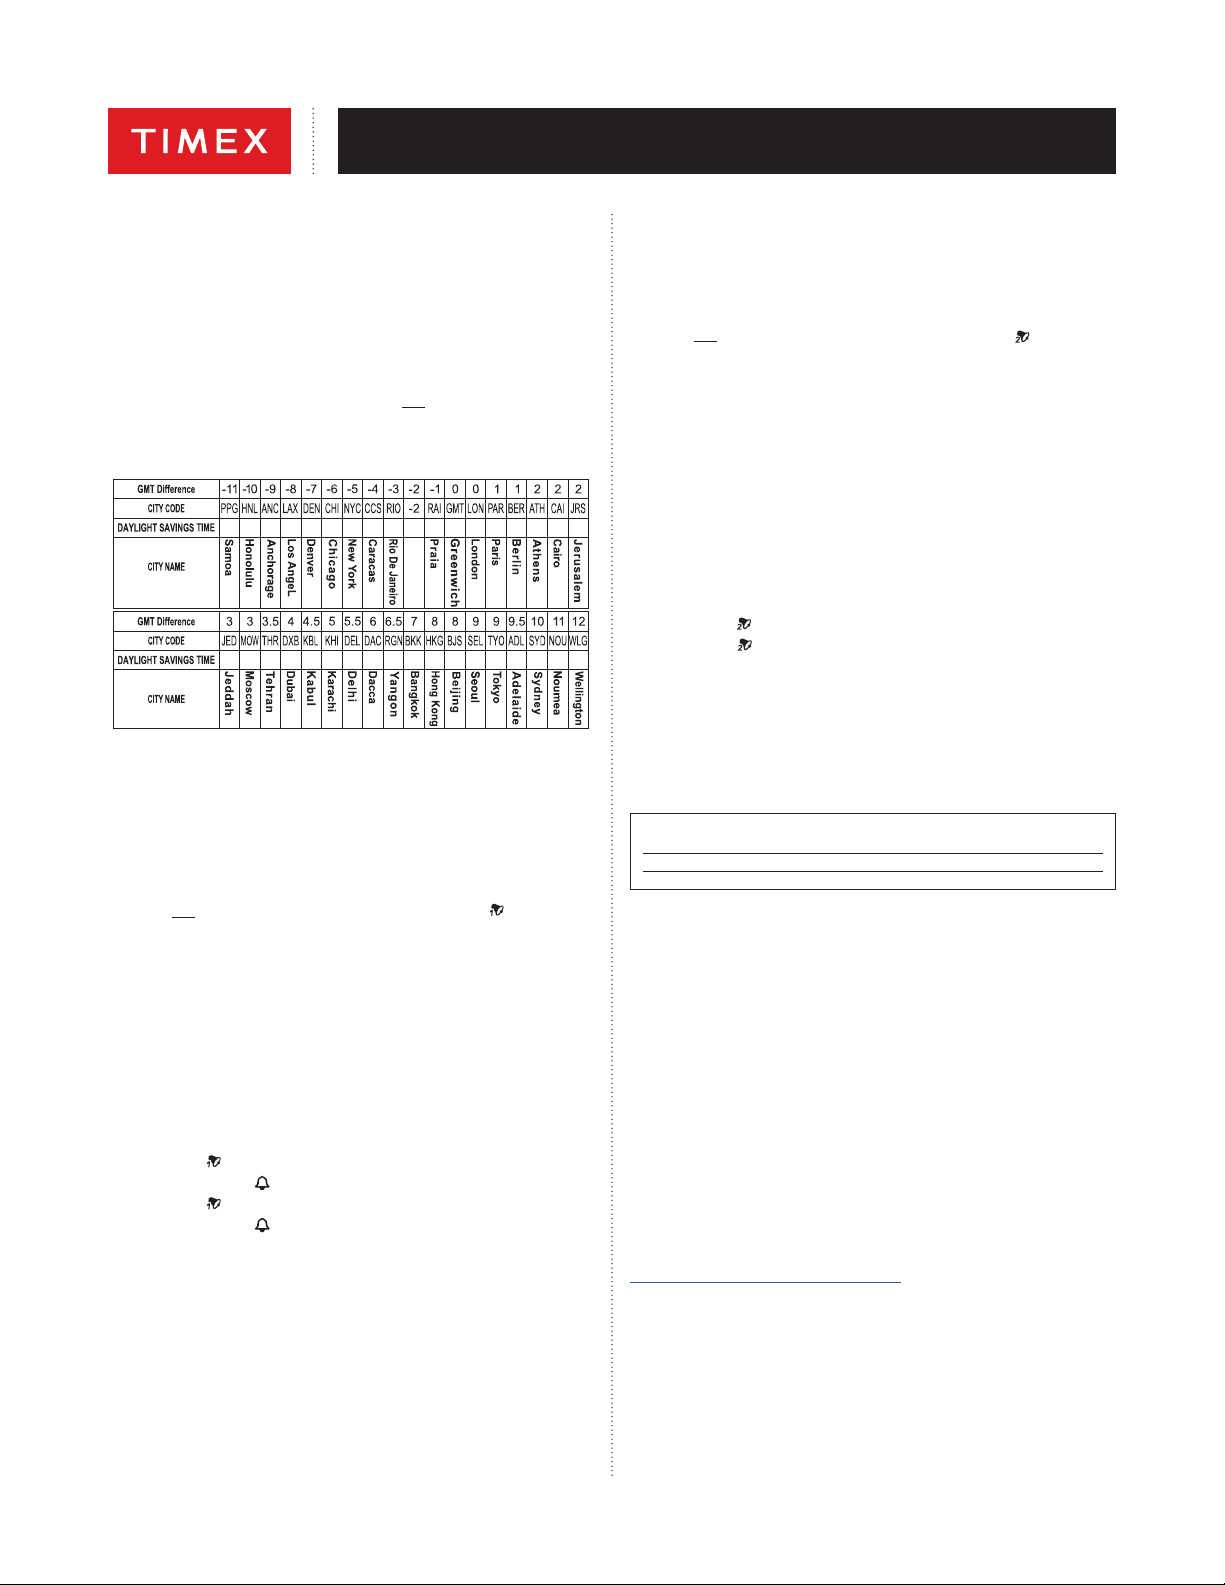
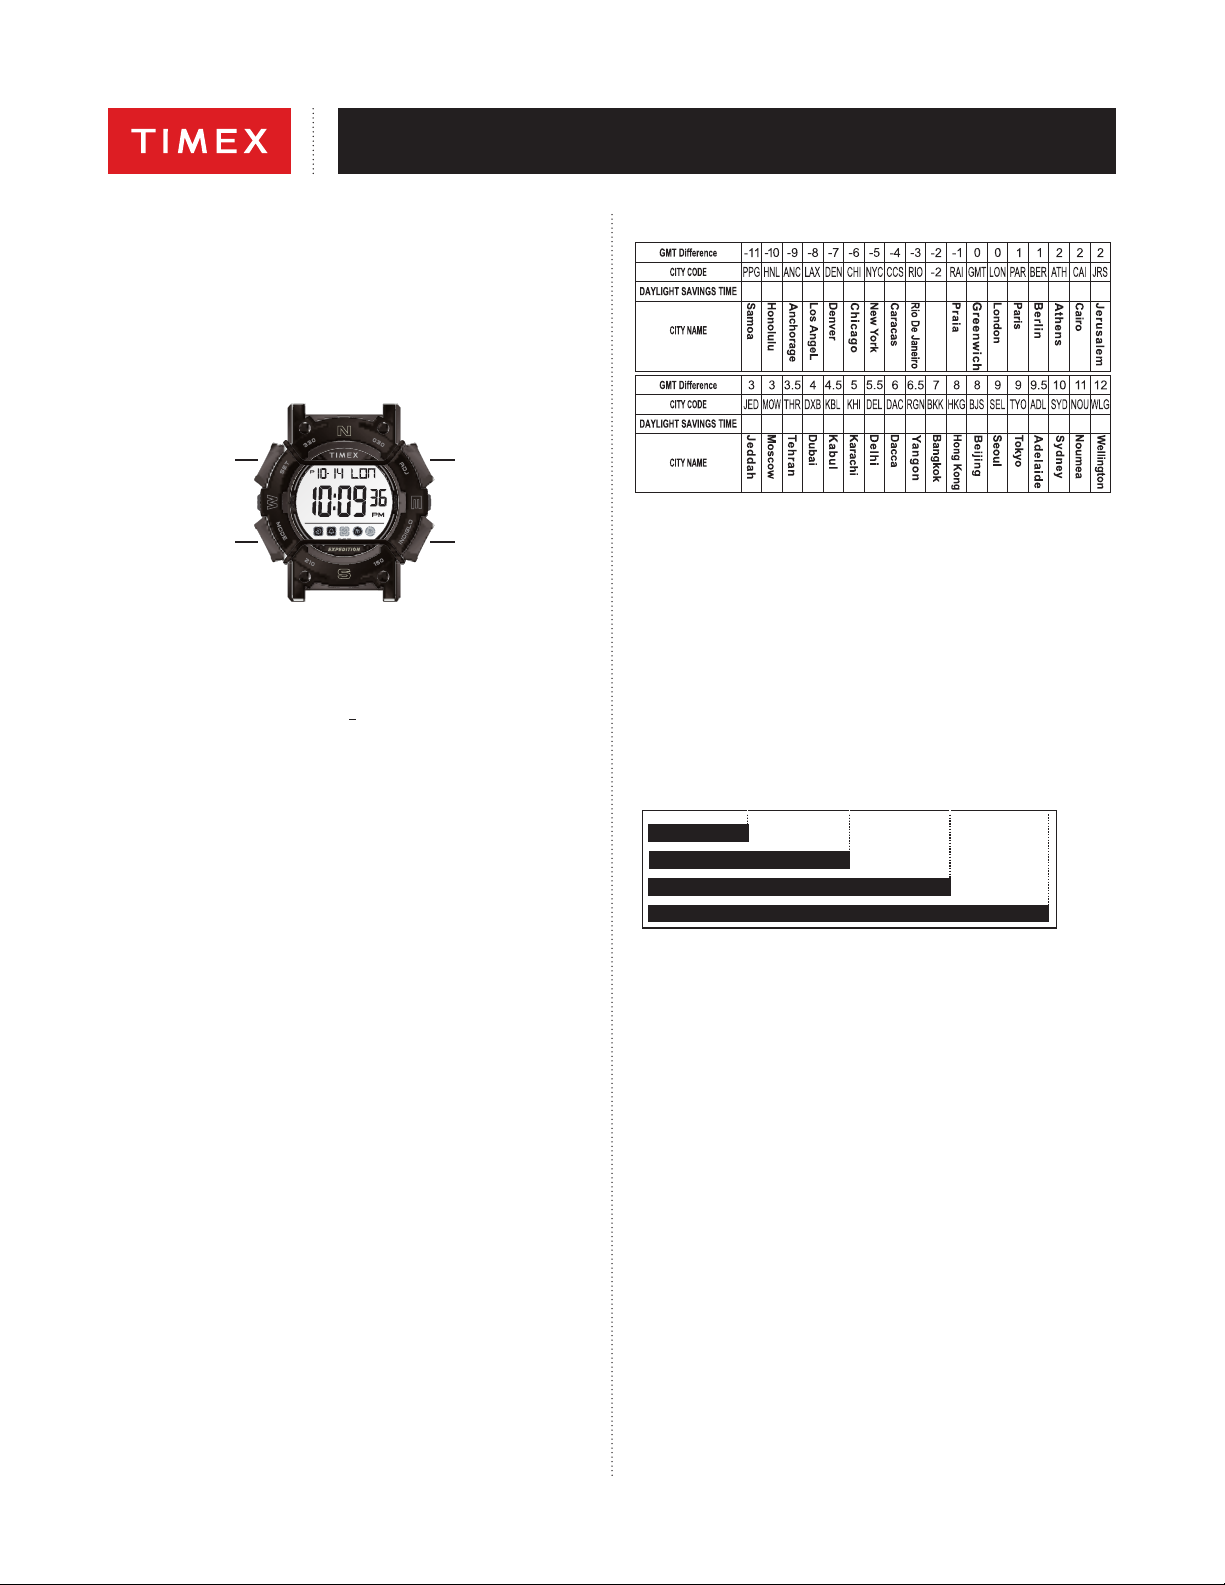
HEURE MONDIALE
Acher l’heure locale dans n’importe lequel des 35 fuseaux horaires suivis par
la montre.
Remarque : Consulter le Tableau de fuseaux horaires du monde pour connaître
les Codes de ville disponibles, rangés par leur écart par rapport au GMT.
1. Appuyer sur MODE jusqu’à ce que le Code de ville soit aché. L’heure
locale sera achée sur la ligne Supérieure et l’heure du fuseau horaire
correspondant sera achée sur la ligne Intermédiaire.
2. Appuyer sur ADJ pour faire déler la liste de Fuseaux horaires du monde.
Tenir le bouton choisi enfoncé pour changer le réglage rapidement.
3. Pour que l’heure locale s’ache correctement, il faut que le réglage DST
(Daylight Saving Time, soit Heure d’été) soit correctement activé/désactivé.
Appuyer sur et tenir enfoncé le bouton SET pour alterner le réglage DST
pour chaque code de ville.
TABLEAU DE FUSEAUX HORAIRES DU MONDE
NO YESNO NO NO NO NO
NO NO NO NO NO NO NO NO NO NO NO NO NO NONO
YES YESYES YES YESYES YESYES YESYESYES
YES YES YES YES
ALARME 1
Activation/désactivation de la première des deux Alarmes quotidiennes,
activation/désactivation de l’Alarme 1 ou activation/désactivation du carillon
horaire
Réglage de l’alarme
1. Appuyer sur MODE jusqu’à l’achage du message « AL1 » (Alarme 1).
Remarque : L’Heure actuelle est achée sur la ligne Supérieure de l’achage,
et l’heure réglée de l’Alarme est achée dans le même format (12 ou 24 h) que
le mode de l’Heure.
2. Appuyer sur et tenir enfoncé le bouton SET. Le chire de l’Heure clignote
et le voyant Alarme s’illumine.
3. Appuyer sur ADJ pour eectuer le réglage en avant ou appuyer sur
INDIGLO pour eectuer le réglage en arrière. Tenir le bouton choisi enfoncé
pour changer le réglage rapidement.
4. Appuyer sur MODE pour régler les Minutes. (Un achage qui clignote
indique que le réglage est en cours.) Appuyer sur ADJ pour eectuer le
réglage en avant ou appuyer sur INDIGLO pour eectuer le réglage en
arrière. Tenir le bouton choisi enfoncé pour changer le réglage rapidement.
5. Appuyer sur SET pour quitter le réglage de l’Alarme 1.
6. Quand l’alarme sonne, appuyer sur TOUT bouton pour l’éteindre, faute de
quoi elle s’arrêtera automatiquement dans environ 20 secondes.
Activation/désactivation de l’Alarme 1 et Activation/désactivation du
Carillon horaire
1. Appuyer sur MODE jusqu’à l’achage du message « AL1 » (Alarme 1).
Remarque : L’Heure actuelle est achée sur la ligne Supérieure de l’achage.
2. Appuyer sur ADJ de façon répétée pour :
a. activer l’Alarme ( ),
b. activer le Carillon horaire ( )
c. désactiver l’Alarme ( ), ou
d. désactiver le Carillon horaire ( )
3. Appuyer sur MODE pour quitter le mode Alarme 1.
ALARME 2
Réglage de la deuxième alarme quotidienne, ou activation/désactivation de
l’Alarme 2
1. Appuyer sur le bouton MODE jusqu’à l’achage du message « AL2 »
(Alarme 2).
Remarque : L’Heure actuelle est achée sur la ligne Supérieure de l’achage,
et l’heure réglée de l’Alarme est achée dans le même format (12 ou 24 h) que
le mode de l’Heure.
2. Appuyer sur et tenir enfoncé le bouton SET. Le chire de l’Heure clignote
et le voyant Alarme ( ) s’illumine.
3. Appuyer sur ADJ pour eectuer le réglage en avant ou appuyer sur
INDIGLO pour eectuer le réglage en arrière. Tenir le bouton choisi enfoncé
pour changer le réglage rapidement.
4. Appuyer sur MODE pour régler les Minutes. (Un achage qui clignote
indique que le réglage est en cours.) Appuyer sur ADJ pour eectuer le
réglage en avant ou appuyer sur INDIGLO pour eectuer le réglage en
arrière. Tenir le bouton choisi enfoncé pour changer le réglage rapidement.
5. Appuyer sur SET pour quitter le réglage de l’Alarme 2.
6. Quand l’alarme sonne, appuyer sur TOUT bouton pour l’éteindre, faute de
quoi elle s’arrêtera automatiquement dans environ 20 secondes.
Remarque : Le format (12 ou 24 h) du réglage de l’Alarme sera identique à
celui du mode de l’Heure.
Activation/Désactivation de l’Alarme 2
1. Appuyer sur le bouton MODE jusqu’à l’achage du message « AL2 »
(Alarme 2).
Remarque : L’Heure actuelle est achée sur la ligne Supérieure de l’achage.
2. Appuyer sur ADJ de façon répétée pour :
a. activer l’Alarme ( ), ou
b. désactiver l’Alarme ( )
VEILLEUSE INDIGLO®
Appuyer sur le bouton INDIGLO® pour illuminer l’achage de la montre
pendant 2 à 3 secondes. La technologie électroluminescente utilisée dans la
veilleuse INDIGLO®permet d’illuminer le cadran de la montre la nuit et dans des
conditions de faible éclairage. Si vous appuyez sur un bouton quand la veilleuse
INDIGLO®est activée, celle-ci restera activée.
ÉTANCHÉITÉ ET RÉSISTANCE AUX CHOCS
Si la montre est étanche, la profondeur maximale ou le symbole (O) est
indiqué
Profondeur d'étanchéité p.s.i.a. * Pression de l’eau sous
la surface
30 m/98 pi 60
50 m/164 pi 86
100 m/328 pi 160
*livres par pouce carré (abs.)
AVERTISSEMENT : POUR PRÉSERVER L’ÉTANCHÉITÉ, NE PAS
ENFONCER LES BOUTONS SOUS L’EAU.
1. La montre est étanche aussi longtemps que le verre, les boutons poussoir
et le boîtier sont intacts.
2. La montre n’est pas conçue pour la plongée. Ne pas l’utiliser dans ces
conditions.
3. Rincer à l’eau douce après tout contact avec l’eau de mer.
4. La résistance aux chocs est indiquée sur le cadran de la montre ou au dos
du boîtier. Les montres sont conçues pour se conformer à l’essai de choc
ISO. Toutefois, prendre garde à éviter d’endommager le verre/cristal.