Tineco PURE ONE STATION FURFREE Series User manual

PURE ONE STATION FURFREE SERIES
Clean Station
Instruction Manual
Manual De Uso
Mode D’emploi
*Actual product may differ from illustration.
TINECO IS HERE TO HELP.
We’ll get back to you within 1 business day.
www.tineco.com
1-855-292-8864


EN
1
CONTENTS
Important Safety Instructions...............................................................2
Specications........................................................................................6
Overview................................................................................................7
Assembly ...............................................................................................9
Operation............................................................................................11
Maintenance .......................................................................................15
Troubleshooting..................................................................................18
Warranty ..............................................................................................19
www.tineco.com
1-855-292-8864
TINECO IS HERE TO HELP.
We’ll get back to you within 1 business day.

EN
2
Important Safety Instructions
SAVE THESE INSTRUCTIONS
Household use only.
When using an electrical appliance, basic precautions should always be followed,
including the following:
READ ALL INSTRUCTIONS BEFORE USING (THIS APPLIANCE). Failure to follow the
warnings and instructions may result in electric shock, re and/or serious injury.
WARNING – To reduce the risk of re, electric shock, or injury:
1. This appliance can be used by children aged from 8 years and above and persons
with reduced physical, sensory or mental capabilities or lack of experience and
knowledge if they have been given supervision or instruction concerning use of the
appliance in a safe way and understand the hazards involved. Children should not
play with the appliance. Cleaning and user maintenance shall not be performed by
children without supervision.
2. The appliance is not to be used by persons (including children) with reduced
physical, sensory or mental capabilities, or lack of experience and knowledge, unless
they have been given supervision or instruction.
3. For INDOOR use ONLY. Do not use the appliance outdoors, nor in commercial or
industrial environments. Do not use the appliance on wet surfaces or surfaces with
standing water.
4. Do not allow to be used as a toy. Close attention is necessary when used by or near
children, pets or plants.
5. Use only as described in this manual. Use only manufacturer’s recommended
attachments.
6. Do not use with a damaged cord or plug. If appliance has been dropped, damaged,
left outdoors, dropped into water, or is not working as it should, return it to a service
center.
7. Do not handle charger, including charger plug, and charger terminals with wet hands.
8. Do not block openings. Stop use if openings become blocked. Clean and remove
any blocked objects according to the manual instructions.
9. Keep hair, loose clothing, ngers, and all parts of your body away from openings and
moving parts.
10. Use extra care when cleaning on stairs.
11. Do not use to pick up ammable or combustible liquids, such as gasoline, or use in
areas where they may be present.
12. Do not pick up anything that is burning or smoking, such as cigarettes, matches, or
hot ashes.
13. Do not use without a lter.
14. Prevent unintentional activation. Ensure the switch is in the off position before
connecting to the battery pack, picking up or carrying the appliance. Carrying the
appliance with your nger on the switch or powering on the appliance with the switch
on may cause accidents.
15. Disconnect the battery pack from the appliance before making any adjustments,
changing accessories, storing the appliance. Such preventive safety measures reduce
the risk of starting the appliance accidentally.

EN
3
16. For the purposes of recharging the battery, only use the detachable supply unit
provided with this appliance. A charger that is suitable for one type of battery pack
may create a risk of re when used with another battery pack.
17. Use appliances only with specically designated Tineco battery packs. Use of any
other battery packs may create a risk of injury and re.
18. When battery pack is not in use, keep it away from other metal objects, like paper
clips, coins, keys, nails, screws or other small metal objects, that can make a
connection from one terminal to another. Shorting the battery terminals together
may cause burns or a re.
19. Under improper usage, liquid may be ejected from the battery; avoid contact. If
contact accidentally occurs, ush with water. If liquid comes into eye contact, seek
medical help. Liquid ejected from the battery may cause irritation or burns.
20. Do not use a battery pack or appliance that is damaged or modied. Damaged or
modied batteries may exhibit unpredictable behavior resulting in re, explosion or
risk of injury.
21. Do not expose a battery pack or appliance to re or excessive heat. Exposure to re
or temperatures above 266°F (130°C) may cause an explosion.
22. Follow all charging instructions and do not charge the battery pack or appliance
outside of the temperature range specied in the instructions. Charging improperly
or at temperatures outside of the specied range may damage the battery and
increase the risk of re.
23. Have servicing performed by a qualied repair person using only identical
replacement parts. This will ensure that the safety of the product is maintained.
24. This appliance contains battery cells that are non-replaceable. Do not modify or
attempt to repair the appliance or the battery pack except as indicated in the
instructions for use and care.
25. Always turn off this appliance before connecting or disconnecting the motorized
nozzle.
26. Do not charge or store the appliance outdoors or inside a car. Only charge, store or
use the battery in a dry indoor area where the temperature is higher than 39.2°F (4°C)
but lower than 104°F (40°C). The charger is for indoor use only.
27. The appliance is only to be used with the unit provided. The plug must be removed
from the socket-outlet before cleaning or maintaining the appliance.
28. Do not leave appliance when plugged in. Unplug from outlet when not in use and
before servicing.
29. Do not pull or carry by cord, use cord as a handle, close a door on cord, or pull cord
around sharp edges or corners. Do not run appliance over cord. Keep cord away
from heated surfaces.
30. Do not unplug by pulling on cord. To unplug, grasp the plug, not the cord.
31. Do not handle plug or appliance with wet hands.
32. Do not handle plug or appliance with wet hands.
33. Do not use with any opening blocked; keep free of dust, lint, hair, and anything that
may reduce air ow.
34. Turn off all controls before unplugging.
35. “Connect to a properly grounded outlet only. See Grounding Instructions.”
36. ”While grooming your pet, use proper care. Handle carefully and brush gently. To
prevent injury to your pet, avoid using this tool on the face of your pet.”

EN
4
GROUNDING INSTRUCTIONS
1) This appliance must be grounded. If it should malfunction or breakdown,
grounding provides a path of least resistance for electric current to reduce the risk
of electric shock. This appliance is equipped with a cord having an equipment-
grounding conductor and grounding plug. The plug must be inserted into an
appropriate outlet that is properly installed and grounded in accordance with all local
codes and ordinances.
WARNING – Improper connection of the equipment-grounding conductor can result
in a risk of electric shock. Check with a qualied electrician or service person if you
are in doubt as to whether the outlet is properly grounded. Do not modify the plug
provided with the appliance – if it will not t the outlet, have a proper outlet installed
by a qualied electrician.
2) This appliance is for use on a nominal 120-V circuit and has a grounding
attachment plug that looks like the plug illustrated below. Make sure that the
appliance is connected to an outlet having the same conguration as the plug. No
adaptor should be used with this appliance.
GROUNDED
OUTLET
GROUNDING PIN
GROUNDED
OUTLET BOX
FCC Supplier’s Declaration of Conformity
Tineco / PURE ONE STATION FURFREE SERIES
This appliance complies with part 15 of the FCC Rules. Operation is subject to the
following two conditions:
(1) This appliance may not cause harmful interference, and (2) this appliance must accept
any interference received, including interference that may cause undesired operation.
Tineco INTELLIGENT, INC.
1700 WESTLAKE AVENUE N., SUITE 200, SEATTLE, WA, 98109, USA
WWW.TINECO.COM
1-855-292-8864
Changes or modications not expressly approved by the party responsible for
compliance could void the user’s authority to operate the equipment.
Note: This equipment has been tested and found to comply with the limits for a Class
B digital appliance, pursuant to Part 15 of the FCC Rules. These limits are designed to
provide reasonable protection against harmful interference in a residential installation.
This equipment generates uses and can radiate radio frequency energy and, if not
installed and used in accordance with the instructions, may cause harmful interference
to radio communications. However, there is no guarantee that interference will not occur
in a particular installation. If this equipment does cause harmful interference to radio
or television reception, which can be determined by turning the equipment off and on,
the user is encouraged to try to correct the interference by one or more of the following
measures:

EN
5
(1) Reorient or relocate the receiving antenna.
(2) Increase the separation between the equipment and receiver.
(3) Connect the equipment into an outlet on a circuit different from that to which the
receiver is connected.
(4) Consult the dealer or an experienced radio/TV technician for help.
FCC Radiation Exposure Statement
This equipment complies with FCC radiation exposure limits set forth for an uncontrolled
environment. This equipment should be installed and operated with a minimum distance
of 20cm between the radiator and any part of your body.
Note
The manufacturer is not responsible for any radio or TV interference caused by
unauthorized modications to this equipment, such modications could void the user’s
authority to operate this equipment.
IC Note
This appliance contains licence-exempt transmitter(s)/receiver(s) that comply with
Innovation, Science and Economic Development Canada’s licence-exempt RSS(s).
Operation is subject to the following two conditions:
(1) this appliance may not cause interference.
(2) this appliance must accept any interference, including interference that may cause
undesired operation of the appliance.
- This Class B digital apparatus complies with Canadian ICES-003.
- This equipment complies with ISED RSS-102 radiation exposure limits set forth for an
uncontrolled environment. This equipment should be installed and operated with a
minimum distance of 20cm between the radiator and any part of your body.

EN
6
CLEAN STATION
Input (Self-Cleaning Mode) 120V 60Hz 4.2A
Input (Charging) 120V 60Hz 0.5A
Output 18V 1A
Disposal
• The battery contains materials that are harmful to the environment and must be removed from the
appliance before it is discarded.
• Batteries, chargers, accessories and packaging should be sorted for environmental friendly
recycling. Do not put them into fire, water or soil. Do not dispose of chargers into household
waste!
• If battery leakage contacts skin or clothing, immediately ush with water to avoid irritation and
seek medical help.
Specications

EN
7
A. Upper Part
B. Dustbin Module
C. Docking Base
D.Digital Display
E. Dustbin Release Button
F. Dustbin
Overview
A B
G.HEPA Filter
H. 2-in-1 Crevice Dusting Brush
I. Mini Power Brush
J. Charging Port
K. Cleaning Tool
A. Extension Hose
B. Brush
D
J
K
E
F
G
H
I
FURFREE KIT
Note: Furmaid kit is exclusively compatible with specific models, please refer to the vacuum
cleaner manual for details.
A
B
C

EN
8
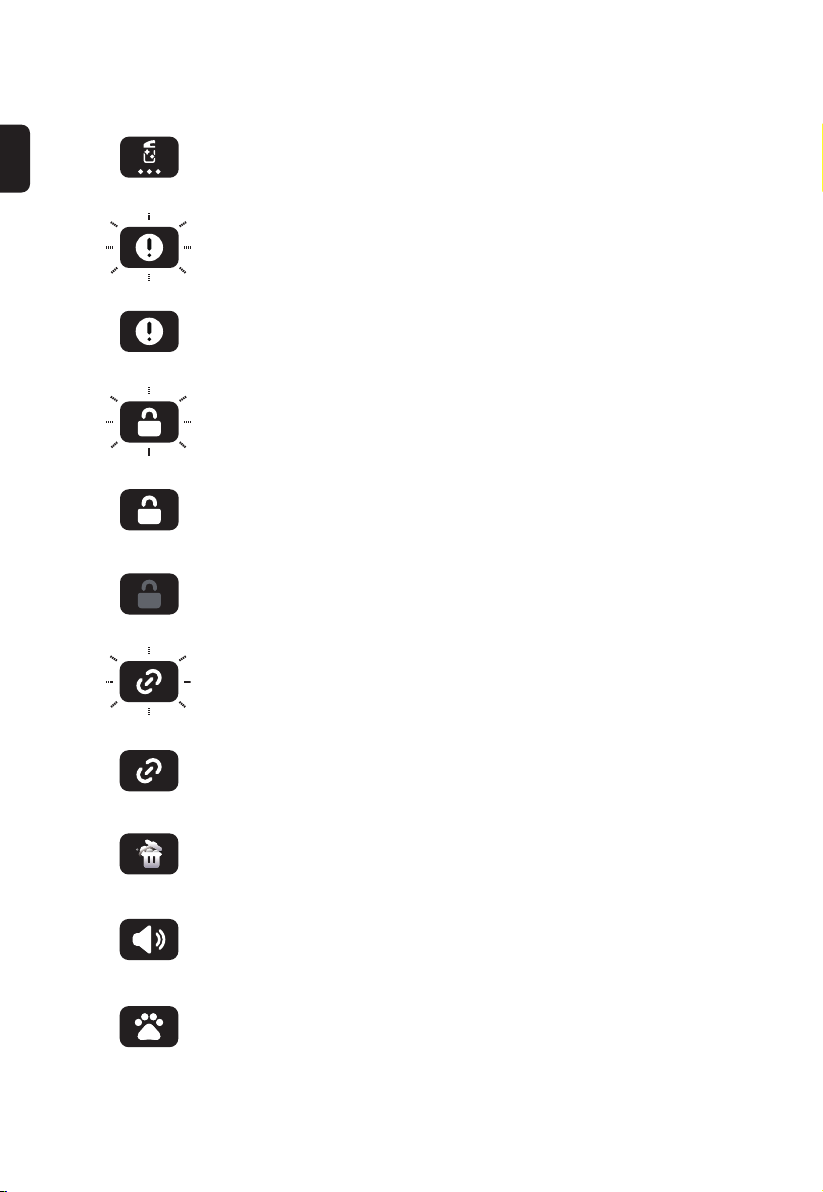
A. Voice Prompt Button
B. Pet Grooming Button
C. Malfunction
D.Vacuum Locked/Unlocked
E. Signal Connection
F. Dustbin Maintenance
G.Dust Monitoring Loop
(Cleaning is complete when
the dust monitoring loop turns
from red to solid blue.)
H. Self-cleaning
I. Tineco Logo
Digital Display of Clean Station
A B C D E F G H I

EN
9
Assembly
Clean Station Assembly
Note: Please make sure the Clean Station is placed on a hard at surface
Insert dustbin module into docking base
rst, then insert upper part into the dustbin
module.
In the event that the Clean Station needs to
be disassembled, press the latch with tool to
remove the three parts.
Plug in the Clean Station. Place the accessories on the Clean Station for
convenient storage after use.
Upper Part
Dustbin Module
Docking Base
click
click

EN
10
FURFREE Kit Installation.
Remove the brush roller. Install the extension hose.
Place the vacuum cleaner onto the Clean
Station.
Note: Do not bend the connecting part when
assembling.
Insert the extension hose to the connection
port of the brush.

EN
11
Operation
Vacuum’s Dustbin Emptying & Vacuum Charging
Note:
• To make sure that the vacuum cleaner is successfully charged, please place it near the charging
port. Also, place the dustbin close enough to the suction port of the Clean Station to ensure that
the Clean Station is fully operational.
• The vacuum cleaner cannot be charged when connected to accessories other than the brush
roller.
• The vacuum cleaner is not allowed to be removed when the self-cleaning or pet grooming feature
is activated.
Place the vacuum onto the Clean Station.
The Clean Station will then start charging,
meanwhile, self-cleaning will also be activated.
When self-cleaning is complete, the Dust
Monitoring Loop turns solid blue, and the
voice announces “Self-cleaning completed.”
Warning:
• Only use the Tineco-provided adapter to charge the appliance.
• To avoid trip hazards, please place the appliance securely on the charging dock, near a wall
during charging.
• During long periods of not being used, store the appliance in a cool, dry place. Ensure the battery
is fully charged every 3 months.
• Do not expose appliance to sunlight or freezing temperature. Recommended temperature range:
39.2°F (4°C)~104°F (40°C).
EN
12
Indicators of Clean Station
1/2/3 lights on: quick/medium/deep self cleaning, the Clean
Station automatically checks the cleanliness of the vacuum
cleaner and applies quick/medium/deep self cleaning
correspondingly.
Blinking: Please place the dustbin and vacuum cleaner properly
or clean the air channel.
Solid yellow light: Malfunction, check troubleshooting
Blinking: Clean Station is locking/unlocking the vacuum
Solid light: Vacuum locked and is not allowed to be removed
from the Clean Station.
Light faded: Vacuum unlocked
Blinking: Vacuum is connecting to the Clean Station
Solid light: Vacuum is connected to the Clean Station
Solid light: Dustbin maintenance prompt
Solid light: Voice prompt on
*Press and hold for 5s to switch languages
Solid light: Pet grooming mode
*Press and hold for 14s to enter hibernation mode.

EN
13
FURFREE KIT-With Brush
The rough comb brush is a suitable tool for
smoothing out messy hair on at parts of long-
haired dogs’ bodies.
1. Press the Pet Grooming button;
2. Use the brush to comb pet’s hair;
3. Pull the trigger on the brush to collect and
dispose of the combed hair.

EN
14
Clean Station Dustbin’s Emptying
Press the release button and pull outward to
remove the dustbin.
Squeeze the latch to open the cover and
empty the dustbin.
②
①
Close the dustbin cover and put the dustbin
back into place.
click

EN
15
Maintenance
Dustbin and Mesh Filter
Note:
• Wash and dry the mesh lter every 12 months, and the HEPA lter every 2 year.
Turn counter-clockwise to open the upper
cover, and then remove the lter cotton and
lter element.
Note:
• The cover of dustbin is not water-proof.
The mesh lter and dustbin can be washed
under cold running water and must be
completely dry before reinstalling.
After cleaning, install the mesh lter dustbin
back into the Clean Station.
Note:
• When assemble the sponge lter, make sure
to face the plastic ring upwards as shown
above.
• Leave the dustbin cover open when insert
the lter.

EN
16
HEPA Filter
Pull out the HEPA lter for cleaning. Do not
use the appliance without rst installing the
HEPA lter.
The HEPA lter can be washed under running
water and must be completely dry before
reinstalling.
Air Channel
Clean the vacuum opening with a vacuum
cleaner.
Clean air channel with cleaning tool when the
air channel is blocked, pull out the dustbin for
cleaning.

EN
17
Brush
Use the hose to suck away the hair from the brush.
SCAN THE QR CODE BELOW TO
GET PRODUCT CARE VIDEOS.

EN
18
Problem Possible cause Solution
The Clean Station does not
turn on
No power Plug in the Clean Station
Auto protection for overheating Restart after cooling down
Short runtime Use normally
The dustbin is not properly
tted
Place the dustbin to the right
place
The vacuum is not properly
tted
Place the vacuum to the right
place
Malfunction indicator
remains lit Motor malfunction
Press “Self-cleaning” button
to restart the Self-cleaning
mode
Malfunction indicator
remains lit
Voice: Please replug in the
Clean Station
Motor malfunction Replug in the Clean Station
Malfunction indicator is
blinking
Voice: Please clean air channel
and HEPA lter
The air channel of Clean Station
is blocked
Check and remove the
blockages
The air channel of Clean Station
is blocked. Clean the HEPA lter
Malfunction indicator is
blinking
Voice: Please install the
dustbin or vacuum properly
The dustbin is not properly
tted
Place the dustbin to the right
place
The vacuum is not properly
tted
Place the vacuum to the right
place
Dustbin maintenance
remains lit
Voice: Please clean the dustbin
timely
The dustbin needs to be
cleaned Clean the dustbin timely
The vacuum can not be taken
out The vacuum is stuck Replug in the Clean Station
Note:
If the above troubleshooting guide fails to provide a solution, please visit our website
www.tineco.com for further support.
Troubleshooting
Table of contents
Languages:
Other Tineco Cleaning Equipment manuals


