Tippmann TANGO ONE User manual

TP04116
11/09
TIPPMANN®
2955 Adams Center Road, Fort Wayne, IN 46803 USA
P) 260-749-6022 • F) 260-749-6619
www.tippmann.com
PAINTBALL MARKER
LANCEUR DE PAINTBALL
MACADOR PAINTBALL
Owner’s Manual
Manuel d’utilisation
Manual del Usuario
TANGO ONE

2
E
N
G
L
I
S
H
F
R
A
N
Ç
A
I
S
E
S
P
A
Ñ
O
L
ADVERTENCIA
ESTO NO ES UN JUGUETE. UN USO INAPROPIADO
PUEDE CAUSAR SERIAS HERIDAS O LA MUERTE.
OJOS, CARA Y OIDOS DEBEN SER PROTEGIDOS
TODO EL TIEMPO, CON LA PROTECCIÓN DISEÑADA
PARA PAINTBALL TANTO POR JUGA-DORES COMO
POR CUALQUIER PERSONA QUE ESTE EN EL RADIO
DE ALCANCE. RECOMENDAMOS AL MENOS 18 AÑOS
PARA LA COMPRA Y USO. LAS PERSONAS MENORES
DE 18 AÑOS DEBEN USAR ESTE PRODUCTO BAJO LA
SUPERVISIÓN DE UN ADULTO. LEA EL MANUAL DEL
USARIO ANTES DE USAR ESTE PRODUCTO.
WARNING
THIS IS NOT A TOY. MISUSE MAY CAUSE SERIOUS
INJURY OR DEATH. EYE, FACE, AND EAR PROTECTION
DESIGNED FOR PAINTBALL MUST BE WORN BY
THE USER AND ANY PERSON WITHIN RANGE. WE
RECOMMEND YOU BE AT LEAST 18 YEARS OLD TO
PURCHASE. PERSONS UNDER 18 MUST HAVE ADULT
SUPERVISION WHEN USING THIS PRODUCT. READ THE
OWNER’S MANUAL BEFORE USING THIS PRODUCT.
AVERTISSEMENT
CECI N’EST PAS UN JOUET. TOUT USAGE
INAPPROPRIE PEUT PROVOQUER DES BLESSURES
GRAVES OU MORTELLES. LE PORT DE LA
PROTECTION POUR LES YEUX, LE VISAGE ET LES
OREILLES CONCUE POUR LE PAINT-BALL EST
OBLIGATOIRE POUR L’UTILISATEUR AINSI QUE
POUR TOUTE PERSONNE A PORTEE DE TIR. POUR
L’ACHAT, NOUS RECOMMANDONS L’AGE DE 18 ANS.
LES PERSONNES DE MOINS DE 18 ANS DOIVENT
ETRE SOUS LA SURVEILLANCE D’UN ADULTE
LORSQU’ELLES UTILISENT CE PRODUIT. LISEZ LE
MANUEL AVANT D’UTILISER CE PRODUIT.

3
E
N
G
L
I
S
H
F
R
A
N
Ç
A
I
S
E
S
P
A
Ñ
O
L
AVERTISSEMENT
LA SECURITE EST VOTRE RESPONSABILITE
LISEZ ET FAMILIARISEZ-VOUS AINSI QUE TOUS LES AU-
TRES UTILISATEURS, AUX RÈGLES DE SÉCURITÉ DÉCRITES
DANS CE MANUEL. SUIVEZ CES INSTRUCTIONS LORS DE
L’UTILISATION, L’ENTRETIEN, LE TRANSPORT ET LE STOCK-
AGE DE CE LANCEUR.
GARDEZ TOUJOURS LA SÛRETÉ DE CE LANCEUR
ACTIVÉE TANT QUE VOUS NE L’UTILISEZ PAS,
COMME EXPLIQUÉ DANS LES INSTRUCTIONS
CONCERNANT LA SURETÉ DE DÉTENTE.
VOIR LES INSTRUCTIONS EN PAGE 24.
GARDEZ ÉGALEMENT LA PROTECTION DE CANON
INSTALLÉE TANT QUE VOUS N’ÊTES PAS EN
SITUATION DE TIR, VOIR LES INSTRUCTIONS EN PAGE 22.
ADVERTENCIA
LA SEGURIDAD ES SU RESPONSABILIDAD
LEA Y FAMILIARICESE USTED Y CUALQUIER OTRO
USUARIO DE ESTE MARCADOR CON LAS INSTRUCCIONES
DE SEGURIDAD DE ESTE MANUAL. SIGA ESTAS
INSTRUCCIONES CUANDO LO USE,TRABAJE EN EL,
TRANSPORTE, O ALMACENE.
SIEMPRE MANTENGA EL BOTON SELECTOR EN
SEGURO A MENOS QUE VA A HACER DISPAROS
COMO SE DETALLA EN AL PAGINA
42.
SIEMPRE MANTENGA LA FUNDA DE SEGURIDAD
INSTALADA CUANDO NO VA HACER DISPAROS,
VER INSTRUCCIONES EN LA PAGINA 40.
WARNING
SAFETY IS YOUR RESPONSIBILITY
READ AND FAMILIARIZE YOURSELF AND ANY OTHER USER
OF THIS MARKER WITH THE
SAFETY INSTRUCTIONS
IN THIS
MANUAL. FOLLOW THESE INSTRUCTIONS WHEN USING,
WORKING ON, TRANSPORTING, OR
STORING THIS MARKER.
ALWAYS KEEP THE SAFETY IN SAFE
POSITION, UNLESS IN A SHOOTING
SITUATION, AS DETAILED IN THE TRIGGER
SAFETY INSTRUCTIONS ON PAGE 6.
ALWAYS KEEP THE BARREL SLEEVE INSTALLED
WHEN NOT IN A SHOOTING SITUATION, SEE
BARREL SLEEVE INSTRUCTIONS BELOW. ON PAGE 4.

4
E
N
G
L
I
S
H
WARNING
ALWAYS KEEP THE BARREL BLOCKING DEVICE INSTALLED EXCEPT
WHEN YOUR MARKER IS IN USE. ALWAYS MAKE SURE THAT THE
TRIGGER SAFETY IS IN THE SAFE POSITION (SEE INSTRUCTIONS
ON PAGE 6) AND THE BARREL BLOCKING DEVICE IS PROPERLY
INSTALLED ON YOUR MARKER ACCORDING TO THE INSTRUCTIONS
TO PREVENT DAMAGE TO PROPERTY, SERIOUS INJURY, OR DEATH.
Barrel Sleeve Installation Instructions
1. Insert the Barrel Sleeve onto the Barrel and
loop the cord over the top of the receiver and
position at the back of the grip as shown.
2. Adjust the cord length retainer up to the back
of the grip by pulling the cord through it until
the retainer is snug against the back of the
grip. Keeping the cord as tight as possible, leave
just enough cord elasticity to pull the cord/retainer
up over the top of the marker to remove the barrel
sleeve for ring.
3. After the cord length is properly adjusted, lock the cord length
by tying a knot in the cord against the back of the retainer as
shown.
4. Before and after playing, inspect the Barrel Sleeve. Replace the Barrel Sleeve if the
sleeve or cord is damaged, or there is a loss of cord elasticity.
5. Clean the Barrel Sleeve with plain, warm water and store out of sunlight in a dry area
when not in use.
Cord Length
Retainer
WARNING
THIS IS NOT A TOY. MISUSE MAY CAUSE SERIOUS INJURY OR
DEATH. EYE, FACE, AND EAR PROTECTION DESIGNED FOR
PAINTBALL MUST BE WORN BY THE USER AND ANY PERSON
WITHIN RANGE. WE RECOMMEND YOU BE AT LEAST 18 YEARS
OLD TO PURCHASE. PERSONS UNDER 18 MUST HAVE ADULT
SUPERVISION WHEN USING THIS PRODUCT. READ THE OWNER’S
MANUAL BEFORE USING THIS PRODUCT.
Barrel Sleeve

5
E
N
G
L
I
S
H
TIPPMANN®
2955 Adams Center Road, Fort Wayne, IN 46803 USA
P) 260-749-6022 • F) 260-749-6619
www.tippmann.com
CONGRATULATIONS on your purchase of your Tippmann® paintball marker. We believe our
Tango One™ marker to be the most accurate and durable paintball marker available, and it
is proudly manufactured by Tippmann. All Tippmann® Tango One markers will provide many
years of dependable service if cared for properly.
Please take time to read this manual thoroughly and become familiar with your Tippmann®
Tango One™ marker’s parts, operation, and safety precautions before you attempt to load
or re this marker. If you have a missing or broken part, or need assistance, please contact
Tippmann Consumer Relations at 1-800-533-4831 for fast, friendly service.
Table of Contents
Barrel Sleeve Installation Instructions ....................................................................................4
Warning / Liability Statement ..................................................................................................6
Safety Is Your Responsibility! .................................................................................................6
Trigger Safety .................................................................................................................6
Familiarize Yourself with Safety... ...................................................................................6
Getting Started .......................................................................................................................8
1. Install the Barrel. .........................................................................................................8
2. Air/CO2 Cylinder Installation. ......................................................................................8
3. Loading the Hopper. ...................................................................................................8
4. Fire the Marker. ..........................................................................................................9
Velocity Adjustment ................................................................................................................9
Unloading Your Marker ...........................................................................................................9
Air/CO2 Cylinder Warnings...................................................................................................10
Air/CO2 Cylinder Safety Tips ........................................................................................10
Air/CO2 Cylinder Removal ...................................................................................................11
Repairing Air/CO2 Cylinder Leaks ...............................................................................12
Cleaning and Maintenance ...................................................................................................12
Storage .........................................................................................................................13
Marker Disassembly and Assembly ......................................................................................13
The Valve ......................................................................................................................14
The Trigger ...................................................................................................................15
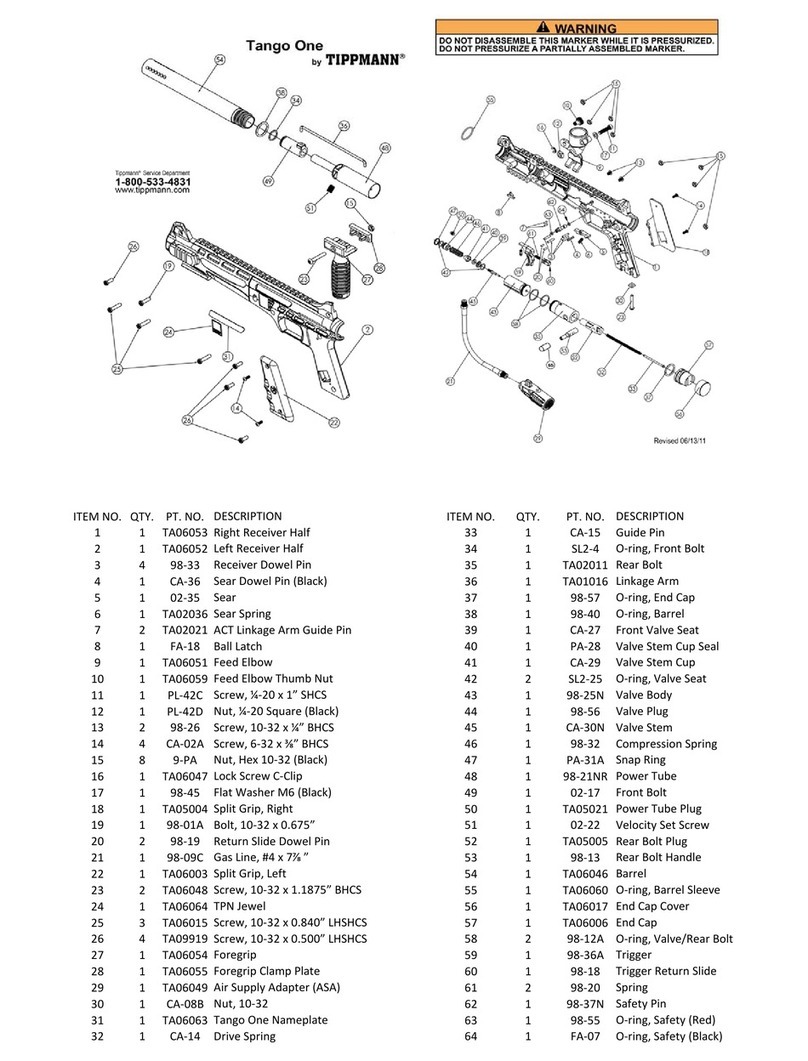
Schematic Diagram ........................................................................................................ 16-17
Parts List ...............................................................................................................................18
General Troubleshooting .....................................................................................................19
Specications ......................................................................................................................19
Warranty and Repair Information .........................................................................................20

6
E
N
G
L
I
S
H
Warning / Liability Statement
This marker is classied as a dangerous weapon and is surrendered by Tippmann Sports,
LLC with the understanding that the purchaser assumes all liability resulting from unsafe
handling or any action that constitutes a violation of any applicable laws or regulations.
Tippmann Sports, LLC shall not be liable for personal injury, loss of property or life resulting
from the use of this weapon under any circumstances, including intentional, reckless,
negligent or accidental discharges.
All information contained in this manual is subject to change without notice. Tippmann
Sports, LLC reserves the right to make changes and improvements to products without
incurring any obligation to incorporate such improvements into products previously sold.
If you as a user do not accept liability, Tippmann Sports, LLC requests you do not use a
Tippmann Sports, LLC marker. By using this paintball marker you release Tippmann Sports,
LLC of any and all liability associated with its use.
Safety Is Your Responsibility!
Trigger Safety
Familiarize Yourself with Safety...
The ownership of this marker places upon you the total responsibility of its safe and lawful
use. You must observe the same safety precautions as you would any rearm to assure
the safety of not only yourself but everyone around you. Outlined here are some general
precautions to be aware of. The user should at all times use caution and common sense
when using this marker and always remember that the game of paintball can only survive
and grow if it remains SAFE!
• Do not load or re this marker until you have completely read this manual and are
familiar with its safety features, mechanical operation, and handling characteristics.
• Handle this and any marker as if it were loaded at all times.
• Keep your nger off the Trigger until ready to shoot.
• Do not look down the barrel of a paintball marker. Accidental discharge into the
eyes may cause permanent injury or death.
• Keep the Trigger Safety in the Safe position until ready to shoot (see Warning
message above).
WARNING
EXCEPT WHEN YOUR MARKER IS IN USE, ALWAYS MAKE SURE
THAT THE TRIGGER SAFETY IS IN THE SAFE POSITION, (WHICH
DISABLES THE TRIGGER) AND THAT THE BARREL SLEEVE IS
PROPERLY INSTALLED (SEE BARREL SLEEVE INSTALLATION ON
PAGE 4).
TO LOCK THE TRIGGER (SAFE POSITION):
PUSH THE SAFETY IN FROM THE MARKER
SIDE SHOWN ABOVE TO THE SAFE POSITION.
TO UNLOCK THE TRIGGER (FIRE POSITION): PUSH THE SAFETY
FROM THE OPPOSITE SIDE OF THE MARKER TO ENABLE FIRING.

7
E
N
G
L
I
S
H
• Keep a barrel sleeve installed on marker when not shooting (see instructions on
page 4).
• Never point the marker at anything you do not intend to shoot.
• Never re your marker at anything you do not intend to shoot because there may
be paintballs or foreign debris lodged in the chamber, barrel, or the marker’s valve.
• Do not shoot at fragile objects such as windows.
• Never re your marker at personal property of others. The paintball impact can
cause damage and the paint can stain the nish of automobiles, houses, etc.
• Always keep the barrel pointed down or in a safe direction, even if you stumble or
fall.
• Eye, face, and ear protection designed specically to stop paintballs in the form of
goggles and full face mask meeting ASTM Specication F 1776 must be worn by
the user and any person within range.
• Never shoot at a person who is not protected by eye, face, and ear protection
designed for paintball.
• Pressurize and load a marker only when the marker will be immediately used.
• Store the marker unloaded and degassed in a secure place.
NOTE: Before storing or disassembling, be sure to remove paintballs and air/
CO2 cylinder (see Unloading Your Marker on page 9 and Air/CO2 Cylinder
Warnings on page 10), put the Trigger Safety in the Safe position (see page 6)
and install the barrel sleeve (see page 4).
• Do not eld strip or otherwise disassemble this marker while it is pressurized.
• Dress appropriately when playing the game of paintball. Avoid exposing any skin
when playing the game of paintball. Even a light layer of clothing will help absorb
some of the impact and protect you from the paintballs.
• Keep exposed skin away from escaping gas when installing or removing the air/
CO2 cylinder, or if the marker or air/CO2 cylinder is leaking. Compressed air,
CO2, and nitrogen gasses are very cold and can cause frostbite under certain
conditions.
• Use only .68 caliber paintballs. Never load or re any foreign objects.
• Avoid alcoholic beverages before and during the use of this marker. Handling
markers while under the inuence of drugs or alcohol is a criminal disregard for
public safety.
• Avoid shooting an opponent at point blank, 6 feet or less.
• Familiarize yourself with instructions listed on the air/CO2 cylinder. Contact the air/
CO2 cylinder manufacturer with any questions.
• Always measure your marker’s velocity before playing paintball and never shoot
at velocities in excess of 300 feet per second (see Velocity Adjustment instructions
on page 9).
• Always keep in mind that the sport of Paintball is viewed and judged by your safe
and sportsmanlike conduct.

8
E
N
G
L
I
S
H
Getting Started
• Eyeprotectiondesignedforpaintballusemustbewornbytheuserandanyperson
withinrange.
• Donotdisassemblethismarkerwhileitispressurizedwithair.
• Donotpressurizeapartiallyassembledmarker.
• Readeachstepcompletelybeforeperformingthestep.
NOTE:Carefullyhandstartallthreadedpartswhenassembling,anddonotover
tighten,asthismaypotentiallystripthethreadedparts.
RefertotheSchematicDiagramonpages16-17fortheseinstructions(itemnumbersarein
parentheses).
1. Install the Barrel.
a. ApplyTippmannoiltotheBarrelO-ring.
b. InserttheBarrelintotheReceiver.
c. CarefullyturntheBarrelclockwisebyhanduntil
tight.
2. Air/CO2 Cylinder Installation.
ReviewAir/CO2 Cylinder Safety Tipsonpage10.
a. PuttheTriggerSafetyintheSafeposition
(seepage6)andinstalltheBarrelSleeve
(seepage4).
b. Cockthemarkerbyslidingthebolthandle
allthewaybackuntilitlocksintoplace.
Alwayskeepmarkerinthecockedposition
whenattachingair/CO2cylindertothe
marker.Thishelpspreventanaccidental
discharge.
c. Lubricatetheair/CO2cylindervalveO-ring
withalittleTippmann®oil.
d. Inserttheair/CO2cylindervalveintotheAirSupplyAdapter(ASA)(29)attheback
endofthemarkergrip.
e. Twisttheair/CO2cylinderclockwiseintotheASAuntilitstops.Usecautionasthe
markerisnowcapableofringafteryouputtheTriggerSafetyintheFireposition.
(Ifyoudonothearthefullair/CO2cylinderengage,thepinvalvecouldbetoo
shortorthepinvalvesealisdamaged,followtheAir/CO2 Cylinder Removal
instructionsonpage11andtakeyourair/CO2cylindertoa“C5”CertiedAirsmith
forinspectionorcontactthecylindermanufacturer).
3. Loading the Hopper.
TheBarrelSleevemustbeinstalled(seepage4)andtheTriggerSafetyintheSafeposition
(seepage6).
a. MakesurethattheFeedElbow(9)andHopperarecleanandfreeofsharpedges
ordebris.Thiskeepspaintballsfrombreakingprematurely,andallowspaintballsto
feedtothemarker’schambersmoothly.
b. InstalltheHopperneckintotheFeedElbow.
Figure 2: Pull the Bolt Handle back
until it locks into place.
Figure 1: Barrel and O-ring

9
E
N
G
L
I
S
H
c. TightentheFeedElbowBolt(11)usingtheincluded3/16”allenwrench.
d. WiththeBarrelSleeveinstalled,andtheTriggerSafetyintheSafeposition,you
arenowreadytoloadthehopperwith.68caliberpaintballs.Donotforceexcessive
numbersofpaintballsintothehopper.
4. Fire the Marker.
a. RemovetheBarrelSleevefromthemarker.
b. Pointthemarkerinasafedirection.
c. PuttheTriggerSafetyintheFireposition.
d. Pullthetriggertorethemarker.
Velocity Adjustment
Eachtimeyouplaypaintball,checkthevelocityofyourpaintballmarkerwithachronograph
(aninstrumentformeasuringvelocity)priortoplayingpaintball.Verifythatthemarker’s
velocityissetbelow300feetpersecond(orlessifrequiredbytheplayingeld).
Toadjustthevelocity,usethe3/16”allenwrench
includedwithyourmarker.TheVelocityAdjustment
Screw(#51inPartsDiagramandshowninFigure3)
islocatedonleftsidereceiver.Toreducethevelocity,
turnthescrewinwardorclockwise.Toincreasethe
velocity,turnthescrewcounterclockwise.Donot
removethevelocityscrew.
Unloading Your Marker
1. Eyeprotectiondesignedforpaintballusemustbewornbytheuserandanyperson
withinrange.
2. Installthebarrelsleeve(seepage4)andputtheTriggerSafetyintheSafeposition
(seepage6).
3. EmptyandremovetheHopper.
4. Gotoadesignatedringarea,removetheBarrelSleeve,andputtheTriggerSafetyin
theFireposition.
5. Pointyourmarkerinasafedirectionandreseveraltimestobesurethereareno
remainingpaintballslodgedinthechamberorbarrel.IMPORTANT:Donotuncockyour
markerasuncockingyourmarkermaypushaballintothechamberordownintothe
barrel,makingithiddenfromview.
6. ReturntheTriggerSafetytotheSafeposition(seepage6)andreinstalltheBarrel
Sleeve(seepage4).
7. Visuallyinspectthechamberforpaintballs.
8. ReadthefollowingAir/CO2 Cylinder WarningsandSafety Tipsonpage10before
removingtheair/CO2cylinderfromyourmarker.
Figure 3: Velocity Adjustment Screw
Location

10
E
N
G
L
I
S
H
Air/CO2 Cylinder Warnings
Refer to Figure 4. There have been reported incidents
caused by players unknowingly unscrewing the cylinder
(2) from the cylinder valve (1). This occurs when the player
thinks the entire valve-cylinder assembly is being unscrewed
from the air supply adaptor (ASA) of the paintball marker,
when in fact they are unscrewing the cylinder from the
cylinder valve.
To avoid this danger, it is recommended (if your cylinder is
not already marked) that you use paint or nail polish to place
a mark (3) on the cylinder valve, and place another mark (4)
on the cylinder, in line with the #3 mark as shown.
Whenever you turn the cylinder during removal, watch the
marks on the cylinder and the cylinder valve to be sure
that they rotate together. If at any time these marks start
to separate as shown in Figure 5, the cylinder is starting
to unscrew from the cylinder valve and you must STOP
and take the entire unit to a “C5” certied airsmith for safe
removal and/or repair.
NOTE: The cylinder valve should unscrew from the paintball
marker in about 3 or 4 full turns. If you nish the 4th full turn
and the cylinder valve is not unscrewed from the paintball
marker, STOP! Take the entire unit to a “C5” certied
airsmith for safe removal and/or repair.
Locate a “C5” Certied Airsmith at www.paintball-pti.com/search.asp.
Whether you have a new or used rellable air/CO2 cylinder, you are at risk if any of the
following has occurred:
• The valve unit was replaced or altered after purchase.
• An anti-siphon device was installed.
• The valve unit was removed from the cylinder for any reason.
• Any modication was done to the rellable air/CO2 cylinder.
If any of these conditions has occurred, take your air/CO2 cylinder to a “C5” Certied Airsmith
for inspection or contact the cylinder manufacturer.
Air/CO2 Cylinder Safety Tips
SAFETY TIPS to ensure that your air or CO2 cylinder is safe for play:
• Improper use, lling, storage, or disposal of air/CO2 cylinder may result in property
damage, serious personal injury or death.
• Make sure that any maintenance or modication to any air/CO2 cylinder is done by
a qualied professional, such as a “C5” certied airsmith.
• The use of anti-siphon devices is not recommended. However, if one is already
installed on your air/CO2 cylinder, or such device is desired, it is critical that your
cylinder be checked by a qualied professional, and you have the device installed
by a qualied professional.
Figure 4: Properly marked
Valve and Cylinder
12
34
Figure 5: Misaligned Valve and
Cylinder
3
4
WARNING
The brass or nickel plated cylinder valve (Figure 4, #1) is intended to be
permanently attached to the air/CO2 cylinder (2).
An air/CO2 cylinder can y off with enough force to cause serious injury
or death if the cylinder (2) unscrews from the cylinder valve (1).

11
E
N
G
L
I
S
H
• All air/CO2 cylinders must be lled only by properly trained personnel.
• Cylinder valves must be installed only by properly trained personnel.
• Do not overll a cylinder! Never exceed the air/CO2 cylinder’s capacity.
• Do not expose pressurized air/CO2 cylinder to temperatures exceeding 130
degrees Fahrenheit (55 degrees Celsius).
• Do not use caustic cleaners or strippers on the air/CO2 cylinder or cylinder valve,
and do not expose them to corrosive materials.
• Do not modify the air/CO2 cylinder in any way. Never try to disassemble the
cylinder valve from the air/CO2 cylinder.
• Any air/CO2 cylinder that has been exposed to re, or heated to a temperature
of 250 degrees Fahrenheit (121 degrees Celsius) or more must be destroyed by
properly trained personnel.
• Use appropriate gas for your cylinder. Only use CO2 in a CO2 cylinder, and only
use compressed air in a compressed air cylinder.
• Keep all cylinders out of the reach of children.
• The air/CO2 cylinder should be inspected and hydrostatically retested at least
every 5 years by a DOT licensed agency.
• Keep exposed skin away from escaping gas when installing or removing the air/
CO2 cylinder, or if the marker or cylinder is leaking. Compressed air and CO2
gasses are very cold, and can cause frostbite under certain conditions.
NOTE: Locate a “C5” certied airsmith at www.paintball-pti.com/search.asp.
Air/CO2 Cylinder Removal
1. Read Air/CO2 Cylinder Warnings and Air/CO2 Cylinder Safety Tips on page 10
before beginning the cylinder removal process.
2. Eye protection designed for paintball use must be worn by the user and any person
within range.
3. Follow the Unloading Your Marker instructions on page 9.
4. Watch the marks on the cylinder and cylinder valve (as shown in Figure 4) as you turn
the cylinder approximately ¾ turn counterclockwise. This allows the air/CO2 cylinder’s
pin valve to close so that no gas enters the marker.
5. Remove the Barrel Sleeve. Set the Trigger Safety to the Fire position. Point the marker
in a safe direction, and discharge the remaining gas in the marker by repeatedly
pulling the trigger until the marker stops ring (this may take 4-5 shots). If your marker
continues to re, the cylinder’s pin valve has not closed yet (the cylinder pin valve
could be longer than usual. Because of the variances in cylinder pin valve parts,
each cylinder varies slightly on exactly how far it has to be turned). Turn the cylinder
counterclockwise a little further and repeat this step until the marker does not re. Only
then remove the air/CO2 cylinder.
NOTE: If during this step, you turned the air/CO2 cylinder and it began to leak before
you pulled the trigger, the cylinder’s O-ring should be checked for damage before any
re-assembly (see Repairing Air/CO2 Cylinder Leaks on page 12).
6. After the air/CO2 cylinder is removed, again point and re the marker in a safe
direction to verify the marker is completely discharged of gas.
7. Move the Trigger Safety to the Safe position (see page 6) and install the Barrel Sleeve
see page 4).

12
E
N
G
L
I
S
H
Repairing Air/CO2 Cylinder Leaks
The most common leak occurs from a bad air/CO2 cylinder valve O-ring. To replace a valve
O-ring you must rst remove the bad O-ring and then install a new one. This O-ring is located
on the tip of your air/CO2 cylinder valve. The best valve O-rings are made of urethane.
Urethane O-rings are not affected by high air/CO2 pressures. These may be purchased from
Tippmann® or your local paintball dealer.
NOTE: If a new air/CO2 cylinder valve O-ring does not resolve a leak, do not attempt to
repair the air/CO2 cylinder. Contact Tippmann Sports, LLC, your local paintball dealer, or a
“C5” Certied Airsmith.
Cleaning and Maintenance
• Eye protection must be worn by the user.
• To reduce the chance of an accidental discharge, follow the Unloading Your
Marker on page 9 and Air/CO2 Cylinder Removal instructions on page 11.
• Do not disassemble a marker while it is pressurized with air.
• Do not pressurize a partially assembled marker.
• Follow warnings listed on the air/CO2 cylinder for handling and storage.
• Familiarize yourself with instructions listed on air/CO2 cylinder.
• Contact the air/CO2 cylinder manufacturer with any questions.
• Do not use any petroleum based cleaning solvents.
• Do not use any cleaning solvents that come in aerosol cans.
NOTE: Petroleum based products and aerosol products can damage your marker’s
O-rings.
To clean your paintball marker exterior, use a damp towel to wipe off paint, oil, and debris.
To clean inside the barrel:
1. Remove the Hopper.
2. Completely loosen the Feed Elbow Thumb Nut (10) from the Receiver and remove the
Feed Elbow (9) from the marker.
3. Insert the tab of the cleaning squeegee into the Feed Elbow opening to the barrel and
push the squeegee into the barrel until the tab is accessible at the muzzle end of the
barrel.
4. Pull the squeegee through the barrel to remove debris.
5. Repeat if necessary.
6. Replace the Feed Elbow back onto the marker.
7. Tighten the Feed Elbow Thumb Nut to secure the Feed Elbow to the marker and
reinstall the Hopper.
To maintain your marker in good working condition, inspect, clean, and replace any damaged
parts. Lubricate as instructed in the Marker Disassembly and Assembly section starting
on page 13. The best valve O-rings are made of urethane. Urethane O-rings are not affected
by high gas pressures. These may be purchased from Tippmann® or your local paintball
dealer. Use Tippmann® oil to lightly lubricate the O-rings, springs, and other areas indicated
in the Marker Disassembly and Assembly instructions. This maintains your marker in
good working condition.

13
E
N
G
L
I
S
H
Storage
Put the Trigger Safety in the Safe position (see page 6). Unload the marker (see page 9) and
remove the air/CO2 cylinder (see page 11). Put the bolt in the forward (uncocked) position
(see step 2.b. on page 8). Clean and oil the marker so that it does not rust. Install the Barrel
Sleeve (see page 4), and store your marker in a dry area.
When removing your marker out of storage, make sure the Trigger Safety is in the Safe
position and the Barrel Sleeve is installed. You should re-oil the rear bolt O-ring and the front
bolt O-ring before use.
Marker Disassembly and Assembly
Always wear eye protection when performing any marker disassembly or re-assembly.
Refer to the Schematic Diagram on pages 16-17 for these instructions (item numbers are in
parentheses). Disassembly instructions are listed here. To re-assemble, just do the steps in
the reverse order.
1. Pull the Bolt Handle back (see Figure 2 on page 8) and keep holding onto it. Then pull
the Trigger and allow the Bolt Handle to move slowly forward. This uncocks the marker.
2. To remove the Barrel (54), simply unscrew the Barrel from the Receiver, and to
reinstall it, just turn it clockwise to thread it into the Receiver.
3. To remove the Left Grip (22) or the Right Grip (18), remove two Screws (14) from
each grip. Reassemble by using the Screws to fasten the Grips to the Receiver.
4. To remove the Feed Elbow (9) from the receiver, unscrew
the Thumbnut (10) from the right side of the receiver. The
C-Clip (16) keeps the Thumbnut from coming loose from
the Feed Elbow. The Feed Elbow hinges downward and the
bottom tabs come out of the slots in the Right Receiver Half
(1). The Screw (11), Flat Washer (17) and Nut (12) are
used to hold the Hopper in the Feed Elbow. Replace only if
necessary. Do all reassembly in the reverse order.
5. Lay the marker with the right side on the workbench. Use the included allen wrench to
turn the Velocity Screw (51) all the way in. Separate the Receiver Halves (1 and
2) by rst removing three (longer) Screws (25), and then four (shorter) Screws (26)
and nally one Bolt (19). Retain eight Nuts (15) for these fasteners from the Right
Receiver Half. Carefully lift the Left-Receiver Half to access the internal parts.
6. If the Ball Latch (8) needs to be replaced, pry the old one
out of the Right Receiver Half. Put the new Ball Latch into the
Right Receiver Half, oriented as shown in Figure 7 (circled
item).
7. Remove the Screw (23) from the ASA (29). Slide the ASA
from the pin in the Right Receiver Half. Be sure to keep track
of the Nut (30). If necessary, you can unthread the ASA
from the Gas Line (21). Use teon tape on threads for
assembly.
NOTE: Do not remove the gas line tting unless it is
leaking or you need to replace the valve. If you do remove
it, you will need some teon tape or paste to reinstall it. Carefully hand start all
threaded parts. Do not overtighten threaded parts when assembling. To fully remove
the Gas Line, unscrew it from the Valve Body (43).
Figure 6: The Feed Elbow.
16
10
9
11
17
12
Figure 7: Ball Latch properly
installed into the
right receiver half.

14
E
N
G
L
I
S
H
The Valve
Disassembly instructions:
1. Remove the End Cap Cover (56), and then remove the End Cap (57).
2. Remove the Guide Pin (33) and Drive Spring (32). These parts must be removed
before the Rear Bolt Handle can be removed.
3. Disconnect the Linkage Arm (36) from the Rear (35) and Front (49) Bolts.
4. Slide the Front Bolt off the Power Tube (48) and check the O-ring. Clean and oil the
O-ring, or if damaged, replace with a new one. Do the same with the Rear Bolt O-ring.
5. Remove the Rear Bolt Handle (53) from the Rear Bolt Plug (52).
6. If it is necessary to remove the Valve, unscrew the two Valve Lock Bolts (13) from
the right side of the Receiver. Use a wrench to slowly unscrew the Gas Line (21)
tting from the Valve. Once the tting is removed, the Valve (43) slides out the back
of the Power Tube. Be sure to set the parts on the workbench. Inspect and clean the
exterior of all assemblies.
NOTE: Check the external Valve O-ring (58) and if damaged, replace with a new
one. If the O-ring is damaged, your marker will not function correctly.
7. Inspect and lubricate these internal drive assembly parts:
• Front Bolt O-ring (34)
• Rear Bolt O-ring (58, see Figure 8)
• Linkage Arm (36)
• Drive Spring (32) and Guide Pin (33)
8. Inspect and lubricate the Barrel O-ring (38) and the air/CO2 cylinder valve O-ring
with a few drops of oil.
Reassembly:
1. Reinstall the Valve into the Power Tube. Insert the cleaned and oiled Valve into the
Power Tube and align the holes of the Valve and Power Tube. Apply teon tape or
thread paste on threads of the Gas Line tting and carefully screw it into the Valve.
Snug with a wrench (do not over tighten and strip threaded parts). Wipe off any excess
paste.
2. Reinstall the Power Tube/Valve into the Receiver. Align the holes of the Power Tube
to those of the Right Receiver Half. Apply red Loctite ™ #271 sealant to threads of two
Valve Lock Bolts (13) and tighten - do not over-tighten bolts as you could strip the
threads.
Figure 8: The Rear Bolt Assembly.
53
35
52
32
33
37
58

15
E
N
G
L
I
S
H
The Trigger
Disassembly instructions:
1. Remove the Trigger (59) assembly from the
receiver. Be sure to retain the trigger return
Spring (61, located in front of the Trigger,
and not shown in Figure 9, but is shown in
the Schematic Diagram).
2. To remove the Trigger Return Slide (60)
and the Spring (61), you must rst remove
the upper Return Slide Dowel Pin (20)
from the Trigger assembly.
3. When re-assembling the Trigger and Sear,
make sure the black Sear Dowel Pin (4)
is in the location shown (see arrow in Figure
10). The black pin is hardened, and it is
critical that it is located in this position.
Figure 9: The Trigger is pulled from the
right receiver half.
20
59 61
60
Figure 10: The black pin is hardened
and must be installed in the
position as shown.

16
E
N
G
L
I
S
H
Tango One

17
E
N
G
L
I
S
H
Schematic Diagram

18
E
N
G
L
I
S
H
Tango One Parts List
ITEM
NO. QTY. PT. NO. DESCRIPTION
1 1 TA06053 Right Receiver Half
2 1 TA06052 Left Receiver Half
3 4 98-33 Receiver Dowel Pin
4 1 CA-36 Sear Dowel Pin (Black)
5 1 02-35 Sear
6 1 TA02036 Sear Spring
7 2 TA02021 ACT Linkage Arm Guide
Pin
8 1 FA-18 Ball Latch
9 1 TA06051 Feed Elbow
10 1 TA06059 Feed Elbow Thumb Nut
11 1 PL-42C Screw, ¼-20 x 1” SHCS
12 1 PL-42D Nut, ¼-20 Square
(Black)
13 2 98-26 Screw, 10-32 x ¼”
BHCS
14 4 CA-02A Screw, 6-32 x ⅜” BHCS
15 8 9-PA Nut, Hex 10-32 (Black)
16 1 TA06047 Lock Screw C-Clip
17 1 98-45 Flat Washer M6 (Black)
18 1 TA05004 Split Grip, Right
19 1 98-01A Bolt, 10-32 x 0.675”
20 2 98-19 Return Slide Dowel Pin
21 1 98-09C Gas Line, #4 x 7⅞ ”
22 1 TA06003 Split Grip, Left
23 1 TA06048 Screw, 10-32 x 1.1875”
BHCS
24 1 TA06064 TPN Jewel
25 3 TA06015 Screw, 10-32 x 0.840”
LHSHCS
26 4 TA09919 Screw, 10-32 x 0.500”
LHSHCS
29 1 TA06049 Air Supply Adapter
(ASA)
30 1 CA-08B Nut, 10-32
31 1 TA06063 TANGO ONE
Nameplate
Tango One Parts List
ITEM
NO. QTY. PT. NO. DESCRIPTION
32 1 CA-14 Drive Spring
33 1 CA-15 Guide Pin
34 1 SL2-4 O-ring, Front Bolt
35 1 TA02011 Rear Bolt
36 1 TA01016 Linkage Arm
37 1 98-57 O-ring, End Cap
38 1 98-40 O-ring, Barrel
39 1 CA-27 Front Valve Seat
40 1 PA-28 Valve Stem Cup Seal
41 1 CA-29 Valve Stem Cup
42 2 SL2-25 O-ring, Valve Seat
43 1 98-25N Valve Body
44 1 98-56 Valve Plug
45 1 CA-30N Valve Stem
46 1 98-32 Compression Spring
47 1 PA-31A Snap Ring
48 1 98-21NR Power Tube
49 1 02-17 Front Bolt
50 1 TA05021 Power Tube Plug
51 1 02-22 Velocity Set Screw
52 1 TA05005 Rear Bolt Plug
53 1 98-13 Rear Bolt Handle
54 1 TA06046 Barrel
55 1 TA06060 O-ring, Barrel Sleeve
56 1 TA06017 End Cap Cover
57 1 TA06006 End Cap
58 2 98-12A O-ring, Valve/Rear Bolt
59 1 98-36A Trigger
60 1 98-18 Trigger Return Slide
61 2 98-20 Spring
62 1 98-37N Safety Pin
63 1 98-55 O-ring, Safety (Red)
64 1 FA-07 O-ring, Safety (Black)

19
E
N
G
L
I
S
H
General Troubleshooting
• Issue — Marker range is too short.
Cause — Not enough gas is entering the system.
Solution — Check velocity with a chronograph. Turn Velocity Adjuster to increase
velocity, and recheck with a chronograph.
• Issue — Marker range is too long.
Cause — Too much gas is entering the system.
Solution — Check velocity with a chronograph. Turn Velocity Adjuster to decrease
velocity, and recheck with a chronograph.
• Issue — Gas leak around cylinder to receiver connection.
Cause — Worn out or damaged air/CO2 cylinder O-ring.
Solution — Replace air/CO2 cylinder O-ring.
• Issue — Minor gas leak.
Cause — Worn or damaged valve seat O-rings.
Solution — Replace valve seat O-ring or return valve if it is defective.
• Issue — Paintballs fall out of the barrel.
Cause — Worn or broken Ball Latch (8).
Solution — Replace the Ball Latch.
Specications
Model .............................................................................................TIPPMANN® Carver One™
Caliber ................................................................................................................................ .68
Action ............................................................................Semi-Automatic (open bolt blow-back)
Power ...................................................................................................................... Pneumatic
Gas Supply ........................................................... Compressed Air, Nitrogen, or CO2 cylinder
Hopper Capacity .................................................................................................188 Paintballs
Ball Feed .................................................................................................Gravity Feed System
Firing Rate ........................................................................................... 8 paintballs per second
Trigger .................................................................................................................... Mechanical
Standard Barrel Length ...................................................................................... 8.5” / 21.6 cm
Length (with standard barrel, no cylinder) ...................................................... 18.75” / 47.6 cm
Effective Range ............................................................................... 150+ feet / 45.72+ meters
Weight (without cylinder) ..........................................................................3.245 lbs / 1.472 kg
Finish ......................................................Powder Coated Receiver and ASA, Anodized Barrel
Velocity — Always measure your marker’s velocity before playing paintball and never shoot
at velocities in excess of 300 feet / 91.44 meters per second (see Velocity Adjustment
instructions).

20
E
N
G
L
I
S
H
Warranty and Repair Information
TIPPMANN SPORTS, LLC (“Tippmann”) is dedicated to quality paintball products and
outstanding service. In the unlikely event of a problem with this Tippmann paintball marker
(“Marker”) and/or Tippmann accessories (“Accessories”), Tippmann’s customer service
personnel are available to assist you. For customer service and/or other information, please
contact:
Tippmann Sports, LLC
2955 Adams Center Road
Fort Wayne, IN 46803
www.tippmann.com
1-800-533-4831
Warranty Registration
To activate the Marker’s Limited Warranty, you must register the Marker within thirty (30)
days of the date of original retail sale by registering online at www.tippmann.com.
The Limited Warranty for Tippmann Accessories does not require activation or registration;
by registering the Marker, you activate the warranty for the Accessories.
Limited Warranty
Tippmann warrants to the original purchaser that it will make any repairs or replacements
necessary to correct defects in material or workmanship, at no charge to you, for the Marker
for a period of one (1) year from the date of original retail sale. Further, Tippmann warrants
to the original purchaser that it will make any repairs or replacements necessary to correct
defects in material or workmanship, at no charge to you, for Tippmann Accessories for a
period of ninety (90) days from the date of original retail sale. All Tippmann asks is that you
properly maintain and care for the Marker and Accessories (collectively, the “Product”) and
that you have warranty repairs performed by Tippmann or a Tippmann Certied Tech Center.
This Limited Warranty is non-transferable, and it does not cover damage or defects to the
Product caused by (a) improper maintenance; (b) alteration or modication; (c) unauthorized
repair; (d) accident; (e) abuse or misuse; (f) neglect or negligence; and/or (g) normal wear
and tear.
Tippmann does not authorize any person or representative to assume or grant any other
warranty obligation with the sale of this Product.
THIS IS THE ONLY EXPRESS WARRANTY GIVEN WITH THE PURCHASE OF THIS
PRODUCT; ANY AND ALL OTHER EXPRESS WARRANTIES ARE DISCLAIMED. THE
IMPLIED WARRANTIES OF MERCHANTABILITY AND FITNESS FOR A PARTICULAR
PURPOSE ARE LIMITED TO THE APPLICABLE LIMITED WARRANTY PERIOD SET
FORTH HEREIN, AND NO WARRANTIES, WHETHER EXPRESS OR IMPLIED, SHALL
APPLY AFTER EXPIRATION OF SUCH PERIOD.
Some states and nations do not allow limitations on the duration of implied warranties, so the
above limitation may not apply to you.
Other manuals for TANGO ONE
2
Table of contents
Languages:
Other Tippmann Fitness Equipment manuals
Popular Fitness Equipment manuals by other brands

Stamina
Stamina AeroPilates Performer 296 owner's manual

BH FITNESS
BH FITNESS G840 Instructions for assembly and use

Soozier
Soozier A91-195 Assembly & instruction manual

SportsArt Fitness
SportsArt Fitness S933 owner's manual

NordicTrack
NordicTrack FS10i user manual

body Power
body Power BUB350 owner's manual