Kerbl Taon-X User manual

Taon-X
# 323510
DE Betriebsanleitung
FR Manuel technique
EN Operation Manual
IT Istruzioni per l’uso
ES Instrucciones de uso
NL Gebruikershandleiding
SV Bruksanvisning
PL Instrukcja obsługi
SK Návod na obsluhu
CS Návod k obsluze dojícího

2
DE Pferdefliegenfalle TAON-X
Aufbau- und Gebrauchsanweisung
Vor Gebrauch bitte sorgfältig lesen!
Der Inhalt dieser Gebrauchsanweisung entspricht den neuesten Erkenntnissen und unterliegt ständiger Überarbeitung.
Änderungen der Konstruktion und/oder Konfiguration dieses Produkts sind ausdrücklich vorbehalten und gewähren
keinen Anspruch auf nachträgliche Anpassung früher in Verkehr gebrachter Versionen dieses Produkts.
A) Lesen Sie diese Anweisung sorgfältig vor Aufstellung und Gebrauch der TAON-X:
Wir gratulieren Ihnen zum Erwerb dieser hochwertigen Pferdefliegenfalle. Bevor Sie die TAON-X in Gebrauch nehmen,
lesen Sie diese Gebrauchsanweisung sorgfältig. Bei Fragen wenden Sie sich bitte an Ihren örtlichen Lieferanten. Der
Inhalt dieser Anweisung entspricht den neuesten Erkenntnissen und wird ständig aktualisiert. Änderungen der
Konstruktion und/oder Konfiguration dieses Produktes sind ausdrücklich vorbehalten und gewähren keinen Anspruch auf
nachträgliche Anpassung früher in Verkehr gebrachter Versionen dieses Produkts. Bewahren Sie diese Gebrauchs-
anweisung für den späteren/weiteren Gebrauch auf.
B) Lieferung und Empfang der TAON-X:
Achten Sie während des Auspackens auf Transportbeschädigungen jeglicher Art und teilen sie diese detailliert sowohl
dem Zulieferer, als auch Ihrem Lieferanten innerhalb von 8 Tagen schriftlich mit. Bewahren Sie bitte sowohl das Produkt,
als auch das Verpackungsmaterial für eine mögliche Begutachtung auf. Überprüfen Sie die Vollständigkeit der von Ihnen
gekauften Ware. Entfernen Sie sämtliche Verpackung, vor Ingebrauchnahme dieses Produkts.
C) Aufbau der TAON-X:
Die TAON-X sollte in unmittelbarer Nähe der Ruhe- und/oder Fütterungsplätze der Tiere auf Sand aufgestellt, oder an
einer Wand oder einem Pfahl befestigt werden. Achten Sie bei der Aufstellung darauf, dass es keinem Tier gelingen kann,
die Kunststoffhülle anzuknabbern. Nötigenfalls schützen Sie die TAON-X mittels einer Einzäunung. Die nachfolgenden
Nummern entsprechen denen in dieser Gebrauchsanweisung abgebildeten Explosionszeichnung.
D) Erforderliches Montagematerial
• Hammer
• Einstellbarer Schlüssel
E) Aufbau:
1.1. Markieren Sie den Punkt am Boden, an den Sie die Anlage stellen möchten.
1.2. Stecken Sie den metallbasierten Rohrstecker (28) in das Basisrohr und hämmern Sie das Basisrohr (1) fest in den
Boden. Siehe Abbildung 2.
1.3. Sobald das Basisrohr (1) fest in den Boden montiert ist, entfernen Sie den Basisrohrstecker (29) aus dem Rohr.
Bewahren Sie dieses Teil auf, da es für zukünftige (Neu-)installationen wieder benötigt wird.
1.4. Montieren Sie das Basisverbindungsrohr (2) mit dem Langbolzen (25) und der Mutter für den Langbolzen (26)
auf das Basisrohr (1), wobei die Unterlegscheibe (27) dazwischen liegt. Siehe Abbildung 1.
1.5. Positionieren Sie nun den Winkel zwischen dem Basisverbindungsrohr (2) und dem Mittelrohr (5), indem Sie
sicherstellen, dass die „L“-Markierung an der unteren gebeugten Aufhängung (3) sich gegenüber der
„L“-Markierung an der unteren geraden Aufhängung (4) befindet. Siehe Abbildung 4.
1.6 Verwenden Sie nun die Schlossschraube (22), Unterlegscheibe (24) und Mutter (23), um diese Aufhängungen
zu befestigen.
1.7. Positionieren Sie die „M“-Markierung der mittleren gebeugten Aufhängung (6) gegen die „M“-Markierung
der mittleren geraden Aufhängung (7). Siehe auch Abbildung 4.
1.8 Verwenden Sie nun die Schlossschraube (22), Unterlegscheibe (24) und Mutter (23), um diese Aufhängungen
zu befestigen.
1.9. Positionieren Sie die „T“-Markierung der oberen gebeugten Aufhängung (9) gegen die „T“-Markierung der
oberen geraden Aufhängung (10). Siehe auch Abbildung 4.

3
1.10. Verwenden Sie nun die Schlossschraube (22), Unterlegscheibe (24) und Mutter (23), um diese Aufhängungen
zu befestigen.
1.11. Stellen Sie sicher, dass die Klammer (11) und der Stabilisierungsring (12) sicher mit den 4 M8-Schrauben
verbunden sind.
1.12. Blasen Sie den Ball (20) mit einem Druckluftgerät, einer Pumpe für eine Luftmatratze auf oder verwenden Sie
die beigefügte Pumpe. Der Durchmesser des Balls muss ca. 60 cm betragen. Stecken Sie nach Aufblasen des
Balls den weißen Plastikstecker ein.
1.13. Setzen Sie den Trichter (17) mit dem Hakenband (15) auf den Metallhalter (14).
1.14. Heben Sie den Trichter (17) an und montieren Sie den Ball (20) mit dem Kugelhaken (16) auf den Metallhalter (14).
1.15. Stecken Sie eine Seite des Rohrsteckers (19) in das Verstärkungsrohr (18), siehe Abb. 3.
1.16. Stecken Sie das Verstärkungsrohr (18) mit dem Rohrstecker (19) in die Öffnung am unteren Ende des Trichters (17).
Falls erforderlich, vereinfacht die Verwendung von Seife zum Schmieren des Rohrs dieses Verfahren. Verbinden
Sie das andere Ende des Verstärkungsrohrs mit dem nächsten Rohrstecker, um die drei Verstärkungsrohre und
Rohrstecker in einen runden Ring zu formen.
1.17. Setzen Sie die Aufnahmewanne (21) mit geschlossenem Deckel in den Halter (14)
Die Bremsenfalle ist nun zur Verwendung bereit.
F) Regelmäßige Pflege und Wartung:
• Das Sammelgefäß der Fliegenfalle muss regelmäßig überprüft und entleert werden. Falls erforderlich, muss Seifenwasser
nachgefüllt werden.
• Stellen Sie sicher, dass der Ball ständig aufgeblasen ist.
• Sturm und starke Winde beeinussen die Stabilität der TAON-X. Überprüfen Sie diese regelmäßig und im Bedarfsfall.
• Der Verschlussstöpsel des Balles kann leicht mittels des beigefügten Werkzeugs herausgenommen werden
G) Besondere Produktmerkmale:
• Galvanisierte, korrosionsgeschützte Konstruktion.
• Witterungsbeständig.
• Verringert den Pferdeiegenbestand erheblich.
• Leichter Aufbau durch integrierten Erdbohrer.
• Umweltfreundlich, ohne Insektizide.
• Leichte Handhabung durch ergonomisches Design.
• Wirkungsvolle und einfache Eindämmung der Pferdeiege.
• 2 Jahre Garantie auf mechanische Teile.
H) Technische Merkmale:
Abmessungen: Mittlerer Durchmesser: 1,20m, Höhe ab Boden: 2,20m
Erdbohrer: Integriert in der Basisröhre
Farben: Schwarz (Ball) & weiß (Kunststofftrichter)
Material: Feuerverzinkter Rohrrahmen, Wandung: 2.0mm
Gewicht: ca. 13kg
Zubehör: Luftpumpe, 0,25” Sechskantdreher

4
Abbildung 1: Einzeldarstellung
Teilenummer Teilename Menge
1 Basisrohr 1
2 Basisverbindungsrohr 1
3 Untere gebeugte Aufhängung 1
4 Untere gerade Aufhängung 1
5 Mittelrohr 1
6 Mittlere gebeugte Aufhängung 1
7 Mittlere gerade Aufhängung 1
8 Oberes Rohr 1
9 Obere gebeugte Aufhängung 1
10 Obere gerade Aufhängung 1
11 Halterung 1
12 Stabilisierungsring 1
13 M8-Schraube 4
14 Halter 1
15 Hakenband 1
16 Kugelhaken 1
17 Trichter 1
18 Verstärkungsrohr 3
19 Rohrstecker 3
20 Ball 1
21 Aufnahmewanne 1
22 Schlossschraube 3
23 Mutter für Schlossschraube 3
24 Unterlegscheibe für Schlossschraube 3
25 Langbolzen 1
26 Mutter für Langbolzen 1
27 Federring 1
28 Basisrohrstecker 1
Abbildung 2: Das Basisrohr in den Boden hämmern
Abbildung 3: Montage des Rohrsteckers an das Verstärkungsrohr
18
19

5
FR Piège à taon TAON-X
Guide d’installation et d’utilisation
À lire attentivement avant toute utilisation !
Le contenu de cette notice représente les plus récentes découvertes et fait l’objet de révisions constantes. Toute
modification de la construction et/ou configuration de ce produit est explicitement proscrite, aucune réclamation
d’adaptation ultérieure à une quelconque version de ce produit commercialisée précédemment n’étant garantie.
A) Lisez attentivement cette notice avant montage et utilisation du TAON-X :
Nous vous remercions d’avoir acheté ce piège à taon haut-de-gamme. Avant d’utiliser TAON-X, lisez attentivement cette
notice. En cas d’interrogation, adressez-vous à votre distributeur local. Le contenu de cette notice représente les plus
récentes découvertes et fait l’objet de mises à jour constantes. Toute modification de la construction et/ou configuration
de ce produit est explicitement proscrite, aucune réclamation d’adaptation ultérieure à une quelconque version de ce
produit commercialisée précédemment n’étant garantie. Conservez cette notice pour usage ultérieur/continu.
B) Livraison et réceptionnement du TAON-X :
Durant le retrait du conditionnement, vérifiez l’absence de dommages de toute sorte dus au transport. En cas de
dommage, veuillez le signaler par écrit au livreur comme au distributeur sous 8 jours. Conservez aussi bien le produit
que son conditionnement pour une éventuelle expertise. Inspectez l’intégrité du produit que vous avez acheté. Éliminez
tout objet de conditionnement avant toute mise en marche de ce produit.
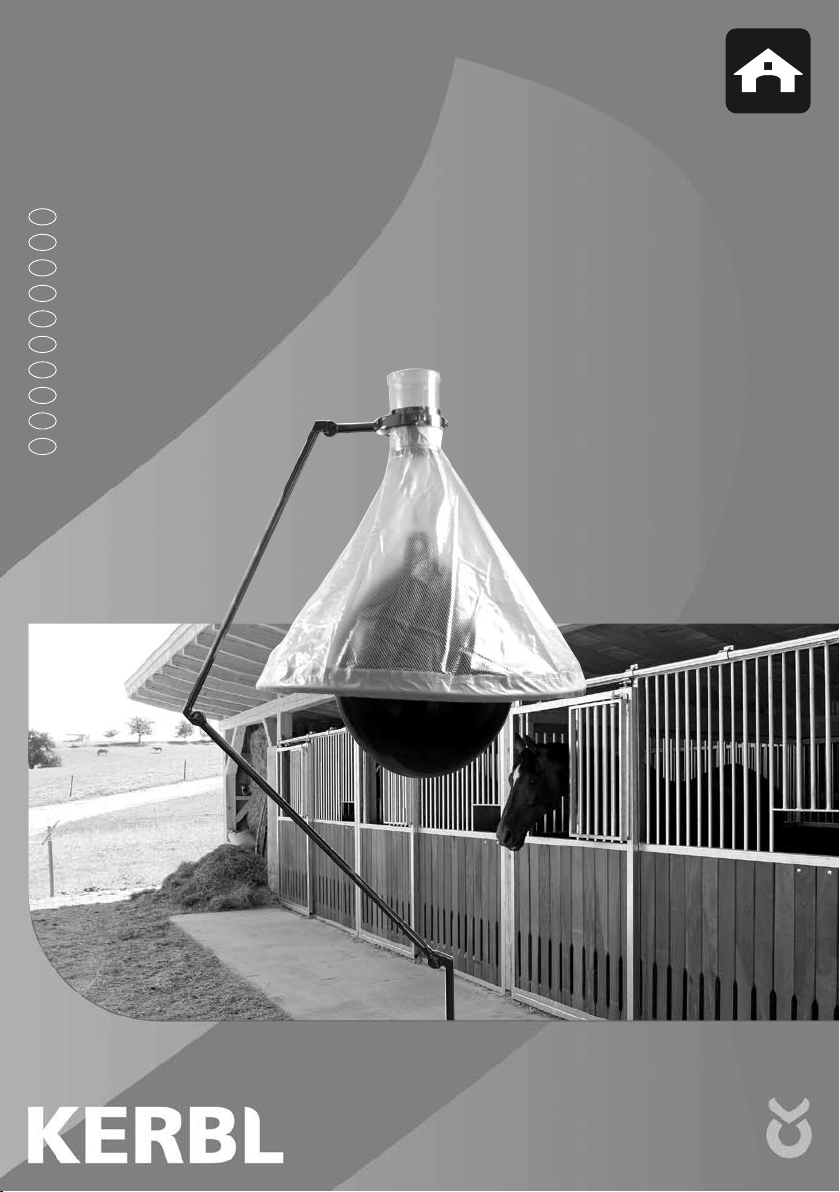
C) Montage du TAON-X :
TAON-X doit être placé sur sable, contre un mur ou sur pieu, à proximité immédiate des places de repos et/ou
alimentation des animaux. Durant le montage, veillez à qu’aucun animal ne puisse grignoter la coquille en plastique.
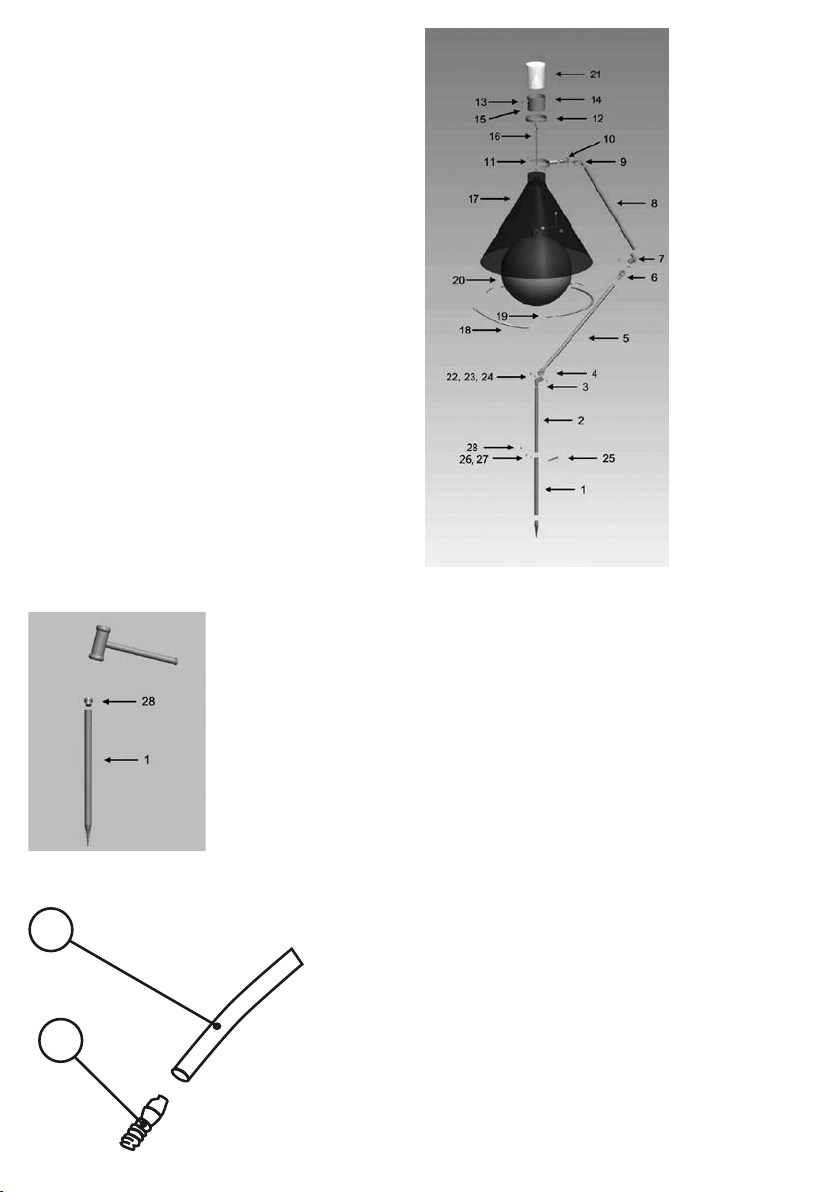
Au besoin, clôturez TAON-X. Les numéros suivants correspondent à ceux du schéma éclaté au dos de cette notice.
D) Matériaux de montage nécessaires
• Marteau
• Clé ajustable
E) Montage :
1.1. Marquez l‘emplacement dans le sol où vous souhaitez placer l‘unité.
1.2. Placez le bouchon du conduit de base en métal (28) dans le conduit de base, et utilisez le marteau pour fixer le
conduit de base (1) fermement dans le sol. Voir la Figure 2.
1.3. Une fois que le conduit de base (1) est fermement fixé au sol, retirez le bouchon du conduit de base (28) du
conduit. Rangez cette pièce car elle sera nécessaire pour une future (ré-)installation.
1.4. Installez le raccord du conduit de base (2) dans le conduit de base (1) en utilisant le boulon long (25), l‘écrou du
boulon long (26) avec la rondelle (27) placée entre les deux. Voir la Figure 1.
1.5. Positionnez ensuite l‘angle entre le raccord du conduit de base (2) et le conduit central (5) en vous assurant que
le repère « L » sur la charnière de flexion inférieure (3) est à l‘opposé du repère « L » sur la charnière droite
inférieure (4). Voir la Figure 4.
1.6. Utilisez ensuite le boulon mécanique (22), une rondelle (24) et un écrou (23) pour fixer ces charnières.
1.7. Positionnez le repère « M » de la charnière de flexion centrale (6) contre le repère « M » de la charnière droite
centrale (7). Voir également Figure 4.
1.8. Utilisez ensuite le boulon mécanique (22), une rondelle (24) et un écrou (23) pour fixer ces charnières.
1.9. Positionnez le repère « T » de la charnière de flexion supérieure (9) contre le repère « T » de la charnière droite
supérieure (10). Voir également Figure 4.
1.10. Utilisez ensuite le boulon mécanique (22), une rondelle (24) et un écrou (23) pour fixer ces charnières.
1.11. Assurez-vous que la bride (11) et l’anneau stabilisateur (12) soient solidement fixés aux 4 vis M8.
1.12. Gonfler la balle (20) en utilisant une unité pneumatique, une pompe pour matelas pneumatique, ou utilisez la
pompe fournie. Le diamètre de la balle doit être d‘environ 60 cm. Placez le bouchon de plastique blanc après
avoir gonflé la balle.

6
1.13. Placez l‘entonnoir (17) sur le support métallique (14) au moyen de la bande/crochet (15)
1.14. Soulevez l‘entonnoir (17) et installez la balle (20) sur le support métallique (14) en utilisant le crochet de la
balle (16)
1.15. Placez un côté du raccord de conduite (19) sur le conduit d‘armature (18), voir la Figure 3.
1.16. Placez le conduit d‘armature (18) avec le raccord de conduite (19) dans l‘ouverture sur l‘embout inférieur
de l‘entonnoir (17). Si besoin, utilisez du savon pour faciliter le processus d‘emboîtement du raccord.
Raccordez l‘autre embout du conduit d‘armature au raccord de conduite suivant, de manière à ce que trois
conduits d‘armature et les trois raccords de conduite forment un cercle.
1.17. Placez le plateau de collecte (21) avec le couvercle fermé dans le support (14)
La trappe en H est maintenant prête à l‘utilisation.
F) Entretien et soins à donner régulièrement :
• Le récipient de collecte du piège à taon doit être régulièrement vidé et inspecté. Si nécessaire, remplissez d’eau
savonneuse.
• Vériez que la boule est constamment gonée.
• La tempête et le vent fort peuvent inuencer la stabilité de TAON-X. En cas de besoin, vérier régulièrement.
• Le bouchon de fermeture de la boule se défait facilement par le bais de l’outil joint
G) Caractéristiques particulières :
• Construction galvanisée anticorrosion.
• Résistance au climat.
• Réduction considérable du nombre de taons.
• Montage facile par tarière intégrée.
• Écologique, sans insecticide.
• Facile d‘utilisation grâce à son ergonomie.
• Ecace, élimination simple des taons.
• Garantie de 2 ans sur les composants mécaniques.
H) Caractéristiques techniques :
Dimensions : diamètre au milieu : 1,20 m
hauteur au sol : 2,20 m
Tarière : intégrée aux tubes de base
Couleurs : noir (boule) & blanc (entonnoir plastique)
Matériau : cadre tubulaire galvanisé, paroi : 2.0 mm
Poids : ca. 13 kg
Accessoires : pompe à air, tournevis à 6 pans 6 mm

7
Figure 1 : Vue éclatée
Numéro Nom de pièce Quantité
de pièce
1 Conduit de base 1
2 Raccord du conduit de base 1
3 Charnière de flexion inférieure 1
4 Charnière droite inférieure 1
5 Conduit central 1
6 Charnière de flexion centrale 1
7 Charnière droite centrale 1
8 Conduit supérieur 1
9 Charnière de flexion supérieure 1
10 Charnière droite supérieure 1
11 Guide-support 1
12 Anneau de stabilisation 1
13 Boulon M8 4
14 Support 1
15 Bande-crochet 1
16 Crochet de balle 1
17 Entonnoir 1
18 Conduit d‘armature 3
19 Raccord de conduit 3
20 Balle 1
21 Plateau de collecte 1
22 Boulon mécanique 3
23 Écrou pour boulon mécanique 3
24 Rondelle pour boulon mécanique 3
25 Boulon long 1
26 Écrou pour boulon long 1
27 Rondelle à ressort 1
28 Bouchon de conduit de base 1
Figure 2 : Fixez le conduit de base avec un marteau dans le sol
Figure 3 : Assemblage du raccord de conduit dans le conduit d‘armature
18
19

8
EN Horsefly Trap TAON-X
Installation and service manual
Please read carefully, before using your unit!
The information in this service manual is based on the latest information, and is provided subject to alterations. We
reserve the right to change the construction and/or configuration of the product at any time without obligation to modify
earlier versions of the product.
A) Read this manual carefully before taking any action with regard to the TAON-X:
Congratulations with the purchase of this high quality horse fly trap. Before using this model we would like to ask you
to read this manual carefully. If you have questions afterwards feel free to contact your local supplier. The information in
this manual is based upon the latest information, and is provided subject to alterations. We reserve the right to change
the construction and/or configuration of the product at any time without obligation to modify earlier versions of the
product. Store this manual carefully for future use.
B) Receipt of the unit:
While unpacking, check for any signs of shipment damage and, if found, notify both transporter and supplier in writing
within 8 days after receipt with full details of the damage that has occurred and retain the equipment and packing
materials for inspection. Check that all parts have been received as ordered. Make sure that all packaging is removed
from the machine before use.
C) Installation of the TAON-X:
The TAON-X needs to be installed in the direct vicinity of the resting and/or feeding places of the animals on sand or at
wall or pole. Horses are especially curious animals and may want to nibble at the plastic hood. This needs to be avoided
at all times. If required protect the TAON-X to avoid this from happening. The numbers in the text below refer to the
numbers used in the exploded view drawings, which are placed in the back of this installation manual.
D) Required mounting materials
• Hammer
• Adjustable wrench
E) Installation:
1.1 Mark the spot in the ground where you want to place the unit.
1.2 Place the metal base pipe plug (28) into the base pipe, and hammer the base pipe (1) firmly into the ground. See
figure 2.
1.3 Once the base pipe (1) is firmly mounted into the ground, remove the base pipe plug (28) from the pipe. Store this
part, as it will be needed again for future (re-)installation.
1.4 Mount the base connection pipe (2) onto the base pipe (1) using the long bolt (25) the nut for long bolt (26) with
the washer (27) in-between. See figure 1.
1.5 Now position the angle between the base connection pipe (2) and the middle pipe (5) by making sure that the
marking “L” on the low bending hinge (3) is opposite the marking “L” on the low straight hinge (4). See figure 4.
1.6 Now use the carriage bolt (22), washer (24) and nut (23) to fix these hinges.
1.7 Position the marking “M” of the middle bending hinge (6) against the marking “M” of the Middle straight hinge
(7). See also figure 4.
1.8 Now use the carriage bolt (22), washer (24) and nut (23) to fix these hinges.
1.9 Position the marking “T” of the top bending hinge (9) against the marking “T” of the top straight hinge (10). See
also figure 4.
1.10 Now use the carriage bolt (22), washer (24) and nut (23) to fix these hinges.
1.11 Make sure that the bracket (11) and stabilising ring (12) are firmly connected with the four M8 bolts.
1.12 Inflate the ball (20) using a compressed air unit, a pump for an airbed, or use the included pump. The diameter of
the ball must be approx. 60cm. Put in the white plastic plug after inflatiing the ball.
1.13 Place the funnel (17) onto the metal holder (14) by means of the hook band (15)

9
1.14 Lift up the funnel (17) and mount the ball (20) on the metal holder (14) using the ball hook (16)
1.15 Put one side of the pipe connector (19) into the reinforcement pipe (18), see fig 3.
1.16 Put the reinforcement pipe (18) with the pipe connector (19) into the opening in the lower end of the funnel (17).
If needed, the use of soap to grease the pipe will simplify this process. Connect the other end of the reinforcement
pipe to the next pipe connector, to form the three reinforcement pipes and three pipe connectors into one round
ring.
1.17 Place the collection tray (21) with the lid closed into the holder (14)
The H-trap is ready for use now.
F) Periodic maintenance:
• The collect bin of the horse y trap needs to be checked, lled with water if necessary and emptied regularly.
• Make sure that the ball stays inated.
• Storm and wind will have an impact on the stability of the TAON-X. Check this periodically or whenever this is required.
• The plug in the ball can be easily removed with included plug removing tool
G) Key features:
Galvanised corrosion proof construction.
• Weather proof design.
• Reduces the horse y population considerably.
• Easy installation, by means of integrated ground drill.
• Environmental friendly.
• Ergonomic design, allows easy handling of the trap.
• Effective and easy control on horse ies.
• 2 years warrantee on mechanical defects.
H) Key specifications:
Dimensions : 1,20m middle diameter, height above the ground is 2,20m
Ground drill : attached to ground pipe
Colour : black (ball) & white (Conical plastic funnel)
Material : hot zinc dipped mounting frame, thickness is 2.0mm
Weight : app 13kg
Tools : manual pump, 0,25” socket head wrench included
Funnel trap : 1 piece included
Shipment : in transport modules, which need to be assembled on location.

10
Figure 1: Exploded view
Part number Part name Quantity
1 Base pipe 1
2 Base connection pipe 1
3 Low bending hinge 1
4 Low straight hinge 1
5 Middle pipe 1
6 Middle bending hinge 1
7 Middle straight hinge 1
8 Top pipe 1
9 Top bending hinge 1
10 Top straight hinge 1
11 Bracket 1
12 Stabilising ring 1
13 M8 bolt 4
14 Holder 1
15 Hook band 1
16 Ball hook 1
17 Funnel 1
18 Reinforcement pipe 3
19 Pipe connector 3
20 Ball 1
21 Collect tray 1
22 Carriage bolt 3
23 Nut for carriage bolt 3
24 Washer for carriage bolt 3
25 Long bolt 1
26 Nut for long bolt 1
27 Spring washer 1
28 Base pipe plug 1
Figure 2: Hammer the base pipe into the ground
Figure 3: Assembly of the pipe connector onto the reinforcement pipe
18
19

11
IT Acchiappamosche cavalline TAON-X
Istruzioni di montaggio e d’uso
Leggere attentamente prima dell’uso!
Il contenuto di queste istruzioni per l’uso è conforme alle conoscenze più recenti ed è oggetto di continua revisione.
Modifiche della struttura e/o configurazione di questo prodotto sono espressamente riservate e non autorizzano
modifiche a posteriori di versioni precedentemente commercializzate di questo prodotto.
A) Leggere attentamente queste istruzioni prima del montaggio e dell’utilizzo di TAON-X:
Ci congratuliamo per aver scelto questo acchiappamosche cavalline di alta qualità. Prima di utilizzare TAON-X, leggere
attentamente queste istruzioni per l’uso. In caso di domande, rivolgersi al proprio fornitore locale. Il contenuto di queste
istruzioni è conforme alle conoscenze più recenti e viene aggiornato costantemente. Modifiche della struttura e/o della
configurazione di questo prodotto sono espressamente riservate e non autorizzano modifiche a posteriori di versioni
commercializzati in precedenza di questo prodotto. Conservare queste istruzioni per l’uso per un utilizzo successivo/
ulteriore.
B) Fornitura e ricezione di TAON-X:
Durante la fase di disimballaggio, assicurarsi che non vi siano danni di trasporto di qualunque tipo e, nel caso,
comunicarli per iscritto dettagliatamente sia al fornitore, sia al proprio rivenditori entro 8 giorni. Conservare sia il
prodotto, sia il materiale di imballaggio per un’eventuale perizia. Controllare che il prodotto acquistato sia completo.
Prima di utilizzare questo prodotto, rimuovere tutto l’imballaggio.
C) Struttura di TAON-X:
TAON-X deve essere montato nella sabbia nelle immediate vicinanze dei luoghi di riposo e/o foraggiamento degli
animali oppure fissato ad una parete o ad un palo. Durante il montaggio assicurarsi che nessun animale possa riuscire
a rosicchiare l‘involucro di plastica. Se necessario, proteggere TAON-X tramite una recinzione. I numeri seguenti
corrispondono a quelli del disegno esploso, riprodotto sul retro di queste istruzioni per l‘uso.
D) Materiale necessario per il montaggio
• Martello
• Chiave regolabile
E) Struttura:
1.1. Contrassegnare il punto a terra in cui si desidera disporre l‘unità.
1.2. Inserire il tappo in metallo (28) nel tubo della base e fissare saldamente il tubo della base (1) a terra con il
martello. Vedere la figura 2.
1.3. Una volta fissato saldamente a terra il tubo della base (1), rimuovere il tappo (28) dal tubo della base. Conservare
questo componente dato che potrebbe essere nuovamente necessario per altre eventuali installazioni.
1.4. Montare il tubo di connessione della base (2) sul tubo della base (1) impiegando il bullone lungo (25), il dado per
il bullone lungo (26) con la rondella (27) al centro. Vedere la figura 1.
1.5. A questo punto regolare l‘angolo tra il tubo di connessione della base (2) e il tubo centrale (5) accertandosi che
l‘indicazione „L“ sulla cerniera incurvata inferiore (3) sia in corrispondenza dell‘indicazione „L“ sulla cerniera
diritta inferiore (4). Vedere la figura 4.
1.6. A questo punto utilizzare il bullone a legno (22), la rondella (24) e il dado (23) per il fissaggio delle cerniere.
1.7. Disporre l‘indicazione „M“ della cerniera incurvata centrale (6) in corrispondenza dell‘indicazione „M“ della
cerniera diritta centrale (7). Vedere anche la figura 4.
1.8. A questo punto utilizzare il bullone a legno (22), la rondella (24) e il dado (23) per il fissaggio delle cerniere.
1.9. Disporre l‘indicazione „T“ della cerniera incurvata superiore (9) in corrispondenza dell‘indicazione „T“ della
cerniera diritta superiore (10). Vedere anche la figura 4.
1.10. A questo punto utilizzare il bullone a legno (22), la rondella (24) e il dado (23) per il fissaggio delle cerniere.
1.11. Assicurarsi che le graffette (11) e l’anello di stabilizzazione (12) siano collegati saldamente con le viti 4 M8.

12
1.12. Gonfiare il pallone (20) con un compressore, una pompa per materassini o utilizzare la pompa fornita in
dotazione. Il diametro del pallone deve essere di 60 cm circa. Inserire il tappo di plastica bianco dopo aver
gonfiato il pallone.
1.13. Disporre l‘imbuto (17) sul supporto in metallo (14) utilizzando il nastro di aggancio (15)
1.14. Sollevare l‘imbuto (17) e montare il pallone (20) sul supporto in metallo (14) utilizzando il gancio a sfera (16).
1.15. Disporre un‘estremità del connettore per tubi (19) nel tubo di rinforzo (18), vedere la figura 3.
1.16. Disporre il tubo di rinforzo (18) con il connettore per tubi (19) nell‘apertura dell‘estremità inferiore dell‘imbuto
(17). In caso di necessità, utilizzando il sapone per lubrificare il tubo è possibile semplificare questo processo.
Collegare l‘altra estremità del tubo di rinforzo al connettore per tubi successivo per creare con i tre tubi di rinforzo
e i tre connettori per tubi un anello.
1.17. Disporre il vassoio di raccolta (21) con la linguetta chiusa nel supporto (14)
A questo punto la trappola H è pronta per l‘impiego.
F) Cura e manutenzione regolare:
• Il recipiente di raccolta dell’acchiappamosche deve essere controllato e svuotato con regolarità. Se necessario,
rabboccare l‘acqua saponosa.
• Assicurarsi che il palloncino sia sempre gono.
• Intemperie e vento forte inuenzano la stabilità del TAON•X. Controllarlo con regolarità e ogni qualvolta è necessario.
• Il tappo di chiusura del palloncino può essere estratto facilmente tramite l‘utensile in dotazione
G) Caratteristiche particolari del prodotto:
• Struttura galvanizzata, protetta dalla corrosione.
• Resistente alle intemperie.
• Riduce notevolmente la quantità di mosche cavalline.
• Semplicità di montaggio grazie alla trivella integrata.
• Ecologico, senza insetticidi.
• Facile da utilizzare grazie al design ergonomico.
• Facilità e semplicità di arginamento della mosca cavallina.
• 2 anni di garanzia sulle parti meccaniche.
H) Caratteristiche tecniche:
Dimensioni: diametro medio: 1,20 m, altezza dal terreno: 2,20 m
Trivella: integrata nel tubo di base
Colori: nero (palloncino) e bianco (imbuto di plastica)
Materiale: telaio tubolare zincato a caldo, parete: 2,0 mm
Peso: circa 13 kg
Accessori: pompa per l’aria, trapano per avvitatura esagonale da 0,25”

13
Figura 1: vista esplosa
Codice Nome Quantità
componente componente
1 Tubo della base 1
2 Tubo di connessione della base 1
3 Cerniera incurvata inferiore 1
4 Cerniera diritta inferiore 1
5 Tubo centrale 1
6 Cerniera incurvata centrale 1
7 Cerniera diritta centrale 1
8 Tubo superiore 1
9 Cerniera incurvata superiore 1
10 Cerniera diritta superiore 1
11 Staffa 1
12 Anello stabilizzatore 1
13 Bullone M8 4
14 Supporto 1
15 Nastro di aggancio 1
16 Gancio a sfera 1
17 Imbuto 1
18 Tubo di rinforzo 3
19 Connettore per tubi 3
20 Pallone 1
21 Vassoio di raccolta 1
22 Bullone a legno 3
23 Dado per bullone a legno 3
24 Rondella per bullone a legno 3
25 Bullone lungo 1
26 Dado per bullone lungo 1
27 Rondella elastica 1
28 Tappo del tubo della base 1
Figura 2: fissare il tubo della base nel terreno con il martello
Figura 3: assemblaggio del connettore per tubi sul tubo di rinforzo
18
19

14
ES ATRAPA TÁBANOS TAON-X
Manual de instrucciones de instalación y de uso
Leer el manual antes de darle el primer uso a su Atrapa-Tábanos
Los detalles de este manual del usuario se basan en la última información, y pueden estar sujetos a cambios. Nos
reservamos el derecho de cambiar la construcción y/o configuración del producto en todo momento sin la obligación de
modificar versiones anteriores de este producto.
A) Debe leer el manual con cuidado previo a utilizar el Atrapa-Tábanos:
Enhorabuena por haber comprado el Atrapa-Tábanos de alta calidad. Antes de usar este modelo le pedimos leer este
manual con atención. Si le surge alguna pregunta después de leerlo, no dude en contactar con su proveedor local. La
información contenida en el manual se basa en los últimos detalles, y está sujeta a cambios. Nos reservamos el derecho
de realizar cambios en la construcción y/o configuración del producto en cualquier momento sin la obligación de
modificar las versiones anteriores del producto. Guarde cuidadosamente este manual para utilizaciones posteriores.
B) Recepción del Atrapa-Tábanos:
Cuando revise y abre el embalaje, debe comprobar que no hay ningún desperfecto debido al transporte y, si lo hubiera,
avisar al transportista o suministrador por escrito antes de 8 días de la recepción con todos los detalles del desperfecto
y conservar el equipo y embalaje para su inspección. Compruebe que todos los componentes se han recibido según el
pedido. Asegúrese de que ha quitado todo el embalaje de la máquina antes de su uso.
C) Instalación del Atrapa-Tábanos:
El atrapa-tábanos precisa ser instalado cerca del lugar de descanso o de pasto de los animales, sobre tierra o contra
un poste o una pared. Los caballos son animales especialmente curiosos y pueden intentar mordisquear la funda de
plástico. Hay que evitar que esto ocurra y puede verse necesitado a proceder a la protección del atrapatábanos. Los
números indicativos () que figuran en el texto a continuación hacen referencia a los dibujos que lo siguen hasta el final
de este manual de instrucciones del usuario.
D) Material necesario para el montaje
• Martillo
• Llave inglesa
E) Instalación:
1.1. Marque el lugar en el suelo donde desea colocar la unidad.
1.2. Coloque la clavija metálica del tubo base (28) en el tubo base y fije firmemente el tubo base (1) al suelo a
martillazos. Consulte la imagen 2.
1.3. Cuando ya haya montado firmemente el tubo base (1) al suelo, retire la clavija (28) del tubo. Conserve esta
pieza porque la necesitará en un futuro para instalar/reinstalar.
1.4. Monte el tubo de conexión base (2) al tubo base (1) usando el perno de retención (25) y la tuerca para el
perno largo (26) con la arandela (27) en medio. Consulte la imagen 1.
1.5. A continuación, fije el ángulo entre el tubo de conexión base (2) y el tubo central (5) y asegúrese de que la
marca „L“ en la bisagra acodada inferior (3) está frente a la marca „L“ de la bisagra recta inferior (4). Consulte
la imagen 4.
1.6. Use el perno de cabeza redonda (22), la arandela (24) y la tuerca (23) para fijar las bisagras.
1.7. Coloque la marca „“M““ de la bisagra acodada central (6) frente a la marca „“M““ de la bisagra recta central
(7). Consulte la imagen 4.
1.8. Use el perno de cabeza redonda (22), la arandela (24) y la tuerca (23) para fijar las bisagras.
1.9. Coloque la marca „T“ de la bisagra acodada superior (9) frente a la marca „T“ de la bisagra recta superior
(10). Consulte también la imagen 4.
1.10. Use el perno de cabeza redonda (22), la arandela (24) y la tuerca (23) para fijar las bisagras.
1.11. Asegúrese de que la abrazadera (11) y el anillo estabilizador (12) se han unido correctamente con los cuatro
tornillos M8.

15
1.12. Infle el globo (20) con un dispositivo de aire comprimido, una bomba para colchonetas o la bomba incluida.
El diámetro del globo debe ser aprox. 60cm. Una vez inflado el globo, coloque el tapón de plástico blanco.
1.13. Coloque el embudo (17) en el soporte metálico (14) mediante la tenaza (15).
1.14. Suba el embudo (17) y monte el globo (20) en el soporte metálico (14) usando el gancho para el globo (16).
1.15. Coloque un lado del conector del tubo (19) en el tubo de refuerzo (18). Consulte la imagen 3.
1.16. Coloque el tubo de refuerzo (18) con el conector del tubo (19) en la abertura del extremo inferior del embudo
(17). Si fuera necesario, use jabón para engrasar el tubo y que el proceso resulte más sencillo. Conecte el
otro extremo del tubo de refuerzo al siguiente conector de tubo para formar una anilla con los tres tubos de
refuerzo y los tres conectores de tubo.
1.17. Coloque la bandeja colectora (21) con la pestaña cerrada en el soporte (14).
El atrapamoscas ya está listo para usarse.
F) Mantenimiento:
• Vaciar la cubeta colectora del atrapa-tábanos con regularidad y rellenar la de agua cuando sea necesario.
• Debemos comprobar que el balón permanece inado.
• Las tormentas y los vendavales tienen un impacto sobre la estabilidad del atrapa-tábanos. Debe comprobar
periódicamente o cuando crea necesario.
G) Características principales:
• Construcción galvanizada anti-corrosivo.
• Diseño resistente a las inclemencias del tiempo.
• Reduce la población de tábanos considerablemente.
• Fácil instalación, jado o de perforación en el suelo.
• No perjudicial para el medio-ambiente.
• Diseño ergonómico, permitiendo un fácil manejo del atrapa-tábanos.
• Control sencillo y efectivo de los tábanos.
• Garantía de 2 años sobre los desperfectos mecánicos.
H) Especificaciones principales:
Dimensiones : 1,20m de diámetro medio, altura sobre el suelo 2,20m
Tubo perforador : adjunto al tubo de base (del suelo)
Color : negro (balón) y blanca (cubierta cónica de plástico)
Material : estructura bañada en zinc, espesor 2.0 mm.
Peso : aprox. 13kg.
Herramientas : bomba inadora y llave Allen de 0.25” incluidas
Embudo : 1 pieza incluida
Envío : cajas para transporte, para ser montados en destino

16
Imagen 1: Vista despiezada
Nº de pieza Nombre de la pieza Cantidad
1 Tubo base 1
2 Tubo de conexión base 1
3 Bisagra acodada inferior 1
4 Bisagra recta inferior 1
5 Tubo central 1
6 Bisagra acodada central 1
7 Bisagra recta central 1
8 Tubo superior 1
9 Bisagra acodada superior 1
10 Bisagra recta superior 1
11 Pinza 1
12 Anillo estabilizador 1
13 Perno M8 4
14 Puntal 1
15 Tenaza 1
16 Gancho de globo 1
17 Embudo 1
18 Tubo de refuerzo 3
19 Conector de tubo 3
20 Globo 1
21 Bandeja colectora 1
22 Perno de cabeza redonda 3
23 Tuerca para perno de cabeza redonda 3
24 Arandela para perno de cabeza redonda 3
25 Perno largo 1
26 Tuerca para perno largo 1
27 Arandela elástica 1
28 Clavija para tubo base 1
Imagen 2: Fijar el tubo base al suelo a martillazos.
Imagen 3: Montar el conector de tubo en el tubo de refuerzo.
18
19

17
NL Dazen Val TAON-X
Installatie and service handleiding
Lees de handleiding aandachtig voor ingebruikname van de unit!
De informatie in deze handleiding is gebaseerd op de laatste informatie en is onderhevig aan veranderingen. We
behouden ons het recht voor de constructie en/of de uitvoering van het product te allen tijde te wijzigen zonder de
verplichting eerdere uitvoeringen van het product te wijzigen
A) Lees deze handleiding zorgvuldig alvorens met de TAON-X aan de slag te gaan.
Gefeliciteerd met de aankoop van deze kwaliteits dazenval. Alvorens het model in gebruik te nemen vragen we u
aandachtig de gebruikshandleiding door te lezen. Indien u, na het lezen van de handleiding vragen heeft, voel u dan vrij
contact op te nemen met uw locale dealer. De informatie in deze handleiding is gebaseerd op de laatste informatie en
is onderhevig aan veranderingen. We behouden ons het recht voor de constructie en/of de uitvoering van het product te
allen tijde te wijzigen zonder de verplichting eerdere uitvoeringen van het product te wijzigen. Bewaar deze handleiding
zorgvuldig voor toekomstig gebruik.
B) Ontvangst van de unit:
Vergewist u tijdens het uitpakken of er schade is ontstaan tijdens transport, informeer transporteur en leverancier
schriftelijk binnen 8 dagen na ontvangst met volledige details van de schade en bewaar verpakking en materialen voor
nadere inspectie. Controleer of alle onderdelen aanwezig zijn. Zorg er voor dat alle verpakkingsmaterialen zijn verwijderd
voor ingebruikname.
C) Installatie van de TAON-X:
De TAON-X dient bij voorkeur te worden geïnstalleerd in de nabijheid van rust en/of voederplaatsen van de dieren, in een
weidegrond, aan een paal of wand. In het bijzonder paarden zijn nieuwsgierige dieren, voorkom dat zij aan het plastic
of andere onderdelen kunnen knagen. De nummers in de tekst verwijzen naar de nummers gebruikt in de tekeningen
achteraan in de bedrijfshandleiding.
D) Benodigd materiaal
• Hamer
• Aanpasbare moersleutel
E) Installatie:
1.1 Markeer de plaats waar u de H-trap in de grond wilt plaatsen.
1.2 Plaats de slagpen (28) op de grondbuis (1) en sla deze voorzichtig de grond in. Zie hiervoor figuur 2.
1.3 Als de grondbuis (1) stevig in de grond staat dan kunt u de slagpin (28) verwijderen. Bewaar deze slagpen goed,
u heeft deze weer nodig als u een volgende keer de unit weer op gaat zetten.
1.4 Monteer de lage buis (2) op de grondbuis (1) met gebruik makend van de lange moer (25), de schroef (26) en de
tandveerring (27). Zie hiervoor figuur 1.
1.5 Op de twee lage scharnierdelen (3) en (4) moeten nu de twee markeringen “L” tegenover elkaar gezet worden.
In deze stand is de hoek tussen de beide buizen correct. Zie hiervoor figuur 4.
1.6 Met behulp van de bout (22), veerring (24) en schroef (23) kan nu het scharnier stevig aangedraaid worden.
1.7 Op de twee middelste scharnierdelen (6) en (7) moeten nu de twee markeringen “M” tegenover elkaar gezet
worden. In deze stand is de hoek tussen de beide buizen correct. Zie hiervoor ook figuur 4.
1.8 Met behulp van de bout (22), veerring (24) en schroef (23) kan nu het scharnier stevig aangedraaid worden.
1.9 Op de twee top scharnierdelen (9) en (10) moeten nu de twee markeringen “T” tegenover elkaar gezet worden.
In deze stand is de hoek tussen de beide buizen correct. Zie hiervoor ook figuur 4.
1.10 Met behulp van de bout (22), veerring (24) en schroef (23) kan nu het scharnier stevig aangedraaid worden.
1.11 Zorg dat beugel (11) en stabilisatiering (12) stevig vastgezet worden met behulp van de 4 x M8 bouten.
1.12 Blaas nu bal (20) met behulp van de meegeleverde pomp of gebruik b.v. een compressor. De bal hoeft alleen
gevuld te zijn met lucht, zodat hij zijn volle ronde vorm krijgt. Plaats hierna het kunststof ventielplug in de bal.
De bal dient nog niet geplaatst te worden in de H-trap.

18
1.13 Plaats de groene kap (17) op de metalen houder (14) door gebruik te maken van het klittenband
1.14 Til de kap (17) nu omhoog en monteer de bal (20) aan de metalen kap (14) met behulp van de balhaak (16)
1.15 Verbind de drie bevestigingsbuizen kap (18) met de verbindingsstukken buis (19)
1.16 Schuif nu aan de onderzijde (binnenkant) van de kap (17) deze bevestigingsbuis kap (18) Deze buis zal de kap
haar ronde vorm aan de onderzijde van de kap geven. Eventueel kan gebruik worden gemaakt van wat groene
zeep, die aan deze bevestigingsbuis kap (18) gesmeerd wordt.
1.17 Plaats de opvangtrechter (21) met deksel in de metalen houder (14)
De unit is nu klaar voor gebruik.
F) Periodiek onderhoud:
• De opvangbak dient regelmatig gecontroleerd, eventueel met water gevuld en geleegd te worden.
• Zorg dat de bal goed opgeblazen blijft.
• Controleer de TAON-X regelmatig op stabiliteit en of alle onderdelen nog in de juiste positie zijn.
• De plug van de bal kan eenvoudig verwijderd worden met behulp van het hulpgereedschap
G) Gebruik van de TAON-X
• Thermisch verzinkte buisconstructie.
• Weervast ontwerp.
• Reduceert de dazenpopulatie in de nabijheid aanzienlijk.
• Eenvoudig te installeren door middel van de geïntegreerde grondpen.
• Vriendelijk voor het milieu.
• Ergonomisch ontwerp vergemakkelijkt hanteren van de val.
• Effectieve en eenvoudige vangst van dazen.
• 2 jaar garantie op mechanische defecten.
H) Specificaties:
Afmetingen : omtrek 1.2m, hoogte ± 2.2m.
Grondboor : vast aan basisbuis.
Kleur : zwart (bal), transparant kunststof trechter.
Materiaal : thermisch verzinkt staal 2mm.
Gewicht : ong.13kg.
Gereedschappen : handpomp & inbussleutel
Trechter : 1 stuks.
Transport : in doos, product dient op locatie geassembleerd te worden.

19
Figuur 1: Onderdelen H-trap en tekening
Nummer Onderdeel Aantal
1 Grondbuis 1
2 Lage buis 1
3 Scharnier Laag 1
4 Scharnier Laag 1
5 Middelste buis 1
6 Scharnier Midden 1
7 Scharnier Midden 1
8 Top buis 1
9 Scharnier Top 1
10 Scharnier Top 1
11 Beugel 1
12 Stabilisatie ring 1
13 M8 schroef 4
14 Metalen houder 1
15 Klittenband 1
16 Balhaak 1
17 Kap 1
18 Bevestigingsbuis kap 3
19 Verbindingsstuk buis 3
20 Bal 1
21 Opvangtrechter 1
22 Moer voor scharnier 3
23 Bout voor scharnier 3
24 Veerring voor scharnier 3
25 Lange schroef 1
26 Moer voor lange schroef 1
27 Ring lange schroef 1
28 Slagpen 1
Figuur 2: Sla de grondbuis (na plaatsing van de slagpen) stevig in de grond
Figuur 3: Assemblage van de bevestigingsbuis van de kap met het verbindingsstuk
18
19

20
SV Flugfångare TAON-X för hästar
Uppställnings- och bruksanvisning
Läs noga före användning!
Innehållet i denna bruksanvisning motsvarar de senaste rönen och det revideras ständigt. Rätten till ändringar i den
här produktens konstruktion och/eller konfiguration förbehålls uttryckligen och innebär inget anspråk på anpassning i
efterhand för produktmodeller som erbjudits tidigare.
A) Läs igenom den här instruktionen noga innan TAON-X ställs upp och används:
Vi gratulerar dig till köpet av denna högkvalitativa flugfångare för hästar. Läs den här bruksanvisningen noga innan du
börjar använda TAON-X. Vid frågor kontaktar du ditt lokala inköpsställe. Innehållet i den här instruktionen motsvarar de
senaste rönen och aktualiseras ständigt. Rätten till ändringar i den här produktens konstruktion och/eller konfiguration
förbehålls uttryckligen och innebär inget anspråk på anpassning i efterhand för produktmodeller som erbjudits tidigare.
Förvara bruksanvisningen för den senare/fortsatta användningen.
B) Leverans och mottagande av TAON-X:
Var uppmärksam på alla sorters transportskador under uppackningen och informera både transportören och leverantören
detaljerat om dessa. Detta ska göras skriftligt och inom åtta dagar. Spara både produkten och förpackningsmaterialet för
en eventuell kontroll. Kontrollera att varan du köpt är fullständig. Ta bort all förpackning innan du börjar använda den
här produkten.
C) Ställa upp TAON-X:
TAON-X ska ställas på sand i direkt anslutning till de platser där djuren vilar och/eller utfordras, eller hängas på en vägg
eller fästas på en stolpe. Vid uppställningen ska du se till att det inte är möjligt för något djur att gnaga på plasthuset.
Skydda TAON-X med inhängning om det behövs. Siffrorna här nedanför motsvarar siffrorna på
sprängskissen som finns på bruksanvisningens baksida.
D) Monteringsmaterial som behövs
• Hammare
• Justerbar skiftnyckel
E) Uppställning:
1.1. Markera platsen på marken där du vill placera enheten.
1.2. Placera basrörets rörplugg (28) i basröret och slå ner basröret (1) ordentligt och fast i marken. Se bild 2.
1.3. När basröret (1) sitter fast ordenligt i marken, ta bort rörpluggen (28) från röret. Behåll den delen eftersom
den behövs vid en senare (om-) installation.
1.4. Montera anslutningsröret (2) på basröret (1) med hjälp av den långa bulten (25) och muttern till den långa
bulten (26) med mellanbrickan (27) emellan. Se bild 1.
1.5. Placera nu vinkeln mellan anslutningsröret (2) och mellanröret (5) genom att se till att markeringen „L“ på den
nedre böjda leden (3) sitter mitt för markeringen „L“ på den nedre raka leden (4). Se bild 4.
1.6. Använd bulten (22), brickan (24) och muttern (23) för att fixera lederna.
1.7. Placera markeringen „M“ på leden (6) mot markeringen „M“ på den mellanliggande raka leden (7). Se figur 4.
1.8. Använd bulten (22), brickan (24) och muttern (23) för att fixera lederna.
1.9. Placera markeringen „T“ på den övre leden (9) mot markeringen „M“ på den övre raka leden (10). Se figur 4.
1.10. Använd bulten (22), brickan (24) och muttern (23) för att fixera lederna.
1.11. Kontrollera att klammern (11) och stabiliseringsringen (12) är säkert förbundna med de 4 M8-skruvarna.
Table of contents
Languages:
Other Kerbl Farm Equipment manuals

Kerbl
Kerbl ProPig 22655 User manual

Kerbl
Kerbl 22745 User manual

Kerbl
Kerbl EasyHeat 23A User manual

Kerbl
Kerbl 37122 User manual

Kerbl
Kerbl Duo 18810 User manual

Kerbl
Kerbl 82806 User manual

Kerbl
Kerbl 1418 Quick guide

Kerbl
Kerbl 1066 User manual

Kerbl
Kerbl 70552 Operation manual

Kerbl
Kerbl HAPPYCOW Duo User manual

Kerbl
Kerbl 37100 User manual

Kerbl
Kerbl BASIC User manual

Kerbl
Kerbl 292220 User manual

Kerbl
Kerbl 141461 User manual

Kerbl
Kerbl PROSTREAM User manual

Kerbl
Kerbl 144355 User manual

Kerbl
Kerbl 1420 User manual

Kerbl
Kerbl HAPPYCOW Free Maxi User manual

Kerbl
Kerbl MaxiSwing User manual

Kerbl
Kerbl 291130 User manual