TMC BLUE BELLE CHIC/TO User manual
1
Energy efficiency class: A( A++ <> G)
THIS PRODUCT IS NOT SUITABLE FOR PRIMARY HEATING.
Instructions for use
BLUE BELLE CHIC/TO
Free flame heater
Household appliance
Keep this manual for future reference. Original in Italian. SOBTO.GB
(31.10.22)
GB - IE

2
This stove uses liquefied petroleum gas: the LPG cylinders are suitable for indoor use.
The use of other fuels or of cylinders not indicated in this manual is forbidden.
Do not store or use petrol or other flammable liquids or vapours in the vicinity of this or other appliances.
Servicing must be carried out by a qualified technician.
This is a heating system. It uses the air (oxygen) of the room in which it is installed. Adequate
arrangements must be provided for combustion and ventilation. Refer to the WARNING AND
SAFETY SECTIONS indicated by the symbol:
Warning!
Warning: failure to comply with the information given in this manual may result in fire or explosions that may
damage properties and injure people and animals.
Important warning!
This icon indicates that the instructions on correct appliance use must be complied with. This will prevent
any malfunction.
Important information!
This icon indicates information and recommendations that ensure that the appliance is correctly used.
These instructions were written with the utmost care. However, the manufacturer reserves the right to
improve this manual at any time and in any way they may deem suitable. Images may differ from the
original appliance.

3
Contents
1. Introduction
2. Product description
2.1 General guidelines
2.2 Scope of application and intended use
2.3 Safety devices
2.4 Specifications
2.5 Power and consumption
2.6 Safety features
2.7 General safety warnings for installation and use
2.8 Conduct in case of gas leaks
3. Preparing the appliance for operation
3.1 Opening the packaging
3.2 Keeping the original packaging
3.3 Connecting the stove to the gas cylinder
3.4 Checking for leaks in the regulator
3.4.1 Checking for leaks in the regulator
3.5 Installing the gas cylinder
4. Instructions for use
4.1 Commissioning and operation
4.2 Switching off
4.3 Replacing the cylinder
4.4 Storing
4.5 Packaging for private transport
5. Cleaning and maintenance
5.1 Cleaning and maintenance by the user
5.2 Faults and repair works
6. Guarantee
7. Spare parts
7.1 Changing the battery
8. Disposal
9. Declaration of Conformity
4
TECHNICAL
SPECIFICATIONS
DESTINATION:
GB - IE
TYPE OF GAS AND PRESSURE:
Butane 28 mbar
Category:
I3B
Rated power:
4.2 kW(Hs)
Max consumption:
0.3 kg/h
DVGW registration number:
CE-0085BM0301
Read the instructions carefully before using the appliance.
The appliance is not intended to be used by people (children included) with reduced physical, sensory or
mental abilities, or without the necessary experience and knowledge, unless they have been instructed on
the use of the appliance. Children must not be permitted to play with the appliance.
Please observe the safety instructions:
The appliance should be operated only if there is adequate ventilation!
The appliance must be used in compliance with the current local, regional and national regulations.
1. Introduction
Dear Customer,
Thank you for purchasing your blue flame stove! You made an excellent choice and we are honoured that
you placed your trust in us. Before using your stove, please read this manual carefully. In the following
pages you will find some important information: it is very important that you read this manual before using
your new gas stove and that you keep it handy for the whole time your stove is in operation.
The open fire stove model Blue Belle does not vent gas and can only be used in a domestic environment.
The fuel used for the stove is a non-polluting liquid gas: propane-butane. This appliance received approval
by the German certification body DVGW and complies with Gas European appliance regulation
2016/426/EU. This stove is tested according to EU gas regulation as well as to EN 449 and complies with
the strictest safety regulations currently in force. This naked flame stove is an ideal and cost-effective
solution for your rooms as it represents an additional heating source. It is also ideal for use in autumn and
spring.
2. Product description
2.1 General guidelines
Gas stoves by TMC guarantee high heating power and low consumptions together with a constant
distribution of heat which in turn leads to a more efficient use of energy as well as lower toxic emissions.
2.2 Scope of application and intended use
The gas stove complies with the required technical and safety standards. However, an improper or incorrect
use may be hazardous for the life or the physical safety of users or thirds, and may damage the device,
property or animals.
This stove generates heat by using gas. The burner produces a flame that heats up the air which, thanks to
the conductive effect, heats up the room where the stove is installed. For appliances without a thermostat,
heat is adjusted manually (there are two power levels), whereas for appliances fitted with a thermostat, the
heat is adjusted automatically, and the stove is switched off once the set temperature has been reached.
The stove should be used as an auxiliary and temporary heating system, to heat rooms, gazebos, garages,
labs and any other room that is above ground and suitably ventilated. It must not be used in bathrooms or

5
dormitories, in boats, recreational vehicles and in rooms located on a high floor of a building. Any other use,
or the extended use of the appliance, is to be considered improper use and the user will be held
responsible for any possible consequent risk.
2.3 Safety devices
The product has been designed to prevent hazards thanks to the presence of the following safety devices:
Thermocouple
The pilot flame heats up a thermocouple which, in turns, keeps the valve of the appliance open (not the
valve of the cylinder). If the pilot flame goes out, the gas flow from the valve to the appliance automatically
stops within approximately one minute.
ODS
A pilot flame with an ODS system goes out and stops the gas supply
before the level of CO2 exceeds the 1.5% limit (in the room where the
room is used).
To prevent activation of the ODS system, the gas stove must be used only
and exclusively in well-ventilated rooms.
Ensure that the room is suitably ventilated and, if the ODS system has
triggered, ventilate the room. If you need to intervene too often, this means
that the room is too small or that ventilation is not sufficient.
Minimum recommended volumes
Heatable volumes with the useful power of the stove (maximum
efficiency power)
Outdoor temperature
-10 °C
-5 °C
0 °C
Insulation
degree
GOOD (Um= 0.20)
280
350
420
Volume in m3
AVERAGE (Um=
0.50)
150
182
221
POOR (Um= 1.00)
84
100
123
Key:
Um: indicates the average transmittance value of all the dispersion structures present in the room to be heated (W/m2.K)
Important remarks:
the values shown in the table refer to "standard" domestic rooms with a temperature of 20 °C ± 2°C
The rooms heated directly by the appliance should not feature partition walls; in other words, they should be free from inner barriers.
The table is for information purposes only. Considering that there are many parameters involved, we recommend contacting a thermos-technical
engineer in order to obtain a final evaluation.
With ON OFF
thermostat :
Automatically variable
Power 4.2 kW
Heatable volumes:
Sitting room
Other rooms
84 m3
42 m3

6
Piezoelectric ignition
This is the safest ignition method as it does not require a flame to manually ignite the appliance.
Safety grid
The grid present on this device prevents the risk of fire or burns: for this reason, it should never be
permanently removed. IT IS NOT A FULL GUARD FOR CHILDREN OR DISABLED PEOPLE.
2.4 Specifications
Nominal heat input: 4,2 kW
Heat settings: Maximum power for ON-OFF appliances
Igniter: electronic ignition
Nominal output pressure: 28 mbar
Gas type: Butane
Gas category: I3B
Size of cylinders (net weight): 15 kg
Country of destination: GB - IE
BLUE BELLE CHIC/TO
Product dimensions
(L x D x H): 38.5 x 43.5 x 77 cm
Weight of the appliance
13 kg
2.5 Power and consumption
The stove operates with 15 kg cylinders containing ecological LPG butane/propane available on the
market.
Depending on the room temperature and on the desired power, the consumption of the gas stove is as
follows: (The values are only indicative).
Automatically variable
305 g / h (at 4200 W) maximum
2.6 Safety features
The improper use of this appliance may cause serious damages to the health of people and to property.
Please, read the instructions carefully.
Familiarise with the appliance before using it.
Respect the general safety regulations on accident prevention. The information provided by this manual, as
well as the laws in force on general safety and accident prevention, must be complied with.
Thirds should only be allowed to use the appliance once they have been given the appropriate instructions.
The appliance is not intended to be used by persons (children included) with reduced physical, sensory or
mental abilities, or without the necessary experience and knowledge, unless they have been instructed on
the use of the appliance or are supervised by someone who is responsible for their safety. Children should
not be permitted to use and play with the appliance.
If the appliance is on and powered, it should not be left unattended.
Pay attention and take care when using the appliance.
Do not use the product if you are distracted or under the influence of drugs, alcohol or medication. When
operating the appliance, even the slightest distraction may cause serious accidents and injuries.
2.7 General safety warnings for installation and use
The stove must be installed on a solid and even surface.
Do not use the appliance in bedrooms, bathrooms, basements or on high floors. Do not use the appliance
as a permanent or continuous heating system. Do not use the appliance in bathrooms, dormitories,
recreational vehicles, such as caravans, motorhomes, boats and on high floors of buildings.
Do not use the appliance in basements or below ground level.
Do not use the appliance in dangerous areas.
Do not use the appliance in rooms where the presence of flammable liquids, gas and airborne dust may
pose a risk of explosion or fire.
Do not use the appliance in rooms that are smaller than those indicated in the table that illustrates the
minimum recommended volumes
Do not touch the hot parts of the appliance.

7
The appliance should be positioned at no less than 1 m from other heat sources.
Do not install the appliance in a room that already contains a gas cylinder (even if it is not in use)
To lift or move the appliance from its intended position, use the dedicated handles.
Never pull the gas hose to move the appliance.
Do not move the appliance while it is operating.
Do not move the stove while it is hot.
Check for any damage: always check that the appliance is in good working order before using it.
Respect the current local, regional and national regulations on gas.
The appliance must be used in a dry, clean and ventilated room.
The appliance should be used only in adequately ventilated rooms. To ensure ideal air ventilation, provide
two openings of at least 25 cm2per kW/h of heat (minimum opening 105 cm2 - 1/2 in high position and 1/2
in low position in the room)
The ventilation openings must be free as their purpose is to guarantee adequate ventilation, which ensures
correct combustion.
The front guard guarantees protection from burns that may be caused by accidental contact with the flame.
IT DOES NOT CONSTITUTE FULL PROTECTION FOR SMALL CHILDREN AND DISABLED PEOPLE.
Do not remove any part that make up the guard.
Do not cover the stove using cloths, clothes or wet laundry that needs drying.
Do not cover the stove as this would cause overheating. It is dangerous and therefore forbidden to position
objects on the stove, as this would cause overheating.
Do not position the stove near armchairs or curtains (remember to take into consideration that curtains
move) or other flammable material.
Any object must be positioned at a minimum of:
20 cm from the rear side of the stove
50 cm from the sides of the stove
100 cm from the front side of the stove
The cylinder compartment can house cylinders of up to 15 kg.
The stove should not be subjected to air current that exceeds 1.2 m/s.
ATTENTION: Do not point fans directly toward the stove. Avoid air currents that may change the flame of
the burner.
When connecting the cylinder for the first time, and any time the cylinder needs to be replaced, ensure that
the room is well ventilated and that there are no naked flames. Do not smoke while carrying out these
operations.
Do not remove or tamper with the regulator or with any other component of the stove.
Protect the stove from the weather.
Do not clean the stove with abrasive products.
Do not put sharp tips and/or metal objects inside the appliance.
Avoid improper use. The appliance should be used only and exclusively for the intended purpose.
The appliance should be regularly checked for wear and tear signs and for damages by qualified,
authorized and trained technicians. Special care should be taken for hoses and connections.
Use only and exclusively original spare parts. For your safety, only use the spare parts expressly indicated
in the user manual.
Repair works must be carried out by a qualified technician. Have a qualified technician inspect the stove at
least once a year.
The presence of excessive dirt caused by carpets, animal litter, pet hair, etc. may require more frequent
maintenance operations.
Do not use the stove if it has been immersed in water, even partially. Contact a qualified technician to
replace any part of the control system and any part of the gas system that were immersed in water.
When igniting the stove after an extended period of inactivity, ensure that there are no foreign bodies inside
it, such as dirt, insects, spider webs, and have the stove checked by a qualified technician.
WARNING: do not use unapproved accessories.
All the components that were removed to carry out maintenance operations must be put back in place
before igniting the appliance.
This heating system should be used only and exclusively as indicated in this manual. Any other use may
cause fires, personal injuries and even death.
To turn off the appliance and put it out of service, close the gas valve on the cylinder and remove the
cylinder itself.
8
2.8 Conduct in case of gas leaks
If you smell gas, proceed as follows!
If you smell gas, do not ignite the device and close the cylinder valve by turning it clockwise.
Do not touch any switch and do not use the phone.
Open doors and windows to ventilate the room.
Extinguish any flame or other potential ignition sources.
No naked flames and no smoking.
Carry out the test operations indicated in 3.4. Never carry out the test in the presence of naked flames.
If there are no leaks, ignite the stove taking special care and in compliance with the instructions provided in
the user manual.
If you still smell gas, try to replace the cylinder as the gas may contain an excessive amount of aroma
compound.
If the problem is not solved, contact the distributor or a specialized technician.
Do not use the appliance until it hasn’t been inspected by a qualified technician.
Never attempt to make any repair work yourself.
Failure to observe this warning may result in injuries or damage to property.
3. Preparing the appliance for operation
3.1 Opening the packaging
Upon delivery, check that the appliance is complete and in perfect conditions.
If there are missing components or faults, do not use the product and contact the seller immediately.
3.2 Keeping the original packaging
Keep the original packaging for the whole life of the appliance.
Use the packaging to store and transport the appliance.
Dispose of the packaging at the end of the life-cycle of the appliance. For further information on correct
disposal, please refer to chap. 8.
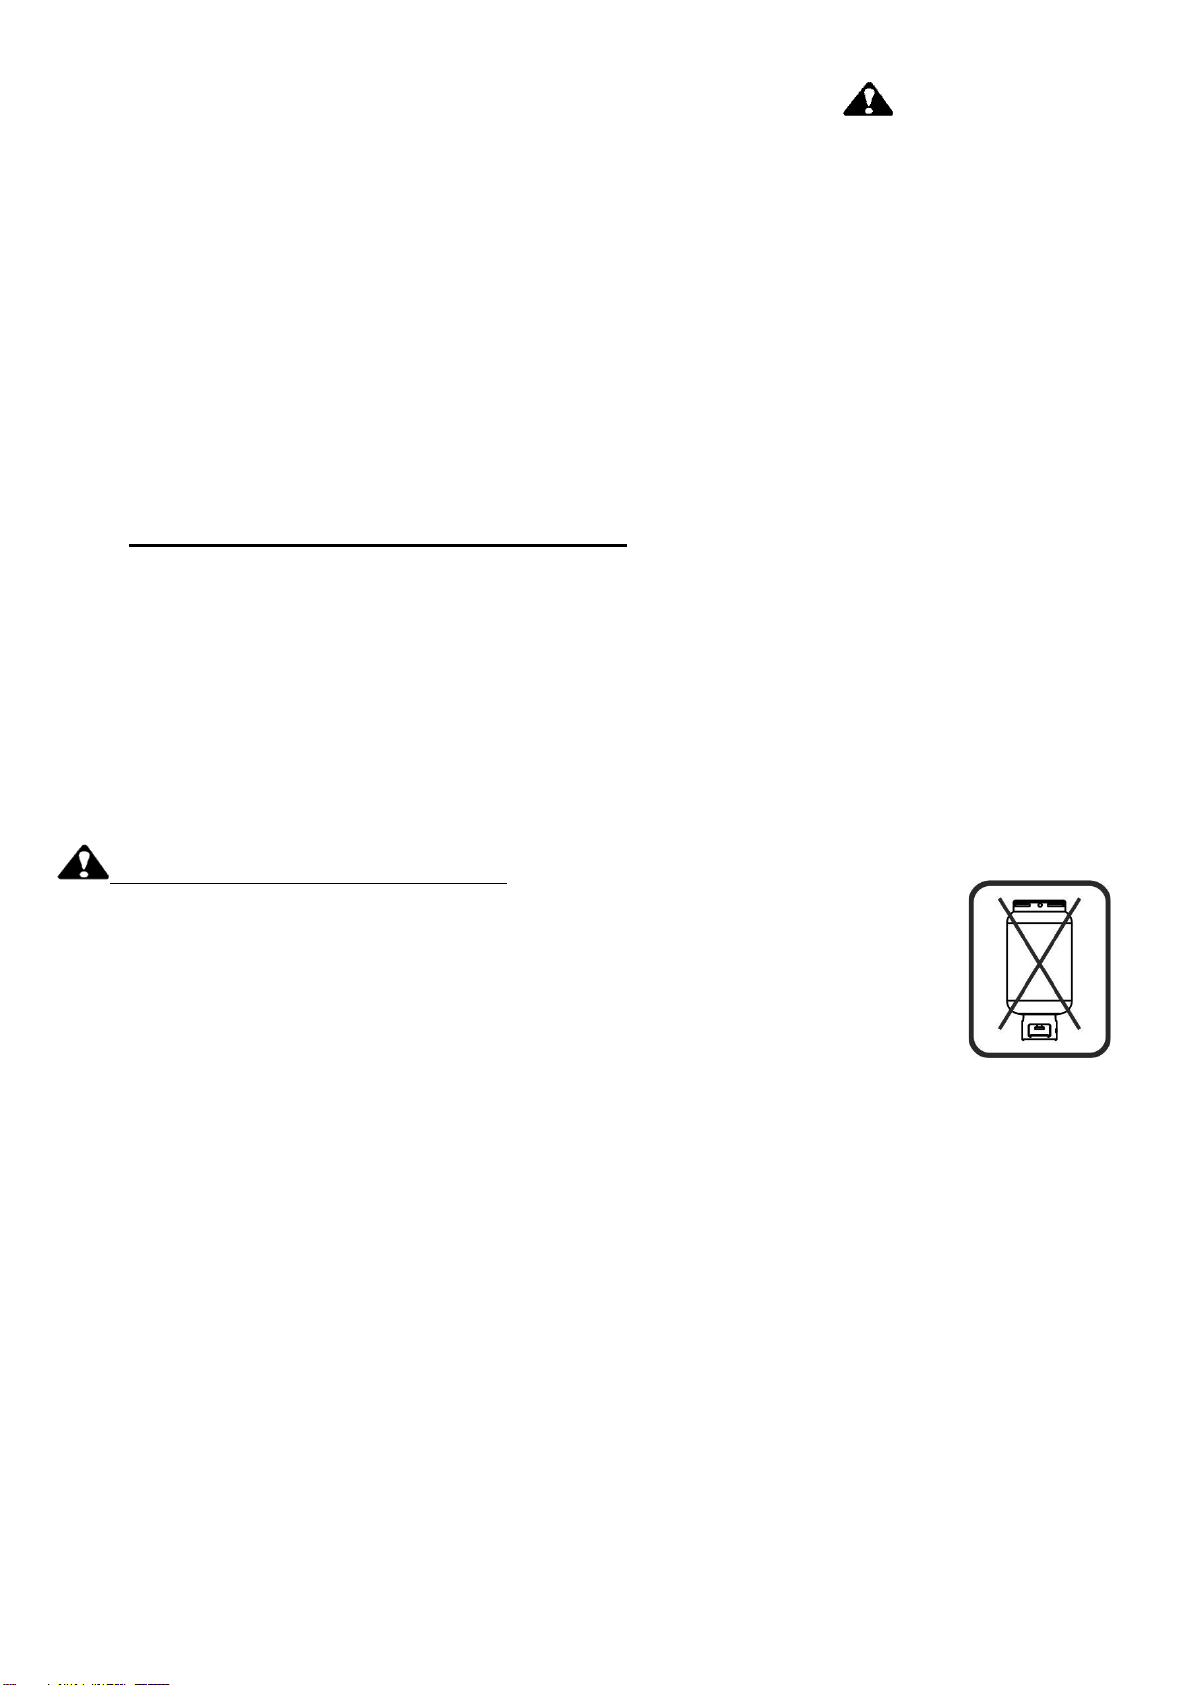
3.3 Connecting the stove to the gas bottle
Never position the cylinder upside-down!
When connecting the cylinder for the first time, and any time the cylinder needs to be
replaced, ensure that the room is well ventilated and that there are no naked flames. Do not
smoke while carrying out these operations.
If the cylinder has been transported, store it in upright position for at least 1 hour before
using it.
Ensure that the gas seal on the cylinder is intact and in perfect conditions.
Check that the connections (the regulator ring and the thread on the cylinder valve) are
clean and undamaged.
Connect the cylinder outside the appliance, as illustrated here below:
Read thoroughly before use.
GB
The following operations are required for the connection:
- Only use this regulator on a Butane gas cylinder with a 21mm (G53) cylinder valve.
- The LP nozzle outlet connection shall only be connected to 8mm Tubing to BS3212 Type 1, 8mm
Hose to BS3212 Type 2, 8mm Tubing to BS EN 16436 Class 1, 8mm Hose to BS EN 16436 Classes 2 or 3.
- The gas cylinder must always be in vertical position and the regulator must never be disconnected while
the appliance is turned on.
- Make sure that the hoses are kept clear of hot surfaces and inspect before use. Replace any hose that
shows signs of wear, cracking or other damage.
- In case of gas escape or malfunction, close the gas supply and contact your dealer.
- Do not use a flame to test for gas leakage: Use a soapy water solution.

9
- If a regulator shows signs of wear, damage or deterioration it should be replaced.
- In normal conditions of use, in order to ensure the correct operation of the of the installation, it is
recommended that this regulator is changed within 10 years of the date of manufacture.
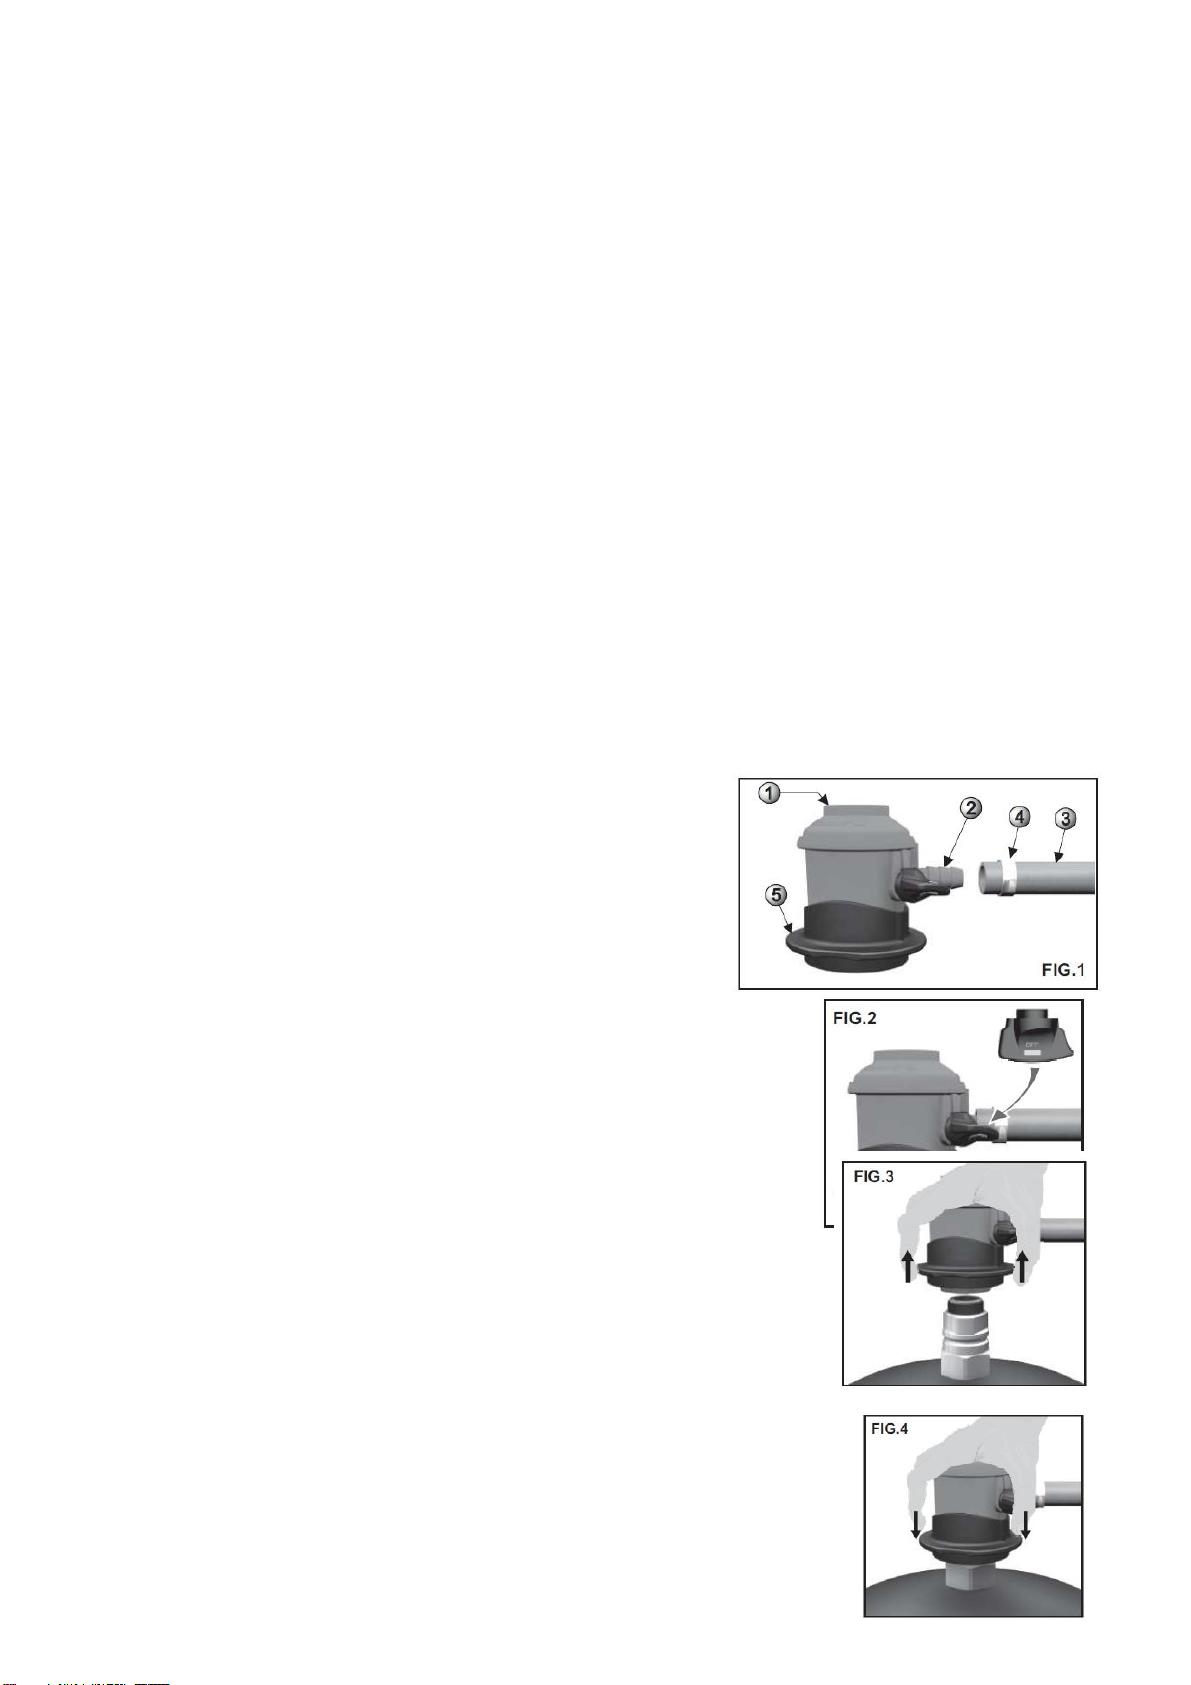
Fitting the tubing or hose (fig.1) (Replacement of the hose)
Use only tubing or hose certified to BS3212 or BS EN 16436 as LPG attacks
and erodes natural rubber and plastics. Maximum length 40 cm.
Connect the end of the hose (3) to the regulator outlet, if necessary with the
aid of soapy water.
Fasten the hose using hose clips (4). To prevent damaging the hose do not
over-tighten the hose clips.
Connecting to the gas cylinder
Turn the orange cap on the cylinder valve so that the arrow is pointing to the
gap in the shroud.
Remove the orange safety cap by pulling the lanyard out, then up.
Do not use tools.
Check the black sealing washer is fitted inside the top of the cylinder valve.
Make sure that:
a) The regulator is switched to the 'off' or disconnect position
(the regulator is OFF when a green rectangle is visible on the handle. See fig. 2)
b) The hose to the appliance is correctly fitted.
c) The valve is clean and free from debris.
Put the regulator on top of the cylinder valve. Place your hand on fig. 3. top of the
regulator and push down firmly and vertically until you hear a click.
NOTE: The regulator can only be fitted to the cylinder valve when the
control knob is in the “OFF” position.
Turning the regulator on
After fitting the regulator correctly onto the valve, turn on by rotating the
control knob anticlockwise half a turn until it stops.
In the ON position a red flame and the marking “ON” is visible. Please,
see fig. 4.
Caution: If you are unable to turn the regulator to the “ON” position, your
regulator is not correctly connected to the valve. Do not force the handle,
repeat the operations described above.
Turning the regulator off
Turn the control knob clockwise half a turn until it stops. Please, see fig. 2.
In the “OFF” position the valve is closed, but the regulator will remain
attached to the cylinder valve.
ALWAYS turn the control knob to the “OFF” position after use. If the appliance is not going to be used again
soon, disconnect the regulator from the cylinder.
Disconnecting the regulator
Make sure the regulator control knob is turned to the 'OFF' position with the green rectangle visible and that
the appliance flame is extinguished.
Remove the regulator by pressing horizontally on the control knob (5) and
then pulling upwards (fig. 5).
Always replace the orange safety cap onto the cylinder valve, when not in
use. Never try to attach or remove the regulator from the cylinder valve
unless the regulator handle is in the OFF position. It is not possible to press
the control knob to release the regulator if it is not in the correct horizontal
position with the marking “OFF” visible.
10
Do not attempt to disconnect the regulator from the cylinder if the appliance flame does not go out when the
regulator is turned 'OFF'. Leave appliance alight and call your local dealer.
IE
The following operations are required for the connection:
- This regulator is a domestic regulator used to supply gas to utilities at specific pressure and flow, as
indicated on the label (1).
- The regulator must be fitted directly to a cylinder featuring a O35 mm (G.56) quick connection valve. Make
sure that the inlet and the outlet of the regulator are correct and suitable for the cylinder valve and the
application.
- The gas cylinder must always be kept in vertical position. Do not move the cylinder during the operation.
When the device is used outdoors, it shall be positioned or protected against direct penetration by any
tracking water.
- Regulator versions featuring a release valve (the marking ”PRV” is visible on the label (1) are generally
not type approved for use in closed premises (see local laws on the subject).
- Regulator operating temperature range is 0/+50°C for Butane and -20/+50 °C for Propane and LPG.
- Never look for gas leaks with a live flame. Use instead a solution of water and soap.
- In the event of any faults being found, close the regulator knob and immediately contact your gas supplier.
- Avoid that the hole on the cover (VENT) is obstructed or stopped (6).
- This regulator cannot be used on caravans and motor homes.
- For a permanent use outside the house, install the regulator in a position protected from the weather,
paying great
attention to the position of the vent hole (6).
Until the time of installation, the product must be stored in a clean, dry location protected from weather,
atmospheric agents and direct sunlight. It must not be knocked or dented in any way.
Before installation, inspect the product for damage and dirt.
Damaged products must not be installed.
Fitting the rubber hose (fig.1) (Replacement of the hose)
Connect the end of the hose (3) to the regulator outlet, if
necessary, with the aid of soapy water. Fasten the hose using
clamps (4). Do not over-tighten to prevent damaging the hose (in
some countries, the hose clamps and the hose are of standards
dimensions).
Assembling on the gas cylinder.
Make sure that:
- All taps of the gas consuming appliance are closed.
- The connecting pipe is correctly fitted to the consuming appliance.
- Make sure the handle is in the “closed” position (the regulator is OFF when
a green rectangle is visible on the handle. See fig. 2)
- Remove the plastic protective plug from the automatic valve.
- Pull the ring (5) upwards as shown in figure 3 and fit the regulator onto the
valve. Afterwards give the ring (5) a strong push downwards as shown in
figure 4. A “click” should be heard, meaning the regulator has been correctly
fitted.
Operation
OPEN (ON): After correctly fitting the regulator onto the valve, the gas flow
can be opened by turning the knob a half turn counterclockwise until the stop,
until you reach the opposite horizontal position. In this position a red flame with
the “ON” is visible as shown in figure 5. In this position the valve is opened and
the gas flow is allowed. CLOSED (OFF): The gas flow can be stopped by turning
the knob a half turn clockwise until the stop, until you reach the opposite
horizontal position “OFF”. In this position the valve is closed.

11
Replacement of a cylinder
Make sure that:
- All the taps of the user appliance are closed.
- The opening knob of the regulator is in the closed position (by turning it a half
turn until the stop the red flame is not visible, “OFF”). Afterwards, remove the
regulator by pulling the ring (5) as shown in figure 6.
NOTE: It is not possible to pull the ring until the knob is in the horizontal position
and the marking “OFF” is not visible. This is an important security feature. The
user must not try to pull the regulator ring if the knob is not in the “OFF” position.
Please contact your gas supplier if you have any problem.
Gas leaks
All gas leaks, however small, are dangerous and must be eliminated. Escaping
gas can normally be traced by smell or sound but liquid detergent should be
brushed over the area to confirm the location of the leak. NEVER look for a leak
with a naked flame.
On cylinders, if a leak is suspected, turn off gas supply immediately, and
extinguish any standing pilot lights or naked flames. Ventilate the room if
possible. If the cylinder is indoors, move the cylinder outdoors to a safe place,
and call your dealer for advice.
Excess flow valve (EFV)
The regulator can be equipped with a safety device “excess flow valve” designed to stop gas escaping in
case of accidental detachment or breakage of the rubber hose used to supply gas to the user appliance.
The marking “EFV” on the label (1) shows the presence of this device on the regulator.
The flow limiting device should operate as follows:
1. In the event of the hose moving from its correct position:
-Close the regulator knob,
- Fit the hose correctly back on the regulator hose connection.
-Open the regulator knob,
-Wait at least 20 seconds before opening the regulator again.
2. In case of the flow of gas being higher than the capacity of the regulator, contact your gas supplier.
Maximum residential flow: 60 g/h.
NOTE: The excess flow valve may close if the gas cylinder is moved during use. To ensure correct
operation of the flow limiting device during gas supply, the appliances hose length should be 1.5m at
maximum.
In normal conditions of use, in order to ensure the correct operation of the of the installation, it is
recommended that this regulator is changed within 10 years of the date of manufacture
IMPORTANT: Never leave the regulator connected to the cylinder valve when the rubber hose is not
correctly fitted in its housing as the flow limiting device has not been designed to guarantee the gas supply
shut off function. The product must never be tampered with or dismantled; any such procedures lead to
forfeiture of warranty cover on the product and the manufacture declines all consequent responsibility.
GB-IE
Emergency advice
If you suspect a leak, turn off the gas, open all the doors and windows and ensure there is no source of
ignition nearby i.e., extinguish any cigarettes and switch off your mobile phone.
Examine all hoses and connections. If the leak is not located, turn on the gas supply and brush over the
connections with liquid detection fluid or a soapy water solution –it will bubble where there is a leak.
NEVER USE A NAKED FLAME to search for a leak. LPG has an odorant added to help with the detection
of leaks.
In the Event of Fire, immediately raise the alarm and call the Fire Brigade advising them of the presence of
LPG.
Turn off the regulator on the cylinder by turning the control knob clockwise.
Keep cylinders cool by water spray if possible.
Ring local Emergency Service number.

12
3.4 Checking the regulator for leaks
Never use a naked flame to check for leaks.
USE ONLY AND EXCLUSIVELY FOAM SOLUTIONS!
After installation, and any time it is necessary, check the connection of the regulator as follows:
1 Connect the regulator to the cylinder.
2. Spray the cylinder connection with combustible gas leak detector. The formation of bubbles indicates a
leak.
3. If the problem is the connection between the regulator and the cylinder the connection needs to be
checked.
4. Repeat steps 1 and 2. Check that the problem has been solved.
If it is impossible to fix the leak, remove the regulator and check that the connection is not uneven or dirty,
or that the seal is not damaged; the connection needs to be tested by a qualified technician..
If the foamy solution detects a further leak, close the regulator handle, replace the cylinder and try again.
Should there still be a leak after replacing the cylinder and carrying out the check, do not use the stove and
contact your seller (see chapter 6). Repair works or faulty component replacement must be carried out by
qualified technicians who must use original components.
ATTENTION:
Ensure that the gas hose has enough space and is not bent. The gas hose
should not be stretched or twisted.
4 Instructions for use
4.1 Commissioning and operation
After installing the cylinder and carrying out the tightness test, the gas stove can be ignited. Please follow
the instructions given here below:
Instructions for using the stove with ON OFF thermostat
1. Install the stove in the desired position, in compliance with the instructions and
warnings given in paragraph 2.7 "General warnings on installation and use".
2. Open the cylinder valve by rotating it anti-clockwise.
3. Turn the knob (fig. 4) clockwise until it stops: this position corresponds to the
START position
Press the knob all the way down and keep it pressed for approximately 45
seconds.
After that, while keeping the knob pressed down, press the piezo push-button until the pilot flames
comes on.
4. Once the pilot flame has come on, keep the knob pressed for 20/30 seconds and then release the
knob.
Fig. 4

13
5. If the pilot flame extinguishes, repeat steps 3 and 4 until the pilot flame comes on correctly
(Fig. 8).
PILOT FLAME NOT CORRECTLY IGNITED PILOT FLAME CORRECTLY IGNITED
6. At this point, to start the burner, slowly turn the thermostatic adjustment knob anti-clockwise until it
stops, corresponding to the number 7 on the knob.
7. When the room has reached the desired temperature, slowly rotate the knob clockwise until the burner
stops: the pilot flame will stay always on and at this point the stove ignites and shuts down
autonomously, maintaining the desired temperature.
ATTENTION: the numbers on the knob are only a reference for the position.
N.B.: When the stove is ignited for the first time, and any time the cylinder needs replacing, the pilot light
will need a little more time to come on. This is due to the air present in the gas circuit.
N.B.: When the stove is ignited for the first time, it generates a little smoke. This will not happen again.
4.2 Shutting off
Turn gas off at the regulator in accordance with the regulator instructions.
In the “OFF” position the valve is closed, but the regulator will remain attached to the cylinder valve.
Ensure that it is well closed. Only after the regulator handle has been correctly closed can the appliance be
switched off completely.
4.3 Replacing the cylinder
When replacing the cylinder, ensure that the room is suitably ventilated.
Ensure that the gas valve is safely closed.
Do not use any tool to remove the pressure regulator: just disconnect the regulator in accordance with the
regulator instructions.
Attention! Install the new cylinder by following the instructions given in this manual.
4.4 Storage (how to store the stove)
When the stove is not in use, it must be stored without the cylinder.
It must be put in its original packaging, covered using a nylon bag and stored in a dry place so that no dust,
insects or insects nest can enter the components of the stove.
4.5 Packaging for private transport
To prevent damaging the appliance during transport, the gas stove must be packed in its original packaging
and the cylinder must be removed. Fasten the gas hose and the pressure regulator.
5 Maintenance
5.1 Cleaning and maintenance
Ensure that the gas valve is completely closed.
Do not carry out any maintenance or cleaning operations until the stove has cooled down completely.
The stove must be cleaned using only and exclusively a dry cloth. Never use pointed or abrasive tools and
always wait until the stove has cooled down. Never clean the stove when it is on and hot
Repairs may only be performed by qualified and certified installers, using original components.
Annually check the status using the appliance and, should you have any doubt, have it checked by a
qualified technician.
Check the state of wear of the flexible hose and replace it, if necessary.
Fig. 8
Fig. 7

14
Check the condition of the gas hose periodically for damage. A leak test should be performed before using
the appliance if it hasn't been used for a long time (see section 3.4).
If any damage is found on the gas hose, have it replaced by a qualified technician together with the
pressure regulator.
If necessary, contact a servicing centre.
Cleaning and maintenance operations that require removing any component must be carried out by a
qualified technician.
Any maintenance work carried out during the first 24 months by unauthorised technician, will render the
guarantee null and void.
Note: Replace the approved pressure regulator EN 16129 and the approved gas hose EN 16436-1 after 10
years from the date of manufacture. The gas tube should have a length of 40 cm. The date of manufacture
is printed on the pressure regulator and on the gas hose.
This operation must be performed by a qualified technician using only original spare parts.
5.2 Faults and repair works
Fault Possible Causes Solutions
Yellow pilot
flame
The gas cylinder is running low.
The nozzle is dirty or clogged.
Replace the cylinder.
Clean with compressed air. Do not use tools.
The flame in
the burner is
yellow
The gas cylinder is running low.
Dirty gas.
The room is very dusty.
When walking near the stove, dust is
sprayed around.
Replace the cylinder.
The flame slowly stabilizes on its own.
The pilot flame
does not come
on.
The cylinder is empty.
See instructions in 4.1
The nozzle is empty or clogged by
dust, insects or insect nests.
No spark
Replace the cylinder.
Follow the instructions in 4.1
Clean with compressed air. Do not use tools.
Contact a specialized technician.
If the appliance is fitted with battery-power
ignition, replace the battery.
Check the connection of the piezo's electrical
wire.
Use a match and ignite through the dedicated
peephole.
The stove
shuts down
during
operation
ODS tripped.
The gas cylinder is empty.
Ventilate the room, wait for a few minutes and
ignite the stove again. If the problem persists, it
means that the room is too small or not
adequately ventilated.
Replace the cylinder.
Leak test
failed
See instructions in 3.4
The gas circuit is damaged.
Follow the instructions in 3.4
Contact your gas dealer.
The regulator
does not
screw in
The thread on the cylinder gas valve
is damaged.
Replace the gas cylinder. If the problem is not
solved, contact the seller.
The main
burners do not
ignite
The gas cylinder is empty
The burner unit is clogged
Replace the cylinder.
Contact a specialized technician.
15
6 Warranty
TMC guarantees its products for a period of 2 years, provided that the following conditions are met:
•the guarantee period starts on the day the stove is delivered with a purchasing document such as an invoice, a
transport document or a payment receipt.
•All the parts that are proven to be defective due to faulty manufacture will be replaced during the guarantee period,
and no charge will be applied for materials and labour.
•Warranty inspections are at the sole discretion of TMC.
•The following items are not included in the warranty: the regulator, the flexible hose and all such components that
are proven to be faulty due to unsuitable use, storage or maintenance operations.
•Any transport expenses for repair works during the warranty period will be charged to the purchaser.
•The warranty shall be invalidated in case of: damages during transport or damages due to lack of care, unintended
use, incorrect installation or failure to comply with the instructions given in this manual.
•The manufacturer's warranty shall be invalidated in case of works carried out by people who were not expressly
authorised to operate on the appliance.
•Any repair work and/or replacement carried out during the warranty period do not extend the warranty itself.
•Cleaning of the components (e.g. burner, pilot flame block, nozzles) is excluded from the warranty.
•The manufacturer is not liable for damage any to persons or property due to installation that is not compliant with
the instructions or to improper use of the appliance.
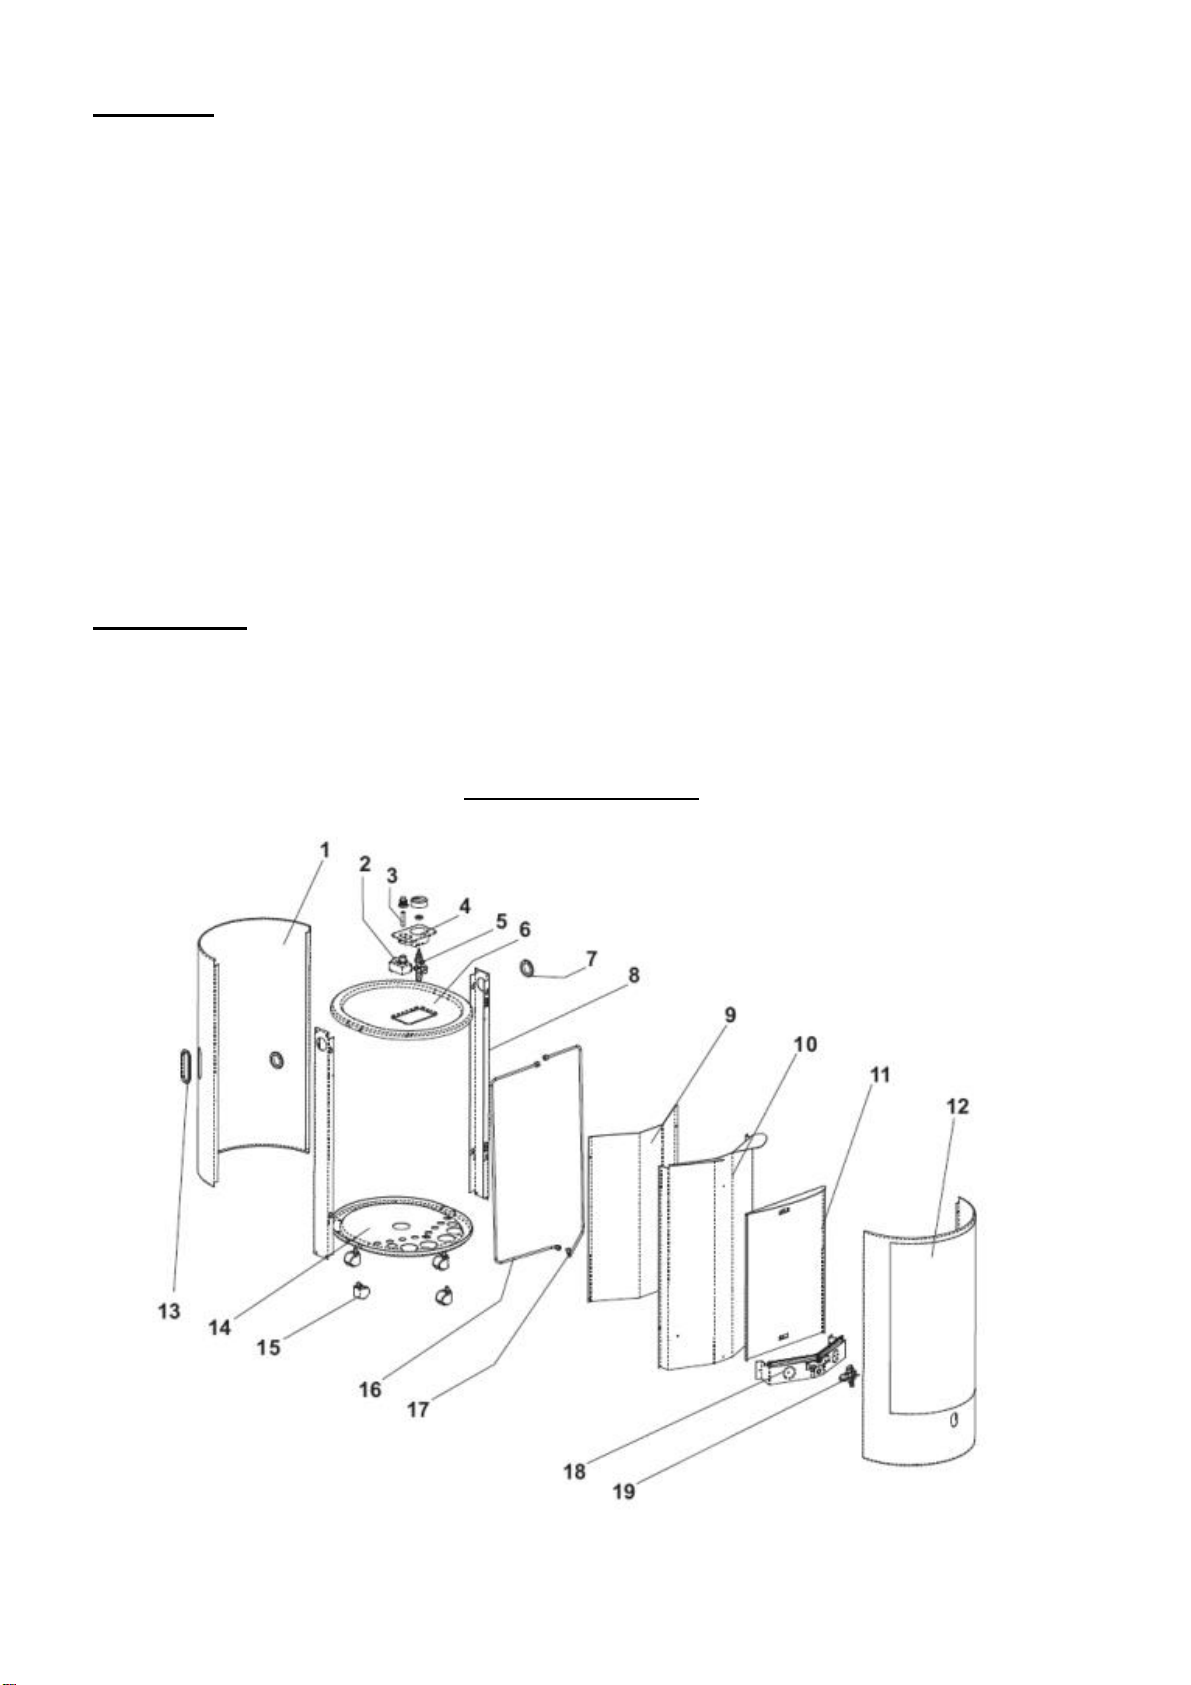
7 Spare parts
When placing an order for spare parts, please provide the description and code of the spare part you
require. (see exploded view drawing)
BLUE BELLE CHIC/TO

16
1
CYLINDER COVER
2
ELECTRONIC PIEZO
3
BATTERY (AAA type)
4
VALVE SUPPORT
5
VALVE
6
COVER*
7
UPRIGHT HANDLE
8
UPRIGHT*
9
REAR PROTECTION PLATE
10
PLATE
11
REFLECTOR
12
FRONT PANEL
13
HANDLE
14
PRINTED BOTTOM PLATE
15
CASTORS
16
BURNER TUBE
17
ANALYZER PIPE
18
BURNER UNIT
19
ANALYZER
* Specify the colour
TMC reserves the right to make technical changes.
7.1 Changing the battery
When the battery that powers the electronic ignition is dead, it must be replaced in compliance with the
instructions and respecting the polarity.
The electronic ignition block contains an AAA type battery. To replace the battery, turn the top of the
piezoelectric igniter (see Fig. 5) anti-clockwise and pull the unit up.
2. Remove the old battery and replace it with a new one (1 AAA type battery, 1.5 V), respecting the polarity.
8 Disposal
To protect the environment, the packaging and any packaging material are made using 100% recyclable
material that can be treated as urban waste.
Once the product has reached the end of its life cycle, it cannot be disposed of as urban waste.
Contact the local authorities to find out about the options for waste disposal in your area.

17
9. EU DECLARATION OF CONFORMITY
LPG CABINET HEATER BLUE BELLE CHIC/TO
Type: 22D
(Domestic flueless heaters –UNI EN 449)
The Company:
TMC S.r.l.
Traversa Viale del Lavoro, 1
I - 37013 CAPRINO VERONESE (VR)
hereby declares under its own responsibility that the following appliances:
BLUE BELLE CHIC/TO
have been developed and produced in compliance with the EU regulation on gas products 2016/426, the
directive 2009/125/EU, the regulations 2015/1186 / EU, 2015/1188 / EU and in compliance with the
harmonized standard EN 449: 2002 + A1: 2007 and are subjected to EC type-approval test.
Notified body CE-0085 has issued the certificate: CE0085BM0301
DVGW CERT GmbH Zertifizierungsstelle
Josef-Wirmer-Str. 1-3
53123 BONN - DE
Validity start of the certificate: 04/21/2018
Expiration of validity of the certificate: 02/13/2028
Supervisory body CE-0085 (DVGW):
DVGW-Forschungstelle Prüflaboratorium Gas
Engler-Bunte-Ring 1-7
76131 Karlsruhe –DE
Signed for and on behalf of:
Bruno Cristini
Sole Director
Caprino Veronese, 05/06/2020

18
UK DECLARATION OF CONFORMITY
We: TMC srl
Address: Traversa Viale del Lavoro, 1- 37013 Caprino Veronese - Verona Italy
Declare that
Indipendent space heater (LPG)
BLUE BELLE CHIC/TO
Satisfies the essential requirements of the Regulation 2016/426 on gas appliances as brought into UK law
and amended and is manufactured in accordance with the UK designated standards:
Standards Number(s): BS EN 449:2002 +A1 2007
BS EN 461:1999 inc A1 2004
2009/125/EU
2015/1188/EU
2015/1188/EU
BSI has performed the following conformity assessment procedure(s) specified in the Regulation 2016/426
on gas appliances as brought into UK law and amended:
•Annex III Module B (Type Examination) and issued the Certificates below:
UKCA Module B certificate: UKCA 753788
Approved Body: BSI Assurance UK Limited (Approved Body No. 0086)
Address: Kitemark Court, Davy Avenue, Knowlhill Milton Keynes MK5 8PP UK.
This declaration of conformity is issued under the sole responsibility of the manufacturer.
In the case of fittings, instructions on how the fitting should be incorporated into an appliance or
assembled to constitute an appliance in order to assist compliance with the essential requirements
applicable to finished appliances.
Bruno Cristini
Sole Director
Caprino Veronese, 21/09/2021

19
Information requirements for gaseous/liquid fuel local space heaters
Model identifier(s): BLUE BELLE CHIC/TO
Indirect heating functionality: No
Direct heat output: …(kW) 4.2 kW
Indirect heat imput: …(kW) 0 kW
Fuel
Space heating emissions(*)
NOx
Select fuel type
[gaseus/liquid]
[specify]
NOx emissions are under the
given limit
Lpg Liquid Petroleum Gas
Butan/Propan G30/G31
Item
Symbol
V
alue
Unit
Item
Symbol
V
alue
Unit
Heat output
Useful efficiency (NCV)
Nominal heat output
P
nom
4.2
kW
Useful efficiency at nominal heat
output
ηth,nom
100
%
Minimum heat
output (indicative)
P
min
N/A
kW
Useful efficiency at minimum heat
output
ηth,min
N/A
%
Auxiliary electricity consumption
Type of heat output/room temperature control (select one)
At nominal heat
output
el
max
x,xxx
kW
single stage heat output, no room
temperature control
No
At minimum heat
output
el
min
x,xxx
[yes/no]
two or more manual stages, no room
temperature control
No
In standby mode
el
SB
x,xxx
[yes/no]
with mechanic thermostat room
temperature control
Yes
with electronic room temperature control
No
with electronic room temperature control
plus day timer
No
with electronic room temperature control
plus week timer
No
Other control options (multiple selections possible)
room temperature control, with presence
detection
No
room temperature control, with open
window detection
No
with distance control option
No
with adaptive start control
No
with working time limitation
No
with black bulb sensor
No
Permanent pilot flame power requirement
Pilot flame power
requirement (if
applicable)
P
pilot
0.1
kW
Contact details
TMC srl Traversa Viale del lavoro, 1 –37013 -Caprino Veronese - Verona - Italia
(*) NOx = Nitrogen oxides

20
Scheda prodotto / Product fiche / Tarjeta de producto / Produktkarte / Carte de produit
a) Produttore / Manufacturer / Productor / Produzent / Producteur:
TMC srl
b) Modello / Model:
BLUE BELLE CHIC/TO
c) Classe di efficienza energetica / Energy efficiency class / Clase de eficiencia
energética / Energieeffizienzklasse / Classe d'efficacité énergétique):
A
(A++ <> G)
d) Potenza termica diretta / Direct power heat imput / Potencia térmica
directa / Direkte thermische Leistung / Puissance thermique directe:
4,2 kW
e) Potenza termica indiretta / Indirect power heat imput / Potencia térmica
indirecta / Indirekte thermische Leistung / Puissance thermique indirecte:
0 kW
f) EEI (Energy efficiency index)
90
g) Efficienza utile alla potenza termica nominale / useful energy efficiency at
nominal heat output / Eficiencia efectiva a la potencia térmica nominal /
Effektiver Wirkungsgrad bei Nennwärmeleistung / Efficacité efficace à la
puissance thermique nominale:
100%
Table of contents
Other TMC Heater manuals


Popular Heater manuals by other brands


Mini
Mini E-90 Technical documentation operation manual

Bimar
Bimar HR301 Instruction booklet

MONDEX
MONDEX Tahko 6.6 Installation and operating instructions

Thermogroupuk
Thermogroupuk ThermoRAIL 7081 installation guide

Amerec
Amerec T1.7 Installation and service instructions

Dimplex
Dimplex CKHA Series Features and specifications