TNI softFlow 50 User manual

TNI soft
Flow
50

TNI-System

3
Operating instructions TNI softFlow 50 Clinic System
• These operating instructions are intended for healthcare professionals.
• These operating instructions apply to TNI softFlow systems manufactured in 2015 or later.
• To reduce the risk of injuries and to receive the most benefit from Therapy with Nasal Insufflation
(TNI), please follow these instructions and warnings strictly and comply with the demands of the
product specifications.
• Keep these operating instructions ready at hand for future reference.
• Before first use, the TNI softFlow system must undergo a setup and configuration process.
• The device must be cleaned regularly and particularly between patients.
• For additional information and support, please contact your local TNI medical AG representative.
First notes

4
Operating instructions TNI softFlow 50 Clinic System

5
Operating instructions TNI softFlow 50 Clinic System
First notes..................................................................................................................................................... 3
Table of Content..........................................................................................................................................4
1 Overview............................................................................................................................. 6
1.1 Intended use................................................................................................................................... 6
1.2 Benets ............................................................................................................................................ 6
1.3 Safety notes .................................................................................................................................... 6
1.4 System components ..................................................................................................................... 9
2 Setup................................................................................................................................... 11
2.1 Humidier ....................................................................................................................................... 11
2.1.1 Componentsofhumidiercliniccomplete........................................................................................12
2.1.2 Assemblyofhumidiercliniccomplete ..............................................................................................12
2.1.3 Water bag installation ................................................................................................................................13
2.1.4 Componentsofhumidierhomecarecomplete..............................................................................14
2.1.5 Assemblyofhumidierhomecarecomplete ....................................................................................14
2.1.6 Waterrell.......................................................................................................................................................15
2.2 Applicators...................................................................................................................................... 15
2.2.1 Applicator installation ................................................................................................................................15
2.2.2 Uninstalling the applicator .......................................................................................................................15
2.2.3 Applicator attachment ...............................................................................................................................16
2.3 Oxygen supply ............................................................................................................................... 16
2.4 Conguration ................................................................................................................................. 17
2.4.1 Modi and operating keys..........................................................................................................................17
2.4.2 Language, date and time ..........................................................................................................................18
2.4.3 Alarm volume.................................................................................................................................................19
2.4.4 Therapy hours................................................................................................................................................19
2.4.5 New patient....................................................................................................................................................19
3 Operation ........................................................................................................................... 20
3.1 Therapy parameters...................................................................................................................... 20
3.1.1 Flow rate ..........................................................................................................................................................20
3.1.2 Humidity ..........................................................................................................................................................21
3.1.3 Oxygen .............................................................................................................................................................21
3.2 Troubleshooting............................................................................................................................. 22
4 Reprocessing...................................................................................................................... 24
4.1 Cleaning and disinfection............................................................................................................ 25
4.1.1 Manual cleaning ...........................................................................................................................................25
4.1.2 Manual disinfection.....................................................................................................................................25
4.1.3 Automatic disinfection...............................................................................................................................25
4.2 Detergents and disinfectants ..................................................................................................... 25
4.3 Cleaning and replacement cycles ............................................................................................. 26
4.3.1 Dustlterchange.........................................................................................................................................27
5 Technical information ....................................................................................................... 27
5.1 Productspecications.................................................................................................................. 27
5.2 System information....................................................................................................................... 29
5.3 Ambient conditions ...................................................................................................................... 29
5.4 Data storage ................................................................................................................................... 29
5.5 Symbols............................................................................................................................................ 30
5.6 Disposal ........................................................................................................................................... 30
6 Warranty............................................................................................................................. 31
7 Service/User assistance information ............................................................................... 31
Appendix: Electromagnetic compatibility (EMC) ....................................................................... 32
Table of Content

6
Operating instructions TNI softFlow 50 Clinic System
1 Overview
TherapywithNasalInsuation(TNI)providesthepatientwithanairowofwarmed,almostfullysaturated
air.Technically,theTNIsoftFlowdeviceconsistsofaventilationunitandahumidicationunit.Theventila-
tionunitdrawsinroomairandcompressesit.Inthehumidicationunit,waterisheateduntilevaporation.
Consequently,thetherapyairishumidied.
If the patient additionally requires supplemental oxygen, an external oxygen source can be connected to the
TNI softFlow system. Using an applicator (comprising a respiratory circuit and a soft nasal cannula as patient
interface),thewarmed,humidiedairorair-oxygenmixtureisledintothenoseofthepatientandfrom
here to the rest of the respiratory tract.
1.1 Intended use
Therapywithnasalinsuation(TNI)isacomplementarytreatmentforpatientswithpartialorglobalrespi-
ratoryinsuciency,e.g.COPD(chronicobstructivepulmonarydisease),ILD(interstitialpulmonarydisease),
in order to relieve breathing muscles, improve ventilation and mucociliary clearance. The TNI softFlow 50
System can be used in adult patients and children in hospitals, long-term care facilities etc. and for outpa-
tient use. The therapy is performed individually according to medical prescription during wakefulness or
sleep. The TNI softFlow 50 is not intended for life support measures.
1.2 Benets
Aconstanthighowofwarmed,humidiedairorair-oxygenmixturemaysupportthehumidicationofthe
mucosainthepatient’srespiratorysystem.Moreover,TherapywithNasalInsuationmayhelpthepatient’s
well-being by delivering oxygen and facilitating the work of breathing.
1.3 Safety notes
Risks
• Nasalapplicationofhigh-flowtherapymaycausepositiveairwaypressure(PAP).Thetreatingphysi-
cian has to consider this possibility when deciding whether high-flow therapy with the TNI softFlow
system is appropriate for the patient.
• Thanks to humidification of the applied air and a thin and soft nasal silicon applicator, irritations
of the nasal mucosa, bleeding and nasal obstruction are very unlikely when using the TNI softFlow
system. In the rare case when such symptoms occur, the humidity should be increased (see chapter
3.1.2 Humidity).
Precautions
• Read and follow the operating instructions carefully.
• Use the TNI softFlow system within the product specifications and for the intended use only.
• The system may only be used by prescription by a physician as per his/her instructions.
• The TNI softFlow system my only be operated by a mentally alert person, possibly a qualified third
person. This must be taken into account especially when the appliance is used in children.
• In case of abnormalities, switch off the device and disconnect it from the power supply to
reduce the risk of injury or damage. When in doubt, please contact your local TNI medical AG
representative.
• Alarms and notes on the display indicate deviations from the tolerance limit.
• During therapy, the patient should be in a sitting or lying position and should not move excessively.
• Positionthedeviceonahorizontalsurfaceandkeepitstationaryduringuse.
• Positionthedevicewherefreeventilationisguaranteed.Donotblocktheairsupplynortheairflow.
• PositiontheTNIsoftFlowsysteminafairdistancetothegroundtoavoiddustaccumulationinthe
dust filter.

7
Operating instructions TNI softFlow 50 Clinic System
• Only use the TNI softFlow system indoors.
• Keep a distance in between the device and animals or unattended children to avoid dirt and dama-
ge to the device.
•Ensure that a sufficient amount of water is available in the humidification chamber at all times
during use.
• Humidity performance can be compromised when used outside the recommended ambient tempe-
rature and humidity range.
•Useauthorized,originallypackedandunexpiredcomponentsonly.
• The ports located below the carrying handle are meant for servicing purposes only.
• The user data (usage times, etc.) may not be used for diagnostic or therapeutic purposes by the
physician.
• Follow the hygiene rules in order to gain the best potential benefits from the therapy. See chapter 4.
Reprocessing.
Warnings
• Do not use the device in a potentially explosive or easily flammable environment!
• Do not smoke or use open fire if a supplemental oxygen source is in use!
• Keep a min. distance of 1m to other electrical devices when using oxygen!
• Do not let children play with the hoses or cables to prevent injuries such as strangulation or swallo-
wing of small parts!
•Do not reach into the housing directly after use since inner parts such as the heating plate and the
bottom of the humidifier might be hot!
• Do not cover the device nor the breathing tube/applicator during use!
• Positionthedevicewhereitcannotfallintowater!
• If water has entered the housing or spilled out of the humidification chamber, disconnect the power
supply and discontinue use!
• If the unit has been dropped or damaged, disconnect the power supply and discontinue use!
• If the power cord or plug damaged, disconnect the power supply and discontinue use!
• Do not use damaged breathing tubes!
• Donotconnectunauthorizedcomponentstothepowersocket!
• Ensure that the characteristics of the local power supply correspond to the requirements of the TNI
softFlowsystem.Seethedevice’snameplateandchapter5.1Productspecifications!
• Do not supply any gases other than oxygen via the lateral oxygen inlet port!
• Do not use the TNI softFlow system in MRI environments, near HF surgical equipment or in other
environments where the intensity of the EM disturbances is high!
Contraindications
• Do not use the TNI softFlow applicators if you are allergic to silicon.
• The TNI softFlow system is not intended as a life-supporting measure.
• The TNI softFlow system is not suitable for the treatment of acute respiratory failure.
• The TNI softFlow system may not be used for invasive ventilation.
• The TNI softFlow system may not be used if the patient’s upper airways are completely obstructed.
• The TNI softFlow system may not be used if the patient’s airways have been bypassed.
• TheTNIsoftFlowsystemmaynotbeusedinpatientswhoexperienceepilepticseizuresoragitated
sleep.
8
Operating instructions TNI softFlow 50 Clinic System
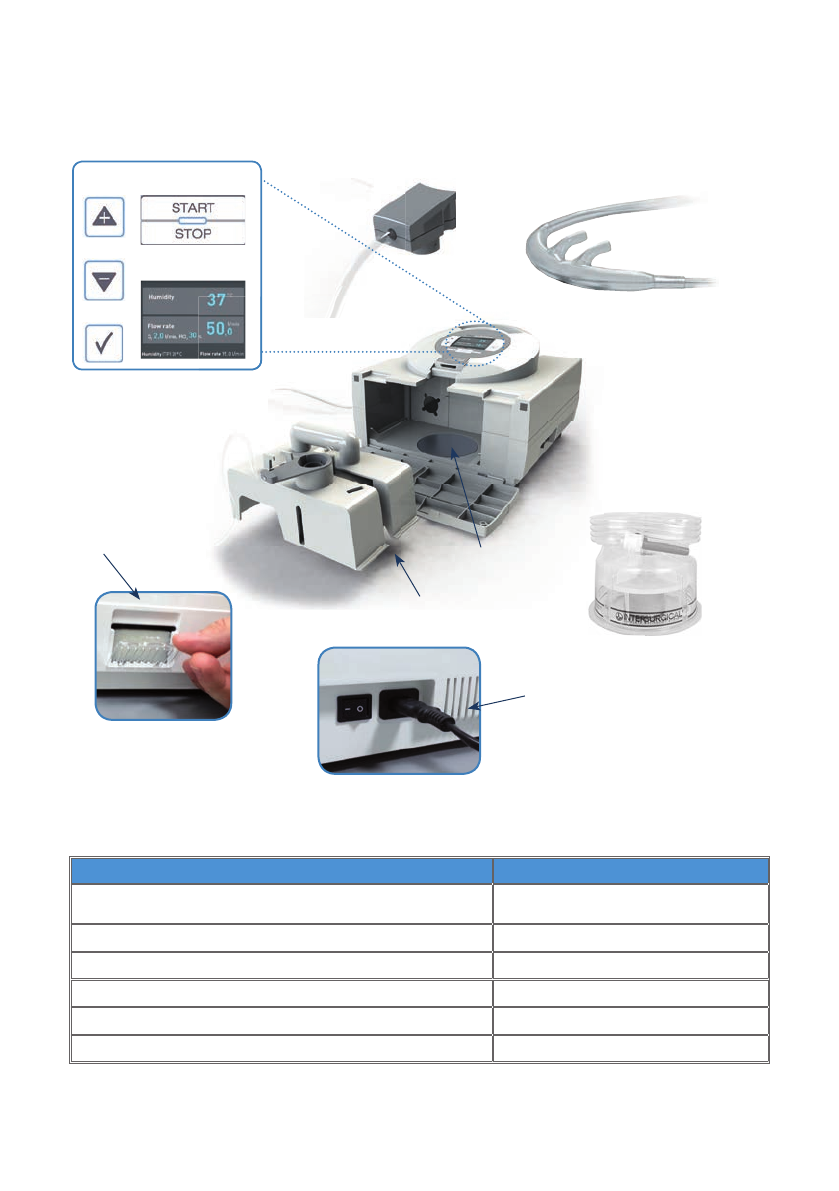
1.4 System components
Scope of delivery
Component Art. No
TNI softFlow 50 clinic system 40610021
Humidiercliniccomplete(set) 40620100
Powerconnectingcable,typeC 40641150
Dustlters(5pcs) 40620060
Protectioncapforoxygeninletport(5pcs.) 40620061
Operating instructions TNI softFlow 50 clinic system 30221040
DISPLAY
MODE
UP
ENTER
DOWN
POWER CORD
and
CONNECTOR
HUMIDIFICATION
CHAMBER
auto-fi ll
HEATING
PLATE
HUMIDIFIER
CLINIC
TNI softFlow 50
PATIENT INTERFACE
APPLICATOR PLUG
DUST FILTER

9
Operating instructions TNI softFlow 50 Clinic System
Accessories
Applicators Art. No Recommendedmax.owrate
Clinic*
Applicator Clinic Small 40630001 20 l/min
Applicator Clinic Standard 40630002 25 l/min
ApplicatorClinicStandardPlus 40630005 35 l/min
Applicator Clinic Large 40630013 50 l/min
Homecare**
Applicator Homecare Small 40630101 20 l/min
Applicator Homecare Standard 40630102 25 l/min
ApplicatorHomecareStandardPlus 40630105 35 l/min
Applicator Homecare Large 40630113 50 l/min
Applicator accessories
Applicator Headgear 40630334
Applicator Clip 40630331
All applicators are for single use; * max. usage time is 15 days; ** max. usage time is 30 days
Component Art. No
Clinic
Humidierrackclinic 40641107
Air bridge softFlow 40641108
Humidicationchamberauto-ll 40641110
ClearGuard3bacteriallter 40641111
Homecare
Waterchamberhumidierhomecare 40641104
Lidhumidierhomecare 40641105
Cycloneelementhumidierhomecare 40641106
For further information, please see www.tni-medical.com.

10
Operating instructions TNI softFlow 50 Clinic System
2 Setup
• For highest efficiency, use the TNI softFlow system within the given product specifications only.
• If the ambient conditions are out of the required range, keep the device switched off for safety
reasons.
• When the device is brought into the therapeutic environment from outside, a significant tempe-
rature difference (transition from storage conditions to usage conditions) can develop, sometimes
over 50°C. If that has occurred, allow 24 hours of adaptation to the ambient conditions (room
temperature, e.g.) before startup.
•PlacetheTNIsoftFlowdevicehorizontallyonaflatsurfacebelowthepatient’sheadheight.
• Placethedeviceataminimumheightof40cmfromthefloorandkeepaminimumdistanceof
40 cm from the wall and 1 m from any other electrical device.
• Placethedevicesothatthepowerplugcanbeconnectedanddisconnectedwithoutdifficulty.
• Use the provided power cable to connect the power socket on the right side of the device to a
power outlet.
• Switch on the device by pressing the rocker switch next to the power socket.
NOTE
• The device performs an internal test during startup: an alarm sound must be audible.
WARNING
• Ensure that the interior of the TNI softFlow unit is dry before connecting it to the power
supply.
2.1 Humidier
TheTNIsoftFlowsystemcanbeoperatedwithtwodierenthumidiertypes.TheTNIsoftFlowsystemis
usedwiththehumidiercliniccompleteforpatientsintheclinicorinacarefacility,withthehumidier
homecarecompleteforpatientsathome.Accordingly,therespectivehumidiertypemustbeselectedin
theusermenu,tab“Humidiertype”(seechapter2.4.6Humidiertype).

11
Operating instructions TNI softFlow 50 Clinic System
2.1.1 Componentsofhumidiercliniccomplete
Thehumidiercliniccompleteconsistsoffourparts.
Humidierrackclinic ClearGuard3bacteriallter
Humidicationchamberauto-ll AirbridgeTNIsoftFlow
2.1.2 Assemblyofhumidiercliniccomplete
Assemblethehumidieraccordingtofollowingdescriptivepicturesequence:
Slidethehumidicationchamberauto-llfrombelow
into the dedicated socket of the casing.
Pushthebacteriallterfromaboveintothededi-
cated socket of the casing.
Placetheairbridgefromaboveontothededicated
openingsofthecasingtoconnectthelterandthe
humidierchamber.
Theapplicatorlockingleveronthehumidierrack
mustfaceawayfromthedevice.Pushthehumidi-
errackfullyintothedevice.Makesuretherack
slides beneath the rails. Close the front lid of the
casingbyippingitup.
12
34

12
Operating instructions TNI softFlow 50 Clinic System
2.1.3 Water bag installation
• The bag with sterile water can be installed/changed when the device is switched on or off.
• Pushthespikeofthechamberhoseintothededicatedopeningatthebottomofthewaterbag.
• Placethewaterbagsothattheopeningis1mabovetheupperedgeofthedevice(seefigure
below as example).
• Open the vent cap on the side of the bag spike. The humidification chamber will now automatically
and constantly be filled up to the mark line until the water bag is empty.
NOTE
• Ensure that the humidi cation chamber and the water bag always contain su cient amounts
of water.
• Switch o the TNI softFlow system if not in use.
WARNING
• Ensure that the water level is always below the mark line
(see gure)!
• Use sterile water only. Do not use any additives!
• Empty the humidi cation chamber completely before
transporting or moving the device!
• Do not use the humidi cation chamber after it has been
dropped or when material damage is visible!

13
Operating instructions TNI softFlow 50 Clinic System
2.1.4 Componentsofhumidierhomecarecomplete
Thehumidierhomecarecompleteconsistsofthreeparts.
Lidhumidierhomecare
Cycloneelementhumidierhomecare
Waterchamberhumidierhomecare
2.1.5 Assemblyofhumidierhomecarecomplete
Assemblethehumidieraccordingtofollowingdescriptivepicturesequence:
Fill the water chamber with boiled tab or drinking water
(max.lukewarm)uptothe“max.”mark.
Putthecycloneelementandthelidfrom
above onto the water chamber.
Close the lid and lock it by lowering the locking tabs. Carefullypushthehumidierhomecare
complete into the device. Close the housing
frontlidbyippingitup.
WARNING
• Do not use the humidi er chamber homecare complete after it had been dropped or run dry,
which will trigger the alarm “Re ll water”!
• Empty the humidi cation chamber completely before transporting or moving the device!
4 5
Putthecycloneelementandthelidfrom
above onto the water chamber.
max.
min.
123
Lidhumidierhomecare
Cycloneelementhumidierhomecare
Waterchamberhumidierhomecare
Lidhumidierhomecare
Cycloneelementhumidierhomecare
Waterchamberhumidierhomecare

14
Operating instructions TNI softFlow 50 Clinic System
2.1.6 Waterrell
• Change of water in the humidifier homecare complete is due daily.
• Disassemble the individual components of the humidifier homecare complete and rinse them under
running water.
• Soak a soft, lint-free cloth in lukewarm water with a little amount of mild, standard household clea-
ning detergent and wring it afterwards.
• Rub and wipe the damp cloth over the surfaces of the unit and its components and along the edges
and joints to remove visible dirt deposits and calcifications.
• Rinse the components under running water.
• Wipe dry all components with a dry, soft, lint-free cloth to avoid calcifications.
• Just before the next use, refill the water chamber with recently boiled tab or drinking water (max.
lukewarm).
2.2 Applicators
2.2.1 Applicator installation
Choose appropriate applicator type (see chapter
1.4 System components).
Insert the applicator plug from above into the dedi-
cated socket and push it down gently and fully.
NOTE
• To meet the requirements of the ongoing therapy, be sure to choose the appropriate
applicator type.
2.2.2 Uninstalling the applicator
Move the locking lever under the applicator plug
to the right. The applicator plug is released from
its lock.
Carefully pull the applicator plug straight up from
the socket.

15
Operating instructions TNI softFlow 50 Clinic System
2.2.3 Applicator attachment
Switch on the TNI softFlow device before attaching an applicator. Attach the applicator to the patient’s face
according to the following picture sequence.
Make sure that the slight-
ly curved prongs point
towards the face.
Carefully insert the prongs
into the nose. Slide the
tube over the ears.
To fix the applicator’s
position, pull the fixing
sleeve towards the chin.
NOTE
• Keep the heated applicator tube away from any electronic monitoring electrode (EEG, ECG,
EMG, etc.) to avoid potential interference with the monitored signal.
• Do not jam or bend the tube.
• The applicator must be changed with every patient.
WARNING
To reduce the risk of burns:
• Do not use accessories that are not authorized by TNI medical AG.
• Do not use insulating sleeves and do not cover the applicator when in use (e.g. by a blanket).
• Do not use any external source (a radiant heater, e.g.) to heat the applicator.
• Do not modify the applicator in any way.
To reduce the risk of electric shocks:
• After the applicator has been attached, the patient should not touch the electrical connec-
tions of the TNI softFlow system.
2.3 Oxygen supply
If supplemental oxygen is required, an external, medically approved oxygen source can be connected to the
TNI softFlow device using the lateral oxygen inlet port.
The oxygen inlet port is
located on the left side of the
device casing.
If no oxygen supply is
needed, the oxygen inlet
port must be kept sealed
by the protective cap.
Connect an external oxygen
source to the oxygen inlet port
of the device using a dedicated
oxygen tube.
123

16
Operating instructions TNI softFlow 50 Clinic System
NOTE
• Please follow the operating instruction of the external oxygen source closely. If you have any
questions concerning the use of the oxygen source, please contact your oxygen vendor or our
hotline [US number to be supplied].
• Incorrect connection of the oxygen source may lead to inecient oxygen therapy. Ensure a
stable connection.
WARNING
• Mount the oxygen source safely to prevent damage and injury.
• Smoking and open re are strictly forbidden when using supplemental oxygen due to the risk
of explosion.
• Do not operate the device in closed rooms producing or using anesthetics and/or nitrous
oxide.
• Keep the oxygen valves free of oil, grease or any ammable liquids.
• Keep the device at a min. distance of 40 cm from the oor and from the wall and a min.
distance of 1 m to other electrical devices when using supplemental oxygen.
2.4 Conguration
The user menu can be entered in standby or operation mode. Use the arrow keys to scroll up or down in the
usermenuandtoincreaseordecreasevalues.Onceparametersettingshavebeenselectedandconrmed,
they are saved in the system’s internal memory and booted with the next startup. The settings can be read-
justed at any time.
2.4.1 Modi and operating keys
Standby mode
Operation mode
The display illumination darkens after 10 min. By pressing any function key, the display illumination is
reactivated.
ENTER USER MENU
STARTUP OUT OF
STANDBY MODE
ENTER USER MENU
STOP OPERATION

17
Operating instructions TNI softFlow 50 Clinic System
User menu
2.4.2 Language, date and time
Language
Entertheusermenuandselectthetab“Language”.Scrolltothedesiredlanguageandconrmtheselecti-
on.
Usermenu: Example:
Date
Entertheusermenuandselectthetab“Date”.Selectthedesiredformatandconrmtheselection.Usethe
arrowkeystosetthecorrectdate.Conrmthesetting.Itissavedinthesystem’smemory.
Usermenu: Example: Setting:
Time
Entertheusermenuandselectthetab“Time”.Selectthedesiredformatandconrmtheselection.Usethe
arrowkeystosetthecorrecttime.Conrmthesetting.Itissavedinthesystem’smemory.
Usermenu: Example: Setting:
SCROLL UP OR DOWN/
INCREASE OR REDUCE
VALUE CONFIRM SELECTION /
ADJUSTED VALUE
EXIT USER MENU

18
Operating instructions TNI softFlow 50 Clinic System
2.4.3 Alarm volume
Entertheusermenuandselectthetab„Alarmvolume“.Selectthedesiredalarmvolumeandconrmthe
selection.
Usermenu: Example:
2.4.4 Therapy hours
The TNI softFlow system continuously records the patient’s therapy hours. Enter the user menu and select
“Therapyhours”toreadoutthetherapyhours.
Usermenu: Displayoftherapyhours:
NOTE
• All data on operation and dysfunction are recorded and can be read out by TNI medical AG
technical sta or an authorized TNI medical AG representative.
2.4.5 New patient
Before the TNI softFlow system is used by another patient, therapy hours of the previous patient should be
settozero.Entertheusermenuandselectthetab“Newpatient“.Select“Yes”andconrmtheselection.
Usermenu: Selection: Therapyhoursaredeleted:

19
Operating instructions TNI softFlow 50 Clinic System
3 Operation
InordertogetallthepotentialbenetsfromTherapywithNasalInsuation(TNI),pleasecomplyclosely
with the present setup and operating instructions.
NOTE
• Before startup, ensure that the humidication chamber is lled with a sucient amount of
water.
WARNING
• Ensure that the water level is always below the mark line.
• Ensure that the interior of the TNI softFlow device is dry.
• Do not reach into the interior of the device during or immediately after use since the inner
parts might be hot.
• Ensure that protective caps seal the ports located below the carrying handle.
3.1 Therapy parameters
Inoperationmode,thedisplayshowsthecurrentoutputhumidity(dewpointtemperaturein°CDP),ow
rate(inl/min),oxygenowrate(inl/min)andFiO2(in %).
Numbers in the bottom line show the programmed nominal values. Arrows in front of the output values
indicate that the nominal values are not reached yet and the device is currently up- or down-regulating the
respective parameter.
3.1.1 Flow rate
•
Selecttheparameter”Flow”intheusermenu.
•
Adjust the flow rate in 0.5 l/min steps within the range of 10-50 l/min and confirm the selec-
ted nominal value.
•
The newly set nominal value is shown in the footer at the bottom of the display.
Usermenu: Setting: Nominalvalueinthefooter:
NOTE
• Set the ow rate before attaching the applicator to the patient to prevent discomfort.
• Ensure that the total ow rate is at least 3 l/min higher than the oxygen ow rate since the
ventilation unit draws in at least this amount of room air when the device is running.
CURRENT VALUE
NOMINAL VALUES
CURRENT VALUE
1
1
20
Operating instructions TNI softFlow 50 Clinic System
WARNING
• Flow rates must be set by qualied health professionals only.
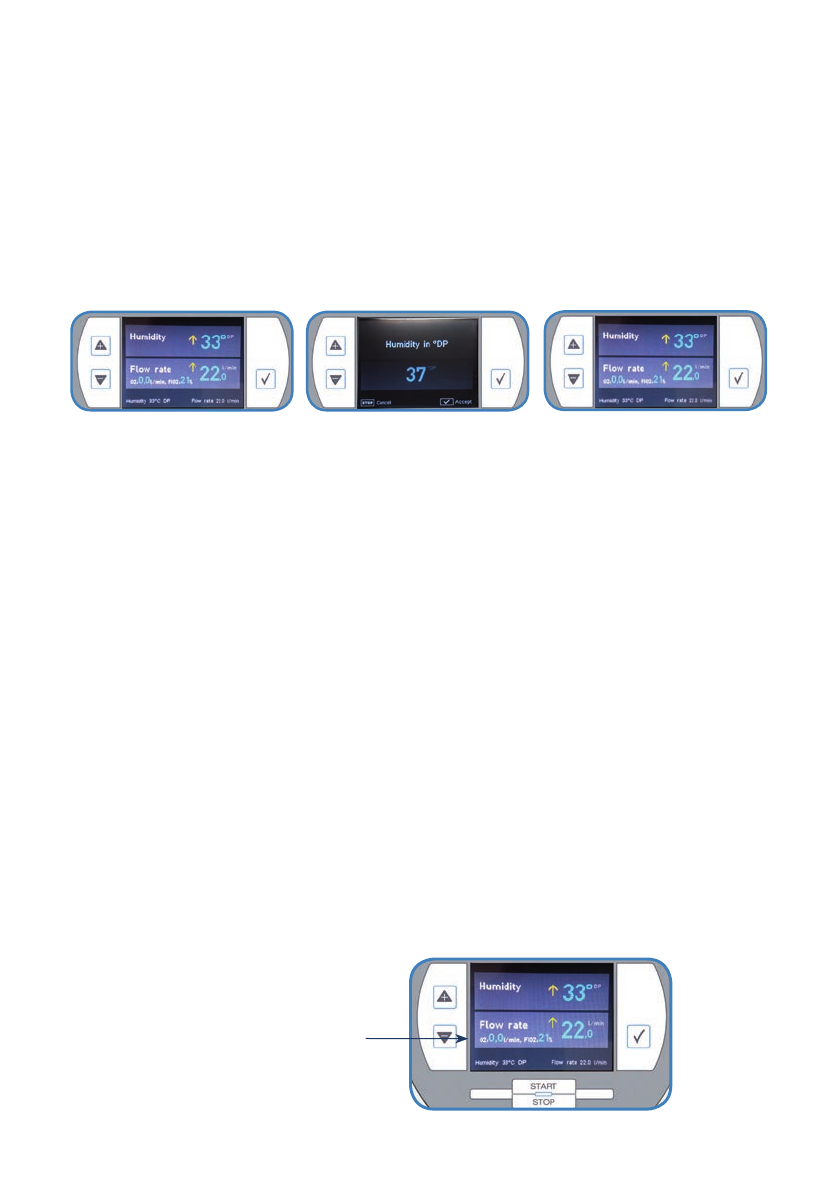
3.1.2 Humidity
•
Selecttheparameter”Humidity”intheusermenu.
•
Increasethedewpointtemperature(in1°CDPsteps,withintherangefrom30-37°CDP)to
increase the humidity or vice versa by pressing the arrow keys. Confirm the new nominal
value.
•
The newly set nominal value is shown at the bottom of the display.
Usermenu: Setting: Nominalvalueinthefooter:
•
Alternatively, the nominal value can be changed directly in the operation mode by pressing
the arrow keys.
NOTE
• For optimal humidication of the patient’s mucosa, humidity of 34-37°C DP during therapy is
recommended.
• If the patient feels dryness in the nose, check if the humidication chamber contains enough
water and/or increase the humidity value.
• The system requires a setup-time of about 10 min to adjust a newly set nominal value of
humidity.
• If water condenses excessively in the applicator / heating tube, the chosen humidity value
might be too high for the present ambient conditions. Reduce the dew point value.
3.1.3 Oxygen
Ifrequired,oxygencanbeadditionallymixedintotheairowbyconnectinganexternaloxygensourceto
the TNI
soft
Flow device (see chapter 2.3 Oxygen supply).
• Switch on the TNI softFlow device first.
• Start the oxygen supply by opening the valve of the oxygen source.
• The oxygen flow rate is displayed in l/min and the resulting oxygen concentration of the air flow is
shown as FiO2value in %.
• Adjust the oxygen supply by adjusting the opening of the valve of the external oxygen source.
• Stop the oxygen supply by closing the valve of the external oxygen source.
DisplayoftheoxygenowrateandtheFiO2
Other manuals for softFlow 50
4
This manual suits for next models
1
Table of contents
Other TNI Medical Equipment manuals


Popular Medical Equipment manuals by other brands


Getinge
Getinge Arjohuntleigh Nimbus 3 Professional Instructions for use

Mettler Electronics
Mettler Electronics Sonicator 730 Maintenance manual

Pressalit Care
Pressalit Care R1100 Mounting instruction

Denas MS
Denas MS DENAS-T operating manual

bort medical
bort medical ActiveColor quick guide

AccuVein
AccuVein AV400 user manual


