Tommee Tippee 1069 User manual

IMPORTANT WARNINGS!
Keep this instruction sheet for future reference as it includes important information.
• This appliance is intended for household use only. Do not use outdoors.
• Before plugging in the Steriliser for the first time ensure that the voltage is compatible
with your electricity supply by checking the label on the base of the unit.
• Ensure water has been added to the unit before switching the unit on
• Do not immerse in water. To protect against fire, electric shock and injury to persons.
Do not immerse cord, plugs or other parts of the unit in water or other liquid.
• Misuse of the product may result in the risk of fire, electric shock and/or personal injury.
• This appliance shall not be used by children. Keep the appliance and its cord out of
reach of children.
• Appliances can be used by persons with reduced physical, sensory or mental
capabilities or lack of experience and knowledge if they have been given supervision
or instruction concerning use of the appliance in a safe way and understand the
hazards involved. Children shall not play with the appliance.
• User maintenance other than cleaning and descaling is not required for this product.
• Cleaning and user maintenance shall not be made by children.
• The surfaces are liable to get hot during use
• The heating element surface is subject to residual heat after use.
• Do not touch hot surfaces use handles and knobs.
• When in use the steriliser contains hot water and steam. Keep hands away from steam
vents as it can cause burns and scalds. Use in a well ventilated area.
• Do not operate any appliance with a damaged cord or plug or after the appliance
malfunctions or has been damaged in any manner. If the supply cord is damaged it
must be changed by a qualified person in order to avoid a hazard. If the damage is
from new the unit must be returned to the manufacturer. If within a retail warranty
period this product should be exchanged at place of purchase. The manufacturer will
then be made aware. Any questions? Visit our website www.tommeetippee.com
or call us FREE on AUSTRALIA: 1800 096 938, NEW ZEALAND: 0800 726 436
• Always use on a flat heat resistant surface
• Do not move appliance when in use
• Do not let the cord hang over edge of kitchen work surface or touch hot surfaces. The
product has been fitted with a cord wind on the base of the unit to allow you to adjust the
length of the cord safely. It is recommended that the cord be kept as short as possible.
• Do not use any accessories other than those supplied with this appliance.
electric
steam steriliser
INSTRUCTIONS FOR USE
roclosetnature®
A
B
G
H
L
I
J
C
M
D
2
1
3
4
5
6
7
8
9
f l oz ml
60
30
90
120
150
180
210
24 0
260
2
1
3
4
5
6
7
8
9
f l oz ml
60
30
90
120
150
180
210
24 0
260
E
K
F
Before using your steriliser, please ensure that you read these instructions thoroughly.
Please read and retain this important information for future reference.
IMPORTANT INSTRUCTIONS FOR SETTING UP YOUR STERILISER BEFORE USE:
TO CLEAN YOUR STERILISER BEFORE FIRST USE REFER TO PARTS GUIDE AND DIAGRAM
Do not connect to power at this stage.
Remove all items from inside the steriliser base.
Pour exactly 80ml of water into the steriliser base.
Assemble the white lower tray (A), central stem (C) and upper tray (B) and place in the steriliser base.
Add the lid.
Connect the lead and plug into the mains supply. The start switch and sterilising light should come on automatically. If it does not then press
the switch and it will light up amber to show that sterilising has begun.
The light will switch off when sterilising has finished.
Allow to cool for 3 minutes before turning off at the mains, removing the plug and disconnecting the lead from the steriliser.
Remove lower tray, central stem and upper tray, pour away any remaining water and wipe dry – Your steriliser is now ready for use.
This steriliser is designed for use with closer to nature® bottles and feeding accessories (except bottle brush). The steriliser will hold up to 6 closer
to nature® bottles, plus accessories.
1
2
3
4
5
6
7
8
9
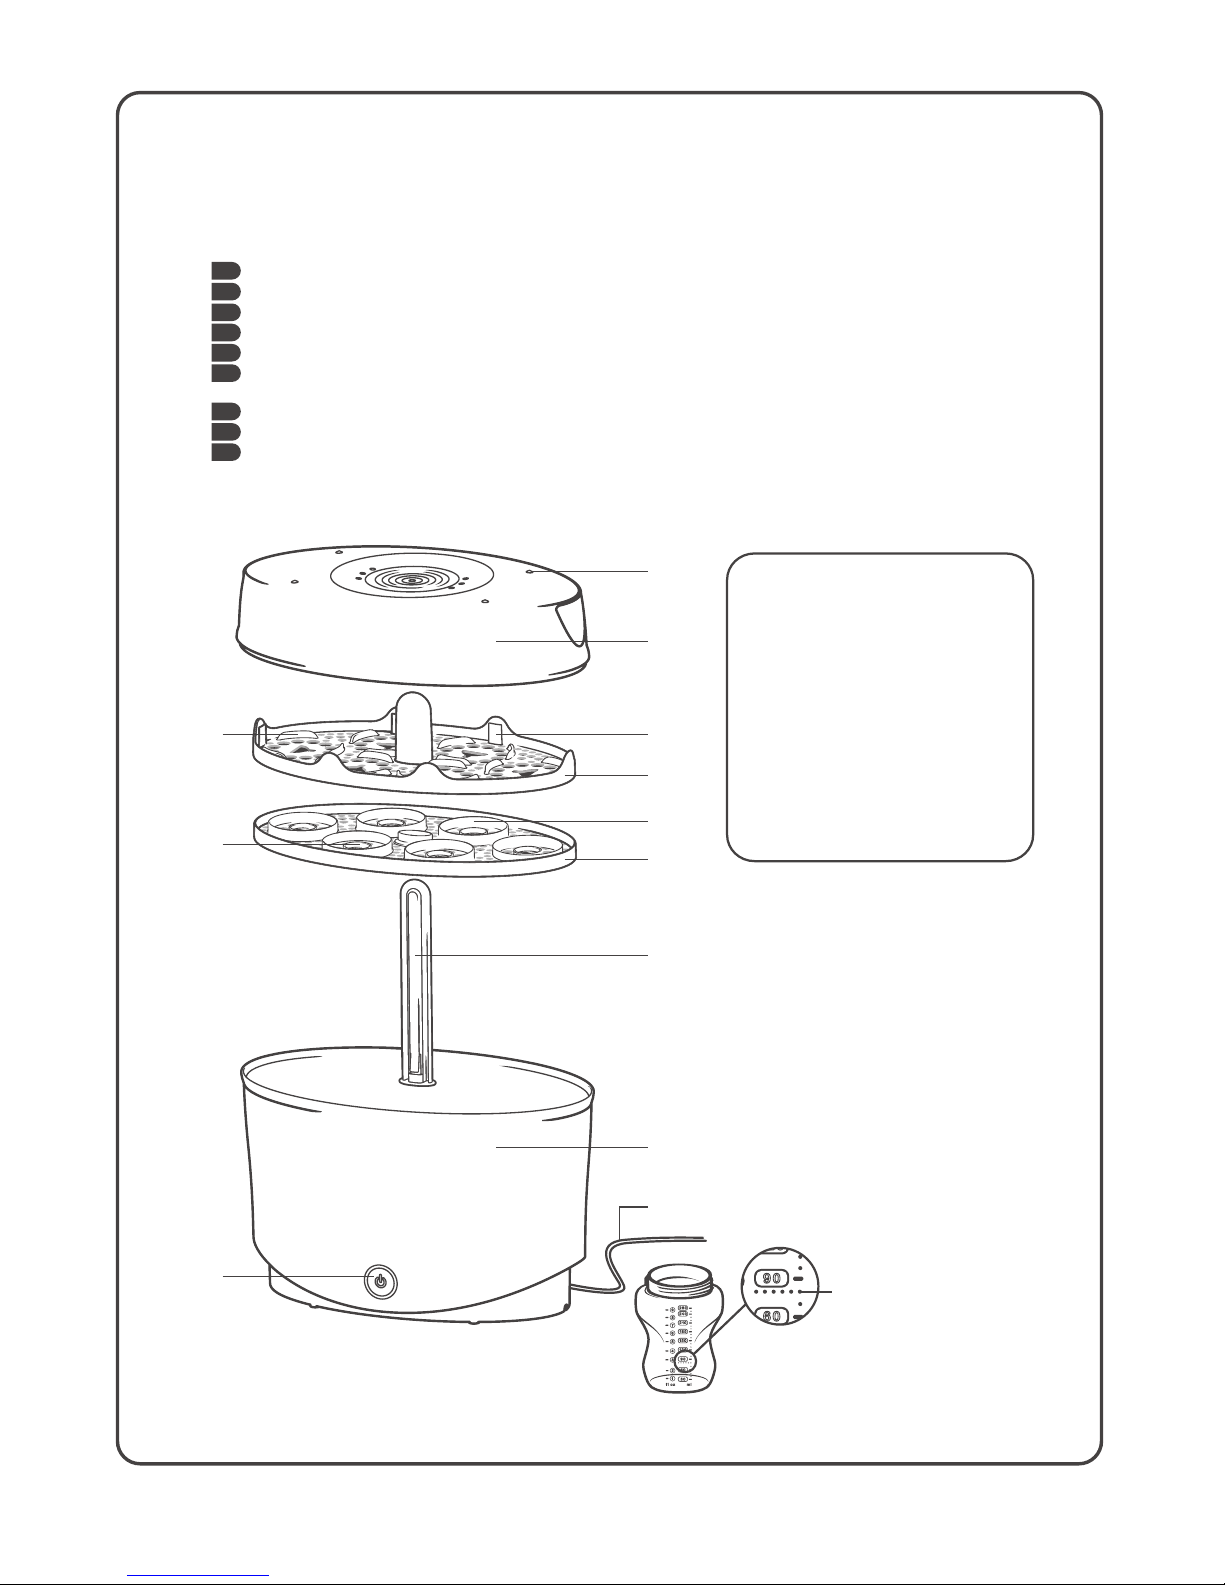
PARTS GUIDE (see diagram)
A
Removable lower tray
B
Removable upper tray
C
Central Stem
D
Locator for closer to nature® bottle neck
E
Locator for closer to nature® anti-colic plus valve
(if sterilising closer to nature® anti-colic plus bottles)
F
Locator for closer to nature® screw ring and teat
G
Locator for bottle hood
H
Lid
I
Sterliser base
J
Lead with plug
K
Start switch and sterilising light.
L
Steam vents
M
80ml measurement on closer to nature® bottle

FOR INSTRUCTIONS ON HOW TO CLEAN AND STERILISE THE CLOSER TO NATURE® BOTTLES, PLEASE SEE
SEPARATE LEAFLET.
USING THE ELECTRIC STEAM STERILISER
Before sterilisation, wash all bottles and feeding accessories in warm soapy water or in a dishwasher (top rack only) to remove any milk
residues. Separate all components for washing and reassemble teat and screw ring for sterilising.
WARNING: DO NOT ALLOW PRODUCT TO COME INTO CONTACT WITH OIL BASED FOODS (e.g. OIL/TOMATO BASED SAUCES) AS STAINING WILL OCCUR.
Place the lid onto the steriliser base.
Plug the lead into the mains power and switch on.
Press the start switch and it will light up amber. This shows that the steriliser is in its warm up phase and will automatically begin
the sterilising phase when the appropriate temperature is reached .
The light will switch off when the sterilising phase has finished.
Allow to cool for 3 minutes before opening the steriliser.
The contents will remain sterile for 24 hours if the steriliser is unopened.
Wash your hands thoroughly before handling sterilised items. Take care as the items will be hot.
2
Pour exactly 80ml of water into the sterilser base.
Your closer to nature® bottles have a handy 80ml
measure.
WARNING: MORE THAN 80ML OF WATER IN THE
STERILISER BASE WILL PROLONGTHE CYCLETIME.
LESS THAN 80ML MAY NOT STERILISE ITEMS PROPERLY.
Assemble central stem and lower tray
into the steriliser base.
Place the bottles neck downwards into the
locators of the removable lower tray.
If using closer to nature® anti-colic plus
bottles, place bottle parts in the locators as
shown in diagram 4 and 6.
6
Slot the hoods into the hood locators of the
removable upper tray so that they hang over the
teat and screw ring but are not fully assembled.
4
2
4 5
7
1
8
16
9
10
Place the assembled teat and screw ring in
the locators of the removable upper tray. It is
important not to have the hoods fitted onto
the teat and screw ring.
Fit the removable upper tray into place.
6
3
11
12
13
14
16
Remove the sterilised items. The teat tongs can
be used to remove the small items. The lid
when removed and placed flat becomes
another hygienic work surface for making up
feeds.
15
CLEANING INSTRUCTIONS
• After each use, pour away any remaining water from the Steriliser base.
• You should descale your steriliser every 4 weeks to ensure it continues to work efficiently. Electric steam steriliser descaling products
are widely available. Use according to the manufacturer’s instructions.
• Do not use softened water in the steriliser. The hot plate is easily damaged and must be treated with care.
• Do not use metal objects or scourers.
• Do not use bleach or chemical sterilising solutions/tablets in your steriliser or on products to be sterilised.
• Do not use abrasive or anti-bacterial materials to clean the steriliser.
Drain and rinse unit to prevent a build up of limescale.
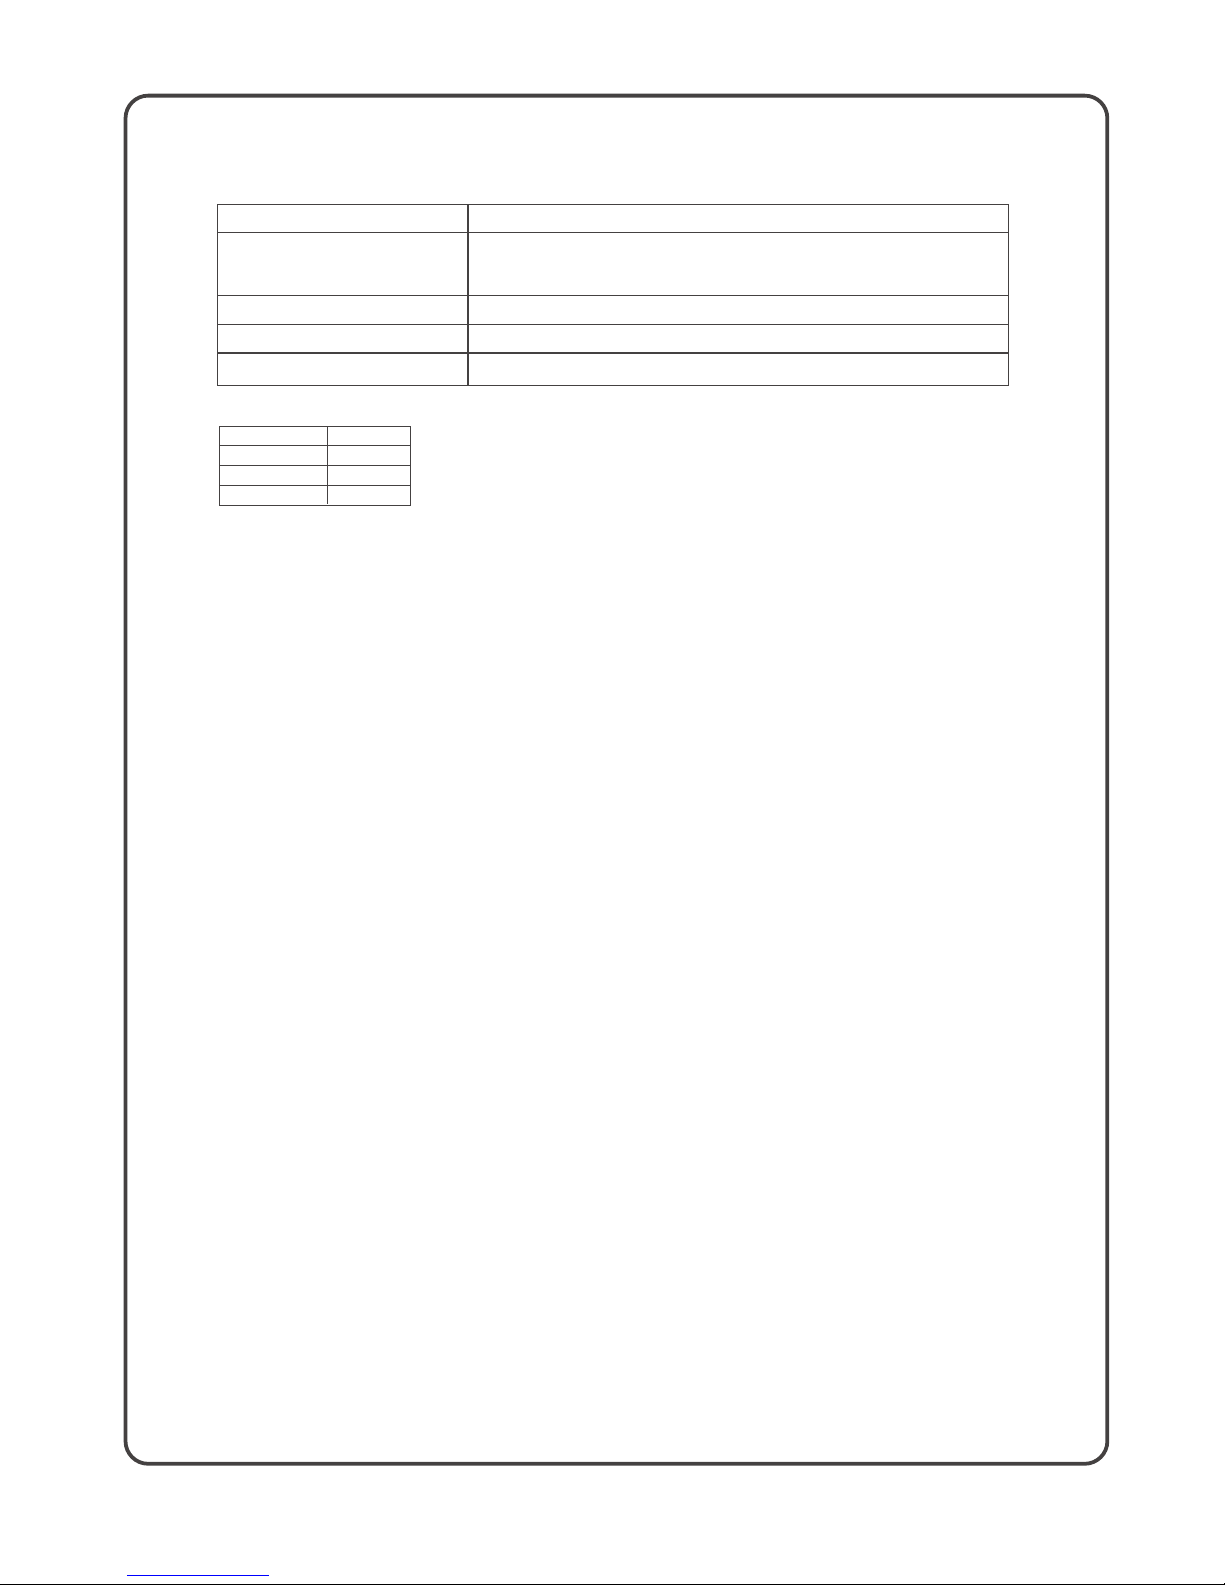
Model 1069
Voltage (V) 220-240
Frequency (Hz) 50
Watt (W) 650
PROBLEM CHECK
Steriliser will not work Check the mains lead is plugged into the unit and the mains socket is switched on.
Check the socket by plugging in another appliance.
Excessive steam Items incorrectly loaded in steriliser. Refer to Instructions for Use.
Bottles come out with mark
Steriliser needs descaling. Refer to Cleaning Instructions.
Cycle takes too long to complete
Too much water in steriliser. Use exactly 80ml
PROBLEM SOLVING
tommeetippee.com.au
tommeetippee.co.nz
Mayborn ANZ Pty Ltd.
(ABN 66 154 703 134)
PO Box 475,
Mt Waverley VIC 3149
AUSTRALIA
Mayborn Group is a business name of Mayborn ANZ Pty Ltd.
Copyright © 2015 Jackel International Limited
Newborn Brands (NZ) Ltd.
PO Box 47-677
Ponsonby Auckland 1144
NEW ZEALAND
0223200
Other Tommee Tippee Steriliser manuals


Popular Steriliser manuals by other brands

Dust Free
Dust Free LightStick Installation & operation manual

Euronda
Euronda E9 Next 18L instruction manual

UVPLUS
UVPLUS ALS UVP201R quick guide

SterileLight
SterileLight Illumicide SL-UVC-IDC-01-B Quick reference guide

Norka
Norka BUENOS AIRES UV-C 997 100 02 Series operating instructions

CertoClav
CertoClav Vacuum Pro 45 instruction manual


