Topeak PANOBIKE User manual
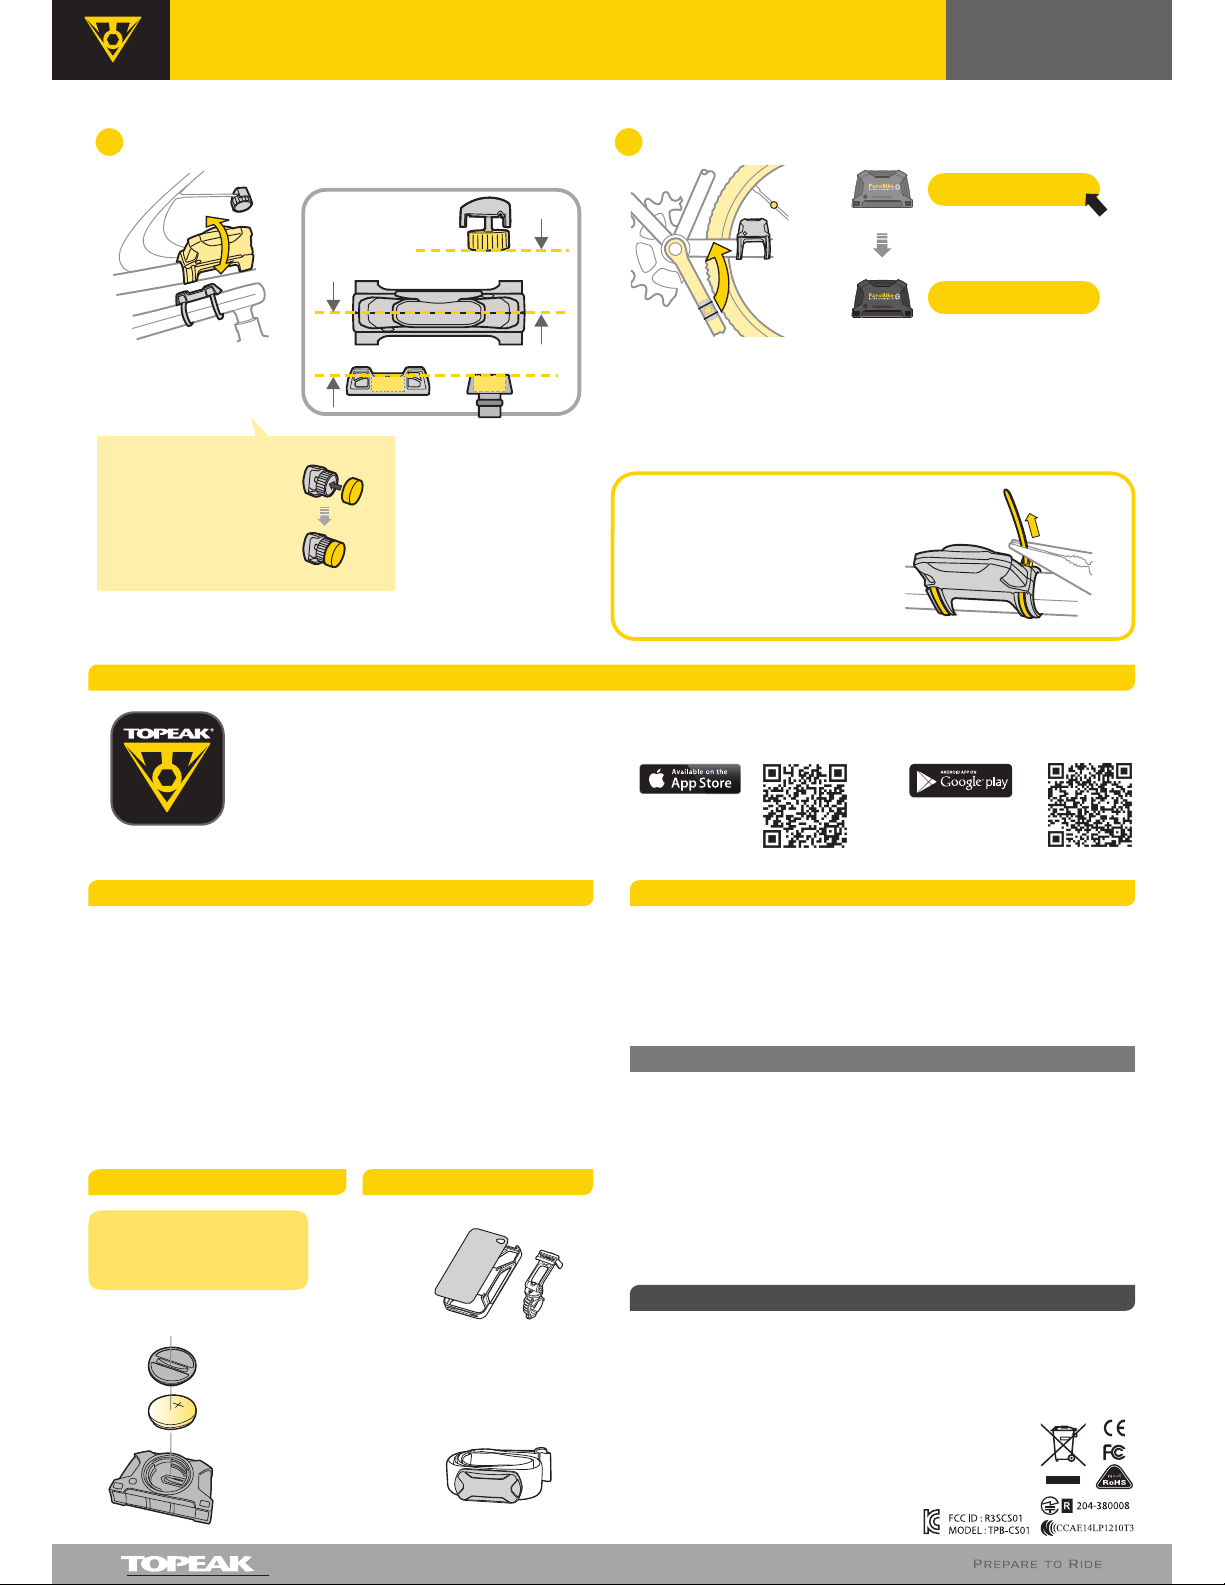
Tighten the Wheel Magnet onto spoke and align with sensing point on sensor.
3
Unscrew the wheel
magnet to install on spoke.
Pre-fit Sensor and Rubber Bracket on left rear
chainstay (non-drive side) and trim excess
rubber from bracket. Insure the Topeak logo
is facing up. Install zip ties loosely to allow
sensor placement.
2
GB
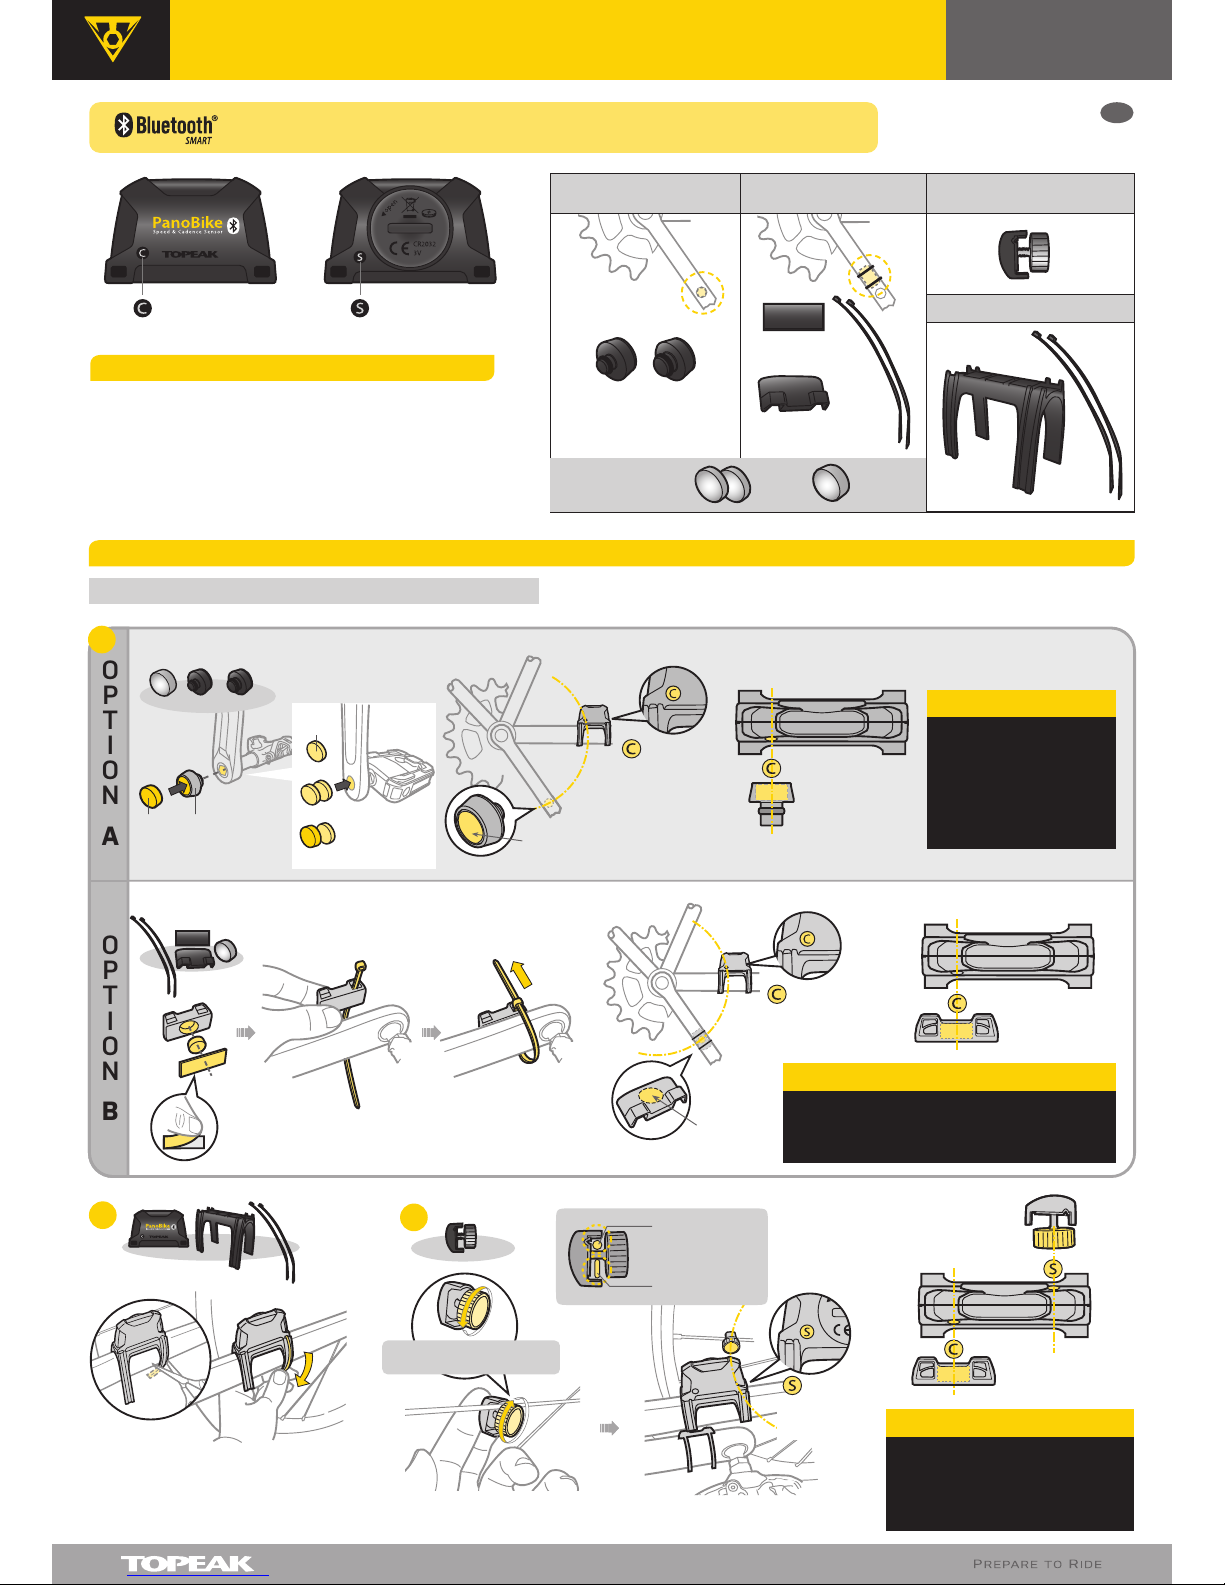
Tech: Bluetooth® Smart super low energy technology
Battery Lifetime (approx): 900 hours (2.5 years with 1 hr/ day use)
Battery: CR2032 x 1 pc (included)
Transmission Range: < 5 meter (16.4 ft)
Waterproof: IPX 5
Weight: 21 g / 0.74 oz
Operating temperature: -10ºC ~ 50ºC (14ºF~122ºF)
SPECIFICATION
Cadence Sensor
Sensing Point Speed Sensor
Sensing Point
Cadence Magnet Holder Cadence Magnet
Holder
6 mm 8 mm
Zip Tie
Rubber
Bracket
Cadence Magnet Set (A)
for pedal axle hexagon socket
Wheel Magnet Set
Rubber Bracket Set
Cadence Magnet Set (B)
for crankarm
Zip Tie
Rubber Pad
Sync to PanoBike App and other Apps with Bluetooth® Smart (BLE 4.0) connection program.
INSTALLATION
TIPS : Proper distance between Sensor and Magnet : < 25 mm
Install Cadence Magnet on left crankarm near
pedal as shown. Do not tighten zip ties
completely to allow magnet placement.
Cadence Magnet Set (B)
OPTION
A
OPTION
B
Top View
1
IMPORTANT NOTE
Align Wheel Magnet with Speed
Sensor Sensing Point as shown
to insure magnet does not
interfere with Cadence Sensor.
IMPORTANT NOTE
Align Cadence Magnet with Cadence Sensor
Sensing Point as shown to insure magnet
does not interfere with Speed Sensor.
Speed Sensor
Sensing Point
Top View
Cadence
Magnet
Cadence Sensor
Sensing Point
Cadence
Magnet
Cadence Sensor
Sensing Point
User's Guide
PANOBIKE SPEED & CADENCE SENSOR
Top View
Preset suitable 6 or 8 mm
Cadence Magnet Set.
Cadence Magnet Set (A)
6 mm 8 mm
Optional
Installation
(for solid axle)
or
or
6 mm
6 mm
4 mm
IMPORTANT NOTE
Align Cadence Magnet
with Cadence Sensor
Sensing Point as shown
to insure magnet does
not interfere with
Speed Sensor.
For Round Spokes
For Bladed Spokes
6 mm
4 mm
Cadence Magnet
6 or 8 mm
User's Guide
PANOBIKE SPEED & CADENCE SENSOR
<25 mm
<25 mm
or
M-TPB-CS01 GB 04/15
2-year Warranty: All mechanical components against manufacturer defects only. Batteries are not
covered under any implied warranty.
Warranty Claim Requirements
To obtain warranty service, you must have your original sales receipt. Items returned without a sales
receipt will assume that the warranty begins on the date of manufacture. All warranties will be void
if the product is damaged due to user crash, abuse, system alteration, modification, or used in any
way not intended as described in this manual.
* The specifications and design are subject to change without notice.
Please contact your Topeak dealer with any questions.
For USA customer service call : 1-800-250-3068
www.topeak.com
Copyright © Topeak, Inc. 2015
WARRANTY
CAUTION
FCC INFORMATION
1. The Sensor and hardware can be used in the rain but should not be used
underwater.
2. Do not disassemble the Sensor and hardware.
3. Check relative positions and gap between sensor and magnets periodically.
4. Do not use harsh chemicals to clean the Sensor and hardware.
5. Remember to pay attention to the road while riding.
This device complies with Part 15 of the FCC Rules. Operation is subject to the following two conditions:
1. This device may not cause harmful interference.
2. This device must accept any interference received, including interference that may cause undesired operation.
Note: This equipment has been tested and found to comply with the limits for a Class B digital device, pursuant to part
15 of the FCC Rules. These limits are designed to provide reasonable protection against harmful interference in a residential
installation. This equipment generates, uses and can radiate radio frequency energy and, if not installed and used in
accordance with the instructions, may cause harmful interference to radio communications. However, there is no guarantee
that interference will not occur in a particular installation. If this equipment does cause harmful interference to radio or
television reception, which can be determined by turning the equipment off and on, the user is encouraged to try to
correct the interference by one or more of the following measures:
• Reorient or relocate the receiving antenna.
• Increase the separation between the equipment and receiver.
• Connect the equipment into an outlet on a circuit different from that to which the receiver is connected.
• Consult the dealer or an experienced radio/TV technician for help.
Caution: Any changes or modifications not expressly approved by the party responsible for compliance could void the
user's authority to operate this equipment
TROUBLE SHOOTING
1. Why can’t I connect the sensor with PanoBike App?
• Make sure the Bluetooth® system in your smartphone has been open.
• Is the battery exhausted? Replace battery.
2. Display is slow?
• Is the temperature below -10ºC (14ºF)? The unit will return normal state when
the temperature rises.
3. No current speed or incorrect data?
• Make sure the magnets are aligned to pass by the sensor as the crankarm and
wheel spin.
Adjust angle and position of
sensor to achieve recommended
magnet distances and aligning
sensing points.
* Bluetooth® is a registered trademark of Bluetooth SIG, Inc.
* iPhone is a registered trademark of Apple Inc.
* App Store is a service mark of Apple Inc.
CHANGING BATTERY
NOTE:
Install the sensor
battery before
first use.
+
-
CR2032
Operation Time up to
900 hr. /2.5 yr.
* 2.5 years with 1 hr/ day use
RELEVANT ACCESSORIES
PanoBike Heart Rate Monitor
Art No. TPB-HRM01
RideCase
Pair with PanoBike App
5
Pair with PanoBike App
Tap "Add a new device" and turn the crankarm counterclockwise several revolutions to
make sure the Current Cadence (CAD) and Current Speed (SPD) connect correctly without
interfering with each other. Input your name and wheel circumference and save all data.
When "connected" appears, the pairing is successful. Tighten all zip ties and wheel magnet
after successful pairing. Trim excess zip tie ends.
TOPEAK PANOBIKE APP
Sync to PanoBike App and other Apps with Bluetooth® Smart (BLE 4.0) connection
program.
IMPORTANT NOTE
After pairing with PanoBike App
successfully, make sure the
Sensor is installed and tightened
securely on left rear chainstay by
using needle nose pliers before
trimming excess zip tie.
4
If after adjustment the
wheel magnet does
not meet the recom-
mended distance, the
extra cadence magnet
may be added to the
wheel magnet.
The ultimate cycling performance app that utilizes your
smartphone’s powerful Bluetooth® Smart capabilities and
transforms it into your bike computer, personal training and
health management device.
This app combines the functions of phone, cycle computer,
GPS, music player, camera, and heart rate monitor (requires
purchase of separate PanoBike Heart Rate Monitor) into one
program that allows you to have loads of fun on your bike
ride.
Add a new device
Add a new device
CONNECTED
iOS 5 or above
(Download for Free)
Android OS 4.3 or above
(Download for Free)
Art No. TT9833B, TT9833W
(works with iPhone 5/ 5S)
TT9845B,W, TT9846B,W
(works with iPhone 6/ 6 Plus)
Other Topeak Accessories manuals


