Toro RP-500 User manual
FormNo.3377-539RevA
RP-500/700/1200ReversiblePlate
Compactor
ModelNo.68071—SerialNo.313000001andUp
ModelNo.68072—SerialNo.313000001andUp
ModelNo.68073—SerialNo.313000001andUp
Registeratwww.Toro.com.
OriginalInstructions(EN)*3377-539*A
Introduction
WARNING
CALIFORNIA
Proposition65Warning
Thisproductcontainsachemicalorchemicals
knowntotheStateofCaliforniatocausecancer,
birthdefects,orreproductiveharm.
Theengineexhaustfromthisproduct
containschemicalsknowntotheStateof
Californiatocausecancer,birthdefects,
orotherreproductiveharm.
Useofthisproductmaycauseexposureto
chemicalsknowntotheStateofCalifornia
tocausecancer,birthdefects,orother
reproductiveharm.
Readthisinformationcarefullytolearnhowtooperateand
maintainyourproductproperlyandtoavoidinjuryand
productdamage.Youareresponsibleforoperatingthe
productproperlyandsafely.
YoumaycontactTorodirectlyatwww .Toro.comforproduct
andaccessoryinformation,helpndingadealer,ortoregister
yourproduct.
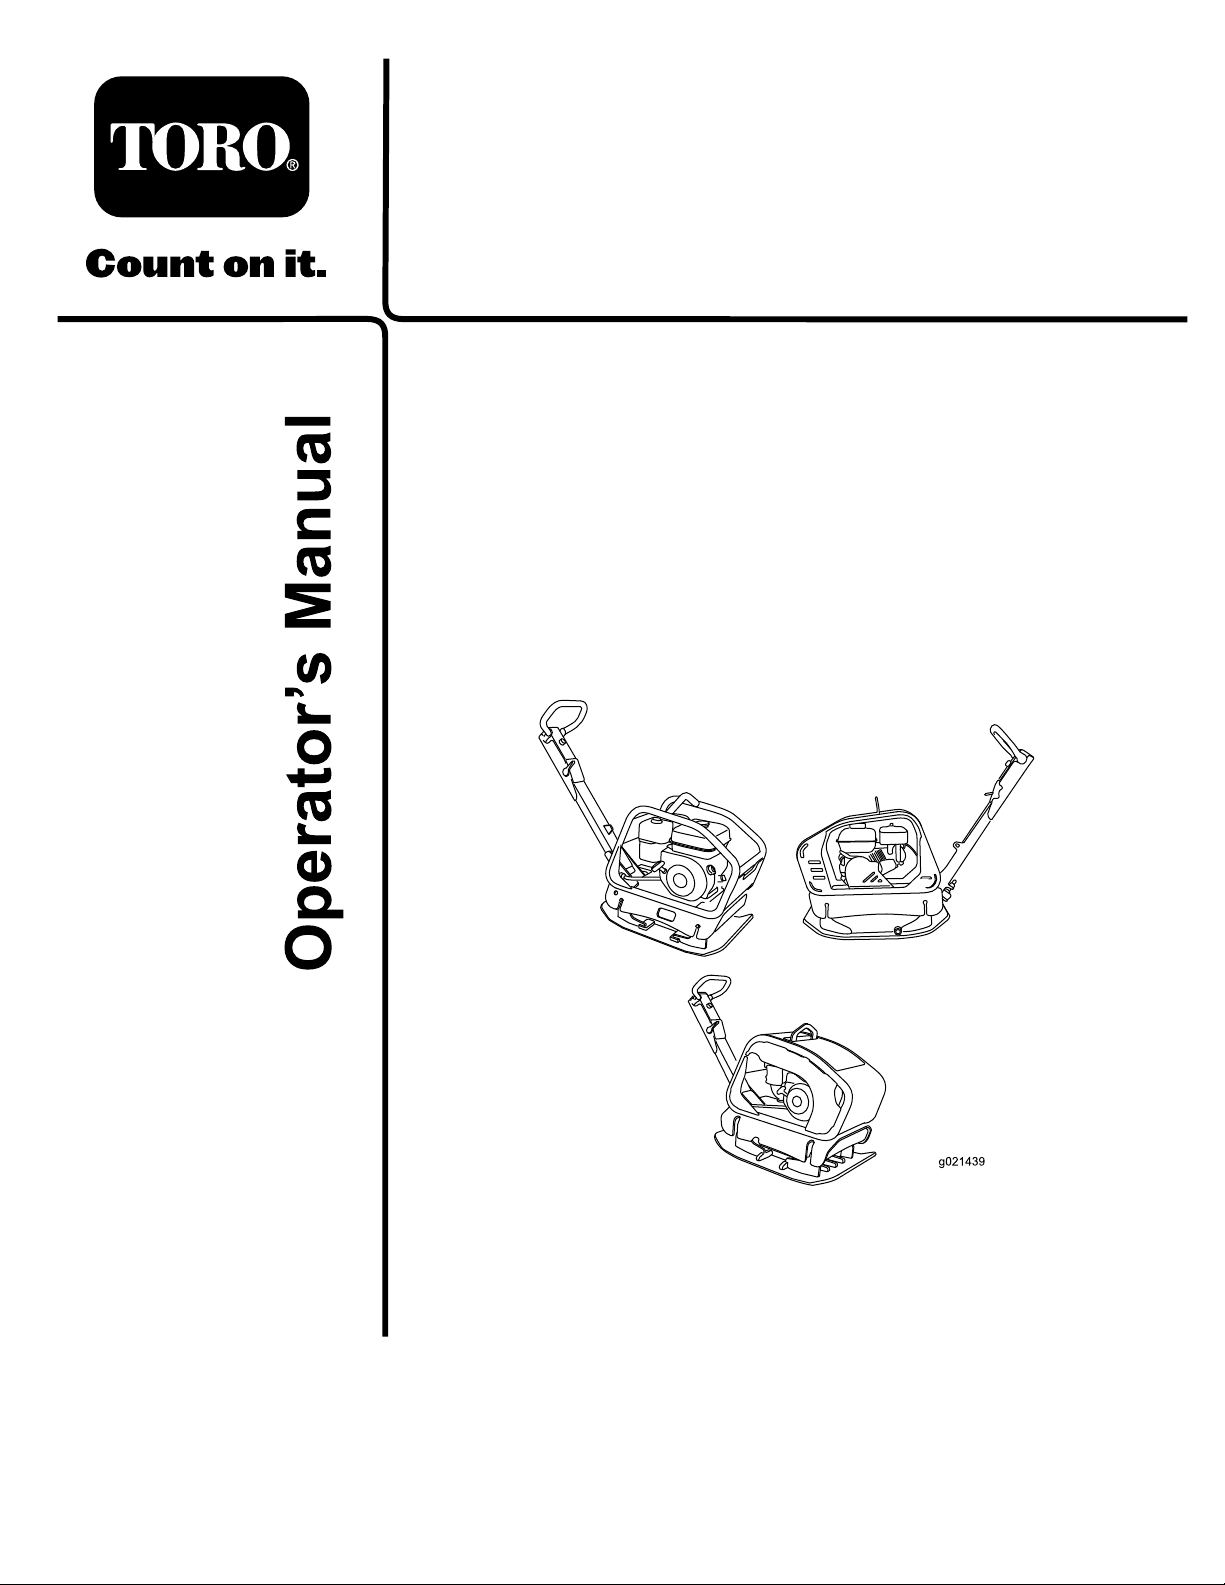
Wheneveryouneedservice,genuineToroparts,oradditional
information,contactanAuthorizedServiceDealerorToro
CustomerServiceandhavethemodelandserialnumbersof
yourproductready.Figure1illustratesthelocationofthe
modelandserialnumbersontheproduct.Writethenumbers
inthespaceprovided.
Figure1
ModelNo.
SerialNo.
Thismanualidentiespotentialhazardsandhassafety
messagesidentiedbythesafetyalertsymbol(Figure2),
whichsignalsahazardthatmaycauseseriousinjuryordeath
ifyoudonotfollowtherecommendedprecautions.
Figure2
1.Safetyalertsymbol
Thismanualuses2otherwordstohighlightinformation.
Importantcallsattentiontospecialmechanicalinformation
andNoteemphasizesgeneralinformationworthyofspecial
attention.
©2013—TheToro®Company
8111LyndaleAvenueSouth
Bloomington,MN554202
Contactusatwww.Toro.com.
PrintedintheUSA.
AllRightsReserved

Contents
Introduction..................................................................2
Safety...........................................................................3
SafeOperatingPractices...........................................3
SafetyandInstructionalDecals.................................5
Setup............................................................................7
CheckingtheEngineOilLevel..................................7
CheckingtheEccentricOilLevel...............................7
ProductOverview..........................................................7
Specications.........................................................8
Operation.....................................................................9
CheckingtheEngineOilLevel..................................9
CleaningDebrisfromtheMachine.............................9
AddingFuel............................................................9
StartingandStoppingtheEngine..............................11
OperatingtheCompactor........................................12
TransportingtheMachine........................................12
Maintenance.................................................................13
RecommendedMaintenanceSchedule(s)......................13
DisconnectingtheSparkPlugWire...........................13
ServicingtheAirCleaner.........................................13
ServicingtheEngineOil..........................................14
ServicingtheEccentricOil......................................15
CleaningtheSedimentCup......................................16
ServicingtheBelt...................................................16
ServicingtheSparkPlug..........................................16
Storage........................................................................17
Troubleshooting...........................................................18
Safety
Improperuseormaintenancebytheoperatoror
ownercanresultininjury.Toreducethepotential
forinjury,complywiththesesafetyinstructionsand
alwayspayattentiontothesafetyalertsymbol,which
means
Caution
,
W ar ning
,or
Danger
—personalsafety
instruction.Failuretocomplywiththeinstructionmay
resultinpersonalinjuryordeath.
SafeOperatingPractices
Thisproductiscapableofcrushingoramputatinghandsand
feet.Alwaysfollowallsafetyinstructionstoavoidserious
injuryordeath.
WARNING
Engineexhaustcontainscarbonmonoxide,and
odorless,deadlypoisonthatcankillyou
Donotruntheengineindoorsorinanenclosed
area.
Training
•ReadtheOperator'sManualandothertrainingmaterial.If
theoperator(s)ormechanic(s)cannotreadEnglish,itis
theowner'sresponsibilitytoexplainthismaterialtothem.
•Becomefamiliarwiththesafeoperationoftheequipment,
operatorcontrols,andsafetysigns.
•Alloperatorsandmechanicsshouldbetrained.The
ownerisresponsiblefortrainingtheusers.
•Neverletchildrenoruntrainedpeopleoperateorservice
theequipment.Localregulationsmayrestricttheageof
theoperator.
•Theowner/usercanpreventandisresponsiblefor
accidentsorinjuriesoccurringtohimselforherself,other
peopleorproperty.
Preparation
•Evaluatetheterraintodeterminetheproperandsafe
actionstoperformthejob.Onlyuseaccessoriesand
attachmentsapprovedbythemanufacturer.
•Wearappropriateclothingincludinghardhat,safety
glasses,longpants,safetyshoes,andhearingprotection.
Longhair,looseclothingorjewelrymaygettangledin
movingparts.
•Inspecttheareawheretheequipmentistobeusedand
removeallobjectssuchastools,buildingmaterials,and
personalitemswhichcanbedamagedbythemachine.
•Useextracarewhenhandlingfuels.Theyareammable
andvaporsareexplosive.
–Useonlyanapprovedcontainer
–Neverremovethefuelcaporaddfuelwiththeengine
running.Allowtheenginetocoolbeforerefueling.
Donotsmoke.
3

–Neverrefuelordrainthemachineindoors.
•Checkthattheoperator'spresencecontrols,safety
switches,andshieldsareattachedandfunctioning
properly.Donotoperateunlesstheyarefunctioning
properly.
Operation
•Neverrunanengineinanenclosedarea.
•Onlyoperateingoodlight,keepingawayfromholesand
hiddenhazards.
•Donotoperateinstandingwater.
•Slowdownandusecautionwhenmakingturns.
•Ensurethattheareaisclearofotherpeoplebefore
operatingthemachine.Stopthemachineifanyoneenters
thearea.
•Keeppetsandbystandersaway.
•Keepfeetclearoftheplatecompactor.
•Earprotectionisrequiredwhenoperatingthisequipment.
•Donotoperatethemachineundertheinuenceof
alcoholordrugs.
•Forfootprotection,wearsteeltoeshoesortoepads.
•Neveroperatewiththeguardsnotsecurelyinplace.
•Donotchangetheenginegovernorsettingoroverspeed
theengine.
•Usecarewhenloadingorunloadingthemachineintoa
trailerortruck.
•Neverleavethemachinerunningunattended.Always
setthethrottletoslow,stoptheengine,andwaitforall
movingpartstostopbeforeleaving.
•Donottouchpartswhichmaybehotfromoperation.
Allowthemtocoolbeforeattemptingtomaintain,adjust,
orservice.
•Beforecompactingsoil,havetheareamarkedfor
undergroundutilities.
•Lightningcancausesevereinjuryordeath.Iflightning
isseenorthunderisheardinthearea,donotoperate
themachine;seekshelter.
MaintenanceandStorage
•Parkthemachineonalevelsurface,setthethrottleto
slow,andstoptheengine.Waitforallmovementtostop
beforeadjusting,cleaning,orrepairing.
•Cleandebrisfromthedrives,mufers,andenginetohelp
preventres.Cleanupfuelandoilspillage.
•Lettheenginecoolbeforestoringanddonotstorenear
ame.
•Donotstorefuelnearamesordrainindoors.
•Parkthemachineonlevelground.Neverallowuntrained
personneltoservicethemachine.
•Disconnectthesparkplugbeforemakinganyrepairs.
•Keephandsandfeetawayfrommovingparts.Ifpossible,
donotmakeadjustmentswiththeenginerunning.
•Keepallpartsingoodworkingconditionandallhardware
tightened.Replaceallwornordamageddecals.
•Keepnutsandboltstight.Keepequipmentingood
condition.
•Keepthemachinefreefromthebuild-upofmud,rocks,
orotherdebris.Cleanupoilorfuelspillage.Allowthe
machinetocoolbeforestoring.
•Useextracarewhenhandlingfuels.Theyareammable
andvaporsareexplosive.
–Useonlyanapprovedcontainer.
–Neverremovethefuelcaporaddfuelwhenthe
engineisrunning.Allowtheenginetocoolbefore
refueling.Donotsmoke.
–Neverrefuelthemachineindoors.
–Neverstorethemachineorfuelcontainerinside
wherethereisanopename,suchasnearawater
heaterorfurnace.
–Neverllafuelcontainerwhileitisinsideavehicle,
trunk,pick-upbed,oranysurfaceotherthanthe
ground.
–Keepcontainernozzleincontactwiththetankduring
lling.
•Stopandinspecttheequipmentifyoustrikeanobject.
Makeanynecessaryrepairsbeforerestarting.
•UseonlygenuineTororeplacementpartstoensurethat
originalstandardsaremaintained.
4
SafetyandInstructionalDecals
Safetydecalsandinstructionsareeasilyvisibletotheoperatorandarelocatednearanyareaofpotential
danger.Replaceanydecalthatisdamagedorlost.
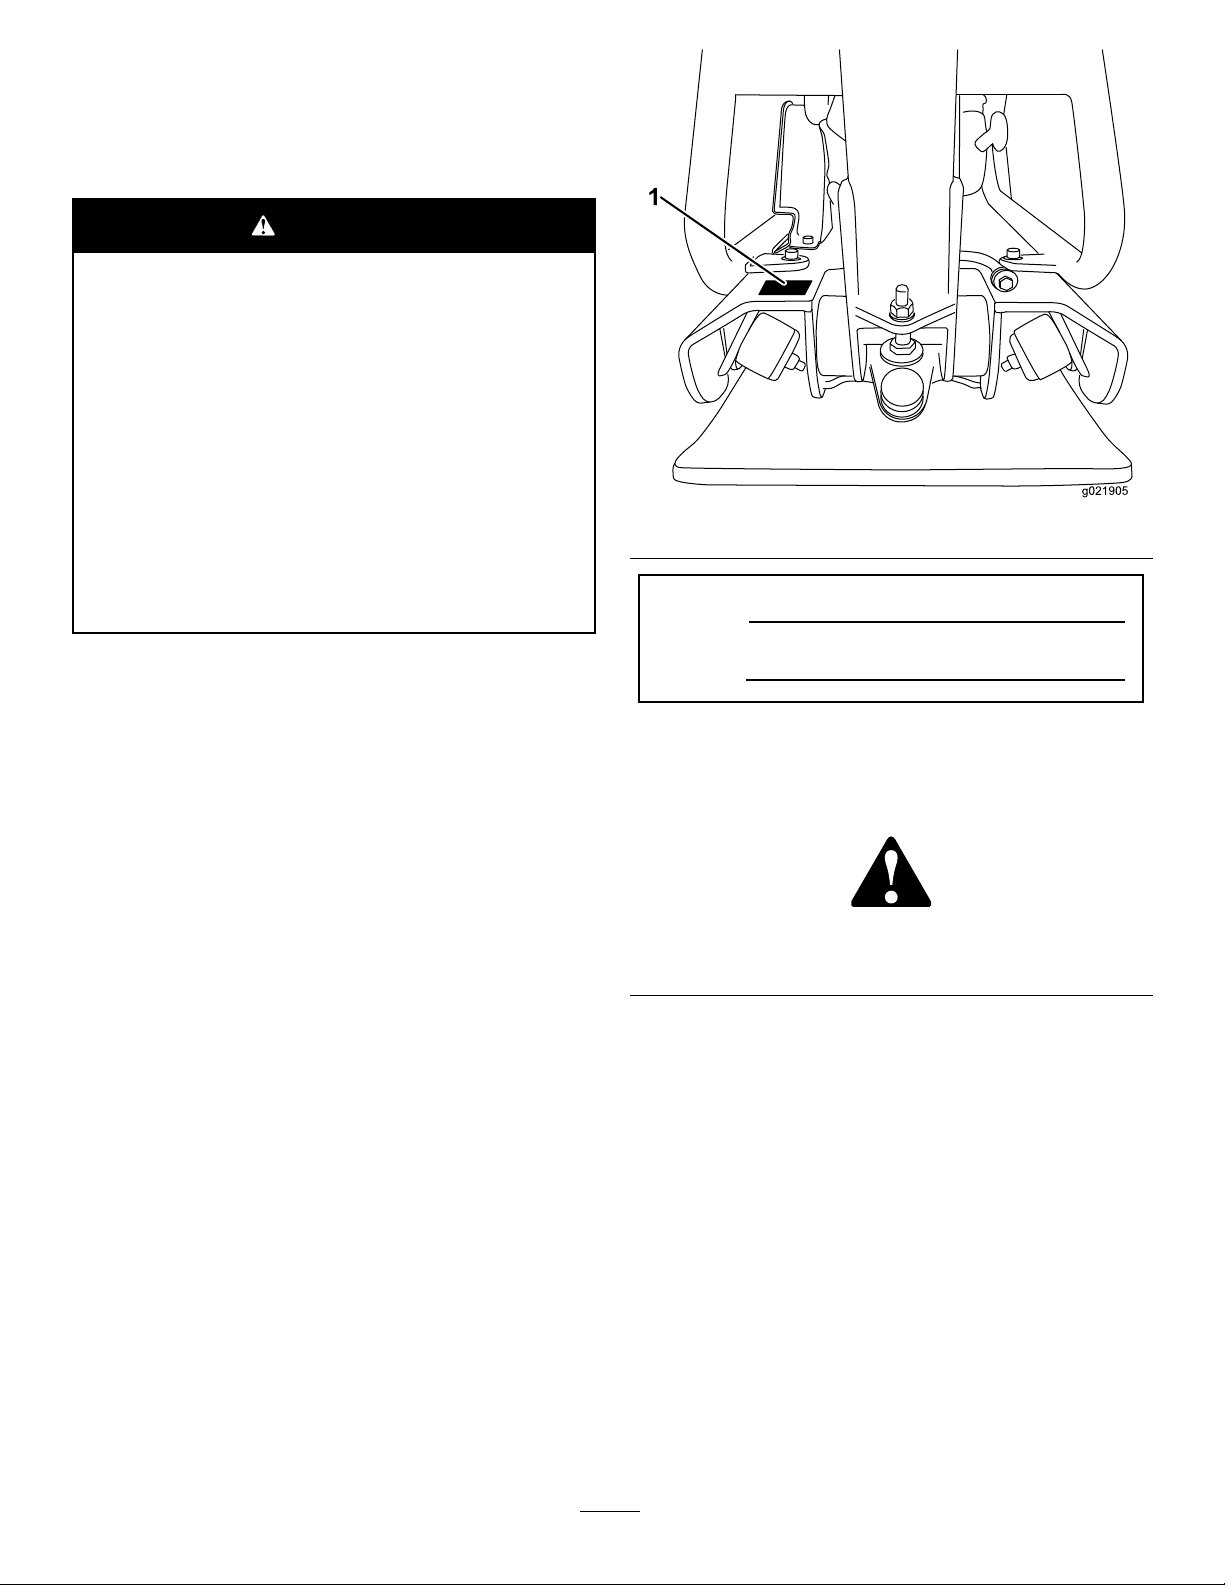
125–8182
1.Slow3.Fast
2.Variablespeedcontrol
125–8207
1.Engineoil
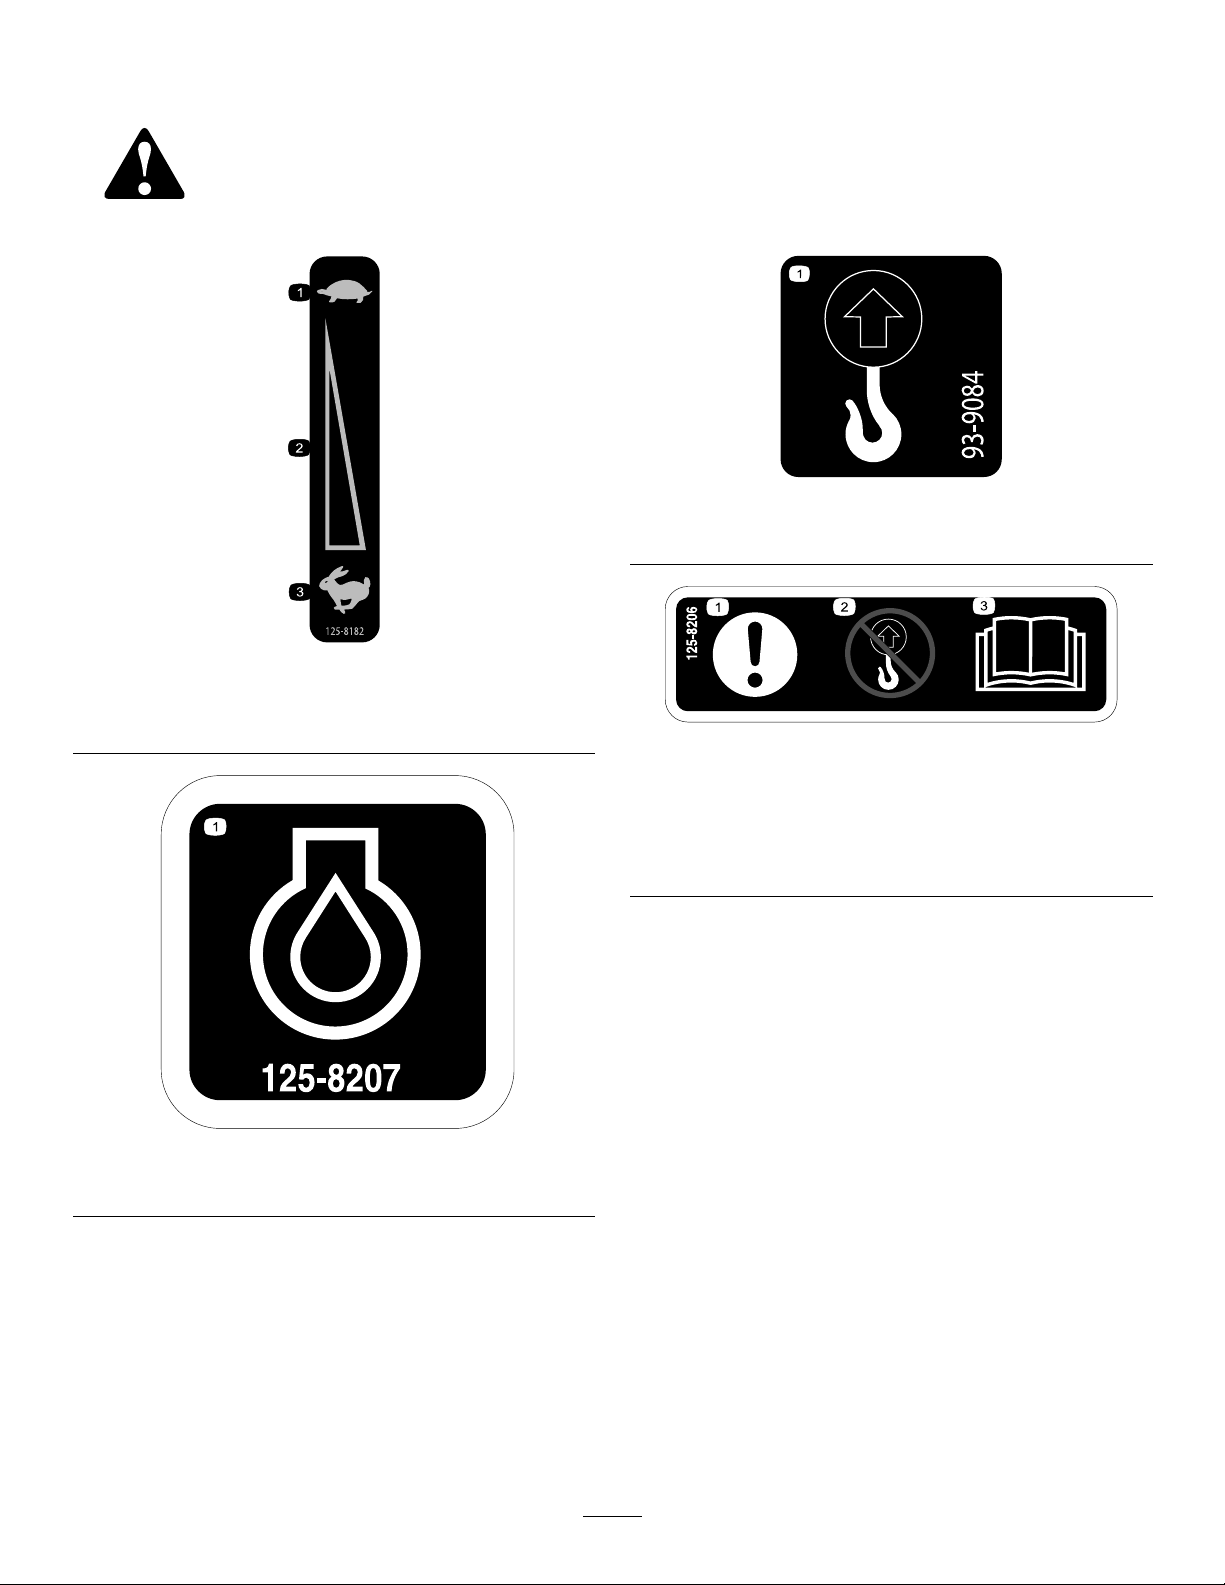
93–9084
1.Liftpoint
125–8206
1.Caution3.ReadtheOperator’s
Manualforinformationon
liftingthemachine.
2.Donotliftthecompactor
bythehandle.
5

125–8205
1.Pushthehandleforward
tomovethecompactor
forward.
2.Pullthehandlebackward
tomovethecompactor
backward.
117–2718
125–4943
1.Warning—readtheOperator’sManual.4.Warning—keepawayfrommovingparts;keepallguardsand
shieldsinplace.
2.Warning—wearhearingprotection.5.Chokinghazard—donotoperatethemachineindoors.
3.Warning—checkengineoillevelbeforeoperatingthe
machine.
6.Explosionhazard—stoptheengineandextinguishallames
beforerefuelingthemachine.
6

Setup
CheckingtheEngineOilLevel
Themachinecomesfromthefactorywithoilintheengine
crankcase;however,itmaybenecessarytoaddoil.Referto
ServicingtheEngineOil(page14).Addonlyenoughoilto
raisetheleveltotheFullmarkonthedipstick.
CheckingtheEccentricOil
Level
Themachinecomesfromthefactorywitheccentricoilin
theeccentrichousing;however,itmaybenecessarytoadd
oil.RefertoServicingtheEccentricOil(page15).Addonly
enoughoilsothattheoillevelisushwiththeoilplugonthe
sideoftheeccentrichousing.
ProductOverview
Figure3
RP–500
1.Directioncontrollever5.Fueltank
2.Throttlecontrol6.FuelOn/Offswitch
3.Aircleaner7.Oildipstick
4.Liftpoint8.Recoilstarthandle
Figure4
RP-700
1.Beltcover4.Aircleaner
2.Fueltank5.Throttlecontrol
3.Liftpoint6.Directioncontrollever
7

Figure5
RP-1200
1.Directioncontrollever4.Aircleaner
2.Throttlecontrol5.Recoilstarthandle
3.Liftpoint
Figure6
1.Recoilstarter4.Chokelever
2.Sedimentcup5.Throttlelever
3.Fuelshut-offvalve6.EngineOn/Offswitch
Specications
Model
Number
RP-500RP-700RP-1200
Width40cm(15.7
inches)
50cm(19.7
inches)
60cm(23.6
inches)
Length118cm(46.5
inches)
128cm(50.8
inches)
142cm(55.9
inches)
Height
(handle
raised)
109cm(42.9
inches)
113cm(44.5
inches)
115cm(45.3
inches)
Height
(handle
lowered)
99cm(39
inches)
104cm(40.9
inches)
105.5cm
(41.5inches)
Weight120kg(264.6
lbs)
210kg(463
lbs)
330kg(727.5
lbs)
8
Operation
Note:Determinetheleftandrightsidesofthemachine
fromthenormaloperatingposition.
CheckingtheEngineOilLevel
ServiceInterval:Beforeeachuseordaily
1.Stopthemachineonalevelsurface.
2.Setthethrottletoslow,turnofftheengineswitch,and
waitforallmovingpartstostop.
3.Cleanaroundthedipstick(Figure7)sothatdirtcannot
fallintothellerholeanddamagetheengine.
Figure7
1.Dipstick
4.Unscrewthedipstickandwipetheendclean(Figure7).
5.Screwthedipstickfullyontothellertube(Figure7).
6.Unscrewthedipstickagainandlookattheend.Ifthe
engineoillevelislow,slowlypouronlyenoughoilinto
thellertubetoraisetheleveltotheFullmarkonthe
dipstick.
Important:Donotoverllthecrankcasewith
engineoilandruntheengine;enginedamage
mayresult.
CleaningDebrisfromthe
Machine
ServiceInterval:Beforeeachuseordaily
1.Setthethrottletoslow ,stoptheengine,andwaitfor
allmovingpartstostop.
WARNING
Contactwithhotpartsonthemachinecan
causesevereburns.
Waitforallpartstocoolbeforetouchingthe
machine.
2.Brushdirtanddebrisawayfromtheaircleanerand
engineopenings.
AddingFuel
•Forbestresults,useonlyclean,fresh,unleadedgasoline
withanoctaneratingof87orhigher((R+M)/2rating
method).
•Oxygenatedfuelwithupto10%ethanolor15%MTBE
byvolumeisacceptable.
•Donotuseethanolblendsofgasoline(suchasE15
orE85)withmorethan10%ethanolbyvolume.
Performanceproblemsand/orenginedamagemayresult
whichmaynotbecoveredunderwarranty.
•Donotusegasolinecontainingmethanol.
•Donotstorefueleitherinthefueltankorfuelcontainers
overthewinterunlessafuelstabilizerisused.
•Donotaddoiltogasoline.
DANGER
Incertainconditions,gasolineisextremely
ammableandhighlyexplosive.Areorexplosion
fromgasolinecanburnyouandothersandcan
damageproperty.
•Fillthefueltankoutdoors,inanopenarea,
whentheengineiscold.Wipeupanygasoline
thatspills.
•Neverllthefueltankinsideanenclosedtrailer.
•Donotllthefueltankcompletelyfull.Add
gasolinetothefueltankuntilthelevelis1/4to
1/2inch(6to13mm)belowthebottomofthe
llerneck.Thisemptyspaceinthetankallows
gasolinetoexpand.
•Neversmokewhenhandlinggasoline,andstay
awayfromanopenameorwheregasoline
fumesmaybeignitedbyaspark.
•Storegasolineinanapprovedcontainerand
keepitoutofthereachofchildren.Neverbuy
morethana30-daysupplyofgasoline.
•Donotoperatewithoutentireexhaustsystemin
placeandinproperworkingcondition.
9

DANGER
Incertainconditionsduringfueling,static
electricitycanbereleasedcausingasparkwhich
canignitethegasolinevapors.Areorexplosion
fromgasolinecanburnyouandothersandcan
damageproperty.
•Alwaysplacegasolinecontainersontheground
awayfromyourvehiclebeforelling.
•Donotllgasolinecontainersinsideavehicleor
onatruckortrailerbedbecauseinteriorcarpets
orplastictruckbedlinersmayinsulatethe
containerandslowthelossofanystaticcharge.
•Whenpractical,removegas-poweredequipment
fromthetruckortrailerandrefueltheequipment
onaatsurface.
•Ifthisisnotpossible,thenrefuelsuch
equipmentonatruckortrailerfromaportable
container,ratherthanfromagasolinedispenser
nozzle.
•Ifagasolinedispensernozzlemustbeused,
keepthenozzleincontactwiththerimofthe
fueltankorcontaineropeningatalltimesuntil
fuelingiscomplete.
UsingStabilizer/Conditioner
Useafuelstabilizer/conditionerinthetractionunitto
providethefollowingbenets:
•Keepsgasolinefreshduringstorageof90daysorless.
Forlongerstorageitisrecommendedthatthefueltank
bedrained.
•Cleanstheenginewhileitruns
•Eliminatesgum-likevarnishbuildupinthefuelsystem,
whichcauseshardstarting
Important:Donotusefueladditivescontaining
methanolorethanol.
Addthecorrectamountofgasstabilizer/conditionertothe
gas.
Note:Afuelstabilizer/conditionerismosteffectivewhen
mixedwithfreshgasoline.Tominimizethechanceofvarnish
depositsinthefuelsystem,usefuelstabilizeratalltimes.
FillingtheFuelTank
1.Setthethrottletoslow,turnofftheengineswitch,and
waitforallmovingpartstostop.
2.Allowtheenginetocool.
3.Models68072and68073only:raisethecover(Figure
8).
Figure8
1.Coverhandle
4.Cleanaroundthefueltankcapandremoveit(Figure9).
Note:Thecapistetheredtothefueltank.
g013315
Figure9
5.Addunleadedgasolinetothefueltank.
Important:Donotllthefueltankcompletely
full.Thespaceinthetankallowsgasolineto
expand.
6.Installthefueltankcapsecurely.
7.Wipeupanygasolinethatmayhavespilled.
10
StartingandStoppingthe
Engine
StartingtheEngine
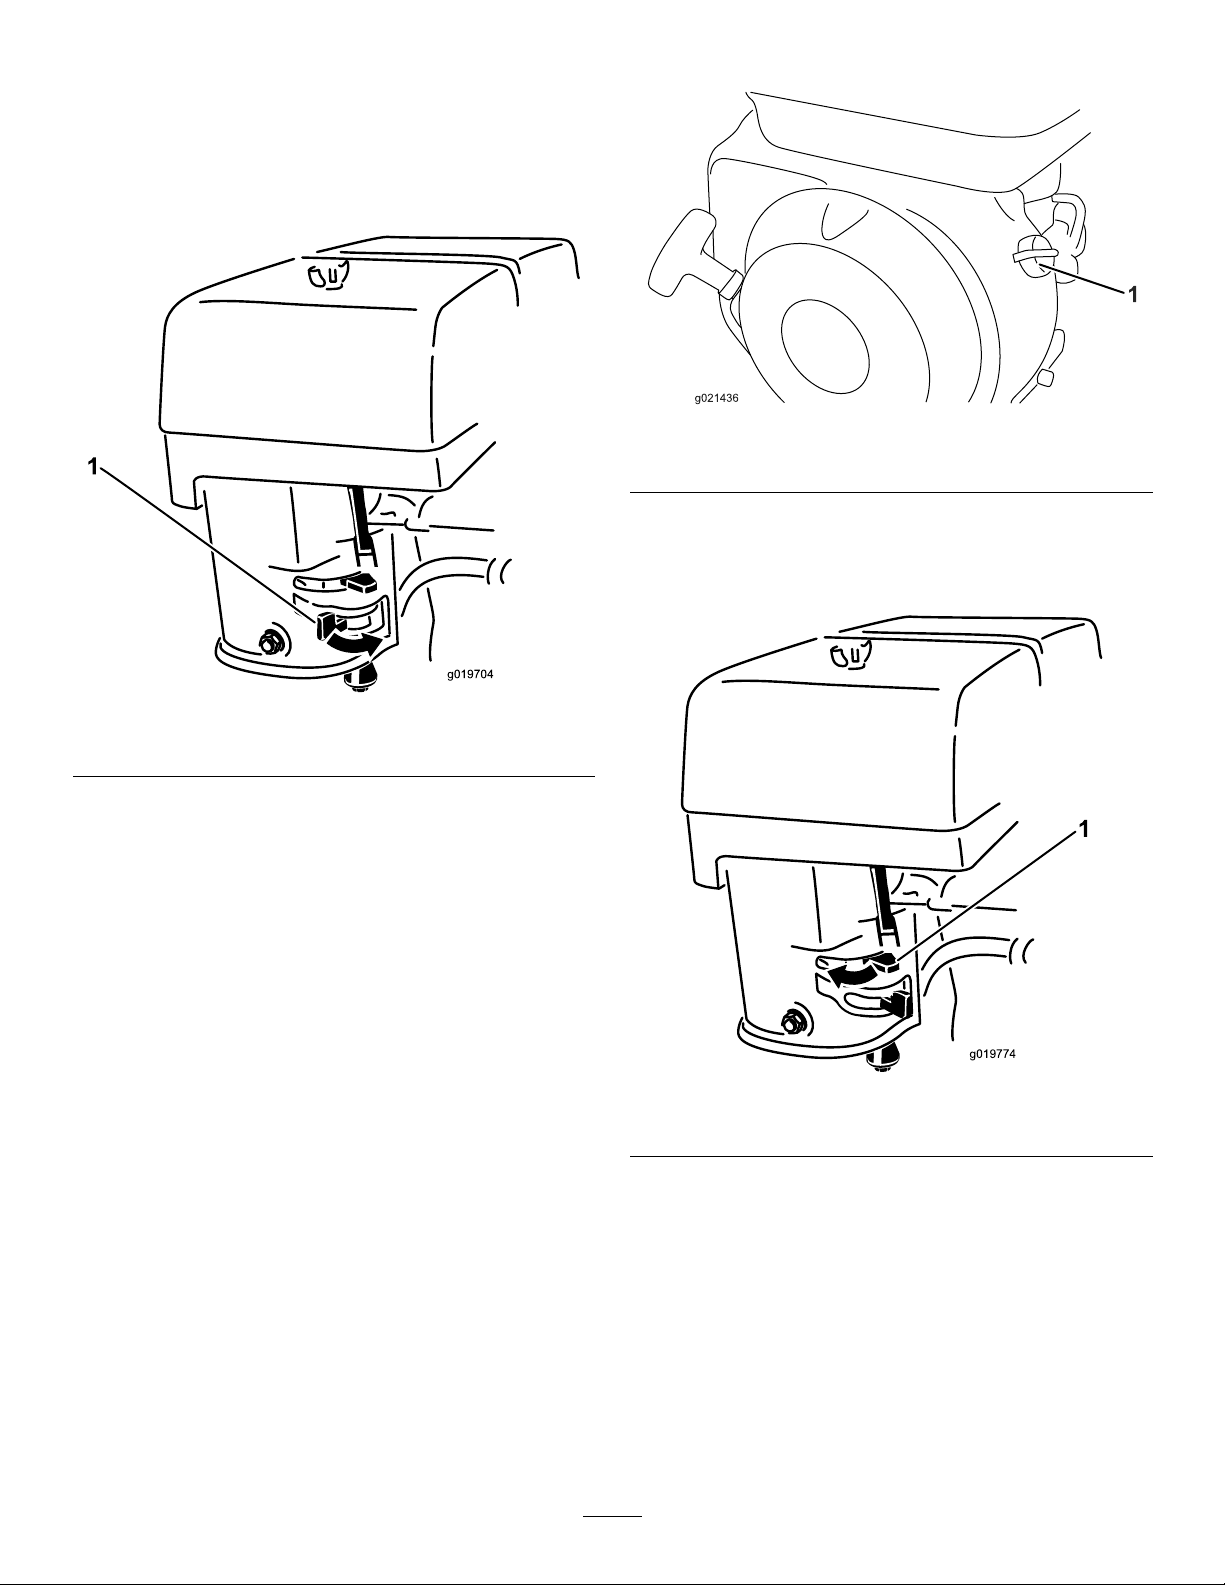
1.MovethefuelvalvetotheOnposition(Figure10).
g019704
1
Figure10
1.Fuelvalve
2.MovetheengineswitchtotheOnposition(Figure11).
Figure11
1.Engineswitch
3.Movethechokelevertotheleftifyouarestartinga
coldengine(Figure12).
Note:Awarmorhotenginemaynotrequirechoking.
g019774
1
Figure12
1.Choke
4.Slowlypulltherecoilhandleuntilyouencounter
resistance,thenpullsharplytostarttheengine.
5.Aftertheenginestarts,graduallymovethechoketothe
right.Iftheenginestallsorhesitates,movethechoke
leftagainuntiltheenginewarmsup.
11

6.Movethethrottlelevertomaximumthrottle.
Note:Thecompactorwillbeginvibratingwhenthe
throttleleverissettomaximumthrottle.
Figure13
1.Throttlelever
StoppingtheEngine
1.Movethethrottlecontrollevertotheslowposition
(Figure14).
Figure14
1.Throttlelever
2.Turntheengineswitchandfuelvalveoff.
OperatingtheCompactor
ControllingtheDirectionofTravel
•Thetravelcontrolleverautomaticallymovesforwardand
themachinewillbegintravellingforward(Figure17).
Figure15
1.Travelcontrolleverin
forwardposition
2.Travelcontrolleverin
backwardposition
•Pullthetravelcontrolleverbackwardtomakethe
machinetravelbackwards(Figure17).
TransportingtheMachine
Therollcageliftpointcanbeusedtoliftandtransportthe
machinewithstrapsoracrane(Figure16).
Figure16
RP-500shown
1.Rollcageliftpoint
12
Maintenance
RecommendedMaintenanceSchedule(s)
MaintenanceService
IntervalMaintenanceProcedure
Aftertherst25hours•Changetheengineoil.
Beforeeachuseordaily
•Checktheengineoillevel.
•Cleandebrisfromtheaircleaner.
•Inspecttheaircleanerelements.
Every50hours•Cleantheairlterelements.Cleanthemmorefrequentlyindustyoperating
conditions.
Every100hours
•Changetheengineoil.
•Adjustthebelt.
•Inspect,clean,andadjustthesparkplug;replaceitifnecessary.
Every200hours•Replacethesparkplug.
Every300hours
•Replacethepaperaircleanerelement.Replaceitmorefrequentlyindustyoperating
conditions.
•Changetheeccentricoil.
Monthly•Checktheeccentricoillevel.
Yearly•Changetheeccentricoil.
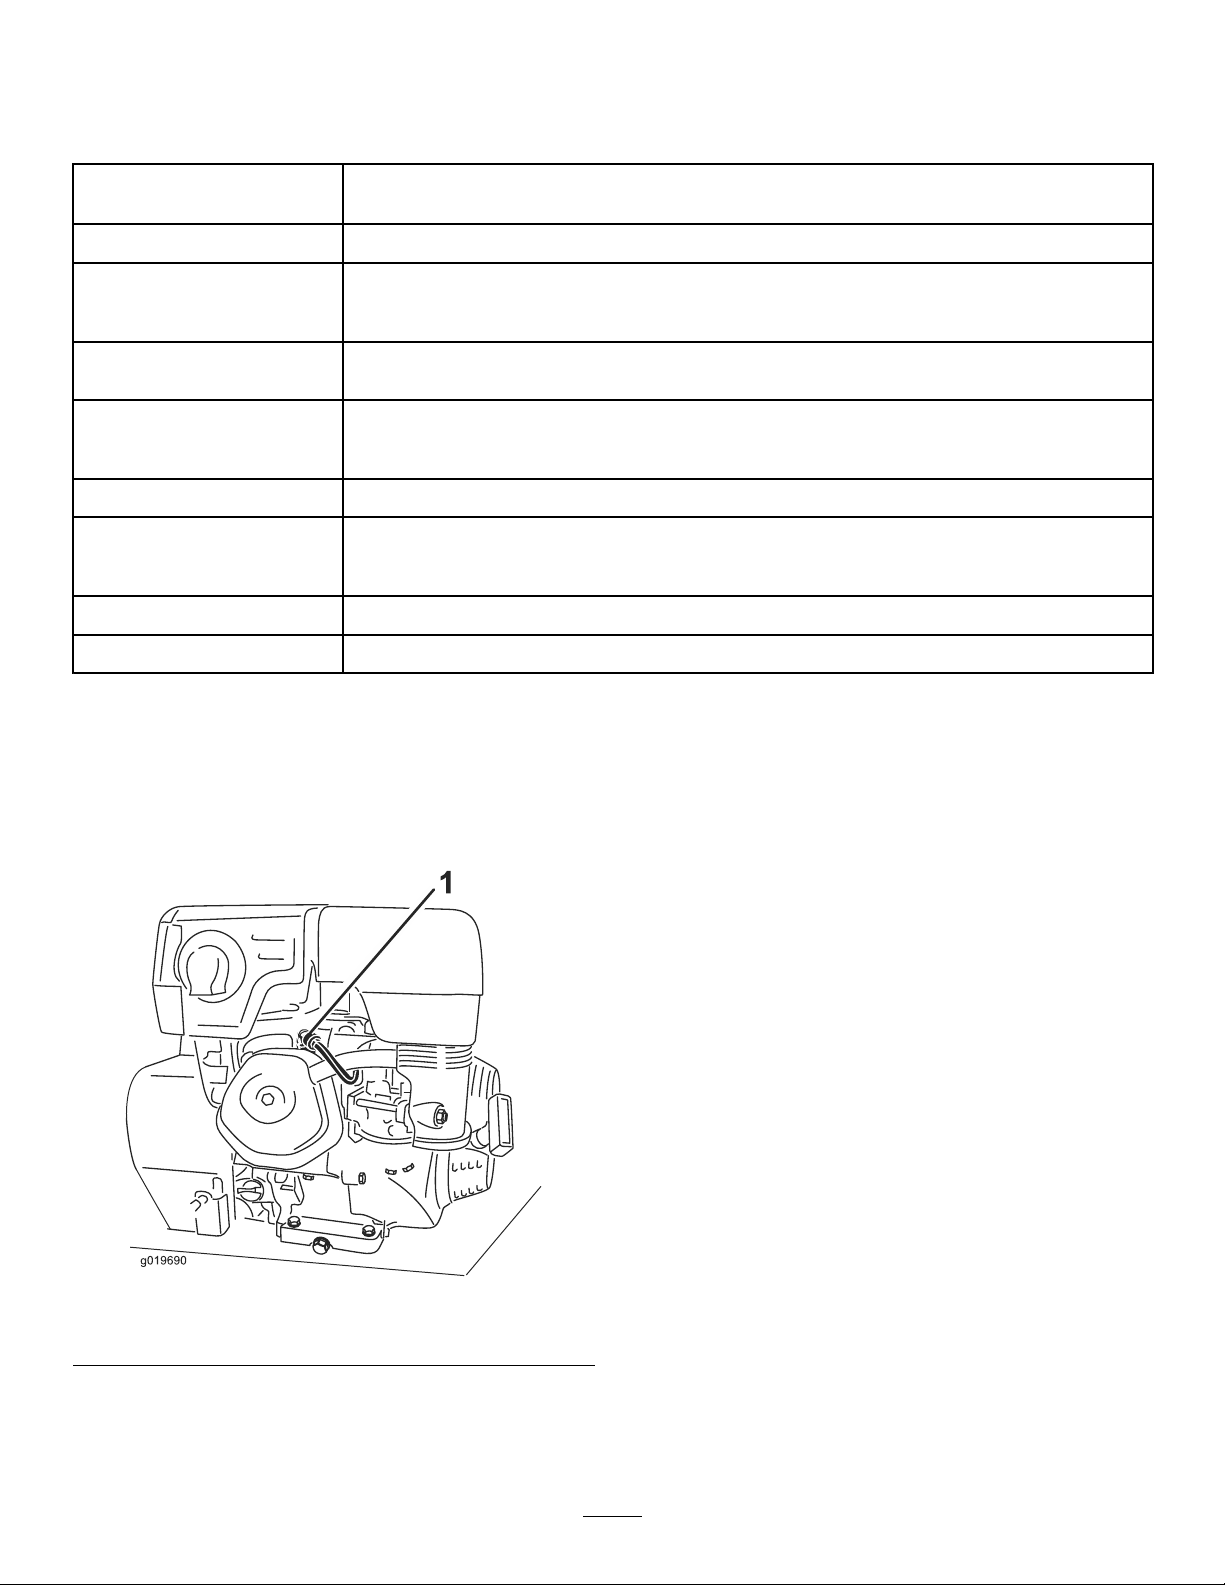
DisconnectingtheSparkPlug
Wire
Beforeperforminganymaintenanceontheengine,disconnect
thesparkplugwirefromthesparkplug(Figure16).
Figure17
1.Sparkplugwire
ServicingtheAirCleaner
ServiceInterval:Beforeeachuseordaily—Inspecttheair
cleanerelements.
Every50hours—Cleantheairlterelements.Clean
themmorefrequentlyindustyoperatingconditions.
Every300hours/Yearly(whichevercomes
rst)—Replacethepaperaircleanerelement.Replace
itmorefrequentlyindustyoperatingconditions.
Important:Donotoperatetheenginewithouttheair
lterassembly;extremeenginedamagewilloccur.
1.Setthethrottletoslow ,stoptheengine,andwaitfor
allmovingpartstostop.
2.Models68072and68073only:raisethecover(Figure
8).
3.Disconnectthewirefromthesparkplug.
4.Removethenutthatsecuresthecover(Figure18).
13

g019695
Figure18
1.Nut3.Paperelement
2.Cover4.Foamelement
5.Removethecover.
Note:Becarefultopreventdirtanddebrisfrom
fallingintothebase.
6.Removethefoamandpaperelementsfromthebase
(Figure18).
7.Removethefoamelementfromthepaperelement
(Figure18).
8.Inspectthefoamandpaperelements,andreplacethem
iftheyaredamagedorexcessivelydirty.
9.Ifthepaperelementisexcessivelydirty,replaceit.
Note:Nevertrytobrushdirtoffthepaperelement;
brushingforcesthedirtintothebers.
10.Cleanthefoamelementinwarm,soapywaterorina
nonammablesolvent.
Note:Donotusegasolinetocleanthefoamelement
becauseitcouldcreateariskofreorexplosion.
11.Rinseanddrythefoamelementthoroughly.
12.Dipthefoamelementincleanengineoil,thensqueeze
outtheexcessoil.
Note:Excessoilinthefoamelementrestrictstheair
owthroughtheelementandmayreachthepaper
lterandclogit.
13.Wipedirtfromthebaseandthecoverwithamoistrag.
Note:Becarefultopreventdirtanddebrisfrom
enteringtheairductleadingtothecarburetor.
14.Installtheaircleanerelementsandensurethattheyare
properlypositioned.
15.Securelyinstallthecoverwiththenut.
ServicingtheEngineOil
OilType:Detergentoil(APIserviceSJorhigher)
CrankcaseCapacity:RP-500andRP-700–20.3oz(0.6l)
CrankcaseCapacity:RP-1200–37oz(1.1l)
Viscosity:Seetablebelow
g013375
0 20 40 60 80 100 F
-20 -10 0 10 20 30 40 C o
o
30
5W - 30 / 10W - 30
Figure19
ChangingtheEngineOil
ServiceInterval:Aftertherst25hours
Every100hours
WARNING
Oilmaybehotaftertheenginehasbeenrun,and
contactwithhotoilcancauseseverepersonalinjury.
Avoidcontactingthehotengineoilwhenyoudrain
it.
1.Stoptheengineandwaitforallmovingpartstostop.
2.Disconnectthewirefromthesparkplug.
3.Removethedrainplug(Figure20).
14

Figure20
1.Drainplug
Note:Youmayhavetotipthecompactorbackwards
todraintheoil.
4.Whentheoilhasdrainedcompletely,replacetheplug.
Note:Disposeoftheusedoilatacertiedrecycling
center.
5.Removethedipstick(Figure7)andslowlypouroilinto
thellerholeuntiltheoilpoursoutofthellerhole.
6.Replaceandsecurethedipstick.
7.Wipeupanyspilledoil.
ServicingtheEccentricOil
OilType:Detergentoil(APIserviceSJorhigher)
CrankcaseCapacity:RP-500andRP-700–13.5oz(0.4l)
CrankcaseCapacity:RP-1200–16.9oz(0.5l)
Viscosity:15W-40
CheckingtheEccentricOilLevel
ServiceInterval:Monthly
1.Setthethrottletoslow ,stoptheengine,andwaitfor
allmovingpartstostop.
2.Placeadrainpanundertheoilplugandremovetheoil
plugscrewonthesideoftheeccentrichousing(Figure
21).
Figure21
RP-500shown
1.Oilplug
3.Verifythattheeccentricoilislevelwiththebolthole.If
addingoilisrequired,refertoChangingtheEccentric
Oil(page15).
4.Wipeupanyspilledoil.
5.Replacetheoilplugscrew.
ChangingtheEccentricOil
ServiceInterval:Yearly
Every300hours
1.Setthethrottletoslow ,stoptheengine,andwaitfor
allmovingpartstostop.
2.Placeanoildrainpanundertheoilplugandremove
theoilplugscrew(Figure21).Placeanoildrainpan
undertheoilplug.
3.Tiptheplatecompactorslightlytotheright,anduse
asuctionguntoremovetheoilthroughtheoilplug
hole(Figure21).
4.Tiptheplatecompactorslightlytotheleft,andslowly
pouroilintotheoilplughole(Figure21).
Note:Useafunneltopouroilintotheoilplughole
ifnecessary.
5.Theoilleveliscorrectwhenthereisaslightowofoil
outoftheoilplugholewhenthecompactorislevel.
6.Wipeupanyspilledoil.
7.Replacetheoilplugscrew.
15

CleaningtheSedimentCup
DANGER
Incertainconditions,gasolineisextremely
ammableandhighlyexplosive.Areorexplosion
fromgasolinecanburnyouandothersandcan
damageproperty.
•Setthethrottletoslow,stoptheengineandkeep
heat,sparks,andameaway.
•Handlefuelonlyoutdoors.
•Wipeupspillsimmediately.
•Donotsmokewhilehandlingfuel.
1.Stoptheengineandwaitforallmovingpartstostop.
2.Disconnectthewirefromthesparkplug.
3.Movethefuelshut-offvalvetotheOffposition.
4.RemovethesedimentcupandO-ring(Figure22).
2
3
4
1
G019333
Figure22
1.Fuelvalve(off)3.Fuellter
2.O-ring4.Sedimentcup
5.Washthesedimentcupinanonammablesolventand
dryitthoroughly.
6.PlacetheO-ringinthefuelvalveandinstallthe
sedimentcup,tighteningitsecurely(Figure22).
7.Movethefuelshut-offlevertotheOnposition.
Ifanyfuelleaks,repeatthisprocedureandreplacethe
O-ring.
ServicingtheBelt
CheckingtheBeltTension
1.Removetheboltsholdingthebeltcoverinplace
(Figure23).
Figure23
1.Bolts
2.Apply1kg(2.2lbs)ofpressuretothemiddleofthe
belt.Iftensionedcorrectlyitshouldsag0.5cm(0.2
inches).
3.Ifthebeltisnottensionedproperly,refertoAdjusting
theBeltTension(page16).
4.Replacethebeltcover.
AdjustingtheBeltTension
ServiceInterval:Every100hours
1.Removetheboltsholdingthebeltcoverinplace
(Figure23).
2.Loosentheenginemountingbolts.
3.Adjustthepositionoftheengineuntiltheproperbelt
tensionisobtained.
4.Tightentheenginemountingboltsandreplacethebelt
cover.
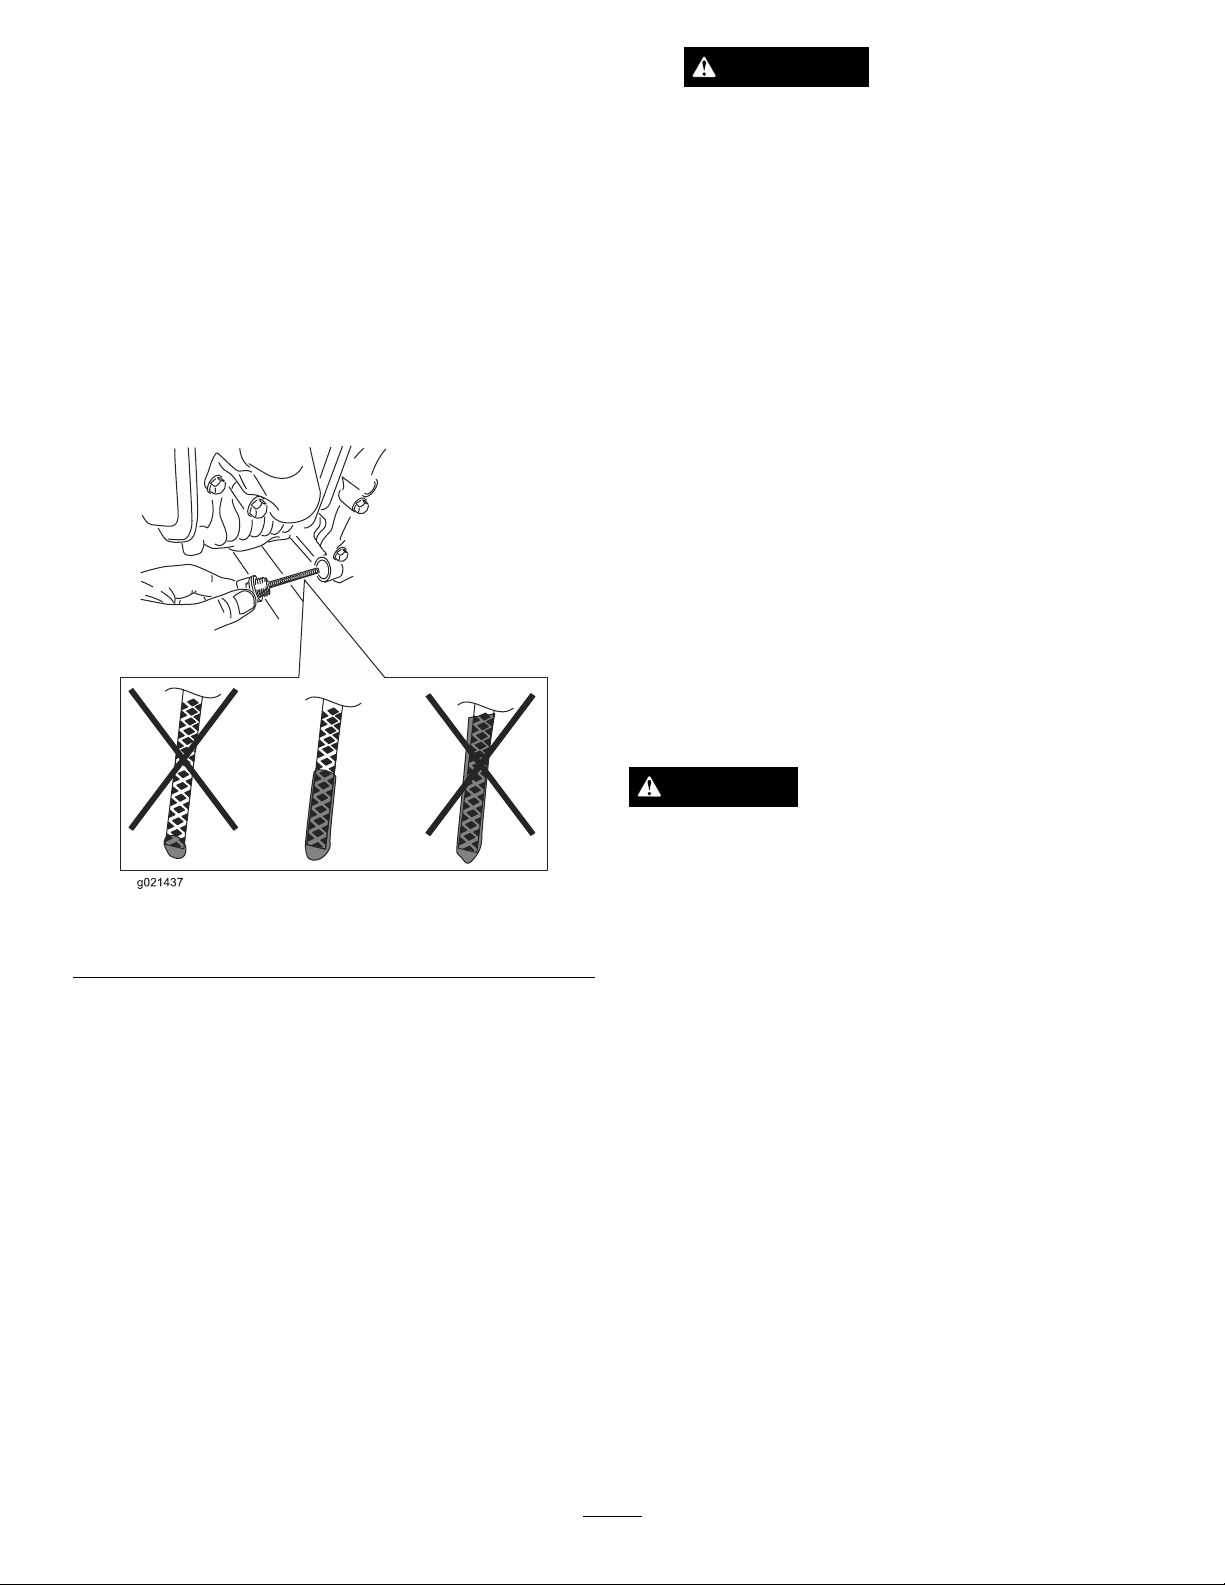
ServicingtheSparkPlug
ServiceInterval:Every100hours—Inspect,clean,and
adjustthesparkplug;replaceitif
necessary.
Every200hours—Replacethesparkplug.
UseanNGKBPR6ESsparkplugorequivalent.
1.Stoptheengineandwaitforallmovingpartstostop.
2.Disconnectthewirefromthesparkplug.
3.Cleanaroundthesparkplug.
4.Removethesparkplugfromthecylinderhead.
16
Important:Replaceacracked,fouled,ordirty
sparkplug.Donotcleantheelectrodesbecause
gritenteringthecylindercandamagetheengine.
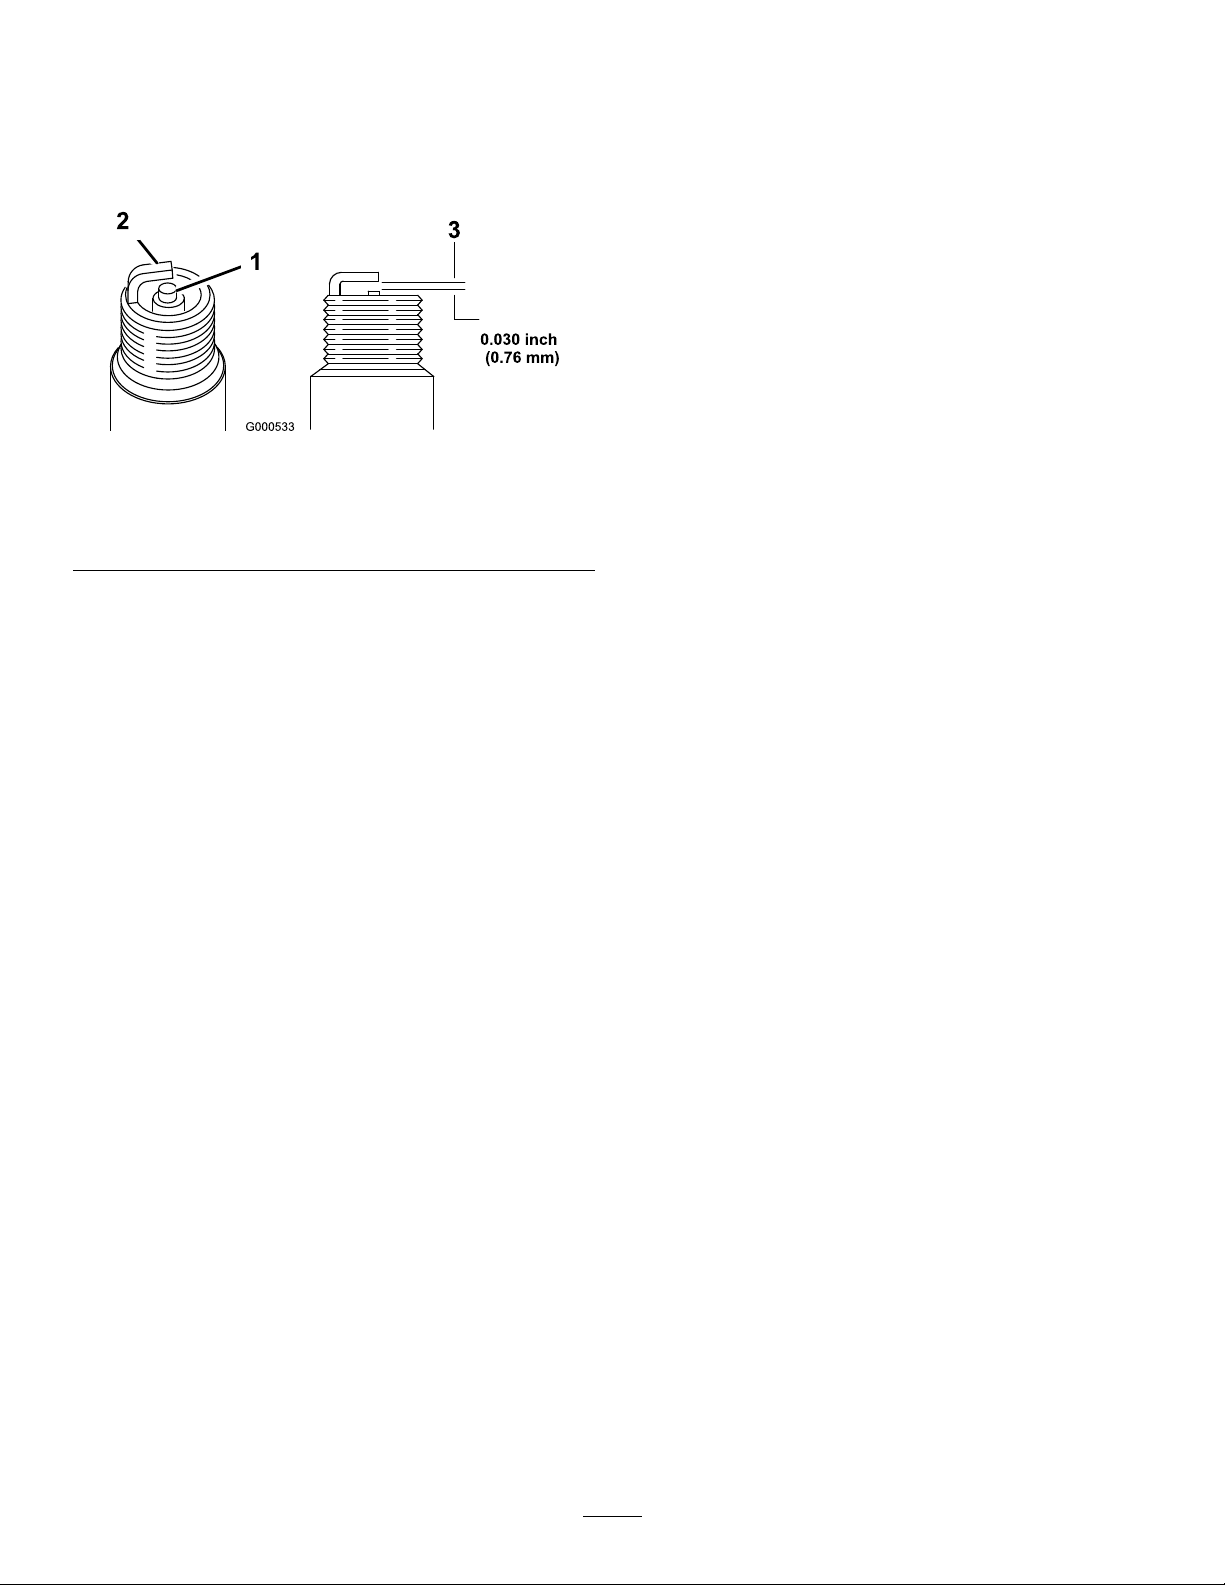
5.Setthegapontheplugto0.030inch(0.76mm)(Figure
24).
Figure24
1.Centerelectrodeinsulator
2.Sideelectrode
3.Airgap(nottoscale)
6.Carefullyinstallthesparkplugbyhand(toavoidcross
threading)untilitishandtight.
7.Tightenthesparkpluganadditional1/2turnifitis
new;otherwise,tightenitanadditional1/8to1/4turn.
Important:Aloosesparkplugcanbecomevery
hotandcandamagetheengine;overtighteninga
sparkplugmaydamagethethreadsinthecylinder
head.
8.Connectthewiretothesparkplug.
Storage
1.Stoptheengine,anddisconnectthesparkplugwire.
2.Removedirtandgrimefromthemachine.
Important:Youcanwashthemachinewithmild
detergentandwater.Donotpressurewashthe
machine.Avoidexcessiveuseofwater,especially
neartheengine.
3.Servicetheaircleaner;referto(page).
4.Changetheengineoil;refertoCheckingtheEngine
OilLevel(page9).
5.Forstorageover30days,preparetheunitasfollows:
A.Addapetroleumbasedstabilizer/conditionerto
fuelinthetank.Followmixinginstructionsfrom
stabilizermanufacturer(1oz.pergallon).Do
notuseanalcoholbasedstabilizer(ethanol
ormethanol).
Note:Afuelstabilizer/conditionerismost
effectivewhenmixedwithfreshgasolineandused
atalltimes.
B.Runtheengineuntilitstopsfromrunningout
offuel.
C.Choketheengine.
D.Startandruntheengineuntilitwillnotstartagain.
E.Disposeoffuelproperly.Recycleasperlocal
codes.
Important:Donotstorestabilizer/conditioned
gasolineover90days.
6.Checkandtightenallbolts,nuts,andscrews.Repairor
replaceanypartthatisdamaged.
7.Paintallscratchedorbaremetalsurfaces.Paintis
availablefromyourAuthorizedServiceDealer.
8.Storethemachineinaclean,drygarageorstoragearea.
9.Coverthemachinetoprotectitandkeepitclean.
17

Troubleshooting
ProblemPossibleCauseCorrectiveAction
1.Thefueltankisempty.1.Fillthefueltankwithgasoline.
2.Thesparkplugispitted,fouled,orthe
gapisincorrect.
2.Installanew,correctlygappedspark
plug.
Theenginewillnotstart,startshard,or
failstokeeprunning.
3.Theaircleanerisdirty.3.Cleanorreplacetheaircleaner
elements.
1.Theoillevelintheeccentrichousing
istoohigh.
1.Checktheoillevelanddrainas
necessary.
Theplatedoesnotvibrateatfullspeed.
2.Thebeltisloose.2.Adustthebelttension.
1.Aforeignobjectislodgedagainstthe
eccentricsheave.
1.Removetheobstruction.
2.Theoillevelintheeccentrichousing
istoohigh.
2.Checktheoillevelanddrainas
necessary.
3.Theclutchhasslipped.3.Adjustthecarburetor.
Theclutchisextremelyhot.
4.EngineRPMisnotreachingfullRPM.4.Adjustthethrottlesotheenginerunsat
3,600to3,800RPM.
1.Thebeltisbroken.1.Replacethebelt.
2.Theclutchisbrokenorwornout.2.Replacetheclutch.
Theplatedoesnotvibratewhenthe
engineisrunning.
3.Theeccentrichasseized.3.Ensuretheeccentricisfreeturning.
18

Notes:
19

TheToroWarranty
Alimitedwarranty(seewarrantyperiodsbelow)
Concrete,Masonry,
andCompaction
Equipment
ConditionsandProductsCovered
TheT oroCompanyanditsafliate,ToroWarrantyCompany,pursuantto
anagreementbetweenthem,jointlywarrantyourToroConcrete,Masonry,
andCompactionEquipmentProductslistedbelowtobefreefromdefects
inmaterialsorworkmanship.
Thiswarrantycoversthecostofpartsandlabor,butyoumustpay
transportationcosts.
Thefollowingtimeperiodsapplyfromthedateofpurchase:
ProductsWarrantyPeriod
ConcreteMixers1year
•SpindleBearingsLifetime*(originalowneronly)
MortarMixers1year
•DrumBearingsandSealsLifetime*(originalowneronly)
ForwardPlateCompactors2years
ReversiblePlates1year
RammerCompactors2years
MudBuggy1year
VibratingTrenchRoller2years
ConcreteSaws1year
MasonrySaws1year
PowerTrowels1year
Screeds1year
ConcreteVibrators1year
Whereawarrantableconditionexists,wewillrepairtheProductatnocost
toyouincludingdiagnosis,labor,andparts.
*LifetimeWarranty-Ifthebearing(s)orseal(s)onyourmixerfail,itwillbereplacedunderwarranty,
atnocostforpartsorlabor.
InstructionsforObtainingWarrantyService
IfyouthinkthatyourT oroProductcontainsadefectinmaterialsor
workmanship,followthisprocedure**:
1.ContactanyAuthorizedServicingOutlettoarrangeserviceattheir
dealership.Tolocateoneconvenienttoyou,accessourwebsiteat
www.Toro.com.Select“WheretoBuy”andselect“Contractor”under
producttype.Youmayalsocallourtollfreenumberbelow.
2.Bringtheproductandyourproofofpurchase(salesreceipt)tothem.
3.IfforanyreasonyouaredissatisedwiththeServiceOutlet’s
analysisorwiththeassistanceprovided,contactusat:
SWSCustomerCareDepartment
ToroWarrantyCompany
8111LyndaleAvenueSouth
Bloomington,MN55420-1196
TollFree:800-888-9926
**ToroAuthorizedRentalCustomerswhohavepurchasedproductsdirectlyfromT oroandhave
signedtheT oroRentalCustomerAgreementhavetheabilitytoperformtheirownwarrantywork.
PleasevisitT oro’sRentalPortalforelectronicwarrantyclamlingproceduresorcallthetollfree
numberabove.
OwnerResponsibilities
YoumustmaintainyourT oroProductbyfollowingthemaintenance
proceduresdescribedintheOperator’sManual.Suchroutine
maintenance,whetherperformedbyadealerorbyyou,isatyourexpense.
Partsscheduledforreplacementasrequiredmaintenance(“Maintenance
Parts”),arewarrantedfortheperiodoftimeuptothescheduled
replacementtimeforthatpart.Failuretoperformrequiredmaintenance
andadjustmentscanbegroundsfordisallowingawarrantyclaim.
ItemsandConditionsNotCovered
Notallproductfailuresormalfunctionsthatoccurduringthewarranty
periodaredefectsinmaterialsorworkmanship.Thisexpresswarranty
doesnotcoverthefollowing:
•Productfailureswhichresultfromtheuseofnon-T ororeplacement
parts,orfrominstallationanduseofadd-on,modied,orunapproved
accessories
•Productfailureswhichresultfromfailuretoperformrequired
maintenanceand/oradjustments
•ProductfailureswhichresultfromoperatingtheProductinan
abusive,negligentorrecklessmanner
•Partssubjecttoconsumptionthroughuseunlessfoundtobe
defective.Examplesofpartswhichareconsumed,orusedup,during
normalproductoperationinclude,butarenotlimitedto,belts,wipers,
sparkplugs,tires,lters,gaskets,wearplates,seals,O-rings,drive
chains,clutches.
•Failurescausedbyoutsideinuence.Itemsconsideredtobeoutside
inuenceinclude,butarenotlimitedto,weather,storagepractices,
contamination,useofunapprovedcoolants,lubricants,additives,or
chemicals,etc.
•Normal“wearandtear”items.Normal“wearandtear”includes,butis
notlimitedto,wornpaintedsurfaces,scratcheddecals,etc.
•Anycomponentcoveredbyaseparatemanufacturer’swarranty
•Pickupanddeliverycharges
GeneralConditions
RepairbyanAuthorizedServicingOutletorSelf-ServiceasanAuthorized
RentalCustomerisyoursoleremedyunderthewarranty.
NeitherTheToroCompanynorToroWarrantyCompanyisliablefor
indirect,incidentalorconsequentialdamagesinconnectionwith
theuseoftheToroProductscoveredbythiswarranty,including
anycostorexpenseofprovidingsubstituteequipmentorservice
duringreasonableperiodsofmalfunctionornon-usepending
completionofrepairsunderthiswarranty.Allimpliedwarranties
ofmerchantabilityandtnessforusearelimitedtotheduration
ofthisexpresswarranty.Somestatesdonotallowexclusionsof
incidentalorconsequentialdamages,orlimitationsonhowlong
animpliedwarrantylasts,sotheaboveexclusionsandlimitations
maynotapplytoyou.
Thiswarrantygivesyouspeciclegalrights,andyoumayalsohaveother
rightswhichvaryfromstatetostate.
ExceptfortheenginewarrantycoverageandtheEmissionswarranty
referencedbelow,ifapplicable,thereisnootherexpresswarranty.The
EmissionsControlSystemonyourProductmaybecoveredbyaseparate
warrantymeetingrequirementsestablishedbytheU.S.Environmental
ProtectionAgency(EPA)ortheCaliforniaAirResourcesBoard(CARB).
RefertotheCaliforniaEmissionControlWarrantyStatementsuppliedwith
yourProductorcontainedintheenginemanufacturer’sdocumentationfor
details.
CountriesOtherthantheUnitedStatesorCanada
CustomerswhohavepurchasedToroproductsoutsidetheUnitedStatesorCanadashouldcontacttheirT oroDistributor(Dealer)toobtainguarantee
policiesforyourcountry,province,orstate.IfforanyreasonyouaredissatisedwithyourDistributor'sserviceorhavedifcultyobtainingguarantee
information,contacttheToroimporter.Ifallotherremediesfail,youmaycontactusatT oroWarrantyCompany.
AustralianConsumerLaw:AustraliancustomerswillnddetailsrelatingtotheAustralianConsumerLaweitherinsidetheboxoratyourlocalT oro
Dealer.
374-0288RevB
This manual suits for next models
2
Table of contents
Other Toro Power Tools manuals


