manuals.online logo
Brands
  1. Home
  2. •
  3. Brands
  4. •
  5. Toshiba
  6. •
  7. Control Unit
  8. •
  9. Toshiba TCB-PCIN2E User manual

Toshiba TCB-PCIN2E User manual

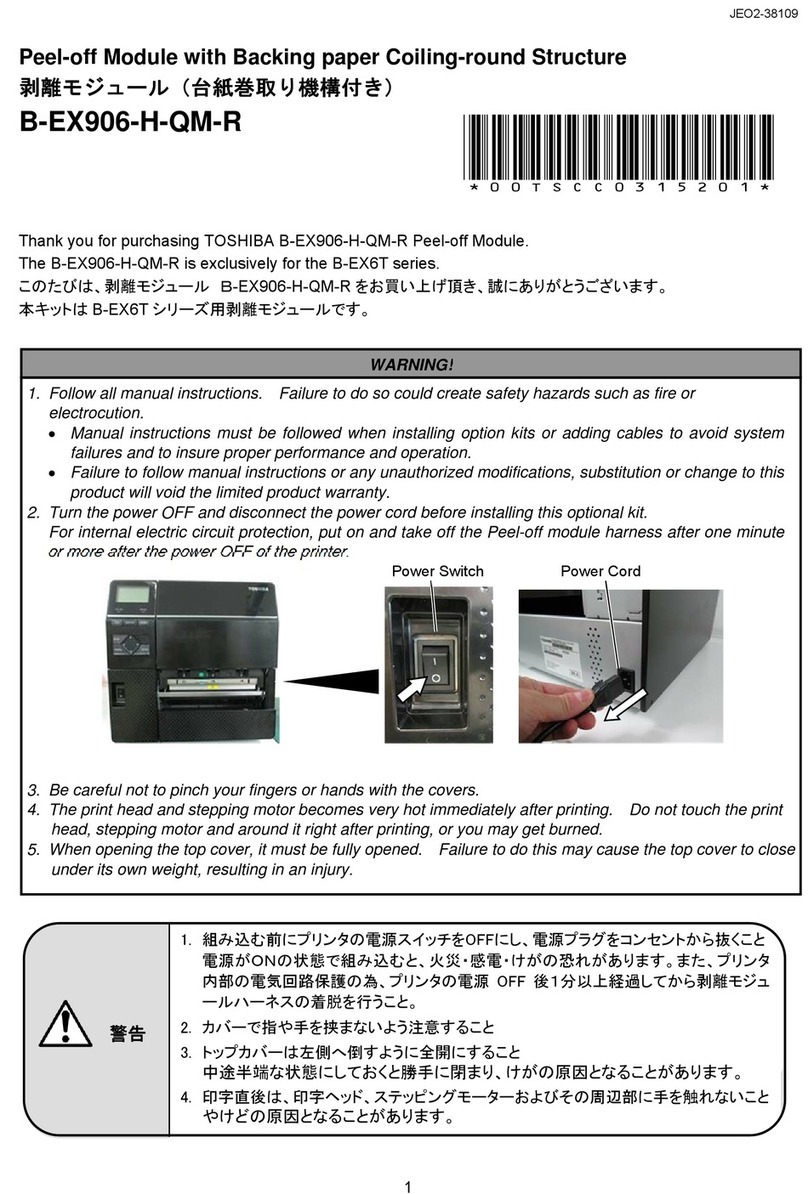
Error output control board
(1) Be sure to turn off the power switch before installing.
(2) Place this P.C. board by using the support on the upper side of the electric
component box. There are four installation holes to place the support on the
upper side of the electric component box.
( ) Connect the P.C.board (TCB-PCIN2E)PJ20
and outdoor unit interface CN511
withconnection cable.
(4) Bind the remaining connection cable with the
attached banding band.
[ Outdoor unit interface PC board ]
Wiring
SN:CH49941101
INSTALLATION MANUAL
MODEL:
TCB-PCIN E
Feature Operation and Error monitoring is possible by using Error output
control board "TCB-PCIN2E"
Dimension
No.
1
2
4
5
6
Q’ty
1
4
2
1
1
2
Parts name
Connection cable
Support to fix the board
Earth screw
Wire-clamp
Screw for cable-clamp
Banding band
69
79
6
7
4-φ4 hole
Terminal(Screw M )
Accesory parts
Placing position
TCB-PCIN2E
Outdoor unit
interface PC board
[ Outdoor unit ] [ Electric component box ]
CN511
GREEN
How to install
Safety Precautions
WARNIN
CAUTION
This symbol is used to identify action which, if carried out in an incorrect ignoring this indication,
could lead to serious personal injury or even death.
Installation of accessory parts should be performed either by personnel from this dealer
where it was purchased or by specialist installation technicians.
Reassembling, repair, or modification of this accessory parts is strictry forbidden.
Do not install a location where flammable gasses may be present.
Repair of the accessory parts must also carried out by personnel from dealer where it was purcased.
Use the specified wires for wiring connect the terminals securely fix. To prevent external
forces applied to the terminals from affecting the terminals.
This symbol is used to identify action which, if carried out in an incorrect ignoring this indication,
could lead to serious human injury or property damage.
 Please read this section carefully before installation work to install the accessory parts in the
prescribed manner. The precaution given here deal with serious safety issues. It is, therefore,
of the utmost importance that they are observed in full.
 The meanings of safety-related symbol are as follows:
 After installation work has been completed, perform a trial operation of the equipment in order
to ensure that it is operating normally, and then hand over to the customer and ask to keep
this Safety Precautions and Installation Instruction.

Incorrect installation by unqualified personnel can result in electric shock, fire or abnormal operation.

Fire may break out should flammable gas leak into the vicinity of the parts.

Fire may break out should flammable gas leak into the vicinity of the parts.

Failure to follow these directions can result in inflammation, earth leakage or abnormal operation
causing electric shock or injury.
WARNIN
Size(mm):H22 x L7 x W79
Weight(g): 57
Length
Shield wire
TypeSize
* In conformity with design 60245 IEC 57
Output wiring
Up to 200m
Up to 400m
4-core, 0.75mm2 *
4-core, 1.5mm2 *
(1) Refer to the "Electric wiring diagram" when wiring.
(2) Be sure to use the shield wire to prevent noise trouble, and perform the
grounding at both sides of shield wires.
( ) Fix the output wiring with the cable-clamp and banding band.
( )-1. Let the output wiring into the banding band and band it together with the
other wiring.
( )-2. Fix the wire-clamp using the screw hole on the "B" position.
[ Electric component box ]
A
B
Banding band
Wire-clamp
Output wiring
(Local supply)
Function / Electric wiring diagram
Operation monitoring : Display relay is ON with more than one indoor unit operation.
EMG monitoring : Display relay is ON when the system in error status.
I/F P.C. Board*
*Place this option P.C. Board to header outdoor unit.
Connection
Cable
Local Supply
: Operation monitoring lamp
TCB-PCIN2E
Power Supply
OPERATION
PJ20CN511
L1
L1
: Error monitoring lamp
L2
Display
Relay
Power Supply
EMG
L2
Display
Relay
  CAUTION)

 
・Be sure to prepare a non-voltage point for each terminal.
 ・Display Relay capacity of "OPERATION" and "EMG"
Below AC240V 0.5A (COSφ=100%)
When connecting load such as relay coil to "L1,L2" load, insert the noise surge absorber.
Below DC24V 1A (Non-inductive load)
When connecting load such as relay coil to "L1,L2" load, insert the bypass circuit.
Install this P.C. board to the upper side of the electric component box on outdoor unit.
MODEL:TCB-PCIN2
外形図
運転異常表示用PC板 取付説明書
取付位置
安全上のご注意
●
取り付け工事の前に、この「安全上のご注意」をよくお読みのうえ取り付けてください。
●
ここに示した注意事項は、安全に関する重大な内容を記載していますので、必ず守ってください。
表示と意味は次のようになっています。
●
取り付け工事完了後、試運転を行い異常がないことを確認するとともに取扱説明書にそって
お客様に使用方法、お手入れの仕方を説明してください。また、この取付説明書は取扱説明
書とともに、お客様で保管いただくように依頼してください。
警告
注意
「誤った取り扱いをすると、人が死亡または重傷を負う可能性があ
ること」を示します。
「誤った取り扱いをすると人が傷害を負う可能性、または物的損害
が発生する可能性があること」を示します。
警告
取り付けはお買い上げ販売店、または専門業者に依頼すること
ご自分で据え付け工事をされ不備があると、感電、火災の原因になります。
取り付け工事は、この取付説明書に従って確実に行うこと
取り付けに不備があると、感電、火災、異常動作の原因になります。
電気工事は、電気工事士の資格のある方が、「電気設備に関する技術基準」、「内線規定」
及び取付説明書に従って施工すること
施工不備があると、感電、火災の原因になります。
配線は所定のケーブルを使用して確実に接続し、端子接続部にケーブルの外力が伝わら
ないよう確実に固定すること
接続や固定が不完全な場合は、火災などの原因になります。
絶対に改造はしないこと
感電、火災の原因になります。
修理はお買い上げの販売店に依頼すること
修理に不備があると感電、火災、異常動作の原因になります。
機能、特徴
運転異常表示PC板は室外機のインターフェース基板に接続することで運転・異常の外部取り出しが
可能になります。
付属部品
No. 個数部 品 名
ケーブルクランプ

ケーブルクランプ
固定用ネジ
結束バンド
シールド線接地用ネジ
(未使用)
1
1
2
3
4
5
6
接続ケーブル
固定用サポート
1
4
2
2
1
寸法(mm):
H22×L73×W79
重さ(g):57
4-φ4取付穴
69
79
63
73
端子台(M3)
運転異常表示用PC板は電気部品ボックスの右上部位置に取り付けてください。
取付方法
(1)取り付け作業の際は必ず電源を切ってください。
(2)固定用サポートを用いて電気部品ボックス内の所定位置に「運転異常表示用PC板」を
取り付けます。 電気部品ボックス内の所定位置には固定用サポートの取付穴が4ヵ所
あります。
(3)「運転異常表示用PC板」上のコネクタ(PJ20)と「インターフェース基板」上のコネ
クタ(CN511)を付属のケーブルにて接続します。
(4)付属のケーブルは結束バンドで束ねてください。
[コネクタ(CN511)位置:スーパーモジュールマルチ(MMY-)の場合]
(室外機のインターフェース基板)
[コネクタ(CN511)位置:ROB-、ROP-、RDA-の場合]
(室外機のインターフェース基板)
CN511
(緑)
室外機

インターフェース基板


運転異常表示用PC
板

配線方法
線長
VCTFビニルキャブタイヤ
丸型コード
仕    様サイズ
表示用出力信号線 200mまで
400mまで
0.75mm2
1.5mm2
(1)配線は「電気配線図」に従って行ってください。
(2)表示用出力信号線は付属のケーブルクランプと結束バンドで必ず固定してください。
(2)-1.結束バンドは下図に示す固定穴Aに通してから、他の配線とともに出力用配線を
結束してください。
(2)-2.ケーブルクランプは下図Bの位置にあるネジ穴を利用して、固定してください。
[電気部品ボックス]
A
B
結束バンド
ケーブルクランプ
表示用出力線
動作内容、電気配線図
[スーパーモジュールマルチ(MMY-)の場合]
運転表示:系統内の室内ユニットが1台でも運転している時、運転表示出力を行います。
故障表示:系統内の室内ユニットまたは室外機が1台でも異常が発生した場合に故障表示出力を行います。
[室外機] [電気部品ボックス]
CN511
(緑)
[ROB-、ROP-、RDA-の場合]
運転表示:室外機が運転している時、運転表示出力を行います。
故障表示:系統内の室内ユニットまたは室外機が1台でも異常が発生した場合に故障表示出力を行います。
センター室外機インターフェース基板
*
*スーパーモジュールマルチ(MMY-)の場合、オプション基板はセンター室外機に接続してください。
付属の
接続ケーブル
現地手配
:運転表示ランプ
:異常表示ランプ
TCB-PCIN2
電源
電源
運転
異常
PJ20
CN511
L1
L2
L2
L1
表示用
リレー
表示用
リレー
  
注意)表示用リレー接点容量
 ・AC200V0.5A以下(COSφ=100%)、 DC24V1A以下(無誘導負荷)
 ・ランプ(L1、L2)などの負荷を必ず挿入してください。
 ・L1、L2負荷にリレーコイルなどの誘導負荷を接続する場合はバイパス回路に
  サージキラー用CR(ACの場合)、または逆起電圧防止用ダイオード(DCの場合)
  を挿入してください。
室外機の形名がMMY-MAP、ROB-AP、RDA-SPEで始まる機種及びROP-AP***HT
に取り付ける場合は、本取付説明書にしたがって取り付けてください。

Other Toshiba Control Unit manuals

Toshiba e-STUDIO 810 User manual

Toshiba

Toshiba e-STUDIO 810 User manual

Toshiba TCB-CC163TLE User manual

Toshiba

Toshiba TCB-CC163TLE User manual

Toshiba RBM-PMV0363E, RBM-PMV0903E User manual

Toshiba

Toshiba RBM-PMV0363E, RBM-PMV0903E User manual

Toshiba AJ65VBTCU-68ADVN User manual

Toshiba

Toshiba AJ65VBTCU-68ADVN User manual

Toshiba B-FV904T-H-QM-R User manual

Toshiba

Toshiba B-FV904T-H-QM-R User manual

Toshiba G3 Plus Pack Instruction Manual

Toshiba

Toshiba G3 Plus Pack Instruction Manual

Toshiba B-EP700-BLTH-QM-R User manual

Toshiba

Toshiba B-EP700-BLTH-QM-R User manual

Toshiba TOSVERT VF-A7 User manual

Toshiba

Toshiba TOSVERT VF-A7 User manual

Toshiba IK-HD1E User manual

Toshiba

Toshiba IK-HD1E User manual

Toshiba Carrier RBM-A0601UPVA-UL User manual

Toshiba

Toshiba Carrier RBM-A0601UPVA-UL User manual

Toshiba MMW-UP0271LQ-E User manual

Toshiba

Toshiba MMW-UP0271LQ-E User manual

Toshiba BMS-SM1280HTLE User manual

Toshiba

Toshiba BMS-SM1280HTLE User manual

Toshiba nv Series User manual

Toshiba

Toshiba nv Series User manual

Toshiba TC-net 100 User manual

Toshiba

Toshiba TC-net 100 User manual

Toshiba GN2020 User manual

Toshiba

Toshiba GN2020 User manual

Toshiba IK-HR1CS User manual

Toshiba

Toshiba IK-HR1CS User manual

Toshiba RBM-A101VAE User manual

Toshiba

Toshiba RBM-A101VAE User manual

Toshiba MMW-UP0271LQ-E User manual

Toshiba

Toshiba MMW-UP0271LQ-E User manual

Toshiba B-EX206-QM-R User manual

Toshiba

Toshiba B-EX206-QM-R User manual

Toshiba IK-TU61 User manual

Toshiba

Toshiba IK-TU61 User manual

Toshiba TOSVERT VF-MB1 User manual

Toshiba

Toshiba TOSVERT VF-MB1 User manual

Toshiba BMS-SM1280HTLE User manual

Toshiba

Toshiba BMS-SM1280HTLE User manual

Toshiba IK-TF5U User manual

Toshiba

Toshiba IK-TF5U User manual

Toshiba B-EX700-WLAN2-QM-R User manual

Toshiba

Toshiba B-EX700-WLAN2-QM-R User manual

Popular Control Unit manuals by other brands

Allen-Bradley ControlNet 1747-SCNR installation instructions

Allen-Bradley

Allen-Bradley ControlNet 1747-SCNR installation instructions

Task Force Tips ER Bubble Cup Instructions for installation, safe operation and maintenance

Task Force Tips

Task Force Tips ER Bubble Cup Instructions for installation, safe operation and maintenance

Roger Technology H70/200AC Instruction and warnings for the installer

Roger Technology

Roger Technology H70/200AC Instruction and warnings for the installer

HID Aero X300 installation guide

HID

HID Aero X300 installation guide

Emerson FISHER 66R instruction manual

Emerson

Emerson FISHER 66R instruction manual

Pilz PSS CPU Series operating manual

Pilz

Pilz PSS CPU Series operating manual

Schell 02 254 06 99 Assembly and service instructions

Schell

Schell 02 254 06 99 Assembly and service instructions

GEM 635 Installation, operating and maintenance instructions

GEM

GEM 635 Installation, operating and maintenance instructions

Emerson fisher EDR instruction manual

Emerson

Emerson fisher EDR instruction manual

Belden Grass Valley HCO-1822 Guide to installation and operation

Belden

Belden Grass Valley HCO-1822 Guide to installation and operation

Danfoss ICM 20 Installation, programming, and troubleshooting manual

Danfoss

Danfoss ICM 20 Installation, programming, and troubleshooting manual

PDi PD251-047 quick start guide

PDi

PDi PD251-047 quick start guide

Fantech VT20M quick start guide

Fantech

Fantech VT20M quick start guide

CCS Lighting Solution PD3-5024-4-EI Instruction guide

CCS

CCS Lighting Solution PD3-5024-4-EI Instruction guide

PIETRO FIORENTINI Cirval 200 Installation and commissioning guide

PIETRO FIORENTINI

PIETRO FIORENTINI Cirval 200 Installation and commissioning guide

Viessmann VITOTRONIC 200 Service instructions

Viessmann

Viessmann VITOTRONIC 200 Service instructions

KIESELMANN 406 Series Operating	 instruction

KIESELMANN

KIESELMANN 406 Series Operating instruction

Lutron Electronics GRAFIK Eye QSGRJ-3P Installation and operation guide

Lutron Electronics

Lutron Electronics GRAFIK Eye QSGRJ-3P Installation and operation guide

manuals.online logo
manuals.online logoBrands
  • About & Mission
  • Contact us
  • Privacy Policy
  • Terms and Conditions

Copyright 2025 Manuals.Online. All Rights Reserved.