Toshiba TF 610 User manual

1
A
B
F
M
L
H
E
C
D
KI
G
G
N
519 213239
4
20
10
17 18 21 15 221413
123
64
789
0
04 05 06 G2
01 02 03 G1
07 08 09 G3
10 11 12 G4
13 14 15 G5
16 17 18 G6
5
1611 126 8 7

2
GB TF610
TOSHIBA
Welcome to your fax machine
Welcometoyourfaxmachine
ACover
BControl panel
CDocumentexit
DExittraywire
ERecording paper cassette
FControl panel lock
GInterface for Computer printer cable
HDocumentguides
IRecording paper exit tray
KTraywire
1LCDDisplay
Displays indications about the
operating modes of your fax
machine. Your control monitor for
all function settings.
2Fault LED
Lights up if a malfunction occurs or
to indicate paper out or toner out.
3BusyLED
Flashes or lights up when the fax
machine connects to the line or is
just transmitting or receiving.
4Job Status
Queries the status of the entered
jobs.
5Menukeys
Use these keys to start the menu or
select a particular menu item.
6Cancel key
Deletes jobs in the memory or
deletes the last entry during
programming.
7Group
Use this key for group selection.
8One Touch Dialing keys
Sends documents at the push of a
button.
9Copy
Makes a copy of your original.
10 Option
When document hsa been inserted into
machine, press to select special settings
for document transmission.
11 Start
Indicates the sending and receiving
options, confirms entries.
12 Stop
Clears error messages and terminates
input.
13 Redial/pause
Activatesthepreviouslydiallednumber
and inserts a dialling pause.
14 Handset
Used for on-hook dialling.
15 Dial Keypad
Used for entering telephone numbers.
16 ABB.DIAL/ALPHABET
Press this key in order to select a stored
alphabet dial number or a name.
17 RCV KEY
Switches between automatic and
manual reception.
18 ResolutionKey
Changes the scan resolution of the
loaded originals.
19 Input
Activates selected menu items and
terminates data input.
20 Directtransmit
Pressthiskeytosendthe
document directly from the
document feeder (avoiding the
stackmemory).
21 Contrast
For adjusting the scanning of dark
or light documents.
22 TX report
The settings for printing out the TX
report can be adjusted individually.
23 ON LINE
Lights up to indicate data being
transmitted from the PC.
LDocument tray wire
MDocument tray
NTelephone connection

3GB
TOSHIBA
TF610 Contents
Contents
Preparation
Unpacking................................................... 4
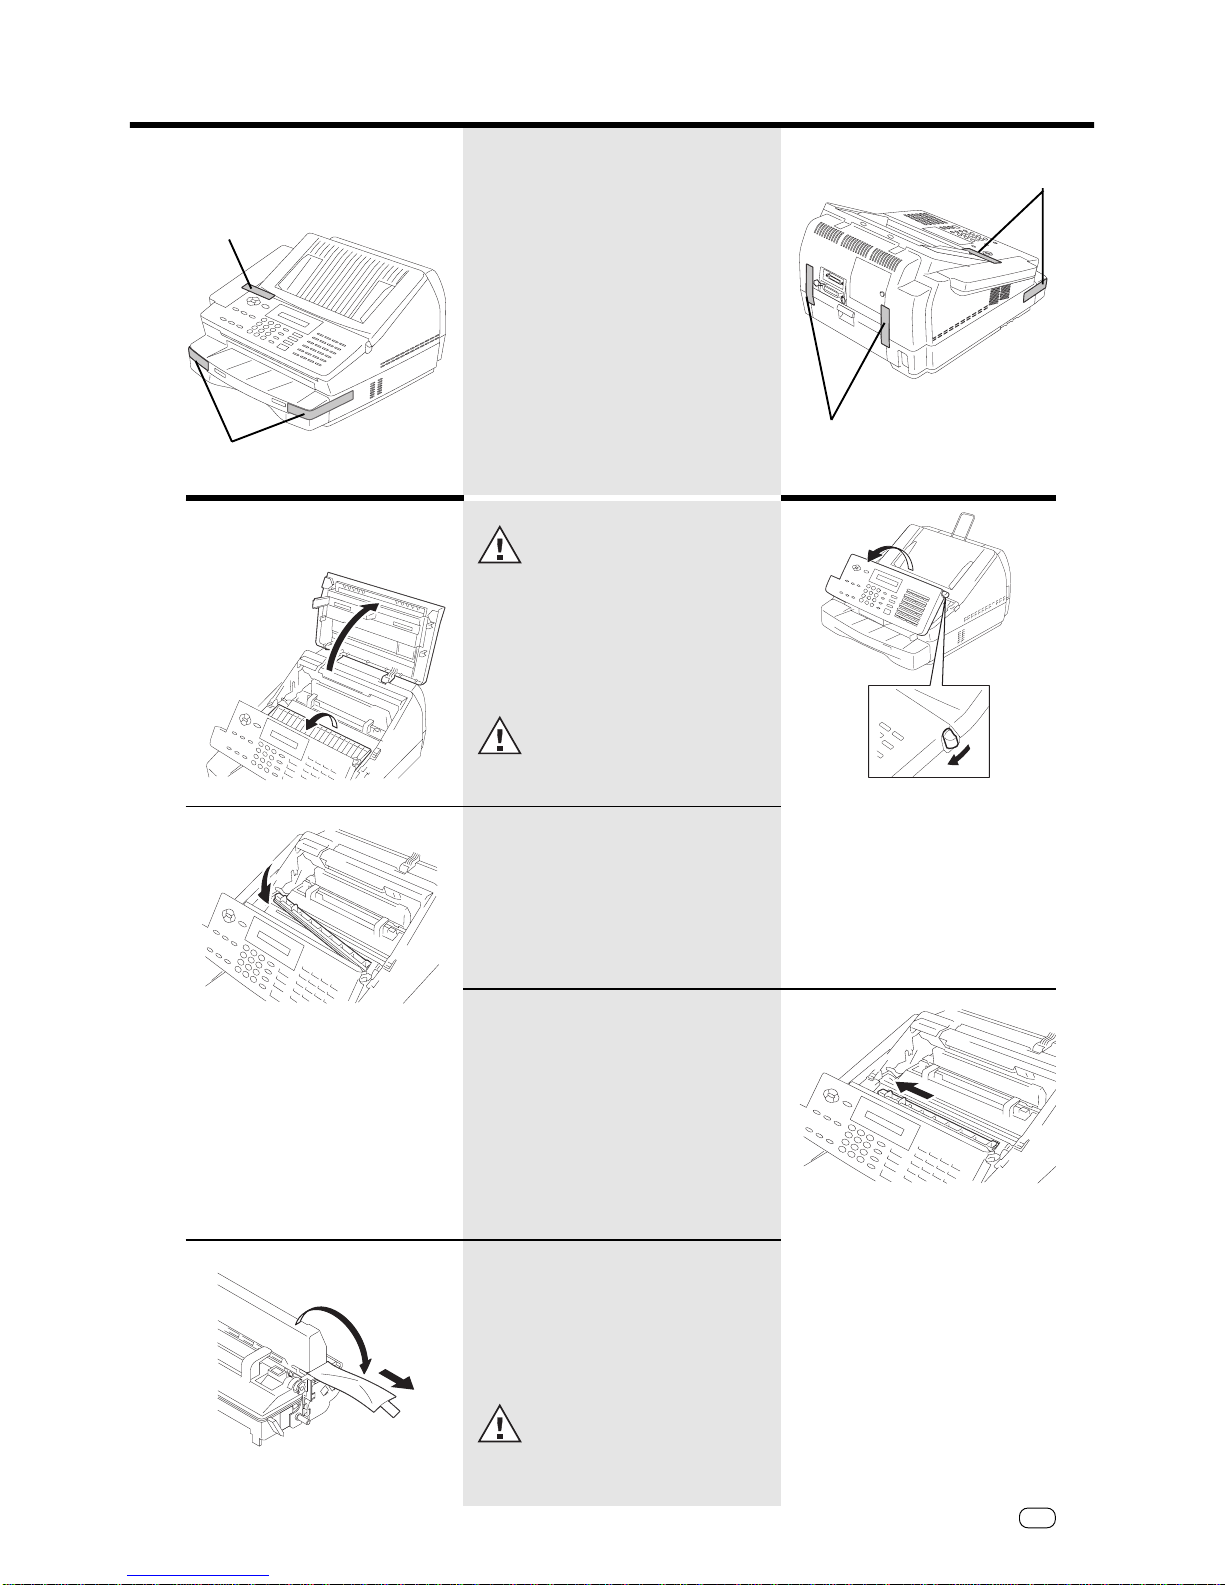
Removetransportfittings:........................... 5
Insertprocessunit....................................... 5
To make a good impression:
a new toner cartridge ................................. 6
Insert recording paper................................. 7
Make connections: ..................................... 8
Install recording paper tray ......................... 8
Insert memory card..................................... 9
Safetyinstructions ...................................... 9
Installation
The menu system ..................................... 10
Set language ............................................ 11
Enter terminal ID....................................... 12
Enter the user name ................................. 13
Setting dialling method............................. 14
ConnectiontoPABX,
obtaining a public line............................... 15
ConnectiontoPABX,furthersettings ........ 17
Set date and time..................................... 18
Reception of documents
Manual reception...................................... 19
Automatic reception ................................. 19
Set standby mode..................................... 19
Telephone/faxswitch ................................ 20
Fax/TADswitch.......................................... 20
Setting the TAD time ................................ 21
Set remote reception (manual reception). 22
Reception reduction ................................. 23
Local copy ................................................ 24
Set call counter ........................................ 25
Memoryreception..................................... 25
Cancel reception ...................................... 26
Transmit documents
Document format ..................................... 27
Stack mode .............................................. 28
Directtransmission ................................... 29
Automaticfaxmessages........................... 30
Transmissionwithalphabetdialling ........... 31
Transmissionwithone-touchdialling ......... 31
Transmissionwithtelephone
(manualtransmission)............................... 32
LongDialling ............................................. 32
Transmissionwithdirectoryfunction ......... 33
Monitoring ................................................ 34
Set resolution ........................................... 35
Redial ....................................................... 35
Delayedtransmission ................................ 36
Singlemulti-addresstransmission ............. 37
Stored broadcast ...................................... 38
Polling ....................................................... 39
Reservepolling.......................................... 40
Reducetransmissionspeed ...................... 41
Stoptransmission ..................................... 42
Store numbers
Alphabet dial memory............................... 43
One-touchdialkeys................................... 45
Groupkeys ................................................ 45
Report prints
Activateprintingreport ............................. 48
Transmissionreport ................................... 48
Transmission and reception journal ........... 49
Themultitransmissionreport..................... 50
Number list ............................................... 50
Grouplist .................................................. 50
Jobsinprogress........................................ 50
The function list ........................................ 51
Advanced settings
Functions .................................................. 52
ConnectiontoPABX .................................. 56
Receive footer on/off ................................ 56
Change speaker volume............................ 57
Adjustringingtone/keybeeps ................... 58
Settransmissionreportoutput.................. 59
Temporarily activate TX report .................. 60
Remote maintenance (COMLINE) ............. 60
Powersaver .............................................. 61
Switch off error correction ....................... 62
Possible problems
Error codes in journal ................................ 63
Errormessages in the Display ................... 64
Transmissionproblems .............................. 65
Receivingproblems................................... 66
How to clear a paper jam ......................... 67
How to clear a recording paper jam......... 67
Handling faxes on your PC
Systemrequirements ................................ 68
Features .................................................... 68
Connection to the PC................................ 68
Scanning documents into the PC ............. 69
Sending fax messages from the PC .......... 69
Sending faxes to the PC ........................... 70
Your fax machineused as
a PC Printer
Introduction............................................... 71
Connection to the PC................................ 71
Installprinterdriver ................................... 72
Settings of the printer driver ..................... 74
Printout ..................................................... 76
Deleteprinterdriver .................................. 77
UK Connection information
EPA ENERGY STAR ................................... 78
Reset ........................................................ 78
Index
Index ......................................................... 79

4
GB TF610
TOSHIBA
1. Fax machine
2. Power cable
3. Telephon cable
(not supplied in all
countries)
4. Instruction manual-
fax machine
PC printer manual
5. Process unit and toner
cartridge
6. Fixercleaner
7. Progamdiskwith
WindowsTM printer
driver
Unpacking
When unpacking your machine, please check that all parts shown
here are present and in perfect condition.
Preparation
Preparation
Ifanythingis missing,ordamaged,
please connect your dealer immediately.
The correct location
for your fax machine is:
• near a 230 V AC socket*,
• near a telephone connection, ideally
with a single line reserved for your fax
machine.
* No other equipment with high power
consumption (such as a photocopier) or
equipment which generates electrical
noise (such as a radio, computer, radio
transmitting and receiving equipment)
should be connected to this mains
supply.
ACpower
You will find the mains connection on the
back of the machine.
Please protect your machine from:
vibration
direct
sunlight
dust
humidity
heat
8. Cleaner
9. Local language label
10.One-touch dialling index
11.Document exit tray
(withwire)
12.Recording paper exit
tray(withwire)
13.Wire for document tray

5GB
TOSHIBA
TF610
Remove transport
fittings:
Preparation
Before you start to use your fax machine,
please remove all transport fittings as
illustrated.
Insert process unit: In order to transport or move
the machine the toner pack and
the process unit has to be
removed.
When installing the machine for the first time
and later when CHANGE PROC. UNIT is
displayed, insert the new process unit as
decribedbelow.
Open the control panel and housing
cover as illustrated.
1.Thefixercleaner
This is inserted when installing your machine
for the first time and each time the process
unit is replaced:
Open the control panel cover to the front. Slide
the cleaner underneath to the right, lift and
remove.
Insert the new cleaner first on the right, then
press down firmly on the left.
2. Prepare the process unit
Place a sheet of paper on an even surface and
lay the process unit on this. Remove the seal.
When holding the protective foil, be sure to
avoid contact with any toner.
The print volume achieved with the
first filling of the toner cartridge is less
than that achieved with subsequent
fillings.
Preparation
Transportfittings
Transportfittings
Transportfittings
Transport fitting

6
GB TF610
TOSHIBA
Shake the process unit
several times side to side to ensure even
spread of toner...
... insert the process unit
First slide the green lock lever on the inside left
of the machine to the back. The process unit is
then inserted with its pins into the lateral
guides and placed exactly in position by
applyingslightpressuredownwards.
Now pull the lock lever forward again.
Then close the top cover and the control panel
cover again.
Now (re)connect your fax machine to the
socket.
A damaged drum will affect the copy
quality. Therefore: Never touch the
drum surface or expose the drum to
sunlight.
To make a good
impression:
a new toner cartridge
After printing many pages, TONER NEAR
EMPTY and later TONER EMPTY appear
on the display. This means you must
insert a new toner cartridge in your fax
machine:
Openthetopcover.
Don’t forget: First remove the mains plug from
the socket.
Toreplace toner:
Slide the green lock lever on the left side of the
machine to the back and remove the process
unit.
Place the process unit on a piece of paper on
an even surface. Lightly tap on the toner
cartridge to prevent any toner residue falling
into the process unit. Pull the tape on the the
toner cartridge upwards before you slide it out
of ist holder.
First shake the new cartridge...
... then place on top of the process unit and
slide it until it locks into place.
Preparation
Preparation

7GB
TOSHIBA
TF610
Now:removethe seal.
When holding the protective foil, be sure to
avoid contact with any toner residue.
Now shake the process unit several times
horizontally before you..
... install the process unit again.
Insert the pins into the lateral guides and then,
by applying slight pressure, lower the unit into
the correct position.
Nowpull the lock lever forwardagain.
Never allow hair or dust to get into the process
unit as this will block the proper supply of toner.
Then close the top cover and the control panel
cover.
You can now connect your fax machine to the
mains again.
From time to time:
clean the housing
Never using abrasive materials to
clean your fax machine - the could
cause damage.
Remove the paper cassette
Press down the cassette plate until it locks into
place.
Insert a stack of A4 paper
Prepare the recording paper by flexing and
fanning out the stack to separate the sheets.
Place the paper so that it lies straight in the
cassette with the side to be printed face-down
and don’t forget:
The paper cassette holds a maximum
250sheets(80g/m2).
Then: Slide the cassette into the slot
until you hear it lock into place.
Do not use damp, wrinkled or torn
paper.
Insert recording paper
Preparation
Preparation

8
GB TF610
TOSHIBA
Install recording paper
tray Recording Paper Exit Tray:
Insert the Recording Paper Exit Tray Wire into
the holes on the Recording Paper Exit Tray, then
pull down.The following steps may be performed
more easily with the Recording Paper
Cassette removed from the facsimilie
machine.
Install the Recording Paper Exit Tray underneath
the Recording Paper Cassette.
DocumentExitTray:
Inster the Document Exit Tray into the
Recording Paper Exit opening.
Flip out the folded Tray Wire as shown.
Recording
Paper Exit
Tray
Wire
Telephoneconnection
Connect your fax machine (LINE) to the
telephone socket.
Make connections:
ConnectingtheACpower
The power connector is located on the rear
right of the machine.
Connect the machine to the mains
only after you have installed the
process unit and the fixer cleaner.
Phone Plug-in
Line cord
to the wall
socket
AC power cord
Preparation
Preparation

9GB
TOSHIBA
TF610
Insert memory card 1. Pull the plug out of the mains socket.
2.2.
2.2.
2. Remove the cover for the memory module
(on the rear of the FAX machine) by
loosening the retaining screw.
3.3.
3.3.
3. Press the retaining lug into the hole on the
motherboard.
4. Position the memory expansion on the
connector of the motherboard and press
carefully until it snaps into place.
5. Close the cover of the memory module and
tighten the retainer screw again.
In case you come into contact
withtoner:
Preparation
Preparation
Safety instructions
When your fax machine is
open,always keep the
followinginmind:
• Do not touch any parts inside the fax
machine other than those described here.
The fixer cover can be very hot - even after
the machine has been switched off.
• You should install the process unit as quickly
as possible as exposure to strong light can
demage the drum and reduce the life of the
processunit.
• Never throw old toner cartridges into an
open fire and ensure proper disposal of
packing from exchanged parts as organic
waste.
• Wash hands in cold water and clean
thoroughlywithsoap.
• Wash eyes with plenty of water.
• If you have inhaled toner, breathe deeply
in the open air.
• If toner gets in your mouth, wash it out
with plenty of water.
• In an emergency, call a doctor.

10
GB TF610
TOSHIBA
Installation
Installation
The menu system
You fax machine has a wide range of
settings.Thevarioussettingsare
presented to the operator via a menu
systeminthe display.
A special group of keys is used for
activating the menu and also for
navigating within the various menu levels:
The M- key activates the menu and
moves up through the menu
The N- key moves down through the
menu
The P- key selects the corresponding
submenulevel.
The O- key selects the higher menu
level.
As soon as a menu item is displayed, use
the ENTER key to select the
corresponding function.
Use the following example to get to know
the menu system: The machine prints out
the menu listmenu list
menu listmenu list
menu list withthe completemenu
structure of your fax machine.
*) Instead of using the ENTER key, you
can alternatively also use the START
key
The fax machine automatically
switchesovertothestandby
mode if the pause between
entries is longer than one minute. In this
case, entered data are NOT stored.
Standby mode
Pagethroughthemenu...
...until you reach this menu item
Select submenu
Pagethroughthemenu...
...until you reach this menu item
ConfirmwithENTER*)
Menu list is printed out
15-03 19:56 M 100%
REPORTS
ACTIVITY REPORT
ENTER
PRINTING
MENU L IST
2x

11 GB
TF610 TOSHIBA
2 x
15-03 19:56 M 100%
PROGRAM SETUP DATA
STOP
Standby mode
Start the menu
Select submenu (2x)
Makeyourselection
Enterfunctionnumber
ConfirmwithENTER
Set language
Pagethroughthemenu...
...until you reach this menu item
ConfirmwithENTER
Press STOP, return to standby
mode
Installation
Installation
LANGUAGE ?????
ENTER
ENTER
PARAMETER NUMBER =
_
Set language
Your fax machine is set to English. Please
carry out the following menu steps if you
wish to use another language for the
menu and the list prints.
LANGUAGE ENGLISH

12
GB TF610
TOSHIBA
Installation
Enter terminal ID
The terminal ID which is part of the
transmissing header contains the number
under which your fax machine can be
reached. The number should be entered
in the international format:
Example:
+441932 12345678
Fax number
Space
(toimprovelegibilitly)
Area code (without initial
0)
Country code
Plus symbol (for the
international form)
To enter the characters:
Character Keytobe pressed
+❊-key
Hyphen P-key
Enter the actual figures via the dial keypad
(as usual).
If you have entered a wrong
number, you can delete this
number by means of the
CANCELkey.
In Germany, the terminal ID entry
ismandatory!
15-03 19:56 M 100%
PROGRAM SETUP DATA
LOCAL ID NUMBER
+44 1932 12345678
STOP
Standby mode
Start the menu
Select submenu
Pagethroughthemenu...
...until you reach this menu item
ConfirmwithENTER
Makeyourselection
Enter the terminal ID
(seeInfotext)
Terminal ID is complete
ConfirmwithENTER
Press STOP, return to standy
mode
ID:
Installation
ENTER
ENTER
2x

13 GB
TF610 TOSHIBA
Installation
15-03 19:56 M 100%
PROGRAM SETUP DATA
LOCAL NAME
NAME:
NAME: TOSHIBA
STOP
Enter the user name
The transmission header not only contains
the terminal ID but also the user name.
This can contain up to 20 characters.
Each digit features several characters
which can be activated by repeatedly
pressing the corresponding key. If you
have found a character of your choice,
press the „P“ key to got to the next
position. Use the „O“ key to got back
one letter and make any corrections. Use
the „0“ key to select special characters.
If you enter too many characters, press
the CANCEL key to delete the unwanted
characters.
When the name is complete, press the
ENTER-key.
Example:TOSHIBA
Standby mode
Start the menu
Select submenu
Pagethroughthemenu...
...until you reach this menu item
ConfirmwithENTER
Makeyourselection
Enter the name
Example:TOSHIBA
1 x 8 = T # 3 x 4 = I #
3x 6 = O# 2x 2 = B#
4 x 7 = S # 1 x 2 = A
2x 4 = H #
Name is complete
ConfirmwithENTER
Press STOP, return to standy
mode
Installation
ENTER
ENTER

14
GB TF610TOSHIBA
Installation
15-03 19:56 M100%
PROGRAMSETUP DATA
STOP
2 x
Setting dialling method
There are two dialling methods. The
pulse-dialling method is normally used in
the public switched telephone network. If
your fax machine is connected to a
PABX*,theDTMFdiallingmethodmay
also be used. As the public network is
modernised, this dialling method may also
be used in the public network. If you are
in any doubt, first try the pulse-dialling
method (basic setting).
If the dialling procedure fails, try DTMP
dialling. How ever DTMF is the most
efficient.
✽) This function may not be available in
machines in certain countries.
Standby mode
Start the menu
Select submenu (2x)
Makeyourselection
Enterfunctionnumber
ConfirmwithENTER
Set dial method
Example: Tone
Pagethroughthemenu...
...until you reach the desired menu item
Example: 10PPS
ConfirmwithENTER
Press STOP, return to standy
mode
DIAL METHOD10PPS
DIAL METHODTONE
Installation
ENTER
ENTER
PARAMETER NUMBER =_
✽

15 GB
TF610 TOSHIBA
15-03 19:56 M 100%
PROGRAM SETUP DATA
ACCESS OFF
2 x
Connection to PABX,
obtaining a public line
The TF 610 can be connected not only to
the public switched telephone network
(public line) but also to a PABX. In this
case, additional parameters have to be
entered.
With PABXs, the public line is obtained in
variousways:
• Number Dial one digit (or several
digits) in order to obtain
the public line
•Earthkey Earth potential is
connected to the voice
wire(s) in order to obtain
the public line
•Flashkey With this method of
obtaining the public line,
the connection circuit is
interruptedbriefly.
When the method of obtaining a
public line has been entered, you
mustalwayspress the key ”❊”
before the actual number when you dial
your fax partner. This is also applicable for
saving the fax numbers (see page 43).
If you have problems if your
machine is connected to an
extension, please read the
“Comments concerning connection to
PABXs”under“Furthersettings”(page56).
Standby mode
Start the menu
Select submenu (2x)
Makeyourselection
Enterfunctionnumber
ConfirmwithENTER
Set public line
Pagethroughthemenu...
Public line Flash: Flash function
Public line Earth key: Earth key function
Public line Digit: Code (see next page)
...until you reach the desired menu item
ConfirmwithENTER
Press STOP, return to standy
mode
Installation
Installation
STOP
ENTER
ENTER
............
PARAMETER NUMBER =
_

16
GB TF610
TOSHIBA
Installation
Installation
PROGRAM SETUP DATA
ACCESS CODE = 0
2 x
ACCESS CODE =
Start the menu
Select submenu (2x)
Makeyourselection
Enterfunctionnumber
ConfirmwithENTER
Makeyourselection CODE
Enter the code(s)
(Example: 0)
...until you reach the desired menu item
ConfirmwithENTER
Press STOP, return to standy
mode
STOP
ENTER
ENTER
OnlywithCODEsetting
PARAMETER NUMBER =
_

17 GB
TF610 TOSHIBA
Installation
PROGRAM SETUP DATA
LINE = PUBLIC LINE
2 x
Start the menu
Select submenu (2x)
Makeyourselection
Enterfunctionnumber
ConfirmwithENTER
Currentsetting
The fax machine waits for the
dial tone sent by the exchange
before dialling starts.
Pagethroughthemenu...
...until you reach the desired menu item
The setting INIT WAIT X SEC
involves a pause of X seconds
before dialling starts. The fax
does notnot
notnot
not check the presence of
a dial tone.
ConfirmwithENTER
Press STOP, return to standy
mode
LINE = PBX
Installation
STOP
ENTER
ENTER
PARAMETER NUMBER =
_
Connection to PABX,
further settings
If you wish to connect your fax machine
toaPABX, further settings are necessary.
The following menu procedure sets
default values for connecting a fax
machine to PABXs. If the machine does
not operate perfectly, please refer to page
56 for explanations concerning
connectiontoPABXs.

18
GB TF610
TOSHIBA
Installation
PROGRAM SETUP DATA
DATE & TIME
DD-MM-YY HH:MM
15.03.98 19:56
15-03 19:56 M 100%
4 x
Set date and time
Enter the current date and time at this
point so that all details relating to date
and time is correct. The internal clock of
your fax machine then runs automatically
- even in the event of a power failure.
Standby mode
Start the menu
Select submenu
Pagethroughthemenu...
...until you reach this menu item
ConfirmwithENTER
Makeyourselectiondate & time
Enter date and time
Example: March 15th, 19.56 hours
ConfirmwithENTER
Press STOP, return to standy
mode
Installation
STOP
ENTER
ENTER

19 GB
TF610 TOSHIBA
Receptionofdocuments
If the line is reserved exclusively for fax
operation.
Set standby mode
If your fax machine is connected to the
PSTN or the PABX, there are four different
ways of receiving documents.
The fax machine switches over to
reception as soon as the line rings (see
page25).
The fax machine is always
activated, even if the call is
initiated by a voice partner.
Receptionofdocuments
If the line is used primarily for telephone traffic
Manual reception
Press the AUTO key.
The call must be accepted manually; the
fax machine is not activated when the
line rings. If you wish to transmit a
document, you must press the START key
of the fax machine.
Ensure that any fax calls can
indeed be accepted; it is always
necessary to press the START
key.
AUTOlampon:AUTOlampon:
AUTOlampon:
The following reception modes can be
alternativelysetbyindividualsettingof
function 38function 38
function 38(seepage 52 et seq.):
• Fax reception mode
• Telephone/fax mode
• Fax/TADmode
AUTO lamp off:
Manualreception
Automatic reception
Key functions:
••
••
•Function37Function37
Function37Function37
Function37
Number of rings before the fax
machine picks up the call (1-10)
••
••
•Function38Function38
Function38Function38
Function38
Setting of automatic reception
Press the AUTO key.
The standby mode is indicated with the AUTO
LED. Press the AUTO key to change between
two different reception modes (these are
indicated by the AUTO LED):
LED “AUTO” is lit
LED “AUTO” off

20
GB TF610
TOSHIBA
Receptionofdocuments
If the line is used for telephone and also for
operation and if you are usually present in the
same room.
Incoming calls are automatically
distinguishedbetweenfax-andvoice
calls:
If the call is a voice call the fax rings via
the loudspeaker to notify the user. At this
time the caller will hear a Ring which
indicates that the partner is beeing
called.
In this case take up the handset und
press STOP on the fax machine.
If the call is from another fax machine
the document will be receiverd
automatically without ringing.
Ensure that there is always
someone present in this mode
to accept the call. As soon as
ringing tone is generated, the connection
is established and the caller incurs
charges.
If the line is operated with a TAD or radio
telephone and if you wish to collect the call
from other rooms.
This mode enables you to receive
incoming fax messages and also to
answer telephone calls. There are two
situations:
Youare present:
Switch off the call answering equipment
and collect the call at any point. If the
caller is a fax machine, your fax machine
will take over the call and print out the
fax message.
Youare absent:
Switch on the call answering equipment.
The call answering equipment records all
telephone calls. Your fax machine
automatically receives any incoming fax
messages.
You must always ensure that
the TAD is connected in this
reception mode. Otherwise, fax
messages cannot be received when the
line is called.
Fax/TAD switch
Keyfunctions:
•Function38Function38
Function38Function38
Function38
Set the fax/TAD switch
•Function44Function44
Function44Function44
Function44
Specify the time in which the fax
machine identifies a partner fax (TAD
timer / 1-99 sec.)
Press the AUTO key
Receptionofdocuments
LED “AUTO” is lit
LED “AUTO” is lit
Telephone/fax switch
Keyfunctions:
•Function38Function38
Function38Function38
Function38
Setting of telephone/fax switch
•Function37Function37
Function37Function37
Function37
Number of rings until the fax machine
picks up the call (1-10)
•Function36Function36
Function36Function36
Function36
Number of rings (synthetic ringing tone)
from the loudspeaker (1-10)
Press the AUTO key.
Table of contents
Other Toshiba Fax Machine manuals

Toshiba
Toshiba DP125F User manual

Toshiba
Toshiba TF 471 User manual

Toshiba
Toshiba TF 505 User manual

Toshiba
Toshiba ESTUDIO170F User manual

Toshiba
Toshiba GD-1190 User manual

Toshiba
Toshiba TF 541 User manual

Toshiba
Toshiba TF 211 User manual

Toshiba
Toshiba GD 1080 How to use

Toshiba
Toshiba DP85F User manual

Toshiba
Toshiba ESTUDIO170F User manual

Toshiba
Toshiba DP80F User manual

Toshiba
Toshiba GD-1150 User manual

Toshiba
Toshiba GD-1220 User manual

Toshiba
Toshiba e-STUDIO50F User manual

Toshiba
Toshiba TF 605 User manual

Toshiba
Toshiba TF P21 User manual

Toshiba
Toshiba DP120F User manual

Toshiba
Toshiba TF 461 User manual

Toshiba
Toshiba TF P51 User manual

Toshiba
Toshiba e-STUDIO 170F User manual