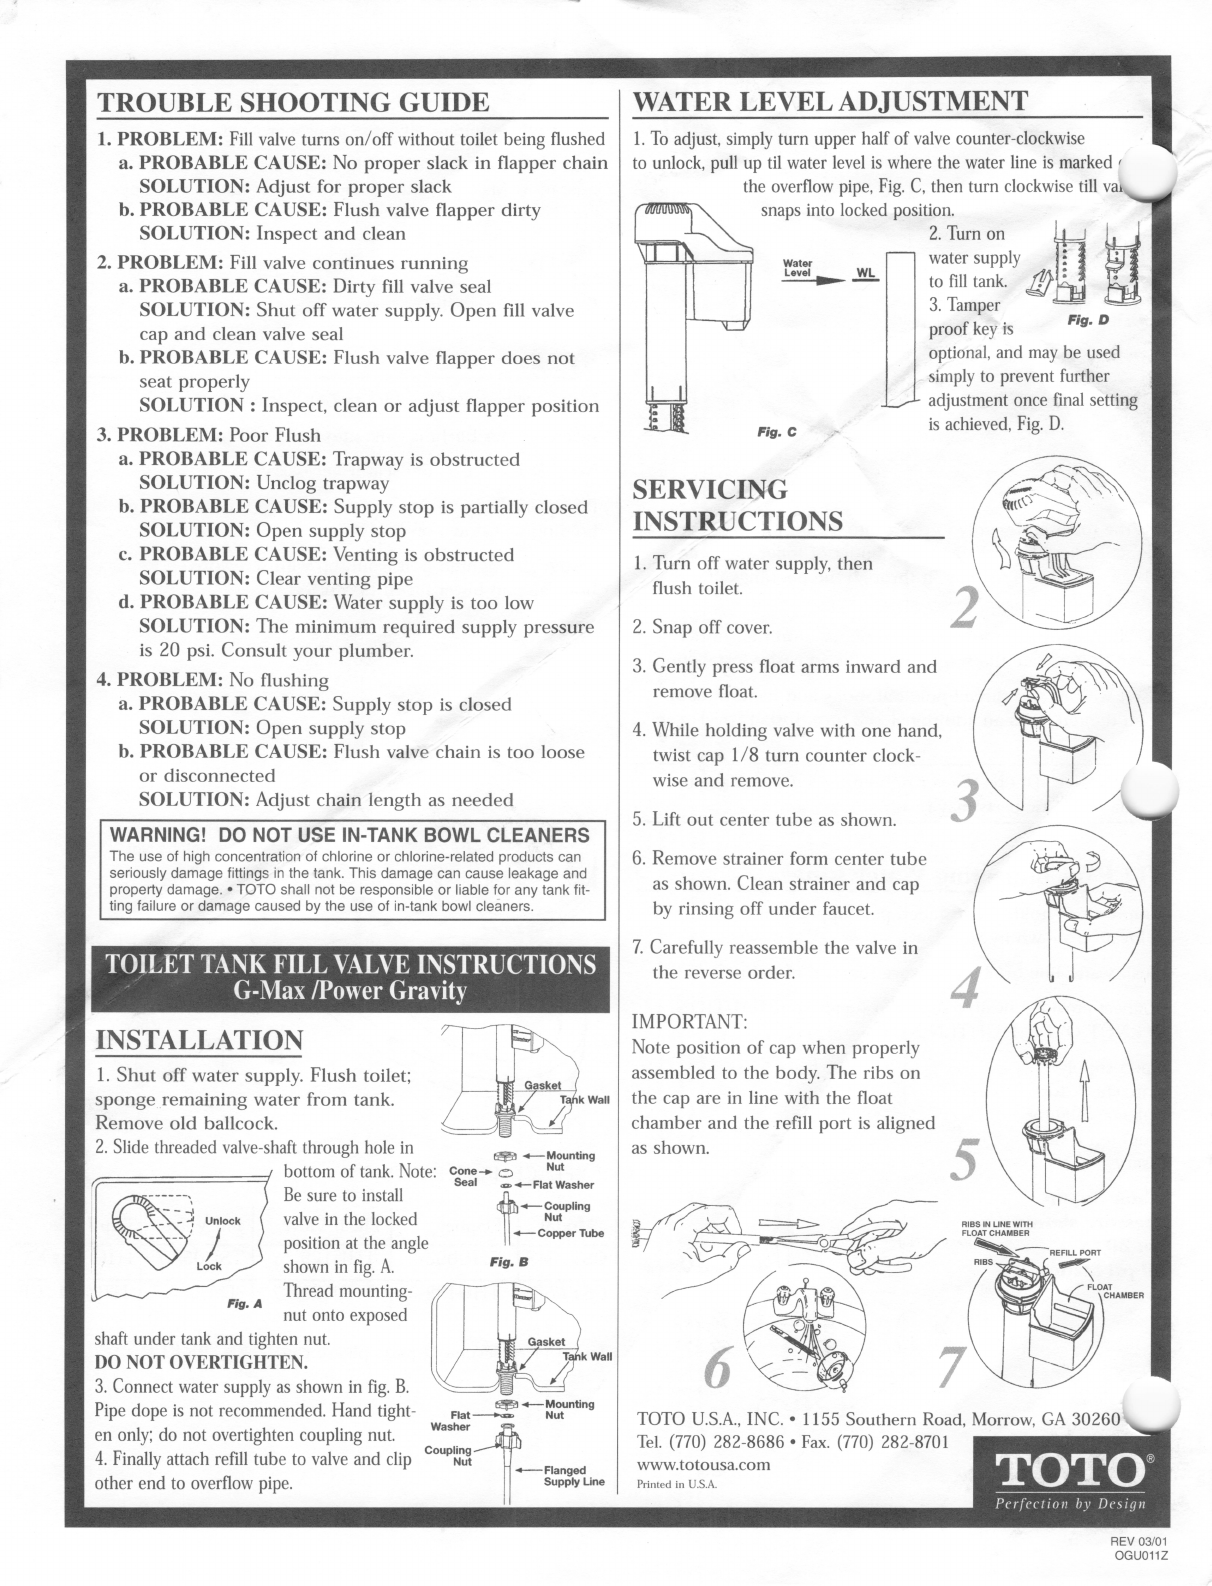
WATER LEVEL ADJUSTMENT
T R O U B L E S H O O T I N G G U I D E
1. PROBLEM: Fill valve turns on/off without toilet being flushed
a. PROBABLE CAUSE: No proper slack in flapper chain
SOLUTION: Adjust for proper slack
b. PROBABLE CAUSE: Flush valve flapper dirty
SOLUTION: Inspect and clean
2. PROBLEM: Fill valve continues running
a. PROBABLE CAUSE: Dirty fill valve seal
SOLUTION: Shut off water supply. Open fill valve
cap and clean valve seal
b. PROBABLE CAUSE: Flush valve flapper does not
seat properly
SOLUTION :Inspect, clean or adjust flapper position
3 . P R O B L E M : P o o r F l u s h
a. PROBABLE CAUSE: Trapway is obstructed
SOLUTION: Unclog trapway
b. PROBABLE CAUSE: Supply stop is partially closed
SOLUTION: Open supply stop
c. PROBABLE CAUSE: Venting is obstructed
SOLUTION: Clear venting pipe
d. PROBABLE CAUSE: Water supply is too low
SOLUTION: The minimum required supply pressure
is 20 psi. Consult your plumber.
4. PROBLEM: No flushing
a. PROBABLE CAUSE: Supply stop is closed
SOLUTION: Open supply stop
b . P R O B A B L E C A U S E : F l u s h v a l v e c h a i n i s t o o l o o s e
or disconnected
SOLUTION: Adjust chain length as needed
1. To adjust, simply turn upper half of valve counter-clockwise H
to unlock, pull up til water level is where the water line is marked '
theoverflowpipe.Fig.C,thenturnclockwisetillvai^^^v
'(fWiiliwRj \snaps into locked position.
2. Turn on 4
water supply
to fill tank.
3. Tamper
proof key is
optional, and may be used
simply to prevent further
adjustment once final setting
is achieved. Fig. D.
Water
Level WL
Fig. D
Fig. C
SERVICING
INSTRUCTIONS
1. Turn off water supply, then
flush toilet.
2. Snap off cover.
3. Gently press float arms inward and
remove float.
4. While holding valve with one hand,
twist cap 1/8 turn counter clock¬
wise and remove.
5. Lift out center tube as shown.
W A R N I N G ! D O N O T U S E I N - T A N K B O W L C L E A N E R S
The use of high concentration of chlorine or ohiorine-reiated products can
seriously damage fittings in the tank. This damage can cause leakage and
property damage. ●TOTO shall not be responsible or liable for any tank fit¬
ting failure or damage caused by the use of in-tank bowl cleaners.
6. Remov e s train e r form cen ter tube
as shown. Clean strainer and cap
by rinsing off under faucet.
7. Carefully reassemble the valve in
the reverse order.
TO ILE T TAN K FIL L VALVE INS TRU CTI ONS
G-Max /Power Gravity
IMPORTANT:
INSTALLATION Note position of cap when properly
assembled to the body. The ribs on
the cap are in line with the float
chamber and the refill port is aligned
1. Shut off water supply. Flush toilet;
sponge remaining water from tank.
Remove old ballcock.
2. Slide threaded valve-shaft through hole in
bottom of tank. Note: cone-* o
Be sure to install
valve in the locked
a s s h o w n .
—Mounting
Nut
Seal «.**-Rat Washer
^—Coupling
Nut RIBS IN LINE WITH
^— Copper Tube FLOATCHAURFR
position at the angle
shown in fig. A.
Thread mounting- ^
nut onto exposed
REFILL PORT
Fig. B
\
FLOAT
CHAMBER
shaft under tank and tighten nut.
DO NOT OVERTIGHTEN.
Gasket
7Wall
3. Connect water supply as shown in fig. B.
Pipe dope is not recommended. Hand tight¬
en only; do not overtighten coupling nut.
4. Finally attach refill tube to valve and clip
other end to overflow pipe.
^—Mounting
Flat Nut TOTO U.S.A., INC. ●1155 Southern Road, Morrow, GA 30260
Tel. (770) 282-8686 ●Fax. (770) 282-8701
Washer,.J0b
Coupling
TOTO
Nut www.totousa.com
Printed in U.S.A.
Flanged
Supply Une
P e r f e c t i o n b y D e s i g n
R E V 0 3 / 0 1
OGU011Z