Toto Giovannoni TCF892G User manual

Installation Guide
Installationsanleitung
Guide d'installation
Manuale di installazione
Cautions and warnings...........2
Before Installing the Washlet ......3
Vorsichtsmaßnahmen und Warnungen
...4
Vor der Installation des Washlets
...5
Mises en garde et avertissements
...6
Avant d'installer le Washlet . . . . . . . 7
Avvisi di pericolo e attenzione
. . . . . . 8
Prima di installare il Washlet . . . . . . 9
Included parts / Mitgelieferte Teile /
Pièces fournies / Parti in dotazione
...10
Required tools / Erforderliches Werkzeug /
Outils requis / Utensili richiesti
........10
Parts / Teile / Pièces / Parti .......11
Meaning of the indications / Bedeutung der
Hinweise / Signication des indications /
Signicato delle indicazioni
........... 12
Installing the Washlet / Installation des
Washlets / Installation du Washlet /
Installazione del Washlet
..........12
Testing the operation of the Washlet /
Funktionstest des Washlets / Test du
fonctionnement du Washlet / Prova di
funzionamento del Washlet
........18
To installation contractors: Für Installateure:
Please explain to the customer the functions of the
Washlet and how to use them. In new buildings or
other places where there will be a signicant time until
the customer receives the product, please disconnect
the mains plug.
Erklären Sie dem Kunden bitte die Funktions- und
Bedienungsweise des Washlets. In neuen Gebäuden
oder an Orten, wo es geraume Zeit dauert, bis der
Kunde das Gerät zum ersten Mal benutzt, ziehen Sie
bitte den Netzstecker.
Aux prestataires d'installation: Per gli installatori:
Veuillez expliquer au client les fonctions du Washlet et
comment les utiliser. Dans de nouveaux bâtiments où
d'autres lieux où une durée importante s'écoulera avant
que le client ne reçoive le produit, veuillez déconnecter
la prise secteur.
Si prega di illustrare ai clienti le funzioni del Washlet e
le loro modalità di utilizzo. Negli edici nuovi e in altri
luoghi in cui dovrà passare molto tempo prima che il
cliente inizi a utilizzare il prodotto, staccare la spina di
alimentazione.
"Washlet" is a registered trademark of TOTO.
"Washlet" ist ein eingetragenes Warenzeichen von TOTO.
"Washlet" est une marqué déposée de TOTO.
"Washlet" è un marchio registrato di TOTO.

2
Cautions and warnings
Before installing your Washlet, be sure to read the following installation instructions. Install the product only as
described in this guide.
Follow all safety precautions and warnings.
WARNING
When this appears next to a topic,
this indicates that misoperation
could result in death or serious
injury.
CAUTION
When this appears next to a topic,
this indicates that misoperation may
result in injury or physical damage.
Symbol example
The symbol indicates
something that is prohibited. The symbol indicates something
that must be done.
This equipment is Class 1, so it is necessary to attach it to an earthed connection.●
Install this equipment close to a mains socket.●
Use the new hose set included with this equipment. Do not reuse an old hose set.●
WARNING
Required
Since this is electronic equipment, do not locate it in a place where it might be splashed or●
otherwise become wet. Likewise, do not locate it in a humid place where water could drip onto
the surface of the Washlet. When using it in a bathroom, install a ventilation fan or ventilation
opening, so that the bathroom has sufcient airow.
Install the Washlet at least 0.6 m away from any bathtub.
(Failure to observe this caution may result in re or electrical shock.)
Prepare the socket for the electrical wiring as follows.●
(Failure to observe this caution may result in re or electrical shock.)
a. Provide electric current to the socket (device) using a differential residual electric current
device (DDR) with a released current that does not exceed 30 mA.
b. Locate the socket (device) and its wiring plug at least 0.6 m from the outside edge of a
shower chamber or bathtub.
Conrm that the wiring for items a and b above has been completed. If the wiring has not ¿
been completed, request completion from the business that installed the unit.
Be sure to install an earth wire in a place where connection is ensured.●
(If the earth wire is not installed, electric shocks
could occur if there is a malfunction or a short
circuit.)
Note:
Use copper wire with a diameter of 1.6 mm or
more and with an earth resistance of 100 Ω or
less.
If the earth wire has not been installed, request¿
installation from the business that installed the
unit.
Always insert the electrical cord completely into the socket (220-240 V AC, 50 Hz). ●
(Failure to observe this caution may result in re or electrical shock.)
Make the connection so that the electrical plug is easy to reach.●
Always connect the Washlet to the cold water supply.●
(Failure to do so could cause burns or malfunction of the equipment.)
Follow the installation requirements for the country in which the Washlet is being installed.●
Prohibited
Use only tap water or potable well water (groundwater). ●
(Use of other water could cause skin inammation or other problems.)
Do not use this product with any power supply other than specied (220-240 V AC, 50 Hz).●
(Failure to observe this caution may result in re or electrical shock.)
0.60 m
Ventilation fan or ventilation opening
Circuit board
Earth leakage
breaker
GB
0.60 m

3
CAUTION
Required
After cleaning the water lter, thoroughly tighten the drain valve with built-in water lter. ●
(Failure to do so could cause a water leak.)
Follow the Installation Guide thoroughly during installation.●
(Failure to attach things correctly could cause water leaks.)
Prohibited
Do not detach the drain valve with built-in water lter while the water shut-off valve is still open.●
(Doing so will cause water to spill.)
Do not bend or crush the water supply hose.●
(This could cause a water leak.)
Do not lift the Washlet by the seat or toilet lid.●
(Injury could result if the main Washlet unit becomes dislodged and falls.)
Before Installing the Washlet
1. Do not transmit electrical current or supply water to the unit until the installation process is complete.
2. Do not damage the connected parts at the end of the water supply hose.
3. The power voltage is 220-240 V AC (50 Hz). The rated energy consumption is 274-319 W. Use wiring and
electrical sockets that are appropriate for this level of power. (Independent wiring is recommended.)
4. Do not install the base plate to the Washlet when it is not attached to the toilet. (Turning the Washlet on in this
condition could result in product damage.)
5. The power cord is about 0.9 m long. Conrm that a mains socket is installed within reach to allow easy
installation and removal of the Washlet.
6. Use a water supply with pressure between 0.1 - 1.0 Mpa.
7. The water temperature range should be between 0 - 35°C.
8. The length of the connection hose is 0.5 m. The water supply should be located to allow easy installation and
removal of the Washlet.
9. Before installing the Washlet, conrm that the water supply is on a regulated position.
GB

4
Vorsichtsmaßnahmen und Warnungen
Lesen Sie vor der Installation des Washlets unbedingt die folgenden Installationsanweisungen. Installieren Sie das
Washlet auf keinen Fall auf andere Weise als in dieser Anleitung beschrieben.
Beachten Sie bitte alle Vorsichtsmaßnahmen und Warnungen.
WARNUNG
Wenn ein Abschnitt mit diesem
Symbol gekennzeichnet ist, wird
darauf hingewiesen, dass bei
fehlerhafter Handhabung die
Gefahr von schweren oder gar
tödlichen Verletzungen besteht.
VORSICHT
Wenn ein Abschnitt mit diesem Symbol
gekennzeichnet ist, wird darauf
hingewiesen, dass bei fehlerhafter
Handhabung möglicherweise
Verletzungsgefahr oder die Gefahr von
Sachschäden besteht.
Beispielsymbole
Das Symbol gibt an, dass
etwas verboten ist. Das Symbol weist auf etwas
hin, das getan werden muss.
Bei diesem Gerät handelt es sich um ein Gerät der Klasse 1, es muss daher an eine Steckdose mit Schutzerde angeschlossen werden.●
Installieren Sie das Gerät in der Nähe einer Netzsteckdose.●
Verwenden Sie die neuen, mit diesem Gerät gelieferten Schläuche. Verwenden Sie keine alten Schläuche.●
WARNUNG
Erforderlich
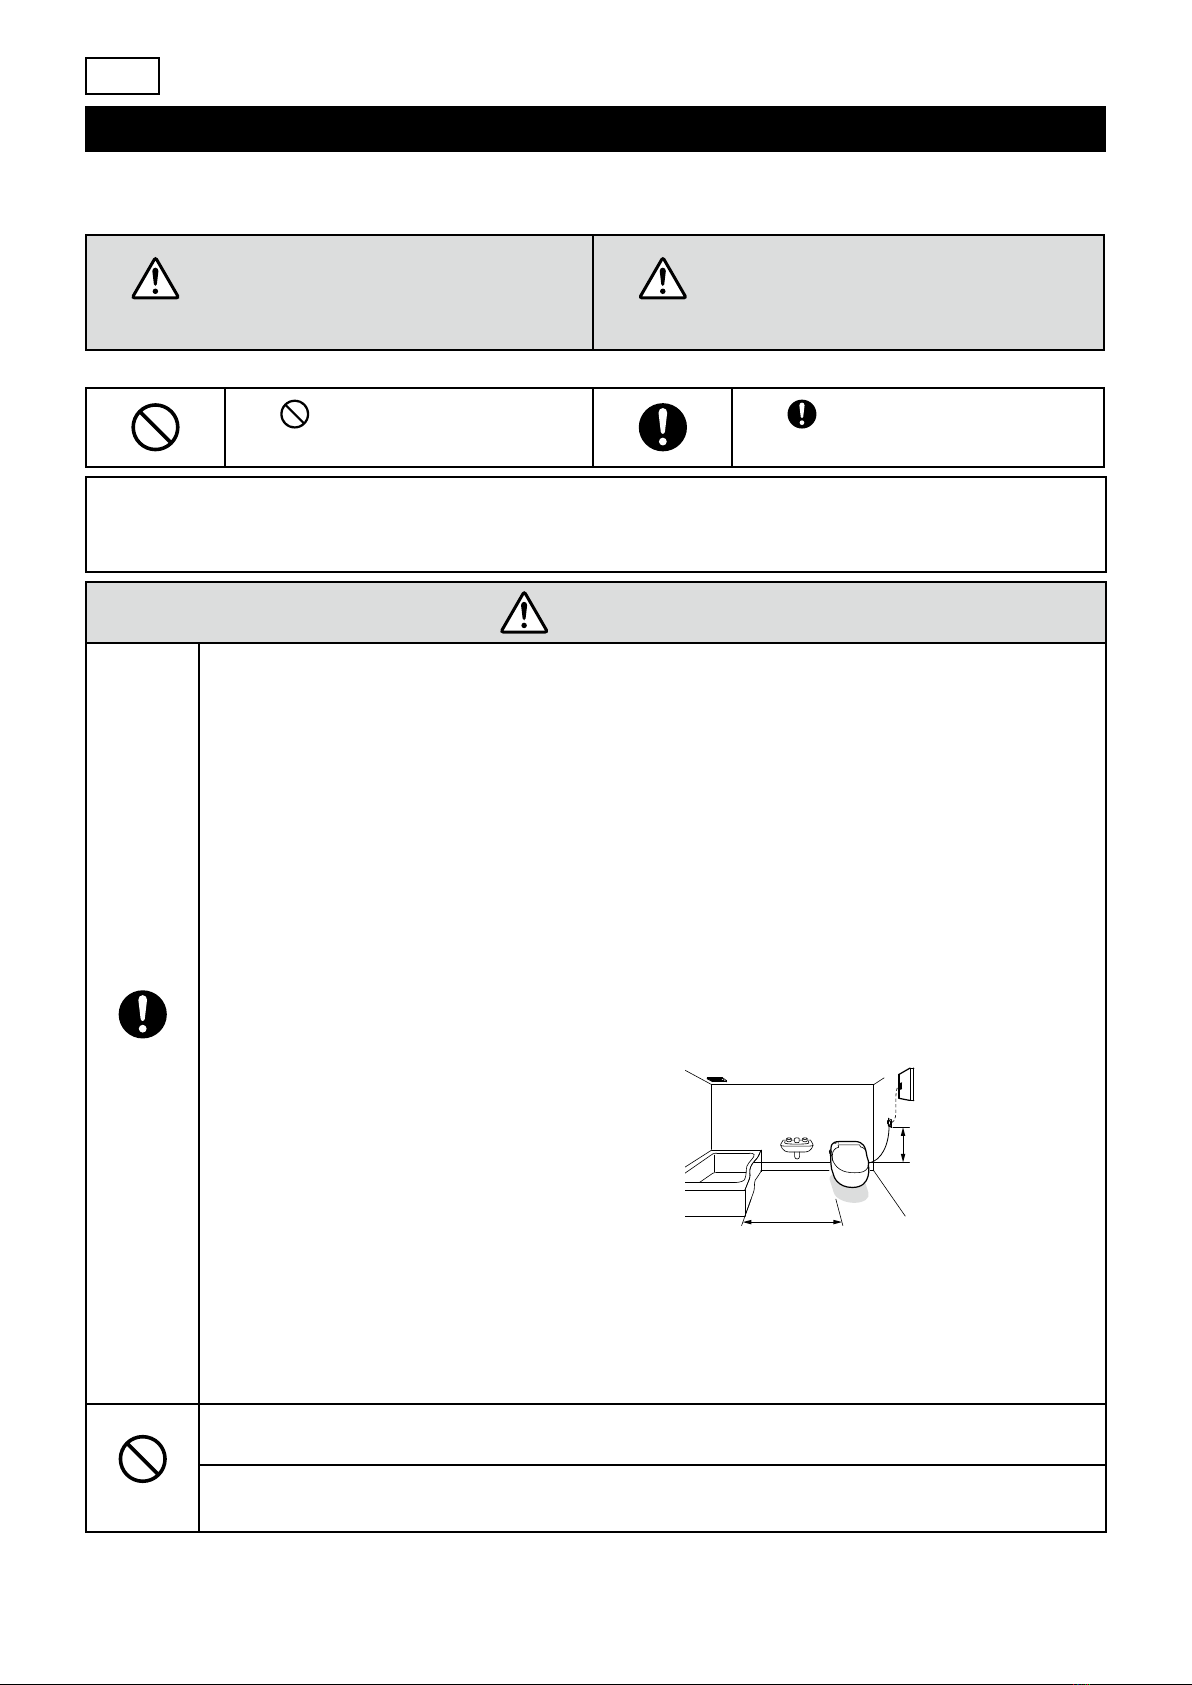
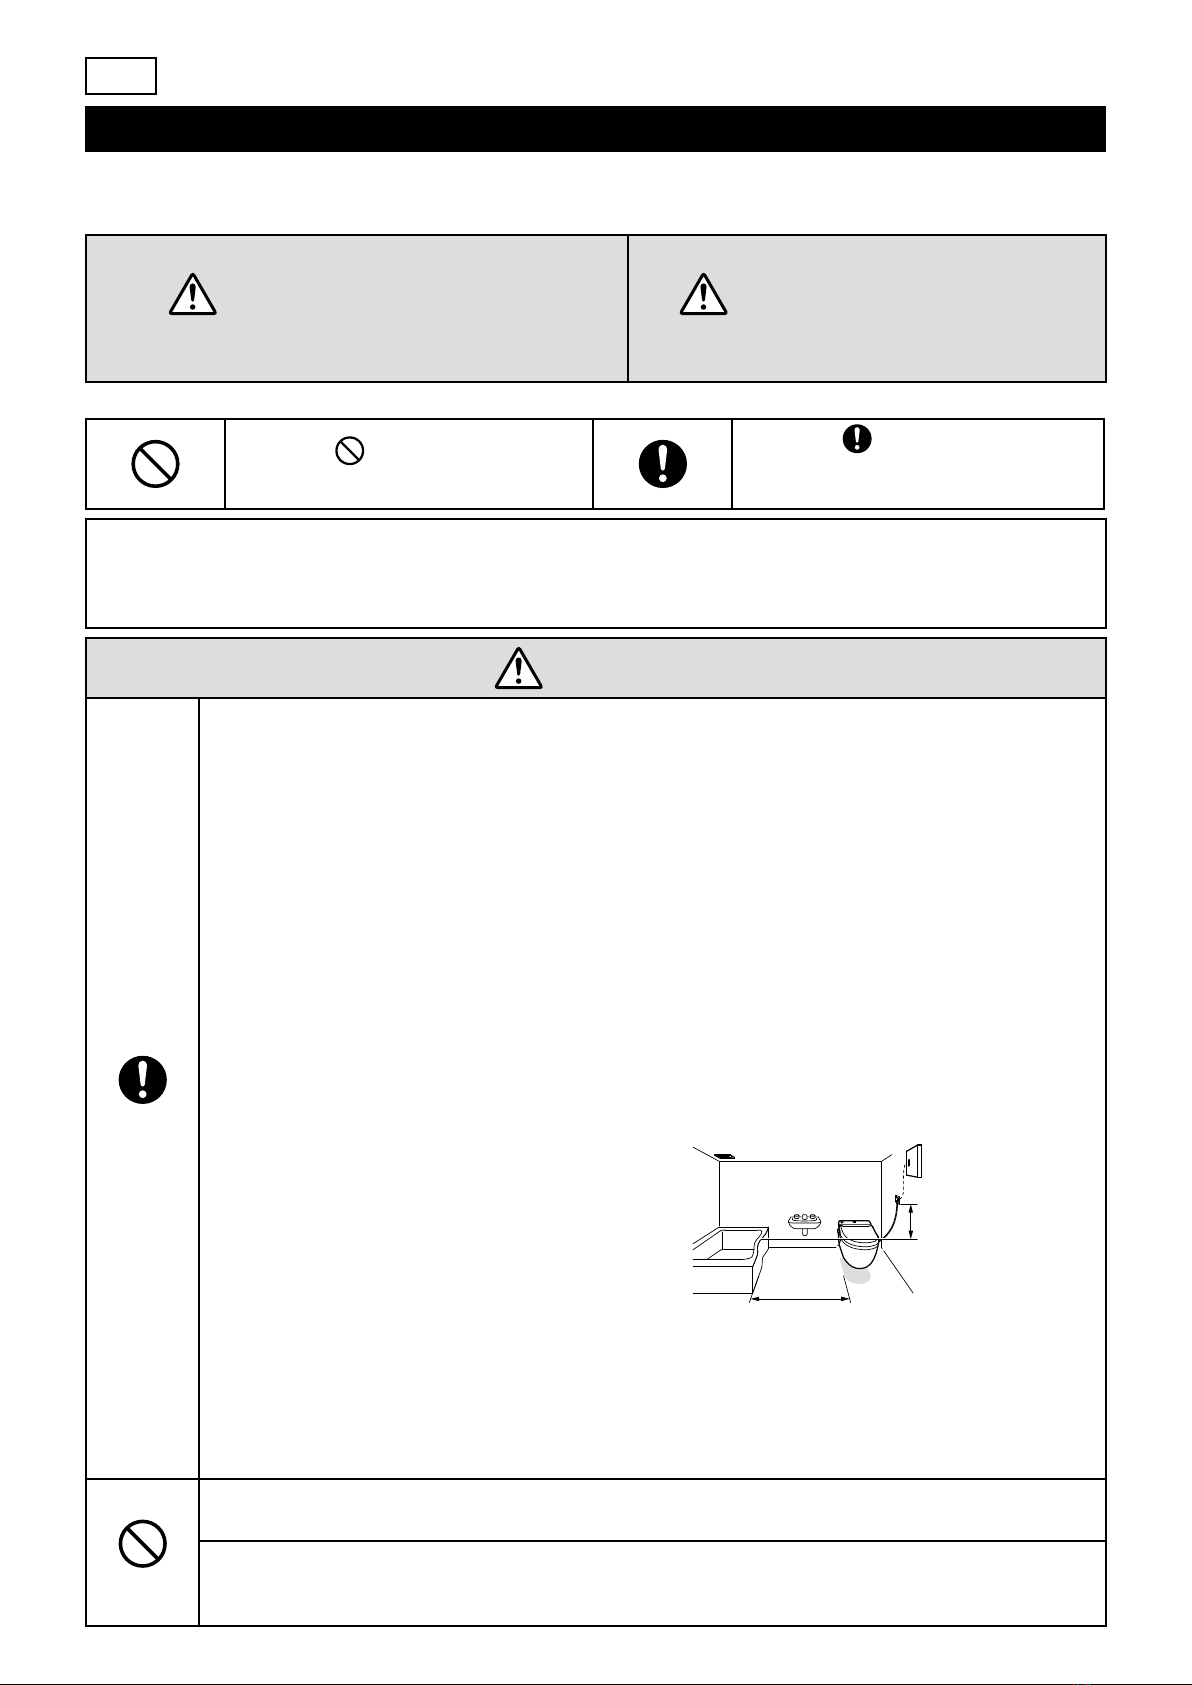
Da es sich hierbei um ein Elektrogerät handelt, dürfen Sie es nicht an einem Ort aufstellen,●
an dem es durch Spritzwasser oder auf andere Weise nass werden könnte. Stellen Sie
es auch nicht an einem feuchten Ort auf, an dem Wasser auf die Oberseite des Washlets
tropfen könnte. Bei Verwendung in einem Badezimmer muss mit einem Lüfter oder einer
Lüftungsöffnung für ausreichende Luftzirkulation gesorgt werden.
Installieren Sie das Washlet mindestens 0,6 m von Badewannen u. Ä. entfernt.
(Ansonsten besteht die Gefahr, dass ein Feuer entsteht oder Sie einen elektrischen Schock bekommen.)
Beachten Sie beim Elektroanschluss unbedingt folgende Hinweise.●
(Ansonsten besteht die Gefahr, dass ein Feuer entsteht oder Sie einen elektrischen Schock bekommen.)
a. Die Steckdose (das Geräts) für die Stromversorgung muss mit einer
Fehlerstromschutzschaltung (RCD) mit einem Auslösestrom von maximal 30 mA gesichert sein.
b. Die Steckdose (das Gerät) und der Stecker müssen sich mindestens 0,6 m von der
Außenkante einer Duschkabine oder Badewanne entfernt benden.
Vergewissern Sie sich, dass die Verkabelung wie unter a. und b. beschrieben¿
vorgenommen wurde. Wenn die Verkabelung nicht entsprechend vorgenommen wurde,
wenden Sie sie diesbezüglich an das Geschäft, in dem Sie das Gerät gekauft haben.
Es muss ein Schutzleiter verlegt sein, und zwar so, dass die Verbindung gewährleistet ist.●
(Wenn kein Schutzleiter verlegt ist, kann es bei
einer Fehlfunktion oder einem Kurzschluss zu
einem elektrischen Schlag kommen.)
Hinweis:
Verwenden Sie Kupferdraht mit einem
Durchmesser von mindestens 1,6 mm und mit
einem Erdungswiderstand von maximal 100 Ω.
Wenn kein Schutzleiter verlegt ist, wenden¿
Sie sie diesbezüglich an das Geschäft, in
dem Sie das Gerät gekauft haben.
Stecken Sie den Netzstecker immer ganz in die Steckdose (220-240 V Wechselstrom, 50 Hz). ●
(Ansonsten besteht die Gefahr, dass ein Feuer entsteht oder Sie einen elektrischen Schock bekommen.)
Achten Sie darauf, dass der Netzstecker leicht zugänglich ist. ●
Schließen Sie das Washlet immer an die Kaltwasserversorgung an.●
(Bei Nichtbeachtung kann es zu Verbrennungen und Fehlfunktionen des Geräts kommen.)
Befolgen Sie bitte die Installationsanweisungen für das Land, in dem das Washlet installiert wird.●
Verboten
Verwenden Sie ausschließlich Leitungswasser oder als Leitungswasser geeignetes Brunnenwasser (Grundwasser). ●
(Bei Verwendung anderer Wasserquellen kann es zu Hautreizungen und anderen Problemen kommen.)
Benutzen Sie für dieses Produkt keine andere als die angegebene Stromversorgung (220-240 V Wechselstrom, 50 Hz).●
(Ansonsten besteht die Gefahr, dass ein Feuer entsteht oder Sie einen elektrischen Schock bekommen.)
0,60 m
Lüfter oder Lüftungsöffnung
Schaltkasten
Fehlerstromschutzschalter
DE
0,60 m

5
VORSICHT
Erforderlich
Nach dem Reinigen des Wasserlters müssen Sie das Ablaufventil mit eingebautem ●
Wasserlter fest schließen.
(Bei Nichtbeachtung kann Wasser austreten.)
Befolgen Sie bei der Installation die Anweisungen in der Installationsanleitung genau.●
(Bei fehlerhaften Verbindungen kann Wasser austreten.)
Verboten
Nehmen Sie das Ablaufventil mit eingebautem Wasserlter nicht ab, solange das ●
Wasserabsperrventil geöffnet ist.
(Andernfalls strömt Wasser aus.)
Biegen und quetschen Sie den Wasserzulaufschlauch nicht.●
(Andernfalls kann Wasser austreten.)
Heben Sie das Washlet nicht am Sitz oder am Toilettendeckel an.●
(Wenn sich das Washlet-Hauptgerät löst und herunterfällt, besteht Verletzungsgefahr.)
Vor der Installation des Washlets
1. Schließen Sie die Installation vollständig ab, bevor Sie das Gerät mit Strom oder Wasser versorgen.
2. Beschädigen Sie die an das Ende des Wasserzulaufschlauchs angeschlossenen Teile nicht.
3.
Die Betriebsspannung beträgt 220-240 V Wechselstrom (50 Hz). Die Nennleistungsaufnahme beträgt 274-319 W.
Achten Sie darauf, dass die Verkabelung und die Steckdose auf diese Anschlusswerte ausgelegt sind. (Es empehlt
sich, das Gerät an einen eigenen Stromkreis anzuschließen.)
4. Installieren Sie die Auageplatte nicht am Washlet, wenn dieses nicht an der Toilette angebracht ist.
(Andernfalls kann es zu Beschädigungen am Gerät kommen, wenn Sie das Washlet einschalten.)
5. Das Netzkabel ist ungefähr 0,9 m lang. Vergewissern Sie sich, dass in der Nähe eine leicht zugängliche
Netzsteckdose installiert ist, so dass sich das Washlet leicht anschließen und trennen lässt.
6. Der Wasserversorgungsdruck muss zwischen 0,1 und 1,0 MPa liegen.
7. Die Wassertemperatur muss zwischen 0 und 35°C liegen.
8. Der Verbindungsschlauch ist 0,5 m lang. Achten Sie darauf, dass sich in der Nähe eine
Wasserentnahmestelle bendet, so dass sich das Washlet leicht anschließen und trennen lässt.
9. Vergewissern Sie sich vor der Installation des Washlets, dass der Wasseranschluss sich an einer geeigneten
Stelle bendet.
DE

6
Mises en garde et avertissements
Avant d'installer votre Washlet, assurez-vous de lire les instructions d'installation suivantes. Installez ce produit en
suivant exclusivement la procédure décrite dans ce guide.
Suivez toutes les précautions et les avertissements de sécurité.
AVERTISSEMENT
Lorsque ce symbole apparaît
en regard d'une rubrique, cela
indique que toute utilisation
incorrecte pourrait entraîner la
mort ou une blessure grave.
MISE EN
GARDE
Lorsque ce symbole apparaît
en regard d'une rubrique, cela
indique que toute utilisation
incorrecte peut entraîner une
blessure ou un dommage
physique.
Exemple de symbole
Le symbole indique que
quelque chose est interdit. Le symbole indique que
quelque chose doit être fait.
Ce matériel est de catégorie 1, c●'est pourquoi il est nécessaire de le connecter à la terre.
Installez ce matériel près d●'une prise secteur.
Utilisez le nouveau jeu de exibles inclus avec cet appareil. Ne réutilisez pas un ancien jeu de exibles.●
AVERTISSEMENT
Requis
Dans la mesure où il s●'agit d'un matériel électronique, ne le placez pas à un emplacement où il
pourrait être éclaboussé ou soumis à l'humidité. De même, ne le placez pas dans un lieu humide
où de l'eau pourrait couler sur la surface du Washlet. Lorsque vous l'utilisez dans une salle de
bain, installez un ventilateur ou un orice de ventilation an que la salle de bain soit sufsamment
ventilée.
Installez le Washlet à au moins 0,6 m d'une baignoire.
(Le non-respect de cette mise en garde pourrait entraîner un incendie ou l'électrocution.)
Préparez la prise pour le câblage électrique en procédant comme suit.●
(Le non-respect de cette mise en garde pourrait entraîner un incendie ou l'électrocution.)
a. Alimentez la prise en courant électrique (appareil) à l'aide d'un appareil électrique différentiel
à double vitesse de transfert émettant une puissance ne dépassant pas 30 mA.
b. Placez la prise femelle (appareil) à 0,6 m minimum du bord extérieur d'une douche ou d'une
baignoire.
Vériez que le câblage des éléments a et b ci-dessus a été réalisé. Si le câblage n¿'est pas
réalisé, demandez à l'entreprise ayant installé l'appareil de le faire.
Assurez-vous d●'installer un conducteur de terre dans un lieu où ce type de branchement est
possible.
(Si le conducteur de terre n'est pas installé, des
chocs électriques pourraient survenir en cas de
dysfonctionnement ou de court-circuit.)
Remarque:
Utilisez un l de cuivre d'un diamètre de 1,6 mm
ou plus et d'une résistance à la terre de 100 Ω ou
inférieure.
Si le conducteur de terre n¿'a pas été installé,
demandez à l'entreprise ayant installé l'appareil
de le faire.
Insérez toujours le câble électrique complètement dans la prise (220-240 V CA, 50 Hz). ●
(Le non-respect de cette mise en garde pourrait entraîner un incendie ou l'électrocution.)
Faites le branchement de façon à ce que la prise électrique soit facile à atteindre.●
Connectez toujours le Washlet à l●'alimentation en eau froide.
(Le non-respect de cette instruction pourrait entraîner des brûlures ou un dysfonctionnement de l'appareil.)
Suivez les exigences d●'installation pour le pays dans lequel le Washlet est installé.
Interdit
N●'utilisez que de l'eau du robinet ou de l'eau d'un puits potable (provenant de nappes).
(L'utilisation d'autres types d'eau pourrait entraîner une inammation de la peau ou d'autres problèmes.)
N●'utilisez pas ce produit avec une alimentation électrique autre que celle spéciée (220-240 V CA,
50 Hz).
(Le non-respect de cette mise en garde pourrait entraîner un incendie ou l'électrocution.)
0,60 m
Ventilateur ou orice de ventilation
Boîtier
électrique
Coupe-circuit de
fuite à la terre
FR
0,60 m

7
MISE EN GARDE
Requis
Après avoir nettoyé le ltre à eau, serrez fermement le robinet de vidange avec ltre à eau ●
intégré.
(Le non-respect de cette mise en garde pourrait entraîner une fuite.)
Suivez le guide d●'installation avec attention pendant l'installation.
(Un branchement incorrect pourrait entraîner des fuites d'eau.)
Interdit
Ne détachez pas le robinet de vidange avec ltre à eau intégré lorsque le robinet de ●
sectionnement est encore ouvert.
(De l'eau pourrait se déverser.)
Ne pliez pas ou n●'écrasez pas le exible d'alimentation en eau.
(Cela pourrait entraîner une fuite d'eau.)
Ne soulevez pas le Washlet par le siège ou l●'abattant.
(Une blessure pourrait survenir si l'unité Washlet principale se déloge et tombe.)
Avant d'installer le Washlet
1. Ne transmettez pas de courant électrique et n'alimentez pas l'unité en eau avant que la procédure
d'installation ne soit terminée.
2. N'endommagez pas les pièces connectées à l'extrémité du exible d'alimentation en eau.
3.
La tension d'alimentation est de 220-240 V CA (50 Hz). La consommation d'énergie nominale est de 274-319 W.
Utilisez des câbles et des prises électriques adaptés à ce niveau d'alimentation. (Un câblage indépendant est
recommandé.)
4. Ne xez pas le socle au Washlet lorsque celui-ci n'est pas xé aux toilettes. (Si le Washlet est allumé dans
ces conditions, le produit pourrait être endommagé.)
5. Le cordon d'alimentation mesure environ 0,9 m de long. Vériez qu'une prise secteur est installée à portée
an de faciliter l'installation et le retrait du Washlet.
6. Utilisez une alimentation en eau d'une pression située entre 0,1 et 1,0 Mpa.
7. La plage de température de l'eau doit être située entre 0 et 35°C.
8. La longueur du exible de branchement est de 0,5 m. L'alimentation en eau doit être située de façon à
permettre une installation et un retrait faciles du Washlet.
9. Avant d'installer le Washlet, vériez que l'alimentation en eau est en position stabilisée.
FR

8
Avvisi di pericolo e attenzione
Prima di installare il Washlet, leggere le seguenti istruzioni di installazione. Per l'installazione, adottare
esclusivamente le procedure riportate nel presente manuale.
Rispettare tutte le istruzioni di sicurezza e le indicazioni riportate negli avvisi.
PERICOLO
I paragra preceduti da questa
indicazione contengono
descrizioni importanti. In caso
di inosservanza, si possono
vericare gravi infortuni, anche
mortali.
ATTENZIONE
I paragra preceduti da questa
indicazione contengono
descrizioni importanti. In caso
di inosservanza, si possono
vericare infortuni o danni alle
cose.
Esempio di simbolo
Il simbolo indica operazioni
vietate.
Il simbolo indica operazioni
che devono essere eseguite
obbligatoriamente.
Questa apparecchiatura è di Classe 1, pertanto è necessario effettuare il collegamento a un sistema di messa a terra.●
L●'apparecchiatura deve essere installata in prossimità di una presa di alimentazione.
Utilizzare il set di tubi nuovi fornito insieme all●'apparecchiatura. Non riutilizzare tubi essibili utilizzati in
precedenza.
PERICOLO
Obbligatorio
Il Washlet è un apparecchio elettronico, pertanto non deve essere installato in luoghi in cui●
potrebbe essere spruzzato o bagnato. Analogamente, non deve essere installato in luoghi umidi o
in cui l'acqua potrebbe gocciolare sulle sue superci. Se viene installato in una stanza da bagno,
prevedere un impianto di ventilazione o un'apertura per la ventilazione, in modo da garantire
un'adeguata circolazione dell'aria.
Il Washlet deve essere installato ad almeno 0,6 m di distanza dalle vasche da bagno.
(In caso di mancata osservanza di questa indicazione si potrebbero vericare incendi o scosse elettriche.)
Preparare la presa per il collegamento elettrico attenendosi alle istruzioni sotto riportate.●
(In caso di mancata osservanza di questa indicazione si potrebbero vericare incendi o scosse elettriche.)
a.
La presa elettrica deve essere alimentata tramite collegamento a un impianto munito di
Dispositivo a corrente Differenziale Residua (DDR) con corrente nominale non superiore a 30 mA.
b. La presa e la spina di collegamento devono essere poste ad almeno 0,6 m di distanza dal
bordo esterno di una cabina doccia o vasca da bagno.
Vericare che i collegamenti descritti ai punti a e b siano stati completati. Qualora i ¿
collegamenti non siano stati completati, richiedere l'intervento dell'installatore dell'unità.
Si raccomanda di installare il lo di terra in un punto in cui il collegamento possa essere eseguito ●
correttamente.
(Se il lo di terra non è installato, in caso di
anomalie di funzionamento o cortocircuiti si
potrebbero vericare scosse elettriche.)
Nota:
Utilizzare un lo di rame da almeno 1,6 mm di
diametro con una resistenza di terra massima di
100 Ω.
Se il lo di terra non è stato installato, richiedere ¿
l'intervento dell'installatore dell'unità.
Il cavo elettrico deve essere sempre inserito a fondo nella presa (220-240 V CA, 50 Hz). ●
(In caso di mancata osservanza di questa indicazione si potrebbero vericare incendi o scosse elettriche.)
Effettuare il collegamento in modo che la spina elettrica sia facilmente raggiungibile.●
Il Washlet deve essere sempre collegato all●'ingresso dell'acqua fredda.
(In caso contrario, si potrebbero vericare ustioni o anomalie di funzionamento dell'apparecchiatura.)
Per l●'installazione, attenersi alle norme in vigore nel paese di utilizzo del Washlet.
Vietato
Utilizzare esclusivamente acqua del rubinetto o acqua sotterranea potabile.●
(Utilizzando acque di provenienza diversa si potrebbero vericare inammazioni cutanee o altri problemi.)
Non utilizzare il prodotto con caratteristiche di alimentazione diverse da quanto specicato (220-240 V CA, ●
50 Hz).
(In caso di mancata osservanza di questa indicazione si potrebbero vericare incendi o scosse elettriche.)
0,60 m
Ventilatore o apertura di ventilazione
Quadro
elettrico
Interruttore
differenziale
(salvavita)
IT
0,60 m

9
ATTENZIONE
Obbligatorio
Dopo aver pulito il ltro dell●'acqua, stringere a fondo la valvola di scarico con ltro dell'acqua
incorporato.
(In caso di mancata osservanza di questa indicazione si potrebbero vericare fuoriuscite d'acqua.)
Durante l●'installazione, attenersi scrupolosamente al Manuale di installazione.
(Se i collegamenti idraulici non vengono eseguiti correttamente, si potrebbero vericare fuoriuscite d'acqua.)
Vietato
Non staccare la valvola di scarico con ltro dell●'acqua incorporato mentre la valvola di chiusura
acqua è ancora aperta.
(In caso contrario, si avrà una fuoriuscita di acqua.)
Non piegare o schiacciare il tubo essibile di ingresso acqua. ●
(In caso contrario, si potrebbero vericare fuoriuscite di acqua.)
Non sollevare il Washlet afferrando il sedile o il coperchio del WC.●
(Se l'unità principale del Washlet dovesse spostarsi e cadere, si potrebbero vericare infortuni.)
Prima di installare il Washlet
1. Non dare corrente all'apparecchio e non attivare l'erogazione dell'acqua nché l'installazione non sarà
completata.
2. Fare attenzione a non danneggiare le parti collegate all'estremità del tubo essibile di ingresso acqua.
3. La tensione di alimentazione è pari a 220-240 V CA (50 Hz). L'assorbimento nominale è di 274-319 W.
Utilizzare cavi e prese adatti a questi valori di potenza. (Si raccomanda di eseguire cablaggi indipendenti.)
4. Non installare la base di appoggio sul Washlet prima di avere eseguito il ssaggio alla tazza. (Se si accende il
Washlet in tali condizioni, si rischia di danneggiarlo.)
5. Il cavo di alimentazione ha una lunghezza di circa 0,9 m. Vericare che sia presente una presa elettrica nelle
vicinanze per agevolare l'installazione e la rimozione del Washlet.
6. Collegare a una rete idraulica con pressione compresa tra 0,1 e 1,0 Mpa.
7. La temperatura dell'acqua deve essere compresa tra 0 e 35°C.
8. Il tubo essibile di collegamento è lungo 0,5 m. L'ingresso dell'acqua deve trovarsi in posizione tale da
agevolare l'installazione e la rimozione del Washlet.
9. Prima di installare il Washlet, vericare che l'erogazione dell'acqua sia controllata.
IT

10
Included parts / Mitgelieferte Teile / Pièces fournies / Parti in dotazione
A-1
A-2
A-4 A-6A-5
A-3
Anti-theft
Installation
Instructions
Anti-theft Installation Instructions
Installationsanweisungen für Diebstahlschutz
Les piËces antivol de la tÈlÈcommande sont
fournies dans le mÍme emballage
Istruzioni di installazione antifurto
A-7a
A-7c
A-7d
A-7 A-7b
A-8 A-9
A-10
Instruction
Manual
Warranty
A-12
A-11
Available separately
Please request the separate accessory set for use with a oor-mounted toilet.●
Separat erhältlich
Bestellen Sie für eine bodenmontierte Toilette bitte den separaten Zubehörsatz.●
Disponible séparément
Veuillez demander le jeu d’accessoires distinct à utiliser avec des toilettes xées au sol.●
Accessori in vendita separatamente
Per l’installazione su un WC da terra, richiedere l’apposito set di accessori.●
Required tools / Erforderliches Werkzeug / Outils requis / Utensili richiesti
B-1 +
B-6
B-5 B-7
B-2 B-3 B-4
-
The anti-theft parts for remote control are supplied in the●
same package. Be sure to assemble them after asking the
customer’s need. If they are not used, hand them to the
customer without fail.
Installation
Guide
A-13
White paper
Weißes Papier
Papier blanc
Pezzo di carta bianca
For the U.K.
Für U.K.
Pour le Royaume-Uni
Per il Regno Unito
Instruction Manual
Bedienungsanleitung
Manuel d'instructions
Manuale di istruzioni
Warranty
Garantie
Garantie
Garanzia
Installation Guide
Installationsanleitung
Guide d'installation
Manuale di installazione
Die Diebstahlschutzteile für die Fernbedienung gehören●
zum Lieferumfang. Diese sind nach Feststellen der
Wünsche des Kunden unbedingt entsprechend zu
montieren und müssen bei Nichtverwendung dem Kunden
ausgehändigt werden.
Veillez à bien les assembler aprËs avoir demandÈ les●
besoins du client. Si elles ne sont pas utilisÈes, ne
manquez pas de les remettre au client.
Le parti antifurto per il telecomando sono fornite nella●
stessa confezione. Assicurarsi di assemblarle dopo
averne richiesto al cliente la necessità. Qualora esse non
vengano utilizzate, non mancare di consegnarle al cliente.

11
Parts / Teile / Pièces / Parti
C-10
C-1
C-2
C-3
C-4
C-6
C-7
C-8
C-11
C-12
C-5
C-5
For the U.K.
Für U.K.
Pour le Royaume-Uni
Per il Regno Unito

12
Meaning of the indications
Bedeutung der Hinweise
Signication des indications
Signicato delle indicazioni
GB
: Task that must be conducted by
the installer
: Action that the Washlet should
perform automatically
: Work that requires conrmation
: Shows the work sequence
DE
: Diese Aufgabe ist vom Installateur
auszuführen
: Diese Funktion wird vom Washlet
automatisch ausgeführt
: Bei dieser Tätigkeit ist eine
Bestätigung erforderlich
: Zeigt den Arbeitsablauf an
FR
: Tâche incombant à l'installateur
: Action que le Washlet doit
exécuter automatiquement
: Tâche exigeant une vérication
: Indique l'ordre de suivi de la
procédure
IT
: operazione che deve essere
eseguita dall'installatore
:
operazione che il Washlet dovrebbe
eseguire automaticamente
: intervento che deve essere
preceduto da veriche
: indica la sequenza di lavoro
Installing the Washlet
Installation des Washlets
Installation du Washlet
Installazione del Washlet
1
1
2
2
A-7
3
3
502~
504mm

13
4
4
5
5
6
6
GB
Press the washlet body into the base
plate until it clicks into place.
(After attaching it, conrm that the
washlet body cannot be detached even if
pulled.)
DE
Drücken Sie den Korpus des Washlet in
die Auageplatte, bis er mit einem Klicken
einrastet.
(Stellen Sie nach der Anbringung sicher,
dass sich der Korpus des Washlet
nicht lösen lässt, selbst wenn Sie daran
ziehen.)

14
FR
Enfoncez le corps du Washlet dans le
socle jusqu’à ce qu’il s’enclenche avec un
déclic.
(Une fois xé, assurez-vous que le corps
du Washlet ne peut plus être retiré, même
en tirant dessus.)
IT
Spingere il Washlet nella base di
appoggio nché non scatta in posizione.
(Dopo averlo montato, accertarsi che il
Washlet non possa essere staccato anche
se tirato.)
7
7
C-7
[GB]CAUTION
Required
Fix the water supply input using a
spanner, and connect the water supply
hose.
An excessive force may damage the ●
water supply input and water leaks
could occur.
[DE]VORSICHT
Erforderlich
Befestigen Sie den Wasserzulauf
mit Hilfe eines Schraubenschlüssels
und schließen Sie den
Wasserzulaufschlauch an.
Übermäßige Krafteinwirkung kann●
den Wasserzulauf beschädigen,
wodurch möglicherweise undichte
Stellen entstehen.
[FR]MISE EN GARDE
Requis
Fixez l'entrée de l'alimentation en eau
à l'aide d'une clé à écrous et branchez
le exible d'alimentation en eau.
Une force excessive pourrait●
endommager l'entrée de
l'alimentation en eau et des fuites
pourraient se produire.
[IT]ATTENZIONE
Obbligatorio
Fissare il raccordo di ingresso acqua
con una chiave inglese, e collegare il
tubo essibile di ingresso acqua.
Esercitando una forza eccessiva si●
rischia di danneggiare il raccordo di
ingresso acqua, pertanto potrebbero
vericarsi perdite.

15
8
8
2
1
A-10
9
9
1
10
0

16
1
11
1
1
3
A-2
A-6
2
1
12
2
770
(mm)
150 450
300
1220
950
A-2
1
13
3
(1)
C-12
A-2
Longer than 5 sec
Länger als 5 Sekunden
Plus de 5 secondes
Superiore a 5 sec
(2)
A-2

17
1
14
4
3x2
6x2
With a plasterboard or tile wall.
An Gipskartonplatten oder Fliesen.
Pour un mur en plaques de plâtre ou en carrelage.
Con parete in cartongesso o piastrellata.
1
15
5
A-3
A-2
A-3
A-3
GB
As for the procedure of how to mount the anti-theft
parts, please refer to the instruction manual in the
same package.
DE
Das Verfahren zum Einbau der Diebstahlschutzteile
ist in der mitgelieferten Installationsanleitung
beschrieben.
FR
En ce qui concerne la procÈdure de montage des
piËces antivol, veuillez vous reporter au manuel
d’instructions contenu dans le mÍme emballage.
IT
Per la procedura sul montaggio delle parti antifurto,
si prega di fare riferimento al manuale di istruzioni
fornito nella stessa confezione.

18
When you want to remove the remote control
hanger.
Bei gewünschtem Ausbau des
Fernbedienungshalters.
Lorsque vous voulez retirer le support de
tÈlÈcommande.
Quando si desidera rimuovere il portatelecomando.
A-3
B-5
Testing the operation of the Washlet
Funktionstest des Washlets
Test du fonctionnement du Washlet
Prova di funzionamento del Washlet
1
1
C-8
C-7
A-8
A-8
2
2
B-7
Projection of hook
Hervorstehender Haken
Projection du crochet
Sporgenza del gancio

19
3
3
A-2
B-7
C-12
B-6
4
4
B-7
C-12
A-2
5
5

©TOTO Ltd. All rights reserved.
©TOTO Ltd. Alle Rechte vorbehalten.
©TOTO Ltd. Tous droits réservés.
©TOTO Ltd. Tutti i diritti riservati.
2009. 12. 25
D08324
Printed in Japan.
Gedruckt in Japan.
Imprimé au Japon.
Stampato in Giappone.
This manual suits for next models
2
Table of contents
Other Toto Toilet manuals

Toto
Toto Villeroy & Boch VICLEAN-U User manual

Toto
Toto washlet User manual

Toto
Toto NEOREST 550 User manual

Toto
Toto NEOREST DH CS989VT User manual

Toto
Toto DRAKE CST775 User manual

Toto
Toto TCF802 Series User manual

Toto
Toto UT105U User manual

Toto
Toto washlet User manual

Toto
Toto Maris CT486FG User manual

Toto
Toto SoftClose SS117 User manual

Toto
Toto NEOREST SN996MX User manual

Toto
Toto SW3056AT40 User manual

Toto
Toto washlet User manual

Toto
Toto NEOREST A User manual

Toto
Toto CWT426CMFG User manual

Toto
Toto MS903CUMFX User manual

Toto
Toto MS642 User manual

Toto
Toto CST446 Installation instructions

Toto
Toto CT708U(G) Installation instructions

Toto
Toto CST614 Series User manual