manuals.online logo
Brands
  1. Home
  2. •
  3. Brands
  4. •
  5. TownSteel
  6. •
  7. Lock
  8. •
  9. TownSteel MDE Series User manual

TownSteel MDE Series User manual

INSTALLATION GUIDE
4
MDE Series
MDS Series
MVE Series
MVS Series
Heavy Duty
Commercial Mortise Lock
Technical Support: Tel: (626) 858-5080 Fax: (626) 858-3393 [email protected]
TownSteel Inc. 707 N. Barranca Ave., Bldg #6, Covina, CA 91723
2 3
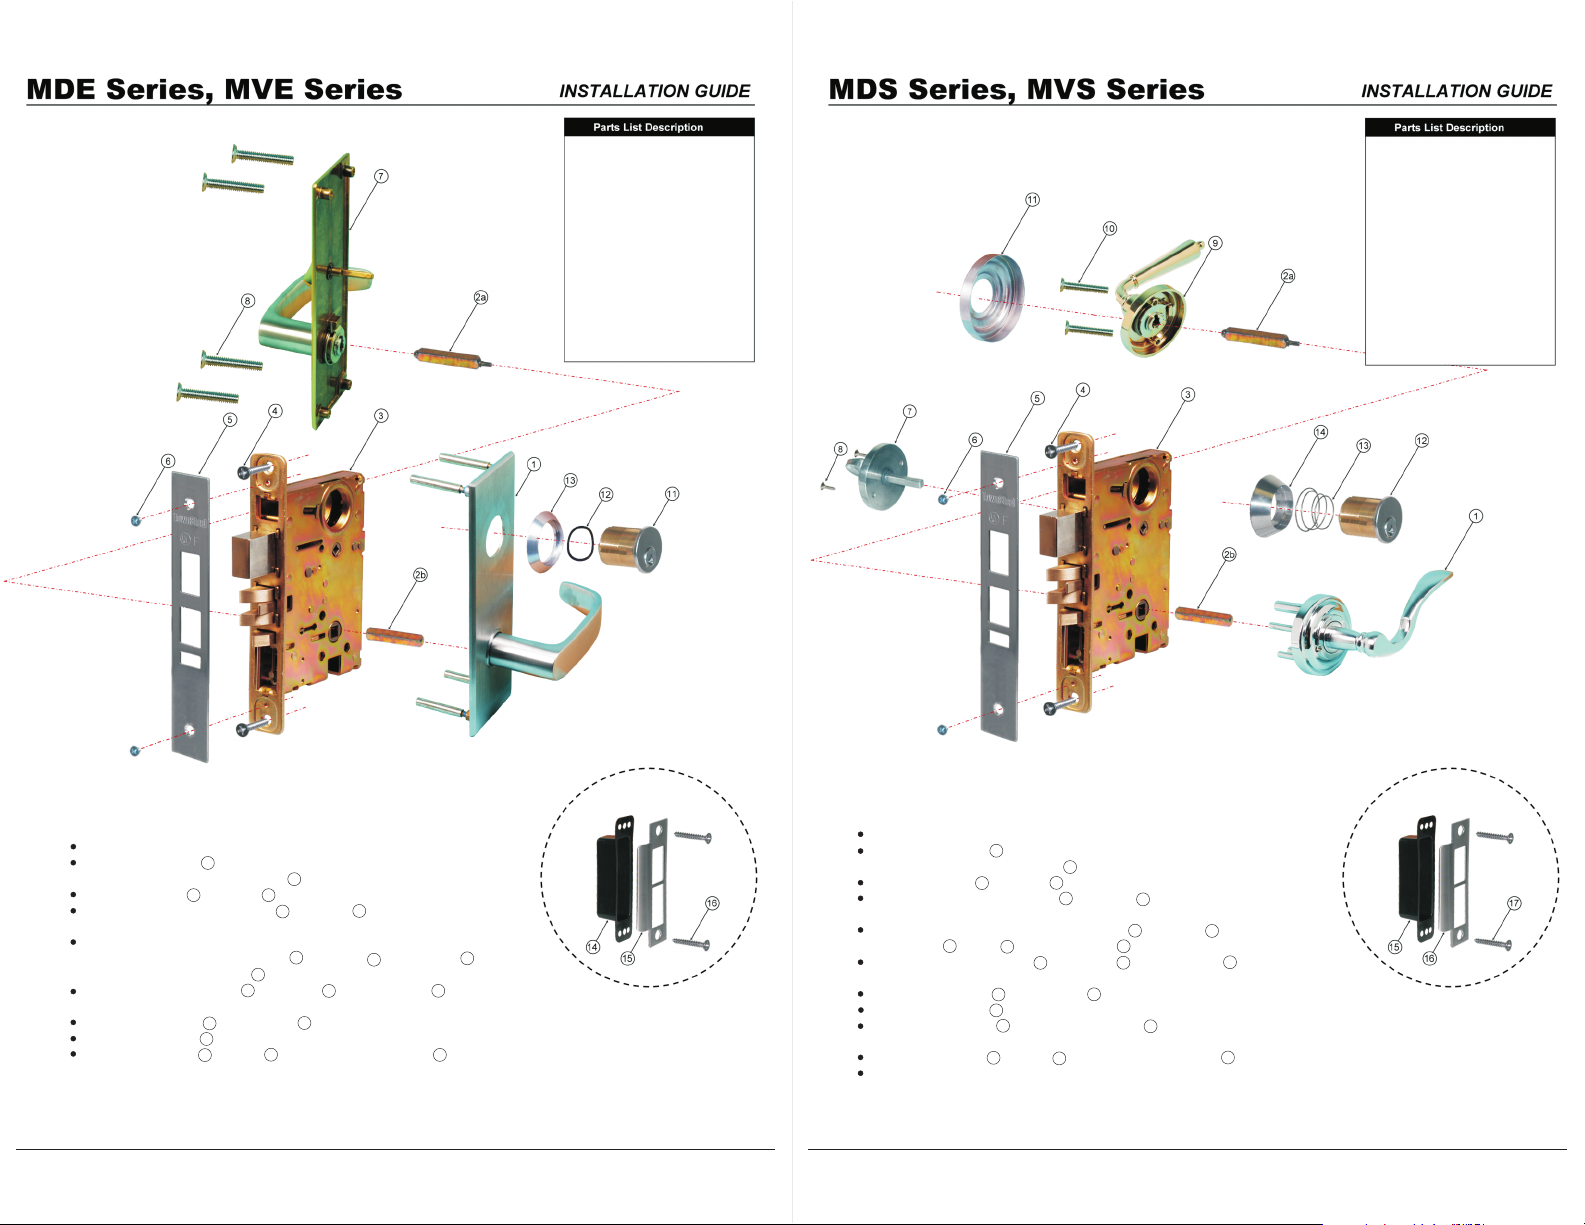
1. Outside Escutcheon Assembly (1)
2a. Inside Spindle (1)
2b. Outside Spindle (1)
3. Mortise Lock Case (1)
4. Lock Case Screws (2)
5. Face Plate (1)
6. Face Plate Screws (2)
7. Inside Escutcheon
Trim/Lever Assembly (1)
(Thumbturn Optional)
8. Assembly Mounting Screws (4)
9. Mortise Cylinder (1) (Optional)
10. Wave Spring (1) (Optional)
11. Cylinder Collar (1) (Optional)
12. Dustbox (1)
13. Strike (1)
14. Strike Screws (2)
Strike and Dustbox
for Door Jamb.
1. Outside Lever Assembly (1)
2a. Inside Spindle (1)
2b. Outside Spindle (1)
3. Mortise Lock Case (1)
4. Lock Case Screws (2)
5. Face Plate (1)
6. Face Plate Screws (2)
7. Thumb Turn Assembly (1) (Optional)
8. Thumb Turn Screw (2) (Optional)
9. Inside Lever Assembly (1)
10. Assembly Mounting Screws (2)
11. Inside Rose (1)
12. Mortise Cylinder (1) (Optional)
13. Wave Spring (1) (Optional)
14. Cylinder Collar (1) (Optional)
15. Dustbox (1)
16. Strike (1)
17. Strike Screws (2)
Strike and Dustbox
for Door Jamb.
Step 1: Prepare door per template (supplied).
Step 2: Insert lockcase 3 into mortise cut-out (faceplate removed)
and fasten to door with 2 screws 4 .
Step 3: Insert inside 2a and outside 2b spindles into the lockcase hubs and tighten screw.
Step 4: Install outside escutcheon trim 1 onto spindle 2b & 4 post thru holes on the
door.
Step 5: With the deadbolt projected, install the inside escutcheon Trim/Lever assembly
(Thumbturn in horizontal position) 7 onto spindle 2a & secure inside 7 /outside trim
assemblies with 4 screws 8 temporarily
Step 6: Optional: Install cylinder 9 , wave spring 10 and cylinder collar 11 .
Adjust accordingly, tighten set screw and check lock (use key) for function.
Step 7: Install faceplate 5 with two screws 6 .
Step 8: Tighten screws 8 and check lock for fit and function.
Step 9: Install dustbox 12 and strike 13 to jamb and fasten with screws 14 .
Step 1: Prepare door per template (supplied).
Step 2: Insert lockcase 3 into mortise cut-out (faceplate removed)
and fasten to door with screws 4 .
Step 3: Insert inside 2a and outside 2b spindles into the lockcase hub and tighten screw.
Step 4: Install outside lever assembly 1 onto spindle 2b with the screw posts
thru holes in lockcase.
Step 5: Install inside mounting plate/lever assembly 9 onto spindle 2a and secure
inside 9 /outside 1 assemblies with two 10 screws temporarily.
Step 6: Optional: Install cylinder 12 , wave spring 13 and cylinder collar 14 .
Adjust accordingly, tighten set screw and check lock (use key) for function.
Step 7: Install faceplate 5 with two screws 6 .
Step 8: Tighten screws 10 and check lock for fit and function.
Step 9: Slide inside rose 11 onto inside lever assembly 9 . Align indented dot over bottom
notch and press to secure.
Step 10: Install dustbox 15 and strike 16 to jamb and fasten with screws 17 .
Step 11: Install thumbturn assembly (if required).

This manual suits for next models

3

Other TownSteel Lock manuals

TownSteel e-Genius 2990 Series Operating instructions

TownSteel

TownSteel e-Genius 2990 Series Operating instructions

TownSteel Prodigy SmartLock 4000 Series Troubleshooting guide

TownSteel

TownSteel Prodigy SmartLock 4000 Series Troubleshooting guide

TownSteel e-Smart 6000 Series User manual

TownSteel

TownSteel e-Smart 6000 Series User manual

TownSteel E-GENIUS 2000 Series User manual

TownSteel

TownSteel E-GENIUS 2000 Series User manual

TownSteel 2000 Series Troubleshooting guide

TownSteel

TownSteel 2000 Series Troubleshooting guide

TownSteel e-Genius 2000 Series User manual

TownSteel

TownSteel e-Genius 2000 Series User manual

TownSteel Prodigy SmartLock Interconnect 2000 Series Operating instructions

TownSteel

TownSteel Prodigy SmartLock Interconnect 2000 Series Operating instructions

TownSteel XCE 2000 Series User manual

TownSteel

TownSteel XCE 2000 Series User manual

TownSteel e-Elite 4000 Series Operating instructions

TownSteel

TownSteel e-Elite 4000 Series Operating instructions

TownSteel e-lite 4000 Series Operating instructions

TownSteel

TownSteel e-lite 4000 Series Operating instructions

Popular Lock manuals by other brands

Gianni Industries EB-262 specification

Gianni Industries

Gianni Industries EB-262 specification

Kiramek SL30H manual

Kiramek

Kiramek SL30H manual

Promet PS600/E36 user manual

Promet

Promet PS600/E36 user manual

Securam D Series quick start guide

Securam

Securam D Series quick start guide

Mul-t-lock Entr quick start guide

Mul-t-lock

Mul-t-lock Entr quick start guide

iLoq S10 user guide

iLoq

iLoq S10 user guide

Turbolock TL117 manual

Turbolock

Turbolock TL117 manual

Kwikset SMARTKEY quick start guide

Kwikset

Kwikset SMARTKEY quick start guide

COMPX National D150CB instruction sheet

COMPX

COMPX National D150CB instruction sheet

FingerTec TL40B quick start guide

FingerTec

FingerTec TL40B quick start guide

Assa Abloy EL490 manual

Assa Abloy

Assa Abloy EL490 manual

GEM GL-1800F-IOTB Specification sheet

GEM

GEM GL-1800F-IOTB Specification sheet

BURG-WACHTER PointSafe user manual

BURG-WACHTER

BURG-WACHTER PointSafe user manual

bosvision PL881 Series quick start guide

bosvision

bosvision PL881 Series quick start guide

Reer 71090 user manual

Reer

Reer 71090 user manual

Yale Luna Pro+ installation guide

Yale

Yale Luna Pro+ installation guide

LEHMANN M300 LEGIC L043-A01 operating instructions

LEHMANN

LEHMANN M300 LEGIC L043-A01 operating instructions

Draper KEY BOX Original instructions

Draper

Draper KEY BOX Original instructions

manuals.online logo
manuals.online logoBrands
  • About & Mission
  • Contact us
  • Privacy Policy
  • Terms and Conditions

Copyright 2025 Manuals.Online. All Rights Reserved.