Toyota PZQ85-33270 Install guide

PRADO
F
I
Do
c
No
:
PZQ85
-
33270F
I
-
Issue
:
2
-
17/09
/18
Pag
e
1
o
f
23
04
JUNE 2018 PRODUCTION ONWARDS
Part No: PZQ85-33270
Fitting Time: 45 minutes
Dash Camera
Fitting Instruction

PRADO
F
I
Do
c
No
:
PZQ85
-
33270F
I
-
Issue
:
2
-
17/09
/18
Pag
e
2
o
f
23
JUNE 2018 PRODUCTION ONWARDS
Part No: PZQ85-33270
General Notes
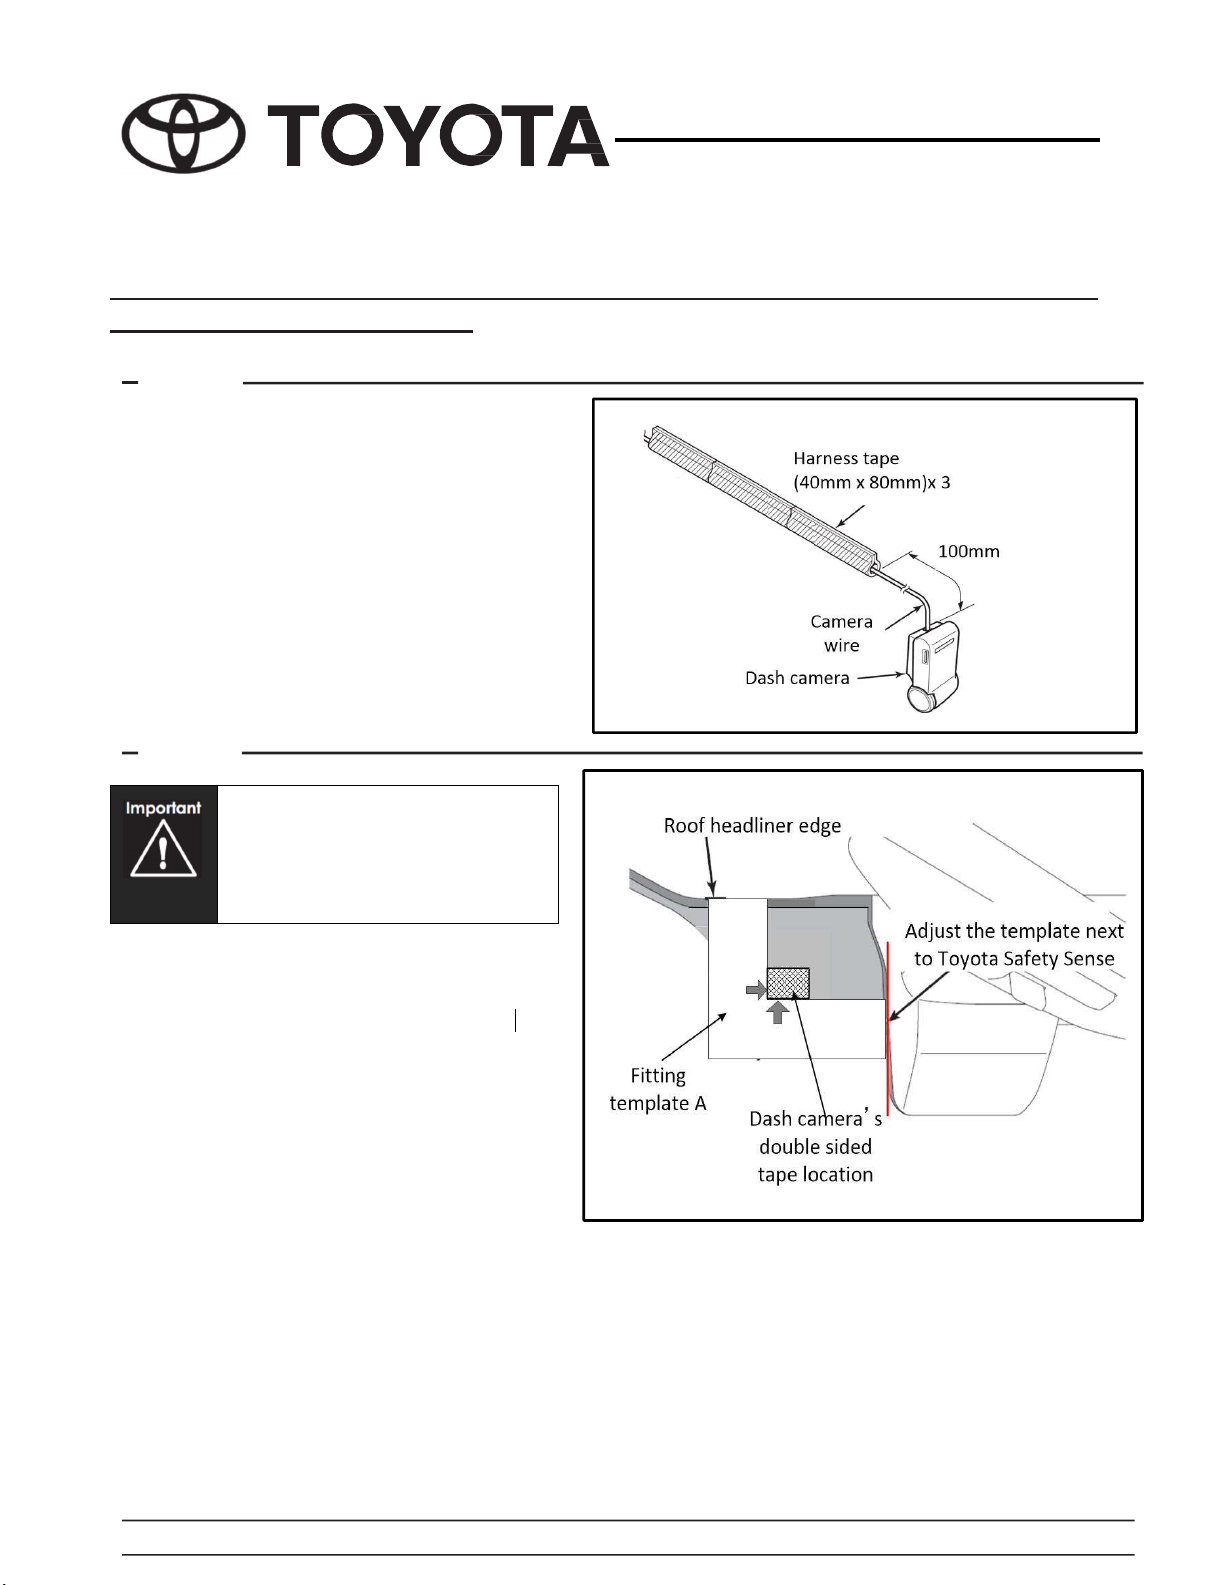
- Read through the fitting instructions before installation of accessory.
- Always install the accessory following the fitting instructions. Failure to do so may cause damage to the vehicle
or the accessory.
- Ensure all recyclable discarded vehicle accessory components and packaging are recycled following local
recycling regulations.
- It is always recommended that this accessory is fitted by a qualified Toyota Technician.
- Safely store and protect any removed vehicle components.
- Ensure all bare metal surfaces are protected using Automotive Bare Metal Primer and touch-up paint.
- Remove all metal swarf and dust from all vehicle surfaces if surface is used for accessory installation.
Safety Notes
- Check that all work practices comply with safety standards.
- Please wear appropriate clothing and use safety equipment.
Fitting Time
45 minutes
Parts Supplied
A B C D E F
G H I J K L
M N O
Cable guide cord x 1
Dash camera wire
harness x 1 Cable ties x 18
Dash camera
module x 1 End cap x 1 Micro SD card x 1
Protection tape x 3
(NO TUSED)
Harness tape x 2
Wire harness clip x 1
(NOT USED) Blue splice connector,
red wire (0.3) x 1
Blue splice connector,
yellow wire (0.3) x 1
White splice connector,
red wire (0.85)
x 1
(NOT USED)
Alcohol wipe x 1
White splice connector,
yellow wire (0.85) x 1
(NOT USED) Owner Manual

PRADO
F
I
Do
c
No
:
PZQ85
-
33270F
I
-
Issue
:
2
-
17/09
/18
Pag
e
3
o
f
23
JUNE 2018 PRODUCTION ONWARDS
Part No: PZQ85-33270
Tools and Material Required
8mm and 10mm
Rachet
10mm Torque Wrench
(pre-set to 8.5Nm)
Side cutter Plier
Phillip head screw
Trim removal tool
Standard business
card or driver
license or credit
card size paper
(55mm x 85mm)

PRADO
F
I
Do
c
No
:
PZQ85
-
33270F
I
-
Issue
:
2
-
17
/09
/18
Pag
e
4
o
f
23
JUNE 2018 PRODUCTION ONWARDS
Part No: PZQ85-33270
Step 1
• Disconnect the negative battery terminal.
Step 2
• Remove left hand side instrument cluster
panel as shown.
Step 3
• Remove left hand side under cover as
shown.
Always refer to the vehicle’s
Workshop Manual when
removing vehicle components.

PRADO
F
I
Do
c
No
:
PZQ85
-
33270F
I
-
Issue
:
2
-
17
/09
/18
Pag
e
5
o
f
23
JUNE 2018 PRODUCTION ONWARDS
Part No: PZQ85-33270
Step 4
• Remove left hand side front console
cover.
Step 5
• Remove left hand side front door scuff
plate as shown.
Step 6
• Remove left hand side cowl side trim as
shown.

PRADO
F
I
Do
c
No
:
PZQ85
-
33270F
I
-
Issue
:
2
-
17
/09
/18
Pag
e
6
o
f
23
JUNE 2018 PRODUCTION ONWARDS
Part No: PZQ85-33270
Step 7
• Remove left hand side instrument side
panel as shown.
Step 8
•
Remove indash cluster panel as shown.
Step 9
•
Remove glove box as shown.
Step 10
•
Remove left hand side register as shown.

PRADO
F
I
Do
c
No
:
PZQ85
-
33270F
I
-
Issue
:
2
-
17
/09
/18
Pag
e
7
o
f
23
JUNE 2018 PRODUCTION ONWARDS
Part No: PZQ85-33270
Step 11
• Remove left hand side assist grip.
• Remove left hand side A-Pillar panel as
shown.
Step 12
•
Remove heat control panel as shown.
Step 13
•
Remove sat nav unit as shown.

PRADO
F
I
Do
c
No
:
PZQ85
-
33270F
I
-
Issue
:
2
-
17
/09
/18
Pag
e
8
o
f
23
JUNE 2018 PRODUCTION ONWARDS
Part No: PZQ85-33270
Step 14
•
Remove instrument lower panel left hand
side.
Step 15
• Remove instrument lower switch panel
right hand side as shown.
Step 16
•
Remove meter cluster as shown.

PRADO
F
I
Do
c
No
:
PZQ85
-
33270F
I
-
Issue
:
2
-
17
/09
/18
Pag
e
9
o
f
23
JUNE 2018 PRODUCTION ONWARDS
Part No: PZQ85-33270
Step 17
• Remove combination meter as shown.
• Remove all connectors on the
combination meter.
Step 18
• Untighten the adjustment screw of the
Dash camera
• Adjust the camera lens position to the 3rd
mark from the left as per instruction
Step 19
• Install the dash camera end cap

PRADO
F
I
Do
c
No
:
PZQ85
-
33270F
I
-
Issue
:
2
-
17
/09
/18
Pag
e
10
o
f
23
JUNE 2018 PRODUCTION ONWARDS
Part No: PZQ85-33270
STEP 20 TO STEP 22 IS FOR VEHICLE WITHOUT RAIN SENSOR (for vehicle with rain
sensor go straight to step 23)
Step 20
• Prepare 3 harness tape (40mm x 80mm).
• Cover the dash camera wire as shown.
Step 21
Prepare fitting template A and adjust the
template to the roof headliner edge and
Toyota Safety Sense sensor as shown.
Use sticky tape to hold the template.
Prior to installing, clean inside of
the windscreen in the area to be
installed using alcohol wipe
cleaner

PRADO
F
I
Do
c
No
:
PZQ85
-
33270F
I
-
Issue
:
2
-
17
/09
/18
Pag
e
11
o
f
23
JUNE 2018 PRODUCTION ONWARDS
Part No: PZQ85-33270
Step 22
Peel out the adhesive tape on the dash
camera.
Stick the dash camera, by adjusting it to the
template next to “arrow” mark as shown.
Remove the fitting template when the dash
camera attached on the screen.
Please see the side view for the installation
reference.
GO DIRECTLY TO STEP 28

PRADO
F
I
Do
c
No
:
PZQ85
-
33270F
I
-
Issue
:
2
-
17
/09
/18
Pag
e
12
o
f
23
JUNE 2018 PRODUCTION ONWARDS
Part No: PZQ85-33270
STEP 23 TO STEP 27 IS FOR VEHICLE WITH RAIN SENSOR (for vehicle without rain
sensor go straight to step 28)
Step 23
• Prepare standard business card or driver
license size paper (55mm width and 85
to 90mm length)
• Take wire measurement 80mm (+/- 5mm)
from dash camera module.
• From 80mm length, start making wire
loops using standard driver license or
credit card size paper (55mmx 65mm).
• Make 3 loops
Step 24
• Remove the paper from the wire loops.
• Cable tie the middle of the wire loops.
• Make sure the cable tie is tight.

PRADO
F
I
Do
c
No
:
PZQ85
-
33270F
I
-
Issue
:
2
-
17
/09
/18
Pag
e
13
o
f
23
JUNE 2018 PRODUCTION ONWARDS
Part No: PZQ85-33270
Step 25
• Prepare 2 harness tape (40mm x 80mm)
• Cover the dash camera wire next to wire
loop as shown.
Step 26
Prepare fitting template B and adjust the
template to the roof headliner edge and
rain sensor as shown.
Use sticky tape to hold the template.
Step 27
Peel out the adhesive tape on the dash
camera.
Stick the dash camera, by adjusting it to
the template next to “arrow” mark as
shown.
Remove the fitting template when the
dash camera attached on the screen.
Prior to installing, clean inside of
the windscreen in the area to be
installed using alcohol wipe
cleaner

PRADO
F
I
Do
c
No
:
PZQ85
-
33270F
I
-
Issue
:
2
-
17
/09
/18
Pag
e
14
o
f
23
JUNE 2018 PRODUCTION ONWARDS
Part No: PZQ85-33270
Step 28
• Route the dash camera wire inside the roof
headliner
• Prepare the cord guide and measure the
length from the larger end to the dash
camera
• Mark the desire length.
Please see the side view and top view of
the cord guide installation for reference.
Step 29
After the measuring, cut the adjusted
length of the cord guide.

PRADO
F
I
Do
c
No
:
PZQ85
-
33270F
I
-
Issue
:
2
-
17
/09
/18
Pag
e
15
o
f
23
JUNE 2018 PRODUCTION ONWARDS
Part No: PZQ85-33270
Step 30
• Insert the Dash camera wire into the cord
guide
• Install the cord guide to the roof
headliner as shown.
Step 31
• Route dash camera wire to left hand side A
pillar area
Step 32
• Cable tie the dash camera wire to the
existing vehicle wire.
Do not cable tie vehicle water
hose

PRADO
F
I
Do
c
No
:
PZQ85
-
33270F
I
-
Issue
:
2
-
17
/09
/18
Pag
e
16
o
f
23
JUNE 2018 PRODUCTION ONWARDS
Part No: PZQ85-33270
Step 33
• Apply harness tape on to the dash camera
wire to protect from sharp edges
• Pass through the wire to the glove box area
Step 34
• Route the wire to the glovebox area
• Cable tie the wire on to the vehicle
reinforcement bar.
• Bundle and cable tie the excess wire on
the right hand side of the reinforcement
bar as shown.
• Make sure the inter connection
connector is in reachable.
Step 35
• At the combination meter area, locate 40
pin combination meter connector.
• Peel the harness tape to get easy access
to the wire signal.

PRADO
F
I
Do
c
No
:
PZQ85
-
33270F
I
-
Issue
:
2
-
17
/09
/18
Pag
e
17
o
f
23
JUNE 2018 PRODUCTION ONWARDS
Part No: PZQ85-33270
Step 36
• Locate Battery signal (pin 21, light blue wire)
and IG signal ( Pin 22, red wire) on the
combination meter connector
Step 37
Battery signal installation
Prepare yellow wire Blue Splice connector.
Splice yellow wire of the Blue Splice
connector using Black Splice connector
yellow wire
Locate the vehicle Battery signal (light blue
wire pin no 21)
Splice the vehicle Battery signal using Blue
Splice connector with yellow wire.
The connector view is from wire
side
The connector view is from wire
side

PRADO
F
I
Do
c
No
:
PZQ85
-
33270F
I
-
Issue
:
2
-
17
/09
/18
Pag
e
18
o
f
23
JUNE 2018 PRODUCTION ONWARDS
Part No: PZQ85-33270
Step 38
IG signal installation
Prepare red wire Blue Splice connector.
Splice red wire of the Blue Splice connector
using Black Splice connector red wire
Locate the vehicle Battery signal (Red wire
pin no22)
Splice the vehicle IG signal using Blue Splice
connector with red wire.
Step 39
•
Cable tie the wire to the existing vehicle
harness.
• Re tape the exposed harness with PVC
tape.
The connector view is from wire
side

PRADO
F
I
Do
c
No
:
PZQ85
-
33270F
I
-
Issue
:
2
-
17
/09
/18
Pag
e
19
o
f
23
JUNE 2018 PRODUCTION ONWARDS
Part No: PZQ85-33270
Step 40
• Route the dash camera harness (power
cable side) to glovebox area through the
centre console area.
• Cable tie the wire on the existing vehicle
harness.
Step 41
Ground signal installation
• Locate vehicle ground signal near the
vehicle reinforcement bar as shown.
• Loosen the vehicle ground terminal’s bolt.
• Insert the dash camera ground terminal.
• Tighten back the bolt.
• Cable tie the excess wire on the existing
vehicle harness on the right hand side of
the glovebox area.
• Make sure the interconnection connector is
reachable.
Re-install bolt to 8.5N.m.

PRADO
F
I
Do
c
No
:
PZQ85
-
33270F
I
-
Issue
:
2
-
17
/09
/18
Pag
e
20
o
f
23
JUNE 2018 PRODUCTION ONWARDS
Part No: PZQ85-33270
Step 42
• Connect module side and power side
interconnection connector.
Step 43
Dash Camera Initial Setting
1) Insert the Micro SD card into the Dash Camera.
2) Re connect the battery
3) Take the vehicle outside and park in open area to get
proper GPS signal.
4) Turn off the power (ACC OFF) and wait until the Dash
Camera LED light is off (for about 1 minute)
5) Perform the calibration setting. Press and hold “Action”
button and turn the vehicle engine ON.
6) The Dash Camera will start the booting process.
When booting process completed there will be a double
high tone “beep” sound and green LED light will switch ON.
Then release the “Action” button.
If there is no “beep” sound, repeat step 4) – 6) again.
7) Switch OFF the vehicle engine, and wait until the Dash
Camera LED light is OFF (for about 1 minute).
8) Start the vehicle engine again
Check the error light. If the error light is still ON, repeat step 7)
again. Error light will switch OFF when GPS signal acquired.
Refit all removed parts and secure all fasteners to the
Service Manual torque specifications.
Reprogram all radio stations and clock settings by
referring to the vehicle's owner manual.
Please place the owner manual in the glove box
after installation is completed.
Re-connect battery terminal.
Battery Post terminal to be torqued to 5.5Nm +/- 2Nm
Other manuals for PZQ85-33270
1
Table of contents
Other Toyota Dashcam manuals

Toyota
Toyota PK6A3-33HT1 User manual

Toyota
Toyota PZQ85-33270 Install guide

Toyota
Toyota PT949-34220 User manual

Toyota
Toyota N656 User manual

Toyota
Toyota PZQ90-89011 User manual

Toyota
Toyota 2.0 Series User manual

Toyota
Toyota VENZA PT949-08210 User manual

Toyota
Toyota PT949-34222 User manual

Toyota
Toyota CAMRY PT949-08210 User manual