Toyota VENZA PT949-08210 User manual

TOYOTA VENZA 2021 - DASHCAM (Digital Video Recorder)
Preparation
Page 1 of 11 pages
Issue: D 4/14/2021
DIO
Part Number: PT949-08210 (Dash Cam)
PT949-48210 (Y-Harness)
Kit Contents
Item #
Quantity Reqd.
Description
1
1
Dashcam Main Unit
4
1
Window Mounting Plate
5
2
Foam Tape
6
4
Cable Ties
7
1
Quick Start Guide
1
1
Y-Harness
Hardware Bag Contents
Item #
Quantity Reqd.
Description
1
2
3
Additional Items Required For Installation
Item #
Quantity Reqd.
Description
1
2
Conflicts
None
Recommended Tools
Personal & Vehicle
Protection
Notes
Seat protection
Dash protection
Special Tools
Notes
Installation Tools
Notes
Panel Tool
Socket Wrench
With 10mm socket
Torque Wrench
With 10mm socket
Special Chemicals
Notes
VDC approved cleaner
To clean windshield
General Applicability
Applicable to XLE, Limited models
Recommended Sequence of Application
Item #
Accessory
1
Dashcam (PT949-08210)
2
Y-Harness (PT949-48210)
3
*Mandatory
Vehicle Service Parts (may be required for reassembly)
Item #
Quantity Reqd.
Description
1
2
3
Legend
STOP: Damage to the vehicle may occur. Do not
proceed until process has been complied with.
OPERATOR SAFETY: Use caution to avoid risk of
injury.
CAUTION:
A process that must be carefully observed
in order to reduce the risk of damage to the
accessory/vehicle and to ensure a quality installation.
TOOLS & EQUIPMENT:
Used in Figures calls out the
specific tools and equipment recommended for this
process.
REVISION MARK: This mark highlights a change in
installation with respect to previous issue.
SAFETY TORQUE: T
his mark indicates that torque is
related to safety.

TOYOTA VENZA 2021 - DASHCAM (Digital Video Recorder)
Procedure
Page 2 of 11 pages
Issue: D 4/14/2021
DIO
Care must be taken when installing this accessory to ensure damage does not occur to the vehicle. The installation of this
accessory should follow approved guidelines to ensure a quality installation.
These guidelines can be found in the "Accessory Installation Practices" document.
This document covers such items as:
•Vehicle Protection (use of covers and blankets, cleaning chemicals, etc.).
•Safety (eye protection, rechecking torque procedure, etc.).
•Vehicle Disassembly/Reassembly (panel removal, part storage, etc.).
•Electrical Component Disassembly/Reassembly (battery disconnection, connector removal, etc.).
Please see your Toyota dealer for a copy of this document.
1. Protect Vehicle and Disconnect Battery
(a) Protect the bumper before starting.
(b) The engine components and coolant may be
hot.
(c) Check the kit for contents or damage.
(d) Locate the Battery service hole cover on the
passenger side of the cargo area and
disengage the clips circled (Fig. 1-1).
(e) Remove battery negative terminal (Fig. 1-2).
CAUTION: Do NOT touch the positive (+)
terminal with
any tool during removal.
Fig. 1-1
Fig. 1-2
10 mm wrench

TOYOTA VENZA 2021 - DASHCAM (Digital Video Recorder)
Procedure
Page 3 of 11 pages
Issue: D 4/14/2021
DIO
2. Apply Vehicle Protection.
(a) Apply vehicle protection to front seats, dash
and center console (Fig. 2-1).
3. Install the Windshield Base Plate
STOP: The front windshield must be at
least 50°F (10°C).
(a) Using approved cleaner, clean the area
around the TSS cover.
(b) Using scissors, cut the template at the back
of these instructions as indicated.
(c) Slip the template under the lower left edge of
the TSS cover. (Fig. 3-1) Align to the
indicated line, affix the template to the
windshield with tape.
(d) Take film off adhesive and place base plate
onto in the indicated area. Hold firmly for 10
seconds for adhesive to apply to windshield.
4. Remove Roof Console
(a) Remove the roof console by pulling down
firmly on the rear edge.Continue to rotate
console down to disengage the front clips
(Fig. 4-1).
(1) A hooked panel tool may be used to
pull down on the console.
CAUTION: Do NOT pry against the
headliner.
Fig. 2-1
Fig. 3-1
Fig. 4-1

TOYOTA VENZA 2021 - DASHCAM (Digital Video Recorder)
Procedure
Page 4 of 11 pages
Issue: D 4/14/2021
DIO
(b) Once fully detached, disconnect roof console
(Fig. 4-2).
5. Remove the TSS Cover
(a) Rotate the mirror down to gain adequate
clearance (Fig. 5-1).
(b) Remove the 2-piece mirror cover plate (Fig.
5-2).
(1) Pull down on the upper edge of the
plate to disengage the clips (Fig. 5-3
circled in red) This can be done with
a hooked panel tool.
(2) Alternatively, you reach into and the
upper edge of the cover with your
fingers.
Fig. 4-2
Fig. 5-1
Fig. 5-2

TOYOTA VENZA 2021 - DASHCAM (Digital Video Recorder)
Procedure
Page 5 of 11 pages
Issue: D 4/14/2021
DIO
(3) Slide the cover up and back to
disengage the lower hooks (Fig. 5-3
circled in yellow).
(c) Remove the TSS cover by sliding the cover
down (Fig. 5-4) from the TSS cover base.
6. Install the Y-Harness
(a) Disconnect the mirror from the vehicle wire
harness by pushing in on the release tab (Fig.
6-1).
(b) Install the Y-harness between the mirror
connector and the vehicle mirror wire
harness connector.
(1) Pull the whole harness into headliner.
Fig. 5-4
Fig. 5-3
Fig. 6-1

TOYOTA VENZA 2021 - DASHCAM (Digital Video Recorder)
Procedure
Page 6 of 11 pages
Issue: D 4/14/2021
DIO
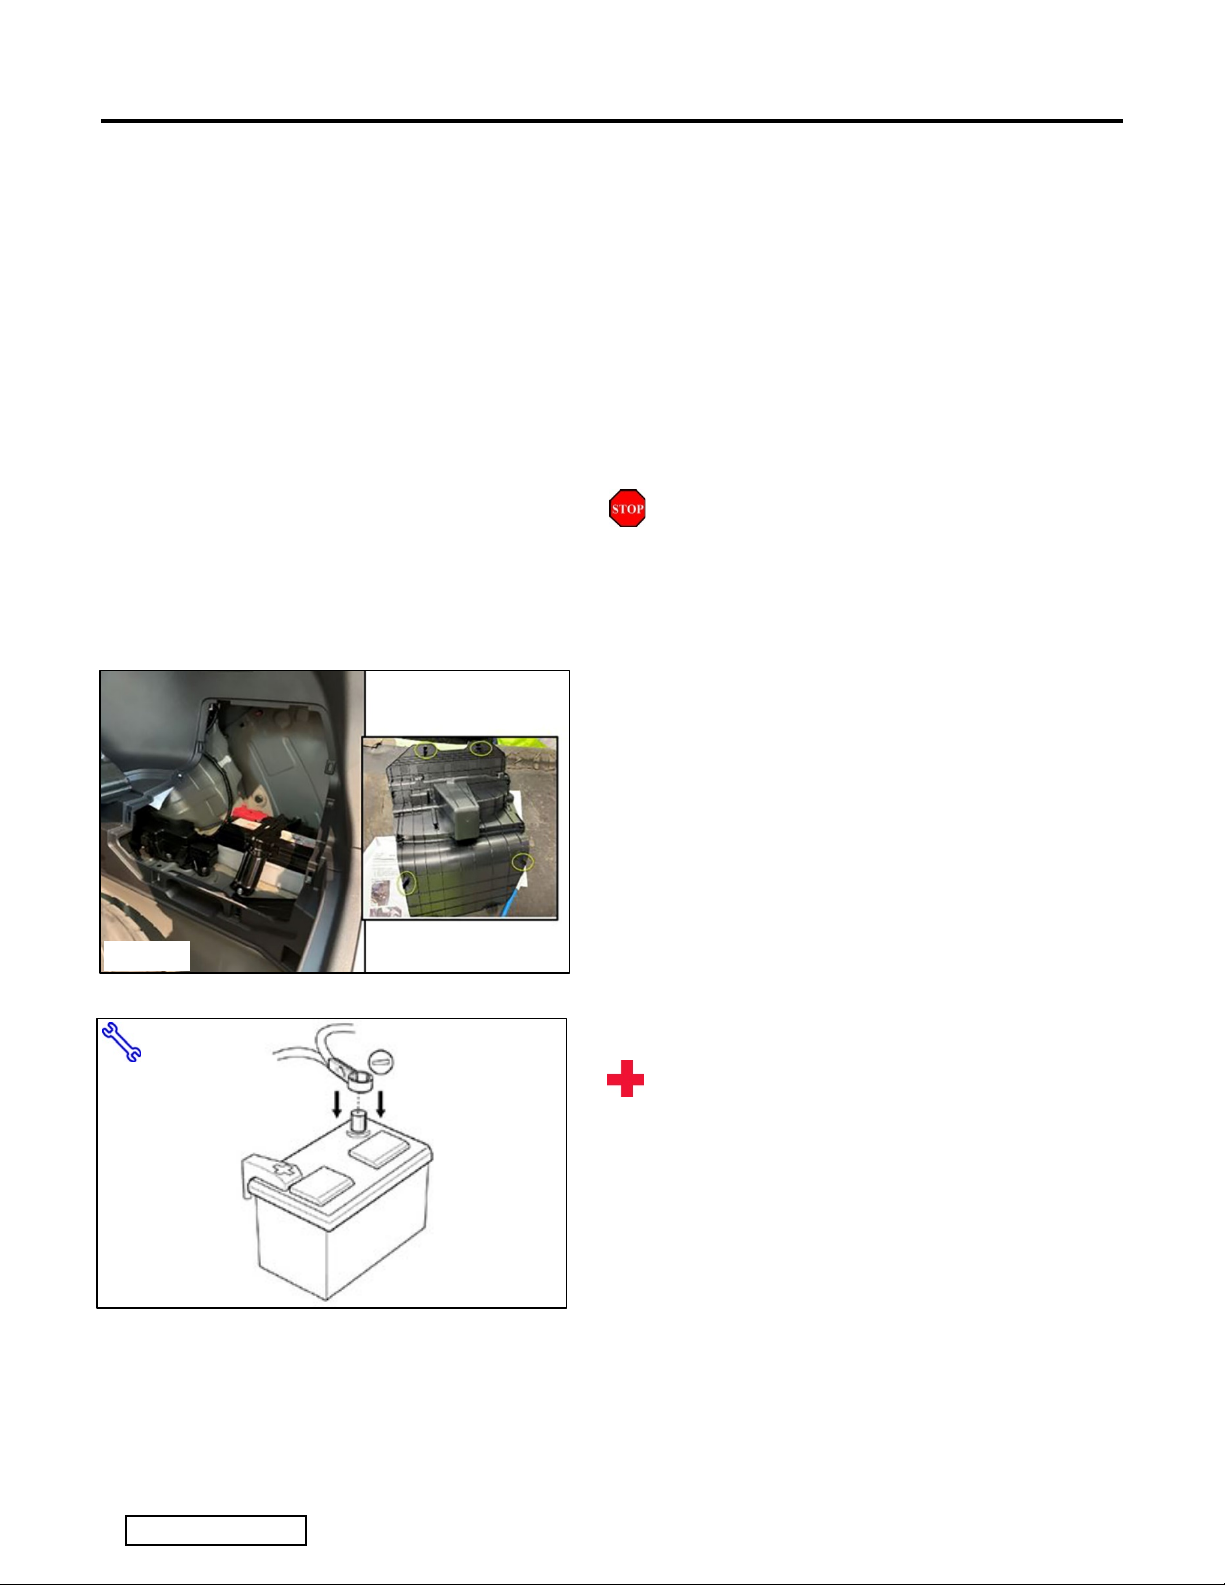
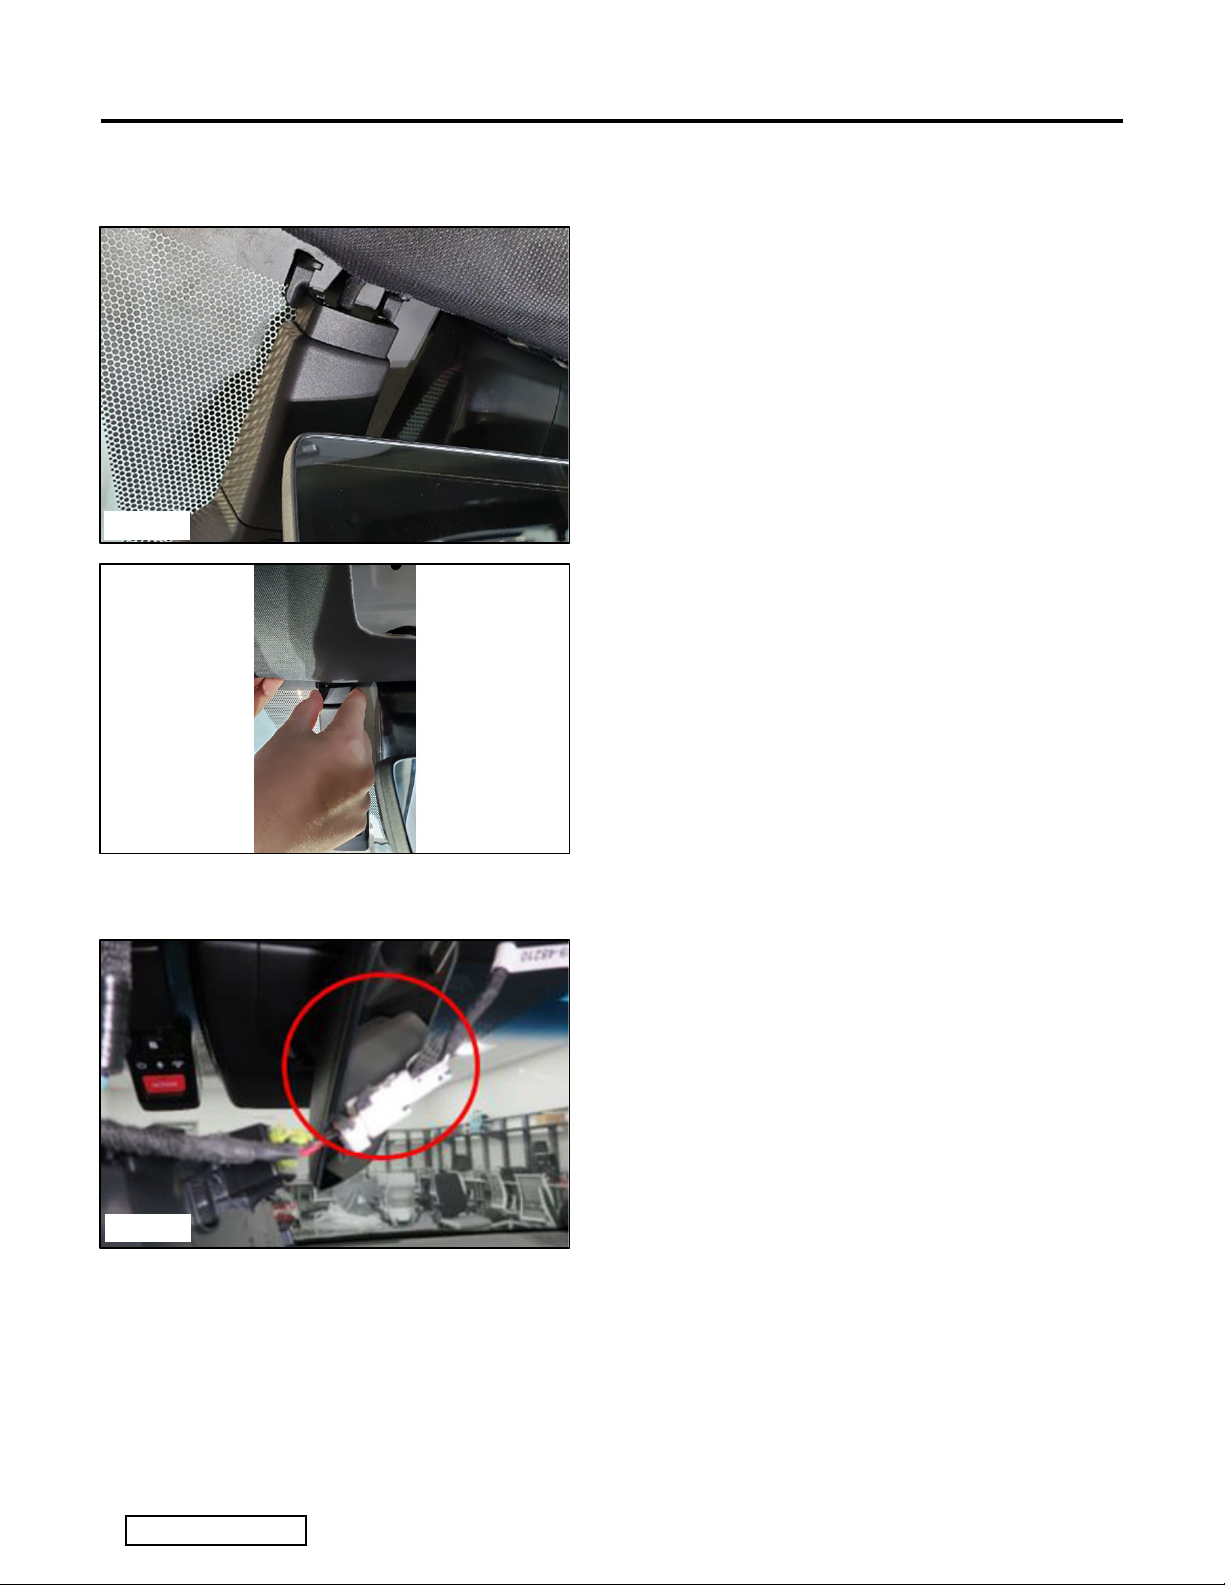
(2) Insert the black Y-Harness male
connector into the female vehicle
connector. (Fig. 6-2 and 6-3)
NOTE: For XLE models, there is only 1
connecter (Fig 6-2). For Limited models,
there are 2 connectors (Fig 6-3). Connect
to the black female vehicle connector that
is circled in dotted yellow.
(3) Insert the male mirror connector into
the Y-Harness black female
connector and wrap with foam tape
(Fig. 6-2).
(4) Pull slack into headliner.
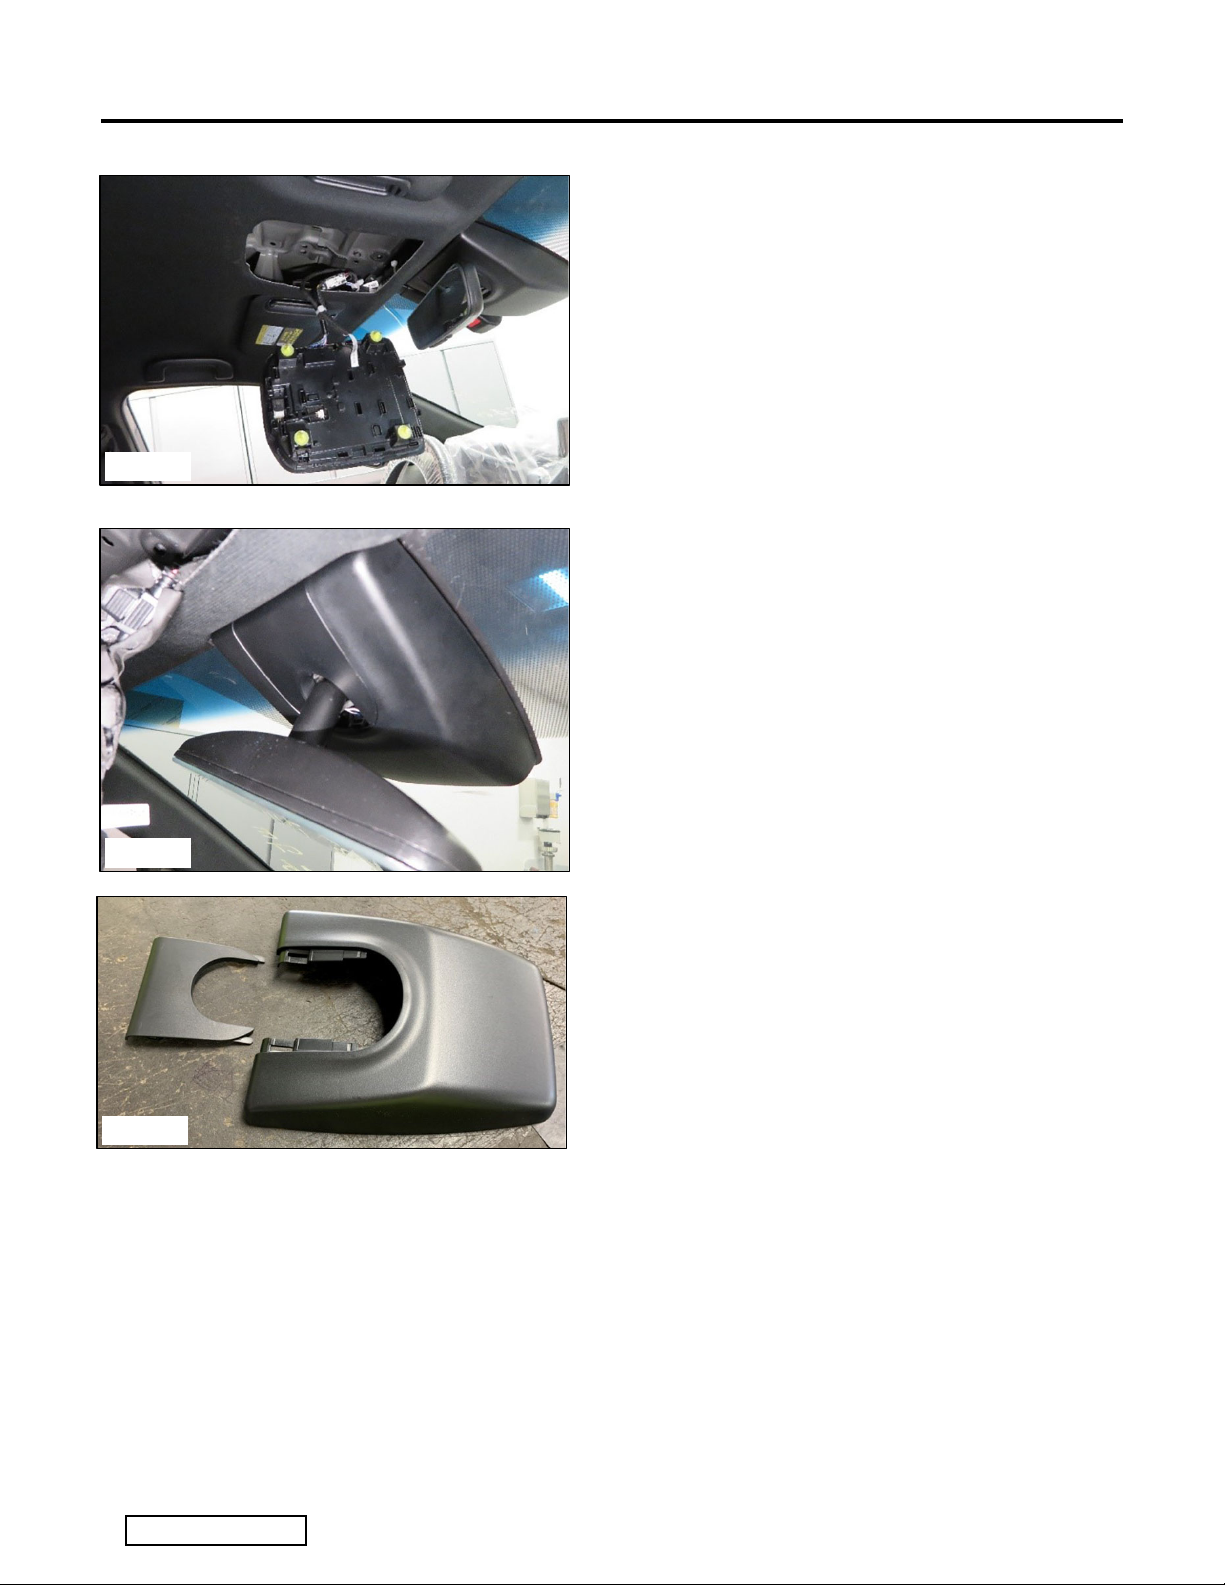
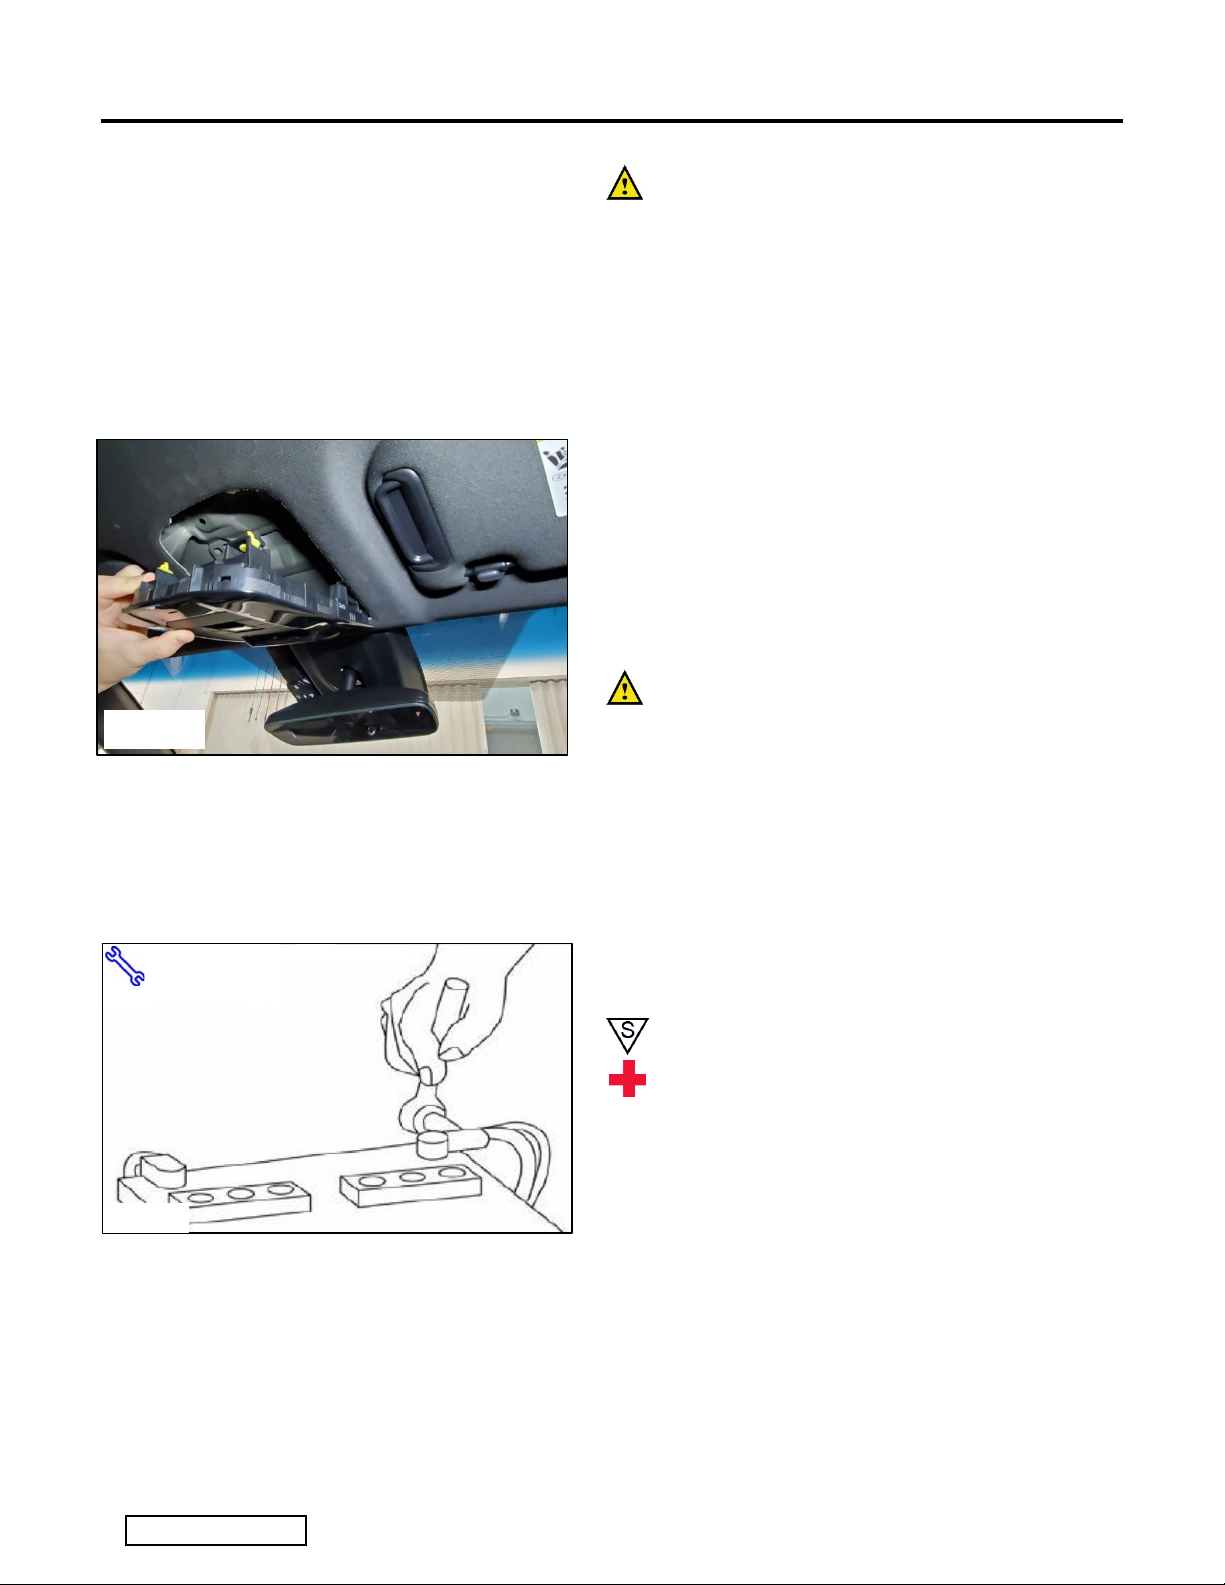
7. Reinstall the TSS Cover
(a) Reinstall the TSS cover by pushing up on
cover along the windshield to engage the
mounting clips into the cover base (Fig. 7-1).
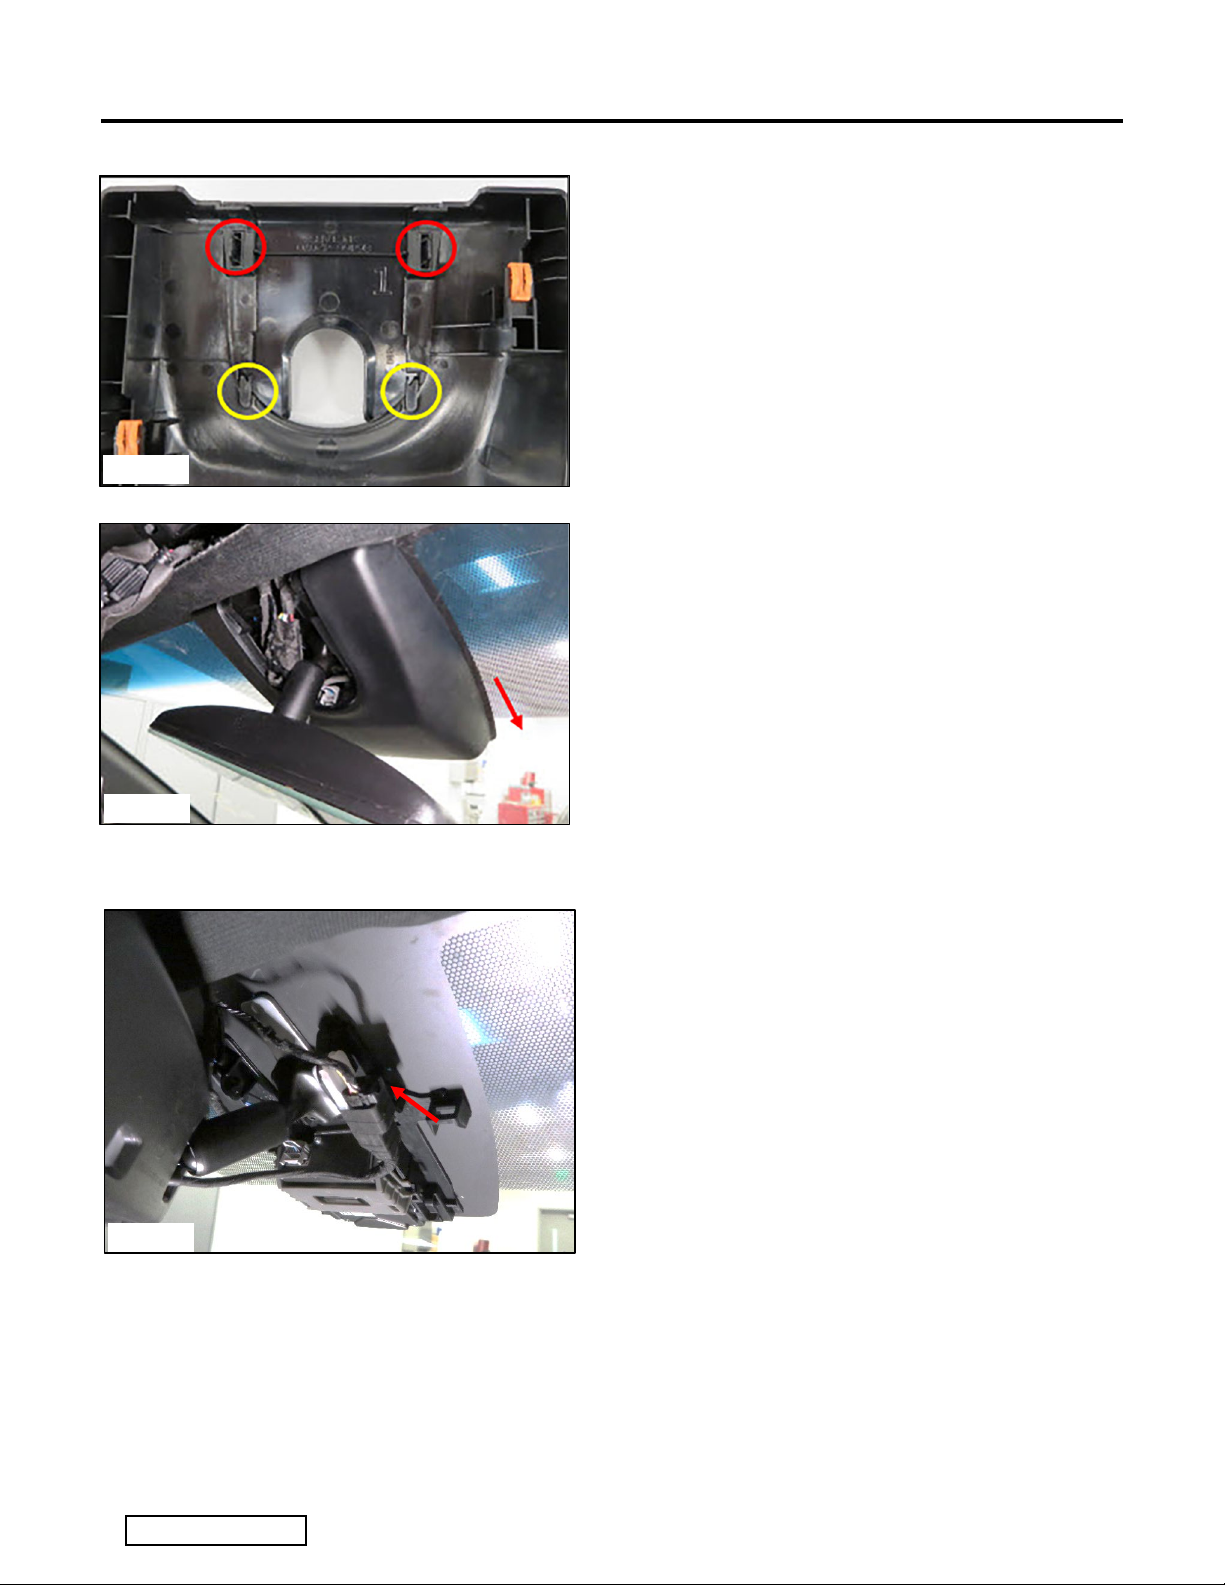
(b) Reinstall the mirror cover plate by hooking
the front hooks onto the edge of the TSS
cover mirror opening and pushing up to
engage the mounting clips into the TSS
cover.
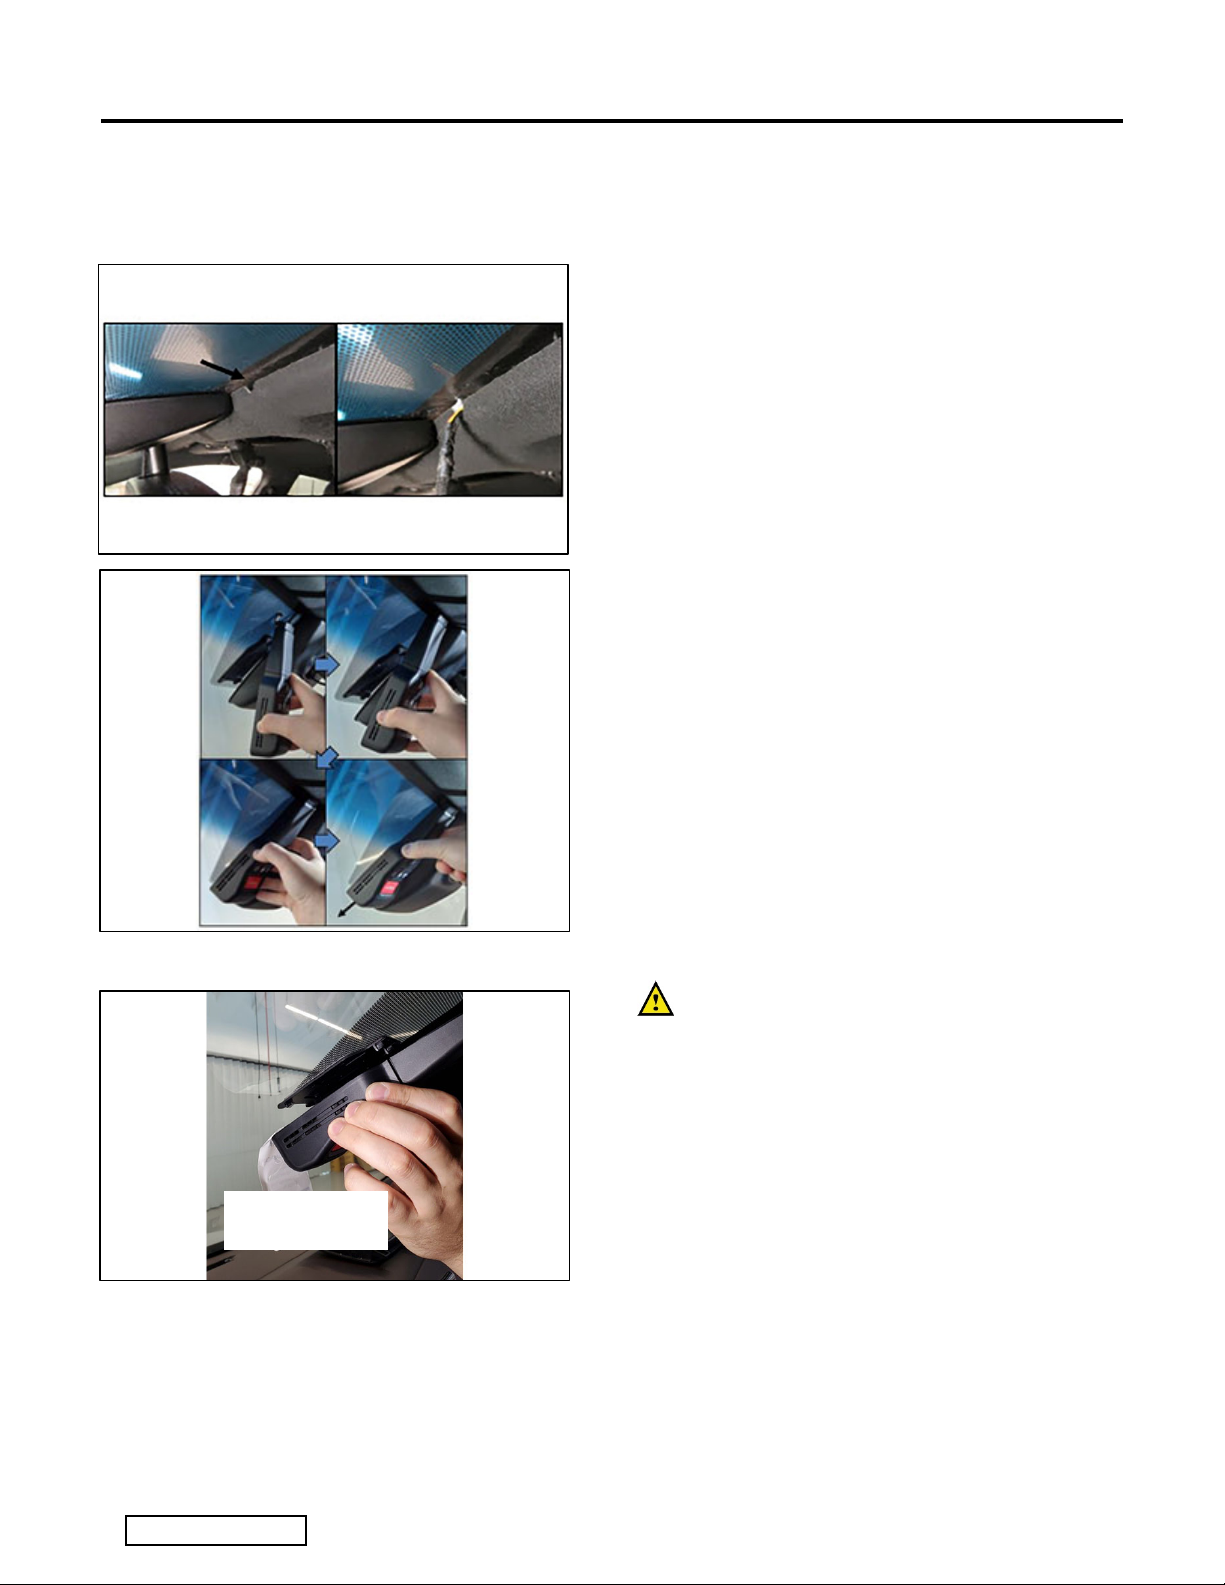
8. Affix Dashcam to base plate and route
wire harness through headliner
NOTE: The hang tag that is present with
the Dash Cam is only to be removed by the
end customer. Because the Dash Cam
always turns on with ignition, the hang tag
is meant to block recording while the
vehicle is processed prior to customer
drive away. Do not remove the hang tag.
Fig. 6-3
Fig. 7-1
Fig. 6-2
Female vehicle connector

TOYOTA VENZA 2021 - DASHCAM (Digital Video Recorder)
Procedure
Page 7 of 11 pages
Issue: D 4/14/2021
DIO
(a) From the driver side of the windshield, locate
the notch in the front edge of the headliner.
(b) Route the Dash Cam pigtail through the
notch and into the headliner (Fig. 8-1).
(c) Hook the Dashcam wire extension cover
hooks into the headliner (Fig. 8-2).
(d) Swing Dashcam unit onto the base plate.
Gaps all around the dashcam unit and
windshield should be even (Fig. 8-2).
(e) Press down on dashcam unit to secure to base
plate. Dashcam unit will move slightly as it
fits to its final position (Fig. 8-2).
NOTE: Do not remove the hang tag that is
present with the Dash Cam. Keep hang tag
in front of the Dash Cam, between the
windshield and the Dash Cam (Fig. 8-3).
Fig. 8-1
Fig. 8-2
Fig. 8-3
HANG TAG
Do NOT Remove

TOYOTA VENZA 2021 - DASHCAM (Digital Video Recorder)
Procedure
Page 8 of 11 pages
Issue: D 4/14/2021
DIO
9. Hook harness protector under headliner
(a) Use one hand to slightly pull headliner down
and use the other hand to extend the harness
protector. Hook the protector under the
headliner (Fig. 9-1 and Fig. 9-2).
10. Route/Bundle Wire Harness
(a) Pull the white Y-Harness connector through
the headliner opening and connect to the
white Dash Cam connector (Fig. 10-1).
Fig. 9-1
Fig. 9-2
Fig. 10-1

TOYOTA VENZA 2021 - DASHCAM (Digital Video Recorder)
Procedure
Page 9 of 11 pages
Issue: D 4/14/2021
DIO
(b) Pull all slack through the headliner opening
and form a loop (Fig. 10-2).
(c) Wrap connector pair with foam tape
(Fig. 10-2).
(d) Wrap both in-line fuses with foam tape
(Fig. 10-2).
(e) Orient the wires roughly as shown. Take note
of which wire segment belongs to which part.
(f) Bundle the wires roughly as shown (Fig. 10-
3).
(g) Continue to gather wires into a smaller
bundle (Fig. 10-4).
NOTE: Keep the Y-harness on top of the
Dashcam harness.
(h) Wire tie the bundle and fit into open
headliner cavity. Take care not to cause
bulging in the headliner (Fig. 10-5).
NOTE: Some adjustment to the bundle may
be necessary to fit bundle without bulging the
headliner.
Fig. 10-2
Fig. 10-3
Y-harness
Connector pair
Dashcam harness
Fig. 10-4
Fig. 10-5

TOYOTA VENZA 2021 - DASHCAM (Digital Video Recorder)
Procedure
Page 10 of 11 pages
Issue: D 4/14/2021
DIO
NOTE: Do not block access to the indicated
clip hole or else roof console may not attach
correctly.
(i) Clip off extra wire tie length.
11. Reassemble the console
(a) Reconnect roof console connector.
(b) Reinstall roof console (Fig. 11-1).
(1) Engage front hooks of the roof
console into the headliner opening.
Tilt up and push upward to engage
the clips into the roof.
NOTE: Make sure to align clip holes before
pushing up to avoid damage to clips.
(c) Place the Quick Start Guide in the Glove
Box.
12. Reconnect Battery.
(a) Reconnect the negative battery cable
(Fig. 12-1).
Torque: 5.4 N•m (48 in•lbsf)
CAUTION: Do not touch the positive terminal
with any tool.
13. Reinstall Battery Cover and Remove
Protective Covering
(a) Reinstall battery service hole cover in step 1c
(b) Remove and discard vehicle protective
covering
Fig. 12-1
10mm socket & torque wrench
Fig. 11-1

TOYOTA VENZA 2021 - Dashcam (Digital Video Recorder)
Checklist - these points MUST be checked to ensure a quality installation.
Check: Look For:
Page 11 of 11 pages
Issue: D 4/14/2021
DIO
Accessory Function Checks
Verify parts
Vehicle Startup
Power LEDs light up.
Vehicle Function Checks
Standard exterior lights - low/high beams,
left/right turn signal, emergency signal.
Roof console functions- map lights,
sun/pano roof (if equipped), trunk release,
rear dimming mirrors.
TPMS gauge indicator
Removed items have been discarded &
replaced items are in place
Confirm Dashcam does not emit continuous
beep on vehicle startup. If it does, confirm
SD card is installed.
Confirm standard lighting functions work
properly.
Confirm roof functions work properly.
Prior to TPMS activation and PDS, the
TPMS light may blink when IG is on. After
activation and PDS, the TPMS light should
turn off when IG is on.
Vehicle Appearance Check
After accessory installation and removal of
protective cover(s), perform a visual
inspection.
Ensure no damage (including scuffs and
scratches) was caused during the
installation process.
(For PPO installations, refer to TMNA
Accessory Quality Shipping Standard.)
Confirm windshield template has been
removed from vehicle.
This manual suits for next models
3
Other Toyota Dashcam manuals

Toyota
Toyota PZQ85-33270 Install guide

Toyota
Toyota PK6A3-33HT1 User manual

Toyota
Toyota PT949-34220 User manual

Toyota
Toyota N656 User manual

Toyota
Toyota PZQ90-89011 User manual

Toyota
Toyota PZQ85-33270 Install guide

Toyota
Toyota 2.0 Series User manual

Toyota
Toyota CAMRY PT949-08210 User manual

Toyota
Toyota PT949-34222 User manual