Toyota TVSS IV-S Service manual

TOYOTA MOTOR CORPORATION
Manual Ref. Nr. T4SLSET-2-0
ALARM
TOYOTA VEHICLE SECURITY SYSTEM
Setting Guide
(LHD)
TTVVSSSSIIVV--SS

TABLE OF CONTENTS
(LHD) - 3
Setting Guide TVSS IV-S
Connection and Function Test ..................................................................................................................................................................................... 4
Radar Sensor Sensitivity Check and Adjustment ............................................................................................................................ 8
Glass Breakage Sensor Sensitivity Check and Adjustment ............................................................................................. 10
Selectable Functions .................................................................................................................................................................................................................. 12
Changing the Functions ........................................................................................................................................................................................................ 13
- Arming mode .................................................................................................................................................................................................................... 13
- Status monitor LED flashing ......................................................................................................................................................................... 14
- Piezo buzzer defeat ................................................................................................................................................................................................. 15
- Answer back ...................................................................................................................................................................................................................... 16
- Ignition controlled door lock ........................................................................................................................................................................... 17
How to Verify the Latest Alarm Cause .............................................................................................................................................................. 18
Temporary Override ...................................................................................................................................................................................................................... 19

(LHD) - 4
CONNECTION AND FUNCTION TEST
Setting Guide TVSS IV-S
TESTING MODE
nPREPARATION
1) Check that all connectors and terminals of the fitting kit wiring harnesses (main) and (engine)
are fitted correctly.
2) Reconnect the negative battery cable.
3) Close boot and bonnet completely.
4) Step in the vehicle and make sure that all doors are closed completely.
5) Open all windows and put the dome light switch into the “DOOR” position.
6) Remove the key from the ignition key cylinder and push the “unlock“ button of the remote control.
Ë Indicator lights will flash twice.
7) Insert the key into the ignition key cylinder.
8) Wait for more than 5 seconds.
9) After turning the key to the ACC position, turn the key from the ACC
to the ON position five times (Last position : ON).
ËStatus Monitor LED will illuminate for 30 seconds.
10) While the LED is illuminated :
• Open and close the driver’s door 7 times.
• Turn the key to the LOCK position.
ËLED will flash for 15 seconds.
ËIndicator lights will flash 7 times.
11) While the LED is flashing :
•Remove the key from the ignition key cylinder.
12) Step out of the vehicle and close the driver’s door again.
The system is now ready for testing.
nRADAR SENSOR TEST (if fitted)
13) Wait until the LED stops flashing.
ËStatus Monitor LED will illuminate for 30 seconds.
14) While the LED is illuminating :
• Put your hand through the opening of the window to trigger the radar sensor.
ËIndicator lights will flash once.
(Refer to pages 8 & 9 for radar sensitivity adjustment).
nDOOR SWITCHES TEST
15) Wait till the LED starts flashing again then open and close the driver’s DOOR.
ËIndicator lights will flash once.
16) Test each remaining door (repeating step 15).
nBOOT SWITCH TEST
17) Open and close the BOOT.
ËIndicator lights will flash once.
Verify the connections and functions of TVSS before mounting the TVSS ECU and refitting the removed parts.
Follow all procedures below :
ACC
ON
START
LOCK

(LHD) - 5
Setting Guide TVSS IV-S
nBONNET SWITCH TEST (if fitted)
18) Open and close the BONNET.
ËIndicator lights will flash once.
nREMOTE CONTROL TEST
19) Press the “LOCK”-button of the remote control.
ËIndicator lights will flash once.
ËDoors will lock.
20) Press the “UNLOCK”-button of the remote control.
ËIndicator lights will flash once.
ËDoors will unlock.
nKEY UNLOCK WARNING SWITCH TEST (key detection switch)
21) Step in the vehicle and close the door.
ËIndicator lights will flash once.
22) Insert the key into the ignition key cylinder.
ËIndicator lights will flash once.
nIGNITION SWITCH, DOME LIGHT, SIREN AND HORN TEST
23) Turn the key to the ignition-ON position.
ËIndicator lights will illuminate for 1 second.
ËDome light will illuminate for 1 second.
ËThe horn will sound for 1 second.
nGLASS BREAKAGE SENSOR TEST (If fitted)
24) Close the driver’s door window.
25) Step out of the vehicle and close all doors.
ËIndicator lights will flash once.
26) Tap the driver’s door window with moderate force, by using a coin.
ËIndicator lights will flash once.
(Refer to pages 10 and 11 for Glass Breakage Sensitivity Adjustment.)
nPIEZO BUZZER TEST (if selected see page 12) AND TEST FINISH
27) Step in the vehicle and close all doors.
ËIndicator lights will flash once.
28) Turn the key to the LOCK-position.
ËThe piezo buzzer of the siren will shortly sound.
ËIndicator lights will flash TWICE.
ËStatus monitor LED will stop flashing.

(LHD) - 6
Setting Guide TVSS IV-S
STANDARD MODE
nREMOTE OPERATION
1) Remove the key from the ignition key cylinder and make sure that all doors, boot and bonnet are com-
pletely closed.
2) Press the "LOCK"-button of the remote control once.
ËIndicator lights will flash once.
ËStatus Monitor LED will start flashing.
ËDoors will lock.
3) Push the "UNLOCK" button of the remote control.
ËIndicator lights will flash twice.
ËStatus Monitor LED will stop flashing.
ËDome light will illuminate for 5 seconds.
ËDoors will unlock.
nAUTO-REARMING (AUTO-RELOCK)
4) Press the "UNLOCK"-button of the remote control.
ËIndicator lights will flash twice.
ËStatus Monitor LED will stop flashing.
ËDome light will illuminate for 5 seconds.
ËDoors will unlock.
5) Wait for 30 seconds.
ËIndicator lights will flash once.
ËStatus Monitor LED will start flashing.
ËDoors will lock.
Important notes : a) The system will NOT Auto-rearm (NOT relock) if any of the 4 doors or bonnet
are opened after disarming the system.
b) Sedan models WILL Auto-rearm (relock) after 30 seconds if the boot has been
opened after disarming the system.
nAUTOMATIC (PASSIVE) ARMING
(if selected see page 12)
6) Open the driver’s door window.
7) Close all doors, boot and bonnet completely.
8) Wait for 45 seconds, then ;
ËIndicator lights will illuminate for 2 seconds.
ËStatus Monitor LED will flash continuously.
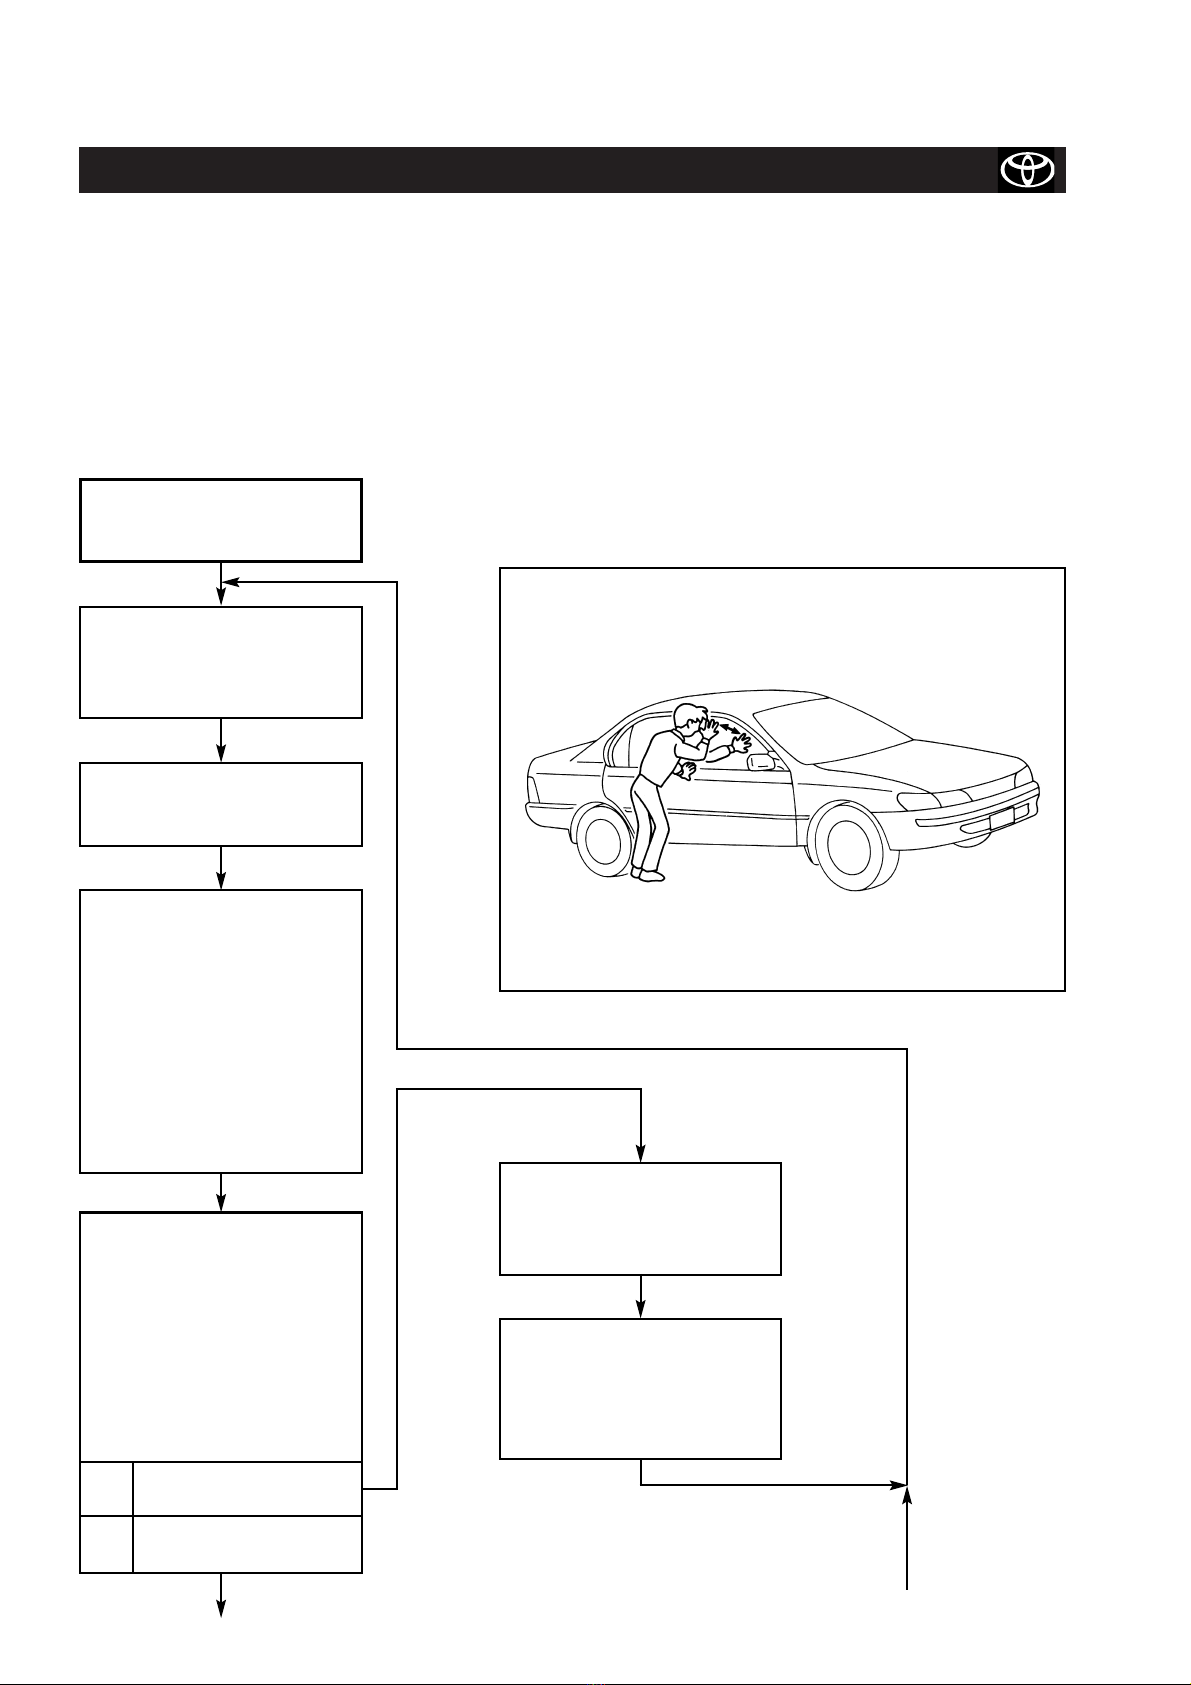
nARMING WITHOUT RADAR SENSOR DETECTION
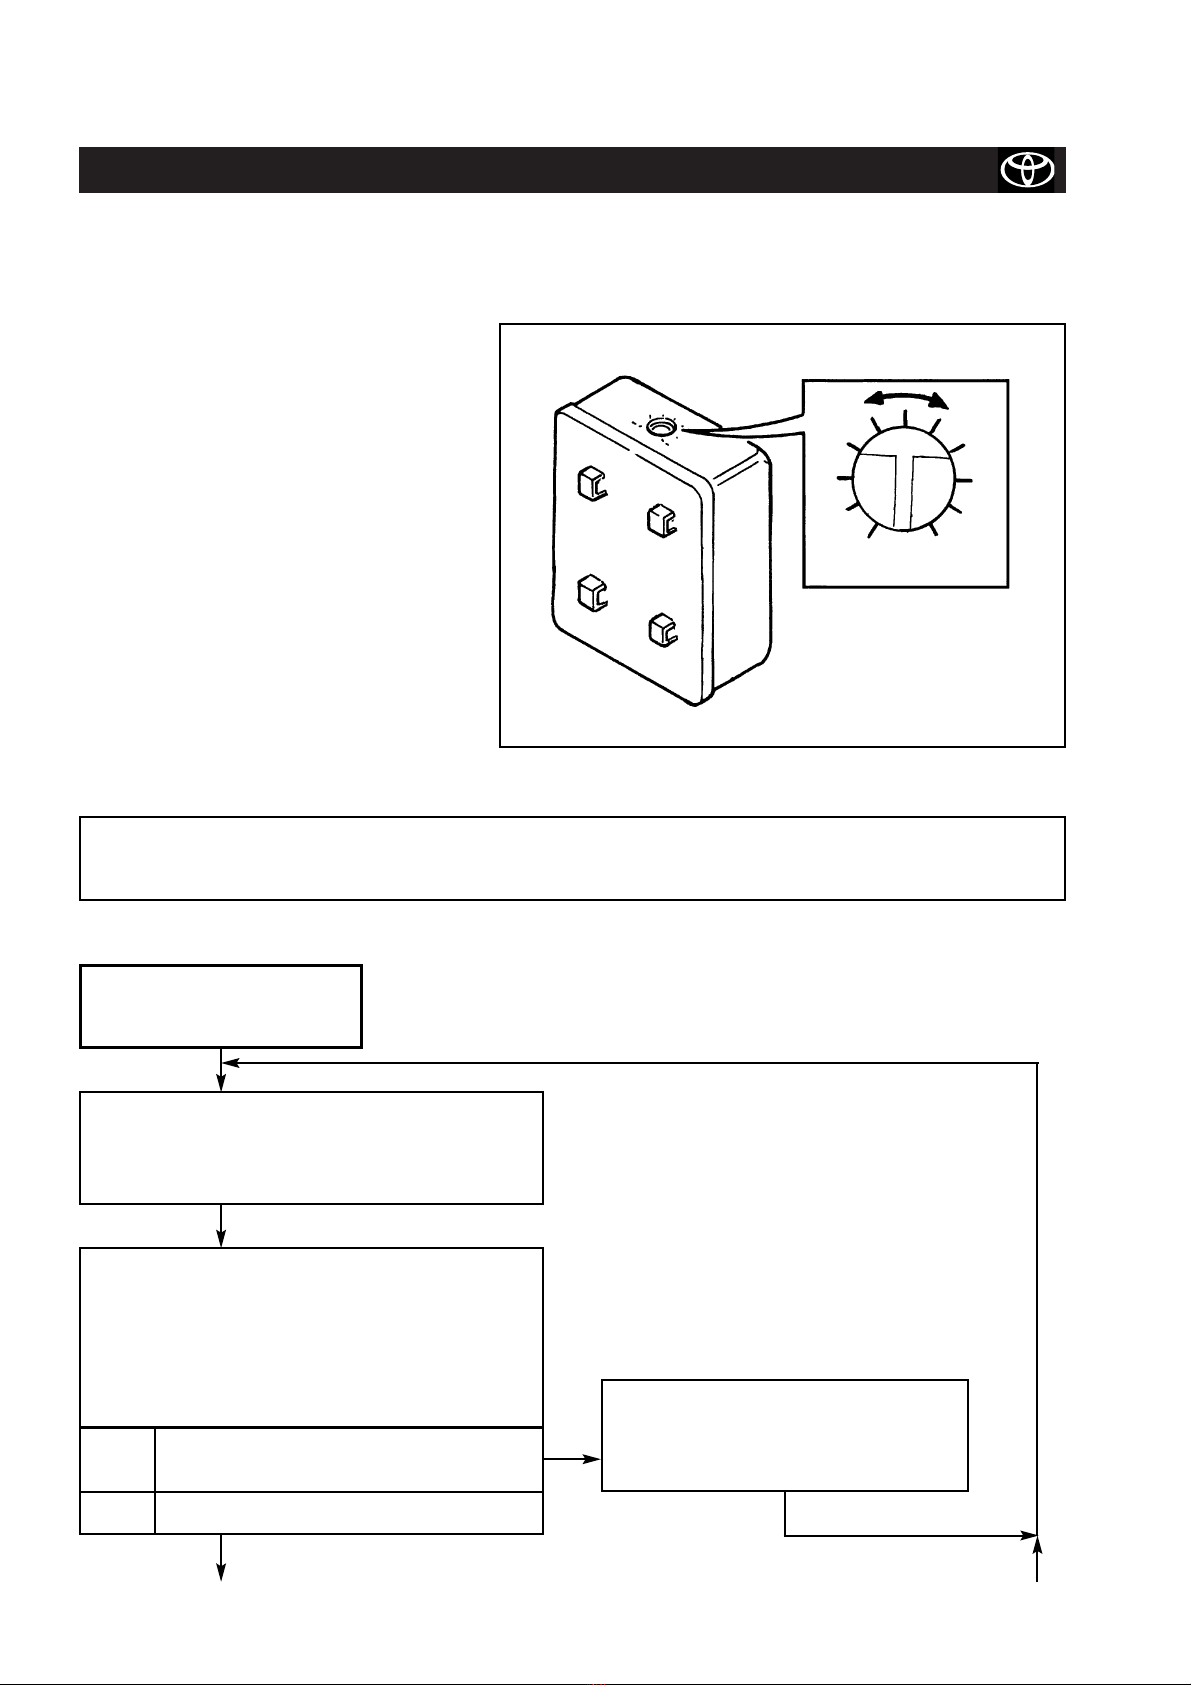
Note : Confirm first that the radar sensor triggers the alarm.
Refer to page 8 & 9 for radar sensor sensitivity adjustment.
9) Open a window.
10) Press the "UNLOCK"-button of the remote control.
ËIndicator lights will flash twice.
ËStatus Monitor LED will stop flashing.
ËDome light will illuminate for 5 seconds.
ËDoors will unlock.
11) Press the “LOCK”-button of the remote control once.
ËIndicator lights will flash once (1 second).
ËStatus Monitor LED will start flashing.
ËDoors will lock.
12) Press the “LOCK”-button of the remote control again within 15 seconds from step 7.
ËIndicator lights will flash once, but this is a longer flash (3 seconds).

(LHD) - 7
Setting Guide TVSS IV-S
13) Wait for 15 seconds.
14) Insert your hand into the vehicle by the open window and wave it widely.
ËNo response.
nALARM AND ALARM MEMORY
15) Press the “LOCK”-button of the remote control once.
ËIndicator lights will flash once.
ËStatus Monitor LED will start flashing.
ËDoors will lock.
16) Open a door by the key method.
ËThe siren (if fitted) will sound for 30 seconds.
ËThe horn will sound for 30 seconds.
ËIndicator lights will flash rapidly for 30 seconds.
ËStatus Monitor LED will illuminate for 30 seconds.
ËDome light illuminates for 30 seconds.
17) After step 13) has finished completely, press the “UNLOCK”-button of the remote control.
ËIndicator lights will flash three times.
ËStatus Monitor LED will stop flashing.
ËDome light will illuminate for 5 seconds.
ËDoors will unlock.
ËThe siren (if fitted) will stop sounding.
ËThe horn will stop sounding.
nDOOR AJAR WARNING (if fitted, see page 12)
Note : This function is a default setting but can be deleted. Refer to page 15 “Piezo defeat”.
18) Open a door.
19) Press the “LOCK”-button of the remote control.
ËThe piezo buzzer of the siren will sound for 15 seconds.
ËDoors will remain unlocked.
nIGNITION CONTROLLED DOOR LOCK (if selected, see page 12)
Note : This function is default ON but can be deleted. Refer to page 17 “Ignition controlled door lock”.
20) Step in the vehicle and close all doors.
21) Insert the key into the ignition key cylinder.
22) Turn the key to the “ON” position.
ËDoors will lock.
Overrule : The door lock will be overruled by operating the “central lock button” or manual door knob operation.
23) Turn the ignition OFF.
ËDoors will unlock.
Remark : If the Ignition is turned ON a second time the “ignition controlled door lock” will NOT operate again.
nWarning for siren disconnection
When the siren is disconnected from the power supply :
(for example vehicle battery disconnection)
a) in armed condition : The siren will start sounding (tampermode) 100 dB.
b) in disarmed condition : The siren will bleep discretely for about 7 seconds.

RADAR SENSOR SENSITIVITY CHECK AND ADJUSTMENT
(from next page)
Yes
Fig. 6
(LHD) - 8
Setting Guide TVSS IV-S
Verify and adjust the radar sensor sensitivity before completing the installation of the TVSS and the refitting of
the removed parts. Follow the procedures below:
PREPARATION
1) Check that all connectors and terminals of the fitting kit wiring harnesses (main) and (engine) are fitted cor-
rectly.
2) Reconnect the negative battery cable.
3) Open all the windows and remove the ignition key.
4) Verify that the trimmer of the radar sensor is at the correct position (see Installation Instructions manual for
the vehicle).
VERIFICATION AND
ADJUSTMENT
1) Push the “LOCK” button
of the remote to arm the
system.
2) Wait for 15 seconds to
get ready for the radar
sensor test.
3) Place your hand very clo-
se to the driver’s window
area. Then wave your
hand sideways across
about 30 cm span seve-
ral times. (The purpose
of this is to simulate a
person’s movement pas-
sing close to the vehicle).
(See figure 6).
4) Is the alarm triggered ?
• Status monitor LED will
illuminate for 30 seconds.
• Dome light will illuminate.
• Indicator lights will flash.
• Siren (if fitted) will sound.
• Horn will sound.
Yes The sensor is too sensitive
and must be adjusted.
No The sensor is not too sen-
sitive.
8) Push the “UNLOCK” but-
ton of the remote once to
stop alarming and disarm
the system.
9) Decrease the sensitivity
of the radar sensor by tur-
ning the trimmer slightly
counterclockwise.
(see figure 7)

(Continue from
previous page)
No
Cap
Radar sensor
Trimmer
Yes
Fig. 7
Fig. 8
Min. Max.
(LHD) - 9
Setting Guide TVSS IV-S
5) Put your hand through
the driver’s window and
then wave your hand
sideways across about
30 cm span several times
(See figure 8).
6) Is the alarm triggered ?
• Status monitor LED will
illuminate for 30 seconds.
• Dome light will illuminate.
• Indicator lights will flash.
• Siren (if fitted) will sound.
• Horn will sound.
No The sensor is too unsensi-
tive and must be adjusted.
Yes The sensor has optimum
sensitivity.
7) Verification and adjust-
ment are over.
Push the “UNLOCK” but-
ton of the remote once to
stop the alarm and dis-
arm the system.
10) Is current scale posi-
tion “Max.” ?
Yes The sensor may be defect.
Please check the sensor.
No Push the “UNLOCK” but-
ton of the remote once to
stop the alarm and disarm
the system. Turn the trim-
mer slightly clockwise to
increase the sensitivity of
the radar. (See figure 7).

GLASS BREAKAGE SENSOR SENSITIVITY CHECK AND ADJUSTMENT
Fig. 9
(Continue to next page) (From next page)
adjustment screw
Yes
No
MIN. MAX.
(LHD) - 10
Setting Guide TVSS IV-S
Verify and adjust the glass breakage sensor sensitivity before completing the installation of the TVSS and the
refitting of the removed parts. Follow the procedures below:
PREPARATION
1) Check that all connectors and terminals
of the fitting kit wiring harnesses (main)
and (engine) are fitted correctly.
2) Reconnect the negative battery cable.
3) Verify that the trimmer of the glass bre-
akage sensor is set at the correct posi-
tion according to the installation instruc-
tions for this vehicle.
4) Close all windows, all doors, boot and
bonnet.
5) Press the “LOCK” button of the remote
to arm the system.
6) Wait for 2 seconds until the status moni-
tor LED starts to flash.
CAUTION: Use caution when performing the next step. Do not tap the window too hard, as this may dama-
ge the glass.
CHECK AND
ADJUSTMENT
1) Tap on the centre of the driver’s window with
moderate force, by using a metal object (coin or
key).
2) Is the alarm triggered ?
- Status monitor LED will illuminate for 30 sec.
- Dome light will illuminate for 30 sec.
- Indicator lights will flash.
- Siren (if fitted) will sound.
- Horn will sound.
Yes The sensor is too sensitive, and must be
adjusted.
No The sensor is not too sensitive.
6) Turn the glass breakage sensor
sensitivity adjustment screw one
position counterclockwise.

Yes
No
(Continue from previous page)
(LHD) - 11
Setting Guide TVSS IV-S
3) Tap on the centre of the glass with slightly
stronger force.
4) Is the alarm triggered ?
No The sensor is too unsensitive, and must
be adjusted.
Yes The sensor has optimum sensitivity.
5) Check and adjustment are over.
Press the “UNLOCK” button of the remote
once to stop the alarm and disarm the sys-
tem.
7) Turn the glass breakage sensor
sensitivity adjustment screw one
scale position clockwise.

(LHD) - 12
Setting Guide TVSS IV-S
SELECTABLE FUNCTIONS
TVSS IV-S has 5 selectable functions. The functions indicated with uare the default settings. To change the
settings refer to “CHANGING THE FUNCTIONS”, page 13.
1) ARMING MODE : Automatic arming ON or OFF.
uAutomatic arming ON : The alarm system will automatically arm 45 seconds after the key has
(Passive mode) been removed from the ignition cylinder AND all doors, boot and bonnet
have been closed.
Remark : Should any door, the boot or bonnet be opened during the 45
seconds the system will suspend the arming process temporarily till they
are closed again.
Automatic arming OFF : The alarm system can only be armed and disarmed by the remote control.
(Valet mode)
2) STATUS MONITOR LED FLASHING : Flashing while disarmed ON or OFF.
Note : This function is ONLY applicable in case the Automatic arming is LOCK (VALET mode) see 1).
uFlashing while disarmed ON : In case the driver fails to press the “LOCK”-button while leaving the vehi-
cle, despite the vehicle is not locked nor armed, the Status Monitor LED
will start flashing to deterrent any theft-attempt.
Flashing while disarmed OFF : The Status Monitor LED only flashes when the alarm system is armed.
3) PIEZO BUZZER DEFEAT : Door AJAR warning ON or OFF.
uDoor ajar warning ON : When the “LOCK”-button of the remote control is pressed while any of the
doors is still not completely closed, the siren will beep for 15 seconds to
indicate that arming is impossible.
Door ajar warning OFF : No audible warning when the doors are not completely closed when pres-
sing the “LOCK”-button.
4) ANSWER BACK : Indicator light indication ON or OFF.
uIndicator light indication ON : The indicator lights will flash once while the “LOCK”-button is pressed to
announce the arming of the alarm system.
The indicator lights will flash twice while the “UNLOCK”-button is pressed
to announce the disarming of the alarm system.
Indicator light indication OFF : In the event of alarm the indicator lights will flash simultaneous with
siren/horn.
Only the Status Monitor LED indicates the status of the alarm system.
In the event of alarm the indicator lights will NOT flash.
5) IGNITION CONTROLLED DOOR LOCK : Door locking while driving controlled by Ignition-ON.
uDoor locking by Ignition-ON : When the key is turned to the Ignition-ON position the doors will automatic-
ally lock.
The doors will unlock when the key is turned to the Ignition-OFF position.
Overrule : The door lock will be overruled by operating the “central lock
button” or manual door knob operation.
Remark : If the ignition is turned ON a second time the “ignition controlled
door lock” will NOT operate again.
Door locking by Ignition-OFF : The door will NOT lock when the Ignition is turned ON.
2
1

(LHD) - 13
Setting Guide TVSS IV-S
CHANGING THE FUNCTIONS
1) ARMING MODE : Automatic arming ON or OFF.
PREPARATION
1) Check that all connectors and terminals of the fitting kit wire harnesses (main) and (engine)
are fitted correctly.
2) Reconnect the negative battery cable.
3) Remove the key from the ignition key cylinder and push the “unlock” button of the remote control.
ËIndicator lights will flash twice.
4) Close boot and bonnet completely.
5) Step in the vehicle and make sure that all doors are closed completely.
6) Insert the key into the ignition key cylinder.
7) Wait for more than 5 seconds.
8) After turning the key to the ACC position, turn the key from the ACC to the
ON position five times (Last position : ON).
ËStatus Monitor LED will illuminate for 30 seconds.
9) While the LED is illuminated :
• Open and close the driver’s door 1 time.
• Turn the key to the ACC position.
ËLED will illuminate for 30 seconds.
ËIndicator lights will flash once.
Automatic arming OFF (valet mode) :
10) While the LED is illuminated :
• Open and close the driver’s door 1 time.
• Turn the key ACC-ON-ACC 1 time (Last position : ACC).
ËIndicator lights will flash once.
ËLED will extinguish.
Automatic arming ON (passive arming) :
10) While the LED is illuminated:
• Open and close the driver’s door 2 times.
• Turn the key ACC-ON-ACC 1 time (Last position : ACC).
ËIndicator lights will flash twice.
ËLED will extinguish.
ACC
ON
START
LOCK

(LHD) - 14
Setting Guide TVSS IV-S
2) STATUS MONITOR LED FLASHING : Flashing while disarmed ON or OFF.
PREPARATION
1) Check that all connectors and terminals of the fitting kit wire harnesses (main) and (engine)
are fitted correctly.
2) Reconnect the negative battery cable.
3) Remove the key from the ignition key cylinder and push the “unlock” button of the remote control.
ËIndicator lights will flash twice.
4) Close boot and bonnet completely.
5) Step in the vehicle and make sure that all doors are closed completely.
6) Insert the key into the ignition key cylinder.
7) Wait for more than 5 seconds.
8) After turning the key to the ACC position, turn the key from the ACC to the
ON position five times (Last position : ON).
ËStatus Monitor LED will illuminate for 30 seconds.
9) While the LED is illuminated :
• Open and close the driver’s door 2 times.
• Turn the key to the ACC position.
ËLED will illuminate for 30 seconds.
ËIndicator lights will flash twice.
LED flashing while disarmed ON :
10) While the LED is illuminated:
• Open and close the driver’s door 1 time.
• Turn the key ACC-ON-ACC 1 time (Last position : ACC).
ËIndicator lights will flash once.
ËLED will extinguish.
LED flashing while disarmed OFF :
10) While the LED is illuminated :
• Open and close the driver’s door 2 times.
• Turn the key ACC-ON-ACC 1 time (Last position : ACC).
ËIndicator lights will flash twice.
ËLED will extinguish.
ACC
ON
START
LOCK

(LHD) - 15
Setting Guide TVSS IV-S
3) PIEZO BUZZER DEFEAT : Door AJAR warning ON or OFF.
PREPARATION
1) Check that all connectors and terminals of the fitting kit wire harnesses (main) and (engine)
are fitted correctly.
2) Reconnect the negative battery cable.
3) Remove the key from the ignition key cylinder and push the “unlock” button of the remote control.
ËIndicator lights will flash twice.
4) Close boot and bonnet completely.
5) Step in the vehicle and make sure that all doors are closed completely.
6) Insert the key into the ignition key cylinder.
7) Wait for more than 5 seconds.
8) After turning the key to the ACC position, turn the key from the ACC to the
ON position five times (Last position : ON).
ËStatus Monitor LED will illuminate for 30 seconds.
9) While the LED is illuminated :
• Open and close the driver’s door 3 times.
• Turn the key to the ACC position.
ËLED will illuminate for 30 seconds.
ËIndicator lights will flash 3 times.
Door AJAR warning OFF :
10) While the LED is illuminated:
• Open and close the driver’s door 1 time.
• Turn the key ACC-ON-ACC 1 time (Last position : ACC).
ËIndicator lights will flash once.
ËLED will extinguish.
Door AJAR warning ON :
10) While the LED is illuminated :
• Open and close the driver’s door 2 times.
• Turn the key ACC-ON-ACC 1 time (Last position : ACC).
ËIndicator lights will flash twice.
ËLED will extinguish.
ACC
ON
START
LOCK

(LHD) - 16
Setting Guide TVSS IV-S
4) ANSWER BACK : Indicator light Indication ON or OFF.
PREPARATION
1) Check that all connectors and terminals of the fitting kit wire harnesses (main) and (engine)
are fitted correctly.
2) Reconnect the negative battery cable.
3) Remove the key from the ignition key cylinder and push the “unlock” button of the remote control.
ËIndicator lights will flash twice.
4) Close boot and bonnet completely.
5) Step in the vehicle and make sure that all doors are closed completely.
6) Insert the key into the ignition key cylinder.
7) Wait for more than 5 seconds.
8) After turning the key to the ACC position, turn the key from the ACC to the
ON position five times (Last position : ON).
ËStatus Monitor LED will illuminate for 30 seconds.
9) While the LED is illuminated :
• Open and close the driver’s door 4 times.
• Turn the key to the ACC position.
ËLED will illuminate for 30 seconds.
ËIndicator lights will flash 4 times.
Answer back ON :
10) While the LED is illuminated:
• Open and close the driver’s door 1 time.
• Turn the key ACC-ON-ACC 1 time (Last position : ACC).
ËIndicator lights will flash once.
ËLED will extinguish.
Answer back OFF :
10) While the LED is illuminated :
• Open and close the driver’s door 2 times.
• Turn the key ACC-ON-ACC 1 time (Last position : ACC).
ËIndicator lights will flash twice.
ËLED will extinguish.
ACC
ON
START
LOCK

(LHD) - 17
Setting Guide TVSS IV-S
5) IGNITION CONTROLLED DOOR LOCK : Door locking while driving controlled by Ignition-ON.
PREPARATION
1) Check that all connectors and terminals of the fitting kit wire harnesses (main) and (engine)
are fitted correctly.
2) Reconnect the negative battery cable.
3) Remove the key from the ignition key cylinder and push the “unlock” button of the remote control.
ËIndicator lights will flash twice.
4) Close boot and bonnet completely.
5) Step in the vehicle and make sure that all doors are closed completely.
6) Insert the key into the ignition key cylinder.
7) Wait for more than 5 seconds.
8) After turning the key to the ACC position, turn the key from the ACC to the
ON position five times (Last position : ON).
ËStatus Monitor LED will illuminate for 30 seconds.
9) While the LED is illuminated :
• Open and close the driver’s door 5 times.
• Turn the key to the ACC position.
ËLED will illuminate for 30 seconds.
ËIndicator lights will flash 5 times.
Ignition controlled door lock ON :
10) While the LED is illuminated:
• Open and close the driver’s door 1 time.
• Turn the key ACC-ON-ACC 1 time (Last position : ACC).
ËIndicator lights will flash once.
ËLED will extinguish.
Ignition controlled door lock OFF :
10) While the LED is illuminated :
• Open and close the driver’s door 2 times.
• Turn the key ACC-ON-ACC 1 time (Last position : ACC).
ËIndicator lights will flash twice.
ËLED will extinguish.
ACC
ON
START
LOCK

(LHD) - 18
Setting Guide TVSS IV-S
HOW TO VERIFY THE LATEST ALARM CAUSE
It is possible to verify the latest alarm cause by the following procedure :
PREPARATION
1) Check that all connectors and terminals of the fitting kit wire harness (main) and (engine)
are fitted correctly.
2) Reconnect the negative battery cable.
3) Remove the key from the ignition key cylinder and push the “unlock” button of the remote control.
ËIndicator lights will flash twice.
4) Close boot and bonnet completely.
5) Step in the vehicle and make sure that all doors are closed completely.
6) Insert the key into the ignition key cylinder.
7) Wait for more than 5 seconds.
8) After turning the key to the ACC position, turn the key from the ACC to the
ON position five times (Last position : ON).
ËStatus Monitor LED will illuminate for 30 seconds.
9) While the LED is illuminated :
• Open and close the driver’s door 6 times.
• Turn the key to the ACC position.
ËLED will illuminate for 30 seconds.
ËIndicator lights will flash 6 times.
Verification of the latest alarm cause :
10) While the LED is illuminated :
• Open and close the driver’s door 1 time.
ËThe indicator lights will start flashing :
COUNT HOW MANY TIMES THE INDICATOR LIGHTS ILLUMINATED (SIGNALS).
Signals
1
2
3
4
5
6
7
LATEST ALARM CAUSE
Radar Sensor
Glass Breakage Sensor
Door Switch
Boot/Tailgate Switch
Bonnet Switch
Ignition Switch on
Vehicle Battery cut-lock
11) Turn the key ACC-ON-ACC 1 time (Last position : ACC).
ËLED will extinguish.
ACC
ON
START
LOCK

(LHD) - 19
Setting Guide TVSS IV-S
TEMPORARY OVERRIDE
The alarm system has a temporary override. It is possible to defeat the arming of the alarm system for maxi-
mum one hour.
PREPARATION
1) Check that all connectors and terminals of the fitting kit wire harness (main) and (engine) are fitted cor-
rectly.
2) Reconnect the negative battery cable.
3) Close boot and bonnet completely.
4) Remove the key from the ignition key cylinder and push the “unlock” button of the remote control.
ËIndicator lights will flash twice.
5) Step in the vehicle and make sure that all doors are closed completely.
6) Insert the key into the ignition key cylinder.
OVERRIDE ON :
7) Turn the Ignition ON.
8) Within 20 seconds from step 7) :
• Open and close the driver’s door 7 times.
9) Turn the Ignition OFF.
ËIndicator lights will flash once.
ËLED will start flashing continuously.
OVERRIDE OFF : the override will automatically be cancelled after 1 hour.
ËIndicator lights will flash once.
ËLED will stop flashing.
OVERRIDE OFF : If you want to stop the override earlier :
10) Turn the Ignition ON.
11) Within 20 seconds from step 10) :
• Open and close the driver’s door 7 times.
12) Turn the Ignition OFF.
ËIndicator lights will flash twice.
ËLED will stop flashing.

NOTES
Setting Guide TVSS IV-S
......................................................................................................................................................................................................................................................................................................
......................................................................................................................................................................................................................................................................................................
......................................................................................................................................................................................................................................................................................................
......................................................................................................................................................................................................................................................................................................
......................................................................................................................................................................................................................................................................................................
......................................................................................................................................................................................................................................................................................................
......................................................................................................................................................................................................................................................................................................
......................................................................................................................................................................................................................................................................................................
......................................................................................................................................................................................................................................................................................................
......................................................................................................................................................................................................................................................................................................
......................................................................................................................................................................................................................................................................................................
......................................................................................................................................................................................................................................................................................................
......................................................................................................................................................................................................................................................................................................
......................................................................................................................................................................................................................................................................................................
......................................................................................................................................................................................................................................................................................................
......................................................................................................................................................................................................................................................................................................
......................................................................................................................................................................................................................................................................................................
......................................................................................................................................................................................................................................................................................................
......................................................................................................................................................................................................................................................................................................
......................................................................................................................................................................................................................................................................................................
......................................................................................................................................................................................................................................................................................................
......................................................................................................................................................................................................................................................................................................
......................................................................................................................................................................................................................................................................................................
......................................................................................................................................................................................................................................................................................................
......................................................................................................................................................................................................................................................................................................
......................................................................................................................................................................................................................................................................................................
......................................................................................................................................................................................................................................................................................................
......................................................................................................................................................................................................................................................................................................
......................................................................................................................................................................................................................................................................................................
(LHD) - 20

(LHD) - 21
SETTING GUIDE TOYOTA TVSS IV-S
NOTES
......................................................................................................................................................................................................................................................................................................
......................................................................................................................................................................................................................................................................................................
......................................................................................................................................................................................................................................................................................................
......................................................................................................................................................................................................................................................................................................
......................................................................................................................................................................................................................................................................................................
......................................................................................................................................................................................................................................................................................................
......................................................................................................................................................................................................................................................................................................
......................................................................................................................................................................................................................................................................................................
......................................................................................................................................................................................................................................................................................................
......................................................................................................................................................................................................................................................................................................
......................................................................................................................................................................................................................................................................................................
......................................................................................................................................................................................................................................................................................................
......................................................................................................................................................................................................................................................................................................
......................................................................................................................................................................................................................................................................................................
......................................................................................................................................................................................................................................................................................................
......................................................................................................................................................................................................................................................................................................
......................................................................................................................................................................................................................................................................................................
......................................................................................................................................................................................................................................................................................................
......................................................................................................................................................................................................................................................................................................
......................................................................................................................................................................................................................................................................................................
......................................................................................................................................................................................................................................................................................................
......................................................................................................................................................................................................................................................................................................
......................................................................................................................................................................................................................................................................................................
......................................................................................................................................................................................................................................................................................................
......................................................................................................................................................................................................................................................................................................
......................................................................................................................................................................................................................................................................................................
......................................................................................................................................................................................................................................................................................................
......................................................................................................................................................................................................................................................................................................
......................................................................................................................................................................................................................................................................................................
Other manuals for TVSS IV-S
2
Table of contents
Other Toyota Security System manuals
Popular Security System manuals by other brands

GE Security
GE Security CareGard quick start guide

Visonic
Visonic POWERMAX - Especificacoes

Biamp
Biamp VOCIA LSI-16 Operation manual

Indyme Solutions
Indyme Solutions CB440 Programming and installation instructions

Visonic
Visonic MINI-ALERT installation instructions

Comelit
Comelit RFSIR102 Technical manual