TQC Sheen SP7310 User manual

BRESLE TEST KIT
SP7310
Operating Instructions (V1.0 0119)


3 |
1 Instrument Data
1.1
1.2
1.3
1.4
Product Description
Name/Article
Standards
Scope of Supply
2 Instrument Layout and Functions
3 Preparations
3.1 Determine Test Area
3.2 Instrument Preparations
3.3 Calibration
4 Use
5 ISO 11127-6
6 Maintenance
7 When Something Goes Wrong
8 Disclaimer
4
5
6/7
8/10
11
11
11
11
INDEX
| 4
1.1 Product Description
The TQC Sheen Bresle Kit complies with the ISO 8502-6 and ISO 8502-9
standards that describe the Bresle Method to assess the level of soluble salts
using a Bresle patch or Bresle sampler, distilled water and a conductivity
gauge. The conductivity is mainly directly proportional to the concentration
of dissolved chloride ions in the solution. The kit includes all the necessary
equipment to execute a Bresle test that will indicate the contamination of
soluble salts on blast-cleaned surfaces prior to coating. Inside the Bresle
Kit is a conductivity gauge used for the assessment of soluble salt ions as
chlorides, sulphates and nitrates.
1.2 Name / Article
SP7310 Bresle Test Kit
1.3 Standards
ISO 8502-6, ISO 8502-9, ISO 11127-6
1.4 Scope of Supply
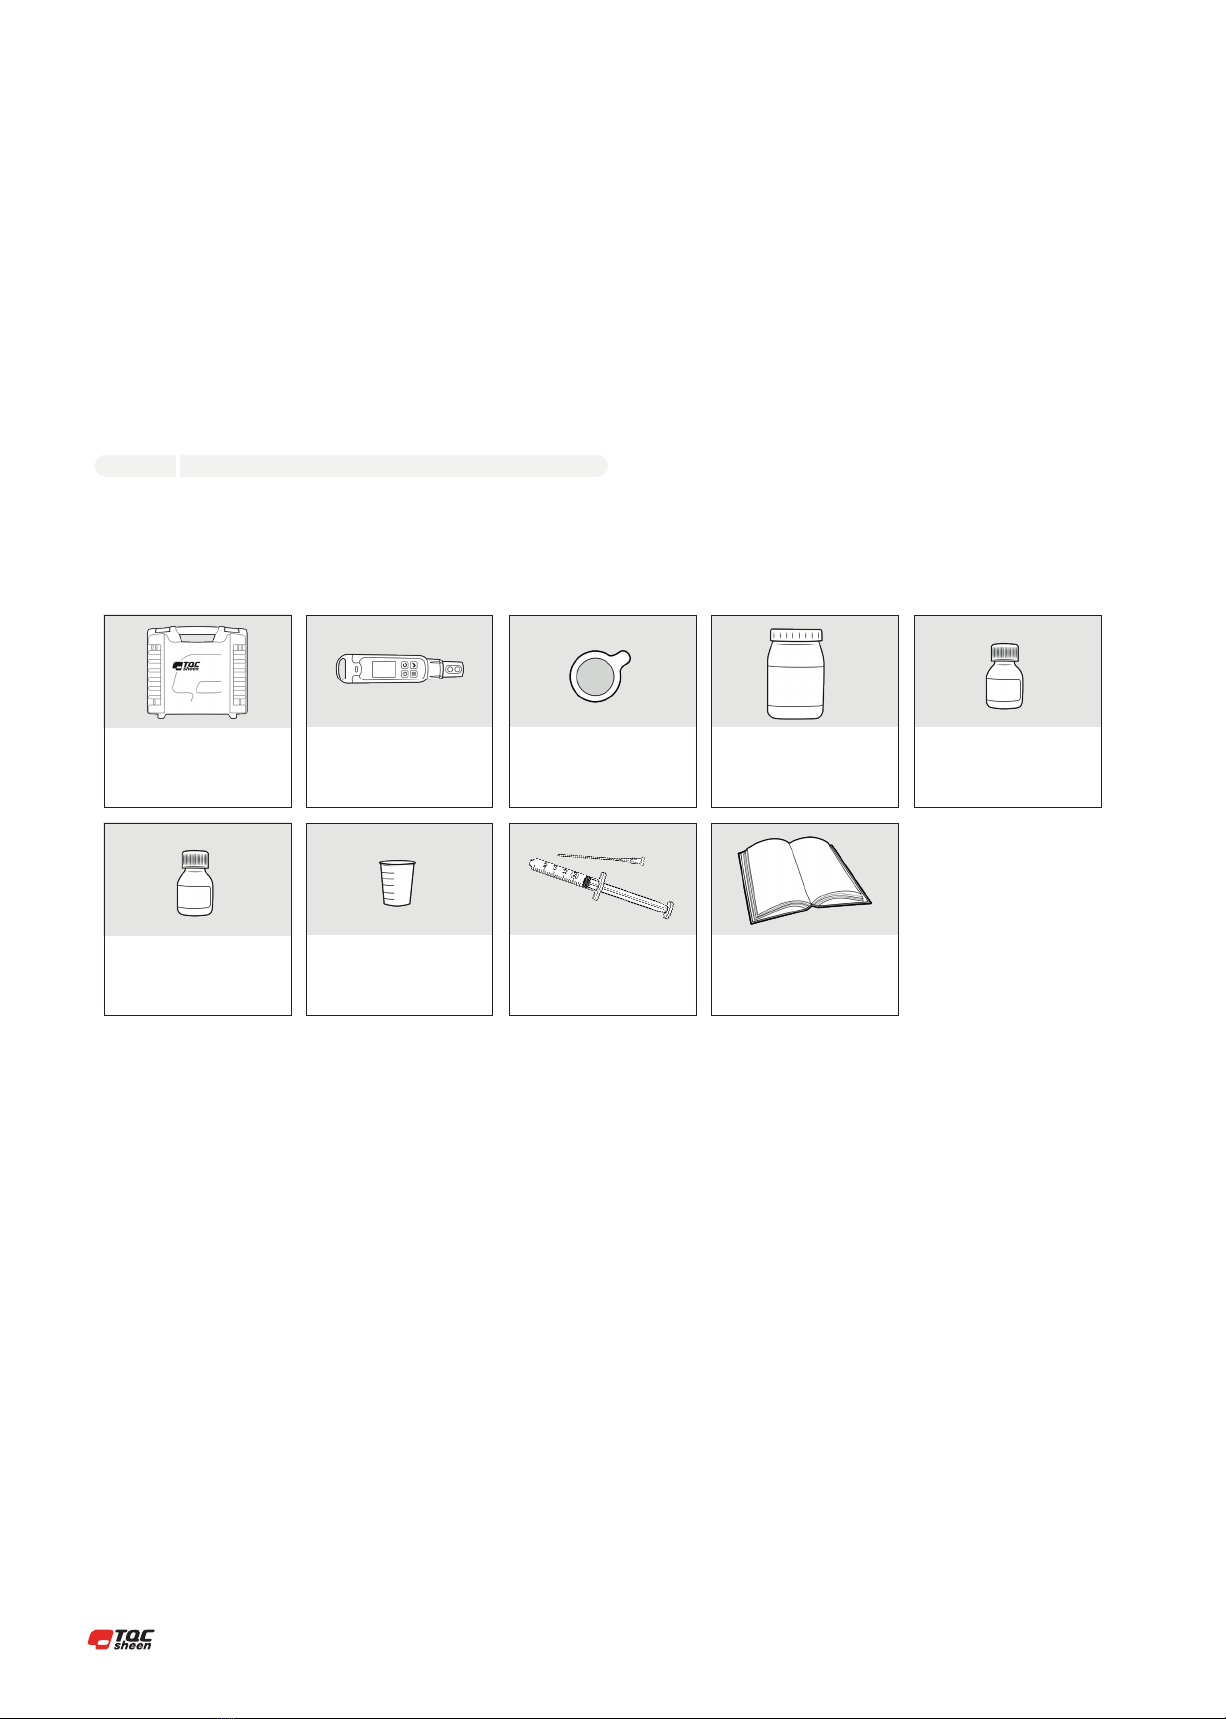
1 INSTRUMENT DATA
Case
Cleansing Solution
Bresle Patches, 25 pieces
Syringe
Calibration SolutionDigital Conductivity Meter
Cup
Deionised Water
Manual

5 |
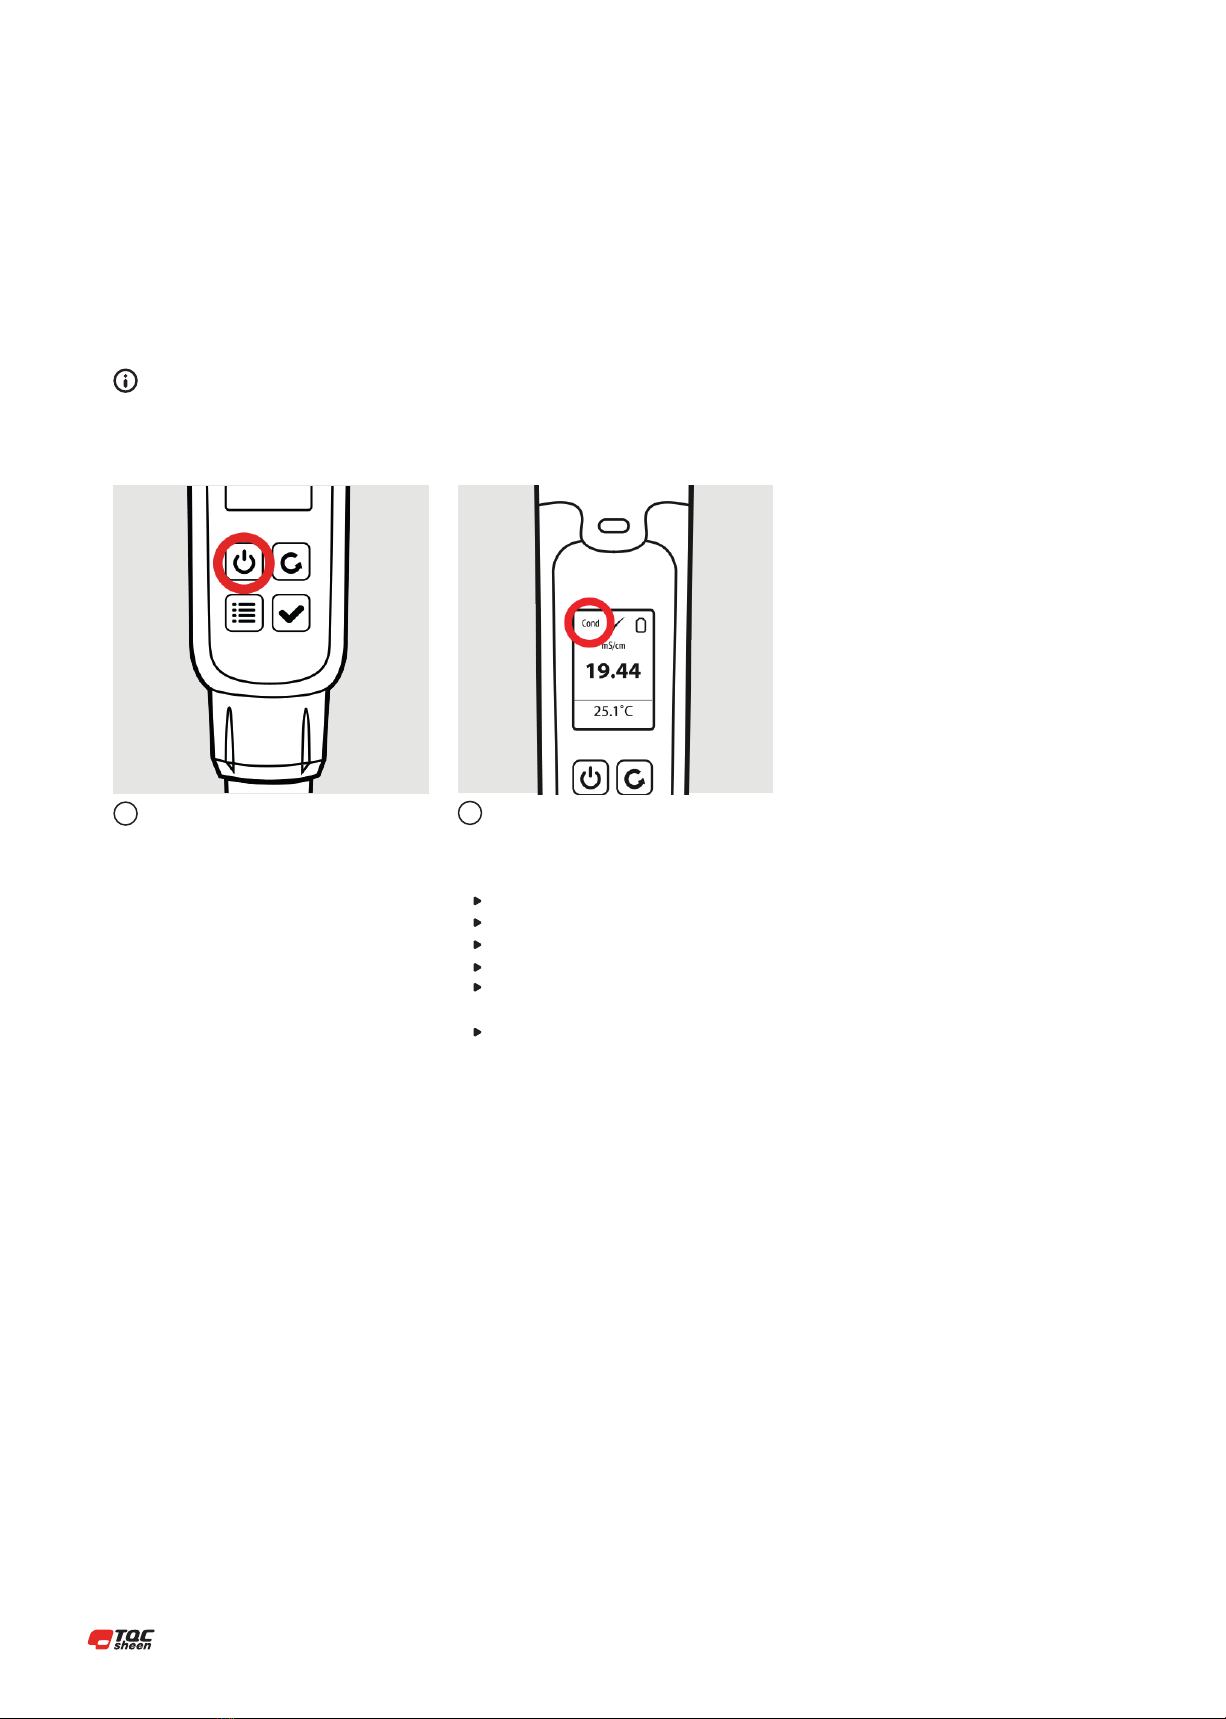
2 INSTRUMENT LAYOUT AND FUNCTIONS
Battery Compartment
Selected Measurement Method (Cond-TDS-Salt) Battery Indicator
Measured Value
Calibration Button (in menu mode‘Exit‘ button)
Enter Button (in menu mode‘Accept‘ button)
EC/Conductivity Electrode
Indication of Unit ( μS/cm of mS/m)
Temperature
On Button
Menu Button (in menu mode ‘Scroll‘ button)
Temperature Electrode
| 6
3 PREPARATIONS
Turn on the Digital Conductivity Meter. Check whether ‘COND’ is shown at the top
left. If so, perform the measurement. If not,
go through the following steps:
12
3.2 Instrument Preperation
Click on menu button.
Scroll with the‘menu / scroll’button until ‘measure’ is selected.
Confirm with the ‘enter / accept’ button.
Scroll with the‘menu / scroll’button until ‘COND’ is selected.
Confirm with the ‘enter / accept’ button.Press‘calibration /
return’ button to return to the measurement screen.
COND is shown at the top left.
3.1 Determine Test Area
Select the section on the steel surface to be used as the test area for
assessment of the total surface density of salts. It should preferably be dry
and with no loosely adherent rust, dirt or moisture (dampness), so that the
patch frame can properly adhere to the surface. The Bresle patch can be
placed in almost every position, vertical, horizontal, slanting or on surfaces
that are not completely flat.
It is recommended to test more than one spot to catch the
variations of the contamination level!
7 |
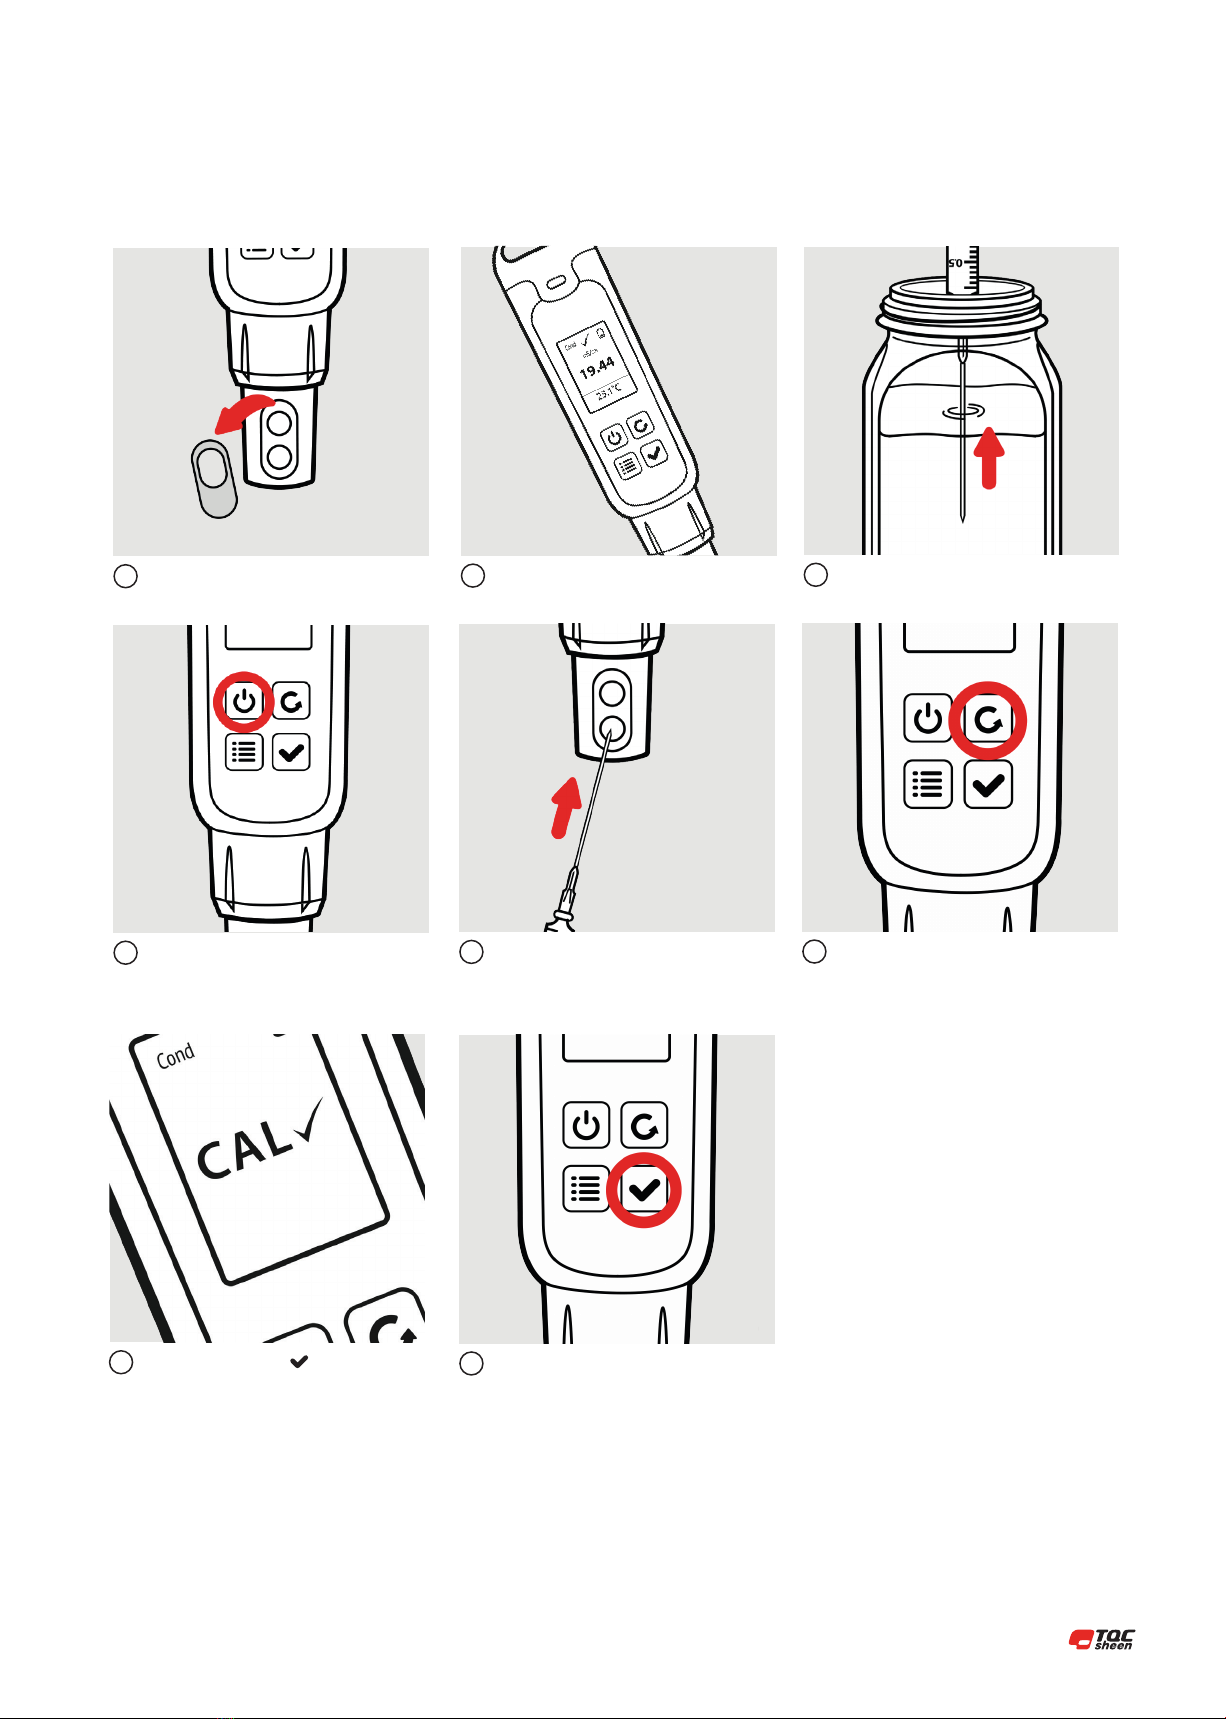
Place the gauge flat on a flat surface.
The display shows CAL , the calibration
was successful.
Inject the deionised water in the measuring
cell.
Push the enter button to return to the
normal display.
Push the CAL button. Wait until the
measurement is stabilized.
2
7
5
8
6
3.3 Calibration
Calibration prior to each use is desirable for a reliable measurement.
Remove the plastic cap from the measuring
cell.
1Fill up the syringe with deionised water.3
Turn on the Digital Conductivity Meter.4

| 8
4 USE
Remove the protective backing of the Bresle
patch with its inner protective paper and
dispose.
Press firmly in order to create a tight seal.
Inject the deionised water in the measuring
cell until it runs over.
Place the Bresle patch with the adhesive
side to the test surface.
Fill up the syringe with deionised water.
A value is shown on the display.
Take care to trap as less air as possible in the
patch.
Empty the syringe until there is 2,5 ml left
to take care that there are no air bubbles in
the syringe.
1
4
8
2
5
9
3
6
Turn on the Digital Conductivity Meter.7

9 |
Empty the syringe.
Empty the syringe until there is 2,5 ml left
to take care that there are no air bubbles in
the syringe.
Dissolve the salts by tapping the
membrane for 90 seconds.*
* ISO 8502-6 recommended time is 10 minutes.
Most users test at 90 seconds. Always agree on test
time prior to testing.
Empty the meter.
Insert the 2,5 ml of deionised water into
the Bresle patch by injecting it through the
foam at an angle of 30º from the surface.
Extract the water from the patch and
reinject into the patch 4 times.
Fill up the syringe with deionised water.
Inserting through the transparent part
of the Patch or though the bottom side
could cause leakage!
11
14
16
12
15
17
13
Write down the value as blank value.10

| 10
When finished, extract the entire volume
of water into the syringe and remove the
syringe from the Bresle Patch.
A value is shown on the display.
Turn the Digital Conductivity Meter back on.
Write down the measured value. Calculate the difference between the
measured value and the blank value.
(measured value -blank value).
The total surface density of soluble salts/
contaminants (S) in mg/m2soluble salts
measured as Sodium Chloride is 1 x
(measured value –blank value).
(All salts are considered as NaCl or Sodium
Chloride) . “Sample Value” and “Zero
Reference” are in microSiemens (μS) per
centimeter.
If an interpretation of just the chlorides
or cl- is required the multiplier will be 0.6
instead of 1!
Inject 1,5 ml of this water into the
measuring cell of the Conductivity Meter.
18
21
19
22 23
20

11 |
Determination of the water soluble salts in mineral abrasives,
conform ISO 11127-6.
Collect a number of samples , minimum 5, of the abrasive at random at
different places.
Mix them well and take 100 g from this mix into a 100 ml. beaker.
Pour 100 ml. distilled water into a 250 ml. beaker which has been
cleaned before with distilled water.
Take a reading of this water with the conductivity gauge and note the
value. This is the “Zero Reference”
Add 50 g of abrasives to the 100 ml distilled water in the 250 ml. beaker.
Shake the mixture well for about 5 minutes and leave it for one hour.
Shake again for 5 minutes.
Decant some of the water into a clean beaker and measure the
conductivity.
Contact the paint-manufacturer, abrasive supplier or project-manager for the
maximum acceptable conductivity level
6 MAINTENANCE
Maintenance of the conductivity meter is minimal, because it’s quite easy to
perform a measurement. Nevertheless the technology inside the instrument
is very advanced.
Depending on the frequency of use, a thin film may occur on the probe.
Use a damp cloth to remove this.
After each use the instrument should be rinsed with tap water and
demineralized liquid. Make sure the probe stays clean.
A blinking battery indicator indicates the batteries need to be replaced.
Open the battery compartment cover. Note polarity facing up and
remove the old batteries. Replace with fresh ones with the same
polarity. facing up as the old ones.
When the instruments doesn’t perform the way you expected, usually
you can solve it yourself easily. Therefore read this part thoroughly before
claiming warranty.
8 DISCLAIMER
The right of technical modifications is reserved.
The information given in this sheet is not intended to be exhaustive and
any person using the product for any purpose other than that specifically
recommended in this sheet without first obtaining written confirmation
from us as to the suitability of the product for the intended purpose does
so at his own risk. Whilst we endeavour to ensure that all advice we give
about the product (whether in this sheet or otherwise) is correct we have
no control over either the quality or condition of the product or the many
factors affecting the use and application of the product. Therefore, unless
we specifically agree in writing to do so, we do not accept any liability
whatsoever or howsoever arising for the performance of the product or
for any loss or damage (other than death or personal injury resulting from
our negligence) arising out of the use of the product. The information
contained in this sheet is liable to modification from time to time in the
light of experience and our policy of continuous product development.
5 ISO 111276 7 WHEN SOMETHING GOES WRONG
Clean the measuring cell with a damp
soft cloth and rinse the measuring cell
thoroughly with demiwater afterwards.
Replace batteries
Always use a‘fresh ‘ calibration
standard. Once opened the calibration
standard will not keep.
The value measured is
unstable
Possible cause: Pollution?
Display fails
Possible cause: Insucient
battery power.
Calibration fails
Possible cause: Dirty
measuring cell or old /
polluted calibration standard.

www.tqcsheen.com
Table of contents
Other TQC Sheen Laboratory Equipment manuals


Popular Laboratory Equipment manuals by other brands

Thermo Scientific
Thermo Scientific LevelPRO Series Application guide

NAPCO
NAPCO NAP9600 user manual

Agilent Technologies
Agilent Technologies 1100 Series Reference manual

Altana
Altana BYK byko-drive S Short instructions

Hettich
Hettich UNIVERSAL 320 operating instructions

Excelitas Technologies
Excelitas Technologies OmniCure S1500 PRO user guide


NoiseKen
NoiseKen LSS-6330 Series instruction manual

PRO Scientific
PRO Scientific Bio-Gen PRO200 operating manual

Thermo Scientific
Thermo Scientific CLEARVUE AUTOMATED COVERSLIPPER Daily Operation Guide

Helmer
Helmer QuickThaw DH2 Service manual

MELAG
MELAG Vacuklav 23 B+ Technical manual

Thermo Scientific
Thermo Scientific Ion 520 user guide