TQC Sheen AB3650 User manual

Automatic Film
Applicator Compact
AB3650, AB3655
Entry level film applicator
Operating Instructions (V1.3 0718)
IMPORTANT! Before taking this instrument
in use we strongly advise you to read this
manual carefully.


3 |
TQC Sheen will grant a warranty for a period of 12 months for the Automatic
Film Applicator Compact and 12 months for all related equipment from
the date of delivery in respect of any evidence of faulty workmanship and
materials.
Should a delivered consignment prove to be contrary to contract upon
inspection, the customer shall grant TQC Sheen the opportunity hereunder
of removing the fault, or else the customer may demand replacement.
Because of size and weight of the instrument TQC Sheen will strive to give
remote support.
Should the supply or delivery of any improvement or replacement not prove
possible, the customer may choose between having the purchase price
reduced or in demanding the contract of sale to be rescinded (conversion).
Damage resulting from natural wear and tear, mechanical or chemical
damage, an act of God or non compliance with the operating instructions
shall be excluded from the warranty as well as mechanical interference by
the customer or by third parties with Automatic Film Applicator Compact
and related equipment without TQC Sheen’s written permission. No liability
will be accepted for defects, damage or injury caused due to use not carried
out in accordance with the manufacturer’s user instructions.
To claim warranty, the rejected product has to be sent to TQC Sheen
together with the original invoice, any exchange before the product has
been returned to TQC Sheen is not possible. TQC Sheen reserve the right to
repair, exchange or supply an equivalent substitute. TQC Sheen is not liable
for handling or transport costs. Warranty on the purchase price is limited, all
liability for consequential damages or changes in technology is expelled.
This product complies to
- Machinery Directive 2006/42 / EC
- Low Voltage Directive 2006/95 / EC
- EMC Directive 2004/108 / EC
This product is RoHS 2 compliant (2011/65/EU)
WARRANTY


5 |
1 General
1.1 Importance of operating manual
1.2 User-responsibility
1.3 Responsibility of personnel
1.4 Dangers
1.5 Designated purpose
1.6 Copyright
1.7 Manufacturer’s/Supplier’s address
2 Safety Instructions
2.1 Meaning of Symbols
2.2 Availability of Safety Information
2.3 Dangers from Electrical Energy
2.4 Modifications to the Equipment
3 Transport and Storage
3.1 Packing
3.2 User: Check on Receipt
3.3 Reporting Transport Damage and
Documentation
3.4 Storage and Protective
Measures when not in use
4 Instrument Data
4.1 Name / Article
4.2 Scope of Supply
4.3 Technical Data
4.4 Dimensions and Weight
4.5 Basic Unit
4.6 Accessories and Spares
5 Instrument Controls and Functions
6 Instrument Preperations
7 Operation
7.1 Navigation
7.2 Starting the machine
7.3 Setting test duration
7.4 Prepare a draw down - Glass bed model (AB3650)
7.5 Prepare a draw down - Vacuum bed model (AB3655)
7.6 Placing an application tool
7.7 Using paper to collect the surplus of paint
7.8 Replacing the drip pan
8 Care and Maintenance
8.1 Disposal of Materials
8.2 Customer Service
9 Disclaimer
6
7
8
9/10
11
12
13/17
18
19
INDEX

| 6
1.1 Importance of operating manual
This manual is written in order to become familiar with all the functions and
possible applications of the instrument. It contains important instructions
about how to use the instrument safely and economically; according to
the purpose designated. Following these instructions is not only essential
to avoid risks. It also reduces repair costs and down-time and increases the
products reliability and service-life.
Anyone who works with the instrument shall follow the instructions in this
manual, particularly the safety related instructions. Additionally local rules
and regulations relating to environmental safety and accident prevention
should be observed. It is mandatory that users have read and understand
this manual prior to first operation of the Automatic Film Applicator
Compact.
1.2 User-responsibility
The user should
a) Only allow persons to work with the instrument who are
familiar with the general instructions on how to work safely and
to prevent accidents. The use of the instrument should have been
instructed duly. The safety chapter and the warnings in this
manual should have been read and understood; acknowledged
as evidenced by their signature.
b) Regularly check the safety-awareness of personnel at work.
1.3 Responsibility of personnel
Before commencing work anyone appointed to work with the instrument
should pay attention to the general regulations relating to working safety
and accident prevention. The safety chapter and the warnings in this manual
should have been read and understood; acknowledged as evidenced by
their signature.
1.4 Dangers
This instrument has been designed and constructed in accordance with
state-of-the-art technology and the acknowledged safety regulations.
Nevertheless, working with the instrument may cause danger to the life and
health of the operator or to others, or damage to the instrument or other
property. Therefore the instrument should only be used for its designated
purpose, and in a perfect technical condition. Any defect that could have a
negative effect on safety should be repaired and recorded.
1.5 Designated purpose
The Automatic Film Applicator Compact is exclusively designed to apply
thin films of liquid or pastes on test specimen. Other applications constitute
improper use. TQC Sheen will not be held liable for damage resulting from
improper use.
Designated purpose also includes properly observing all instructions in the
operation manual, and adherence to inspection and maintenance
schedules. TQC Sheen is entitled to request these form when warranty
claims are made and during inspections to ensure safe operation and
evaluate correct usage.
1.6 Copyright
The copyright of this operating manual remains with TQC Sheen. This
operating manual is intended solely for the user and his personnel. Its
instructions and guidelines may not be duplicated, circulated or otherwise
passed on to others, neither fully, nor partly. Infringement of these
restrictions may lead to legal action may be taken if this restrictions are
infringed upon.
1.7 Manufacturer’s/Supplier’s address
TQC Sheen
Molenbaan 19
2908 LL Capelle aan den IJssel
The Netherlands
T +31(0)10 7900 100
F +31 (0)10 7900 129
1 GENERAL

7 |
2.1 Meaning of Symbols
The following symbols for dangers are used in this instruction manual.
2.2 Availability of Safety Information
The instruction manual should be kept in proximity to where the instrument
operates and should be visible and accessible at any time of operation.
In addition to the information contained in the instruction manual, general
and local regulations for accident prevention and environmental protection
shall be kept available and observed. Always ensure all guidelines in respect
of safety and dangers on the instrument are in readable condition.
In case of danger the instrument has to be switched off by means of the on /
off switch at the left back side of the instrument or by unplugging the mains
power, then the danger should be eliminated.
2.3 Dangers from Electrical Energy
• Work on the electrical supply may only be done by a qualified electrician.
• The electrical equipment of the instrument must be checked regularly.
Loose connections and cables damaged by heat must be corrected
immediately.
• Always make sure the instrument’s power is turned off while adjusting any
electrical component.
Make sure that no paint or other liquids are spilled on the
electronics
2.4 Modications to the Equipment
• Any modifications or additions or alterations to the instrument may solely
be made with permission from the manufacturer otherwise the warranty
will be void.
• Instruments which are not in fault-free condition must immediately be
switched off
• Only use replacement parts from the original supplier. Parts used from
other sources aren’t guaranteed to take the loading and meet the safety
requirements.
Possible immediate
danger to the life or
health of personnel.
If this guideline is not noted
it can lead to severe danger
to health, up to fatal injury.
A dangerous situation
could be caused.
Non observance of this
guideline can lead to injury
or to damage to equipment.
Special tips and
particular information.
Guidelines to make optimal
use of the instrument.
2 SAFETY INSTRUCTIONS

| 8
3.1 Packing
• Please take note of pictorial symbols on the packing.
3.2 User: Check on Receipt
• Check packing for damage
• After unpacking check complete supply.
3.3 Reporting Transport Damage and Documentation
• Any damage should be documented as accurately as possible (possibly
photographed) and reported to the relevant insurers or, in the case of sales
“delivered to customers works”, to the supplier.
3.4 Storage and Protective Measures when not in use
• The instrument must be stored in a dry place at a temperature
between 10 - 40˚C.
• If packing is damaged upon receipt immediately inform the forwarder and
make a note on the packing list and have it signed by the forwarder. Ideally
make some pictures of the damage as well.
• Store instrument in the original packing if possible.
3 TRANSPORT AND STORAGE

9 |
4.1 Name / Article
Automatic Film Applicator Compact – Entry level film applicator
4.2 Scope of Supply
4 INSTRUMENT DATA
Automatic Film
Applicator Compact
Drip Pan
Paper Support
Manual
Vacuum Bed
Tube (1m)
24V Adapter
Weight
Glass Bed
Rubber Mat
Standard supplied Only supplied with AB3650 Only supplied with AB3655
4.3 Technical Data
Traverse speed: 1 - 150 mm/s / 0.03 - 5.90 in/s
Traverse speed accuracy: < 1%
Stroke length: 250 mm / 9.84 in
Stroke length accuracy: < 1 mm
Max. test substrate thickness: 8 mm / 0.31 in incl. coating
Max. width alternative film applicators: 200 mm / 7.87 in
Max. test chart dimensions: 216 mm X 355 mm (or with paper sheet support 500 mm) X 8 mm (incl. coating thickness)
Max. height alternative film applicators: 40 mm / 1.57 in
Min. Wire bar length: > 220 mm / > 8.66 in
Wire bar diameter: 6 - 12,7 mm / 0.23 - 0.5 in
Volume drip pan: 30 ml
Drawn down speeds: 1 - 150 mm/s / 0.03 - 5.90 in/s free selectable
Min. vacuum: -100 mbar required for vacuum model
Diameter vacuum holes: 1.3 mm / 0.05 in
Distance between vacuum holes: 22 mm / 0.86 in
Number of vacuum holes: 117
Vacuum connection: 6 mm / 0.23 in quick connect
4.4 Dimensions and Weight
Depth: 335 mm / 13.18 in
Width: 400 mm / 15.74 in
Height: 190 mm / 7.48 in
Net weight: 12,5 kg / 27.55 in
4.5 Basic Unit
Power Supply: 24 VDC
Power consumption: Max. 40 Watt
Display: 128 x 64 pixels graphic, 70 mm x 40 mm / 2.75 x 1.57 in white illuminated
Menu languages: English
Function: Navigation switch

| 10
Accessories
Vacuum Pumps
AB3675 Vacuum Pump, 23 l/min, 1750rpm 115VAC
AB3676 Vacuum Pump, 18 l/min, 1450rpm 230VAC
Optional Weight
AB3680 Optional Weight 250 g
Wire Bar Coaters
AB3720 Wire Bar Coater 4µm, film width 230mm, total width 290mm
AB3721 Wire Bar Coater 6µm, film width 230mm, total width 290mm
AB3722 Wire Bar Coater 8µm, film width 230mm, total width 290mm
AB3723 Wire Bar Coater 10µm, film width 230mm, total width 290mm
AB3724 Wire Bar Coater 12µm, film width 230mm, total width 290mm
AB3725 Wire Bar Coater 14µm, film width 230mm, total width 290mm
AB3726 Wire Bar Coater 16µm, film width 230mm, total width 290mm
AB3727 Wire Bar Coater 20µm, film width 230mm, total width 290mm
AB3728 Wire Bar Coater 24µm, film width 230mm, total width 290mm
AB3729 Wire Bar Coater 30µm, film width 230mm, total width 290mm
AB3730 Wire Bar Coater 34µm, film width 230mm, total width 290mm
AB3731 Wire Bar Coater 38µm, film width 230mm, total width 290mm
AB3732 Wire Bar Coater 40µm, film width 230mm, total width 290mm
AB3733 Wire Bar Coater 50µm, film width 230mm, total width 290mm
AB3734 Wire Bar Coater 56µm, film width 230mm, total width 290mm
AB3735 Wire Bar Coater 60µm, film width 230mm, total width 290mm
AB3736 Wire Bar Coater 76µm, film width 230mm, total width 290mm
AB3737 Wire Bar Coater 100µm, film width 230mm, total width 290mm
AB3738 Wire Bar Coater 120µm, film width 230mm, total width 290mm
AB3739 Wire Bar Coater 150µm, film width 230mm, total width 290mm
AB3740 Wire Bar Coater 200µm, film width 230mm, total width 290mm
AB3741 Wire Bar Coater microns on request, film width 230mm, total width 290mm
AB3742 Wire Bar Coater plain polished, film width 230mm, total width 290mm
Spare parts
AB3670 Spare Glass Bed for Automatic Film Applicator Compact
AB3667 Spare Vacuum Bed for Automatic Film Applicator Compact
AB3657 Spare Drip Pan
AB3662 Spare Paper Support
A large range of applicators are suitable for the Automatic Film Applicator Compact.
For more information about the applicators we refer you to our website.
4.6 Accessories and Spares
11 |
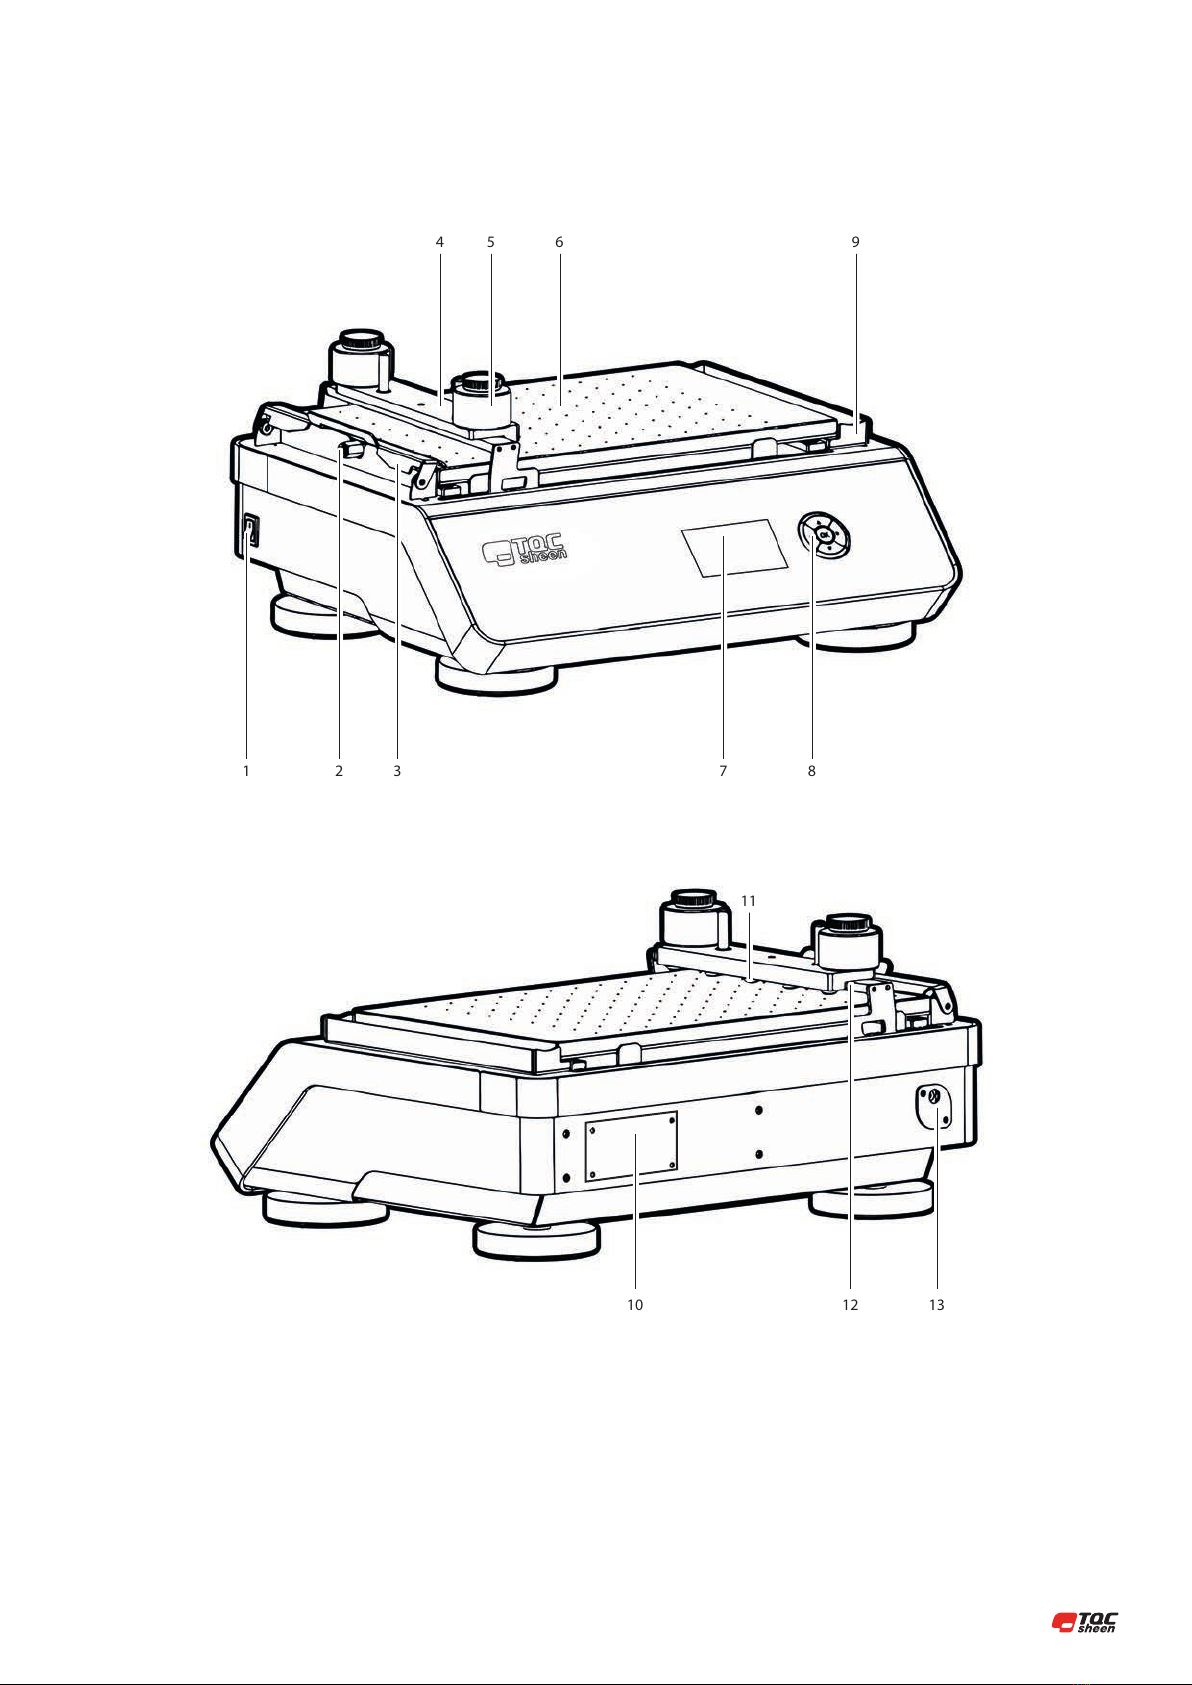
5 INSTRUMENT CONTROLS AND FUNCTIONS
Power Switch
Vacuum Tube Fitting
Test Chart Clamp
Applicator Weight
Optional 250 g Weight
Vacuum Bed at AB3655 or
Glass Bed at AB3650
Display
5
6
7
8
9
10
11
12
13
1
2
3
4
5-key Navigation Switch
Drip Pan or Paper Holder
Machine iD-tag
5x Anti-slip Rubber Bumbers
Red Pushbar
Power Entry
1 2 3
4 5 6
7
11
10 13
8
9
12
| 12
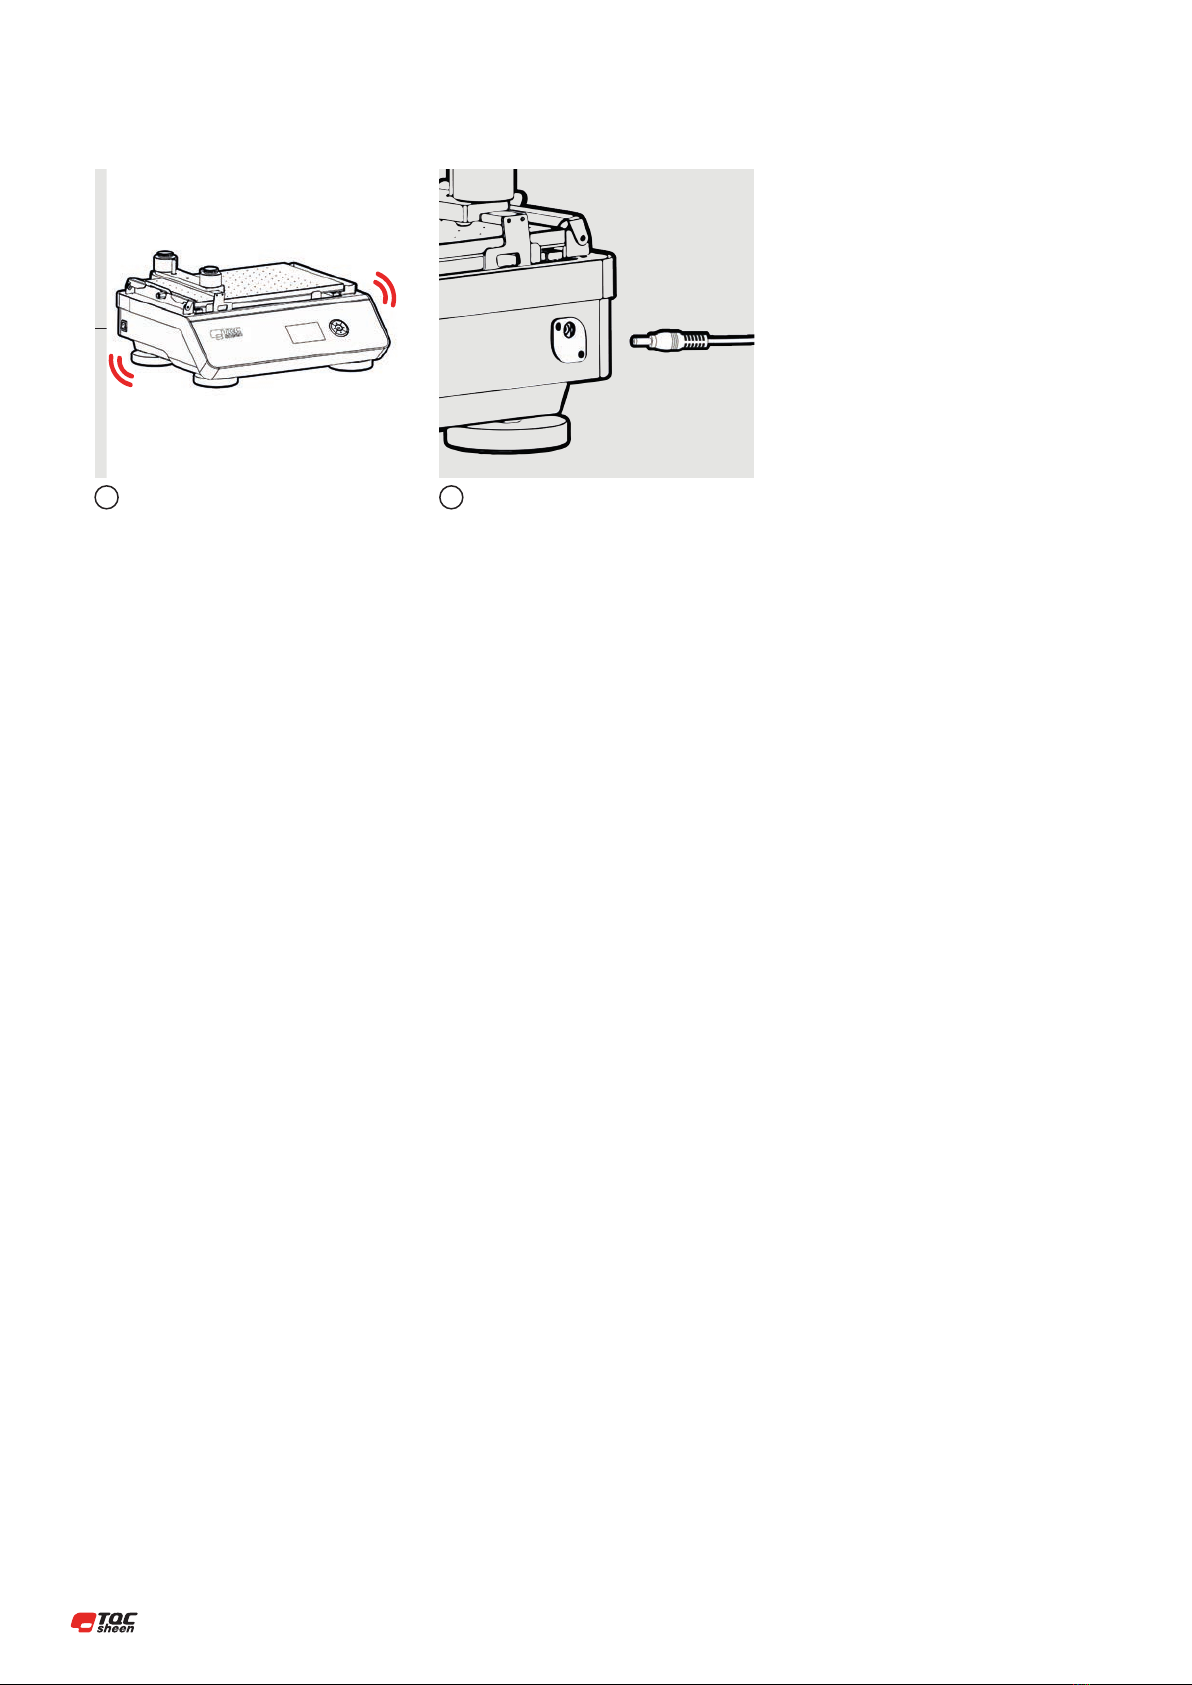
6 INSTRUMENT PREPARATIONS
The instrument has to be installed on a
sturdy table or work area.
Connect the power cable.1 2
13 |
7.1 Navigation
The Automatic Film Applicator Compact is quite simple to operate by means
of the menu in the display and the 5-key navigation switch. Use the 5-key
navigation switch to highlight the function of choice in the menu and
confirm by pressing the“OK” button.
The 5-key navigation switch is equipped with the unique Triple i function
(Intelligent Illumination Interface). Triple i enhances the intuitive operation of
the Automatic Film Applicator Compact by illuminating just those keys that
are active in combination with the position in the operating menu.
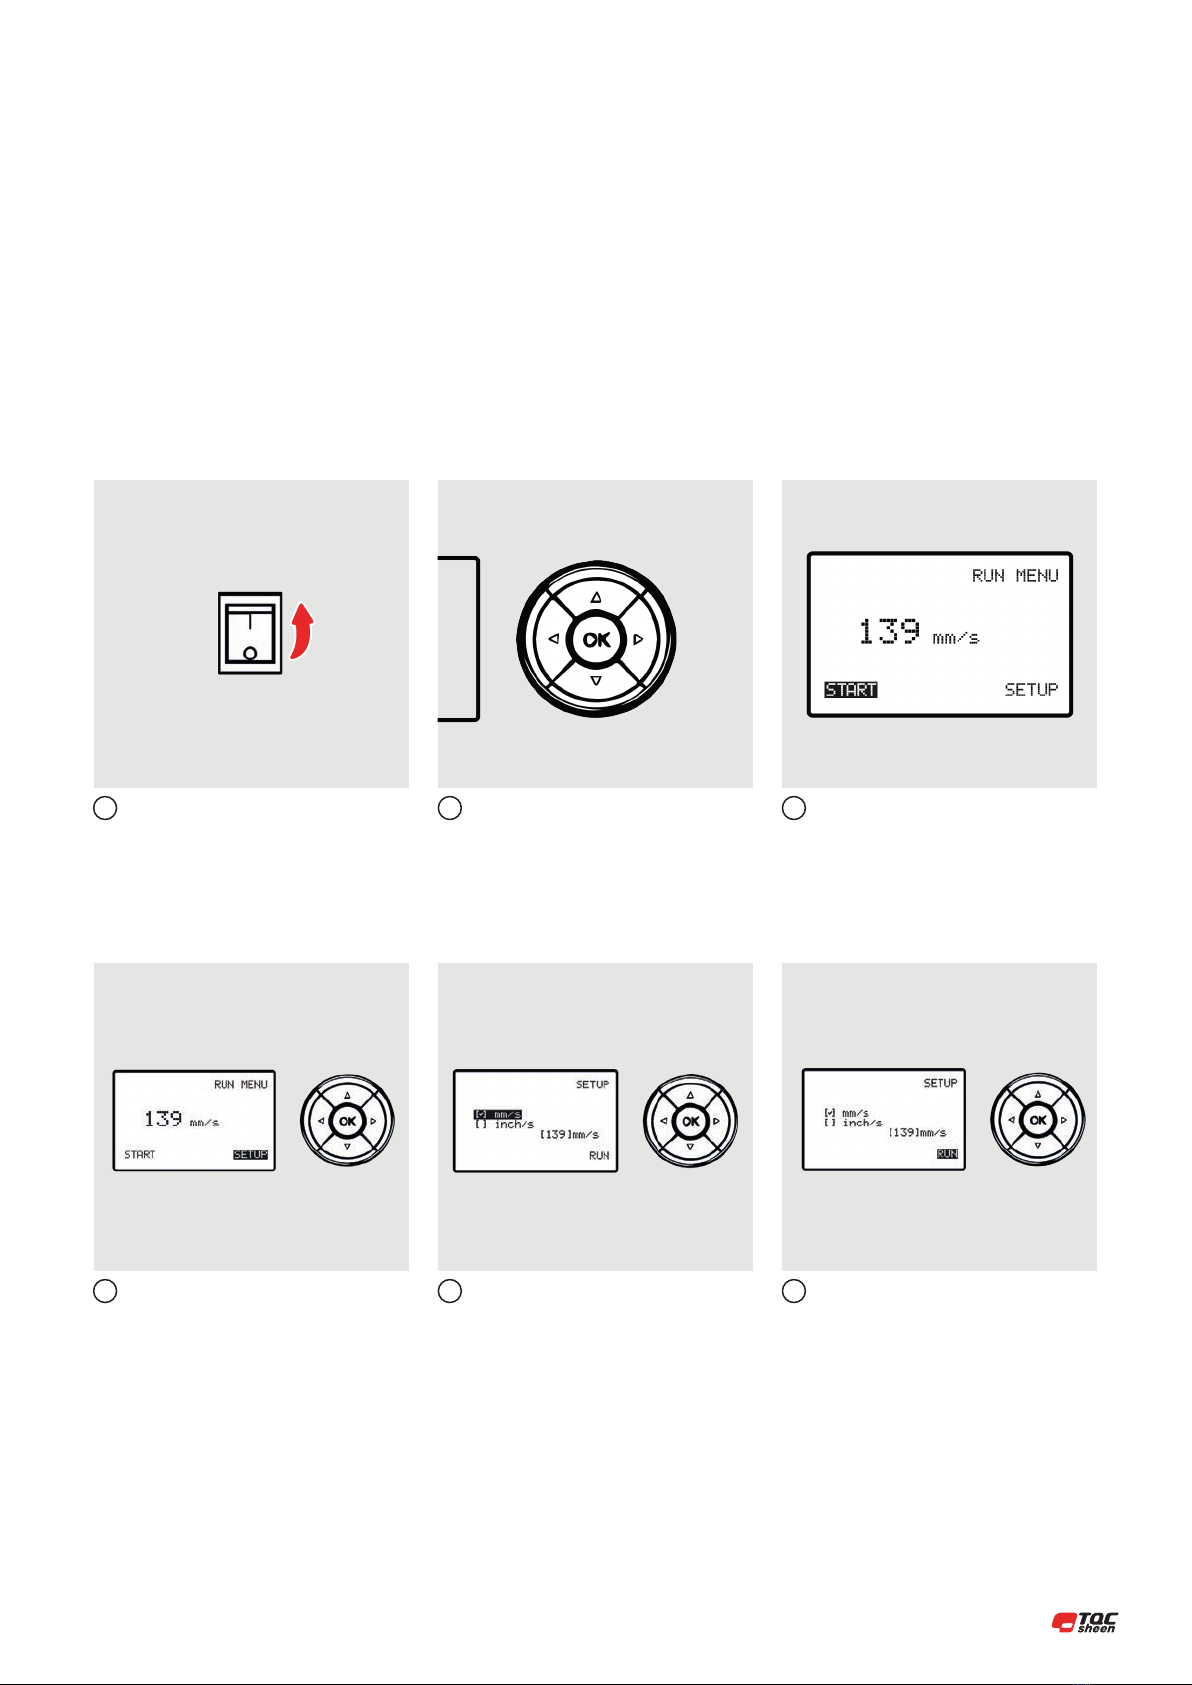
7.2 Starting the machine
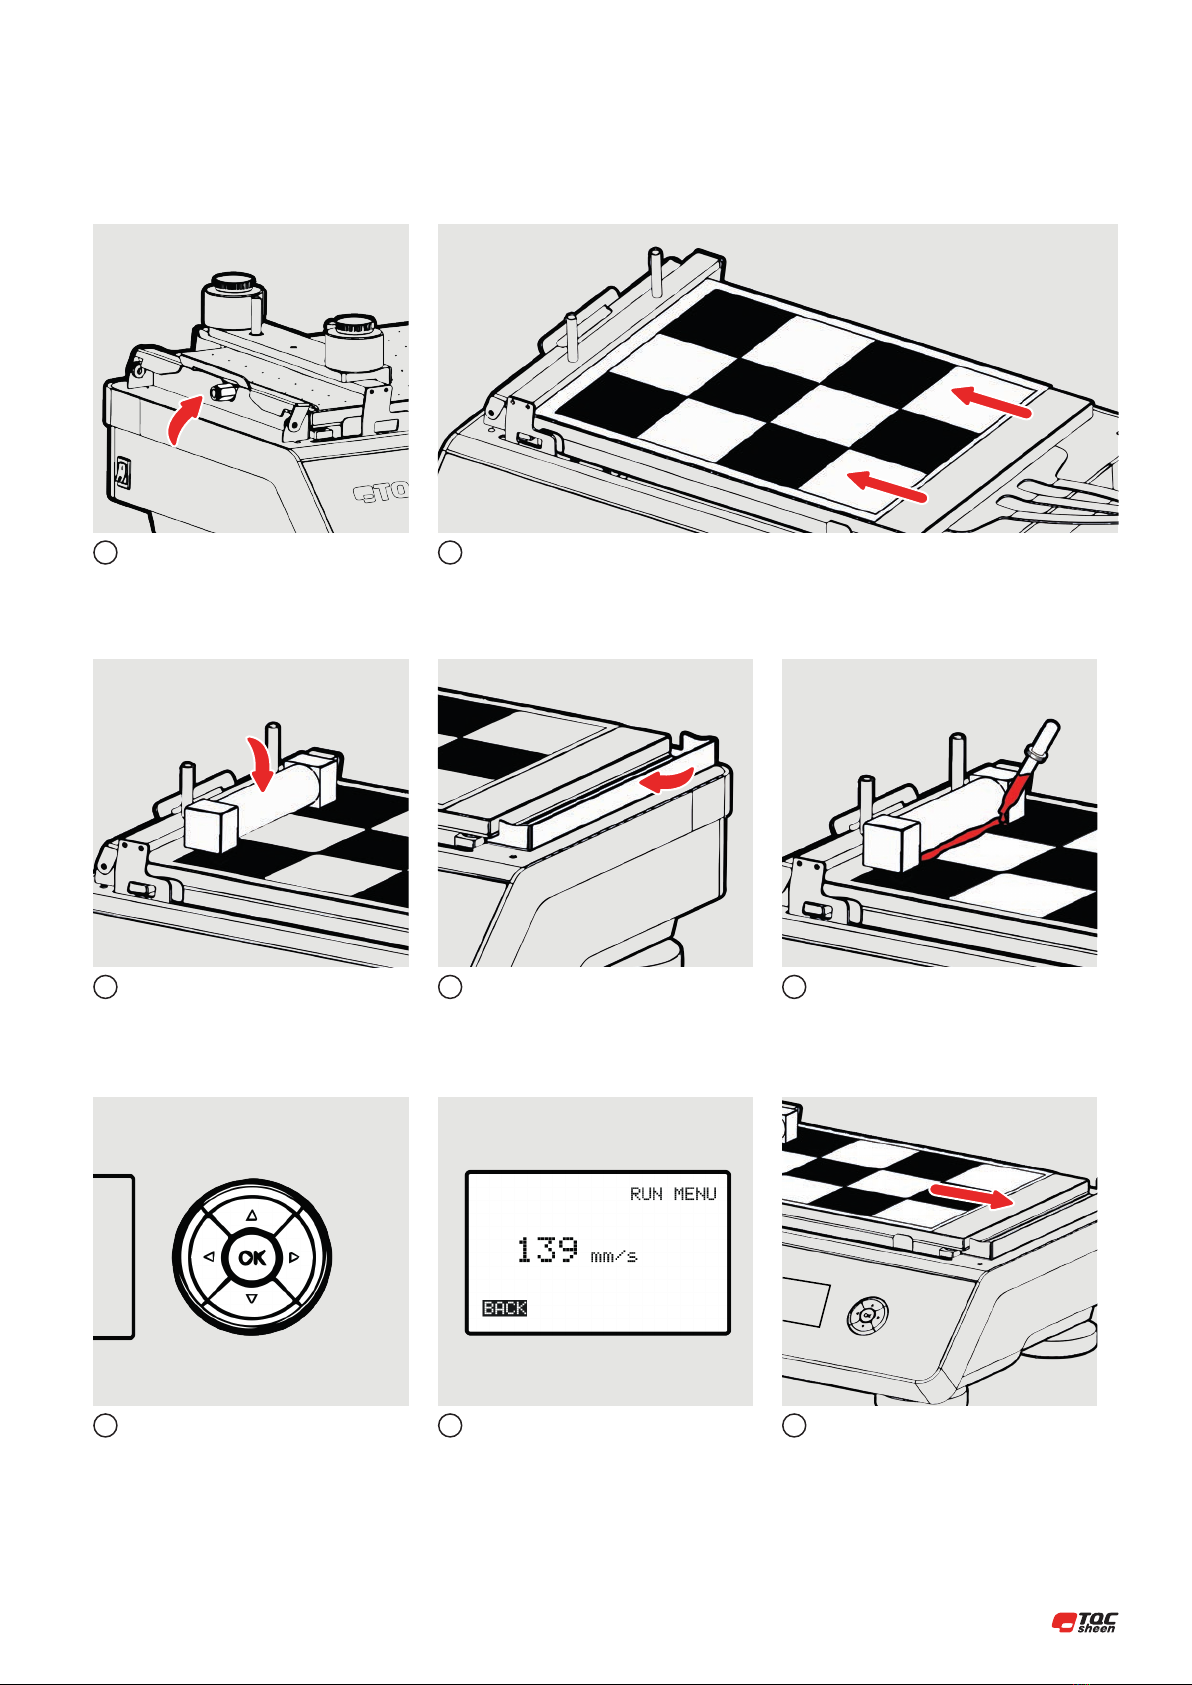
7.3 Setting test duration
Switch on the machine by using the
switch button on the left side of the
machine.
To alter the notation of the speed or the
actual speed navigate with the arrow key
to “SETUP” and press “OK”.
Press “OK” to start-up the machine.
(Machine will perform an internal
calibration)
If the notation of the speed need to be
changed from mm/s into inch/s or vice
versa navigate the cursor to the desired
choice and press“OK”.
The display shows the current set test
duration.
If the speed needs to be altered navigate
the cursor to the correct digit and change
the digit using the up and down keys.
Move the cursor to the“RUN”option and
activate the “RUN” option. You will return
to the RUN MENU screen with the“START”
option.
1
1
2
2
3
3
7 OPERATION
| 14
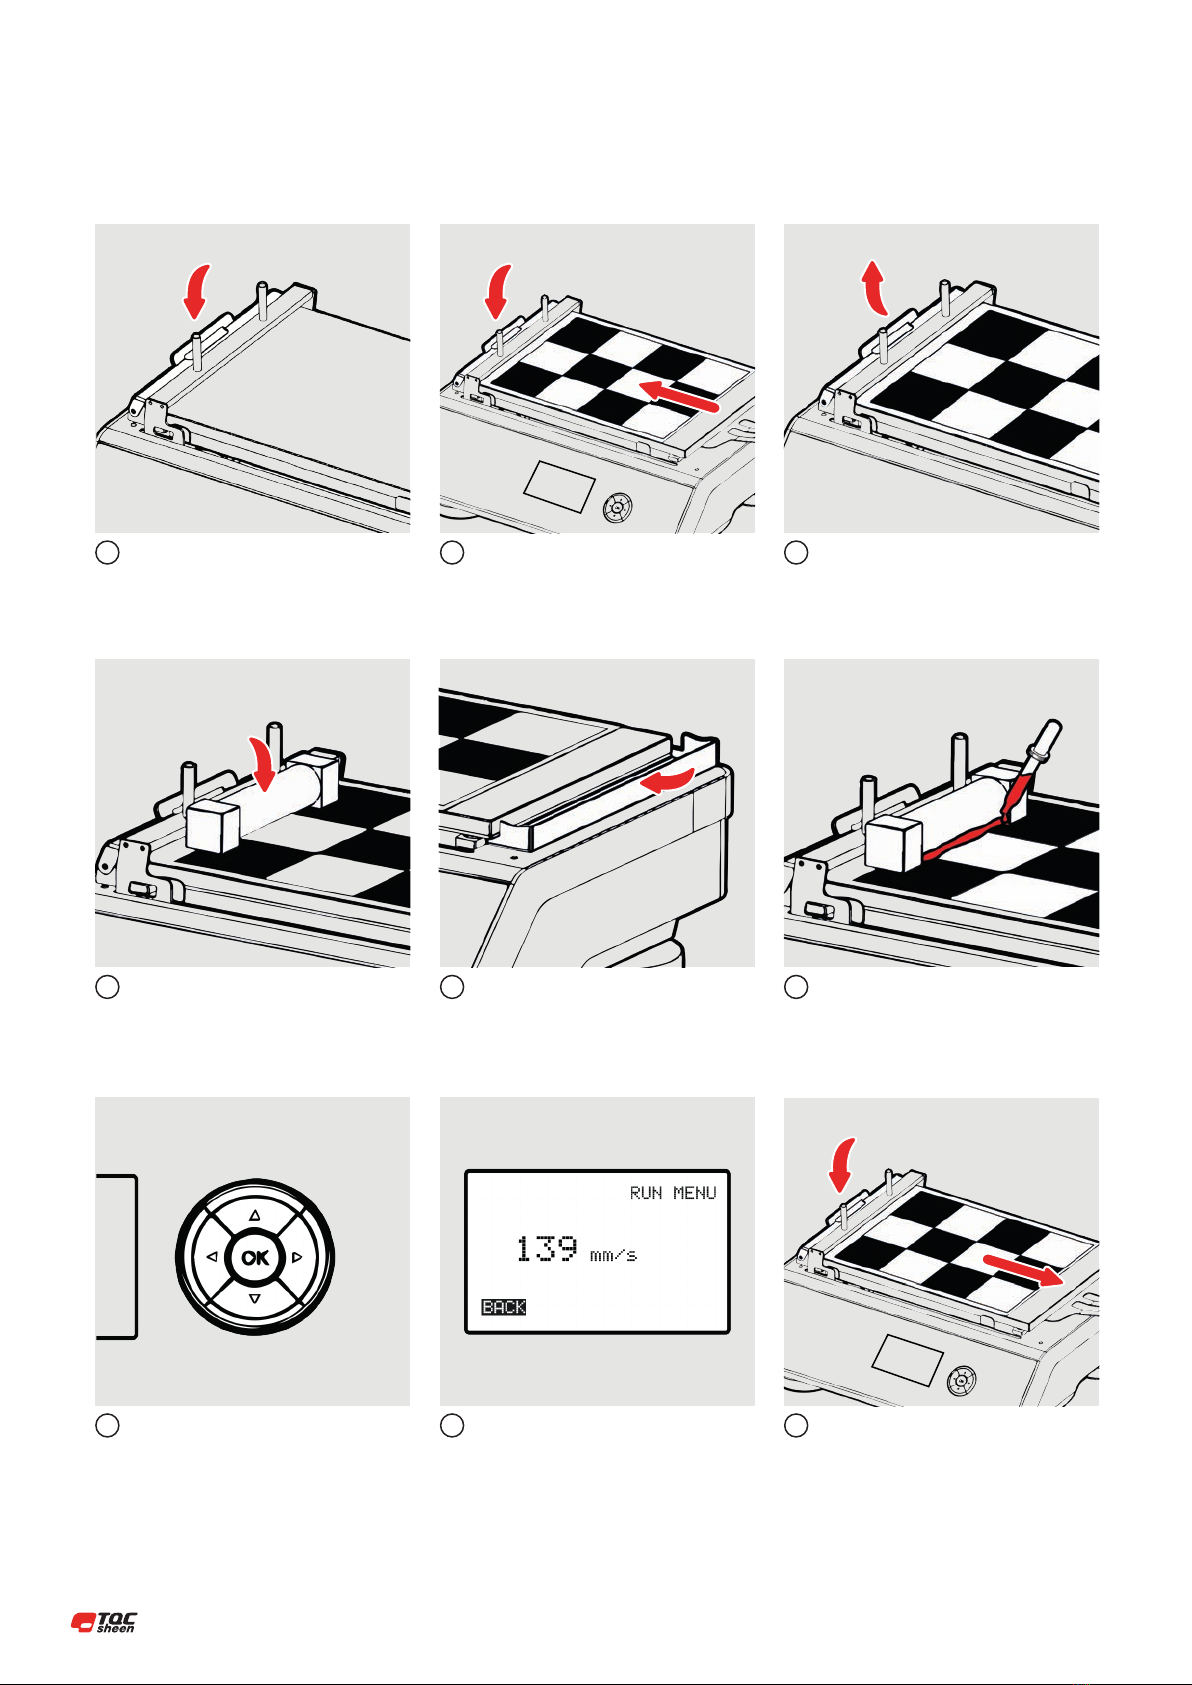
7.4 Prepare a draw down - Glass Bed Model (AB3650)
Press the clamp down to open.
Place the application tool as described in
paragraph 7.6.
Make sure the traverse and application
tool are free to move and press the“OK”
button to start the application.
While pressing the clamp position the
test chart or other specimen on the glass
bed and shift it under the clamp to the
far left side.
Position a sheet of paper to collect the
surplus of paint or make sure the drip
pan is in position and not full. See also
paragraph 7.7 and 7.8.
Once the draw down is made remove the
application tool and return the traverse by
activating the “BACK” option.
Release the clamp mechanism.
Apply the right amount of paint in front
of the application tool.
Remove the test card by releasing the
clamp.
1
4
7
2
5
8
3
6
9
15 |
7.5 Prepare a draw down - Vacuum Bed Model (AB3655)
Make sure the vacuum bed is connected
to a proper and active vacuum source.
Place the application tool as described in
paragraph 7.6.
Make sure the traverse and application
tool are free to move and press the“OK”
button to start the application.
Position the test chart on the vacuum bed and make sure it is fully flat and covers all the holes.
* Note that if the chart is too small to cover all the holes the remaining open holes have to be closed
down by means or adhesive tape (use a tape that can be easily removed)
Position a sheet of paper to collect the
surplus of paint or make sure the drip
pan is in position and not full. See also
paragraph 7.7 and 7.8.
Once the draw down is made remove the
application tool and return the traverse by
activating the “BACK” option.
Apply the right amount of paint in front
of the application tool.
Switch off the vacuum and remove the
test chart.
1
3
6
2
4
7
5
8
| 16
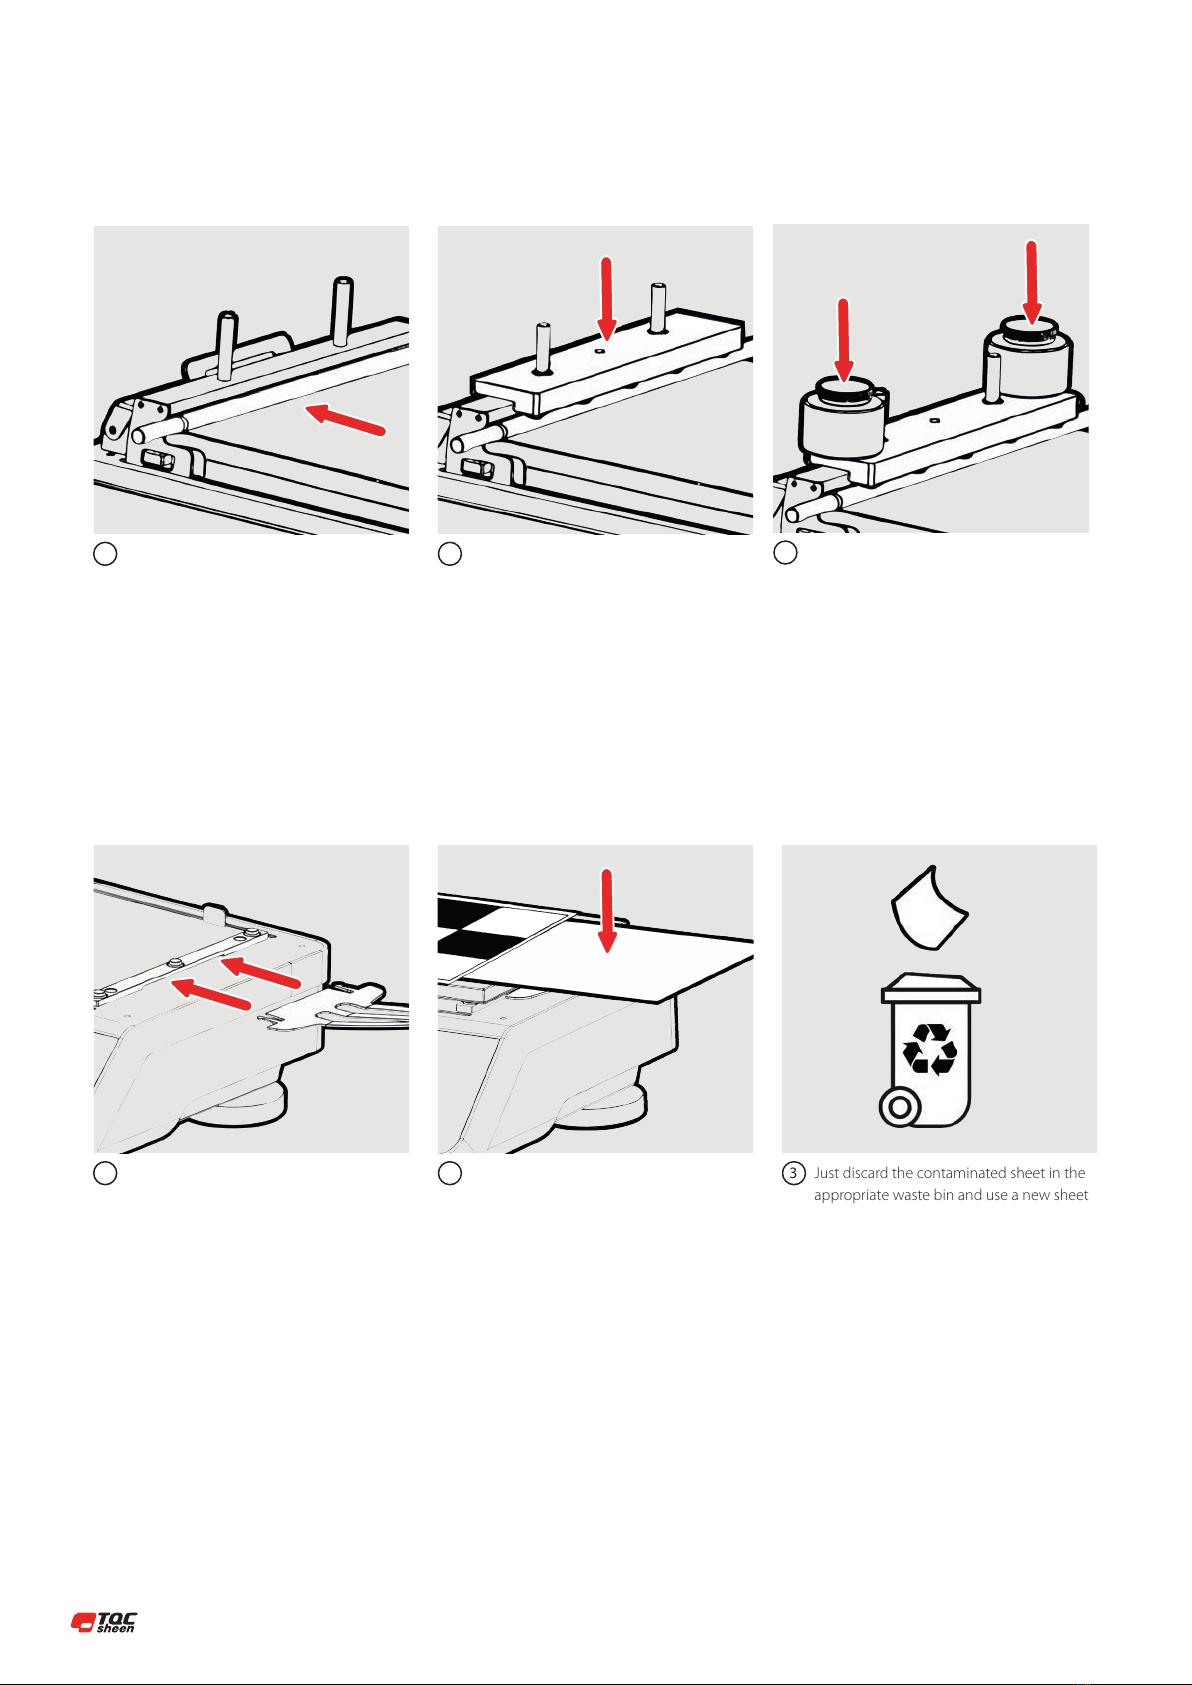
Position the appropriate bird applicator,
wire bar, square applicator, reservoir or
quadruplex or other applicator bar in front
of the red pushbar.
To keep the wire bar from rotating and
when additional weight is needed for
other applicators, set the weight over the
pins of the push bar such that the rubber
feet of the weight bar are resting on the
application tool or wire bar.
1 2
7.6 Placing an application tool
Assemble the paper support on the right
hand side of the machine by sliding it under
the clamp bracket.
When making a drawdown place a thin
sheet of paper just under the trailing edge
of the test-chart so any surplus of paint will
end up on the sheet of paper.
Just discard the contaminated sheet in the
appropriate waste bin and use a new sheet
for the next drawdown.
1 2 3
7.7 Using paper to collect the surplus of paint
TQC Sheen advises to use this method instead of the drip pan. This method does not require any cleaning, just disposal of contaminated sheets.
If required additional option weights can be
mounted on the standard weight.
3
17 |
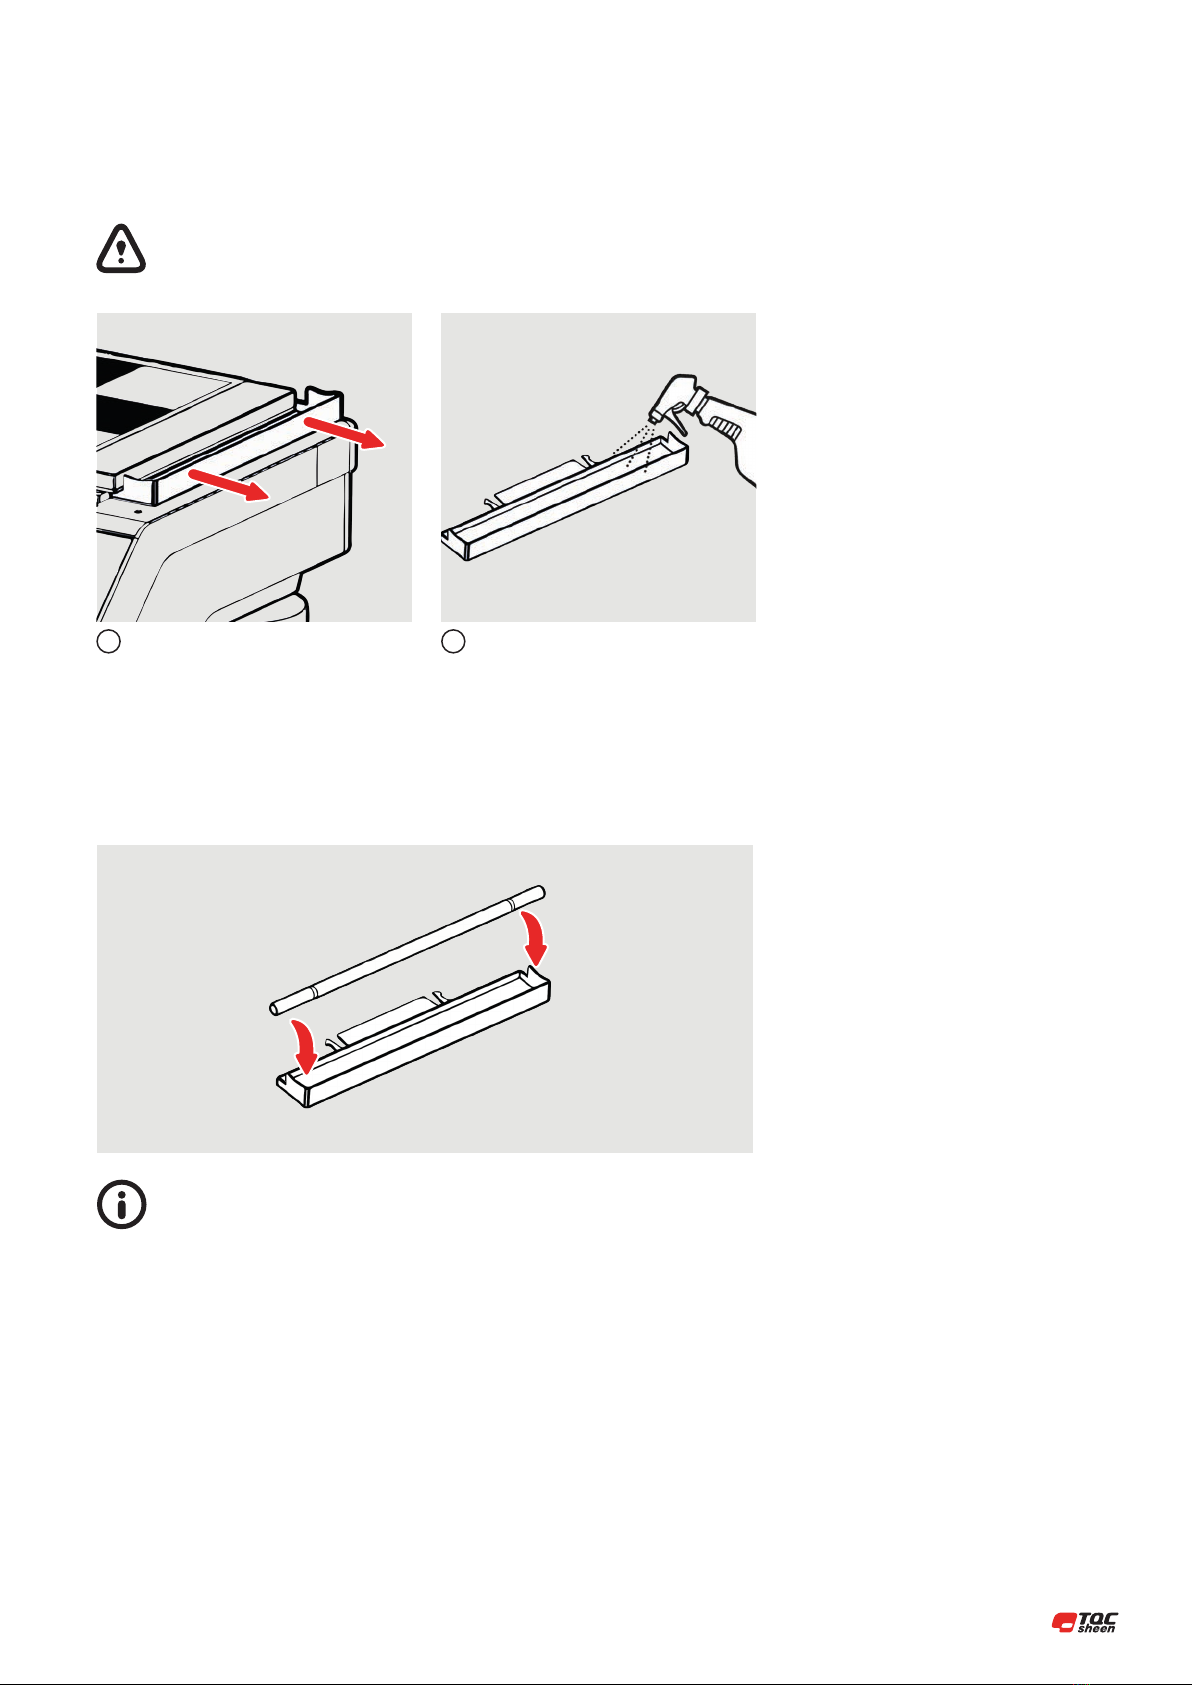
To remove the pan just pull it horizontally
away from the vacuum bed using two
hands.
The pan is entirely made of stainless steel
so can be cleaned using water or when
required more aggressive media.
Please note that the drip pan can hold a limited volume of 30 ml of paint. It is
important to empty and clean this at a regular basis.
The drip pan is designed in such a way that the wire bar applicator rests above it and
any leftover paint leaks into it.
1 2
7.8 Cleaning the drip pan

| 18
• Though robust in design, this instrument is precision-machined.
Never drop it or knock it over.
• Always clean the instrument after use.
• Clean the instrument using a soft dry cloth. Never clean the instrument
by any mechanical means such as a wire brush or abrasive paper. This may
cause, just like the use of aggressive cleaning agents, permanent damage.
• Be careful when using compressed air to clean the instrument.
• Generally the Automatic Film Applicator Compact does not require any
maintenance.
Make sure that no paint or other liquids are spilled on the
electronics or left in the holes.
10.1 Disposal of Materials
Disposal of materials used in the operation of the instrument or for auxiliary
functions and exchanged items should be dealt with safety and in a manner
that will not harm the environment. Follow the local regulations.
10.2 Customer Service
Customer service is provided on request by
TQC Sheen - Molenbaan 19 , 2908LL Capelle aan den IJssel
The Netherlands, T +31(0)10 7900100, F +31 (0)10 7900129
or by local representatives.
8 CARE AND MAINTENANCE

19 |
The right of technical modifications is reserved.
The information given in this manual is not intended to be exhaustive and
any person using the product for any purpose other than that specifically
recommended in this manual without first obtaining written confirmation
from us as to the suitability of the product for the intended purpose does so
at his own risk. Whilst we endeavor to ensure that all advice we give about
the product (whether in this manual or otherwise) is correct we have no con-
trol over either the quality or condition of the product or the many factors
affecting the use and application of the product. Therefore, unless we spe-
cifically agree in writing to do so, we do not accept any liability whatsoever
or howsoever arising for the performance of the product or for any loss or
damage (other than death or personal injury resulting from our negligence)
arising out of the use of the product. The information contained in this man-
ual is liable to modification from time to time in the light of experience and
our policy of continuous product development.
9 DISCLAIMER

TQC Sheen Korea
Bldg Star Plaza, #805
Kimpo-Hangang-8-Ro 410
10071 Kimpo-Si, Gyeonggi-Do
South-Korea
+82 (0) 31 982 7074
+82 (0) 31 997 0827
www.tqcsheen.com
TQC Sheen UK
Po Box 977A
Surbiton, KT1 9XL
England
+44 208 255 0143
-
www.tqcsheen.com
TQC Sheen GmbH
Nikolaus-Otto-Strasse 2
Hilden, D-40721
Germany
+49 (0)2103-25326-0
+49 (0)2103-25326-29
www.tqcsheen.com
TQC Sheen-USA Inc.
3689 Hadley Road
Metamora, MI 48455
USA
+1 810 797 8300
+1 810 797 8303
www.tqc-usa.com
TQC Sheen
Molenbaan 19
2908 LL, Capelle aan den Ijssel
The Netherlands
+31 (0) 10 – 7900 100
+31 (0) 10 – 7900 129
www.tqcsheen.com
TQC Sheen -Singapore
3689 Hadley Road
Tang TH |
Sales & Service Manager APAC
+65 8181 8607
+31 (0)10 7900129
www.tqcsheen.com
TQC Sheen ITALIA s.r.l.
Via Cesare Cantu’ ,26
SEREGNO, (MB) 20831
Italy
+39 0362-1822230
+39 0362-1822234
info@tqcitaly.it
www.tqcsheen.com
TQC Sheen Norge AS
Øvre Langgt. 26
Tønsberg, 3110
Norway
+47 333 10220
-
info@tqc.no
www.tqcsheen.com
This manual suits for next models
1
Table of contents
Other TQC Sheen Laboratory Equipment manuals


Popular Laboratory Equipment manuals by other brands


ibidi
ibidi m–Slide VI 0.4 Series instructions

Biolin Scientific
Biolin Scientific Theta installation manual

Hettich
Hettich HAEMATOKRIT 200 operating manual

Keithley
Keithley 4200-SCS-PK3-903-01 quick start guide

Drucker Diagnostics
Drucker Diagnostics QBC 425740 Service manual

Thermo Scientific
Thermo Scientific 3960 Operating and maintenance manual


