TRANZSPORTER TP250 User manual

404-344-0000 • www.tiedown.com
605 Stonehill Drive SW, Atlanta, GA 30336
www.tranzsporter.com
Carriage Assembly Instructions
TP250
(Pages 1-4)
TP400
(Pages 5-8)
Instruction Sheet #08290 Rev. 11-23-20
E1563
Congratulations
You’ve purchased a roofing hoist manufactured by TIE DOWN ENGINEERING. All of hoist products are easy to
assembly and is solidly built in USA and tested to ensure years of service.
Before You Begin
We’ve included this easy to use instruction sheet to ensure quick, easy assembly of your carriage
platform. Be sure to read the instructions (a time saver in the long run). Identify all parts and hardware.
Questions?
We’re here to help, just call 800-241-1806. For faster service, have your model and serial number
ready when calling.
Read this manual before using this product.
Failure to follow the instructions and safety precautions in this manual can result in serious
injury or death. Keep this manual in a safe location for future reference.
WARNING: This product can expose you to
chemicals including Nickel, which is known to
the State of California to cause cancer. For more
information go to: www.P65Warnings.ca.gov
Page 2 of 8
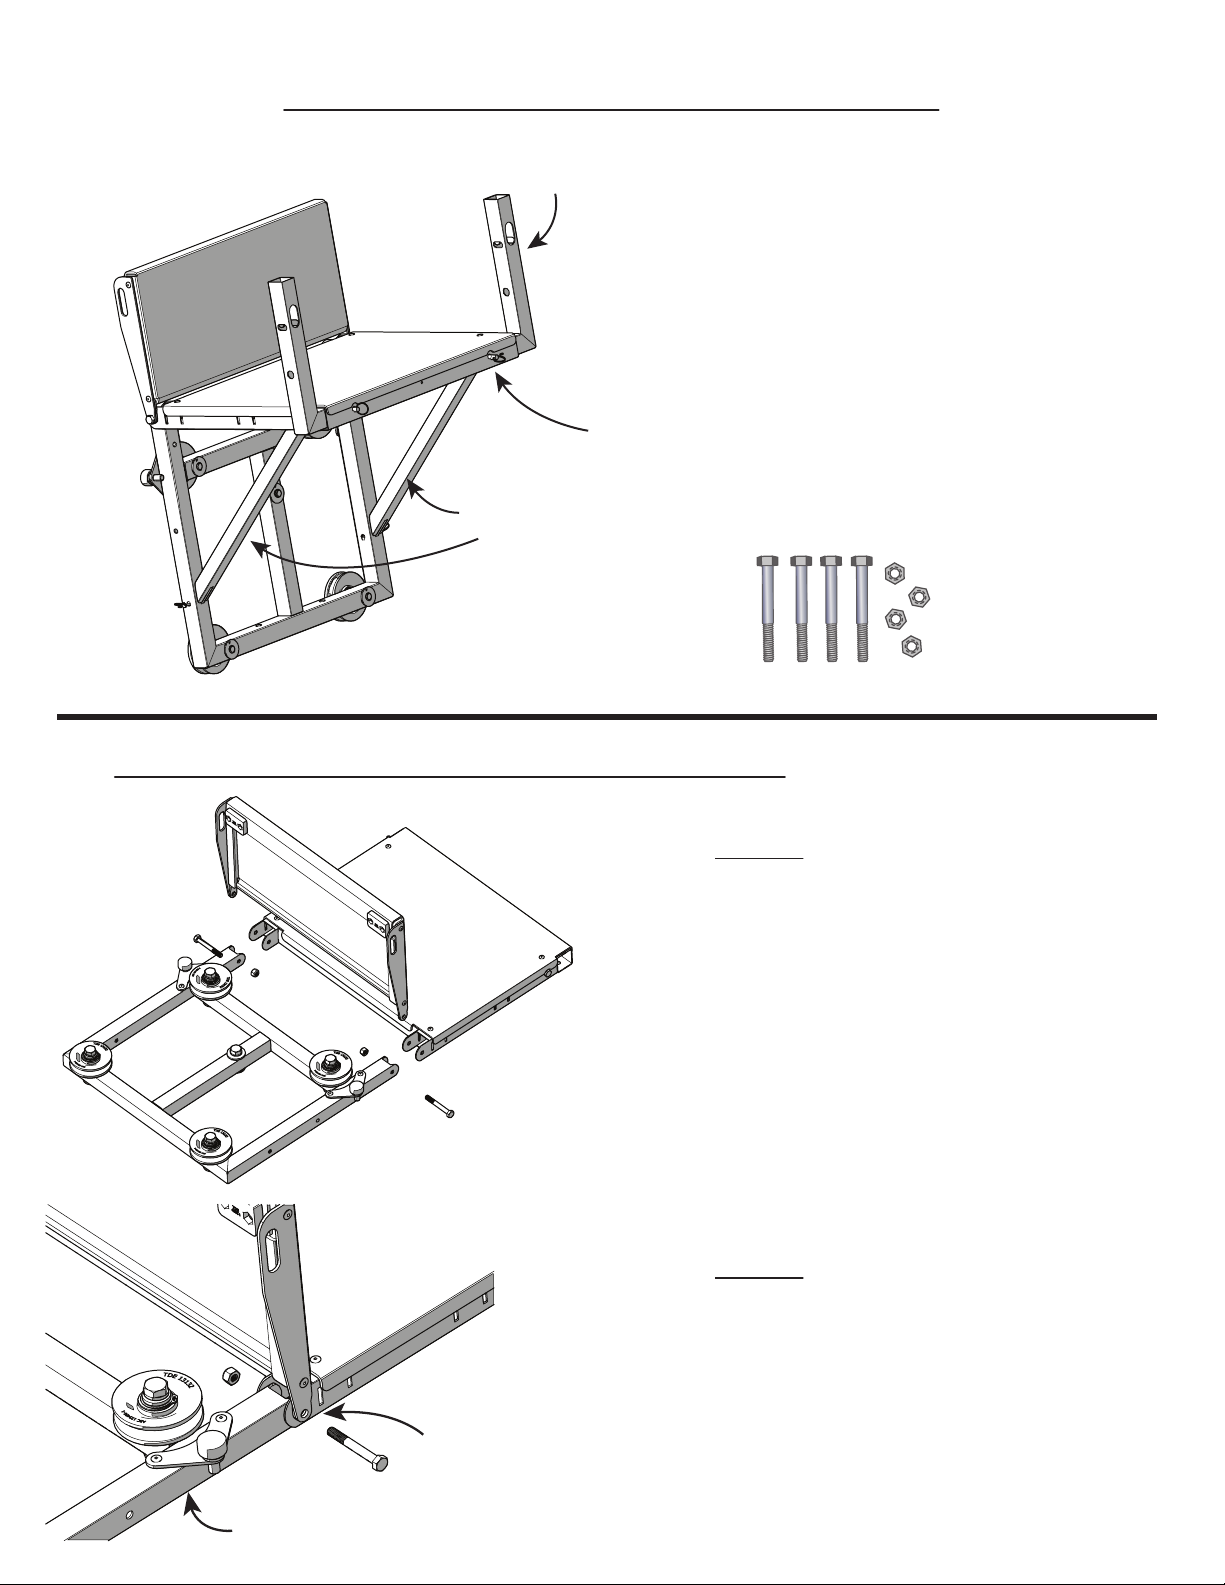
TP250 Carriage Parts Description List
TP250 Carriage Assembly Instructions
Carriage Base
Carriage Base
Carriage Base
Plywood Brackets
Platform Base
Platform Base
Platform Base
Back/Flap
Platform Back/Flap
Platform
Back/Flap
Platform Back/Flap,
Pivot Tab Holes
Description Qty.
Platform Back Flap 1
Platform Base 1
Carriage Base 1
Support Struts w/Pins 2
Plywood Brackets w/Pins 2
5/16”-18 x 2” Bolt 4
5/16” Nyloc Nuts 4
Step #1
Place the Carriage Base (wheels upward)
and Platform Base (Smooth flat top upward)
on a hard flat surface. Place both bases back to
back so the pivot tab holes align with each other.
Position the Platform Back/Flap at a 90˚ angle.
The Back/Flap should have the smooth flat
surface facing the smooth flat surface of
the platform base. Align the pivot tabs/holes with
Back/Flap/Carriage/Platform. The Back/Flap will
overlap both carriage and platform base tabs.
Step #2
Insert 5/16” x 2” Bolt through all three
tab holes (Back/Flap, Carriage and Platform
bases). Tighten nylock nut with the bolt; not
so tight as to prevent free movement.
Repeat #1 and #2 for opposite side.
Support Struts
(TP400 on page 5)
(TP400 on page 5)

404-344-0000 • tiedown.com
605 Stonehill Drive SW, Atlanta, GA 30336
Page 3 of 8
TP250 Carriage Assembly Instructions
Carriage Base
Insert Safety Pins
from the inside
of the carriage
Support Strut
Beveled End
Beveled End
Support Slots
Round End
Platform
Base
Platform Back/Flap
Platform
Back/Flap
Step #3
Lift up one side of the carriage 90˚
and let it rest on its side.
Place the round end of the
support strut in the platform
(underside) base, align with
mounting holes.
The support strut must be
positioned with the beveled
end as shown right.
Insert 5/16”x 2” Bolt through
base and strut. Tighten nylock
nut with the bolt.
Important: Do not over-tighten
nylock nut so tight as to
prevent free movement.
Flip the carriage assembly 180˚.
Repeat for second support strut.
Step #4
Flip the carriage on its side with the
carriage base - wheels down and the
back/flap on flat ground.
With both hands, hold the beveled end
each of the support struts. Slide the
struts upward while holding the strut
and the carriage base with your
hands. Insert the beveled end strut
into the slots on the carriage base.
Step #5
From the inside of the carriage base
insert safety pins for both support
struts (labels indicate pin location).

Page 4 of 8
TP250 Carriage Assembly Instructions
Plywood Brackets
Safety Pins
Step #6
Insert the plywood brackets into slots
on the front of the Platform base.
If you plan to use the plywood
brackets insert the short end into
the slots with the long end 90˚ up.
Insert safety pins on each bracket.
When not in use or during transport
turn the plywood brackets down 90˚
and insert safety pins on both sides.
Step #7
You have completely assembled the TP250
Carriage unit.
Please proceed to the TP250 Operations Manual
for further instructions.
When not in use or during transport
turn the plywood brackets down 90˚
and insert safety pins on both sides.
404-344-0000 • tiedown.com
605 Stonehill Drive SW, Atlanta, GA 30336

404-344-0000 • tiedown.com
605 Stonehill Drive SW, Atlanta, GA 30336
www.tranzsporter.com
Carriage
Assembly
Instructions
TP400
Congratulations
You’ve purchased a roofing hoist manufactured by TIE DOWN ENGINEERING. All of hoist products are easy to
assembly and is solidly built in USA and tested to ensure years of service.
Before You Begin
We’ve included this easy to use instruction sheet to ensure quick, easy assembly of your carriage
platform. Be sure to read the instructions (a time saver in the long run). Identify all parts and hardware.
Questions?
We’re here to help, just call 800-241-1806. For faster service, have your model and serial number
ready when calling.
Page 5 of 8
Read this manual before using this product.
Failure to follow the instructions and safety precautions in this manual can result in serious
injury or death. Keep this manual in a safe location for future reference.
WARNING: This product can expose you to
chemicals including Nickel, which is known to
the State of California to cause cancer. For more
information go to: www.P65Warnings.ca.gov
TP400 Carriage Parts Description List
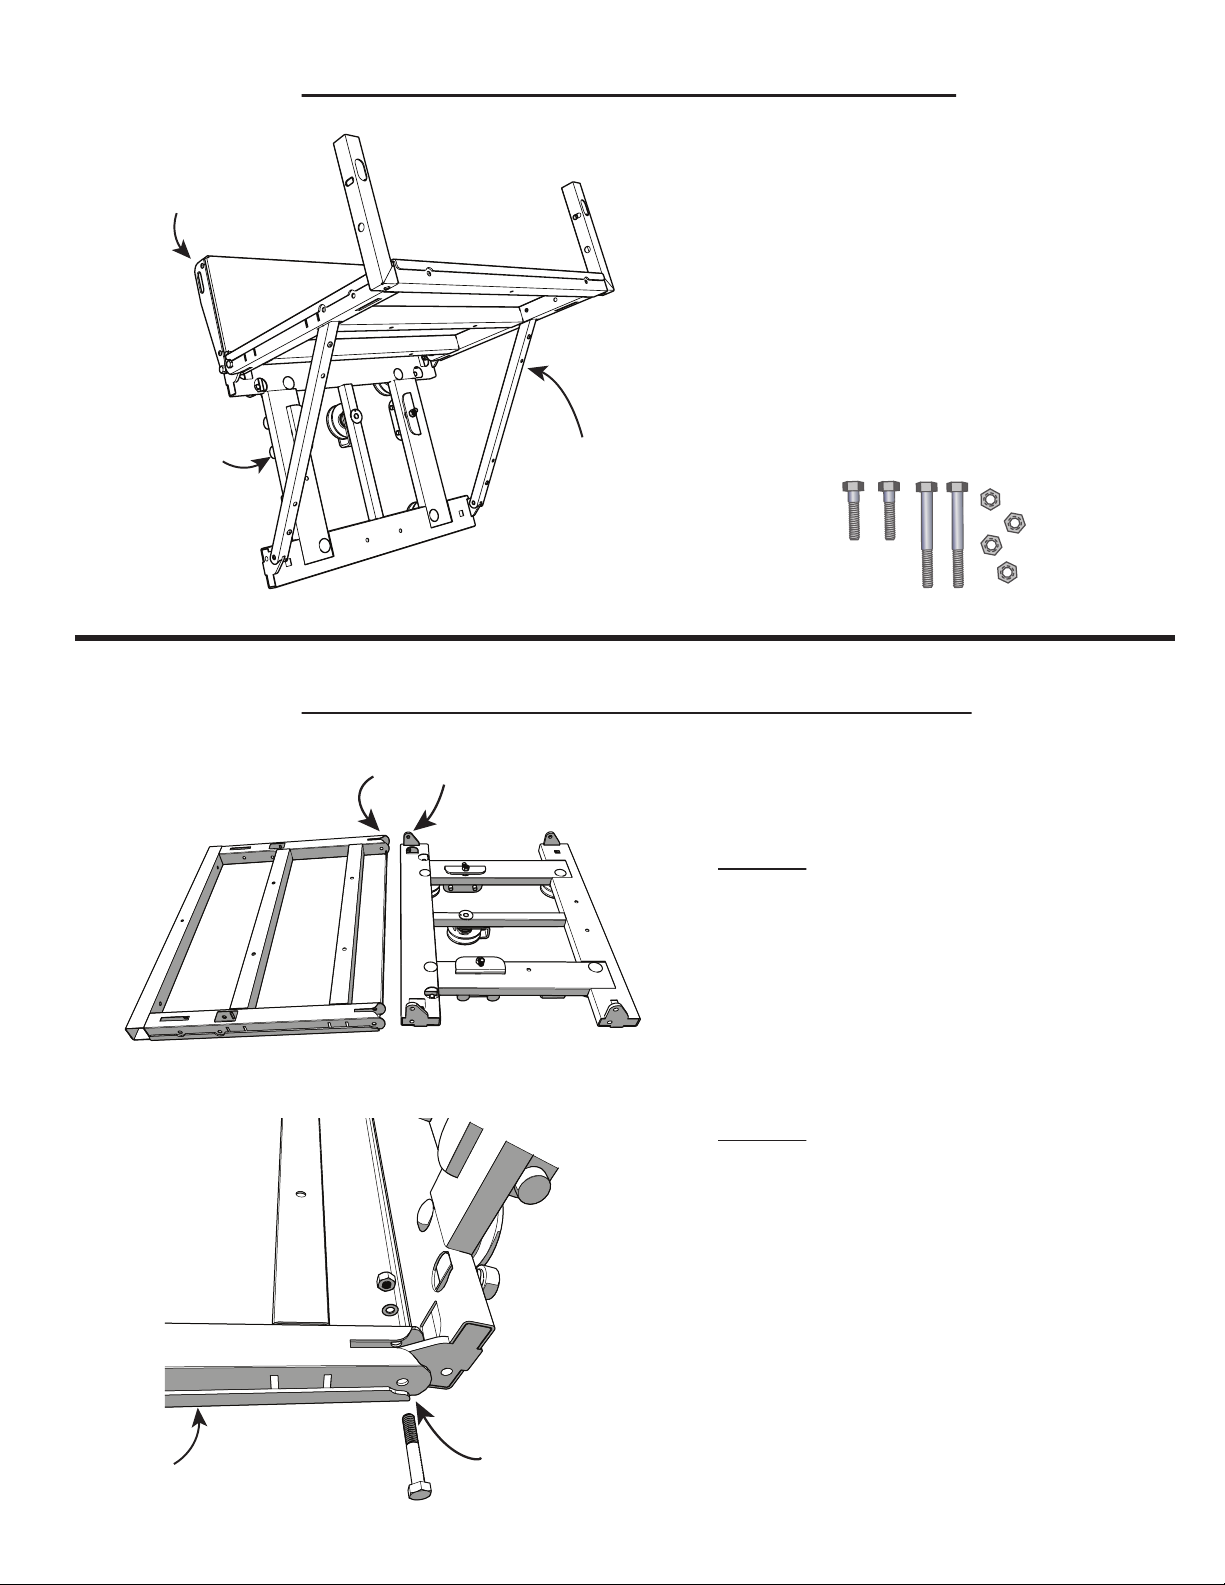
TP400 Carriage Assembly Instructions
Carriage Base
Carriage Base
Carriage Base
Lift This
Side
Support
Strut
Platform
Base
Platform Base
Platform Base
Platform Back/Flap
Platform base/Carriage, Pivot
Tab Holes
Pivot
Tab Holes
Description Qty.
Platform Back Flap 1
Platform Base 1
Carriage Base 1
Support Struts w/Pins 2
Plywood Brackets w/Pins 2
5/16”-18 x 2” Bolt 2
5/16”-18 x 1” Bolt 2
5/16” Nyloc Nuts 4
Step #1
Place the Carriage Base (wheels down)
and Platform Base (Smooth flat top down)
on a hard flat surface. Lift carriage base on
one end (shown left) so the pivot tab holes
align with each other.
Step #2
Insert 5/16” x 2” Bolt through platform and
carriage base tab holes Tighten nyloc nut with
the bolt; not so tight as to prevent free movement.
Repeat opposite side.
Page 6 of 8

TP400 Carriage Assembly Instructions
Support
Strut
Safety Pin
Safety Pin
Platform
Base
Platform Back/Flap
Tab Holes
Carriage Base
Step #3
Flip the carriage base over so that it lays
flat on top of the carriage base
Align the platform back/flap tap holes
with the carriage holes.
Insert 5/16”x 1” bolt through back/flap
tap holes and carriage base, Tighten nylock nut
with the bolt. Do not over-tighten nyloc nut so
tight as to prevent free movement.
Repeat for the other side.
Step #4
Fold the platform back/flap down,
lift the carriage base up 90 degrees
to both back/flap and platform base.
Position support strut with tab over the
carriage base tab as shown.
Insert safety pin. Insert safety pin
between the platform base and strut
as shown right.
Repeat for the other side.
Platform
Back Flap
Page 7 of 8
Carriage Base
404-344-0000 • tiedown.com
605 Stonehill Drive SW, Atlanta, GA 30336

TP400 Carriage Assembly Instructions
Step #6
You have completely assembled the TP400
Carriage unit.
Please proceed to the TP400 Operations Manual
for further instructions.
Plywood Brackets
Safety Pins
Plywood brackets used when
handling panel goods.
Plywood brackets in position for
transport or storage.
Step #5
Flip the completed base over. Insert the plywood brackets into slots on the front of the Platform base.
If you plan to use the plywood brackets insert the short end into the slots with the long end 90˚ up.
Insert safety pins on each bracket.
When not in use or during transport turn the plywood
brackets down 90˚ and insert safety pins on both sides.
Page 8 of 8
Safety Products Division
www.tiedown.com
Atlanta, Georgia 30336
800-241-1806 • 404-344-0000
ISO 9001:2015 Certification
Intellectual property of TIE DOWN Inc. ©2018 TIE DOWN, Inc.
Instruction #08290 (E1563 Rev. 11/23/20)
Other manuals for TP250
3
This manual suits for next models
1
Other TRANZSPORTER Lifting System manuals


Popular Lifting System manuals by other brands


Aqua Creek Products
Aqua Creek Products Power EZ F-03PEZ manual

Ravaglioli
Ravaglioli RAV4300 Translation of the original instructions

Simon, Evers & Co
Simon, Evers & Co HTF-E operating manual

LoadSurfer
LoadSurfer XTN 540-1150 instructions

Braun
Braun UVL Series Operator's manual

Braun
Braun Under-Vehicle Lift NUVL603C Service manual