Traxxas TQ 2.4GHz User manual

Introduction
Thank you for purchasing the Traxxas TQ 2.4GHz radio system with Traxxas Link. The transmitter’s
easy-to-use design provides instant driving fun for new R/C enthusiasts, and also offers a
full compliment of pro-level tuning features for advanced users – or anyone interested in
experimenting with the performance of their model. The steering and throttle channels feature
adjustable Exponential, End Points, and Sub-Trims. Steering and braking Dual Rate are also
available. Many of the next-level features are controlled by the Multi-Function knob, which can be
programmed to control a variety functions. The detailed instructions and Menu Tree (back page)
included in this addendum will help you understand and operate the advanced functions of the
new TQ 2.4GHz radio system. For additional information and how-to videos, visit Traxxas.com.
Important Radio System Precautions
For maximum range, always hold the transmitter so the antenna is in a vertical position
(pointing straight up). The transmitter’s antenna can be swiveled and angled to allow for a
vertical position if necessary.
Do not kink the receiver’s antenna wire. Kinks in the antenna wire will reduce range.
DO NOT CUT any part of the receiver’s antenna wire. Cutting the antenna will reduce range.
Extend the antenna wire in the model as far as possible for maximum range. It is not
necessary to extend the antenna wire out of the body, but wrapping or coiling the antenna
wire should be avoided.
Do not allow the antenna wire to extend outside the body without the protection of an
antenna tube, or the antenna wire may get cut or damaged, reducing range. Always keep the
wire protected (in the antenna tube) to prevent the chance of damage.
Installing Transmitter Batteries
Your TQ 2.4GHz transmitter uses 4 AA batteries. The battery
compartment is located in the base of the transmitter.
1. Remove the battery compartment door by pressing
the tab and lifting the door up.
*
2. Install the batteries in the correct orientation as
indicated in the battery compartment.
3. Reinstall the battery door and snap it closed.
4. Turn on the transmitter and check the status indicator
for a solid green light.
If the status LED flashes red, the transmitter batteries may be weak,
discharged or possibly installed incorrectly. Replace with new or
freshly charged batteries. The power indicator light does not indicate
the charge level of the battery pack installed in the model. Refer to the
Troubleshooting section on page 3 for more information on the transmitter’s Status LED codes.
TQ 2.4GHz Radio System Basic Adjustments
Steering Trim
The electronic steering trim located on the face of the transmitter adjusts the
neutral (center) point of the steering channel.
Multi-Function Knob
The Multi-Function knob can be programmed to control a variety of functions.
From the factory, the Multi-Function knob controls steering sensitivity, also
known as exponential or “expo.” When the knob is turned counterclockwise all
the way to the left (default position), expo is off and steering sensitivity will be linear (the most
commonly used setting). Turning the knob clockwise will “add expo” and decrease the steering
sensitivity in the initial range of steering wheel travel left or right from center. For more detail on
steering exponential, refer to page 2.
Throttle Neutral Adjustment
The throttle neutral adjustment is located on the transmitter face and
controls the forward/reverse travel of the throttle trigger. Change
the adjustment by pressing the button and sliding it to the desired
position. There are two settings available:
50/50: Allows equal travel for both acceleration and reverse.
70/30: Allows more throttle travel (70%) and less reverse travel (30%).
We strongly recommend to leave this control in its factory location until you become familiar
with all the adjustments and capabilities of your model.
Note: 50/50 is the default factory setting and the required setting for Traxxas nitro models. To
change the throttle neutral adjust position for an electric model, turn the transmitter off before
adjusting the neutral position. You will need to reprogram your electronic speed control to
recognize the 70/30 setting. See your Owner’s Manual for instructions.
KC1291-R02 100622
Traxxas TQ 2.4GHz Instructions
Covers Model #2208, #2209
THROTTLE TRIM
100100
00
THROTTLE TRIM
100100
00
TQ 2.4GHz Transmitter
TQ 2.4GHz Receiver
Antenna
Steering
Trim
Multi-Function
Knob
Throttle
Trigger
Shift Switch
Model #2208 4-Channel
Transmitters Only
T-Lock Switch
Model #2208
4-Channel
Transmitters Only
Throttle Neutral
Adjust
Steering Wheel
Power
Switch
Battery
Compartment
Set Button
Menu Button
Red/Green Status LED
see page 3 for more info
Using the TQ 2.4GHz Radio System
The TQ 2.4GHz Radio System has been pre-adjusted at the factory. The adjustment should
be checked before running the model, in case of movement during shipping. Here’s how:
1. Turn the transmitter switch on. The status LED on the transmitter should be solid green
(not flashing).
2.
If you have an electric model, elevate the model on a block or a stand so that all the tires
are off the ground. Make sure your hands are clear of the moving parts of the model.
3. If you have an electric model, plug the battery pack in the model into the speed control.
4. Switch the receiver on. Do this with a nitro vehicle by switching the on/off switch to “on.”
If you have an electric vehicle, you must turn the speed control on to power the receiver.
The on/off switch is integrated into the speed control. With the transmitter on, press and
release the ESC button (.25 seconds). The LED will shine indicating the model is on.
5. Turn the steering wheel on the transmitter back and forth and check for rapid operation
of the steering servo. Also, check that the steering mechanism is not loose or binding. If
the steering operates slowly, check for weak batteries.
6.
When looking down at model, the front wheels should be
pointing straight ahead. If the wheels are turned slightly
to the left or right, slowly adjust the steering trim control
on the transmitter until they are pointing straight ahead.
7. Gently operate the throttle trigger to ensure that you have forward and reverse
operation, and that the motor stops when the throttle trigger is at neutral. Warning: Do
not apply full throttle in forward or reverse while the model is elevated.
8. If you have a nitro model, operate the throttle trigger on the transmitter and check
for rapid operation of the throttle servo. When the throttle trigger is pulled back, the
carburetor should open (slide moves out). When the throttle trigger is pushed all the
way forward, the brake should lock.
9. Once adjustments are made, turn off the receiver on your model, followed by the hand-
held transmitter.
To prevent loss of radio range
do not kink or cut the black
wire, do not bend or cut the
metal tip, and do not cut the
white wire at the end of the
metal tip.
1/16
E-Revo VXL
All Other
Traxxas Models
No No
Steering
Steering
Throttle
Shift**
Front T-Lock**
Rear T-Lock/Battery**
TRAXXAS.com
Traxxas, 1100 Klein Road, Plano, TX 75074,
Phone: 972-265-8000, Fax: 972-265-8011, e-mail: [email protected]
*Always keep your Quick Reference Guide in your transmitter.
** Model #2208 4-Channel transmitter only
1

Range-Testing the Radio System
Before each running session with your model, you should range-test your radio system to
ensure that it operates properly.
1.
Turn on the radio system and check its operation as described in the previous section.
2.
Have a friend hold the model. Make sure hands and clothing are clear of the wheels and
other moving parts on the model.
3.
Make sure your transmitter antenna is fully extended, and then walk away from the model
with the transmitter until you reach the farthest distance you plan to operate the model.
4.
Operate the controls on the transmitter once again to be sure that the model
responds correctly.
5.
Do not attempt to operate the model if there is any problem with the radio system or
any external interference with your radio signal at your location.
• Higher Speeds Require Greater Distance
The faster you drive your model, the more quickly it will near the limit of radio range. At
60mph, a model can cover 88 feet every second! It’s a thrill, but use caution to keep your
model in range. If you want to see your model achieve its maximum speed, it is best to
position yourself in the middle of the truck’s running area, not the far end, so you drive
the truck towards and past your position. In addition to maximizing the radio’s range, this
technique will keep your model closer to you, making it easier to see and control.
No matter how fast or far you drive your model, always leave adequate space between
you, the model, and others. Never drive directly toward yourself or othe
rs
.
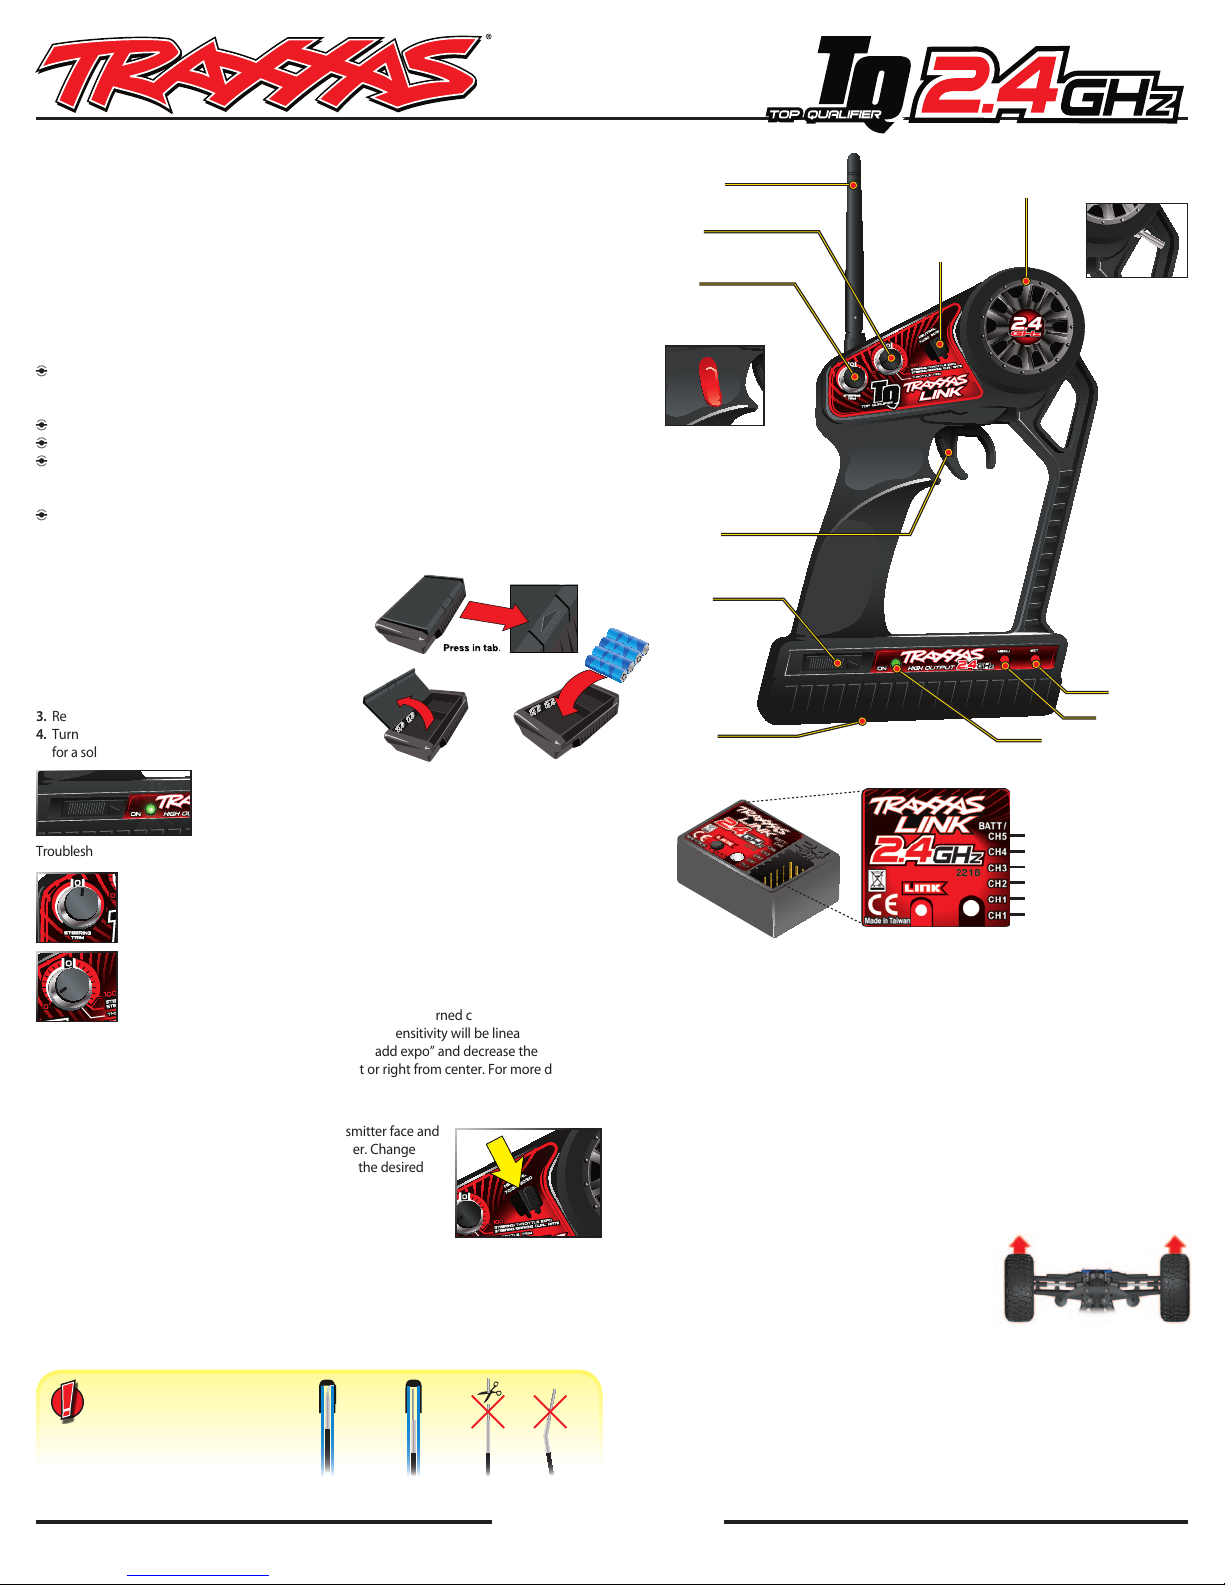
TQ 2.4GHz Binding Instructions
For proper operation, the transmitter and receiver must be electronically ‘bound.’ This has
been done for you at the factory. Should you ever need to re-bind the system or bind
to an additional transmitter or receiver, follow these instructions. Note: the receiver must
be connected to a 4.8-6.0v (nominal) power source for binding and the transmitter and
receiver must be within 5 feet of each other.
1. Press and hold the transmitter’s SET button as you switch transmitter on. The
transmitter’s LED will flash red slowly. Release the SET button.
2.
Press and hold the receiver’s LINK button as you switch the model on. Release the LINK button.
3.
When the transmitter and receiver’s LEDs turn solid green, the system is bound and ready
for use. Confirm that the steering and throttle operate properly before driving your model.
Steering Sensitivity (Exponential)
The Multi-Function knob on the TQ 2.4GHz transmitter has been programmed to control
Steering Sensitivity (also known as exponential). The standard setting for Steering Sensitivity is
“normal (zero exponential),” with the dial full left in its range of travel. This setting provides linear
servo response: the steering servo’s movement will correspond exactly with the input from the
transmitter’s steering wheel. Turning the knob clockwise from center will result in “negative
exponential” and decrease steering sensitivity by making the servo less responsive near neutral,
with increasing sensitivity as the servo nears the limits of its travel range. The farther you turn
the knob, the more pronounced the change in steering servo movement will be. The term
“exponential” comes from this effect; the servo’s travel changes exponentially relative to the
input from the steering wheel. The exponential effect is indicated as a percentage—the greater
the percentage, the greater the effect. The illustrations below show how this works.
Normal Steering Sensitivity (0% exponential)
In this illustration, the steering servo’s travel
(and with it, the steering motion of the model’s
front wheels) corresponds precisely with the
steering wheel. The ranges are exaggerated for
illustrative purposes.
Decreased Steering Sensitivity (Negative Exponential)
By turning the Multi-Function knob clockwise,
the steering sensitivity of the model will be
decreased. Note that a relatively large amount of
steering wheel travel results in a smaller amount
of servo travel. The farther you turn the knob, the
more pronounced the effect becomes. Decreased
steering sensitivity may be helpful when driving
on low-traction surfaces, when driving at high
speed, or on tracks that favor sweeping turns where gentle steering
inputs are required. The ranges are exaggerated for illustrative purposes.
Experiment! Try varying degrees of exponential. It’s easy to go back to
“zero” if you don’t like the effect. There’s no wrong way to adjust exponential. Any setting that
makes you more comfortable with your car’s handling is the “right setting.”
TQ 2.4GHz Advanced Tuning Guide
Your Traxxas transmitter has a programmable Multi-Function knob that can be set to control
various advanced transmitter functions. Accessing the programming menu is done by
using the menu and set buttons on the transmitter and observing signals from the LED. An
explanation of the menu structure follows. Experiment with the settings and features to see if
they can improve your driving experience. See the Menu Tree on page 4 for more information.
Throttle Sensitivity (Throttle Exponential)
The Multi-Function knob can be set to control Throttle Sensitivity. Throttle Sensitivity
works the same way as Steering Sensitivity as described above, but applies the effect to
the throttle channel. Only forward throttle is affected; brake/reverse travel remains linear
regardless of the Throttle Sensitivity setting.
Steering Percentage (Dual Rate)
The Multi-Function knob can be set to control the amount (percentage) of servo travel applied
to steering. Turning the Multi-Function knob fully clockwise will deliver maximum steering
throw; turning the knob counter-clockwise reduces steering throw (note: turning the dial
counter-clockwise to its stop will eliminate all servo travel). Be aware that the steering End Point
settings define the servo’s maximum steering throw. If you set Steering Percentage to 100% (by
turning the Multi-Function knob fully clockwise), the servo will travel all the way to its selected
end point, but not past it. Many racers set Dual Rate so they have only as much steering throw
as they need for the track’s tightest turn, thus making the car easier to drive throughout the
rest of the course. Reducing steering throw can also be useful in making a car easier to control
on high-traction surfaces, and limiting steering output for oval racing where large amounts of
steering travel are not required.
Braking Percentage
The Multi-Function knob may also be set to control the amount of brake travel applied by
the servo in a nitro-powered model. Electric models do not have a servo-operated brake,
but the Braking Percentage function still operates the same way in electric models. Turning
the Multi-Function knob full clockwise will deliver maximum brake throw; turning the knob
counter-clockwise reduces brake throw (Note: Turning the dial counter-clockwise to its stop
will eliminate all brake action).
Throttle Trim
Setting the Multi-Function knob to serve as throttle trim will allow you to adjust the
throttle’s neutral position to prevent unwanted brake drag or throttle application when the
transmitter trigger is at neutral. Note: Your transmitter is equipped with a Throttle Trim Seek
mode to prevent accidental runaways. See below for more information.
Steering and Throttle End Points
The TQ 2.4GHz transmitter allows you to choose the limit of the servo’s travel range (or its “end
point”) independently for left and right travel (on the steering channel) and throttle/brake travel
(on the throttle channel). This allows you to fine-tune the servo settings to prevent binding
caused by the servo moving steering or throttle linkages (in the case of a nitro car) farther
than their mechanical limits. The end point adjustment settings you select will represent what
you wish to be the servo’s maximum travel; the Steering Percentage or Braking Percentage
functions will not override the End Point settings.
Steering and Throttle Sub-Trim
The Sub-Trim function is used to precisely set the neutral point of the steering or throttle servo in
the event that simply setting the trim knob to “zero” does not completely center the servo. When
selected, Sub-Trim allows finer adjustment to the servo output shaft’s position for precise setting
of the neutral point. Always set the Steering Trim knob to zero before making final adjustment
(if required) using Sub-Trim. If Throttle Trim has been previously adjusted, the Throttle Trim will
need to be reprogrammed to “zero” before making final adjustment using Sub-Trim.
Disabling the Multi-Function Knob (Setting Lock)
Once you’ve adjusted all of these settings the way you like them, you may want to disable the
Multi-Function knob so none of your settings can be changed. This is especially handy if you
operate multiple vehicles with a single transmitter via Traxxas Link.
Throttle Trim Seek Mode
When the Multi-Function knob is set to throttle trim, the transmitter remembers the
throttle trim setting. If the throttle trim knob is moved from the original setting while
the transmitter is off, or while the transmitter was used to control another model, the
transmitter ignores the actual position of the trim knob. This prevents the model from
accidentally running away. The LED on the face of the transmitter will rapidly blink
green and the throttle trim knob (Multi-Function knob) will not adjust the trim until it
is moved back to its original position saved in memory. To restore throttle trim control,
simply turn the multi-function knob either direction until the LED stops blinking.
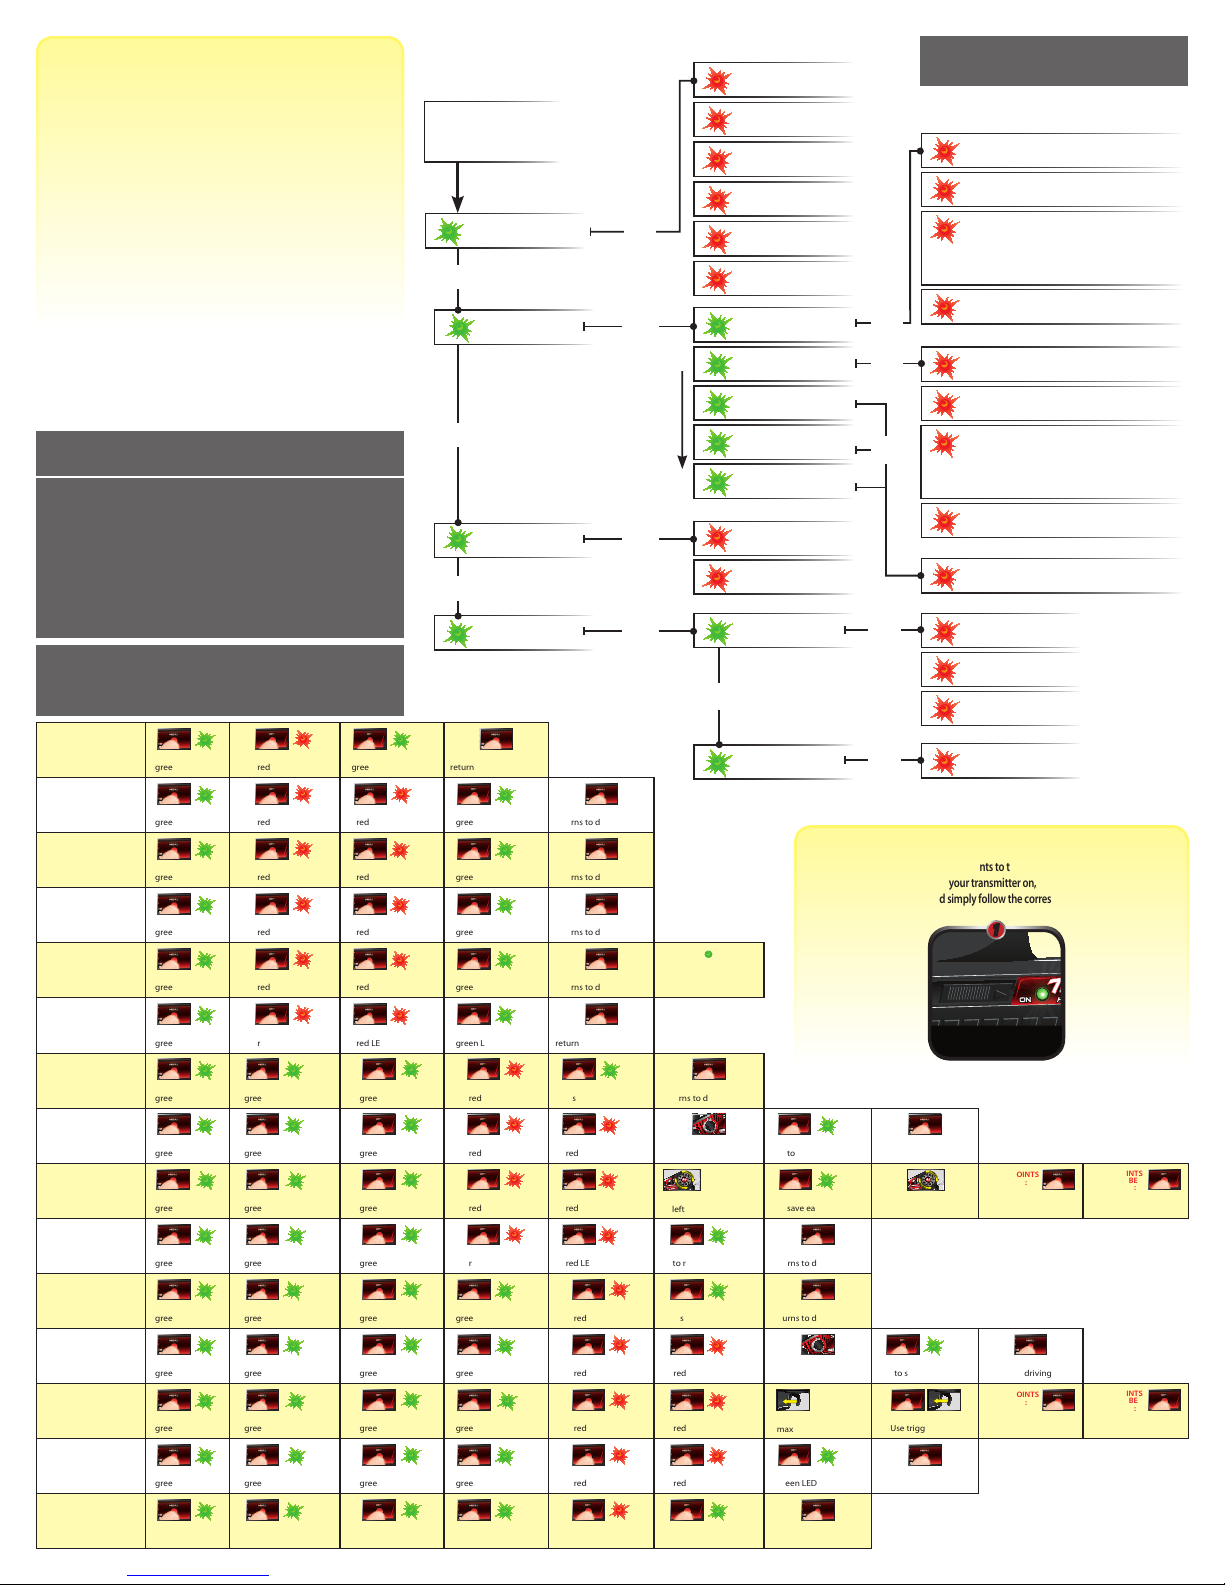
Turning Range
at Transmitter
Effective Turning
Range on Model
Profile 1: 1/16th E-Revo • 1/16th E-Revo VXL
1/16th Slash 4WD • 1/16th Slash VXL 4WD
E-Revo Brushless • E-Revo • Revo • Revo 3.3
Slash • Slash 4X4 • Slayer • Summit • T-Maxx 3.3
Turn
Transmitter OFF
Hold both
MENU and SET
Turn
Transmitter ON
Release MENU and
SET red LED blinks
Profile 2: Bandit • Bandit VXL • Blast • E-Maxx Brushless
E-Maxx • Rustler • Rustler VXL • Stampede
Stampede VXL • Nitro Stampede • Nitro Sport • Villain EX
Turn
Transmitter OFF
Hold both
MENU and SET
Turn
Transmitter ON
Release MENU and
SET red LED blinks
x
2
Press MENU
red LED blinks (x2)
Press SET to clear settings. LED will turn solid
green. Transmitter is restored to default
Profile 3: Jato, Jato 3.3
Turn
Transmitter OFF
Hold both
MENU and SET
Turn
Transmitter ON
Release MENU and
SET red LED blinks
x
3
Press MENU twice
red LED blinks (x3)
Press SET to clear settings. LED will turn solid
green. Transmitter is restored to default
Profile 4: Nitro 4-Tec, Nitro Rustler
Turn
Transmitter OFF
Hold both
MENU and SET
Turn
Transmitter ON
Release MENU and
SET red LED blinks
x
4
Press MENU three times
red LED blinks (x4)
Press SET to clear settings. LED will turn solid
green. Transmitter is restored to default
Profile 5: T-Maxx Classic, S-Maxx
Turn
Transmitter OFF
Hold both
MENU and SET
Turn
Transmitter ON
Release MENU and
SET red LED blinks
x
5
Press MENU four times
red LED blinks (x5)
Press SET to clear settings. LED will turn solid
green. Transmitter is restored to default
Press SET to clear settings. LED will turn
solid green. Transmitter is restored to default
Selecting Your Model Profile
(Resetting to Defaults)
The TQ 2.4 GHz system has been
programmed with servo reversing
profiles for use with current Traxxas
models. Find your model on this chart
and follow the steps to set the default
transmitter settings for your model.
The settings for servo direction will
be set, but you may need to adjust
the trim and endpoint settings for
the steering and throttle channels.
Should you ever need restore your
transmitter to the default settings for
your model, use the steps described
in this chart. See the next page for
using the Traxxas TQ 2.4GHz radio
system with non-Traxxas models.
2

Multiple Settings and the Multi-Function Knob
It is important to note that settings made with the Multi-Function knob are “overlaid” on top
of each other. For example, if you assign the Multi-Function to adjust Steering Percentage
and set it for 50%, then reassign the knob to control Steering Sensitivity, the transmitter will
“remember” the Steering Percentage setting. Adjustments you make to Steering Sensitivity
will be applied to the 50% steering throw setting you selected previously. Likewise,
setting the Multi-Function knob to “disabled” will prevent the knob from making further
adjustments, but the last setting of the Multi-Function knob will still apply.
Traxxas Link
Traxxas Link is an exclusive, patent-pending feature of the TQ 2.4GHz transmitter. Each time
the transmitter is bound to a new receiver, it saves that receiver in its memory along with
all the settings assigned to that receiver. When the transmitter and any bound receiver are
switched on, the transmitter automatically recalls the settings for that receiver. There is no
need to manually select your vehicle from a list of model memory entries.
Model Lock
The Traxxas Link feature can store up to twenty models (receivers) in its memory. If you
bind a twenty-first receiver, Traxxas Link will delete the “oldest” receiver from its memory
(in other words, the model you used the longest time ago will be deleted). Activating Model
Lock will lock the receiver in memory so it cannot be deleted.
You may also bind multiple Traxxas Link transmitters to the same model making it possible to
pick up any transmitter and any previously bound model in your collection and simply turn them
on and drive. With Traxxas Link, there is no need remember which transmitter goes with which
model and there is never a need to have to select any model from a list of model memory entries.
The transmitter and receiver do it all for you automatically.
To activate Model Lock:
1. Switch on the transmitter and receiver you wish to lock.
2. Press and hold MENU. Release when the status LED blinks green.
3. Press MENU three times. The status LED will blink green four times repeatedly.
4. Press SET. The status LED will blink green in single-flash intervals.
5. Press SET once. The status LED will blink red once repeatedly.
6. Press MENU once, the LED will blink red twice repeatedly.
7. Press SET, the LED will blink rapidly green. The memory is now locked. Press MENU and
SET to return to driving mode. Note: To unlock a memory, press SET twice at step 5. The
LED will blink rapidly green to indicate the model is unlocked. To unlock all models, press
MENU twice at step 6 and then press SET.
To delete a model:
At some point, you may wish to delete a model you no-longer drive from the memory.
1. Switch on the transmitter and receiver you wish to delete.
2. Press and hold MENU. Release when the status LED blinks green.
3. Press MENU three times. The status LED will blink green four times repeatedly.
4. Press SET once. The status LED will blink green once repeatedly.
5. Press MENU once. The status LED will blink green twice repeatedly.
6. Press SET. The memory is now selected to be deleted. Press SET to delete the model. Press
and hold MENU to return to driving mode.
Using the Traxxas TQ 2.4GHz Radio System with non-Traxxas Models
The TQ 2.4GHz radio system can be used
with all popular servos in any hobby-grade
R/C vehicle. From the factory, the transmitter
is set for Profile 1, with each channel set as
“reversed.” The illustration below indicates the
direction the servos will operate. Follow the
instructions on page 4 if you need to change
these setting(s) to suit your model.
LED Color / Pattern Name Notes
Solid green Normal Driving Mode See page 1 for information on how to use your transmitter controls.
Slow red (0.5 sec on / 0.5 sec off) Binding See page 2 for more information on binding.
Flashing fast green (0.1 sec on / 0.15 sec off) Throttle Trim Seek Mode Turn the Multi-Function knob right or left until the LED stops flashing.
See above for more information.
Flashing medium red (0.25 sec on / 0.25 sec off) Low Battery Alarm Put new batteries in the transmitter. See page 1 for more information.
Flashing fast red (0.125 sec on / 0.125 sec off) Link Failure / Error Transmitter and receiver are no longer bound. Turn the system off and then back on to resume
normal operation. Find source of the link failure (ie: out of range, low batteries, damaged antenna).
Programming Patterns
Counts out number (green or red) then pauses Current menu position See Menu Tree for more information.
Fast green 8 times Menu setting accepted (on SET)
Fast red 8 times Menu SET invalid User error such as trying to delete a locked model.
LED Color / Pattern Name Notes
Solid green Normal Driving Mode See page 1 for information on how to use your transmitter controls.
Slow red (0.5 sec on / 0.5 sec off) Binding See page 2 for more information on binding.
Flashing fast red (0.125 sec on / 0.125 sec off) Fail-Safe / Low Voltage Detect Consistent Low Voltage in the receiver triggers Fail-Safe so there is enough power to center the
throttle servo before it completely loses power.
x8
x8
or
TRANSMITTER LED CODES
RECEIVER LED CODES
Failsafe
Your Traxxas radio system is equipped with a built-in failsafe function that returns
the throttle to its last saved neutral position in the event of a signal loss. The LED
on the transmitter and the receiver will rapidly flash red.
Profile 1: 1/16th E-Revo • 1/16th E-Revo VXL
1/16th Slash 4WD • 1/16th Slash VXL 4WD
E-Revo Brushless • E-Revo • Revo • Revo 3.3
Slash • Slash 4X4 • Slayer • Summit • T-Maxx 3.3
Turn
Transmitter OFF
Hold both
MENU and SET
Turn
Transmitter ON
Release MENU and
SET red LED blinks
Profile 2: Bandit • Bandit VXL • Blast • E-Maxx Brushless
E-Maxx • Rustler • Rustler VXL • Stampede
Stampede VXL • Nitro Stampede • Nitro Sport • Villain EX
Turn
Transmitter OFF
Hold both
MENU and SET
Turn
Transmitter ON
Release MENU and
SET red LED blinks
x
2
Press MENU
red LED blinks (x2)
Press SET to clear settings. LED will turn solid
green. Transmitter is restored to default
Profile 3: Jato, Jato 3.3
Turn
Transmitter OFF
Hold both
MENU and SET
Turn
Transmitter ON
Release MENU and
SET red LED blinks
x
3
Press MENU twice
red LED blinks (x3)
Press SET to clear settings. LED will turn solid
green. Transmitter is restored to default
Profile 4: Nitro 4-Tec, Nitro Rustler
Turn
Transmitter OFF
Hold both
MENU and SET
Turn
Transmitter ON
Release MENU and
SET red LED blinks
x
4
Press MENU three times
red LED blinks (x4)
Press SET to clear settings. LED will turn solid
green. Transmitter is restored to default
Profile 5: T-Maxx Classic, S-Maxx
Turn
Transmitter OFF
Hold both
MENU and SET
Turn
Transmitter ON
Release MENU and
SET red LED blinks
x
5
Press MENU four times
red LED blinks (x5)
Press SET to clear settings. LED will turn solid
green. Transmitter is restored to default
Warranty Information
Traxxas warrants your Traxxas electronic components to be free from defects
in materials or workmanship for a period of thirty (30) days from the date of
purchase. Before returning any product for warranty service, please contact our
service department (1-888-TRAXXAS)* to discuss the problem you are having
with the product. After contacting Traxxas, send the defective unit along with
your proof of purchase indicating the date purchased, your return address,
e-mail, a daytime phone number, and a brief description of the problem to:
Traxxas
1100 Klein Road
Plano, TX 75074
Detailed Limitations for Electronic Components:
• Allowing water, moisture, or other foreign material to enter the component or
get onto the PC board.
• Exceeding the maximum input voltage of the electronic component.
• Reverse voltage application.
• Incorrect installation or wiring.
• Components worn from use.
• Splices to the input or switch harnesses.
• Disassembling the case.
• Excessive force when adjusting, pressing, or turning any of the controls.
• Tampering with the internal electronics.
• Incorrect wiring of an FET servo.
• Allowing exposed wiring to short circuit.
• Any damage caused by crash, flooding, or act of God.
Limitations
Any and all warranty coverage does not cover replacement of parts and
components damaged by abuse, neglect, improper or unreasonable use, crash
damage, water or excessive moisture, chemical damage, improper or infrequent
maintenance, accident, unauthorized alteration or modification, or items that
are considered consumable. Traxxas will not pay for the cost of shipping or
transportation of a defective component from you to us.
Limitations of Liability
Traxxas makes no other warranties expressed or implied. Traxxas shall not be
liable for any special, indirect, incidental, or consequential damages arising out of
the assembly, installation, or use of their products or any accessory or chemical
required to use their products. By the act of operating/using the product, the
user accepts all resulting liability. In no case shall Traxxas’ liability exceed the
actual purchase price paid for the product. Traxxas reserves the right to modify
warranty provisions without notice. All warranty claims will be handled directly
by Traxxas. The Traxxas warranty gives the customer specific legal rights and
possibly other rights that vary from state to state. The customer is required to fill
out and return the Registration Card enclosed with the product as a condition of
the coverage and performance of the warranty. All dollar amounts stated are in
United States dollars. The term “lifetime” shall refer to the product’s production
life at Traxxas. Traxxas is not obligated to provide upgraded products at a
reduced rate when a previous product’s production cycle has ended.
Traxxas Extended Lifetime Electronics Warranty:
After the expiration date of the free warranty period, Traxxas will repair electronic
components for a flat rate. The electronic products covered by this extended
service plan include electronic speed controls, transmitters, receivers, servos,
and battery chargers. Motors, batteries, and mechanical speed controls are not
covered. The covered repairs are limited to non-mechanical components that
have NOT been subjected to abuse, misuse, or neglect. Products damaged by
intentional abuse, misuse, modification, or neglect, may be subject to additional
charges. Visit Traxxas.com or call 1-888-TRAXXAS (1-888-872-9927) for details on
extended warranty service and rates.
FCC Compliance
This device complies with the limits for a Class B digital device as described in
part 15 of the FCC rules. Operation is subject to the following two conditions: (1)
This device may not cause harmful interference, and (2) this device must accept
any interference received, including interference that may cause undesired
operation.
The limits for a Class B digital device are designed to provide reasonable
protection against harmful interference in residential settings. This product
generates, uses and can radiate radio frequency energy, and, if not operated
in accordance with the instructions, may cause harmful interference to radio
communications.
The user is cautioned that changes or modifications not expressly approved by
the party responsible for compliance could void the user’s authority to operate
the equipment.
*U.S. customers only.
Factory Servo Reversing Settings:
Channel 1
Steering
Channel 2
Throttle/Brake
Channel 3*
Rocker Switch
Channel 4/5*
3-Position Switch
3
* Model #2208 4-Channel transmitter only
Ch. 4 Ch. 5

MENU TREE FORMULAS
To select functions and make adjustments to the TQ 2.4GHz transmitter without
referencing the menu tree, turn your transmitter on, find the function in the left
column you wish to adjust, and simply follow the corresponding steps.
Always turn your
transmitter on first.
1
Set Multi-Function
knob for STEERING
SENSITIVITY (Expo)
Press/hold MENU
green LED blinks
Press SET
red LED blinks
x
8
Press SET to confirm
green LED blinks (x8)
Press/hold MENU
returns to driving mode
Set Multi-Function
knob for THROTTLE
SENSITIVITY (Expo)
Press/hold MENU
green LED blinks
Press SET
red LED blinks
x
2
Press MENU to confirm
red LED blinks (x2)
x
8
Press SET to select
green LED blinks (x8)
Press/hold MENU
returns to driving mode
Set Multi-Function
knob for STEERING
DUAL RATE (%)
Press/hold MENU
green LED blinks
Press SET
red LED blinks
x
3
Press MENU twice
red LED blinks (x3)
x
8
Press SET to select
green LED blinks (x8)
Press/hold MENU
returns to driving mode
Set Multi-Function
knob for BRAKING
PERCENTAGE (%)
Press/hold MENU
green LED blinks
Press SET
red LED blinks
x
4
Press MENU 3 times
red LED blinks (x4)
x
8
Press SET to select
green LED blinks (x8)
Press/hold MENU
returns to driving mode
Set Multi-Function
knob for
THROTTLE TRIM
Press/hold MENU
green LED blinks
Press SET
red LED blinks
x
5
Press MENU 4 times
red LED blinks (x5)
x
8
Press SET to select
green LED blinks (x8)
Press/hold MENU
returns to driving mode
Adjust the Multi-
Function knob until the
LED turns solid green.
To DISABLE (Lock) the
Multi-Function knob
Press/hold MENU
green LED blinks
Press SET
red LED blinks
x
6
Press MENU 5 times
red LED blinks (x6)
x
8
Press SET to lock
green LED blinks (x8)
Press/hold MENU
returns to driving mode
To REVERSE
the direction of
STEERING servo
Press/hold MENU
green LED blinks
x
2
Press MENU
green LED blinks (x2)
Press SET
green LED blinks
Press SET
red LED blinks
x
8
Press SET to reverse
servo direction
Press/hold MENU
returns to driving mode
To set the SUB TRIM
of the STEERING
servo
Press/hold MENU
green LED blinks
x
2
Press MENU
green LED blinks (x2)
Press SET
green LED blinks
Press SET
red LED blinks
x
2
Press MENU
red LED blinks (x2)
THROTTLE TRIM
100100
00
Use Multi-Function
knob to set neutral
x
8
Press SET
to save position
Press/hold MENU
returns to driving mode
To set the END
POINTS of the
STEERING servo
Press/hold MENU
green LED blinks
x
2
Press MENU
green LED blinks (x2)
Press SET
green LED blinks
Press SET
red LED blinks
x
3
Press MENU twice
red LED blinks (x3)
THROTTLETRIM
100100
00
Turn steering
wheel to desired max
left and right travel
x
8
Press SET
to save each position
THROTTLETRIM
100100
00
Turn steering wheel
to test settings
IF END POINTS
ARE OK:
Press/hold MENU
returns to driving mode
IF END POINTS
NEED TO BE
CHANGED:
Press SET
and repeat steps 6-8
To reset the END
POINTS of STEERING
servo to defaults
Press/hold MENU
green LED blinks
x
2
Press MENU
green LED blinks (x2)
Press SET
green LED blinks
Press SET
red LED blinks
x
4
Press MENU 3 times
red LED blinks (x4)
x
8
Press SET
to reset end points
Press/hold MENU
returns to driving mode
To REVERSE
the direction of
THROTTLE servo
Press/hold MENU
green LED blinks
x
2
Press MENU
green LED blinks (x2)
Press SET
green LED blinks
x
2
Press MENU
green LED blinks (x2)
Press SET
red LED blinks
x
8
Press SET to reverse
servo direction
Press/hold MENU
returns to driving mode
To set the SUB TRIM
of the THROTTLE
servo
Press/hold MENU
green LED blinks
x
2
Press MENU
green LED blinks (x2)
Press SET
green LED blinks
x
2
Press MENU
green LED blinks (x2)
Press SET
red LED blinks
x
2
Press MENU
red LED blinks (x2)
THROTTLE TRIM
100100
00
Use Multi-Function
knob to set neutral
x
8
Press SET
to save position
Press/hold MENU
returns to driving mode
To set the END
POINTS of the
THROTTLE servo
Press/hold MENU
green LED blinks
x
2
Press MENU
green LED blinks (x2)
Press SET
green LED blinks
x
2
Press MENU
green LED blinks (x2)
Press SET
red LED blinks
x
3
Press MENU twice
red LED blinks (x3)
THROTTLETRIM
100100
00
Use throttle
trigger to set desired
max throttle or brake
THROTTLETRIM
100100
00
Press SET to save
Use trigger to test
IF END POINTS
ARE OK:
Press/hold MENU
returns to driving mode
IF END POINTS
NEED TO BE
CHANGED:
Press SET
and repeat steps 7-9
To reset the END
POINTS of THROTTLE
servo to defaults
Press/hold MENU
green LED blinks
x
2
Press MENU
green LED blinks (x2)
Press SET
green LED blinks
x
2
Press MENU
green LED blinks (x2)
Press SET
red LED blinks
x
4
Press MENU 3 times
red LED blinks (x4)
x
8
Press SET
green LED blinks (x8)
Press/hold MENU
returns to driving mode
To REVERSE the
direction of SHIFT
servo
Press/hold MENU
green LED blinks
x
2
Press MENU
green LED blinks (x2)
Press SET
green LED blinks
x
3
Press MENU twice
green LED blinks (x3)
Press SET
red LED blinks
x
8
Press SET to reverse
servo direction
Press/hold MENU
returns to driving mode
Press MENU to move through options.
Press SET to select an option.
Press MENU to move through options.
Press SET to select an option.
Enter Programming
Press and hold
MENU for 3 seconds
Steering Sensitivity (Expo)
One Blink Red
1
Electric
One Blink Red
1
Unlock
One Blink Red
1
Confirm Deletion
One Blink Red
1
Multi-Function Knob
One Blink Green
1
Channel Setup
Two Blinks Green
2
Mode Selection
Three Blinks Green
3
Traxxas-Link
Four Blinks Green
4
Steering (Channel 1)
One Blink Green
1
Model Locking
One Blink Green
1
Shift (Channel 3)*
Three Blinks Green
3
Front T-Lock (Channel 4)*
Four Blinks Green
4
Rear T-Lock (Channel 5)*
Five Blinks Green
5
Throttle (Channel 2)
Two Blinks Green
2
Delete Model
Two Blinks Green
2
Throttle Sensitivity (Expo)
Two Blinks Red
2
Nitro
Two Blinks Red
2
Lock
Two Blinks Red
2
Steering % (Dual Rate)
Three Blinks Red
3
Unlock All
Three Blinks Red
3
Braking %
Four Blinks Red
4
Throttle Trim
Five Blinks Red
5
Knob Disabled
Six Blinks Red
6
Press
MENU
Press
MENU
Press
MENU
Press
MENU
Press
MENU
Press
SET
Press
SET
Press
SET
Press
SET
Press
SET
Press
SET
Press
SET
Press
SET
Servo Reversing
One Blink Red
1Press SET to reverse
servo direction.
Servo Reversing
One Blink Red
1Press SET to reverse
servo direction.
Servo Reversing
One Blink Red
1Press SET to reverse
servo direction.
Reset End Points
Four Blinks Red
4Press SET to restore
factory default endpoints.
Reset End Points
Four Blinks Red
4Press SET to restore
factory default endpoints.
Sub Trim
Two Blinks Red
2Use knob to adjust
sub-trim. Press SET to save.
Sub Trim
Two Blinks Red
2Use knob to adjust
sub-trim. Press SET to save.
End Points
Three Blinks Red
3Use steering wheel to
adjust. Turn right to desired
end point, press set to save.
Turn left to desired endpoint and press set to save.
To reset max throw: Let go of controls and press SET.
The menu tree below shows how to navigate through the
TQ 2.4GHz transmitter’s various settings and functions. Press
and hold MENU to enter the menu tree, and use the following
commands to navigate through the menu and select options.
MENU: When you enter a menu, you always start at the top.
Press MENU to move down the menu tree. When you
reach the bottom of the tree, pressing MENU again will
return you to the top.
SET: Press SET to move across the menu tree and select
options. When an option is committed to the transmitter’s
memory, the status LED will rapidly blink green.
BACK: Press both MENU and SET to go back one level in the
menu tree.
EXIT: Press and hold MENU to exit programming. Your
selected options will be saved.
ECHO: Press and hold SET to activate the “echo” function. Echo
will “play back” your current position on the Menu Tree,
should you lose your place. For example: If your current
position is Steering Channel End Points, holding SET will
cause the LED to blink green twice, green once, and then
red three times. Echo will not alter your adjustments or
change your position in the programming sequence.
MENU TREE
Below is an example of how to access a function in the menu
tree. In the example, the user is setting the Multi-Function knob
to be a steering Dual Rate control.
To set the Multi-Function knob to control STEERING DUAL RATE (%):
1. Switch the transmitter on
2. Press and hold MENU until the green LED lights. It will blink in single intervals.
3. Press SET. The red LED will blink in single intervals to indicate Steering Dual
Rate has been selected.
4. Press MENU twice. The red LED will blink three times repeatedly to indicate
Steering Percentage has been selected.
5. Press SET to select. The green LED will blink 8 times fast to indicate
successful selection.
6. Press and hold MENU to return to driving mode.
Note: The transmitter is “live” during programming
so you can test the settings real time without having
to exit the menu tree.
End Points
Three Blinks Red
3Use trigger to adjust. Pull
back to desired end point,
press set to save. Push
forward to desired endpoint and press set to save.
To reset max throw: Let go of controls and press SET.
Press
SET
* Model #2208 4-Channel transmitter only
4
Restoring Factory Defaults:
When programming your 2.4GHz transmitter, you may feel the
need to start over with a clean slate. See Selecting Your Model
Profile (Resetting to Defaults) on page 2 for instructions.
Table of contents
Other Traxxas Remote Control manuals

Traxxas
Traxxas ATXN User manual

Traxxas
Traxxas TQi Docking Base User manual

Traxxas
Traxxas 6509R User manual

Traxxas
Traxxas TQ 2.4 User manual

Traxxas
Traxxas TQi TSM 6507R User manual

Traxxas
Traxxas Jato 3.3 55077-1 User manual

Traxxas
Traxxas TQi 6509 User manual

Traxxas
Traxxas XL-1 User manual

Traxxas
Traxxas TQi User manual