Traxxas TQi TSM 6507R User manual

Visite la página TRAXXAS.com/manuals para
descargar el Manual del usuario en su idioma.
Auf TRAXXAS.com/manuals können Sie eine
Bedienungsanleitung in Ihrer Sprache downloaden.
owner’s manual
manuel du propriétaire
MODELS / MODÈLES 6507R, 6509R

2 •TQiRADIO SYSTEM
Important Radio System Precautions
• For maximum range, always point the front of the transmitter
toward the model.
• Do not kink the receiver’s antenna wire. Kinks in the antenna wire
will reduce range.
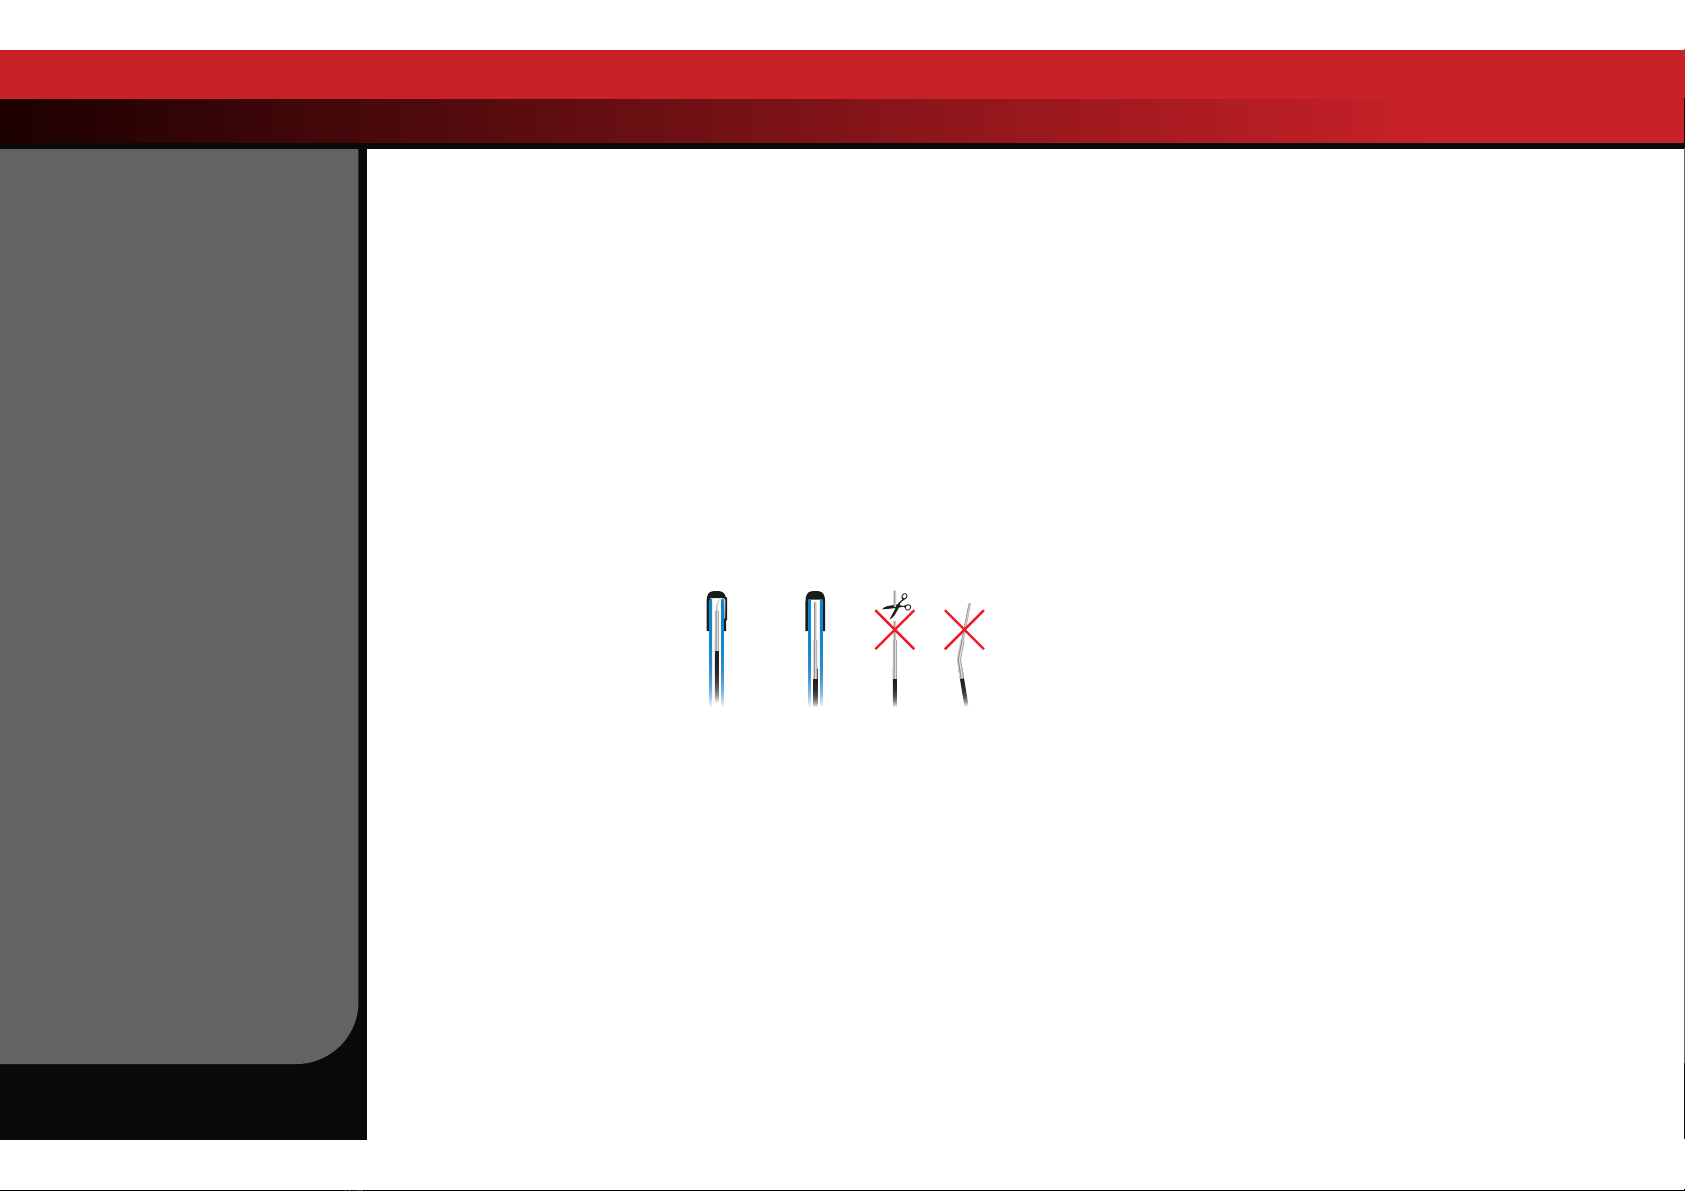
• DO NOT CUT any part of the receiver’s antenna wire. Cutting the
antenna will reduce range.
• Extend the antenna wire in the model as far as possible for
maximum range. It is not necessary to extend the antenna wire
out of the body, but wrapping or coiling the antenna wire should
be avoided.
• Do not allow the antenna wire to extend outside the body
without the protection of an antenna tube, or the antenna wire
may get cut or damaged, reducing range. It is recommended to
keep the wire inside the body (in the antenna tube) to prevent
the chance of damage.
•
To prevent loss of radio range
do not kink or cut the black
wire, do not bend or cut the
metal tip, and do not cut the
white wire at the end of the
metal tip.
Warranty Information
Traxxas warrants your Traxxas electronic components to be free from
defects in materials or workmanship for a period of thirty (30) days from the
date of purchase. Before returning any product for warranty service, please
contact our service department at 1-888-TRAXXAS (U.S. residents only)to
discuss the problem you are having with the product. After contacting
Traxxas, send the defective unit along with your proof of purchase
indicating the date purchased, your return address, e-mail, a daytime
phone number, and a brief description of the problem to:
Traxxas, 6250 Traxxas Way, McKinney, Texas 75070
Phone: 972-549-3000 Internet: Traxxas.com E-mail: support@Traxxas.com
Detailed Limitations for Electronic Components:
• Allowing water,moisture,or other foreign material to enter the component or
get onto the PC board.
• Exceeding the maximum input voltage of the electronic
component.
• Reverse voltage application.
• Incorrect installation or wiring.
• Components worn from use.
• Splices to the input or switch harnesses.
• Disassembling the case.
• Excessive force when adjusting,pressing,or turning any of the
controls.
• Tampering with the internal electronics.
• Incorrect wiring of an FET servo.
• Allowing exposed wiring to short circuit.
• Any damage caused by crash,flooding,or act of God.
Limitations
Any and all warranty coverage does not cover replacement of parts and
components damaged by abuse,neglect,improper or unreasonable use,
crash damage,water or excessive moisture,chemical damage,improper or
infrequent maintenance,accident,unauthorized alteration or modification,
or items that are considered consumable. Traxxas will not pay for the cost of
shipping or transportation of a defective component from you to us.
Limitations of Liability
Traxxas makes no other warranties expressed or implied. Traxxas shall not
be liable for any special,indirect,incidental,or consequential damages
arising out of the assembly,installation,or use of their products or
any accessory or chemical required to use their products. By the act of
operating/using the product,the user accepts all resulting liability. In no
case shall Traxxas’ liability exceed the actual purchase price paid for the
product. Traxxas reserves the right to modify warranty provisions without
notice. All warranty claims will be handled directly by Traxxas. The Traxxas
warranty gives the customer specific legal rights and possibly other rights
that vary from state to state. All dollar amounts stated are in United States
WARRANTY AND PRECAUTIONS
Entire contents ©2018 Traxxas.
Other brand names and marks are the
property of their respective holders
and are used only for purposes of
identification. No part of this manual
may be reproduced or distributed in
print or electronic media without the
express written permission of Traxxas.
Specifications are subject to change
without notice.
1/16
Models All Other
Traxxas Models No No
4
TRANSMITTER
AND RECEIVER
5GETTING STARTED
Basic Adjustments ........................5
Battery Installation .......................6
Model Profiles................................6
7USING THE
RADIO SYSTEM
Range Testing................................7
Binding Instructions.....................8
Traxxas Stability Management ..8
9ADVANCED
TUNING GUIDE
Available Tuning Adjustments...9
Traxxas Link Wireless Module ..12
Transmitter LED Codes...............14
Traxxas Link Model Memory.....15
16 MENU TREE5

TQiRADIO SYSTEM • 3
dollars. The term “lifetime” shall refer to the product’s production life
at Traxxas. Traxxas is not obligated to provide upgraded products at a
reduced rate when a previous product’s production cycle has ended.
Traxxas encourages you to register your model online at Traxxas.com/
register.
Traxxas Lifetime Electronics Warranty
After the expiration date of the free warranty period,Traxxas will repair
electronic components for a flat rate. The electronic products covered by
this extended service plan include electronic speed controls,transmitters,
receivers,servos,and battery chargers. Motors,batteries,and mechanical
speed controls are not covered. The covered repairs are limited to non-
mechanical components that have NOT been subjected to abuse,misuse,
or neglect. Products damaged by intentional abuse,misuse,modification,
or neglect,may be subject to additional charges. Visit Traxxas.com or
call 1-888-TRAXXAS (1-888-872-9927) for details on extended warranty
service and rates.
FCC Compliance
This device complies with Part 15 of the FCC Rules. Operation is subject
to the following two conditions: (1) this device may not cause harmful
interference, and (2) this device must accept any interference received,
including interference that may cause undesired operation.
Note: This equipment has been tested and found to comply with the
limits for a Class B digital device, pursuant to Part 15 of the FCC Rules.
These limits are designed to provide reasonable protection against
harmful interference in a residential installation. This equipment
generates, uses and can radiate radio frequency energy and, if not
installed and used in accordance with the instructions, may cause harmful
interference to radio communications. However, there is no guarantee
that interference will not occur in a particular installation.
If this equipment does cause harmful interference to radio or television
reception, which can be determined by turning the equipment off and
on, the user is encouraged to try to correct the interference by one or
more of the following measures:
• Reorient or relocate the receiving antenna.
• Increase the separation between the equipment and receiver.
• Connect the equipment into an outlet on a circuit different from that to
which the receiver is connected.
• Consult the dealer or an experienced radio/TV technician for help.
WARNING: Changes or modifications not expressly approved by the
party responsible for compliance could void the user’s authority to
operate the equipment.
Canada, Innovation, Science and Economic Development (ISED)
CAN ICES-3 (B)
This device contains license-exempt transmitters that comply with
Innovation, Science and Economic Development Canada’s license-
exempt RSS(s).
Operation is subject to the following two conditions: 1.This device may
not cause interference. 2. This device must accept any interference,
including interference that may cause undesired operation of the device.
Radio Frequency (RF) Exposure Statement
This equipment complies with FCC/IC RSS-102 radiation exposure limits
set forth for an uncontrolled environment. This transmitter must not
be co-located or operating in conjunction with any other antenna or
transmitter.
WARRANTY AND PRECAUTIONS

Forward
Neutral
Brake/Reverse
T
U
R
N
R
I
G
H
T
T
U
R
N
L
E
F
T
4 •TQiRADIO SYSTEM
TRANSMITTER AND RECEIVER
Steering
Trim
Multi-Function
Knob Throttle Trigger
Throttle Neutral Adjust
Steering Wheel
Power Switch Battery Compartment
Set Button
Menu Button
Red/Green
Status LED
Model 6507R only
Rocker Switch
(Channel 3)
3-Position Switch (Channel 4)
Model 6507R only
#6507R - 4-channel with Traxxas Link Wireless Module
*Accessory sensor ports for use with standard voltage/temperature and RPM telemetry sensors.
Traxxas Link Wireless Module
Model 6507R only
#6509R - 2-channel, Traxxas Link Enabled
#6533 - TQi Receiver
Link Button
LED
Sensor Expansion
Port** V/T - Voltage/Temp Sensor Port*
RPM - RPM Sensor Port*
**Accessory sensor expansion port for use with the Telemetry Expander Module (see Traxxas.com for more information).
#6507R Transmitter contains FCC ID: XVE-TRX1018, IC: 8668A-TRX1018 Wireless Module

TQiRADIO SYSTEM • 5
Throttle Neutral Adjustment
The throttle neutral adjustment is located on the transmitter face and
controls the forward/reverse travel of the throttle trigger. Change the
adjustment by pressing the button and sliding it to the desired position.
There are two settings available:
50/50: Allows equal travel for both acceleration and reverse.
70/30: Allows more throttle travel (70%) and less reverse travel (30%).
We strongly recommend to leave this control in its factory location until
you become familiar with all the adjustments and capabilities of your
model.
Note: 50/50 is the default factory setting and the required setting for
Traxxas nitro models. To change the throttle neutral adjust position for
an electric model, turn the transmitter off before adjusting the neutral
position. You will need to reprogram your electronic speed control to
recognize the 70/30 setting. See your speed control’s instructions.
TQi Radio System Basic Adjustments
Steering Trim
The electronic steering trim located on the face of
the transmitter adjusts the neutral (center) point of
the steering channel.
Note: Traxxas Stability Management (TSM) must be completely turned
off while adjusting steering trim. See page 8 for TSM adjustments.
Multi-Function Knob
The Multi-Function knob can be programmed to
control a variety of functions. From the factory,
the Multi-Function knob controls Traxxas Stability
Management (TSM). For more detail on TSM, refer to page 8.
GETTING STARTED
Traxxas Link Wireless Module and Traxxas Link App
A Traxxas TQi transmitter with the Traxxas Link™ Wireless Module
installed is required to set up Traxxas Stability Management (TSM) for your
specific vehicle model using the Traxxas Link App. The Traxxas Link Wireless
Module (part #6511) is included with the #6507R TQi transmitter (available
separately for easy installation in the #6509R TQi transmitter). The Traxxas
Link App is available in the Apple App Store
℠
or on Google Play™.
If you do not have the Traxxas Link Wireless module installed, then you will
not be able to use the Traxxas Link App to access the specific software for
your model. TSM will function, but it will not be optimized for your model
and you may experience some unexpected behavior from the vehicle. If you
do see undesirable effects, turn the multi-function knob counterclockwise
to reduce TSM’s assistance until you are satisfied with the performance or
turn TSM completely off (see page 8 for additional information).
Receiver Installation
For best performance, it is recommended that the receiver be installed in the
same orientation as the original receiver (with the label facing upward).
Refer to the vehicle owner’s manual for additional information, wiring
diagrams, and detailed instructions on maintaining a watertight seal.
Use double-sided adhesive foam tape to install the receiver into the
receiver box. Once installed, plug the wires into the receiver.

6 •TQiRADIO SYSTEM
Selecting Your Model Profile
The Traxxas Link App includes model proles and customized Traxxas Stability
Management (TSM) settings for each Traxxas model. Download the Traxxas
Link App to your Apple® iPhone®, iPad®, iPod touch®, or Android™ device
and select your model from the Home screen (see page 12 for additional
information).
If you do not have the Traxxas Link Wireless Module installed, then you will
not be able to use the Traxxas Link App to access the specic prole for your
model and the servo direction will need to be set manually.
Follow the
instructions on page 16 to change these setting(s) to suit your model.
Use the Right Batteries
Your transmitter uses AA batteries. Use new alkaline batteries.
Do not use rechargeable AA cells to power the TQi transmitter, as they
will not provide sufficient voltage for optimum transmitter performance.
Caution: Discontinue running your model at the first sign of weak
batteries (flashing red light on the transmitter) to avoid losing control.
Caution: Risk of explosion if batteries are replaced by an incorrect type.
Dispose of used batteries according to the instructions.
GETTING STARTED
Using the Traxxas TQi Radio System with non-Traxxas Models
The TQi radio system can be used with all popular servos in any hobby-
grade RC vehicle. Follow the instructions on page 16 to change the servo
setting(s) to suit your model.
Installing Transmitter Batteries
Your TQi transmitter uses 4 AA batteries. The battery compartment is
located in the base of the transmitter.
1. Remove the battery
compartment door by
pressing the tab and
sliding the door open.
2. Install the batteries
in the correct
orientation as
indicated in the battery
compartment.
3. Reinstall the battery door
and snap it closed.
4. Turn on the transmitter
and check the status LED
for a solid green light.
If the status LED flashes red, the transmitter
batteries may be weak, discharged or possibly
installed incorrectly. Replace with new or freshly
charged batteries. The power indicator light does
not indicate the charge level of the battery pack installed in the model.
Refer to the Troubleshooting section on page 14 for more information
on the transmitter status LED codes.

TQiRADIO SYSTEM • 7
Before installing the TQi radio system in your model, make certain
the steering trim knob is centered. After you have installed and
bound the radio system, confirm the steering servo and throttle servo
(if installed) operate properly: turning the steering wheel right makes
the front wheels turn right (and vice-versa), and pulling the trigger
to the grip opens the throttle of your nitro engine. If either control
operates “backwards,” follow the menu tree on page 16 or use the
Traxxas Link App to reverse the servo’s operation.
After confirming correct servo operation, turn off TSM (see page 8) and
use the TQi’s steering trim knob to center your model’s front wheels so
it drives straight with the steering wheel at its neutral position; then,
return the multi-function knob to the desired TSM setting.
If there is not enough adjustment to achieve this with the steering trim
knob, reset the steering trim to its center position, then remove and
reinstall the servo’s steering horn to center the steering system as close
as possible. The steering trim knob can now be used to make the final
adjustments.
Repeat this process for the throttle servo. To access throttle trim, follow
the steps in the menu tree on page 16.
If your model is equipped with an electronic speed control, it will
have to be calibrated to the TQi radio system. Follow the instructions
included with your vehicle or your speed control to calibrate it properly.
Range-Testing the Radio System
Before each running session with your model, you should range-test
your radio system to ensure that it operates properly.
1. Turn on the radio system and check its operation as described in the
previous section.
2. Have a friend hold the model. Make sure hands and clothing are
clear of the wheels and other moving parts on the model.
3. Walk away from the model with the transmitter until you reach the
farthest distance you plan to operate the model.
4. Operate the controls on the transmitter once again to be sure that
the model responds correctly.
5. Do not attempt to operate the model if there is any problem with
the radio system or any external interference with your radio signal
at your location.
Higher Speeds Require Greater Distance
The faster you drive your model, the more quickly it will near the limit
of radio range. At 60mph, a model can cover 88 feet every second! It’s
a thrill, but use caution to keep your model in range. If you want to see
your model achieve its maximum speed, it is best to position yourself
in the middle of the model’s running area, not the far end, so you drive
the model towards and past your position. In addition to maximizing
the radio’s range, this technique will keep your model closer to you,
making it easier to see and control.
No matter how fast or far you drive your model, always leave
adequate space between you, the model, and others. Never drive
directly toward yourself or others.
USING THE RADIO SYSTEM

8 •TQiRADIO SYSTEM
TQi Binding Instructions
For proper operation, the transmitter and receiver must be
electronically ‘bound.’ This has been done for you at the factory.
Should you ever need to re-bind the system or bind to an additional
transmitter or receiver, follow these instructions. Note: the receiver
must be connected to a 4.8-6.0v (nominal) power source for binding
and the transmitter and receiver must be within 5 feet of each other.
1. Press and hold the transmitter’s SET button as you switch the
transmitter on. The transmitter’s LED will flash red slowly. Release the
SET button.
2. Press and hold the receiver’s LINK button as you switch the model
on. Release the LINK button.
3. When the transmitter’s and receiver’s LEDs turn solid green, the
system is bound and ready for use. Confirm that the steering and
throttle operate properly before driving your model.
TRAXXAS STABILITY MANAGEMENT (TSM)
Your radio system is equipped with
a new feature, Traxxas Stability
Management or TSM. TSM allows
you to experience all the speed and
acceleration that was engineered
into your Traxxas model by helping you to maintain control of the
vehicle in low-traction situations. TSM helps provide straight ahead
full-throttle acceleration on slippery surfaces, without fishtailing,
spinouts, or loss of control. TSM also dramatically improves braking
control. High speed cornering and control is also made possible as TSM
makes corrections for you, without intruding on your fun, or creating
unexpected side effects.
The Multi-Function knob on the TQi
transmitter has been programmed
to control TSM. The recommended
(default) settin g for TSM is to rotate
the knob to the 12:00 position (the
zero mark on the dial).
Turn the knob clockwise to
increase assistance; turn the knob
counterclockwise to decrease
assistance. Turn the knob
counterclockwise to its stop to
turn TSM completely off.
Note: TSM is deactivated
automatically when driving or
braking in reverse.
When driving on surfaces with some
traction, decrease the TSM setting
to allow the vehicle to feel more
“loose” for power sliding, drifting, and so on. On surfaces with very
little traction (loose dirt, smooth concrete, ice/snow), increase TSM to
maximize acceleration and control.
Drive with TSM on and off to test how it is making your control of the
vehicle easier and more precise. For more information, visit Traxxas.
com/tsm.
Note: TSM must be completely turned off while adjusting steering
trim.
USING THE RADIO SYSTEM
Recommended setting
Decrease
assistance Increase
assistance
TSM off

TQiRADIO SYSTEM • 9
Available Tuning Adjustments
All the features described below may also be accessed using the menu
and set buttons on the transmitter and observing signals from the LED. An
explanation of the menu structure follows on page 16. The following items
can be adjusted most easily using your mobile device with the Traxxas Link
Wireless Module and the Traxxas Link App (see page 12).
Your Traxxas transmitter has a programmable Multi-Function knob that
can be set to control various advanced transmitter functions (set to
Traxxas Stability Management (TSM) by default,see page 8). Experiment
with the settings and features to see if they can improve your driving
experience.
Steering Sensitivity (Exponential)
The Multi-Function knob on the TQi transmitter can be set to control
Steering Sensitivity (also known as exponential). The standard setting
for Steering Sensitivity is “normal (zero exponential),” with the dial full
left in its range of travel. This setting provides linear servo response:
the steering servo’s movement will correspond exactly with the input
from the transmitter’s steering wheel. Turning the knob clockwise
from center will result in “negative exponential” and decrease steering
sensitivity by making the servo less responsive near neutral, with
increasing sensitivity as the servo nears the limits of its travel range.
The farther you turn the knob, the more pronounced the change in
steering servo movement will be. The term “exponential” comes from
this effect; the servo’s travel changes exponentially relative to the
input from the steering wheel. The exponential effect is indicated as
a percentage—the greater the percentage, the greater the effect. The
illustrations below show how this works.
Normal Steering Sensitivity (0%
exponential):
In this illustration, the steering servo’s
travel (and with it, the steering motion
of the model’s front wheels) corresponds
precisely with the steering wheel. The
ranges are exaggerated for illustrative
purposes.
Decreased Steering Sensitivity (Negative
Exponential):
By turning the Multi-Function knob
clockwise, the steering sensitivity of the
model will be decreased. Note that a
relatively large amount of steering wheel
travel results in a smaller amount of servo
travel. The farther you turn the knob, the
more pronounced the effect becomes.
Decreased steering sensitivity may be
helpful when driving on low-traction
surfaces, when driving at high speed, or on tracks that favor sweeping turns where gentle
steering inputs are required. The ranges are exaggerated for illustrative purposes.
Throttle Sensitivity (Throttle Exponential)
The Multi-Function knob can be set to control Throttle Sensitivity.
Throttle Sensitivity works the same way as Steering Sensitivity,but
applies the effect to the throttle channel. Only forward throttle is
affected; brake/reverse travel remains linear regardless of the Throttle
Sensitivity setting.
ADVANCED TUNING GUIDE
Turning Range
at Transmitter
Effective Turning
Range on Model

10 •TQiRADIO SYSTEM
Throttle Trim Seek Mode
When the Multi-Function knob is set to throttle trim, the transmitter
remembers the throttle trim setting. If the throttle trim knob is moved from
the original setting while the transmitter is off, or while the transmitter was
used to control another model, the transmitter ignores the actual position of
the trim knob. This prevents the model from accidentally running away. The
LED on the face of the transmitter will rapidly blink green and the throttle trim
knob (Multi-Function knob) will not adjust the trim until it is moved back to its
original position saved in memory. To restore throttle trim control, simply turn
the Multi-Function knob either direction until the LED stops blinking.
ADVANCED TUNING GUIDE
Steering Percentage (Dual Rate)
The Multi-Function knob can be set to control the amount (percentage)
of servo travel applied to steering. Turning the Multi-Function knob
fully clockwise will deliver maximum steering throw; turning the
knob counterclockwise reduces steering throw (note: turning the dial
counterclockwise to its stop will eliminate all servo travel). Be aware that
the steering End Point settings define the servo’s maximum steering
throw. If you set Steering Percentage to 100% (by turning the Multi-
Function knob fully clockwise),the servo will travel all the way to its
selected end point,but not past it. Many racers set Steering Percentage
so they have only as much steering throw as they need for the track’s
tightest turn,thus making the model easier to drive throughout the rest
of the course. Reducing steering throw can also be useful in making a
model easier to control on high-traction surfaces,and limiting steering
output for oval racing where large amounts of steering travel are not
required.
Braking Percentage
The Multi-Function knob may also be set to control the amount of brake
travel applied by the servo in a nitro-powered model. Electric models do
not have a servo-operated brake,but the Braking Percentage function
still operates the same way in electric models. Turning the Multi-
Function knob full clockwise will deliver maximum brake throw; turning
the knob counterclockwise reduces brake throw (Note: Turning the dial
counterclockwise to its stop will eliminate all brake action).
Throttle Trim
Setting the Multi-Function knob to serve as throttle trim will allow you
to adjust the throttle’s neutral position to prevent unwanted brake drag
or throttle application when the transmitter trigger is at neutral.
Note: Your transmitter is equipped with a Throttle Trim Seek mode to
prevent accidental runaways. See below for more information.
Steering and Throttle End Points
The TQi transmitter allows you to choose the limit of the servo’s travel
range (or its “end point”) independently for left and right travel (on the
steering channel) and throttle/brake travel (on the throttle channel).
This allows you to fine-tune the servo settings to prevent binding
caused by the servo moving steering or throttle linkages (in the case
of a nitro model) farther than their mechanical limits. The end point
adjustment settings you select will represent what you wish to be the
servo’s maximum travel; the Steering Percentage or Braking Percentage
functions will not override the End Point settings.
This manual suits for next models
1
Table of contents
Other Traxxas Remote Control manuals

Traxxas
Traxxas Jato 3.3 55077-1 User manual

Traxxas
Traxxas TQi 6509 User manual

Traxxas
Traxxas TQ 2.4 User manual

Traxxas
Traxxas TQi User manual

Traxxas
Traxxas TQ 2.4GHz User manual

Traxxas
Traxxas TQi Docking Base User manual

Traxxas
Traxxas XL-1 User manual

Traxxas
Traxxas 6509R User manual

Traxxas
Traxxas ATXN User manual