manuals.online logo
Brands
  1. Home
  2. •
  3. Brands
  4. •
  5. TRENDnet
  6. •
  7. Switch
  8. •
  9. TRENDnet TK-205i User manual

TRENDnet TK-205i User manual

Other manuals for TK-205i

4

Other TRENDnet Switch manuals

TRENDnet TC-P08C6AS User manual

TRENDnet

TRENDnet TC-P08C6AS User manual

TRENDnet TE100-H24R User manual

TRENDnet

TRENDnet TE100-H24R User manual

TRENDnet TK-400K - DATA SHEETS User manual

TRENDnet

TRENDnet TK-400K - DATA SHEETS User manual

TRENDnet TE-910plus User manual

TRENDnet

TRENDnet TE-910plus User manual

TRENDnet TL2-E284 User manual

TRENDnet

TRENDnet TL2-E284 User manual

TRENDnet TE100-S14 User manual

TRENDnet

TRENDnet TE100-S14 User manual

TRENDnet TO-PG541 User manual

TRENDnet

TRENDnet TO-PG541 User manual

TRENDnet TEG-S4000i User manual

TRENDnet

TRENDnet TEG-S4000i User manual

TRENDnet TEG-7080ES User manual

TRENDnet

TRENDnet TEG-7080ES User manual

TRENDnet TE100-S16 - DATA SHEETS User manual

TRENDnet

TRENDnet TE100-S16 - DATA SHEETS User manual

TRENDnet TU2-700 - DATA SHEETS User manual

TRENDnet

TRENDnet TU2-700 - DATA SHEETS User manual

TRENDnet TEG-2248WS - Gigabit Web Smart Switch User manual

TRENDnet

TRENDnet TEG-2248WS - Gigabit Web Smart Switch User manual

TRENDnet TL2-G244 User manual

TRENDnet

TRENDnet TL2-G244 User manual

TRENDnet TK-1603R User manual

TRENDnet

TRENDnet TK-1603R User manual

TRENDnet TPE-3016L User manual

TRENDnet

TRENDnet TPE-3016L User manual

TRENDnet TK-209K User manual

TRENDnet

TRENDnet TK-209K User manual

TRENDnet TI-G80 User manual

TRENDnet

TRENDnet TI-G80 User manual

TRENDnet TK-408K User manual

TRENDnet

TRENDnet TK-408K User manual

TRENDnet TK-209i User manual

TRENDnet

TRENDnet TK-209i User manual

TRENDnet TEG-S224M User manual

TRENDnet

TRENDnet TEG-S224M User manual

TRENDnet TEG-S50ES User manual

TRENDnet

TRENDnet TEG-S50ES User manual

TRENDnet TK-423K - USB/PS/2 KVM Switch User manual

TRENDnet

TRENDnet TK-423K - USB/PS/2 KVM Switch User manual

TRENDnet TEG-S3000I - TEG Gigabit Layer 2 Managed Chassis S3000i... User manual

TRENDnet

TRENDnet TEG-S3000I - TEG Gigabit Layer 2 Managed Chassis S3000i... User manual

TRENDnet TPE-S80 User manual

TRENDnet

TRENDnet TPE-S80 User manual

Popular Switch manuals by other brands

SMC Networks SMC6224M Technical specifications

SMC Networks

SMC Networks SMC6224M Technical specifications

Aeotec ZWA003-S operating manual

Aeotec

Aeotec ZWA003-S operating manual

Planet FGSW-2022VHP user manual

Planet

Planet FGSW-2022VHP user manual

Avocent AutoView 2000  AV2000BC AV2000BC Installer/user guide

Avocent

Avocent AutoView 2000 AV2000BC AV2000BC Installer/user guide

Moxa Technologies PT-7728 Series user manual

Moxa Technologies

Moxa Technologies PT-7728 Series user manual

Intos Electronic inLine 35392I operating instructions

Intos Electronic

Intos Electronic inLine 35392I operating instructions

Cisco Catalyst 3560-X-24T Technical specifications

Cisco

Cisco Catalyst 3560-X-24T Technical specifications

Asante IntraCore IC3648 Specifications

Asante

Asante IntraCore IC3648 Specifications

Siemens SIRIUS 3SE7310-1AE Series Original operating instructions

Siemens

Siemens SIRIUS 3SE7310-1AE Series Original operating instructions

Edge-Core DCS520 quick start guide

Edge-Core

Edge-Core DCS520 quick start guide

RGBLE S00203 user manual

RGBLE

RGBLE S00203 user manual

Thrustmaster FLIGHT SIMULATOR X quick guide

Thrustmaster

Thrustmaster FLIGHT SIMULATOR X quick guide

Southwire SURGE GUARD 41390 RVC troubleshooting guide

Southwire

Southwire SURGE GUARD 41390 RVC troubleshooting guide

Buhler Nivotemp NT 61 Brief instructions

Buhler

Buhler Nivotemp NT 61 Brief instructions

Kramer VS-41HDCP user manual

Kramer

Kramer VS-41HDCP user manual

Techly IDATA AU-270 user manual

Techly

Techly IDATA AU-270 user manual

Belkin F1U109 user manual

Belkin

Belkin F1U109 user manual

Emerson Rosemount 2521 Series quick start guide

Emerson

Emerson Rosemount 2521 Series quick start guide

manuals.online logo
manuals.online logoBrands
  • About & Mission
  • Contact us
  • Privacy Policy
  • Terms and Conditions

Copyright 2025 Manuals.Online. All Rights Reserved.

Quick Installation Guide Applicable models: TK-205i
Rev..1.0 Copyright© All rights reserved. Mar 4, 2003
TK-205i
2-port Super Mini Desktop KVM Switch
w/ built-in 1.1Meters Cables
Quick Installation Guide
Thank you for purchasing the TK-205i Super Mini Desktop
KVM Switch. With this reliable and quality product, users can
enjoy countless benefits from using it.
Introduction
The TK-205i Super Mini Desktop KVM Switch is a 2-port
PS/2 type KVM Switch that comes with two built-in 1.1Meters
cables. It allows users to access, control, boot and reboot two
computers using only one keyboard, monitor and mouse.
Its one-piece design of KVM Switch and its built-in cables offer
portability and convenience for KVM Switch users.
Though, compact and integrated in one-piece, you can expect
every functions of a decent KVM Switch from TK-205i. It is
your best desktop partner for KVM switching in the office or at
home.
Before you begin…
The default settings of the TK-205i KVM Switch are
appropriate for most systems. In fact, you do not need to
configure the KVM Switch before the installation. The KVM
Switch is a plug-and-play device; just connect keyboard,
monitor, and mouse to the KVM Switch, connect the KVM
cables to the computers’ keyboard, video, and mouse
connectors, boot up the computers one at a time, wait for the
computers to boot up completely, and you can start to switch
between the two computers.
For a quick start on installation and operation, please follow
the instructions below.
The correct boot up sequence is ……
(1) Connect at least one computer and one set of the
keyboard, monitor, and mouse to the KVM switch first.
(2) Power up your connected computer.
Since the KVM Switch receives power from the computer’s PS/2
interface, power up the computer will turn on the KVM Switch.
Step-by-Step Installation
Take the Super Mini Desktop KVM Switch out of the box
and begin with the installation….
Before connecting any cable to your KVM Switch, please make
sure the computers and their peripherals are powered off. Otherwise,
the KVM Switch might not power up properly.
Step 1. Power off the computers and their peripherals and
disconnect their power cords.
Step 2. Connect the shared keyboard, monitor and mouse to
the keyboard, monitor, and mouse ports on the KVM
switch.
Step 3. Connect each set of the built-in KVM cable to the
computer’s keyboard, video and mouse ports. You
can use individual standard keyboard, mouse and
video cables to extend the cable distance, but
depends on the type of the cables you use, the
maximum cable distance is limited to 5 ~ 7 meters
(16.5 ~ 23 feet).
Note: if you are only connecting one computer to the KVM Switch,
you can use either set of the cables.
Step 4. Connect the computers and their peripherals’ power
cords and power them up. After the computer is
powered up, the KVM Switch will automatically
recognize the keyboard, video and mouse and you
can start operating the KVM Switch.
DO NOT connect the KVM cable to a computer that is still
power-on. The computer will have difficulty recognizing the shared
keyboard and mouse.
Easy Operation
There are two methods to select a specific computer: using
the front-panel push button (select) or hot-key commands.
Front-Panel Push Button
The front-panel push button lets you have direct control over
channel switching. Simply press the button to select the
computer. See Quick Reference Sheet
The LEDs above the push button indicate which computer is
selected (PC1 or PC2).
Hot-Key Commands
A keyboard hot-key command consists of at least three
keystrokes: See Quick Reference Sheet
Hot-key command = ScrLk , ScrLk , Command key(s)
After pressing the first ScrLk key, you have 2 seconds to press
the next ScrLk key and then another 2 seconds to press the command
key. If you do not press the key within 2 seconds, the hot-key mode is
cancelled.
For detailed Hot-Key commands and their corresponding
functions, please refer to the Quick reference sheet.
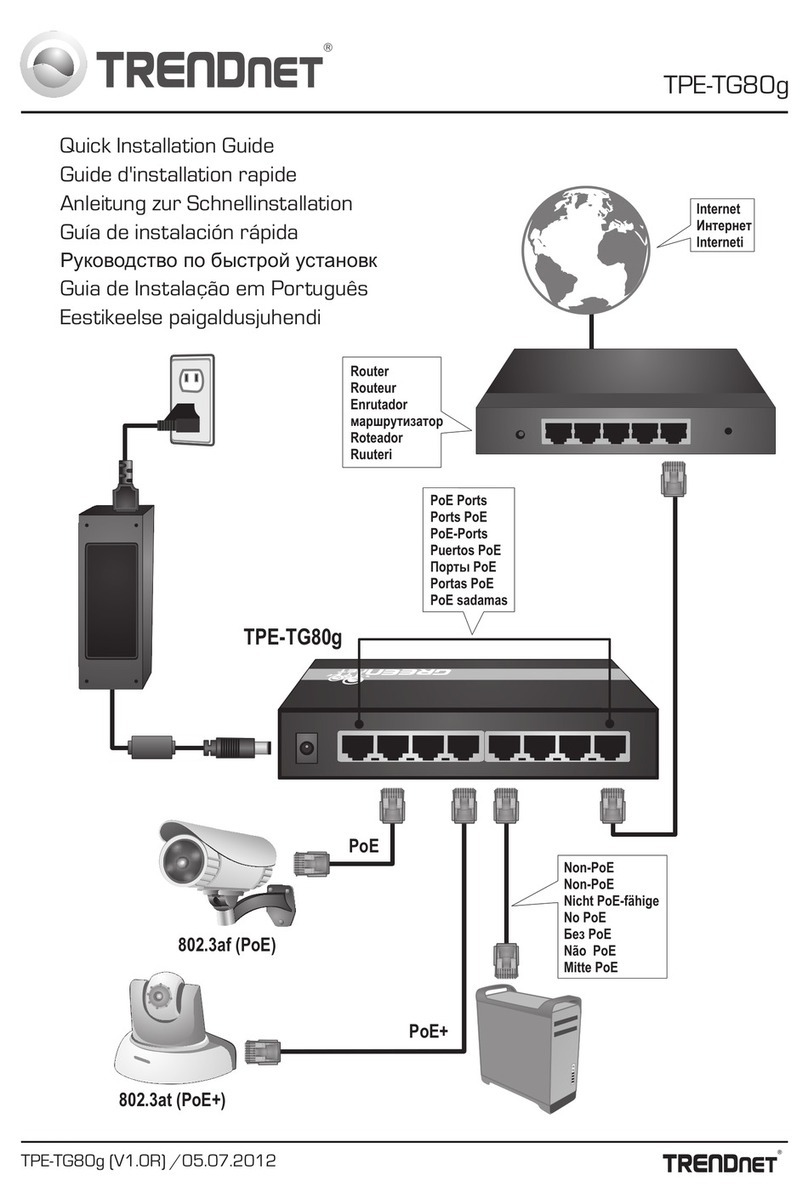
Quick Reference Sheet Applicable Models: TK-205i
Rev..1.0 Copyright© All rights reserved. Mar 4, 2003
Quick Reference Sheet
QUICK REFERNCE SHEET for Operating KVM Switch
Hot-Key Commands/ Front-Panel Push Button
Operating Method Hot-Key Front-panel Push Button Description
Select Port Number
ScrLk , ScrLk , ( X )
(Note: X = 1 or 2)
--
Select the computer on a specific port
Select Next Port Up ScrLk , ScrLk , ↑(arrow up) -- Select the previous available computer
Select Next Port Down ScrLk , ScrLk , ↓(arrow down) Press the push button to select the next
available computer Select the next available computer
Auto-scan Beep Sound On/Off ScrLk , ScrLk , B -- Toggle on/off the beep sound for
switching confirmation in auto-scan
mode
Reset KVM Switch ScrLk , ScrLk , “End” -- Reset the KVM Switch for switch
system reboot (Not available for 2-Port
KVM Switch)
Start Auto-scan ScrLk , ScrLk , S --
Auto-scan through every connected
computer for quick browsing of each
computer. For 2-Port KVM Switch, the
switching interval is fixed at 4 seconds
Stop Auto-scan Any key on keyboard -- Terminate Auto-scan activity