Trevi kidTab 7 S04 User manual

MANUALE UTENTE ITALIANO
USER MANUAL ENGLISH
MODE D’EMPLOI FRANÇAIS
BEDIENUNGSANLEITUNG DEUTSCH
MANUAL DEL USUARIO ESPAÑOL
* Per informazioni integrative e aggiornamenti di questo prodotto vedi: www.trevi.it
* For additional information and updates of this product see: www.trevi.it
Google, Android, Google play and other marks are trademarks of Google LLC.


3
PER IMPOSTARE LA TUA LINGUA SUL DISPOSITIVO:
- Accendere l’apparecchio
- Andare nella pagina con tutte le applicazioni
- Selezionare l’icona “IMPOSTAZIONI”
- Scorrere la lista e selezionare - “SISTEMA”
- Selezionare “LINGUE E IMMISSIONE” e cercare la propria lingua tra quelle disponibili.
Nota: Per informazioni integrative e aggiornamenti di questo prodotto vedi: www.trevi.it
TO SET YOUR DEVICE LANGUAGE:
- Swicth on the appliance
- Go to the page with all applications
- Select the “IMPOSTAZIONI” icon
- Scroll through the list and select - “SISTEMA”
- Select “LINGUE E IMMISSIONE” and find their own language from those available.
Note: For information and updates of this product: www.trevi.it
POUR CONFIGURER LANGUE DE VOTRE APPAREIL:
- Mettre l’appareil
- Aller à la page avec toutes les applications
- Sélectionez l’icône “IMPOSTAZIONI”
- Faites défiler la liste et sélectionnez - “SISTEMA”
- Selectionnez“LINGUEEIMMISSIONE”etàtrouverleurproperlangueparmicelles
disponibles.
Remarque: Pour plus d’informations et pour obtenir des mises à jour sur ce produit, consultez:
www.trevi.it
LINGUA - LANGUAGE - LANGUE

4
SO STELLEN SIE DIE SPRACHE IHRES GERÄTS EIN:
- Auf dem Gerät einschalten
- Gehen Sie zur Seite mit allen Anwendungen
- Wählen Sie die ““IMPOSTAZIONI””-Symbol
- Blättern Sie durch die Liste und wählen Sie - “SISTEMA”
- WählenSie“LINGUEEIMMISSIONE”undfindenihreeigeneSpracheausdenverfügbaren.
Hinweis: Ergänzende Informationen und Aktualisierungen zu diesem Produkt finden Sie unter:
www.trevi.it
PARA CONFIGURAR EL IDIOMA DE SU DISPOSITIVO:
- Conectar el aparato
- Ir a la página con todas las aplicaciones
- Seleccione el icono “IMPOSTAZIONI”
- Desplácese por la lista y seleccionar - “SISTEMA”
- Seleccione “LINGUE E IMMISSIONE” y encontar su proprio idioma entre los disponibles
Nota: Para información adicional y actualizaciones para este producto, véase: www.trevi.it
PARA DEFINIR O IDIOMA DO SEU DISPOSITIVO:
- Ligue o aparelho
- Vá para a página com todos os aplicativos
- Selecione o icone “IMPOSTAZIONI”
- Role a lista e selecione - “SISTEMA”
- Selecione “LINGUE E IMMISSIONE” e encontrar sua própria lingua entre os disponiveis
Nota: Para mais informações e atualizações deste produto, consulte: www.trevi.it
ΝΑ ΡΥΘΜΊΣΕΤΕ ΤΗ ΣΥΣΚΕΥΗ ΓΛΩΣΣΑ ΣΑΣ:
- Ενεργοποιήστετησυσκευή
- Πηγαίνετεστησελίδαμεόλεςτιςεφαρμογές
- Επιλέξτε“IMPOSTAZIONI”εικονίδιο
- Μετακινηθείτεστηλίστακαιεπιλέξτε“SISTEMA”
- Επιλέξτε“LINGUEEIMMISSIONE”καιναβρουντηδικήτουςγλώσσααπόεκείνες
πουείναιδιαθέσιμες.
Σημείωση: Για περισσότερες πληροφορίες και ενημερώσεις του προϊόντος
αυτού βλέπε: www.trevi.it
SPRACHE - IDIOMA - ΓΛΩΣΣΑ

5
INDICE
1. Prefazione e Avvertenze .......................................................................... 5
2. Descrizione comandi .......................................................................... 7
3. Alimentazione a batteria e sua ricarica ........................................................ 8
4. Operazioni base ............................................................................................ 9
5. iWawa APK ............................................................................................ 11
6. Informativa sulla rimozione e smaltimento della batteria ...................................... 12
7. Specifiche tecniche ............................................................................................ 13
1. PREFAZIONE E AVVERTENZE
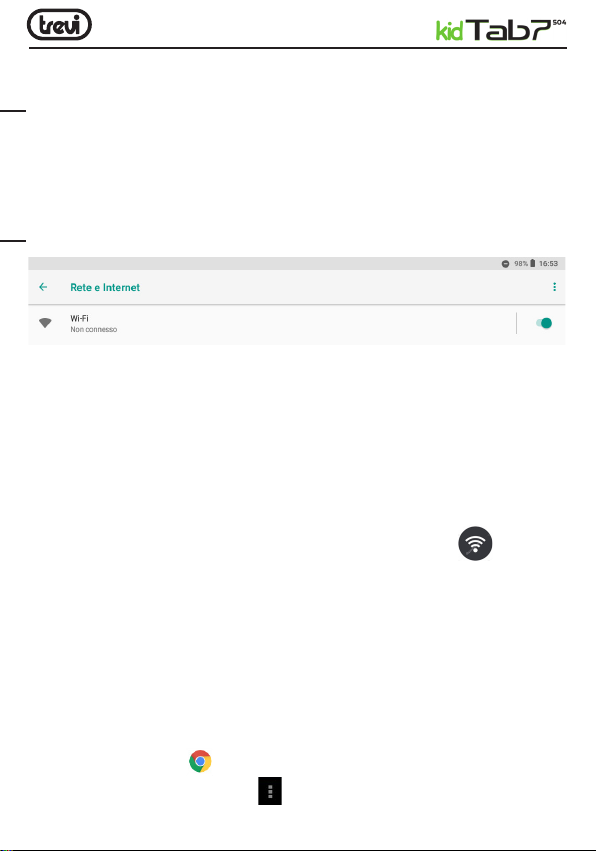
Grazie per aver acquistato KIDTAB 7 S04 Trevi. Con questo apparecchio, grazie al sistema
operativo Google™ Android™ ed alla connessione Wi-Fi, potrete collegarvi liberamente
ad Internet ed accedere a migliaia di contenuti e scaricare applicazioni utili e divertenti.
Prima di utilizzarlo si prega di leggere attentamente il seguente manuale d’uso.
• Il sistema operativo Android™, essendo un sistema open source è in continuo sviluppo
ed è utilizzato in differenti dispositivi, pertanto le parole Telefono, Cellulare o MID
chepotrebberoappariresuldisplaydeldispositivo,equivalgonoadindicare“Apparecchio”,
“Dispositivo”. La scritta “Telefono”, che potrebbe comparire, non indica che lo stesso
funga da telefono, ma è da intendersi come sinonimo di Apparecchio/ Dispositivo.
• Non tentare di aggiornare il sistema operativo Android™ con versioni più recenti o
versioni differenti non fornite da TREVI S.p.a., potreste causare rallentamenti/
danneggiamenti del sistema non riparabili.
• Le impostazioni descritte in questo manuale sono quelle pre definite dell’apparecchio.
• TREVI non è responsabile dei problemi che software di terze parti potrebbero causare
nella velocità e nelle prestazioni dell’apparecchio.
• TREVInon è responsabile deiproblemidiincompatibilitàoprestazionidovutiallamodifica
da parte dell’utente delle impostazioni di sistema dell’apparecchio.
• TREVI non è responsabile di eventuali “virus” o “danneggiamenti” del software dovuti
alla navigazione internet dell’utente.
• TREVI declina ogni responsabilità sulla violazione delle leggi sul copyright da parte
dell’utente.
• Non aprire l’apparecchio: all’interno non vi sono ne comandi manipolabili dall’utente ne parti
di ricambio. Per tutte le operazioni rivolgersi ad un Centro Assistenza Autorizzato Trevi.
• Tutti i marchi e diritti d’autore sono proprietà dei rispettivi possessori dei diritti.
• Google, Android, Google Play e altri marchi sono marchi di Google LLC.
• Conservare questo manuale per future consultazioni.
ITALIANO

6
CONTENUTO DELLA CONFEZIONE:
Nella confezione sono presenti:
• Apparecchio
• Alimentatore AC/DC
• Cavo USB/ Micro USB collegamento a PC
• Manuale Istruzioni
NOTE D’USO
Questo apparecchio è uno strumento elettronico di alta precisione; evitate quindi di
utilizzarlo nei seguenti casi:
• Vicino a forti fonti di calore come caloriferi e stufe.
• In ambienti troppo freddi o troppo caldi.
• In luoghi molto umidi come stanze da bagno, piscine, ecc...
• In luoghi molto polverosi.
• In ambienti immersi in campi magnetici.
• In luoghi soggetti a forti vibrazioni.
AVVERTENZE
• Posizionate l’apparecchio in modo che ai suoi lati ci sia sempre abbastanza spazio per
la libera circolazione di aria (almeno 5cm).
• Non ostruite le feritoie di ventilazione.
• Non fate cadere il dispositivo per non danneggiare il Touch screen.
• Non utilizzate l’apparecchio se il Display è rotto o danneggiato.
• Se dei liquidi penetrano all’interno dell’apparecchio scollegate immediatamente la spina
dalla presa e portate l’apparecchio al più vicino centro assistenza autorizzato TREVI.
• Controllate sempre prima di accendere l’apparecchio che i cavi di alimentazione e di
collegamento siano installati correttamente e non riportino danneggiamenti.
• Nonscollegate il dispositivodurantelaformattazioneo il caricamento difile,sipotrebbero
produrre errori nel programma.
• Utilizzare solamente accessori forniti nella confezione.
• L’apparecchio non deve essere esposto a stillicidio o a spruzzi d’acqua. Nessun oggetto
pieno di liquido, quali vasi, deve essere posto sull’apparecchio.
• Nessuna sorgente di fiamma nuda, quali candele accese, deve essere posta
sull’apparecchio.
• Conservare questo manuale per future consultazioni.
CURA E MANUTENZIONE
Per la pulizia si consiglia l’uso di un panno morbido, leggermente inumidito. Evitate solventi
o sostanze abrasive.
ITALIANO

7
Con utilizzo di auricolari o cuffie:
Perevitarepossibilidanni all’udito, limitareiltempodi ascolto avolumielevati
2. DESCRIZIONE COMANDI
Questo prodotto non è un giocattolo.
Da utilizzare sotto la supervione di un adulto.
ITALIANO
8
9
10
12
13
11
2 3 4
5
6
77
1

8
3. ALIMENTAZIONE A BATTERA E SUA RICARICA
Questo dispositivo al suo interno utilizza una batteria ricaricabile al lithio. Al completa-
mento della carica l’apparecchio funzionerà senza necessità di essere collegato ad una
presa di corrente.
Ricarica della batteria tramite alimentatore esterno.
A Collegareil dispositivo spento, tramite il cavo USB/ Micro USB, all’adattatore di rete
incluso nella confezione;
B Collegare l’adattatore ad una presa di corrente. È MOLTO IMPORTANTE CHE QUESTA
OPERAZIONE VENGA SVOLTA DA UN ADULTO.
C Il dispositivo visualizzerà per qualche secondo l’icona della batteria e la fase di carica.
In qualunque momento, premendo leggermente il tasto Power (4), è possibile verificare
lo stato di carica controllando l’indicatore grafico;
D Quando l’icona della batteria non sarà più in movimento (l’indicazione interna sarà
completa) scollegare il dispositivo dall’alimentazione.
Avvertenze:
• Utilizzare solamente l’alimentatore in dotazione, differenti alimentatori potrebbero
danneggiare la batteria.
• Il caricabatterie deve essere utilizzato esclusivamente da un adulto e va conservato
lontano dalla portata dei bambini.
• Il dispositivo viene ricaricato anche quando è collegato al computer tramite cavo USB.
• Al primo utilizzo dell’apparecchio si consiglia di caricare completamente la batteria.
ITALIANO
1. Display.
2. Camera Frontale.
3. Tasti regolazione Volume.
4. Tasto Power, accensione/ spegnimento
e blocco/ sblocco Display.
5. Tasto , ritorno alla pagina precedente.
6. Tasto attivazione microfono
(funzionamento dipentente dalle App).
7. Altoparlante.
8. Uscita presa cuffia jack 3.5mm.
9. Presa Micro USB: per ricarica batteria
o collegamento al PC.
10. Slot per Memoria esterna Micro SD.
11. Foro Reset.
12. Camera posteriore.
13. Piedistallo.

9
• Potete utilizzare il dispositivo anche quando è sotto carica, ma, per una maggiore
durata della batteria, se ne sconsiglia l’utilizzo; inoltre, utilizzando l’apparecchio, i tempi
di ricarica si allungano.
• Durante la ricarica della batteria i comandi sul Touch Screen potrebbero non funzionare
correttamente, questo è dovuto all’alimentazione instabile, basterà staccare
l’alimentatore per far funzionare correttamente l’apparecchio.
• Durante la ricarica l’apparecchio può aumentare di temperatura, questo non influisce
sulle prestazioni e la durata dell’apparecchio.
• Prima dell’esaurimento completo della batteria il dispositivo avvertirà di collegare il
dispositivo all’alimentazione. All’esaurimento completo della batteria il dispositivo
si spegnerà automaticamente.
AVVERTENZA PER IL CORRETTO UTILIZZO DELLA BATTERIA RICARICABILE
- Ricaricare la batteria ad una temperatura compresa tra i 5°C e i 35°C.
- Non prolungare la ricarica oltre i tempi indicati per evitare il rischio di surriscaldamento
e scoppio.
- Laricarica della batteriaoltre i tempiindicati ounprolungato periododi inattività possono
ridurne la durata.
- La batteria ricaricabile è soggetta ad usura e la sua capacità diminuisce gradualmente.
- Prima di ogni ricarica è consigliabile far esaurire completamente la batteria.
ATTENZIONE: con batteria completamente scarica, collegando l’alimentatore, l’ap-
parecchio non potrà essere usato per i primi 3 minuti di carica, questo per garantire
alla batteria una piccola ricarica e non danneggiarsi prima dell’accensione.
4. OPERAZIONI DI BASE
Accensione e spegnimento.
1. Per accendere il dispositivo, tenere premuto per 7 secondi il tasto Power (4).
Potrebbe essere necessario attendere alcuni minuti per permettere la corretta
configurazionedel tablet.In questafase lasciareil tabletin elaborazionee nonspegnerlo,
alfine di evitare malfunzionamenti.Allaprimaaccensioneprestarelamassimaattenzione
poichè il tablet deve configurare e installare tutte le applicazioni residenti;
2. Per spegnere il dispositivo, tenere premuto per 2 secondi il tasto Power (4); apparirà
unafinestra con diverse opzioni:sceglierel’opzione“Spegni”.Èpossibiletornare indietro
premendo l’icona del cerchio o del triangolo in fondo allo schermo.
Blocco/sblocco del Display (modalità riposo).
Per allungare la durata della batteria è possibile portare l’apparecchio in modalità riposo
disattivando il Display LCD. Per fare questo, premere il tasto Power (4) e rilasciarlo imme-
diatamente. Ripetere l’operazione per riattivare il Display e fare apparire il blocco schermo.
ITALIANO

10
Collegamento alla Rete
Il collegamento Wi-Fi può essere utilizzato con una connessione Wi-Fi Access Point
(AP) o creare una connessione Hotspot e Tethering. Selezionando questa voce si accede
alle impostazioni wireless e reti. Per accedere alla rete Internet, prima di tutto, occorre
configurare una rete Wireless; per far ciò occorre trovarsi in una zona Wi-Fi. Ogni volta
vi troverete in una zona Wi-Fi che avete già precedentemente configurato il dispositivo
cercherà di connettersi automaticamente (se la funzione Wi-Fi è attiva).
Attivazione/disattivazione Wi-Fi:
• Selezionare l’icona “Impostazioni” e toccare la voce “Rete e Internet”; attivare
l’interruttore posto a destra della voce “Wi-Fi”:
• Per spegnere il collegamento WiFi, disattivare l’interruttore.
NOTA: Per aumentare la durata della Batteria, si consiglia di disattivare la connessione
WiFi quando non viene utilizzata.
Ricerca e connessione a una rete Wi-Fi:
• Appena selezionato il comando ON, il Tablet attiverà automaticamente la ricerca delle
retiWi-Fidisponibili,selezionarelascrittaWi-Fi pervisualizzarelalistadelle retidisponibili;
• Selezionare la rete desiderata e, se protetta, inserire la password utilizzando la tastiera
virtuale;
• Toccare il comando “Connetti” ed attendere che compaia il simbolo sulla barra
di stato;
• È possibile configurare anche manualmente una rete qualora si conosca l’SSID di rete
selezionando semplicemente la voce “Aggiungi rete” e inserendo l’indirizzo SSID tramite
la tastiera virtuale.
Navigazione internet
Prima di collegarsi in rete, assicurarsi che il collegamento Wi-Fi sia attivo.
• Nella pagina principale toccare la banda di ricerca di Google™, comparirà
latastiera virtualedi Android™, dove digitare l’indirizzo internet delsito oppureeffettuare
una ricerca tramite un motore di ricerca;
• Oppure toccare l’icona che corrisponde al browser di navigazione.
Durante la navigazione toccare l’icona per visualizzare le impostazioni e i sotto menu.
ITALIANO

11
Gestione delle applicazioni
Il TABLET viene fornito con diverse applicazioni al suo interno, ma è in grado di supportare
anche applicazioni di terze parti. Vi consigliamo di scaricare l’APP “YOUTUBE KIDS” per
i vostri bambini utilizzando il market Play Store.
Disinstallare un’applicazione:
• Selezionare il Menu “IMPOSTAZIONI” - “APP E NOTIFICHE”;
• Selezionare “Mostra tutte le app” e selezionare l’applicazione che si vuole disinstallare;
• Toccare il comando “DISINSTALLA” per disinstallare definitivamente l’applicazione.
5. iWawa APK
L’applicazioneiWawa,pre installataneltablet, offreunottimo controllogenitori per garantire
aibambinichevengafornital’esperienzaappropriataperilloro uso. Ti guideremoattraverso
i passaggi per configurare il tablet del tuo bambino prima del suo utilizzo. Si consiglia di
abilitare iWawa, ai genitori verrà richiesto di inserire un PIN per apportare modifiche e
avere sempre il tablet sotto controllo. Il tablet dovrebbe essere aggiornato man mano che
il bambino cresce, installando app adatte all’età.
Come configurare il software iWawa Kids
1. Selezionare l’icona iWawa sul desktop per accedere al software per bambini;
2. All’apertura della pagina selezionare “Kid” per accedere;
3. Qui puoi utilizzare il programma educativo per bambini iWawa e puoi scaricare app per
tuo figlio tramite il negozio per bambini;
ITALIANO

12
- Selezionare l’icona per scaricare app per tuo figlio tramite il negozio per bambini;
- Controllo genitori: controlla facilmente il tablet del tuo bambino e proteggi il suo
sano sviluppo (password iniziale predefinita: 0000).
- Selezionare l’icona per uscire dalla modalità bambini e tornare al desktop del tablet
in modalità normale.
6. INFORMATIVA SULLA RIMOZIONE E SMALTIMENTO DELLA BATTERIA
Il prodotto funziona con batterie che rientrano nella direttiva europea 2013/56/EU
e che non possono essere smaltite con i normali rifiuti domestici. Informarsi sulle
direttive locali relative alla raccolta differenziata delle batterie: un corretto
smaltimento permette di evitare conseguenze negative per l’ambiente e la salute.
Attenzione: Questa operazione è riservata esclusivamente al personale tecnico specializ-
zato! La batteria ricaricabile installata in questo apparecchio non è sostituibile dall’utente.
1. Svitare tutte le viti che fissano il mobile posteriore a quello frontale;
2. Rimuovere il mobile posteriore dell’apparecchio facendo leva verso l’alto tra la parte
anteriore e quella posteriore;
3. Individuare la batteria;
4. Scollegarla e rimuoverla.
Attenzione:
- Qualunque sia il tipo di batteria esaurita, essa non deve essere gettata tra i rifiuti
domestici, nel fuoco o nell’acqua.
- Ogni tipo di batteria esaurita deve essere, riciclata oppure smaltita presso gli appositi
centri di raccolta dedicati.
ATTENZIONE: batteria al Litio. Pericolo di esplosione se la batteria è sostiutita in modo
non corretto. Sostituire solo con lo stesso tipo o con un tipo equivalente.
ITALIANO

13
INFORMAZIONI AGLI UTENTI
ai sensi del Decreto Legislativo N° 49 del 14 Marzo 2014 “Attuazione della Direttiva
2012/19/UE sui rifiuti di apparecchiature elettriche ed elettroniche (RAEE)”.
Il simbolo del cassonetto barrato riportato sull’apparecchiatura indica che il prodotto alla
fine della propria vita utile deve essere raccolto separatamente dagli altri rifiuti. L’utente
dovrà, pertanto, conferire l’apparecchiatura integra dei componenti essenziali giunta a
fine vita agli idonei centri di raccolta differenziata dei rifiuti elettronici ed elettrotecnici,
oppure riconsegnarla al rivenditore al momento dell’acquisto di nuova apparecchiatura
di tipo equivalente, in ragione di uno a uno, oppure 1 a zero per le apparecchiature aventi
lato maggiore inferiore a 25cm. L’adeguata raccolta differenziata per l’avvio successivo
dell’apparecchiatura dimessa al riciclaggio, al trattamento e allo smaltimento ambientale
compatibile contribuisce ad evitare possibili effetti negativi sull’ambiente e sulla salute e
favorisceil riciclo dei materiali di cui è composta l’apparecchiatura. Lo smaltimento abusivo
del prodotto da parte dell’utente comporta l’applicazione delle sanzioni amministrative di
cui al D.Lgs n. Decreto Legislativo N° 49 del 14 Marzo 2014.
TREVI persegue una politica di continua ricerca e sviluppo, pertanto i prodotti possono
presentare caratteristiche diverse da quelle descritte.
7. SPECIFICHE TECNICHE
Display .................................... 7-inch TFT LCD, TN, Capacitive (Touch- screen)
Resolution .................................................................................. 1024x 600 (16:9)
RAM ...................................................................................................... 2GB
Memoria Interna .................................................................................................... 16GB
Sistema Opeartivo ...................................................................... Android™11 (Go edition)
WiFi Standard ........................................................................... 802.11 b/g/n (2,4GHz)
Bluetooth: ...................................................................................................... V4.2
Banda di trasmissione Bluetooth ............................................................................. 2,4GHz
Potenza di Trasmissione di pico Bluetooth ............................................................ 1mW
Potenza di Trasmissione max Bluetooth .............................................................................. 0,8mW
Valore SAR: ..................................................................................................0,62W/Kg
Batteria ricaricabile .................................................................... 3,7V 2500mAh Li-Poly
....................................con alimentatore esterno 5V 2A in dotazione
Dimensioni .................................................................................... 196x 33x 17mm
Peso .................................................................................................... 315gr
ITALIANO

14
WELCOME
This user manual has been specially designed to guide you through the functions and
features of your device.
IMPORTANT NOTICES
• Keep this device away from strong magnetic field to avoid any damages.
• Do not rub this device with any hard objects and never clean this device with any
chemicals or detergents or acids or it could cause damages on surfaces.
• Humidityorliquid may enterthisdevice and causespermanent damagestothehardware
inside. Do not place this device in any humid environment or under the rain.
• Itisrecommendedthatvolumeleveloftheearphonesshouldbeadjustedtoanappropriate
level to avoid damages to your hearings due to high volume.
• Do not cut off the power abruptly during software update, software download, or during
this device is under any kind of operation or it may cause data lost and system error.
• Over-voltage, power cable strain, bending or squeezing by heavy objects must be
avoided to prevent this device from overheating or fire disaster.
• To eliminate the risk of electric shock, do not connect the power plug with wet hands.
• Somemovies, musicand pictures are under protectionsof copyrights,any unauthorized
usages are deemed as infringements to the laws of copyrights.
• Theperformanceofthe WI-FIreception of thisdevice couldbe influenced bythe wireless
equipments and networks in the surrounding areas.
• Any wireless equipment will influence the flight of an airplane, please consult the airline
company if you want to use this device on the airplane.
• Do not use this device anywhere near any blasting operations.
• Only qualified maintenance personnel is allowed to dismantle this device.
• Please comply with any related restrictions and rules when using this device.
• Only use this device with its original accessories and battery.
• Do not use any incompatible accessories on this device.
• This device is not waterproof, please keep it dry all the time.
• For the sake of data safety, please back up the important data anytime on a timely basis.
• When connecting this device with other equipments, please follow instructions on
this user’s manual.
• Please consult the after-sales service in your area for any technical problems.
• The appliance must not be exposed to dripping or splashing no object Full of liquid,
such as pots, must be placed on the appliance.
• No naked flame source, such as lit candles, must be placed on the unit.
• Keep this manual for future consultations.
Google, Android, Google play and other marks are trademarks of Google LLC.
ENGLISH

15
FUNCTION OVERVIEW
With earphone or headphones use:
To prevent possible hearing damage, limit the amount of time listening at
high volumes.
This product is not a toy.
To use only under adult supervision.
8
9
10
12
13
11
2 3 4
5
6
77
1
ENGLISH

16
BATTERY RECHARGE
This device uses a lithium rechargeable battery inside. Upon completion of charging, the
device will work without needing to be connected to a power outlet.
Battery charging via external power supply.
A Connect the switched off device, using the USB/ Micro USB cable, to the network
adapter included in the package;
B Connect the adapter to a power outlet. IT IS VERY IMPORTANT THIS OPERATION
IS CARRIED OUT BY AN ADULT;
C The device will display the battery icon and the charging phase for a few seconds.
At any time, by lightly pressing the Power button (4), you can check the state of charge
by checking the graphic indicator;
D When the battery icon is no longer moving (the internal indication will be complete)
disconnect the device from the power supply.
Warnings:
• Use only the supplied power supply, different power supplies could damage the battery.
• The charger is for adult use only and should be kept out of the reach of children.
• The device is charged even when it is connected to the computer with a USB cable.
• When using the device for the first time, it is advisable to fully charge the battery.
• You can use the device even when it is being charged, but, for a longer battery life,
its use is not recommended; moreover, by using the device, the charging times are
lengthened.
1. Display.
2. Frontal camera.
3. Volume buttons.
4. Power button and ON/OFF Display.
5. Return key.
6. Voice assistant.
7. Speaker.
8. Earphone Socket 3.5mm.
9. MicroUSB/ DC socket:connect the unit
to 5V adaptor/ connect the unit to PC.
10. Micro SD CARD slot.
11. Reset hole.
12. Rear camera.
13. Bracket.
ENGLISH

17
• While recharging the battery, the controls on the Touch Screen may not work properly,
this is due to the unstable power supply, just unplug the power supply to make the
device work properly.
• During recharging, the device may increase in temperature, this does not affect the
performance and life of the device.
• Before the complete exhaustion of the battery, the device will warn you to connect the
device to the power supply. When the battery is completely exhausted, the device will
turn off automatically.
WARNING FOR CORRECT USE OF THE RECHARGEABLE BATTERY
- Recharge the battery at a temperature between 5°C and 35°C.
- Do not extend the recharge beyond the indicated times to avoid the risk of overheating
and bursting.
- Charging the battery beyond the indicated times or a prolonged period of inactivity can
reduce its duration.
- The rechargeable battery is subject to wear and its capacity gradually decreases.
- Before each recharge, it is advisable to completely drain the battery.
- We suggest you recharge the battery completely once a month if only use your tablet
occasionally.
ATTENTION: with a completely discharged battery, by connecting the power supply,
the device cannot be used for the first 3 minutes of charging, this is to guarantee the
battery a small recharge and not be damaged before switching on.
GETTING STARTED
Power ON/OFF
- Press and hold the Power button (4) for 3-4 seconds to turn On your table. Select your
language and set up your tablet following the start guide.
- Press and hold the Power button (4) for 2 seconds, then release it. It will show Power
Off and Restart on the screen. Tap power Off to turn Off the Tablet.
- Press and hold Power button (4) for 5 seconds to do a forced shoutdown when it’s frozen.
Display lock/ unlock (Standby mode)
To extend the battery life, you can put the device in sleep mode by deactivating the LCD
display. To do this, press the Power button (4) and release it immediately. Repeat the
operation to reactivate the display and bring up the screen lock.
Do not Disturb
- Swipe down from the top of te Tablet to enter the pull-down notification file;
- Select the “Do not Disturb” button. Do not disturb mode (after entering the do not disturb
mode, Notifications paused by do not disturb).
ENGLISH

18
Connection to the Network
The Wi-Fi connection can be used with a Wi-Fi Access Point (AP) connection or create
a Hotspot and Tethering connection. Selecting this item you access the wireless and
networks settings. To access the Internet, first of all, you need to configure a Wireless
network; to do this, you need to be in a Wi-Fi zone. Each time you are in a Wi-Fi zone
that you have previously configured, the device will try to connect automatically (if the
Wi-Fi function is active).
Wi-Fi On/ Off:
• Select the “Settings” icon and tap “Network and Internet”; activate the switch located
to the right of the “Wi-Fi” item:
• To turn off the WiFi connection, turn off the switch.
NOTE: To increase the battery life, it is recommended to turn off the WiFi connection
when not in use.
Search for and connect to a Wi-Fi network:
• As soon as the ON command is selected, the Tablet will automatically activate the
search for available Wi-Fi networks, select the word Wi-Fi to view the list of available
networks;
• Select the desired network and, if protected, enter the password using the virtual
keyboard;
• Touch the “Connect” command and wait for the symbol to appear on the status
bar;
• You can also manually configure a network if you know the network SSID by simply
selecting the “Add network” item and entering the SSID address using the virtual
keyboard.
Internet browsing
Before connecting to the network, make sure that the Wi-Fi connection is active.
• On the main page, touch the Google™, search band, the Android™, virtual keyboard
will appear, where you can type the website address or search using a search engine;
• Or tap the icon that corresponds to the navigation browser.
While browsing, touch the icon to view the settings and submenus.
ENGLISH

19
Application management
The TABLET comes with several applications in it, but is capable of supporting third party
applications as well. We recommend that you download the “YOUTUBE KIDS” APP for
your children using the Play Store market.
Uninstall an application:
• Select the “SETTINGS” - “APP AND NOTIFICATIONS” menu;
• Select “Show all apps” and select the application you want to uninstall;
• Touch the “UNINSTALL” command to permanently uninstall the application.
iWawa
iWawa offers parental controls to ensure the proper kind of experience is provided for
children’s use. Here we will walk you through the steps to help set up your Kids Tablet
before your child’s first use. We reccomend iWawa to be enabled and if the parent’s need
to make adjustement they will need to enter a PIN to make changes to tablet’s behavior. The
Tablet should be updated as the child progress, installing apps that are age-appropriate.
How to set up iWawa Kids software:
1. Clic “iWawa” icon on the desktop to enter the Kids software - click “Kid” to enter
the Kids mode;
2. Here you can use iWawa’s children’s educational programs, or you can download apps
for your child through the Kids Store.
ENGLISH

20
- Here you can use iWawa’s children’s educational programs, or you can download
apps for your child through the Kid Store;
- Parental control: Easily control this kid’s tablet and protect your child’s healthy
development. (Default initial password: 0000).
- Exit iWawa: Exit kids mode and reurn to the tablet desktop into normal mode.
(Default initial password: 0000).
INFORMATION ON BATTERY REMOVAL AND DISASSEMBLY
Caution: This operation is reserved exclusively for specialized technical personnel! The
rechargeable battery installed in this appliance cannot be replaced by the user.
1. Unscrew all the screws that fix the rear cabinet to the front one;
2. Remove the rear cabinet by levering upwards between the front and the rear;
3. Locate the battery;
4. Disconnect it and remove it.
Caution:
- Whatever type of battery is used, it should not be thrown away domestic, fire or water.
- Any used battery should be recycled or disposed of at any time dedicated collection
centers.
WARNING:Lithiumbattery.Riskofexplosionifbatteryis incorrectlyreplaced.Replace
only with the same type or with an equivalent type.
ENGLISH
Table of contents
Languages:
Other Trevi Tablet manuals

Trevi
Trevi mini tab S8 User manual

Trevi
Trevi TAB 7 3G V8 User manual

Trevi
Trevi TAB 7 C4 User manual

Trevi
Trevi MiniTab 3G S8 User manual

Trevi
Trevi Tab 4 User manual

Trevi
Trevi KID TAB 7 S03 User manual

Trevi
Trevi Tab 8 3G V4 User manual

Trevi
Trevi kid Tab 7 S02 User manual

Trevi
Trevi Tab8 3G V8 User manual

Trevi
Trevi Tab10 3G V16 User manual

Trevi
Trevi TAB 7 C4 User manual

Trevi
Trevi Tab 8 C4 User manual

Trevi
Trevi Tab7 4G User manual

Trevi
Trevi Tab7 V4 User manual

Trevi
Trevi Tab7 3G S User manual

Trevi
Trevi SoundPad 360 User manual

Trevi
Trevi MiniTab 3G Q User manual

Trevi
Trevi Tab 10 4G S2 User manual

Trevi
Trevi Tab 7 3G S8 User manual

Trevi
Trevi TAB 9 C8 User manual