TREX Fit User manual

Owner’s Manual
™
™
T-Rex Fit
Feel the Roar of the Dinosaur
A Cutting Edge Approach to Exercise

Welcome to T-Rex Fit™Table of Contents
2 3
Thank you for purchasing the T-Rex Fit™Whole Body Vibration Machine! Welcome ................................................................................... 2
Precautions ............................................................................... 4
T-Rex Fit™ Structure .................................................................. 5
Display and Function ............................................................... 6
Components ............................................................................ 7
Installation ................................................................................. 8
Operation Instructions ............................................................. 11
T-Rex Fit™ Usage ...................................................................... 12
T-Rex Fit™ Exercise Positions ................................................... 13
T-Rex Fit™ Specications ........................................................ 16
Safety Measures ...................................................................... 17
Machine Care ......................................................................... 18
Warranty ................................................................................... 19
You have just embarked
upon a cutting-edge form
of vibration therapy and
exercise that is both enjoy-
able and benecial to your
overall health and well-
being. As one of the most
amazing technologies that
has been released for our
use in recent years, we
believe it will truly make a
difference in your quality
of life for years to come.
We’d love to hear from you!
Share your success story at:
info@t-rext.com.
Thanks again, and...
Have fun staying t with:
T-Rex Fit™!
- The T-Rex Fit™Team
!
Be sure to read the
Owner’s Manual
completely to get the
most out of your T-Rex
Fit™Machine. Visit
www.t-rexfit.com for
more exercise positions,
videos, and excellent
research that will
support effective use of
your new T-Rex Fit™
Machine.

Precautions T-Rex Fit™Structure
• Epilespsy
• Type 1 Diabetes
• Heart and Vascular Disease
• Slipped Discs, Discopathy, or Spondylosis
• Recent knee and hip implants, metal pins
• Pacemaker
• Recent inserted IUD
• Thrombotic conditions
• Tumors
• Recent infections
• Recent operative wounds
• Pregnancy
• Severe migraines
4 5
If you are under medical treatment for any of the following,
please consult your physician before using T-Rex Fit: 1. Control Panel
2. Left Safety Handle
3. Right Safety Handle
4. Cross Bar Grip
5. L. Support Handle
6. R. Support Handle
7. Vibration Plate
8. Moving Wheel
9. Base Cover
10. Adjustable Feet

6 7
Display & Function T-Rex Fit™Machine Components
1. Count Times 7. Time Shortcuts
2. Calorie Indicator 8. Speed Shortcuts
3. Distance Indicator 9. Time Increase/Decrease
4. Time Indicator 10. Start/Stop Button
5. Speed Indicator 11. Speed Increase/Decrease
6. Usage
# Components Quantity
1 Control Panel 1
2 Signal Cable A 1
3 Screw 4
4 Plastic Handle Cover 1
5 Signal Cable B 1
6 Left Support Handle 1
7 Washer (M8) 4
8 Lock Washer 4
9 Screw (M8 X 80) 4
10 Signal Cable D 1
11 Washer (M6) 8
12 Screw (M6 X 20) 8
13 Right Support Handle 1
14 Cross Bar Grip 1
15 Base Cover 1
16 Signal Cable C 1
17 Adjustable Feet 4
18 Moving Wheels 2

8 9
STEP 2: Securing the Support Handles
Connect the Signal
Cable C(16) and
the Signal Cable D
(10), and lower the
Left Support Handle
(6) into the pedestal
taking care not to
crimp the cables.
Lock with a screw
(12), and washer
(11). Put the Right
Support Handle (13)
into to the pedestal
and secure it. Be
careful not to lock
the screws to tightly.
STEP 4: Attaching the Control Panel
Remove the plastic
Handle Cover (4) and
connect the Signal
Cable A(2) and the
Signal Cable B (5).
Place the Control
Panel (1) on the Left
Support Handle (6).
Lock the plastic
Handle Cover (4) on
to the Control Panel
(1) with the screw (3).
Finally, lock the Control
Panel (1) onto the Right
Support Handle (13).
Installation Installation
STEP 1: Setting Up the Base
Tilt the machine base so that the
underside of the base is exposed.
(The serial number should be
visable.) Install the 4 adjustable
feet (18) and place the base feet-
side down.
STEP 3: Connecting the Cross Bar Grip
Afx the Cross Bar Grip
(14) onto the Left Sup-
port Handle (6) with the
screw (9), lock washer
(8), and washer (7). Do
not tighten at this time.
Next, secure the Cross
Grip to the Right Sup-
port Handle in the same
manner. Then, lock all
screws tighlty.

Installation Operation Instructions
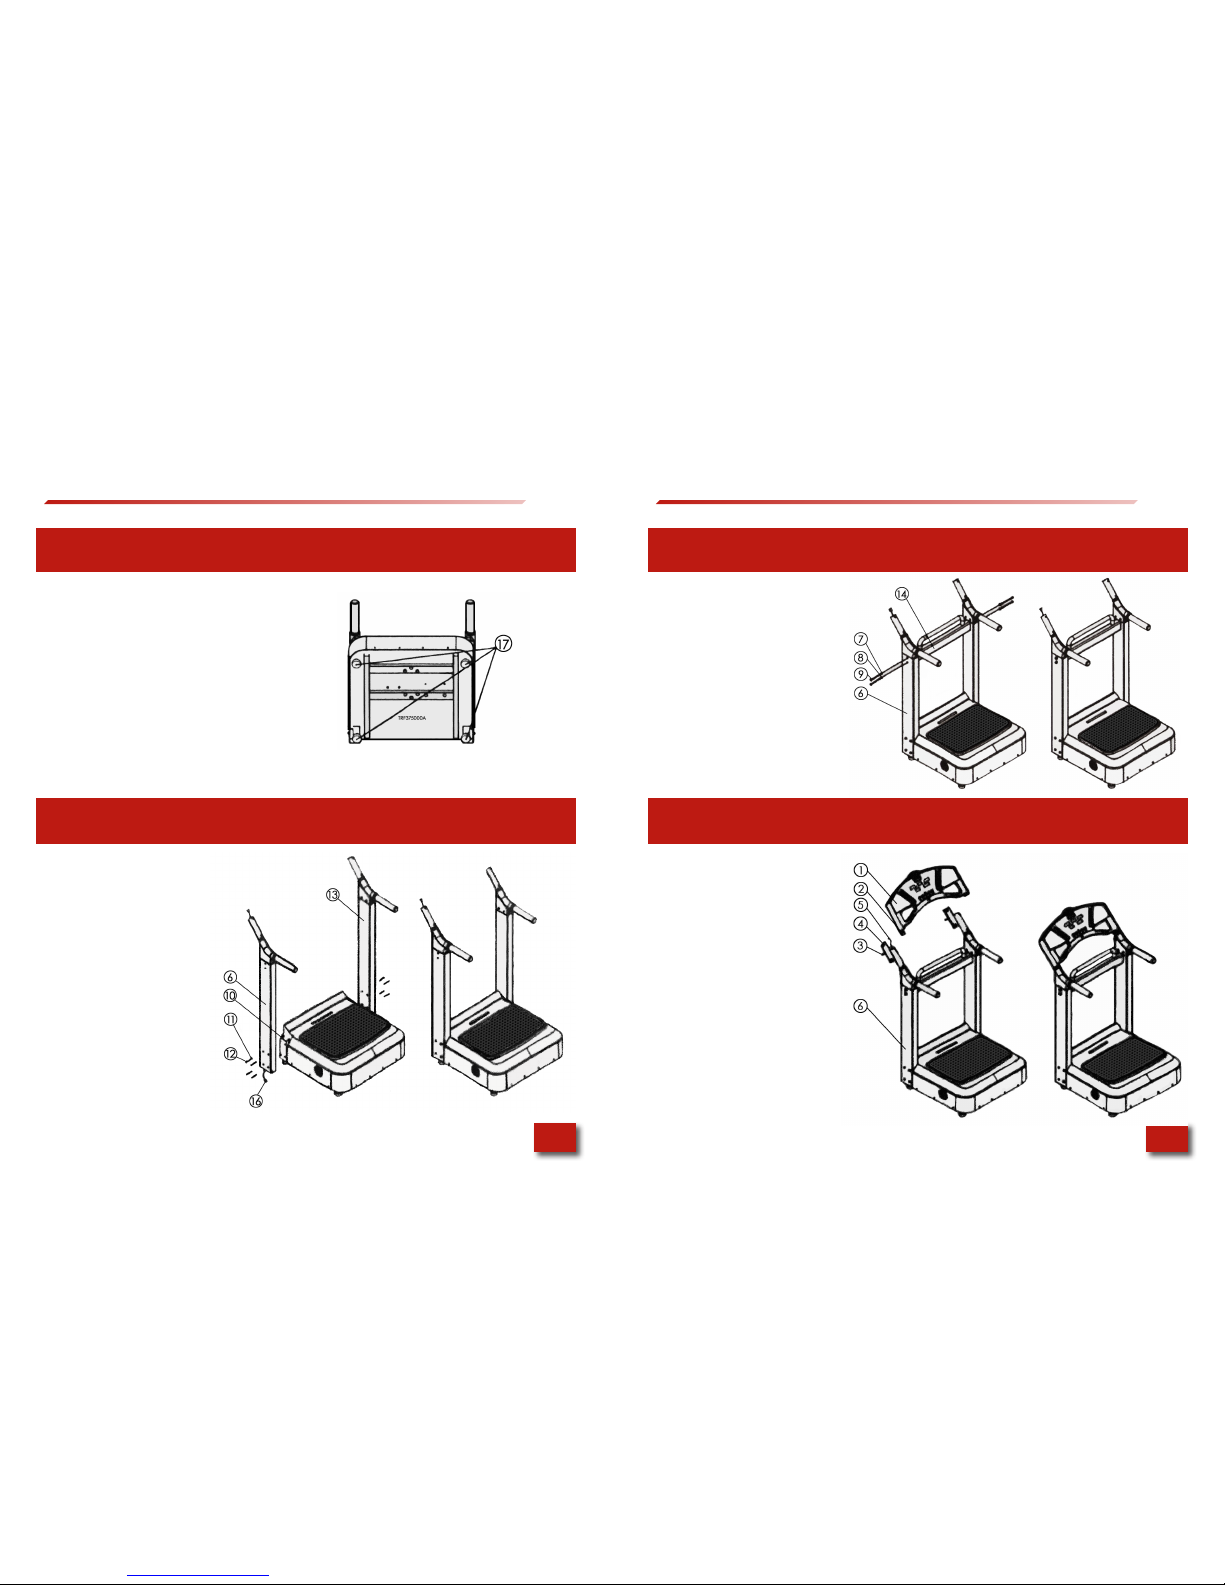
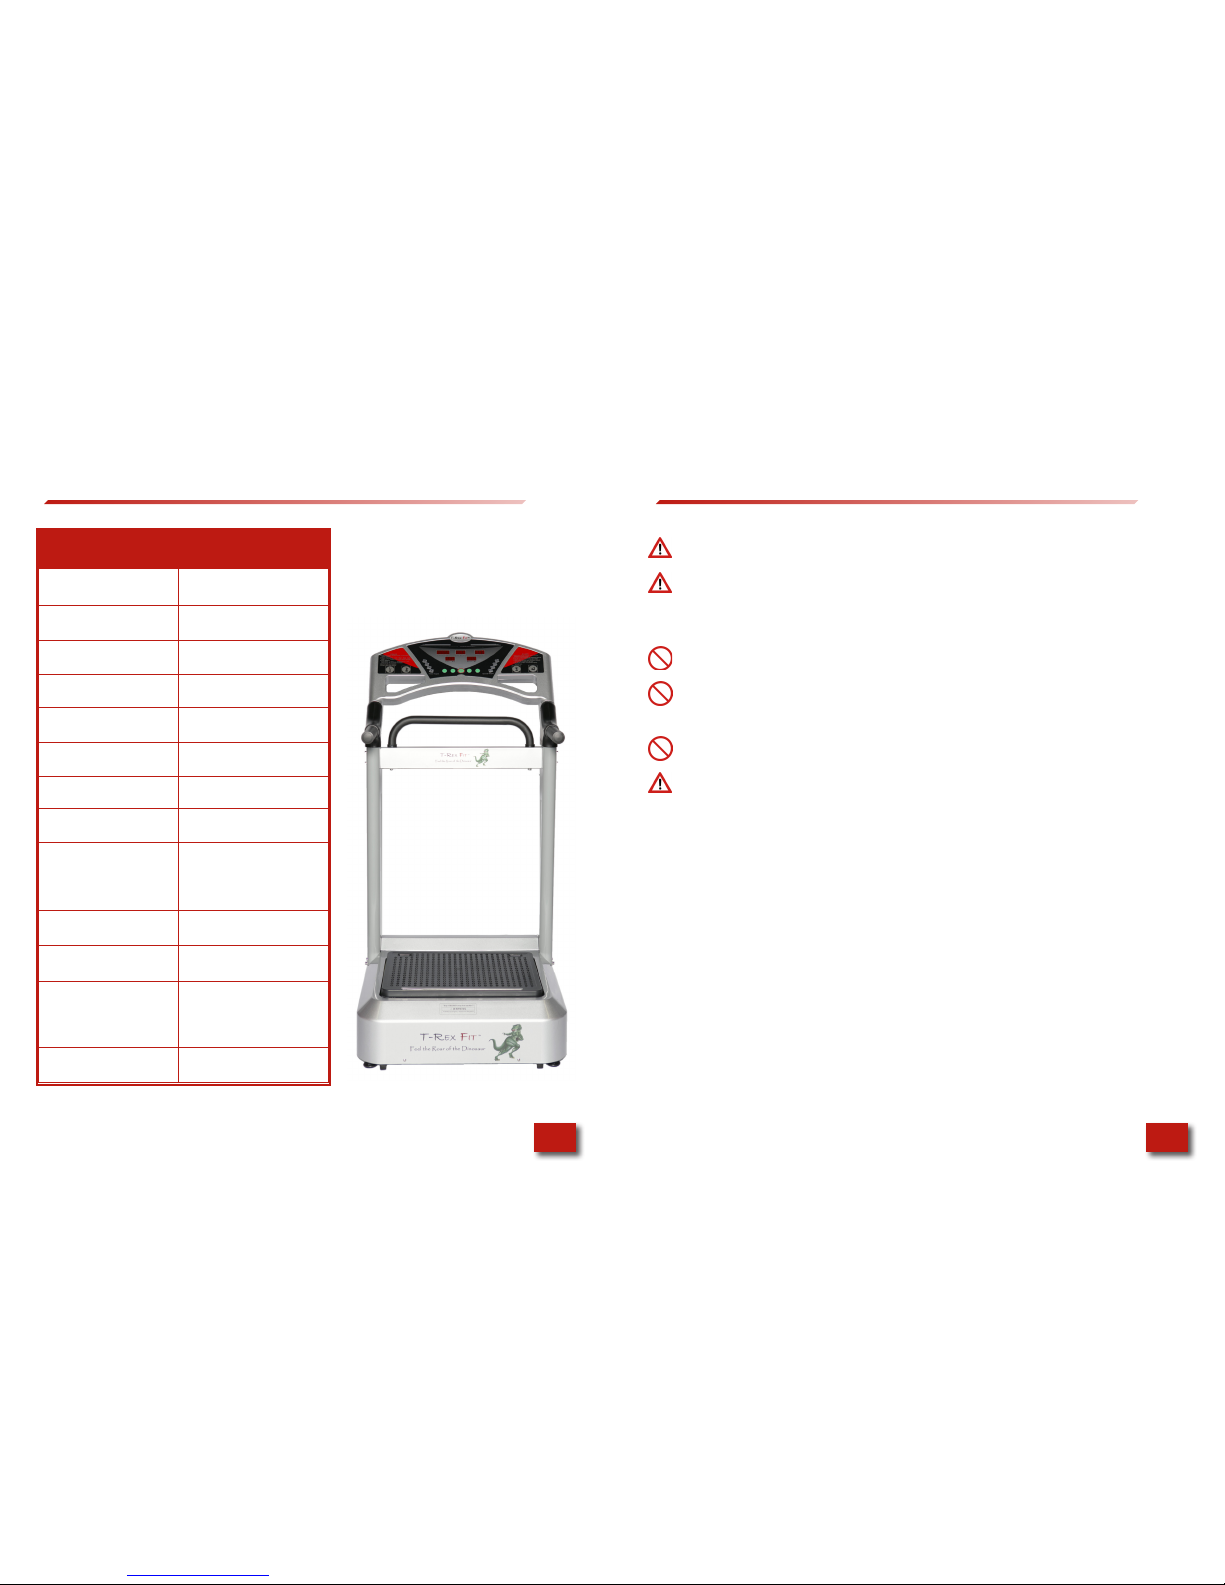
STEP 5: Tightening and Leveling your T-Rex Fit™
Use the smaller Allen wrench
to tighten the screws (11) at
the bottom of the Left (6)
and Right (13) Support
Handles. Next, use the
larger Allen wrench to
tighten the upper screws
(9) to ensure the cross bar
grip is secured to both
Support Handles, (6) and
(13). Once all screws have
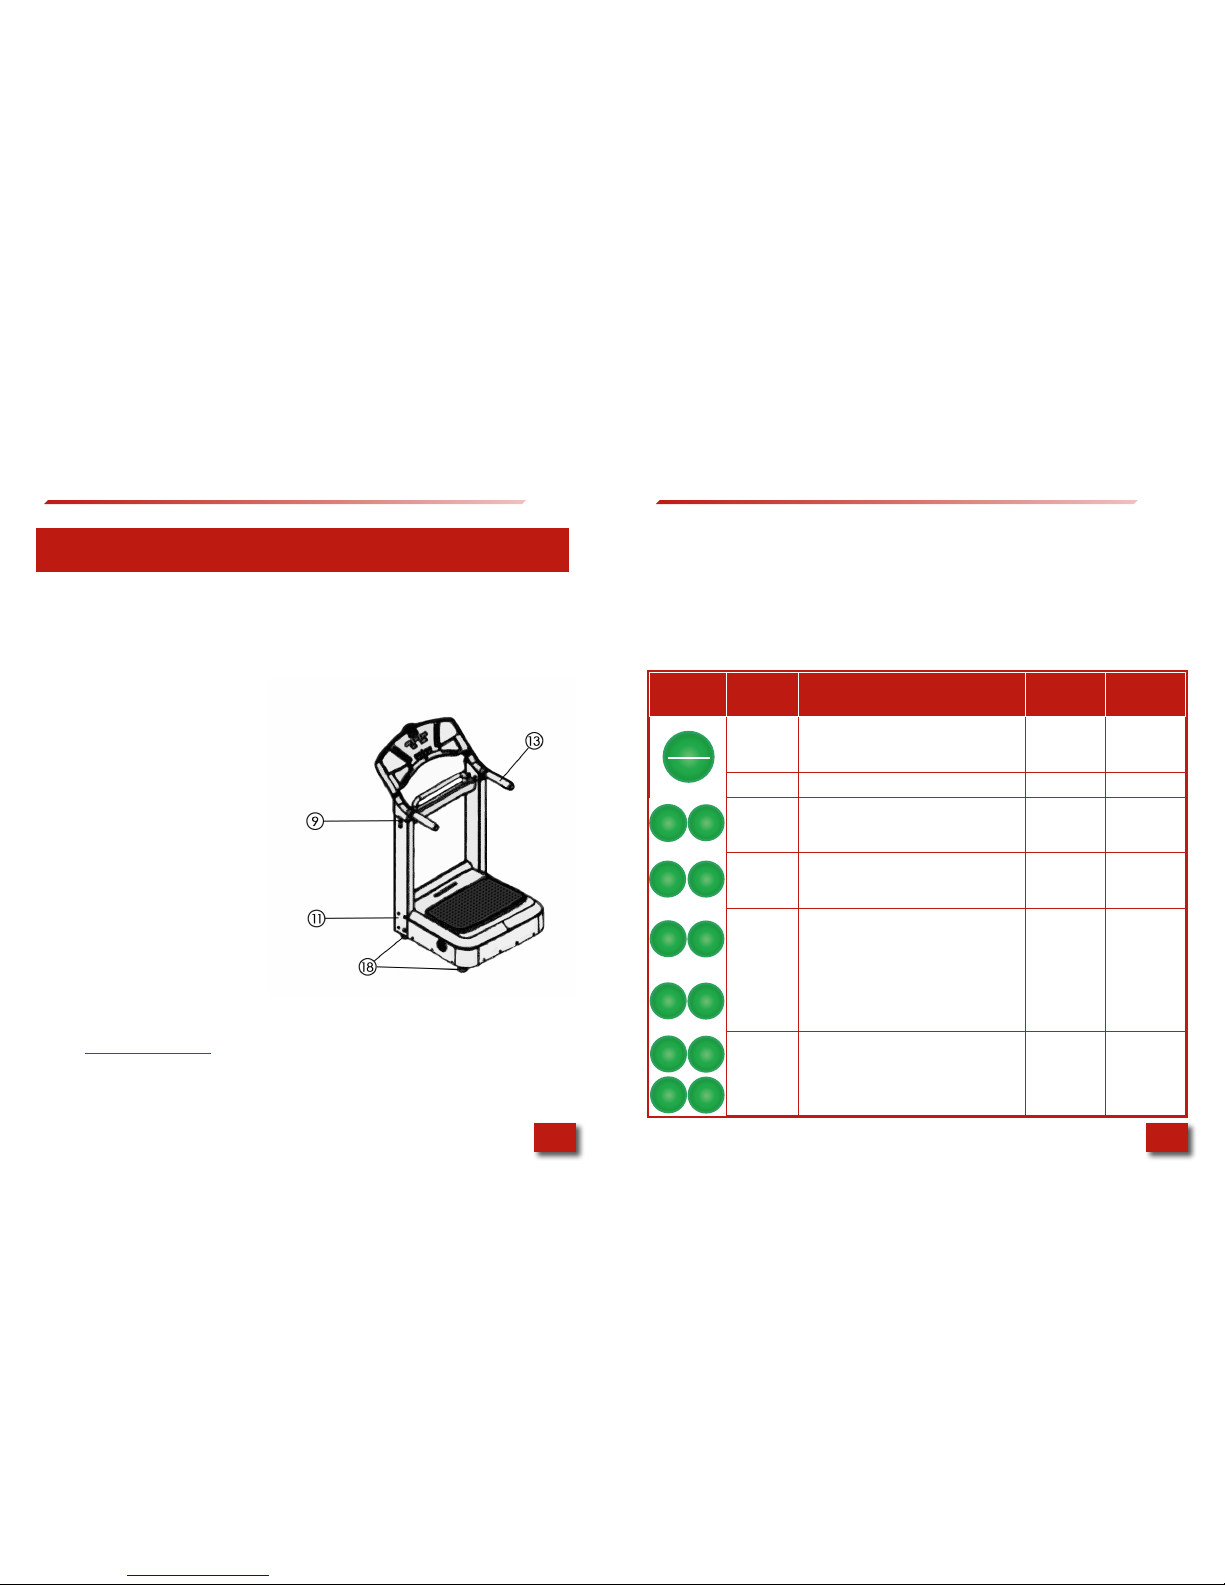
been tightened, carefully tilt
back and roll the machine
to the intended area of use.
(*Note: For optimal perfor-
mance, it is recommended
the machine be operated
on a hard surface.) Finally,
lightly rock the machine
to and fro to determine
whether the adjustable
feet (18) are level. Twist
the feet (18) as neces-
sary until all four feet are
flush with the floor and
the machine no longer
rocks. Your T-Rex Fit™is now
READY TO ROAR!
10 11
Button Vibration
Mode Instructions Time Speed
START
STOP
Start
Press START to turn the machine
on. The machine will be in stand-
by mode until the time is set.
Adjustable Adjustable
Stop Press STOP to end the session.
Time
+
Time
-
Time
Increase/
Decrease
Press Time Increase/Decrease to
increase or decrease the time in
increments of 0.1.
Default/
Max time =
10 minutes
Not
Adjustable
Speed
+
Speed
-
Speed
Increase/
Decrease
Press Speed Increase/Decrease
to increase or decrease the
speed in increments of 0.1.
Not
Adjustable Adjustable
Auto Low
Mode
Selection
Press Mode Selection and select:
• Auto: Gradually increases
and decreases speed settings
fluctuating between Low,
Med, and High settings.
• Low: 16.5 Hz
• Med: 30 Hz
• High: 40 Hz
Adjustable Adjustable
Med High
3 5
Time
Setting
Press Time Setting to set timed
increments of 3, 5, 8, or 10 min.
vibration therapy sessions.
Adjustable Adjustable
810
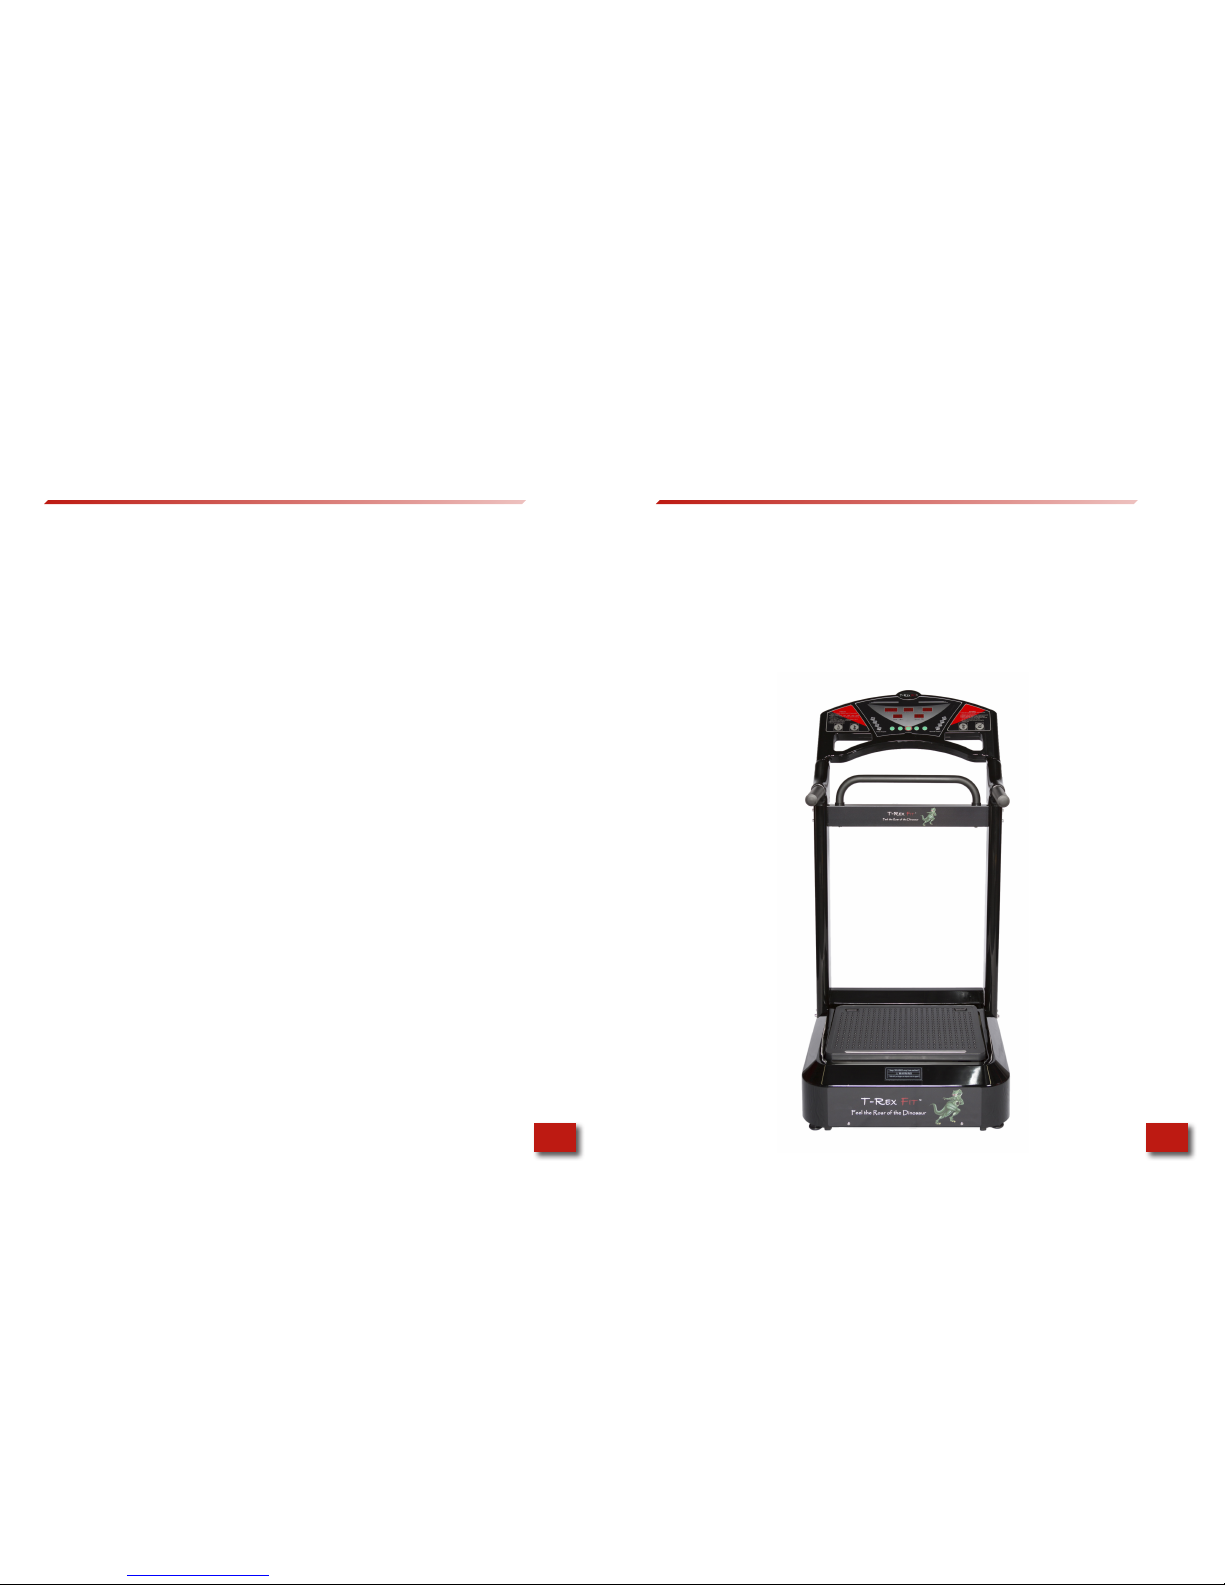
1. Plug the electrical cord into the power connector at the base of the
machine.
2. Turn on the main power switch at the base of the machine.
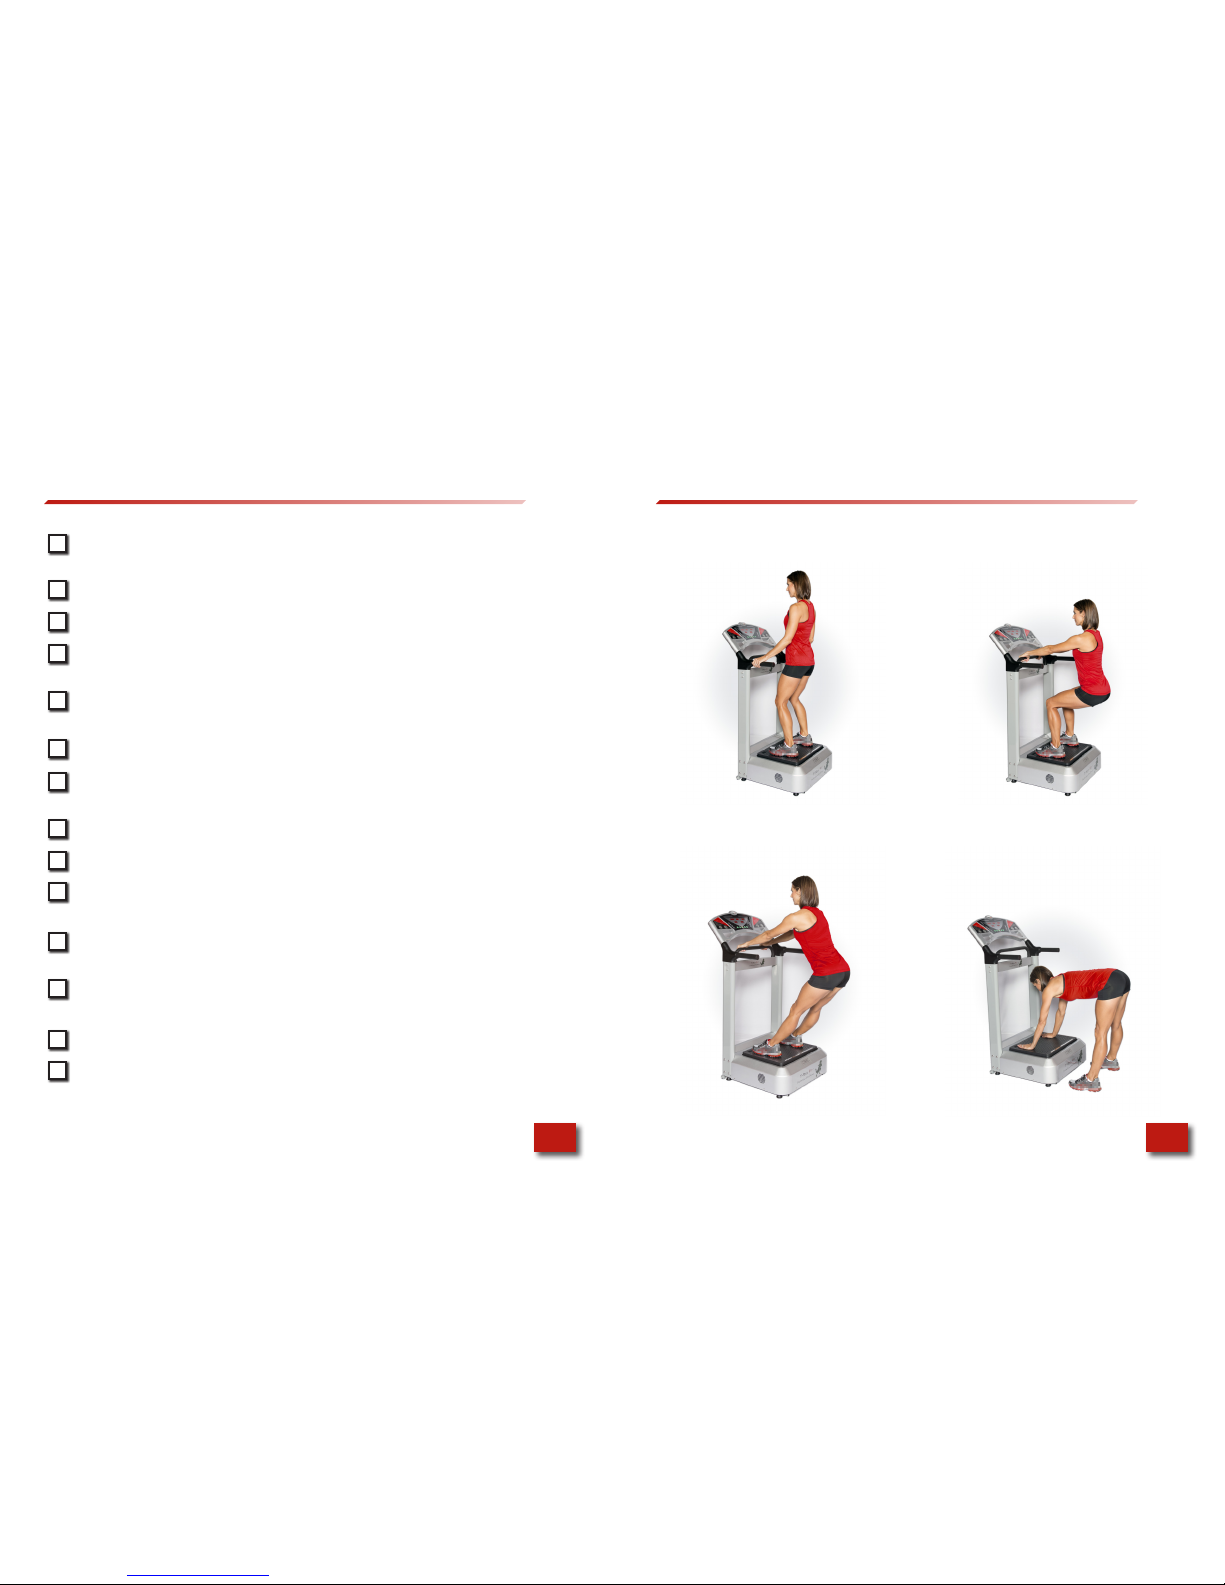
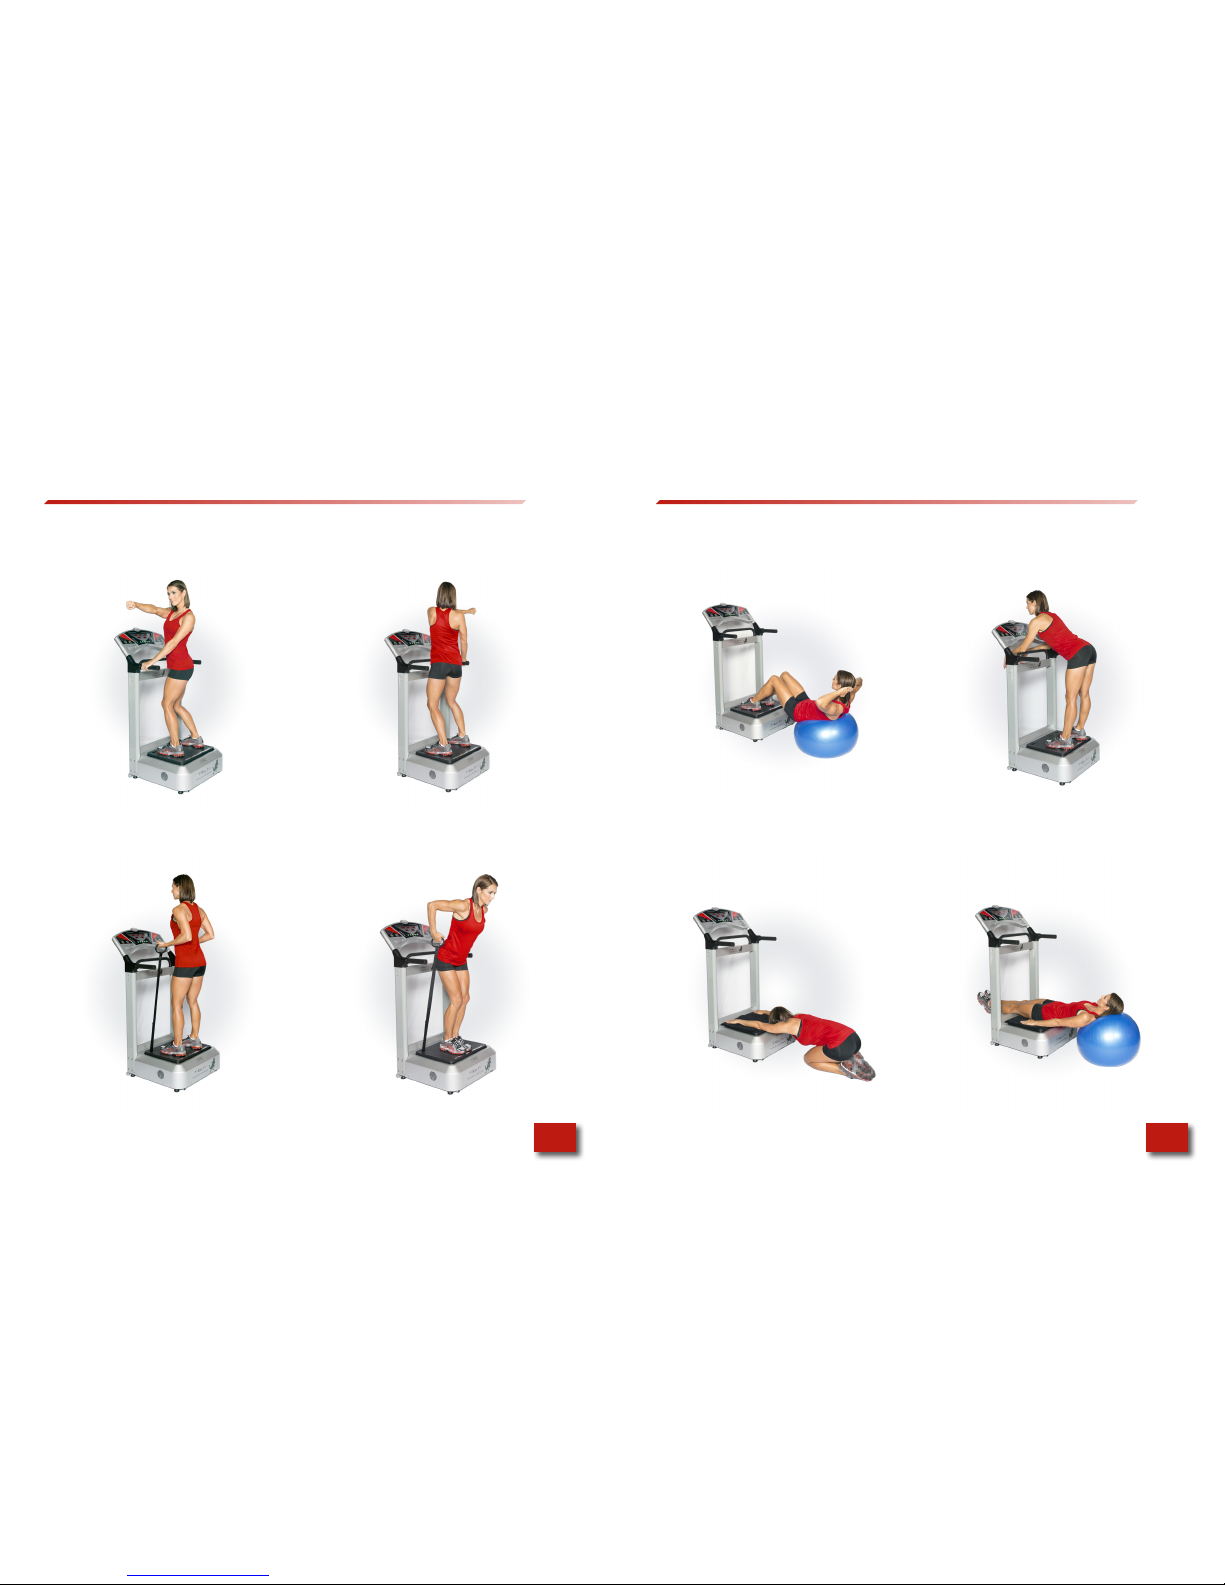
3. Choose your desired posture on T-Rex Fit™, as shown in this Owner’s
Manual.
4. Press the START button to begin your session. Refer to the descriptions
(below) for further instructions.

T-Rex Fit™Usage T-Rex Fit™Exercise Positions
Drink 16oz of room temperature water before use to eliminate toxic
wastes.
Do not exercise more than 10 minutes per session.
Do not exercise within 30 minutes before or after a meal.
Choose a pre-set time (default is 10 minutes) or manually adjust as
appropriate.
Choose a pre-set speed or increase/decrease manually, as
desired.
Hold safety handles securely when stepping on or off the plate.
Step on the middle of the plate and adjust feet shoulder-width
apart.
Press the START button to begin vibration exercises.
Adjust your stance for variations in vibration amplitude.
Change positions on the plate every 60 seconds (1 minute) for best
results.
When rst using, begin at a low speed and increase as your body
feels comfortable.
Press the STOP button to turn off the machine at any time.
(T-Rex Fit™ will automatically turn off when the timer reaches 0.)
Drink an additional 16oz of water upon completion of each session.
If you experience any discomfort, or if abnormalities arise during
exercise, discontinue your session and consult a physician.
12 13
Circulation & Lymphatic Detox Quadriceps, Hips & Back
Hamstrings Triceps, Shoulders and Chest

T-Rex Fit™Exercise Positions T-Rex Fit™Exercise Positions
Obliques
Biceps Triceps
Abdominal Crunch Back Relaxation
Upper Body Stretch & Massage Thigh & Hip Massage
14 15

Safety MeasuresT-Rex Fit™Specications
16 17
Machine Specifications
Power Consumption 1000 Watts
Frequency Range 5-60 Hz
Amplitude 1-13mm
Motor 2 HP
Speed Range 1 - 60
Vibration Type Oscillating
User Load Limit 440 lbs (Current
Overload Protection)
Pre-set Programs 3 (Low, Med, High)
Display
LED - (Time, Speed,
Calorie Indicator,
Distance Indicator,
Exercise Amount
Dimensions 28 in. x 37 in. x 57 in.
Net Weight 120 lbs
Miscellaneous
Durable Steel Frame
Disturbance and
Static Electricity
Resistant
Colors Available Silver, Black
• Use T-Rex Fit™only as described in this Owner’s Manual.
• Only one person should step on the vibration plate at a time.
Failure to follow these instructions may result in injury or break-
down of the machine.
• Do not operate or touch T-Rex Fit™with wet or humid hands.
• Do not insert ngers between the vibration plate and base of
the machine.
• Do not use force against the machine.
• Turn off power and unplug the power cord after each use.

Machine Care Warranty
18 19
• Do not store or use T-Rex Fit™in a moisture-prone area such as
a bathroom, swimming pool area, or spa.
• Do not use where large amounts of dust particles, oil, or caustic
gas are present.
• Avoid hitting, scratching with force, or placing large objects on
the plate or console, as doing so may damage the surface.
• Do not store near heat or open ame.
• Do not expose T-Rex Fit™to direct sunlight for an extended
period of time.
• Keep T-Rex Fit™under 95°F (35°C).
• Keep T-Rex Fit™under 85% humidity.
• Store T-Rex Fit™under 120°F (50°).
• Do not coil the wire cord, as it may cause malfunction to the
machine.
All T-Rex Fit™machines come with a Full One-Year
Replacement Warranty. For complete details, see our
Consumer Limited Warranty at www.t-rexfit.com or in
the shipment containing your T-Rex Fit™Machine.

Copyright © 2014, ALL RIGHTS RESERVED.
T-Rex Fit
Feel the Roar of the Dinosaur
www.T-RexFit.com
Contact us with questions or comments at:
1-844-TREXFIT (873-9348)
™
™
Table of contents