manuals.online logo
Brands
  1. Home
  2. •
  3. Brands
  4. •
  5. TrickleStar
  6. •
  7. Accessories
  8. •
  9. TrickleStar SENSORCLICK 188LV-US-4 Series User manual

TrickleStar SENSORCLICK 188LV-US-4 Series User manual

PRODUCT WARRANTY
The expected lifetime of the product is 10 years (hereafter referred to as Product Lifetime).
TrickleStar warrants to the original purchaser that the Product shall be free of defects in design, assembly, material, or workmanship and
will repair or replace, at its option, any defective product free of charge over the Product Lifetime.
In no event, shall TrickleStar be liable for incidental, special, direct, indirect, consequential, or multiple damages such as, but not limited to,
loss of business or profits arising out of the sale or use of the Product, even if advised of the possibility of such damages. This warranty
gives the original purchaser specific legal rights which vary from state to state. Some states do not allow the exclusion or limitation of
incidental or consequential damage, so the above limitations may not apply to you.
This warranty is valid only for the original purchaser of the product. All damage claims against the product must be made within 15 days
from the date of the occurrence and must be accompanied by a receipt for the damaged devices, or the warranty is void.
Warranty is valid in USA and Canada.
MAKING A WARRANTY CLAIM
Go to: www.tricklestar.com and print our claim form and email it to warranty@tricklestar.com
Provide the following information:
• Product part number
• The date of the occurrence
• Where you purchased the Product
• When you purchased the Product
• A copy of the original receipt
A Customer Service Representative will then instruct you on how to forward your Product, purchase receipt, a photograph of the Product
in use at the time of the “occurrence,” and information on how to proceed with your claim.
COPYRIGHT & DISCLAIMER
© Copyright TrickleStar Ltd. All rights reserved. TrickleStar®
and SensorClick™ are registered trademarks of TrickleStar.
Any typographical, clerical or other error or omission in this
document or other documents or information issued by
TrickleStar shall be subject to correction without any liability on
the part of TrickleStar without notice.
Copyright © 2015 TrickleStar PAGE 1Copyright © 2015 TrickleStarPAGE 4
L
I
F
E
T
I
M
E
P
R
O
D
U
C
T
™
SENSORCLICK™MODULAR POWER PLATFORMS
188LV-US-4XX 4 Outlet Advanced PowerTap 1080
Joules, Current Sensing
188LV-US-7XX 7 Outlet Advanced PowerStrip 1080
Joules, Current Sensing, 4Ft Power Cord
188LV-US-12XX 12 Outlet Advanced PowerStrip 1080
Joules, Current Sensing, 4Ft Power Cord
PRODUCT INFORMATION
188LV-IRMS-8F Multi-Sensor, 8Ft Cord
Sensor
On/Off Button
Copyright © 2015 TrickleStar PAGE 3
Plug Multi-Sensor into
the RJ11 sensor port
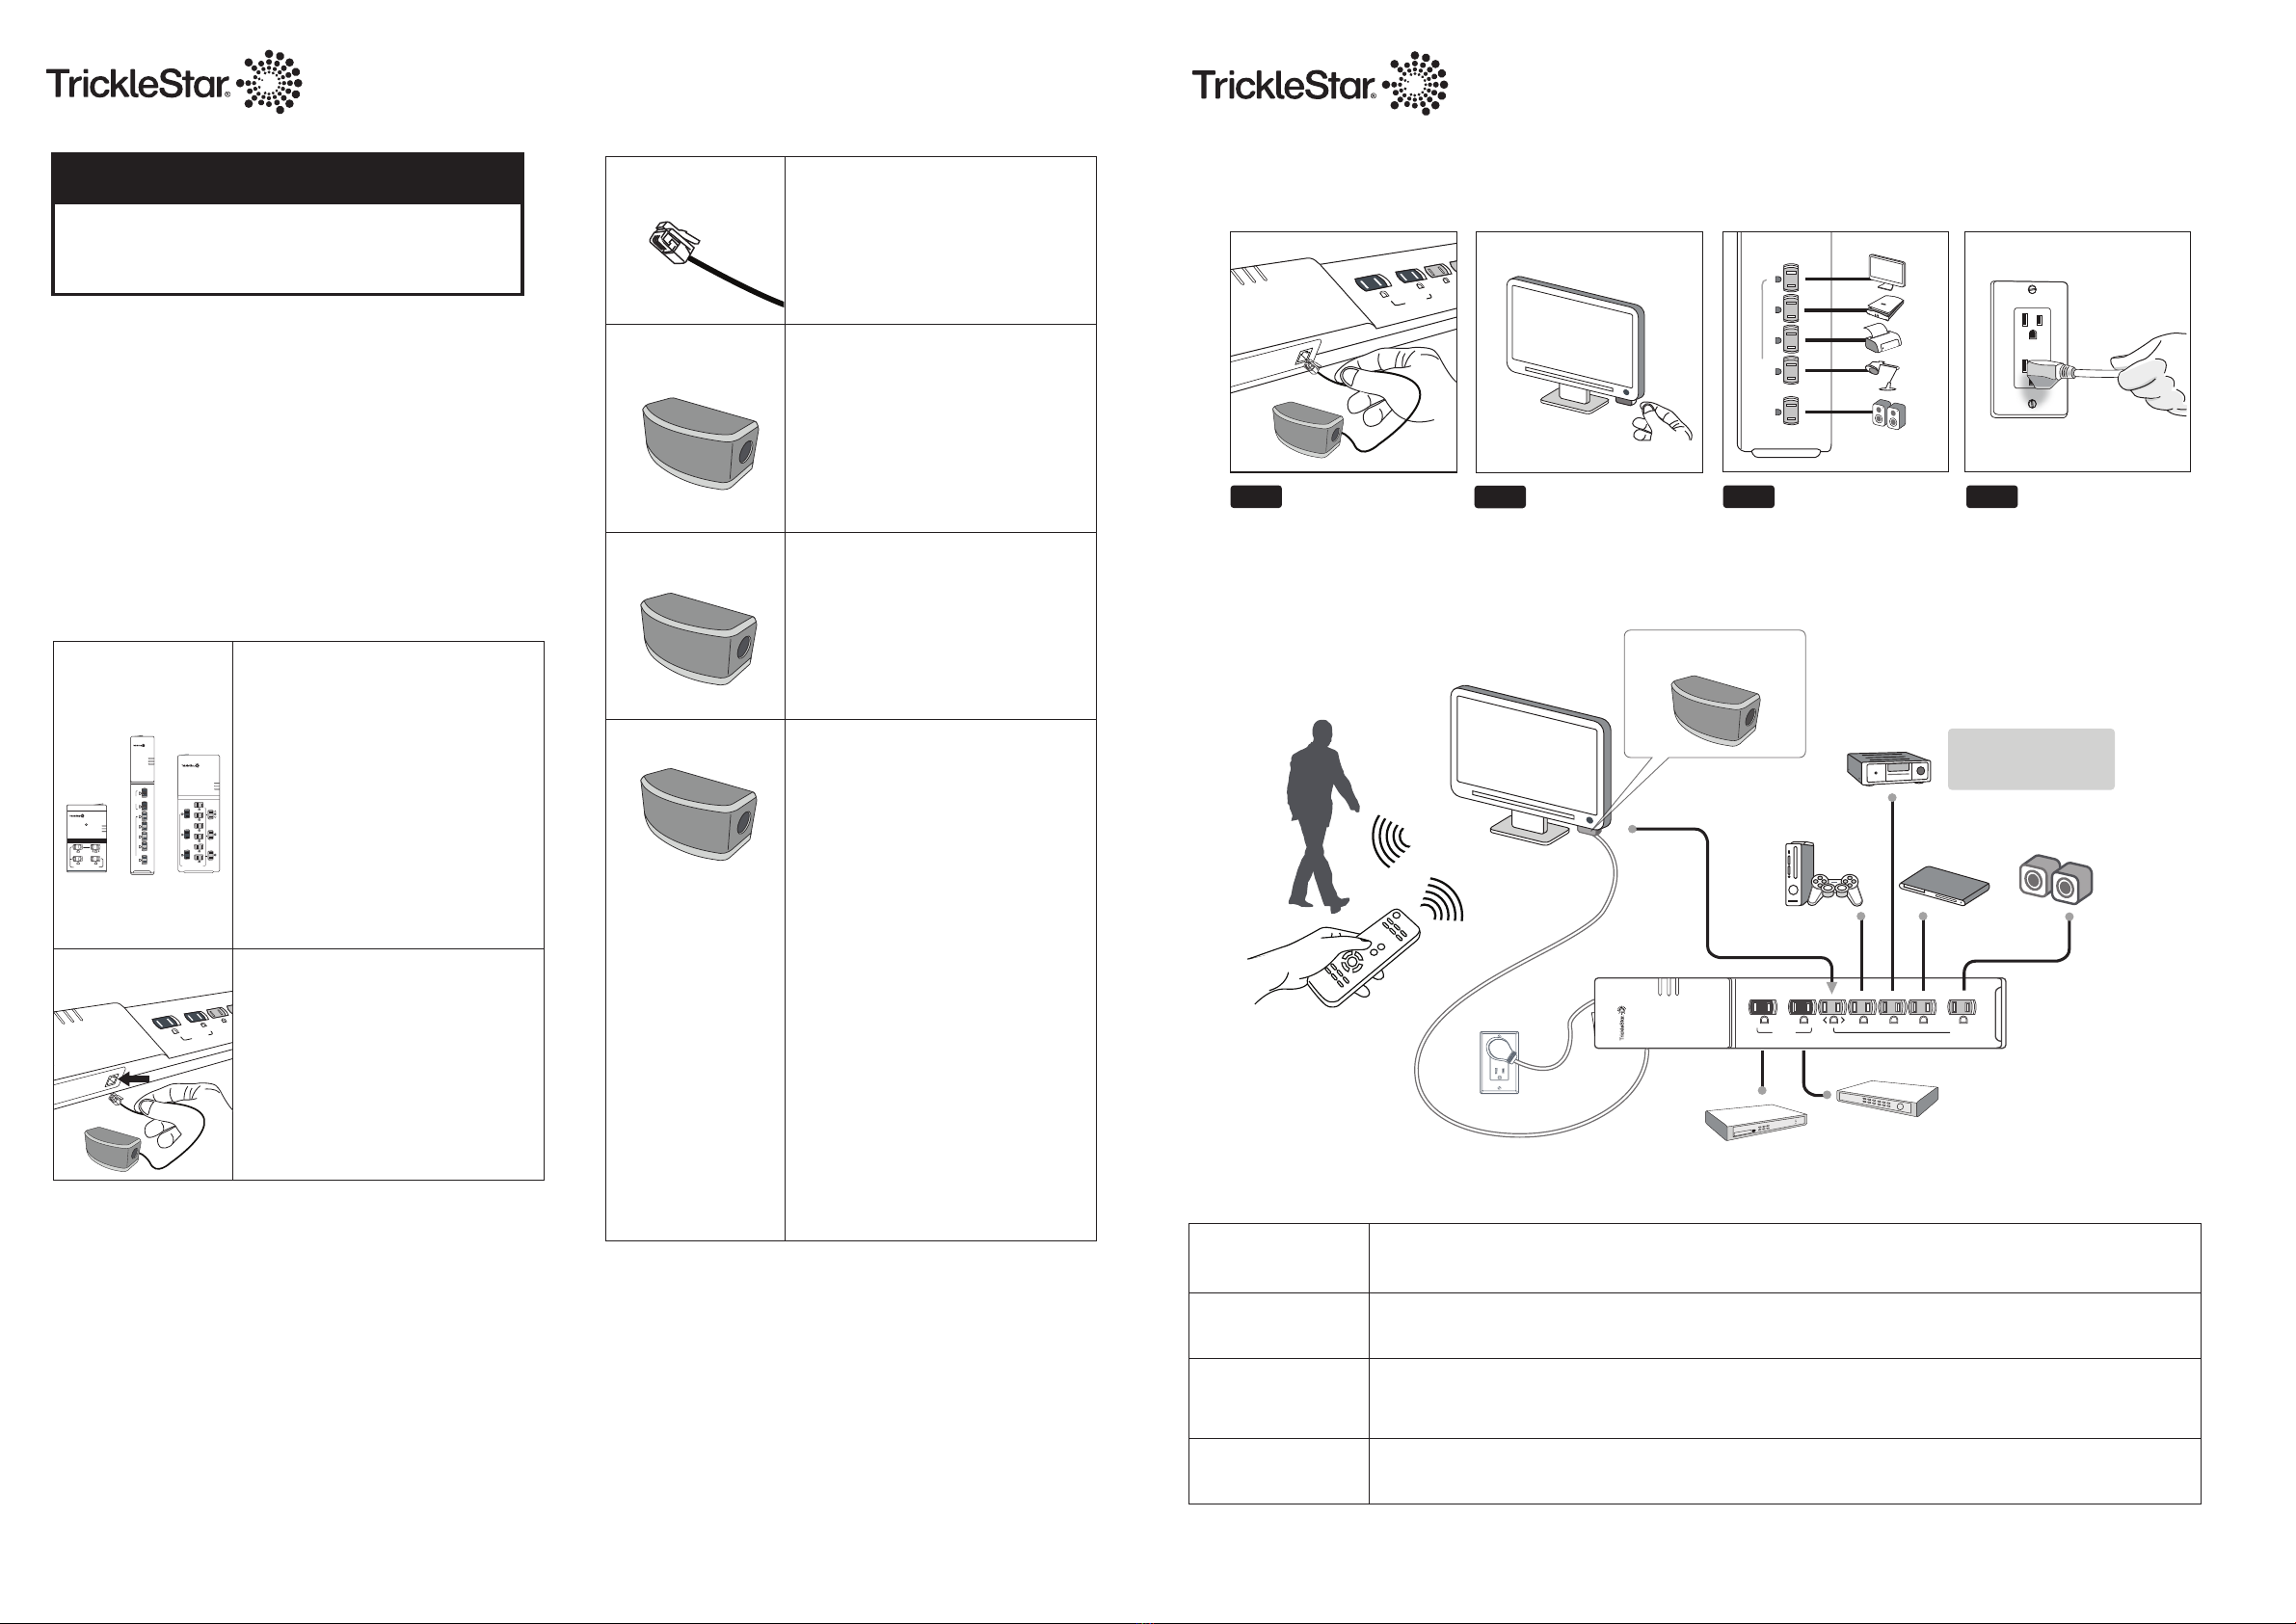
SENSORCLICK™MULTI-SENSOR - INSTALLATION
Step 1 Connect devices
Step 3
always on
< >
surge
ground
switched
sensor
Plug in powerstrip to a
grounded receptacle
Step 4
Attach Multi-Sensor to the
front of your TV. The ideal
sensing range is 6 to 12
feet away from the TV.
Step 2
always on
surge
ground
switched
switched
< >
SENSORCLICK™MULTI-SENSOR - SETUP
Sensor The multi-sensor takes up 10 seconds to initialize after being connected to the powerstrip.
Initialization
Countdown Default Countdown Time is 135 minutes (+/- 5 minutes).
Time
Countdown
Timer Countdown Timer is reset each time movement or IR signals are detected. Note: The current sensing in
Operation the first switched outlet is not utilized by the motion sensor.
Countdown Upon expiry of the Countdown Timer, the switched outlets will switch off.
Timer Expiry
SENSORCLICK™MULTI-SENSOR - OPERATION
PRODUCT FUNCTIONALITY
RJ11 Connector For connecting the product to a
SensorClick™ power platform which
controls the switched outlets.
Includes the following:
• 4 Oultet PowerTap
• 7 Outlet PowerStrip
• 12 Outlet PowerStrip
Sensor • Highly sensitive multi-sensor
• Detects activity and controls
switched outlets
• When motion or IR is detected,
the LED will flash
On/Off • Press the on/off button on the
multi-sensor to toggle switched
outlets on and off manually
• Default countdown time is 135
minutes
Timer • To configure countdown timer:
press and hold button for 10
seconds. Press:
1X for 75 minutes
2X for 135 minutes (Default)
3X for disable/enable the buzzer
• After countdown timer is set, the
LED will flash the number of
times that timer has been set to
• Press the on/off button on the
multi-sensor to toggle switched
outlets to on and off
• Buzzer will sound 10 minutes
before expiry of countdown timer
(and switched outlets switch off)
• LED start flashes for 10 minutes
of expiry of countdown timer until
shutdown.
INTRODUCTION
SensorClick™ is a patent-pending, modular powerstrip and
sensor system that allows you to use any SensorClick™
powerstrip with any SensorClick™ accessory device. With an
extensive and growing list of accessory devices, you can quickly
and inexpensively set up a control solution to suit any
application with no programming required.
This product is a SensorClick™ accessory that is designed for
use with a SensorClick™ PowerStrip.
PRODUCT OVERVIEW
Modular Power The product must be used with
Platforms a SensorClick™ PowerStrip from
TrickleStar in order to operate.
Only TrickleStar SensorClick™
accessory devices may be
connected to the SensorClick™
PowerStrips. Use of non-TrickleStar
accessory devices may result in
damage to the product and will void
all warranties.
Product must only be plugged into
RJ11/Sensor Port.
Multi-Sensor must be connected to
the SensorClick™ PowerStrip via
RJ11 port – marked “sensor”.
FOR TECHNICAL SUPPORT
Toll free : 1-888-700-1098
www.tricklestar.com
4 Outlet 7 Outlet 12 Outlet
surge
ground
switched
alwayson switched
switchedalwayson
surge
ground
switched
alwaysonswitched
always on
< >
surge
ground
switched
sensor
Copyright © 2015 TrickleStarPAGE 2
surge
ground
switched
always on switched
TV
SUBWOOFER
AV RECEIVER
DVD PLAYER
GAME
CONSOLE
(NO HDD)
EXAMPLES OF PRODUCTS
THAT CAN BE PLUGGED
INTO POWERSTRIP
SET TOP BOX
DVR
IR + MOVEMENT
‘MULTI-SENSOR’

This manual suits for next models

4

Other TrickleStar Accessories manuals

TrickleStar SENSORCLICK 188LV-TFS-3F User manual

TrickleStar

TrickleStar SENSORCLICK 188LV-TFS-3F User manual

TrickleStar Advanced PowerStrip+ User manual

TrickleStar

TrickleStar Advanced PowerStrip+ User manual

TrickleStar TS1914 User manual

TrickleStar

TrickleStar TS1914 User manual

TrickleStar TS1921 User manual

TrickleStar

TrickleStar TS1921 User manual

TrickleStar TS1810 User manual

TrickleStar

TrickleStar TS1810 User manual

TrickleStar TS1921 User manual

TrickleStar

TrickleStar TS1921 User manual

TrickleStar SENSORCLICK 188LV-TFS-3F User manual

TrickleStar

TrickleStar SENSORCLICK 188LV-TFS-3F User manual

Popular Accessories manuals by other brands

Jupiter Avionics JA72-006 Installation and operating manual

Jupiter Avionics

Jupiter Avionics JA72-006 Installation and operating manual

KMC Controls STW-6010 installation guide

KMC Controls

KMC Controls STW-6010 installation guide

Omron F150-2 Setup manual

Omron

Omron F150-2 Setup manual

GRASS VALLEY LDK 4582 datasheet

GRASS VALLEY

GRASS VALLEY LDK 4582 datasheet

Waterpik Pearl user manual

Waterpik

Waterpik Pearl user manual

Steren BAT-PBAA4/RECYKO user manual

Steren

Steren BAT-PBAA4/RECYKO user manual

Bogen ZPM-3 install guide

Bogen

Bogen ZPM-3 install guide

National Instruments WSN-3230 USER GUIDE AND SPECIFICATIONS

National Instruments

National Instruments WSN-3230 USER GUIDE AND SPECIFICATIONS

Joolz raincover instruction manual

Joolz

Joolz raincover instruction manual

Global Cache GC-SC1 quick start guide

Global Cache

Global Cache GC-SC1 quick start guide

Vanderbilt WMAG quick start guide

Vanderbilt

Vanderbilt WMAG quick start guide

American Standard Rise and Shine Toilet Seat 5325.024 Specifications

American Standard

American Standard Rise and Shine Toilet Seat 5325.024 Specifications

AVE 45383 manual

AVE

AVE 45383 manual

NeuLog NUL-203 quick start guide

NeuLog

NeuLog NUL-203 quick start guide

brennenstuhl BrematicPRO BM 868 01 Instructions for use

brennenstuhl

brennenstuhl BrematicPRO BM 868 01 Instructions for use

Hanyoung PY Series quick start guide

Hanyoung

Hanyoung PY Series quick start guide

Heatcraft Bohn PRO3 Installation and operation manual

Heatcraft

Heatcraft Bohn PRO3 Installation and operation manual

MOB MO9702 user manual

MOB

MOB MO9702 user manual

manuals.online logo
manuals.online logoBrands
  • About & Mission
  • Contact us
  • Privacy Policy
  • Terms and Conditions

Copyright 2025 Manuals.Online. All Rights Reserved.