TrickleStar TS1921 User manual

Installation Guide
TS1921 Occupancy Sensor

2
Table of Contents
1 What is in the box? 4
2 Sensor Overview 5
3 Pairing the Sensor 6
4 Mounting the Sensor on the wall 10
5 Placing the Sensor on a at surface 11
6 Ready for use 12
7 Changing Occupancy Detection settings on the Portal 13
8 Occupancy Detection 14
9 Connectivity 19
10 Specications 20
11 Enviromental-Friendly Features 22
12 Replacing the battery 23
13 Troubleshooting 24

3
Welcome!
Thank you for choosing the TrickleStar TS1921 Occupancy Sensor.
This Occupancy Sensor is an accessory for the TrickleStar Wi-Fi Smart
Thermostat. The Sensor helps the Thermostat to maximize comfort to your
room as the sensor can detect occupancy as well as measure the temperature
in the room. Maximum 6 sensors can be connected to the thermostat via
bluetooth.
This Installation Guide describes how to install the Sensor and pair it to a
TrickleStar Wi-Fi Smart Thermostat.
If you have any inquiries about TrickleStar products or need technical support,
visit our website for tutorials, videos and Frequently Asked Questions (FAQ).
You can also contact us by email or phone.
Instruction Videos
If you want to see the Installation Instructions
as videos, visit our YouTube channel:
https://www.youtube.com/user/TrickleStarUS/
Website: www.tricklestar.com
Email: customer.service@tricklestar.com
Toll Free: 1-888-700-1098
4
Preparation
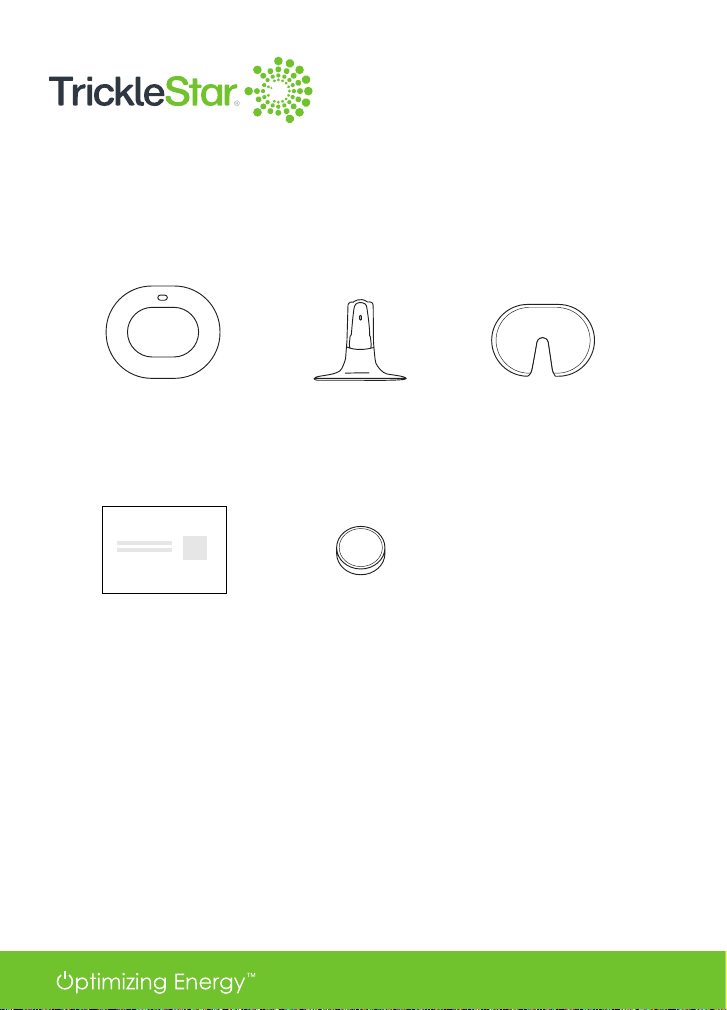
What is in the box?
Occupancy
Sensor
QR code sheet Lithium cell battery
(CR2477X x 1)
Stand Double-sided
adhesive

5
Sensor Overview
Fresnel Lens
Stand
Battery Cover
Top View
Bottom View
LED Indicator
Battery Cover
Double-sided
adhesive
(for wall mount)
Slot (for stand)
Stand (detachable)
Pairing
Button
6
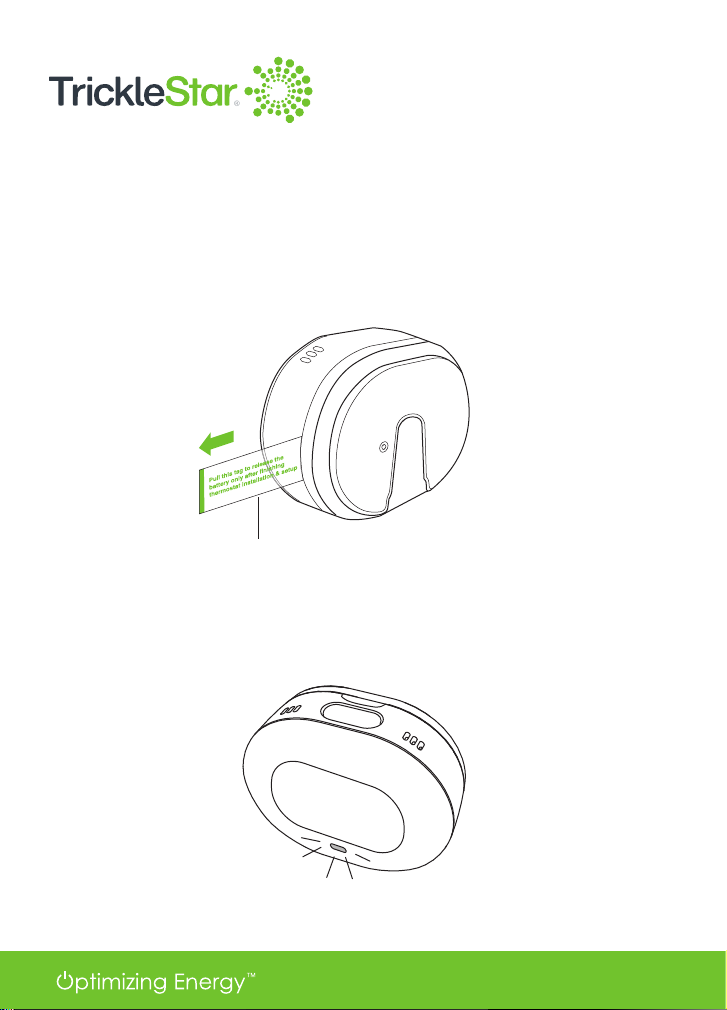
Pairing the sensor
Step 1: Pull the plastic tag
To power up the Sensor, pull out the plastic tag from the Sensor gently.
When the Sensor is powered up, it enters Pairing mode automatically. The
LED starts blinking and continues blinking up to eight minutes.
Plastic tag

7
If the LED does not blink after the Sensor is powered up or after battery
insertion or the Sensor exits Pairing mode after eight minutes, hold the Pairing
Button for 2 seconds to re-initiate pairing to the thermostat. The sensor will
enter Pairing mode again and broadcast itself for 8 minutes for thermostat
scanning. LED will blink briefly in the mode.
Step 2: Add Occupancy Sensor to the system
1.
Log in to your TrickleStar Portal account
at: portal.tricklestar.com You can also use the QR
code here.
2.
At Dashboard screen, select Devices, then click on your Thermostat Name
to enter Thermostat page.
3.
Select Sensors on the left panel, then click on “+” to add a new sensor.
4. Enter the name for your sensor.
5. Press Next once your sensor LED is blinking to complete the pairing process.
This will initiate a scan function and Thermostat will scan for sensors in range.
Sensors that are detected will be listed by their MAC addresses. User can
select from the list if there is more than one sensor to be paired and add the
sensors. Note: It may take up to 30 seconds to detect and pair a new sensor.
6. Once your sensor is successfully added, the Connection Status, Temperature
and Occupancy State will be “Not Used”. Wait for 1-2 minutes then click on
the "Refresh Sensor Data" button to update the sensor readings.

8
If the LED does not blink after the Sensor is powered up or after battery
insertion or the Sensor exits Pairing mode after eight minutes, hold the Pairing
Button for 2 seconds to re-initiate pairing to the thermostat. The sensor will
enter Pairing mode again and broadcast itself for 8 minutes for thermostat
scanning. LED will blink briefly in the mode.
Step 2: Add Occupancy Sensor to the system
1. Log in to your TrickleStar Portal account
at: portal.tricklestar.com You can also use the QR
code here.
2. At Dashboard screen, select Devices, then click on your Thermostat Name
to enter Thermostat page.
3. Select Sensors on the left panel, then click on “+” to add a new sensor.
4. Enter the name for your sensor.
5. Press Next once your sensor LED is blinking to complete the pairing process.
This will initiate a scan function and Thermostat will scan for sensors in range.
Sensors that are detected will be listed by their MAC addresses. User can
select from the list if there is more than one sensor to be paired and add the
sensors. Note: It may take up to 30 seconds to detect and pair a new sensor.
6.
Once your sensor is successfully added, the Connection Status, Temperature
and Occupancy State will be “Not Used”. Wait for 1-2 minutes then click on
the "Refresh Sensor Data" button to update the sensor readings.
6

9
If pairing is successful, the LED will blink twice. Then, the Bluetooth indicator
appears on the Thermostat display.
If pairing is unsuccessful or time-out after 8 minutes, the LED will stop
blinking and the Sensor will go into standby mode. In Standby mode, the
connection between the sensor and the thermostat is not set up. All the
sensor circuits will be shut down to save power. Hold the Pairing Button for 2
seconds to initiate the Pairing mode again.
Note: If the sensor is previously registered, it will be added to the thermostat
network automatically in Pairing mode. The sensor LED will blink twice, then
Pairing mode finishes, and change to Normal mode. If disconnected, the
sensor will change to Pairing mode automatically and try to reconnect with
the thermostat. User can also press the pairing button to restart the sensor in
Pairing mode.

10
Mounting the Sensor on the wall
Before you mount the Sensor on the wall, be sure to check that:
•
The sensor is connected to the Thermostat.
•
The sensor is mounted away from direct heating or cooling sources, such
as a fireplace or an air ventilator.
Attach the double-sided adhesive to the Sensor. Then, mount the Sensor at a
height of approximately 5 ft. (1.5 m) on the wall.
5 ft.
(1.5 m)
Other manuals for TS1921
1
Table of contents
Other TrickleStar Accessories manuals

TrickleStar
TrickleStar TS1914 User manual

TrickleStar
TrickleStar SENSORCLICK 188LV-US-4 Series User manual

TrickleStar
TrickleStar SENSORCLICK 188LV-TFS-3F User manual

TrickleStar
TrickleStar TS1810 User manual

TrickleStar
TrickleStar TS1921 User manual

TrickleStar
TrickleStar SENSORCLICK 188LV-TFS-3F User manual

TrickleStar
TrickleStar Advanced PowerStrip+ User manual


