trig TY96/96A User manual

TY96/96A and TY97/97A VHF Radio
Operating Manual
01239-00-AC
21 June 2017
Trig Avionics Limited
Heriot Watt Research Park
Riccarton, Edinburgh
EH14 4AP
Scotland, UK
© Copyright 2016
EN/DE/FR

This page intentionally left blank

EN
1
Front Panel
This operating manual covers both the TY96/TY97 (8.33 kHz and 25 kHz
channel spacing) and the TY96A/TY97A (25 kHz only channel spacing). Any
references to the TY96/97 will also apply to the TY96A/TY97A unless stated
otherwise.
Display
The display shows the primary and standby frequencies and a series of icons to
indicate the operating mode of the radio.
The primary frequency is on the left and the standby frequency is on the right
half of the screen. The TX icon shows that the radio is transmitting. An RX icon
shows that the frequency is active and the audio will be heard through the
headphone and speaker outputs. The standby frequency will only be received
during the MONITOR function which is indicated by a +2 icon when active.
The top right hand corner indicates what frequency step size is selected.
On/Off, Volume and Squelch Knob
The left hand knob controls the power to the VHF radio, adjusts the audio
volume, and controls the squelch. Turning this knob clockwise will switch on
the radio and then increase the volume. Turning anticlockwise will reduce the
volume and eventually will click off.
Pressing this knob toggles the automatic squelch on and off, which can be
used to listen for faint stations and as a simple audio test.

EN
2
Tuning Knobs
The right hand concentric knobs are used to tune the radio. The large knob
adjusts the MHz portion of the standby frequency, and the smaller knob
adjusts the kHz portion of the standby frequency.
Pressing the end of the small knob changes the channel spacing that the small
knob operates through. If the radio is configured for 8.33 kHz operation, the
steps toggle between 8.33 kHz channels and 25 kHz channels. If the radio is
configured only for 25 kHz operation, the steps toggle between 25 kHz and 50
kHz channels.
Changing the step size does not change the behaviour of the radio, only the
tuning knob step size –it helps to quickly tune a frequency.
The TY96A and TY97A do not support 8.33 kHz operation and so the steps will
only toggle between 25 kHz and 50 kHz; again, changing the step size does
not change the behaviour of the radio and only changes the step size between
25 kHz and 50 kHz.
Flip-flop Button
The flip-flop button swaps the frequency in the standby position into the
active position, and moves the active frequency to the standby position.
MON Button
The VHF radio includes a dual-frequency listen feature; pressing the MON
button toggles this feature on and off.
When the monitor is active, a +2 icon appears next to the standby frequency,
and the radio will scan between the active and standby frequencies listening
for transmissions. The primary channel has priority –a transmission on the
primary channel will interrupt the secondary channel. As an aid to identifying
which channel is active, the RX icon will light next to the active channel and
the secondary channel will appear slightly quieter than the primary. If your
radio is wired for stereo and you are using a stereo headset, the secondary
channel will also appear to be to the right of the primary channel.
This is useful in an aircraft with only a single radio since it allows you, for
example, to copy the ATIS whilst maintaining a listening watch on the ATC
frequency.

EN
3
PLAY Button
The VHF radio includes a digital audio recorder. Pressing the PLAY button will
automatically replay the previous transmission received from ATC. During
playback the PB icon will be displayed on the screen.
If a new transmission is received during playback, the playback is cancelled
and the live transmission will be heard instead.
EMER Button
The EMER button gives quick access to the standard emergency frequency of
121.5 MHz. As well as selecting 121.5 MHz, pressing the EMER button also
mutes the music input and the auxiliary audio input, and if the volume is set to
a low level it turns it up.
Intercom Function
The TY96/TY97 radio has a built in intercom which can be installed as
permanently engaged or selected via a switch. The intercom is voice activated
and the audio is routed through to both of the headsets. The intercom squelch
and volume can be adjusted independently from the radio function through
the configuration menu.
Frequency Database
The radio has up to three databases containing frequencies and station
identifiers. One is stored in the radio and configured by the pilot; it will always
be available. One is a list of the ten most recently used frequencies; it will be
populated automatically as you use the radio. The third is only available if your
radio has been connected to a compatible GPS receiver, and contains
frequencies loaded from the GPS database.
Note that the TY96A and TY97A are only able to store and recall 25 KHz
channel frequencies.
To access these databases press the MEM button. The right hand part of the
screen will be replaced with the database screen which always starts on the
pilot created database.
The large knob moves the highlighted cursor, whilst the small knob selects the
value at the cursor.

EN
4
Airfield or facility identifiers are in alphabetical order. Scroll through the
identifiers until you find the one that you want. Move the cursor using the
large knob to highlight the station type, for example GND, TWR or APPR.
Pressing the MEM button at any time puts the currently selected result into the
standby frequency and returns to the normal operating screen. Pressing the
Flip-Flop button puts the currently selected result into the active frequency
instead, and returns to the normal operating screen.
Recent Frequencies
There is also a memory of the ten most recent frequencies that you have used.
From the initial memory screen, move the cursor using the large knob to
highlight the MEMORY caption, and turn the small knob to select the RECENT
database.
Move the highlight onto the frequency, and you can scroll through the ten
most recently used frequencies.

EN
5
GPS Database
If it has been configured in your aircraft, there is a third database in the radio.
This is loaded by your GPS receiver and will contain airfields appropriate to
your current route of flight.
It is accessed exactly the same way as the built in database, except that you
first select the remote data source using the large knob (to highlight the
database field) and the small knob (to select the GPS data source).
The only difference is that airfield identifiers are usually ordered by how close
they are to your route, rather than alphabetical order.
Entering New Frequencies
You can add station identifiers and frequencies to the internal database, which
stores up to 250 entries. To edit the database, go into memory mode by
pressing the MEM button, then press and hold the MEM button for 5 seconds.
The screen will change to highlight the top field which will offer the choice of
EDIT, DELETE, ADD NEW and CANCEL.
To add a new database entry, select ADD NEW, and then press MEM again.
Use the large knob to move the highlighted cursor, and use the small knob to
select characters, numbers or facility type. Pressing the MEM button again
stores the new value, and returns to the normal memory mode.
If you already have entries in the database, you can edit them to change the
details, or you can delete them. To do that, first find the entry that you want to
edit or delete using the normal memory mode. Then, with the entry you want
to change displayed, press and hold the MEM button for 5 seconds. The
choices described earlier will be offered; EDIT, DELETE, ADD NEW or CANCEL.
If you choose EDIT, and press MEM, the cursor can alter characters, numbers or
facility type in the current entry. Pressing MEM will save that changed entry. If
you choose DELETE, and press MEM, the current entry will be deleted.

EN
6
If you get this far and realise that you did not want to change the database at
all, select CANCEL and then press MEM; you will be returned to the normal
memory mode.
Saving and Loading the Frequency Database
The frequency database entries you have made can be saved to a USB memory
stick, or you can load a database from a USB stick. To load or save to USB, you
need to put the USB memory stick into the radio before you switch on. When
the radio detects the USB device it will offer to save or load your database. If
there are data entries already on the radio you will be offered the choice to
replace the whole database, or add entries from the USB stick. Similarly if
there is already a database on the USB stick you can either overwrite it or add
the radio data to the existing file.
To return to normal radio operation remove the USB device and switch the
radio off and back on again.
In normal radio operation the USB port is powered off.
Configuration Mode
Additional setup items can be accessed by holding down the MON button for
5 seconds. The menu options can be selected using the larger tuning knob and
the parameter value can be altered using the smaller tuning knob.
Intercom Volume
Sets the intercom volume level
Intercom Squelch
Sets the sensitivity of the intercom voice operated
squelch
Music Volume
Sets the volume level of the music input
Music Muting
Mutes the music audio when a VHF transmission is
received by the radio
Enable 8.33 kHz
(TY96 and TY97
only)
Turns on or off the ability to tune 8.33 kHz stations. If
you are operating in an area with no 8.33 kHz service,
turning off the 8.33 kHz channels allows quicker tuning
of 25 kHz and 50 kHz steps.
The TY96A and TY97A are not 8.33 KHz capable and so
this option will not be available.
General Low Temperature Operation
The TY96/TY97 is certified to operate correctly down to -20°C, but at low
temperatures the controller display may be impaired. On a cold day you may
need to wait for the cockpit to warm up to ensure normal operation.
Warning Messages
If the VHF radio detects a problem, the screen will indicate WARNING and a
brief statement of the problem. Depending on the nature of the problem,

EN
7
your VHF radio may not be working properly. Note the message on the screen
and pass that information to your avionics maintenance organisation. Press
the flip-flop button to clear the message.
The following warnings may be seen:
Radio Hot
The radio is overheating.
Stuck Mic
A PTT switch has been closed for more than 35 seconds and
the transmitter has stopped to avoid blocking the channel.
Low Voltage
The aircraft power input is below 10 volts (TY96) or 16 volts
(TY97).
Ant Fault
There is a problem with the aircraft antenna. The radio will
still try to transmit, but you may not be heard.
Transmit Fail
There is a problem with the transmitter and the radio gave
up trying. You may still be able to receive but not transmit.
Fault Annunciation
If the VHF radio detects a catastrophic internal failure, the screen will indicate
FAULT and a brief statement of the problem. Note the FAULT message at the
bottom of the screen and pass that information to your avionics maintenance
organisation. The fault may be cleared by re-cycling the power to the radio
but if the fault is still present the message will reappear.

DE
8
Bedienelemente
Diese Bedienungsanleitung ist für beide TY96/TY97 (8,33kHz und 25kHz
Kanalabstand) und TY96A/TY97A (nur 25kHz Kanalabstand) gemeint. Alle
Verweisen auf die TY96/97 gelten auch für die TY96A/97A, außer wenn anders
angegeben ist.
Anzeige
Die Anzeige zeigt die Primär- und die Standby-Frequenz sowie eine Reihe von
Symbolen an, die den Betriebsmodus des Funkgerätes angeben.
Die Primärfrequenz wird auf der linken Seite angezeigt und die Standby-
Frequenz befindet sich auf der rechten Seite der Anzeige. Das Symbol TX
zeigt an, dass das Funkgerät sendet. Das Symbol RX zeigt an, dass die
entsprechende Frequenz aktiv und das Audiosignal über die Headset- und
Lautsprecherausgänge zu hören ist. Die Standby-Frequenz wird nur im DUAL
WATCH Modus empfangen, der bei Aktivierung durch das Symbol +2
angezeigt wird.
In der rechten oberen Ecke des Displays kann man sehen, welches Frequenz
Raster ausgewählt wurde.

DE
9
Knopf für Ein/Aus, Lautstärke und Squelch (Rauschsperre)
Der Knopf auf der linken Seite schaltet das VHF-Funkgerät sowie die
Rauschunterdrückung ein und aus und regelt die Lautstärke des Audiosignals.
Durch Drehen des Knopfes nach rechts wird das Funkgerät eingeschaltet und
dann die Lautstärke erhöht. Die Drehung nach links senkt die Lautstärke und
schaltet das Funkgerät schließlich mit einem Klick aus.
Durch Drücken des Knopfes wird die automatische Rauschsperre, die zum
besseren Hören schwacher Funkstellen oder als einfacher Audiotest verwendet
werden kann, ein- bzw. ausgeschaltet.
Frequenzwahlknöpfe
Die konzentrischen Knöpfe auf der rechten Seite werden verwendet, um
Frequenzen einzustellen. Der große Knopf dient zur Einstellung des MHz-
Segments der Standby-Frequenz, der kleinere Knopf zur Einstellung des kHz-
Segments der Standby-Frequenz.
Drückt man oben auf den kleinen Knopf, wird der Kanalabstand für die
Frequenzeinstellung geändert. Ist das Funkgerät für den Betrieb im 8,33 kHz-
Raster konfiguriert, schaltet man so zwischen 8,33 kHz-Kanälen und 25 kHz-
Kanälen um. Ist das Funkgerät nur für den Betrieb im 25 kHz-Raster
konfiguriert, schaltet man so zwischen 25 kHz-Kanälen und 50 kHz-Kanälen
um.
Die Änderung des Kanalabstands ändert nichts an den Betriebseigenschaften
des Funkgeräts, sondern nur die Schrittweite des Frequenzeinstellknopfes –
dadurch lässt sich eine Frequenz schneller einstellen.
Die TY96A und TY97A unterstützen den Betrieb des 8,33kHz Kanalabstands
nicht und daher ist es nur möglich, von 25kHz auf 50kHz umzuschalten. Die
Änderung des Kanalabstands ändert nichts an den Betriebseigenschaften des
Funkgeräts.
Flip-Flop-Schalter
Der Flip-Flop-Schalter macht die Standby-Frequenz zur aktiven Frequenz und
die aktive Frequenz zur Standby-Frequenz.
MON-Taste
Das VHF-Funkgerät hat eine Funktion, die die gleichzeitige Überwachung von
zwei Frequenzen ermöglicht (Dual Watch); durch Drücken der MON-Taste
wird diese Funktion ein- und wieder ausgeschaltet.
Wenn die Überwachung eingeschaltet ist, erscheint das Symbol +2 neben der
Standby-Frequenz und das Funkgerät scannt die aktive und die Standby-
Frequenz auf Übermittlungen. Der Hauptkanal hat Priorität –eine auf dem
Hauptkanal gesendete Nachricht unterbricht die Kommunikation auf dem
Nebenkanal. Das RX Symbol wird bei dem aktiven Kanal aufleuchten, um ihn

DE
10
einfacher identifizieren zu können. Gleichzeitig wird die Standby-Frequenz
geringfügig stiller als der Primärkanal. Wenn das Funkgerät für Stereo-Musik
verkabelt wurde und Sie ein Stereoheadset benutzen, wird sich auch der
Sekundärkanal auf der rechten Seite des Primärkanals befinden.
Das ist bei einem Flugzeug, das nur mit einem einzigen Funkgerät ausgerüstet
ist, nützlich, da man ATIS abhören und gleichzeitig die Frequenz der
Flugsicherung überwachen kann.
PLAY Knopf
Das VHF Funkgerät hat einen digitalen Audiorekorder integriert. Durch
Drücken des PLAY Knopfes wird die vorherige Übertragung von Flugsicherung
automatisch wiedergegeben. Bei der Wiedergabe wird das PB Symbol auf dem
Display angezeigt.
Wenn eine neue Übertragung bei der Wiedergabe empfangen wird, wird die
bisherige Wiedergabe stoniert und die neue Übertragung wird Vorrang
haben.
EMER Knopf
Durch Drücken des EMER Knopfes wird die Notfrequenz 121,5 MHz
automatisch übermittelt. Dadurch werden sich die Musik und AUX-Eingänge
stummschalten und die Lautstärke des Funkgerätes wird höher, wenn sie zu
gering ist.
Intercom-Funktion
Das Funkgerät TY91/TY92 hat ein eingebautes Intercom, das wahlweise so
installiert werden kann, dass es dauernd in Betrieb ist oder über einen Schalter
aktiviert werden kann. Das Intercom ist stimmaktiviert und die Audiosignale
werden an beide Headsets geleitet. Rauschsperre und Lautstärke des
Intercoms können unabhängig von der Funkfunktion über das
Konfigurationsmenü eingestellt werden.
Frequenz-Datenbank
Das Funkgerät hat drei Datenbänke, die Frequenzen und Stationskennungen
enthalten. Die erste ist im Funkgerät abgespeichert und muss durch den
Piloten konfiguriert werden; sie ist immer aktiv. Die zweite ist eine Liste der
zehn meistbenutzten Frequenzen; sie wird immer automatisch ausgefüllt,
indem Sie das Funkgerät verwenden. Die dritte ist nur aktiv, wenn das
Funkgerät an einem kompatiblen GPS-Empfänger angeschlossen worden ist
und muss Frequenzen enthalten, die aus der GPS-Datenbank geladen wurden.
Bitte beachten Sie, dass die TY96A und TY97A nur 25kHz Kanalfrequenzen
speichern und zurückrufen können.

DE
11
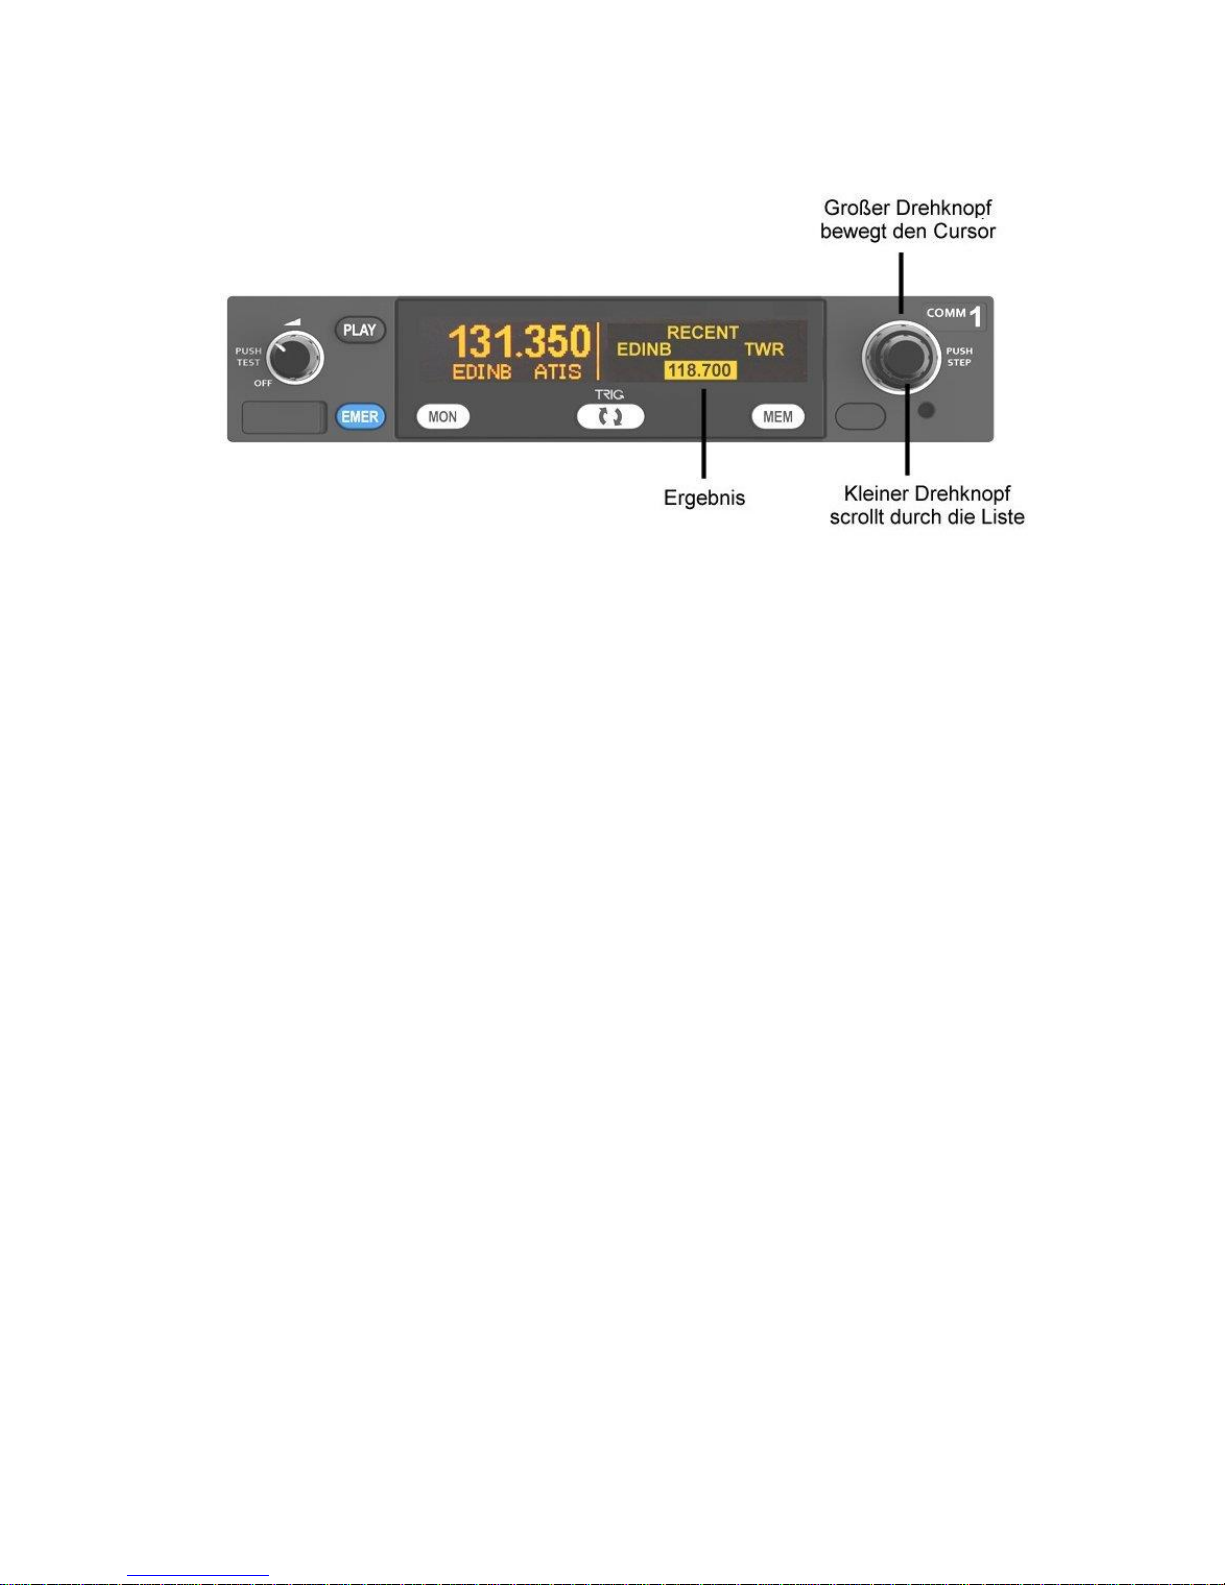
Für einen Zugriff auf diese Datenbänke, drücken Sie den Knopf MEM. Die
rechte Hälfte des Bildschirms wird durch das Datenbankfenster ersetzt und die
erste Datenbank am Bildschirm ist die, die vom Piloten erstellt wurde.
Der große Drehknopf kontrolliert den hervorgehobenen Cursor, während der
kleine Ihnen ermöglicht, durch die Buchstaben und Zahlen durchzuscrollen.
Flugplatz- und Anlagenkennungen sind nach alphabetischer Reihenfolge
geordnet. Scrollen Sie durch die Kennungen durch, bis Sie die Kennung
finden, die Sie brauchen. Beim Drehen des großen Knopfes können Sie den
Cursor bewegen, um die Station hervorzuheben. Zum Beispiel GND, TWR or
APPR.
Das aktuell ausgewählte Ergebnis auf dem Bildschirm wird die Stand-by
Frequenz werden, wenn Sie jederzeit den Knopf MEM drücken. Gleichzeitig
wird der Betriebsbildschirm wieder erscheinen. Das aktuell ausgewählte
Ergebnis wird die aktive Frequenz werden, wenn Sie die Taste Flip-Flop
drücken und der Betriebsbildschirm wird wieder erscheinen.
Zuletzt verwendete Frequenzen
Das Funkgerät enthält einen Speicher der zehn aktuellsten Frequenzen, die Sie
benutzt haben. Das Drehen des großen Knopfes ermöglicht Ihnen, den Cursor
zu bewegen, sodass sich MEMORY hervorhebt. Drehen Sie den kleinen Knopf,
um die RECENT Datenbank auszuwählen.
Bewegen Sie den hervorgehobenen Cursor auf die Frequenz, um durch die
zehn aktuellsten Frequenzen durchzuscrollen.
DE
12
GPS-Datenbank
Diese Datenbank ist von Ihrem GPS-Empfänger geladen und enthält
Information über Flugplätze, die sich entlang der Flugstrecke befinden.
Der Zugriff ist genauso wie bei der integrierten Datenbank, aber in diesem Fall
drehen Sie den großen Knopf, um die Datenquelle auszuwählen (das
Datenbankfeld wird sich hervorheben lassen) und den kleinen Knopf drehen
Sie, um die GPS-Datenquelle auszuwählen.
Der einzige ersichtliche Unterschied besteht darin, dass die
Flugplatzkennungen normalerweise nach ihrer geographischen Nähe von der
aktuellen Flugstrecke geordnet sind, statt der üblichen alphabetischen
Reihenfolge.
Neue Frequenzen eingeben
Sie können Stationkennungen und Frequenzen zur internen Datenbank
hinzufügen, die bis zu 250 Einträge abspeichern kann. Um die Datenbank zu
bearbeiten, drücken Sie den Knopf MEM, dann halten Sie ihn für 5 Sekunden
gedrückt. Das obene Feld wird hervorgehoben angezeigt und Sie werden die
Option folgender Möglichkeit haben: EDIT (bearbeiten), DELETE (löschen),
ADD NEW (Neueinträge hinzufügen) und CANCEL (stonieren).
Wählen Sie ADD NEW aus und drücken Sie MEM noch mal, um einen
Neueintrag zur Datenbank hinzuzufügen. Drehen Sie den großen Knopf, um
den hervorgehobenen Cursor zu bewegen und drehen Sie den kleinen Knopf,
um die Buchstaben, Zahlen und Anlagen auszuwählen. Noch ein Druck auf
MEM und der Neueintrag wird abgespeichert und der Speicher-Modus wird
schon wieder angezeigt werden.
Wenn Sie schon Einträge in der Datenbank haben, können Sie sie bearbeiten,
um die Einzelheiten zu verändern oder zu löschen. Drücken Sie MEM noch mal
und finden Sie den Eintrag, den Sie bearbeiten oder löschen wollen. Ist der

DE
13
Eintrag den Sie verändern wollen angezeigt, halten Sie MEM für 5 Sekunden
gedrückt. Die selben Optionen wie zuvor werden angezeigt: EDIT, DELETE,
ADD NEW oder CANCEL.
Wenn Sie EDIT auswählen und MEM drücken, kann der Cursor Buchstaben,
Zahlen und Anlagen im aktuellen Eintrag verändern. Drücken Sie MEM
nochmals, um den Eintrag abzuspeichern. Wenn Sie DELETE auswählen und
MEM drücken, wird der aktuelle Eintrag gelöscht.
Im Falle, dass Sie es nicht gemeint haben, die Datenbank zu verändern, wählen
Sie CANCEL aus und drücken Sie MEM. Der Speicher-Modus wird schon
angezeigt werden.
Zum Speichern und Laden der Frequenzdatenbank
Die Frequenzdatenbankeingänge, die Sie selbst erstellt haben, können auf
einem Memorystick gespeichert werden, sonst können Sie eine Datenbank von
einem USB-Stick hochladen. Das USB-Stick muss zum Funkgerät
angeschlossen werden, bevor Sie es einschalten, um Information auf dem USB-
Stick zu speichern. Wenn das Funkgerät das USB-Stick erkennt, haben Sie die
Option, Ihre Datenbank zu speichern oder zu laden. Wenn es noch
Datenbankeinträge auf dem Radio gibt, haben Sie dann die Option, die ganze
Datenbank zu ersetzen oder neue Einträge vom USB-Stick hinzuzufügen.
Gleichermaßen, wenn es schon eine Datenbank auf dem USB-Stick gibt,
können Sie entweder die Datenbank überschreiben oder die Funkdaten zu den
existierenden Dateien hinzufügen.
Wenn Sie zum normalen Radiobetrieb zurückkehren wollen, ziehen Sie das
USB-Stick ab und schalten Sie das Funkgerät aus, dann schon wieder ein. Im
normalen Radiobetrieb wird der USB-Anschluss ausgeschaltet.

DE
14
Konfigurationsmodus
Der Zugriff auf zusätzliche Einrichtungsfunktionen ist durch 5 Sekunden
langes Gedrückthalten der MON-Taste möglich. Die Menüpunkte können mit
Hilfe des größeren Innenknopfes für die Frequenzwahl ausgewählt und die
Parameterwerte mit Hilfe des kleineren Außenknopfes für die Frequenzwahl
geändert werden.
Intercom Volume
Hier wird die Lautstärke des Intercoms eingestellt
Intercom Squelch
Hier wird die Empfindlichkeit der stimmaktivierten
Rauschsperre des Intercoms eingestellt
Music Volume
Hier wird die Lautstärke der Musikeingangsquelle
eingestellt
Music Muting
Hier wird die Audio Musik stummgeschaltet, wenn eine
VHF-Übertragung empfangen wird.
Enable 8.33 kHz
(Nur TY96 und
TY97)
Hier können Sie das Einstellen der 8,33 kHz Frequenzen
einschalten und ausschalten. Wenn Sie über ein Gebiet
fliegen, wo 8,33 kHz nicht verfügbar ist, schalten Sie 8,33
aus, um das Einstellen der 25 kHz und 50 kHz Frequenzen
zu vereinfachen.
Die TY96A und TY97A sind mit dem 8,33kHz
Kanalabstand nicht vereinbar, deshalb ist diese Option
nicht verfügbar.
Allgemeiner Betrieb bei niedrigen Temperaturen
Das TY96/TY97 ist für einwandfreien Betrieb bis zu -20°C zertifiziert, es kann
jedoch sein, dass die Anzeige des Bediengeräts bei niedrigen Temperaturen
beeinträchtigt ist. An einem kalten Tag müssen Sie eventuell warten, bis das
Cockpit warm geworden ist, damit die Anzeige normal funktioniert.
Warnmeldungen
Wenn das VHF-Funkgerät ein Problem entdeckt, zeigt der Bildschirm
WARNING und eine kurze Schilderung des Problems an. Je nach Art des
Problems kann es sein, dass Ihr VHF-Funkgerät nicht einwandfrei funktioniert.
Notieren Sie sich die auf dem Bildschirm angezeigte Meldung und leiten Sie
diese Information an das Wartungsunternehmen für Ihre Bordelektronik
weiter. Drücken Sie auf FLIP-FLOP, um die Meldung zu löschen.
Die folgenden Warnungen können angezeigt werden:
Radio Hot
Das Funkgerät ist überhitzt.
Stuck Mic
Wenn Sie einen PTT-Anschluss länger als 35 Sekunden
gedrückt halten, wird der Sender aufhören zu senden, um
eine Blockierung des Kanales zu vermeiden.

DE
15
Low Voltage
Die Bordstromversorgung beträgt weniger als 10 Volt
(TY96) oder 16 Volt (TY97).
Ant Fault
Etwas ist mit den Flugzeugantennen los. Das Funkgerät wird
immerhin versuchen, Übertragungen zu senden, aber Sie
werden vielleicht nicht gehört.
Transmit Fail
Es gibt ein Problem beim Senden und das Funkgerät sendet
nicht mehr. Übertragungen mögen noch empfangen
werden, aber nicht gesendet.
Störungsmeldung
Wenn das VHF-Funkgerät einen internen Totalausfall registriert, zeigt der
Bildschirm FAULT und eine kurze Schilderung des Problems an. Notieren Sie
sich die unten auf dem Bildschirm angezeigte Störungsmeldung und leiten Sie
diese Information an das Wartungsunternehmen für Ihre Bordelektronik
weiter. Die Störung kann eventuell behoben werden, indem das Funkgerät
aus- und wieder eingeschaltet wird. Besteht die Störung jedoch weiterhin,
wird die Meldung erneut angezeigt.

FR
16
Panneau de contrôle
Ce mode d'emploi couvre à la fois l'écart entre les canaux TY96 / TY97 (8.33
kHz et 25 kHz) et le TY96A / TY97A (espace libre de 25 kHz uniquement).
Toute référence au TY96 / 97 s'appliquera également au TY96A / TY97A sauf
indication contraire.
Écran
L'écran affiche les fréquences actives et standby (en attente) ainsi que toute
une série d'icônes indiquant le mode de fonctionnement de la radio.
La fréquence active est sur la partie gauche et la standby sur la partie droite de
l’écran. L'icône TX indique que la radio transmet. L'icône RX indique que la
fréquence reçoit un signal et que la communication audio sera transmise aux
casques et haut-parleurs. La fréquence standby sera uniquement reçue
lorsque la fonction MONITOR (écoute duplex) indiquée par l'icône +2 sera
active.
Le coin en haut à droite indique quel pas de fréquence est sélectionné.
Bouton rotatif Marche/Arrêt, de réglage du volume et du squelch
Le bouton rotatif de gauche permet de mettre en marche la radio VHF, de
régler le volume audio et le squelch. La rotation du bouton dans le sens des
aiguilles d'une montre allume la radio puis augmente le volume. La rotation
du bouton dans le sens inverse des aiguilles d'une montre baisse le volume puis
éteint la radio.

FR
17
Une pression sur le bouton active ou désactive le squelch et règle sa valeur
automatiquement. Cela permet d’écouter les stations de faible amplitude ou
d’effectuer un simple test audio.
Boutons rotatifs de réglage
Les boutons rotatifs concentriques situés sur la droite sont utilisés pour régler
la radio. Le gros bouton rotatif règle la tranche MHz de la fréquence standby
tandis que le plus petit bouton rotatif permet de régler la tranche kHz de la
fréquence standby.
Une pression sur l'extrémité du petit bouton rotatif de réglage permet de
changer l'espacement entre les canaux. Si la radio est configurée pour
fonctionner à 8,33 kHz, les pas permutent entre les canaux de 8,33 kHz et de
25 kHz. Si la radio est configurée pour fonctionner uniquement à 25 kHz, les
pas permutent entre les canaux de 25 kHz et de 50 kHz.
La modification de la taille du pas ne change pas le comportement de la radio.
Le bouton rotatif de réglage de la radio permet de modifier la taille du pas et
ainsi de trouver plus rapidement une fréquence.
Les radios TY96A et TY97A ne sont pas compatibles au fonctionnement en
8.33 KHZ et ne permettront seulement que le changement entre 25 kHz et 50
kHz. La modification de la taille du pas ne changera pas le comportement de
la radio, seulement les canaux entre 25 kHz and 50 kHz
Bouton FLIP-FLOP
Le bouton flip-flop permet de basculer la fréquence standby à la position
active et de mettre la fréquence active en position standby.
Bouton MON
La radio VHF inclut une fonction d'écoute duplex qui peut être activée ou
désactivée par un simple appui sur le bouton MON.
Lorsque cette fonction est activée, l'icône +2 apparaît près de la fréquence
standby et la radio va balayer les fréquences actives et standby à l'écoute
d'émissions. Le canal principal est prioritaire. Toute émission sur le canal
principal interrompt le canal secondaire. Pour aider à identifier le canal actif,
l’icône RX apparaît à côté du canal actif et le canal secondaire sera légèrement
plus silencieux que le primaire. Si votre radio est connectée en stéréo et que
vous utilisez un casque stéréo, le canal secondaire apparaîtra aussi comme
étant sur la droite du canal principal.
Ceci s'avère particulièrement utile dans un avion muni d'une seule radio, car
vous pouvez, par exemple, copier l'ATIS, tout en maintenant une écoute
permanente de la fréquence ATC.

FR
18
Bouton PLAY
La radio VHS inclut un enregistreur audio digital. Appuyer sur le bouton PLAY
va automatiquement repasser la transmission précédente reçue de l’ATC.
Durant le playback l’icône PB sera affiché sur l’écran.
Si une nouvelle transmission est reçue durant le playback, la réécoute est
arrêtée et la transmission en temps réel sera entendue à la place.
Bouton EMER
Le bouton EMER donne un accès rapide à la fréquence d’urgence standard
121.5 MHz. En plus de sélectionner 121.5 MHz, le bouton EMER assourdit
également l'entrée audio musique mais aussi l'entrée audio auxiliaire et si le
volume est réglé à un niveau bas, il augmente. « De plus, il assourdit l’entrée
audio musique mais également l’entrée audio auxiliaire et si le volume est
réglé à un niveau il sera augmenté ».
Fonction intercom
La radio TY96/TY97 intègre un intercom qui peut être installé connecté en
permanence ou sélectionné à l'aide d'un interrupteur. L'intercom fonctionne
par commande vocale et la communication audio est acheminée vers les deux
casques. Le squelch de l'intercom et le volume peuvent être réglés
indépendamment de la fonction radio à l'aide du menu de configuration.
Base de fréquences préenregistrées
La radio peut contenir jusqu'à trois bases de données contenant des
fréquences et des identifiants stations. Une est stockée dans la radio, elle
configurée par le pilote et sera toujours disponible. La seconde est une liste
des dix fréquences les plus récemment utilisées, elle sera remplie
automatiquement lorsque vous utilisez la radio. La troisième est disponible
uniquement si votre radio a été connectée à un récepteur GPS compatible et
contient des fréquences chargées à partir de la base de données GPS.
Notez que les radios TY96A et TY97A ne peuvent préenregistrer que les
fréquence en 25 KHz.
Pour y accéder, appuyez sur la touche MEM. La partie droite de l'écran sera
remplacée par l'écran mémoire qui commence toujours sur la base de données
créée par le pilote.
Le gros bouton rotatif déplace le curseur de sélection des champs (en
surbrillance), tandis que le petit bouton sélectionne la valeur au niveau du
curseur.
This manual suits for next models
1
Table of contents
Languages:
Other trig Radio manuals


