3
EN
SAFETY INSTRUCTIONS
• Please read the instruction manual carefully before using the device.
Please keep these instructions, the guarantee certicate, the sales
receipt and, if possible, the carton with the inner packaging.
• This appliance is not intended to be used by persons (including
children) with reduced physical, sensory or mental capabilities, or
lack of experience and knowledge, unless they have been given
supervision or instructions concerning the use of the appliance by
a person that is responsible for their safety.
• By ignoring the safety instructions the manufacturer can not be
hold responsible for the damage.
• To protect children against the dangers of electrical appliances,
please make sure that you never leave the appliance unattended.
Therefore you have to select a storage place for the appliance
where children are not able to grab it. Make sure that the cable is
not hanging in a downward position.
• This appliance is only to be used for household purposes and only
for the purpose it is made for.
• The appliance must be placed on a stable, level surface.
• The user must not leave the device unattended while it is
connected to the supply.
• All repairs should be made by a competent qualied repair service(*).
• Check if the voltage of the appliance corresponds to the main
voltage of your home. Rated voltage: AC220-240V 50Hz. The socket
must be at least 16A or 10 A slow-protected.
• This appliance complies with all standards regarding
electromagnetic elds (EMF). If handled properly and according
to the instructions in this user manual, the appliance is safe to use
based on scientic evidence available today.
• Never move the appliance by pulling the cord and make sure the
cord can not become entangled.
• The use of accessories that are not recommended by the manufacturer
can cause injuries and will invalidate any warranty that you may have.
• Unplug the appliance from the socket when changing the spare
parts or for maintenance.
• To protect yourself against an electric shock, do not immerse the
cord, plug or appliance in the water or any other liquid.
• Do not use this appliance with a damaged cord or plug or when
the appliance has malfunctions, or has been damaged in any
manner. To avoid a hazard make sure that a damaged cord or plug
will be replaced by an Competent qualied repair service(*). Do
not repair this appliance yourself.
• Unplug the appliance from the socket when you are not using it.
• Do not use this appliance in the bathroom or near a sink lled with
water. If this appliance has fallen into the water do not under no
circumstances directly grab this appliance, but rst pull the plug
from the socket.
• It is absolutely necessary to keep this appliance clean at all times,
because it comes into direct contact with food.
• This appliance is intended to be used in household and similar
applications such as:
- Sta kitchen areas in shops, oces and other working environments.
- By clients in hotels, motels and other residential type environments.
- Bed and breakfast type environments
- Farm houses
• Make sure that the cord is not hanging over the edge of the table
or counter, does not touch any hot surfaces or is coming directly
into contact with the hot parts of the appliance. Do not place the
appliance underneath or close to curtains, window coverings etc.
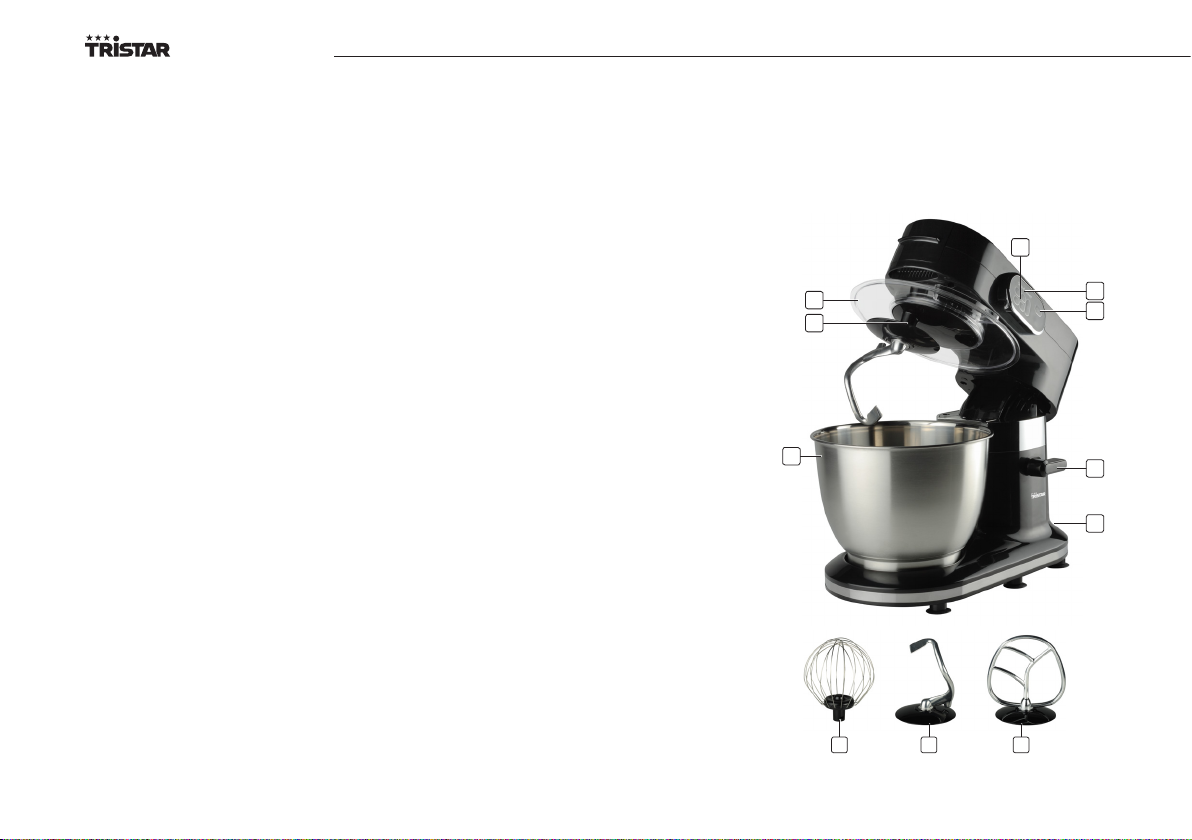
Multi mixer with bowl