EnglishDeutsch
 logo
Brands
  1. Home
  2. •
  3. Brands
  4. •
  5. Troy-Bilt
  6. •
  7. Pressure Washer
  8. •
  9. Troy-Bilt Flex 23AADAAA711 Guide

Troy-Bilt Flex 23AADAAA711 Guide

Other Troy-Bilt Pressure Washer manuals

Troy-Bilt 1903 User manual

Troy-Bilt

Troy-Bilt 1903 User manual

Troy-Bilt 1902 User manual

Troy-Bilt

Troy-Bilt 1902 User manual

Troy-Bilt 2600 PSI User manual

Troy-Bilt

Troy-Bilt 2600 PSI User manual

Troy-Bilt 1902 User manual

Troy-Bilt

Troy-Bilt 1902 User manual

Troy-Bilt 1904 User manual

Troy-Bilt

Troy-Bilt 1904 User manual

Troy-Bilt 20489 User manual

Troy-Bilt

Troy-Bilt 20489 User manual

Troy-Bilt 1904 User manual

Troy-Bilt

Troy-Bilt 1904 User manual

Troy-Bilt 1904 User manual

Troy-Bilt

Troy-Bilt 1904 User manual

Troy-Bilt 20245 User manual

Troy-Bilt

Troy-Bilt 20245 User manual

Troy-Bilt 0020242-1 User manual

Troy-Bilt

Troy-Bilt 0020242-1 User manual

Troy-Bilt 20209 User manual

Troy-Bilt

Troy-Bilt 20209 User manual

Troy-Bilt 20344 User manual

Troy-Bilt

Troy-Bilt 20344 User manual

Troy-Bilt 1904 User manual

Troy-Bilt

Troy-Bilt 1904 User manual

Troy-Bilt 20210 User manual

Troy-Bilt

Troy-Bilt 20210 User manual

Troy-Bilt 2500 MAX PSI User manual

Troy-Bilt

Troy-Bilt 2500 MAX PSI User manual

Troy-Bilt 20210 User manual

Troy-Bilt

Troy-Bilt 20210 User manual

Troy-Bilt 20241 User manual

Troy-Bilt

Troy-Bilt 20241 User manual

Troy-Bilt 1903 User manual

Troy-Bilt

Troy-Bilt 1903 User manual

Troy-Bilt 020676 User manual

Troy-Bilt

Troy-Bilt 020676 User manual

Troy-Bilt 20242 User manual

Troy-Bilt

Troy-Bilt 20242 User manual

Troy-Bilt 20245 User manual

Troy-Bilt

Troy-Bilt 20245 User manual

Troy-Bilt 020641 User manual

Troy-Bilt

Troy-Bilt 020641 User manual

Troy-Bilt 20208 User manual

Troy-Bilt

Troy-Bilt 20208 User manual

Troy-Bilt 020242-4 User manual

Troy-Bilt

Troy-Bilt 020242-4 User manual

Popular Pressure Washer manuals by other brands

Shark RG-232637 Service manual

Shark

Shark RG-232637 Service manual

Shakti Technology S3 user manual

Shakti Technology

Shakti Technology S3 user manual

Kärcher K 4 Pure manual

Kärcher

Kärcher K 4 Pure manual

Porter-Cable D25806-025-2 instruction manual

Porter-Cable

Porter-Cable D25806-025-2 instruction manual

REM POWER HDEm 662 manual

REM POWER

REM POWER HDEm 662 manual

Landa HS-3000 Operator's manual

Landa

Landa HS-3000 Operator's manual

Craftsman 580.752270 Operator's manual

Craftsman

Craftsman 580.752270 Operator's manual

HIKOKI AW 100 Handling instructions

HIKOKI

HIKOKI AW 100 Handling instructions

Delco DC 1302 instruction manual

Delco

Delco DC 1302 instruction manual

Kärcher K 3 Full Control user manual

Kärcher

Kärcher K 3 Full Control user manual

BIEMMEDUE 120/10 - 170/13 Use and maintenance manual

BIEMMEDUE

BIEMMEDUE 120/10 - 170/13 Use and maintenance manual

ARKSEN 014-HG-14141-HR Operator's manual

ARKSEN

ARKSEN 014-HG-14141-HR Operator's manual

Black & Decker PW1700SPX manual

Black & Decker

Black & Decker PW1700SPX manual

Kärcher 595 - SPARE Spare parts

Kärcher

Kärcher 595 - SPARE Spare parts

Kranzle B 10 200 operating manual

Kranzle

Kranzle B 10 200 operating manual

Stihl RE 90 instruction manual

Stihl

Stihl RE 90 instruction manual

PowR-Quip PQ-2600 Operator's manual

PowR-Quip

PowR-Quip PQ-2600 Operator's manual

Hotsy 5645 operating instructions

Hotsy

Hotsy 5645 operating instructions

https://manuals.online logo
https://manuals.online logoBrands
  • About & Mission
  • Contact us
  • Privacy Policy
  • Terms and Conditions

Copyright 2026 Manuals.Online. All Rights Reserved.

778-13409© 2015 23AADAAA
Remove the five plastic caps shown below.
Note: The first four caps pull off as shown.
The plastic cap in the inset rotates counter
clockwise to remove. If choosing not to install
the soap inlet tube at this time, the plastic cap
on the soap inlet port of the pressure washer
pump may remain in place.
Locate the bag containing the 5 multi-
colored spray nozzles, included with the
loose parts in the carton. Insert the tips
into the provided mounting holes on the
pressure washer main unit. Follow the
color pattern provided on the label on
the unit for the proper order in which to
install these tips.
Connect high
pressure hose to
spray gun handle
by threading the
hose onto the
spray gun.
Uncoil and connect the other end of the high
pressure hose to the pressure washer main unit by
threading the hose onto the hose port.
Rear Handle
Spray Nozzles
Pressure
Control Valve
Spray Handle
Hose Storage
Hanger
High Pressure
Hose
High Pressure
Outlet
Water Inlet
Port
Spray Handle Extension
Soap Inlet
Port
Soap Inlet Tube
13
24
READ AND UNDERSTAND ALL INSTRUCTION, WARNING, AND DANGER LABELS.
PARA INSTRUCCIONES EN ESPAÑOL, REFIÉRASE AL MANUAL DEL OPERADOR.
IMPORTANT: READ OPERATOR'S MANUAL AND ENGINE MANUAL THOROUGHLY
AND FOLLOW THE IMPORTANT SAFE OPERATION PRACTICES BEFORE OPERATING . Need Help? Call 1-888-TO-HELP-U
778-13409© 2015 23AADAAA
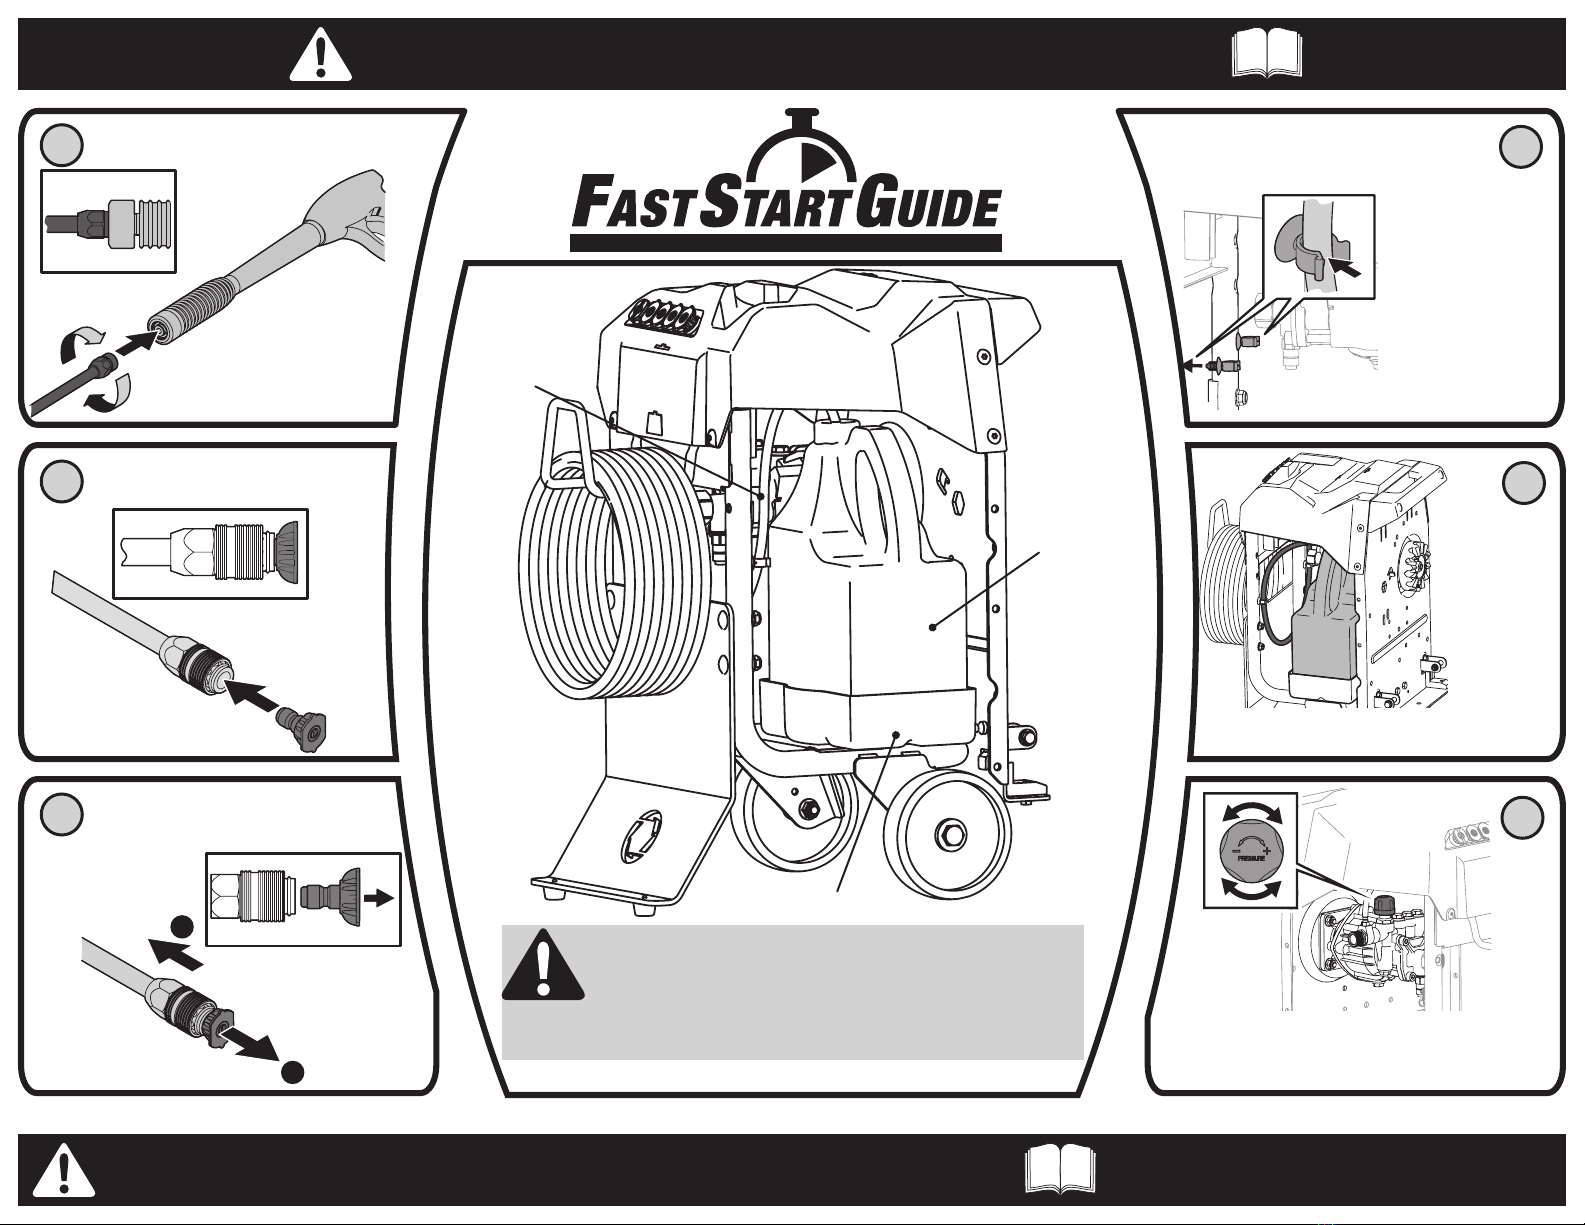
To remove a spray nozzle, simply
pull back on the spray gun collar (A)
and remove nozzle (B).
Install the
desired spray
nozzle into
the end of the
spray handle
assembly.
Simply align the tip into
the end of the spray
handle and push. It will
click into place.
Select the tip to use for the particular
application this pressure washer is to
be used for.
From the factory, the unit’s pressure control valve has been
set at maximum pressure. To lower pressure, rotate knob
counter-clockwise.
If planning to utilize “Soap” tip, follow these steps:
Remove plastic cap on soap inlet port of pressure
washer pump. Refer to Step 1.
Install the
bottle of soap
into the soap
holding tray
and insert the
soap inlet tube
into the bottle.
Soap bottle
NOT included.
Attach the nozzle extension
to spray gun by threading it
into the spray gun handle.
Firmly hand-tighten the two
components together.
Soap Inlet Tube
Soap Bottle
(Not included)
Soap Retaining Tray
Note: See Operation
Section in manual for more
details regarding each
spray nozzle’s usage.
A
B
Install two plastic hose
clips packed with soap
inlet tube, into frame
holes provided.
Push soap inlet tube onto
inlet port on pressure
washer pump. Refer to
Step 1 for location of
where inlet tube attaches.
Route soap inlet tube
through two clips
installed in Step 2. See
inset.
WARNING! When the FLEX™ Pressure Washer attachment is
attached to the FLEX™ Power Base, the engine must only be started
after the water supply is connected and turned on with water flowing
through the pressure washer. Failure to have the water source
connected with water flowing through he pressure washer prior to
starting the engine of the FLEX™ Power Base will cause irreparable
damage to the pressure washer pump.
Note: Only the soap spray nozzle tip (black) is to
be used for dispensing liquid soap detergent.
58
69
710
READ AND UNDERSTAND ALL INSTRUCTION, WARNING, AND DANGER LABELS.
PARA INSTRUCCIONES EN ESPAÑOL, REFIÉRASE AL MANUAL DEL OPERADOR.
IMPORTANT: READ OPERATOR'S MANUAL AND ENGINE MANUAL THOROUGHLY
AND FOLLOW THE IMPORTANT SAFE OPERATION PRACTICES BEFORE OPERATING . Need Help? Call 1-888-TO-HELP-U