Trust SPACECAM 150 User manual

TRUST SPACEC@M 150
UK
TRUST SPACEC@M 150
User’s Manual
Version 1.0

TRUST SPACEC@M 150
UK 12575 SPACEC@M 150 CD HANDLEIDING (A4)
Thank you
Thank you very much for purchasing this product from the Trust range. We wish you hours of fun
with it. Please read this manual carefully before using the product.
Registration
Register your purchase now at the Trust Internet site, www.trust.com, so that you are able to
receive optimal guarantee and service support. You will be automatically informed of
developments to your product and of other Trust products. You will also have the chance to win
some spectacular prizes.
Copyright statement
No part of this instruction manual may be reproduced or transmitted, in any form or by any means,
electronic or mechanical, including photocopying, recording, or information storage and retrieval
systems, for any purpose other than the purchaser's own personal use, without prior written
permission from the manufacturer.
Disclaimer statement
The manufacturer specifically disclaims all warranties, either express or implied, including, but not
limited to, implied warranties for the marketability and suitability for a particular purpose, with
respect to the software, the accompanying product manual(s) and written material, and all other
accompanying hardware. The manufacturer reserves the right to revise or make improvements to
its product at any time and without obligation to notify any person of such revisions or
improvements.
In no event shall the manufacturer be liable for any consequential or incidental damages, including
any loss of business profits or any other commercial damages, arising out of the use of its
products.
All company or product names are trademarks or registered trademarks of their respective
owners.

TRUST SPACEC@M 150
1
UK
Table of contents
1. Introduction ..................................................................................................................................... 2
1.1 Conventions used in this manual........................................................................................... 2
1.2 Contents of the package.......................................................................................................... 2
1.3 Minimum system requirements .............................................................................................. 2
2. Safety................................................................................................................................................ 3
2.1 General ...................................................................................................................................... 3
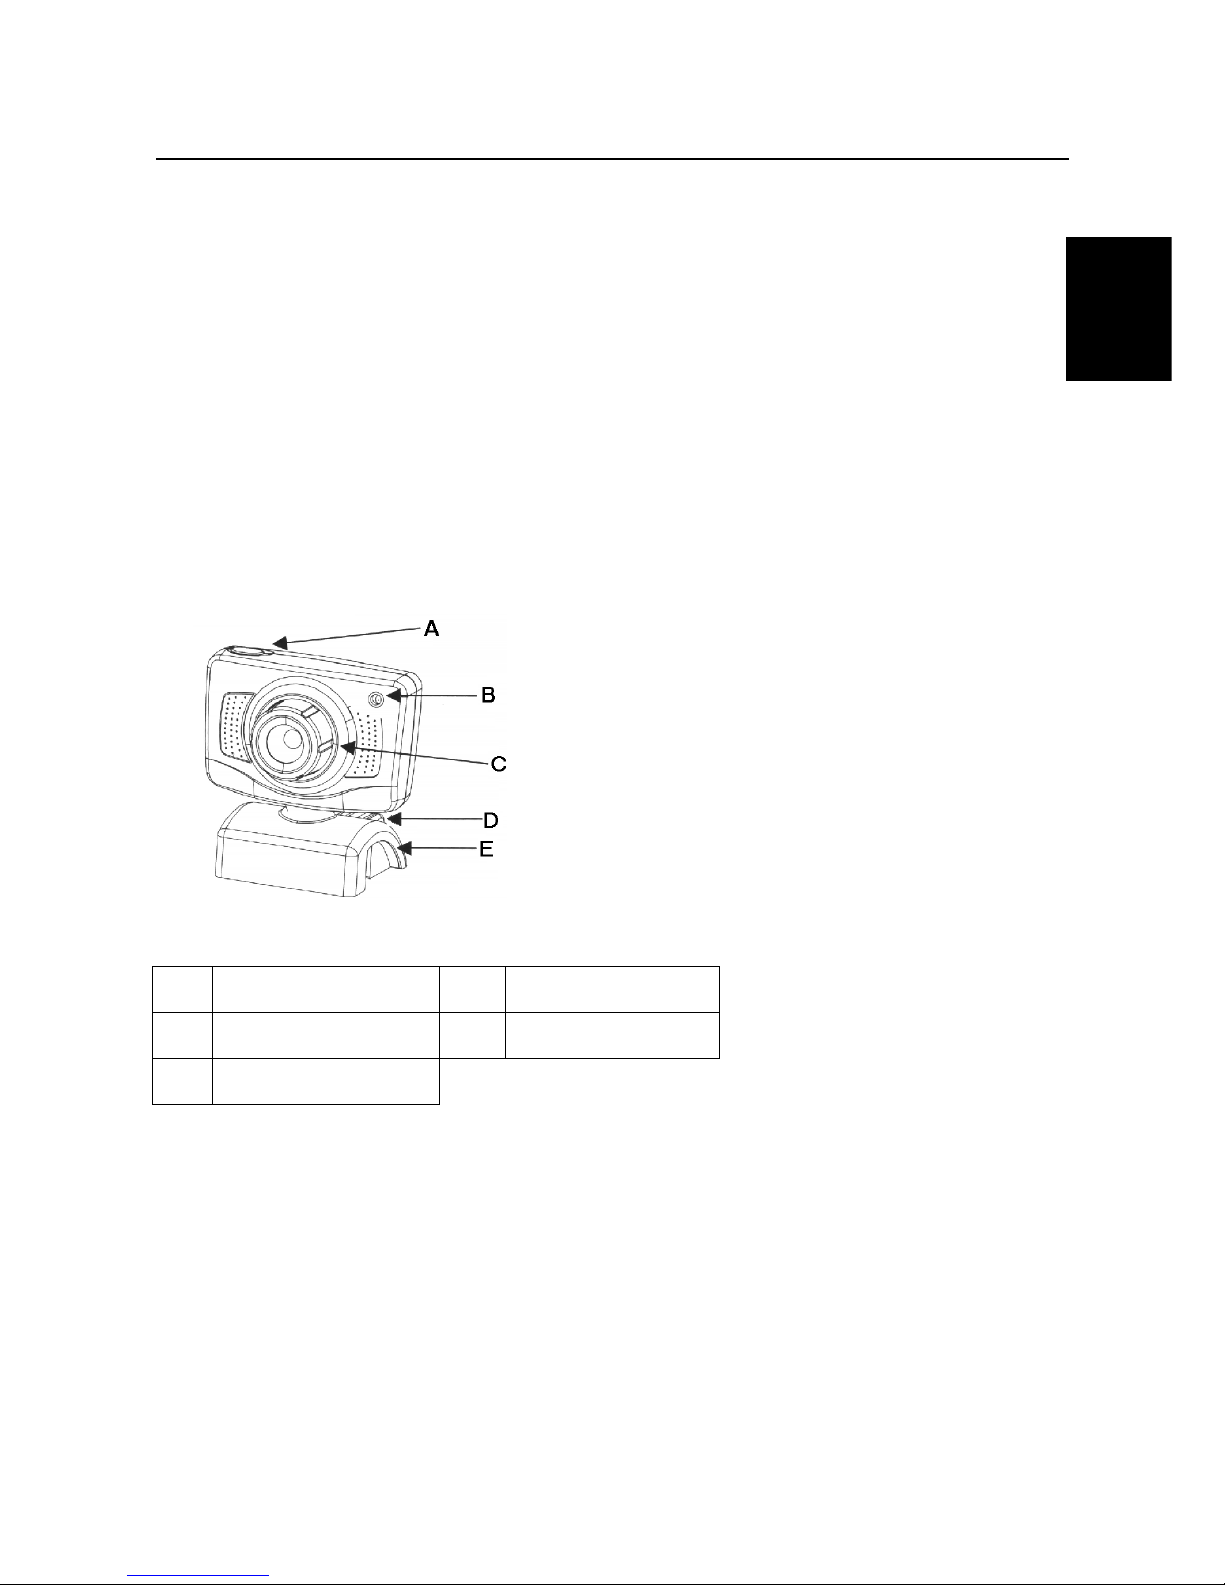
3. Functions of the ‘Trust SPACEC@M 150’..................................................................................... 3
3.1 Camera functions ..................................................................................................................... 3
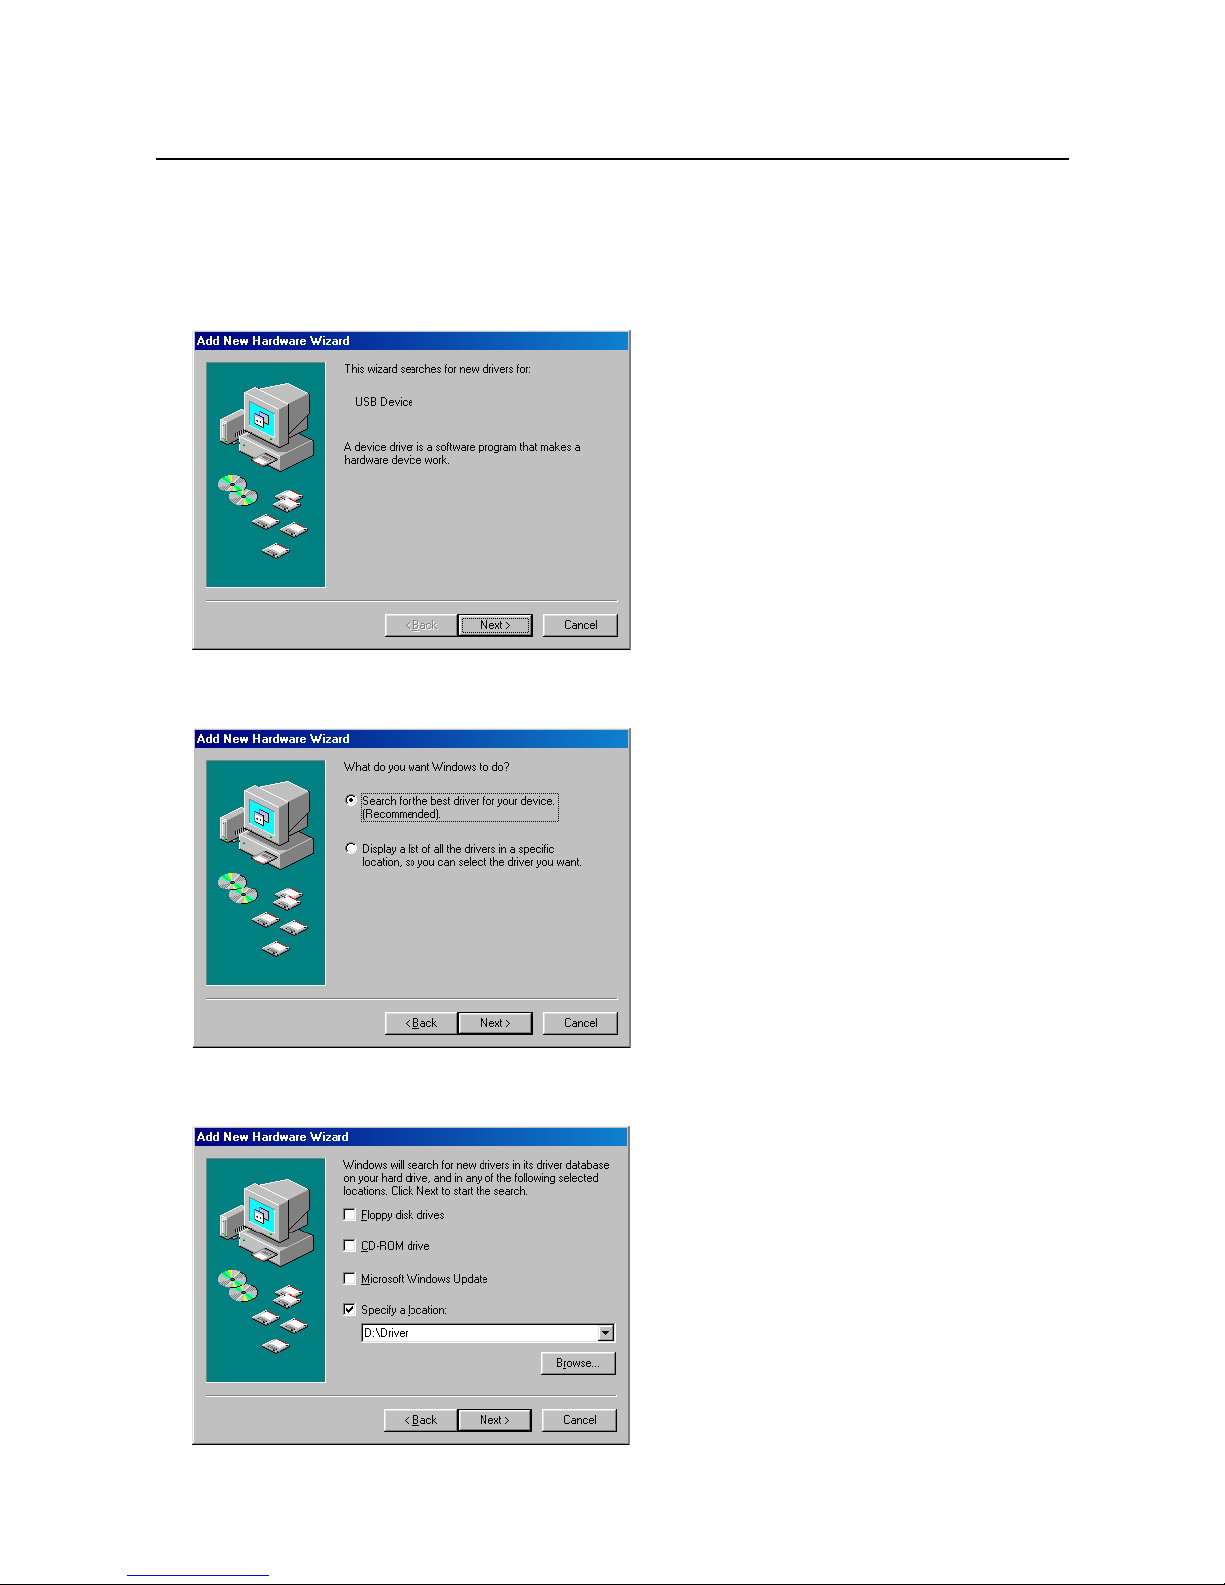
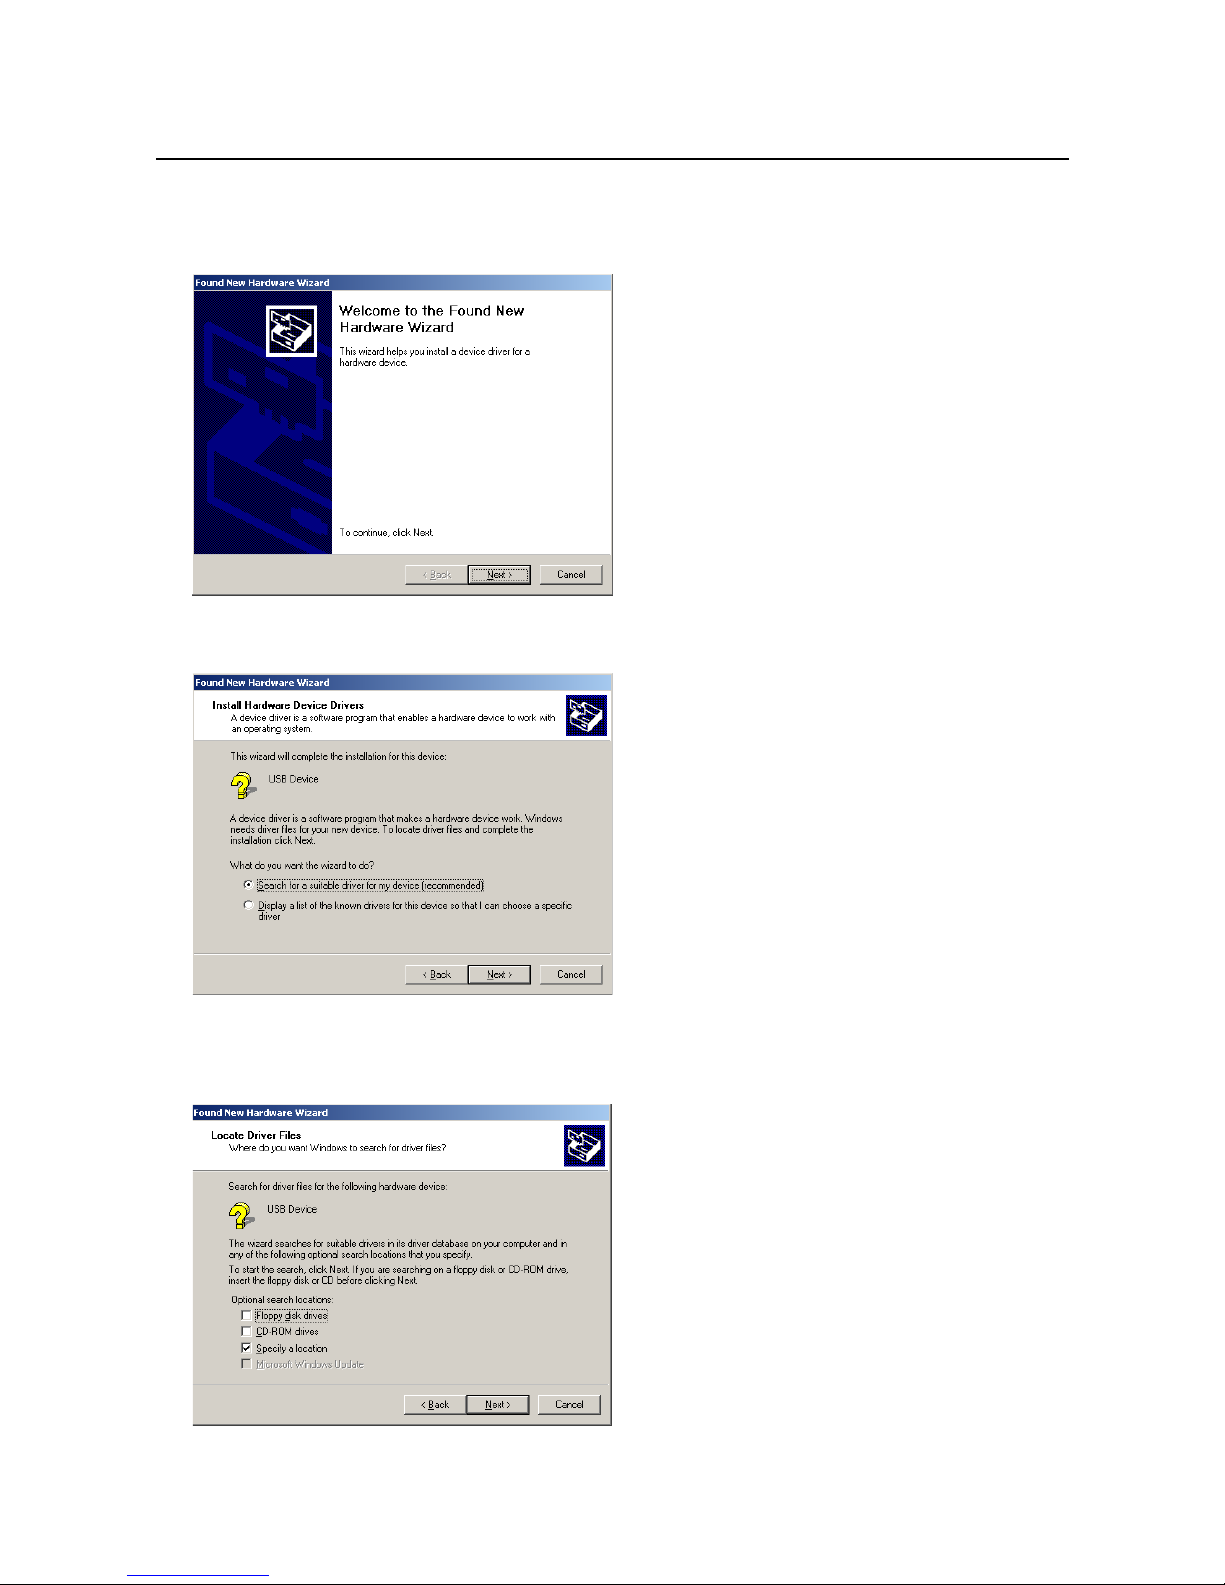
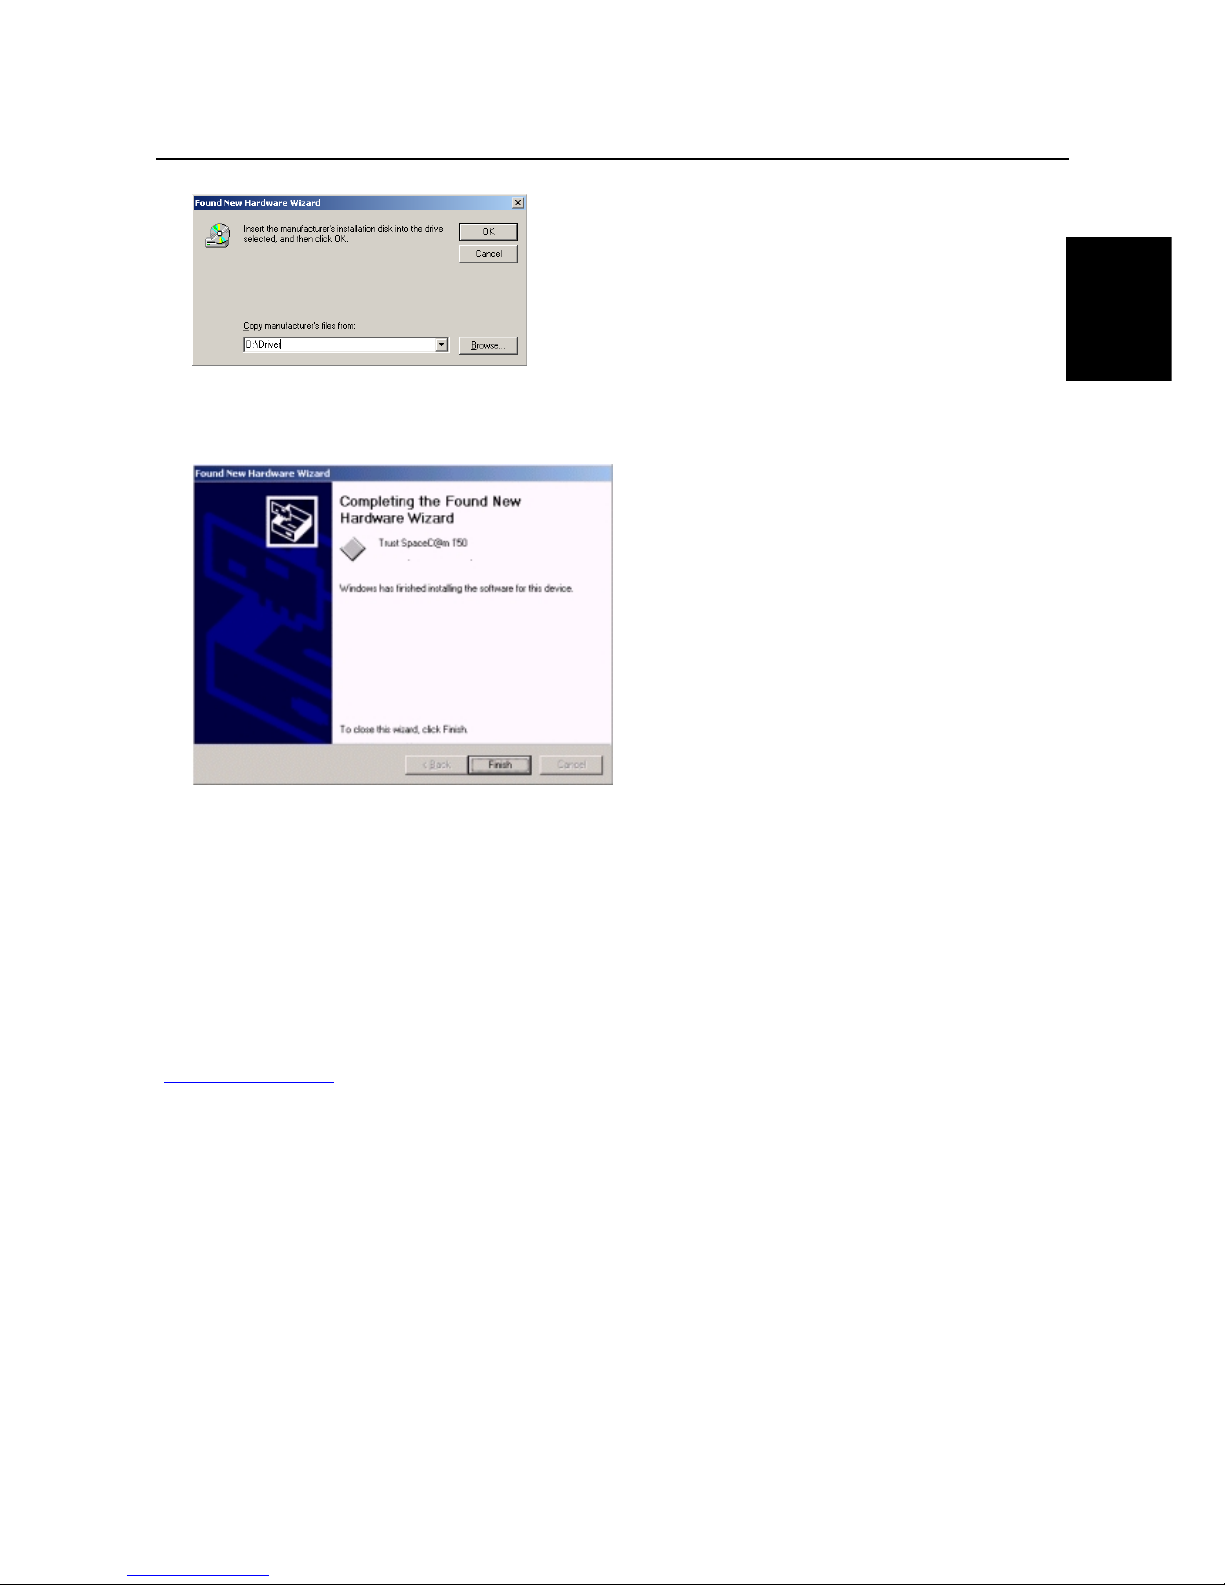
4. Installation Setup program............................................................................................................. 4
4.1 Windows 98 / ME ...................................................................................................................... 4
4.2 Windows 2000........................................................................................................................... 6
4.3 Mac OS 8.6 ................................................................................................................................ 7
5. Software Installation ....................................................................................................................... 8
5.1 Ulead Photo Explorer 6.0 installation..................................................................................... 8
5.2 Installation Microsoft Internet Explorer (NetMeeting) ........................................................ 10
6. Using the camera .......................................................................................................................... 11
6.1 Positioning the camera.......................................................................................................... 11
6.2 Trust SpaceC@m 150 Software ............................................................................................ 11
6.3 Using Ulead PhotoExplorer................................................................................................... 12
6.3.1 Advanced image settings ............................................................................................... 13
6.3.2 Taking a snapshot ........................................................................................................... 14
6.3.3 WebCam & Internet ......................................................................................................... 14
7. Troubleshooting............................................................................................................................ 15
8. Specifications ................................................................................................................................ 16
9. Trust Customer Care Centres ...................................................................................................... 17

TRUST SPACEC@M 150
2
1. Introduction
This instruction manual is intended for users of the Trust SpaceC@m 150. Prior knowledge of computers is
necessary to install this product. If you have any questions, please consult one of the Trust Customer Care
Centres. You can find more information about these Customer Care Centres on the last page of this
electronic manual, as well as at the back of the quick installation manual.
1.1 Conventions used in this manual
The following conventions have been used in this manual to indicate instructions:
<key> Here you should press a key. The name of the key is given between brackets.
‘System’ This is a specific term used in a program. These are the terms used by, for example,
Microsoft Windows 98.
[DIR] Key in the text shown in square brackets [….].
{term} The text between the parentheses {….} is the English term, e.g. {File} used in the figure
referred to.
Additional information will be shown as follows:
NOTE: If you connect the ‘Trust SPACEC@M 150’ to a USB HUB, then the USB HUB should have its
own power supply.
The examples assume that the letter “D” has been assigned to your CD-ROM drive. If your system uses a
different drive letter for your CD-ROM drive, for example “E”, you should replace “D” by “E”.
1.2 Contents of the package
Please check the contents of the package before reading the instruction manual. It should contain the
following:
•Camera
•Rubber strip for clip
•CD-ROM with setup program and applications
If anything is missing or damaged, please contact one of the Trust Care Centres. You can find more
information at the back of this instruction manual.
1.3 Minimum system requirements
•Intel Pentium 200 MMX CPU or higher
•USB port
•Windows 98 / ME / 2000 / MAC OS 8.6 or higher
•32 MB RAM (64 MB recommended)
•60 MB free Hard disk space
•4X CD-ROM player
Recommended system configuration for full operation of the programs:
•ISDN-adapter or modem
•Sound card with speakers and microphone
•Internet subscription

TRUST SPACEC@M 150
3
UK
2. Safety
2.1 General
1. Do not use the device in a damp environment.
2. Do not try to repair the device yourself.
3. Under the following circumstances have the device repaired by qualified personnel:
a) The cable or plug is damaged or worn;
b) Liquid has entered the device;
c) The device has fallen and/or the casing has been damaged.
4. Position the device so that the cables cannot be damaged.
3. Functions of the ‘Trust SPACEC@M 150’
3.1 Camera functions
Figure 1: ‘Trust SPACEC@M 150’ functions
A Shutter release D Clamp
B Indicator (LED) E Notebook clip
C Focus ring
Table 1: Functions of the SPACEC@M 150

TRUST SPACEC@M 150
4
4. Installation Setup program
4.1 Windows 98 / ME
1. Connect the USB connection of the camera to a free USB port of your computer. Windows 98 will detect
the new hardware and request the setup program. Figure 2 will appear.
Figure 2: Installation Windows 98 / ME
2. Click on ‘Next’. Figure 3 will appear.
Figure 3: Installation setup program
3. Click on ‘Next’. Figure 4 will appear.

TRUST SPACEC@M 150
5
UK
Figure 4: Installation setup program
4. Enter: D:\Driver and click on ‘Next’. Follow the direction on the screen. Figure 5 will appear after
installation.
Figure 5: Installation setup program
5. Click on ‘Finish’ to complete the installation.
6. Connect the headphones with the microphone to your sound card. To do this, see the symbols on both
plugs.
You have completed installation of the setup program. Proceed to chapter 5 for installation of the software
enclosed.

TRUST SPACEC@M 150
6
4.2 Windows 2000
1. Connect the USB connection of the camera to a free USB port of your computer. Windows 2000 will
detect the new hardware and request the setup program. Figure 6 will appear.
Figure 6: Windows 2000 installation
2. Click on ‘Next’. Figure 7 will appear.
Figure 7: Windows 2000 installation
3. Click on ‘Next’. Figure 8 will appear.
Figure 8: Windows 2000 installation

TRUST SPACEC@M 150
7
UK
4. Select ‘Specify a location’ and click on ‘Next.’ Figure 9 will appear.
Figure 9: Windows 2000 installation
5. Enter: D:\Driver and click on ‘OK’. Follow the directions on the screen. After installation, Figure 10 will
appear.
Figure 10: Installation setup program
6. Click on ‘Finish’ to complete installation.
You have completed installation of the setup program. For the installation of the software included, proceed
with chapter 5.
4.3 Mac OS 8.6
The Trust SPACEC@M 150 is also compatible with Mac starting at Mac OS 8.6. The driver is not available
on CD-ROM but can only be downloaded from our internet page:
http://www.trust.com

TRUST SPACEC@M 150
8
5. Software Installation
5.1 Ulead Photo Explorer 6.0 installation
Ulead Photo Explorer 6 is an image-processing program that enables you to load and process photos you
have taken with your SPACEC@M 150 on the PC. For installation of Ulead Photo Explorer 6 follow the
instructions below.
1. Go to Start – Run and type: D: SETUP.EXE. Figure 11 will appear.
Figure 11: Ulead Photo Explorer 6.0 installation
2. Click on ‘ULEAD PHOTO EXPLORER 6.0’ to start up installation. Figure 12 will appear.
Figure 12: Ulead Photo Explorer 6.0 installation
3. Click on ‘Next’. Figure 13 will appear

TRUST SPACEC@M 150
9
UK
Figure 13: Ulead Photo Explorer 6.0 installation
4. Press ‘YES” to accept the licence agreement and proceed. Figure 14 will appear.
Figure 14: Ulead Photo Explorer 6.0 installation
5. Enter your data and click on ‘Next’. Follow the directions on the screen. After installation, Figure 15 will
appear.
Figure 15: Ulead Photo Explorer 6.0 installation

TRUST SPACEC@M 150
10
6. Disable the ‘I would like to launch Ulead Photo Explorer’ option and click on ‘Finish” to complete
installation.
You have completed installation of Ulead Photo Explorer 6.0 SE. See chapter 5.2 for the installation of
NetMeeting.
5.2 Installation Microsoft Internet Explorer (NetMeeting)
Microsoft Internet Explorer is a program with various applications for internet use, such as a web browser and
an e-mail program (Outlook Express). The application ‘NetMeeting’ is also included in Internet Explorer.
Microsoft NetMeeting lets you communicate with friends, colleagues and others by image and sound. For this
application you must have a modem or an ISDN device, a sound card with speakers and microphone and an
internet subscription. The program is included on the Software disc.
For installation of Netmeeting, click on ‘MICROSOFT NETMEETING’ in Figure 11.
After installation you can read the Netmeeting manual. Continue to chapter 6 for the use of the camera and
software.

TRUST SPACEC@M 150
11
UK
6. Using the camera
6.1 Positioning the camera
The camera can be positioned, set down or clamped to your notebook PC, for example. For clamping it to
your notebook, clamp D can be used, for example. (See Figure 1).
In case there is too much space between the camera clamp and the object the camera is clamped to, a
rubber strip is provided to take up this space. For attaching this rubber strip, proceed as follows:
1. Clean the area to which the rubber strip will be attached and make sure it is free of grease.
2. Remove the white protective layer from the rubber strip.
3. Position the strip with the arrow, as shown in Figure 16.
Figure 16: Attaching the rubber strip
4. Press hard on the strip and attach the camera to the selected object.
6.2 Trust SpaceC@m 150 Software
During installation of the camera, the ‘Trust SpaceC@m 150’ program has been installed. Follow the
directions below to use this program.
1. Go to ‘Start - Programs - Trust - SpaceC@m 150’ and click on ‘Trust SpaceC@m 150’. Figure 17 will
appear.
Figure 17: SpaceC@M 150 software

TRUST SPACEC@M 150
12
Description
File Save processed recordings here
Devices Select the recording device
Options Configure the settings of the camera and sound recording here,
such as brightness, contrast, colour, audio format, etc.
Capture Make photo or film recordings here
Help For further information about the program
Table 2: SpaceC@M 150 software
2. This program enables you to make photos and short movies.
Click on the Help function for further information.
6.3 Using Ulead PhotoExplorer
A short description for the use of the camera in Ulead Photo Explorer 6.0 is given below. For more
information about Photo Explorer 6.0, please read this program's manual on the CD-ROM.
1. Start Photo Explorer 6.0 SE. Figure 18 will appear.
Figure 18: main Photo Explorer screen
2. Go to File ÆTWAIN Aquire ÆSelect Source. Figure 19 will appear.
Figure 19: selecting camera
3. Select the ‘Trust SpaceC@m 150’ and click on ‘Select’.
Now that the camera is installed, the photos can be loaded from the camera memory.
4. Go to File ÆTWAIN Aquire ÆAquire Now. Figure 20 will appear.

TRUST SPACEC@M 150
13
UK
Figure 20: SpaceC@m 150 Software
Function Description
AThe current camera image is shown in this screen. See chapter 6.3.1 for adjusting the
image.
B‘Snapshot’ button; takes a snapshot of the image (A). The snapshot taken is shown on
screen (G) and added to the ‘thumbnails’ (H). You can also take a snapshot with the
button on the camera.
C‘Transfer’ button; opens the snapshot shown on in screen (G) in the image-processing
program selected by you.
D‘Properties’ button; program the camera settings here.
E‘Format’ button; select the file format used for saving the snapshot here. You can select
BMP or JPEG. JPEG also enables you to set the compression.
F‘Exit’ button; closes the program.
GThe snapshot taken is shown on this screen.
H‘Thumbnails’ (miniature previews) of the snapshots taken are posted here. Click on the
‘thumbnails’ to view the snapshot on screen (G).
Table 3: SpaceC@M 150 software
6.3.1 Advanced image settings
Follow the instructions below for adjusting the camera image.
Note: Only change the settings if necessary. Wrong settings may cause problems in other applications
(NetMeeting, for example).
1. Click on ‘Properties’ button D. Figure 21 will appear.

TRUST SPACEC@M 150
14
Figure 21: Camera settings
2. The camera settings such as brightness, contrast, sharpness, etc. can be changed here. It is also
possible to zoom in the image and determine the size of the image.
3. Click on ‘Apply’ to save the new settings and click on ‘OK’ to return to Figure 20.
6.3.2 Taking a snapshot
To take and process a snapshot, follow the directions below.
1. Click on ‘Snapshot’ button (B) or on the camera button to record an image. The image will be shown on
screen (G) and as a miniature preview in ‘Thumbnails’ (H). See figure 20.
2. A maximum of 10 ‘thumbnails’ can be posted. If you make more snapshots, you will receive the report
that the images taken must be saved or deleted.
3. Click on ‘Transfer’ button C if you want to transfer the selected image to the image processing program.
4. Now you can process the image and save it. If necessary, consult the help function of the image
processing program.
For more detailed information about processing photos in Photo Explorer, we refer you to the manual of the
program on the CD-ROM: D:\Software\Pex6\C360.pdf
6.3.3 WebCam & Internet
De Trust SPACEC@M 150 can also be used very effectively for your internet page, for example.
Some informative sites about web cameras:
http://www.camarades.com
http://www.teveo.com
You can download software from these sites that allow you to send live video images over the Internet.
For more information about installation and use, we refer you to the pertinent sites.

TRUST SPACEC@M 150
15
UK
7. Troubleshooting
Problem Cause Possible solution
Windows does not
detect any new
device after
connecting the
camera.
The computers USB-port is not
working.
‘Delete the USB-port from the device
manager and reinstall it.
The computer
crashes when
using via USB.
USB port is sharing IRQ with
another device.
Remove the cards from your computer or
rearrange them. Consult your Windows
and/or PC manual for this.
Camera is not connected to a
USB-port
Connect the camera to a USB-port
Error notification:
‘Capture device
was not detected’. Camera is connected to a USB-
HUB that is not connected to
the power.
Connect the camera to a live USB-HUB or
computer’s USB-port
Trust SpaceC@m
150 is marked with
an exclamation
point ‘!’ in the
‘Device manager’.
Camera is connected to a USB-
HUB that is not connected to
the power.
Connect the camera to a live USB-HUB or
computer’s USB-port
Cannot take a
photo with the
snapshot button.
The ‘Trust SpaceC@m 150’
program has not been started
up.
Start up the ‘Trust SpaceC@m 150’
program.
Another application has been
opened that uses the camera
image.
First close the other application before
starting up the test program.
Camera does not
show an image in
the application.
Camera is not correctly
connected to the USB port.
Connect the camera to the USB port
correctly.
SPACEC@M 150
does not function
in combination
with TV / capture
card.
Conflict between camera and
TV card.
Continue as follows:
1) Remove the TV Capture card.
2) Install SPACEC@M 150
3) Install the TV Capture card.
USB problems Check the USB tips on the
TRUST internet site
Go to the Troubleshooter: www.TRUST.com
> Customer Care > Troubleshooters > USB
Problem is not
listed
Check the last update of the
FAQ which is available on the
internet.
Go to www.trust.com/12575 for FAQ and
other product information
Table 4: Troubleshooting
Check the FAQ's on the Internet (www.trust.com). You can also register your product via www.trust.com so
that you are able to receive optimal guarantee and service support. You will be automatically informed of
developments to your product and of other Trust products. You will also have the chance to win some
spectacular prizes.
If you still have any problems after trying these solutions, please contact one of the Trust Customer Care
Centres. You can find more information on the last page of this electronic manual, as well as at the back of
the quick installation manual. Please have the following information available:
•The article number. This is: 12575.

TRUST SPACEC@M 150
16
•Your hardware information.
•A good description of what precisely does not work.
•A good description of when precisely the problem takes place.
8. Specifications
Sensor type: CMOS
Image sensor 1/3”
Focus: Manual focus
Pixel resolution: 352 x 288
Max. software resolution 640 * 480
Colour depth: 24 bits (16.7 million colours)
Distance: 5 cm to infinite
Illumination: 1/60 – 1/25.000 sec
Minimum illumination: 50 Lux
30 fps for image format 160 x 120
30 fps for image format 320 x 240
Processing speed:
15 fps for image format 640 x 480
TWAIN interface: Yes
Connection: USB 1.0
Voltage: Via USB port
Dimensions (HxWxL): 70 x 70 x 65
Camera weight: 100 grams
Table 5: technical specifications

TRUST SPACEC@M 150
17
UK
9. Trust Customer Care Centres
TRUST CUSTOMER CARE CENTERS
Internet www.trust.com
Office Open Phone
UK 9:30 - 17:00 +44-(0)1376-500000
Italia 9:00–13:00 / 14:00-18:00 051-6635947
france 9:00 à 17:00 +33-(0)803-083080
Deutschland 9:00 - 17:00 0800-00TRUST (0800-0087878)
España 9:00 - 17:00 +34-902 160937
Nederland 9:00 - 17:00 0800-BELTRUST (0800-23587878)
Other countries 9:00 - 17:00 +31-(0)78-6549999
Table of contents
Other Trust Webcam manuals

Trust
Trust WB-3400T User manual

Trust
Trust Webcam User manual

Trust
Trust WB-3300p User manual

Trust
Trust WB-1200P User manual

Trust
Trust SPEEDLINK 485A User manual

Trust
Trust 14823 User manual

Trust
Trust 16175 User manual

Trust
Trust WB-3500T User manual

Trust
Trust WB-1400T User manual

Trust
Trust WB-5600R User manual

Trust
Trust 15227 User manual

Trust
Trust WB-6200p User manual

Trust
Trust WB-8500X User manual

Trust
Trust 110T User manual

Trust
Trust SpaceC@m 300 User manual

Trust
Trust WB-6250X User manual

Trust
Trust WB-1100G User manual

Trust
Trust 16429 User manual

Trust
Trust 12440 User manual

Trust
Trust WB-5400 User manual