ttfone TT240 User manual

Remove the Back Cover
Open the battery cover carefully by prising open from the
bottom left corner where you will nd a small notch.
Install the SIM card and battery.
For availability and information about using SIM card
services, contact your SIM card vendor. This may be the
service provider, network operator, or other vendor.
Note: The SIM card and its contacts are easily damaged
by scratches or bending, so please be careful when
handling, inserting, or removing the card.
Note: Keep all SIM cards out of the reach of
small children.
1. Ensure the phone is switched o
and the charger is disconnected
before removing the
battery.
2. With the back cover
removed, install the
SIM card by sliding it
into the nest and under
the metal holding plate.
Ensure the angled corner
is on the upper left hand
side. (To remove the SIM card,
gently press on it and slide it
out of its nest.) Please note you
can only use a standard SIM card
and not a Micro and Nano SIM. You
can also install a micro SD memory
card into the slot above the SIM slot.
3. Install the battery into the battery
slot, ensuring that the three metallic
stripes on the battery align with the three
metallic prongs in the battery slot.
4. Put on the battery cover. Ensure the cover is
completely closed and the matching sound
(click) could be heard.
5. Plug the phone in to charge it fully.
Micro SD
SIM Card
TT240 User Manual We reserve the right to upgrade the software and
product and/or to make changes to this user manual
without prior notice. The icons in this user manual
may slightly dier from your phone, depending on
the phone you purchased. All rights reserved.
www.ttfone.com
Safety Instructions
Your Phone Getting started
This user manual includes important safety
information. Please read below instructions
carefully. It may be dangerous or illegal if you do
not follow these instructions.
Pay attention to Trac Safety
Obey local trac laws and do not use the phone
while driving. Using a cell phone while driving is
dangerous and it is illegal in some areas. Radio
frequency (RF) signals may aect improperly
installed or inadequately shielded electronic
systems in motor vehicles such as electronic fuel
injection systems, electronic antiskid (antilock)
braking systems, electronic speed control systems,
and air bag systems. For more information, check
with the manufacturer of your vehicle for any
equipment that has been added. Do not place
objects, including installed or portable wireless
equipment in the area over the air bag or in the air
bag deployment area.
Pacemaker Interference
Pacemaker manufacturers recommend that a
minimum separation of 15.3 centimeters (6 inches)
be maintained between a wireless phone and a
pacemaker in order to avoid potential interference
with the pacemaker.
Turn O Your Cell Phone in Medical and Health
Care Facilities.
Switch o your device in health care facilities when
any regulations posted in these areas instruct you
to do so. Hospitals or health care facilities may
be using equipment that could be sensitive to
external RF energy.
Switch O on Airplanes
Using your device while ying in aircraft is
prohibited. Switch o your device before boarding
an aircraft. The use of wireless devices in an aircraft
may be dangerous to the operation of the aircraft,
disrupt the wireless telephone network, and may
be illegal.
Accessories and Batteries
Use only the approved accessories and batteries.
Please do not try to use with any product that
was not manufactured for use with this phone.
Please be sure the phone has been switched o
before taking out the battery. Please dispose of
scrap batteries properly according to the local
regulations.
Cell Phone Should Be Turned O Near Sites of
Explosion.
Potentially explosive atmospheres include areas
where you would normally be advised to turn o
your vehicle engine. Sparks in such areas could
cause an explosion or re resulting in bodily injury
or even death. Switch o the device at refueling
points such as near gas pumps at service stations
and in any area with a potentially explosive
atmosphere and obey all signs and instructions.
Observe restrictions on the use of radio equipment
in fuel depots, storage, chemical plants or where
blasting operations are in progress.
Using the Phone Correctly
Please use this phone in its normal intended
position. Do not let children use the phone
without supervision. Your phone contains small
parts such as SIM card, which can be accidentally
swallowed by a child.
Your Phone is Not Waterproof
This phone is not waterproof. Please do not expose
your phone to wet weather or environment (such
as rain, snow, seawater, etc.).
1. Navigation key: press to navigate
the Menu or press and hold to
use Google Voice Assistant.
2. Left soft key: Press the left soft
key to see your notications and
conrm menu actions.
3. Call key: Press to access call logs
or enter a number and press the
call key to make the call.
4. Right soft key: press to access
the contacts phone book.
5. End key: Press and hold to turn
on and o the phone, press to
end calls, press to go back and
exit menus.
6. Number keys: Press to input
numbers, hold down for speed
dial. Press and hold number 1
key for voicemail.
7. Star key: Hold down the star
key for 3 seconds to unlock the
keypad, press twice to input +
symbol for international calls.
8. Hash key: Press and hold to
activate Silent mode.
4
2
1
5
3
8
6
7
Set up your phone for the rst time
The rst time you power on the phone, you
should set the following options:
• Select the phone’s language, then press the
Right soft key to go next.
• Select an enabled Wi-Fi, then press Right
soft key to go next.
Even if no SIM card is installed, your phone
will still power on and you will be able to
connect to a Wi-Fi network and use some of
the phone’s features.
Power o your phone
To turn your phone o, hold down the Back/
End key and select Power o.
Charging the Battery
The battery can be charged when the phone
is either on or o. Please ensure the battery is
inserted into the phone before charging. The
charging time is three hours.
To connect the charger:
1. Insert the cord into its port on the bottom
panel of the phone
2. Plug the other end of the cable into either a
computer USB socket or use any USB mains
charger that runs at 240V.
To disconnect the charger:
1. Unplug the wall charger.
2. Remove the cord from the phone.
Status bar and Notices
The Status Bar appears at the top of the
screen. This displays notication icons, such
as missed calls or received messages (on the
left) and phone status icons, such as battery
status (on the right), along with the current
time.
The Notices Panel will display notications
when you miss calls, receive new messages or
have upcoming events.
From the home screen press the left soft
key and use the navigation keys to scroll to
highlight a notice, press SELECT to view it.
Wi-Fi
Switch on Wi-Fi by going to Settings/Network
& Connectivity/Wi-Fi select the available
network and enter the password (if needed)
press CONNECT when done.
The TT240 can be used as a WiFi hotspot
by navigating to Settings/Network &
Connectivity/Internet Sharing (will only work
if you have mobile data).
KaiOS Store
Use the KaiOS store to search for and
download games and applications to your
TT240 phone. You will need a KaiOS login, a
data connection or Wi and enough spare
memory space.
Battery Level Indication
EMPTY FULL
Low Battery Alert
The phone will sound an alert when the
battery is low and display a message of low
battery on the screen.
PLEASE NOTE: The TTfone TT240 does not
come with a charger, you can use any USB
mains plug or plug the cable into your PC
or Laptop to charge the phone. If you do
not have one of these you can purchase a
charger from www.ttfone.com
Making/Receiving Phone Calls
To Make Calls
1. Enter a number and press the call key to call.
• To delete a digit, press the End key.
• To clear the screen, hold the end key once.
You can also make calls directly from the
contact list by going to Menu/Contacts select
your contact, select phone number and the
press CALL.
Call Log
Access the call log to see your last dialed,
missed and incoming calls go to menu/
Call Log, use the Navigation key to select a
numbers and press CALL to call that number.
To Answer Calls
When your phone rings, press the Call key
once to answer the call.
To End a Call
To end a call, press the end key.
To Reject a Call
To reject the call without answering, press the
end key when your phone rings.
To Redial a Number
1. Press the Call key, this will take you to all
your recently dialed call list
2. Select the number you want to dial then
press the Call key to call.
Conference Calling
You can create a third call connection during a
call. During your call with the rst participant,
press Right Soft Key Options/Add call. You
can either enter the phone number of the
third participant, or press the Right Soft Key
(Contacts) to select a contact from your Contact
list. The rst call will be automatically placed
on hold.
• This feature is network dependent.
Making International Calls
1. Press the star key twice until a“+”character
appears on the screen.
2. Enter the country code, area code and
phone number as instructed by your long
distance network service carrier.
3. Press the Call key to call.
Changing the Volume during a Call
To change the volume during a call press
the up or down navigation key. To change
the volume of your media apps, ringtones,
alerts and alarms, go to Menu/Settings/
Personalisation/Sound/Volume.
Ringtone volume
You can adjust the ringtone volume in Menu/
Settings/Personalisation/Sound/Volume. From
here you adjust the volumes for the : Media,
Ringtones & Alerts and Alarm.
Silent Mode
Simply go to Menu/Settings/Personalisation/
Sound/Volume and change Ringtones & Alerts
to Silent or on your home screen hold down
the hash (#) key until silent mode appears.
Vibration
Simply go to Menu/Settings/Personalisation/
Sound/Volume and change Ringtones & Alerts
to Vibrate or on your home screen hold down
the hash (#) key until vibrate mode appears.
Aeroplane Mode
Some locations may require you to switch o
data connections. Instead of turning o your
device, you can set it to Aeroplane Mode.
From the Home Screen press the Navigation
Key Up to display the shortcuts menu select
the aeroplane symbol and press SELECT.
Flight mode will disconnect all your network
data, Wi-Fi and connectivity connections.
You can also access through Menu/Settings/
Network & Connectivity/Aeroplane Mode.
Data Roaming
With a mobile data plan from your network
2
54
3
6
operator you will be able to access internet
feature apps when not in a Wi-Fi zone.
Contact your operator for more information
of data plans.
Shortcut Keys
From the Home Screen, you can use
shortcut keys to easily jump to certain useful
functions. Press the left navigation key to
access these shortcuts on your home screen.
Transferring Media
Transfer your favorite music and pictures
between your TT240 and PC. Connect your
device to a PC with the USB power cable and
go to Menu/Settings/Storage/USB Storage
and select ‘Enabled’.
Your device will be displayed as a removable
device, showing the phone’s internal storage.
If a memory card is inserted,the microSD card
details will also be visible. Copy the chosen
les to the device.
To Lock and Unlock the Keypad
In order to prevent accidental dialling, the
phone is set to auto lock the keypad after
60 seconds of no use. To unlock the keypad
press and hold the Star key for 3 seconds.
If you wish to lock the keypad manually
again hold down the star key for 3 seconds.
To adjust the length of the auto lock go to
Menu/Settings/Personalisation/Display/
Screen Timeout.
KaiOS Account
Register and Log in to your KaiOS account to
set up the anti-theft feature, this allows you
to lock and erase your phone remotely if lost
or stolen.
Go to Menu/Settings/Account/KaiOS
Account/Create Account and follow the on
screen instructions.
Messages (SMS)
Test messaging is easy with the TT240
keypad, simply press a key repeatedly until
the desired letter is shown. Type 0 for a space.
Special characters or punctuation by pressing
*. To switch between lower and upper case
press #. To enter a number, press and hold
a number key. Writing methods can vary
between dierent applications.
Writing and Sending a Message
Go to Menu/Messages and select NEW. In
the“To”eld press the # key three times to
be able to enter numbers, or select add to
choose a contact from your contact list. Write
the message using the keypad, the end key
will delete the last character. Select SEND.
Contacts
Store all your contact information in the phone
book and easily access all your friends and
family. Go to Menu/Contacts or use the shortcut
pressing the right soft key on the home screen.
1. Select NEW and choose to save your
contact on the phone or the sim card
2. Enter the name and phone number of the
contact
3. press SAVE
Transfer Contacts from your old phone
To add contacts from your Gmail or outlook
account or your memory card go to Contacts/
Options/Settings/Import Contacts.
Sort contacts
You can either sort your contacts by rst or last
name. Contacts/Options/Settings/Sort Contacts.
Speed dial settings
Set speed dial numbers to the keypad
numbers keys. Press and hold down a
Network Signal Status
WiFi Network
Battery Status
Battery is charging
Bluetooth
Missed Call
New Text Message
Alarm
Aeroplane mode
Silent mode
Handset mode
New Email Message
Headphones are connected
Upcoming event
Data is syncing
Problem with sign in or sync
Downloading data
Microphone muted
Vibrate mode
New Unread Notices
Remove the Back Cover
Open the battery cover carefully by prising open from the
bottom left corner where you will nd a small notch.
Install the SIM card and battery.
For availability and information about using SIM card
services, contact your SIM card vendor. This may be the
service provider, network operator, or other vendor.
Note: The SIM card and its contacts are easily damaged
by scratches or bending, so please be careful when
handling, inserting, or removing the card.
Note: Keep all SIM cards out of the reach of
small children.
1. Ensure the phone is switched o
and the charger is disconnected
before removing the
battery.
2. With the back cover
removed, install the
SIM card by sliding it
into the nest and under
the metal holding plate.
Ensure the angled corner
is on the upper left hand
side. (To remove the SIM card,
gently press on it and slide it
out of its nest.) Please note you
can only use a standard SIM card
and not a Micro and Nano SIM. You
can also install a micro SD memory
card into the slot above the SIM slot.
3. Install the battery into the battery
slot, ensuring that the three metallic
stripes on the battery align with the three
metallic prongs in the battery slot.
4. Put on the battery cover. Ensure the cover is
completely closed and the matching sound
(click) could be heard.
5. Plug the phone in to charge it fully.
Micro SD
SIM Card
TT240 User Manual We reserve the right to upgrade the software and
product and/or to make changes to this user manual
without prior notice. The icons in this user manual
may slightly dier from your phone, depending on
the phone you purchased. All rights reserved.
www.ttfone.com
Safety Instructions
Your Phone Getting started
This user manual includes important safety
information. Please read below instructions
carefully. It may be dangerous or illegal if you do
not follow these instructions.
Pay attention to Trac Safety
Obey local trac laws and do not use the phone
while driving. Using a cell phone while driving is
dangerous and it is illegal in some areas. Radio
frequency (RF) signals may aect improperly
installed or inadequately shielded electronic
systems in motor vehicles such as electronic fuel
injection systems, electronic antiskid (antilock)
braking systems, electronic speed control systems,
and air bag systems. For more information, check
with the manufacturer of your vehicle for any
equipment that has been added. Do not place
objects, including installed or portable wireless
equipment in the area over the air bag or in the air
bag deployment area.
Pacemaker Interference
Pacemaker manufacturers recommend that a
minimum separation of 15.3 centimeters (6 inches)
be maintained between a wireless phone and a
pacemaker in order to avoid potential interference
with the pacemaker.
Turn O Your Cell Phone in Medical and Health
Care Facilities.
Switch o your device in health care facilities when
any regulations posted in these areas instruct you
to do so. Hospitals or health care facilities may
be using equipment that could be sensitive to
external RF energy.
Switch O on Airplanes
Using your device while ying in aircraft is
prohibited. Switch o your device before boarding
an aircraft. The use of wireless devices in an aircraft
may be dangerous to the operation of the aircraft,
disrupt the wireless telephone network, and may
be illegal.
Accessories and Batteries
Use only the approved accessories and batteries.
Please do not try to use with any product that
was not manufactured for use with this phone.
Please be sure the phone has been switched o
before taking out the battery. Please dispose of
scrap batteries properly according to the local
regulations.
Cell Phone Should Be Turned O Near Sites of
Explosion.
Potentially explosive atmospheres include areas
where you would normally be advised to turn o
your vehicle engine. Sparks in such areas could
cause an explosion or re resulting in bodily injury
or even death. Switch o the device at refueling
points such as near gas pumps at service stations
and in any area with a potentially explosive
atmosphere and obey all signs and instructions.
Observe restrictions on the use of radio equipment
in fuel depots, storage, chemical plants or where
blasting operations are in progress.
Using the Phone Correctly
Please use this phone in its normal intended
position. Do not let children use the phone
without supervision. Your phone contains small
parts such as SIM card, which can be accidentally
swallowed by a child.
Your Phone is Not Waterproof
This phone is not waterproof. Please do not expose
your phone to wet weather or environment (such
as rain, snow, seawater, etc.).
1. Navigation key: press to navigate
the Menu or press and hold to
use Google Voice Assistant.
2. Left soft key: Press the left soft
key to see your notications and
conrm menu actions.
3. Call key: Press to access call logs
or enter a number and press the
call key to make the call.
4. Right soft key: press to access
the contacts phone book.
5. End key: Press and hold to turn
on and o the phone, press to
end calls, press to go back and
exit menus.
6. Number keys: Press to input
numbers, hold down for speed
dial. Press and hold number 1
key for voicemail.
7. Star key: Hold down the star
key for 3 seconds to unlock the
keypad, press twice to input +
symbol for international calls.
8. Hash key: Press and hold to
activate Silent mode.
4
2
1
5
3
8
6
7
Set up your phone for the rst time
The rst time you power on the phone, you
should set the following options:
• Select the phone’s language, then press the
Right soft key to go next.
• Select an enabled Wi-Fi, then press Right
soft key to go next.
Even if no SIM card is installed, your phone
will still power on and you will be able to
connect to a Wi-Fi network and use some of
the phone’s features.
Power o your phone
To turn your phone o, hold down the Back/
End key and select Power o.
Charging the Battery
The battery can be charged when the phone
is either on or o. Please ensure the battery is
inserted into the phone before charging. The
charging time is three hours.
To connect the charger:
1. Insert the cord into its port on the bottom
panel of the phone
2. Plug the other end of the cable into either a
computer USB socket or use any USB mains
charger that runs at 240V.
To disconnect the charger:
1. Unplug the wall charger.
2. Remove the cord from the phone.
Status bar and Notices
The Status Bar appears at the top of the
screen. This displays notication icons, such
as missed calls or received messages (on the
left) and phone status icons, such as battery
status (on the right), along with the current
time.
The Notices Panel will display notications
when you miss calls, receive new messages or
have upcoming events.
From the home screen press the left soft
key and use the navigation keys to scroll to
highlight a notice, press SELECT to view it.
Wi-Fi
Switch on Wi-Fi by going to Settings/Network
& Connectivity/Wi-Fi select the available
network and enter the password (if needed)
press CONNECT when done.
The TT240 can be used as a WiFi hotspot
by navigating to Settings/Network &
Connectivity/Internet Sharing (will only work
if you have mobile data).
KaiOS Store
Use the KaiOS store to search for and
download games and applications to your
TT240 phone. You will need a KaiOS login, a
data connection or Wi and enough spare
memory space.
Battery Level Indication
EMPTY FULL
Low Battery Alert
The phone will sound an alert when the
battery is low and display a message of low
battery on the screen.
PLEASE NOTE: The TTfone TT240 does not
come with a charger, you can use any USB
mains plug or plug the cable into your PC
or Laptop to charge the phone. If you do
not have one of these you can purchase a
charger from www.ttfone.com
Making/Receiving Phone Calls
To Make Calls
1. Enter a number and press the call key to call.
• To delete a digit, press the End key.
• To clear the screen, hold the end key once.
You can also make calls directly from the
contact list by going to Menu/Contacts select
your contact, select phone number and the
press CALL.
Call Log
Access the call log to see your last dialed,
missed and incoming calls go to menu/
Call Log, use the Navigation key to select a
numbers and press CALL to call that number.
To Answer Calls
When your phone rings, press the Call key
once to answer the call.
To End a Call
To end a call, press the end key.
To Reject a Call
To reject the call without answering, press the
end key when your phone rings.
To Redial a Number
1. Press the Call key, this will take you to all
your recently dialed call list
2. Select the number you want to dial then
press the Call key to call.
Conference Calling
You can create a third call connection during a
call. During your call with the rst participant,
press Right Soft Key Options/Add call. You
can either enter the phone number of the
third participant, or press the Right Soft Key
(Contacts) to select a contact from your Contact
list. The rst call will be automatically placed
on hold.
• This feature is network dependent.
Making International Calls
1. Press the star key twice until a“+”character
appears on the screen.
2. Enter the country code, area code and
phone number as instructed by your long
distance network service carrier.
3. Press the Call key to call.
Changing the Volume during a Call
To change the volume during a call press
the up or down navigation key. To change
the volume of your media apps, ringtones,
alerts and alarms, go to Menu/Settings/
Personalisation/Sound/Volume.
Ringtone volume
You can adjust the ringtone volume in Menu/
Settings/Personalisation/Sound/Volume. From
here you adjust the volumes for the : Media,
Ringtones & Alerts and Alarm.
Silent Mode
Simply go to Menu/Settings/Personalisation/
Sound/Volume and change Ringtones & Alerts
to Silent or on your home screen hold down
the hash (#) key until silent mode appears.
Vibration
Simply go to Menu/Settings/Personalisation/
Sound/Volume and change Ringtones & Alerts
to Vibrate or on your home screen hold down
the hash (#) key until vibrate mode appears.
Aeroplane Mode
Some locations may require you to switch o
data connections. Instead of turning o your
device, you can set it to Aeroplane Mode.
From the Home Screen press the Navigation
Key Up to display the shortcuts menu select
the aeroplane symbol and press SELECT.
Flight mode will disconnect all your network
data, Wi-Fi and connectivity connections.
You can also access through Menu/Settings/
Network & Connectivity/Aeroplane Mode.
Data Roaming
With a mobile data plan from your network
2
54
3
6
operator you will be able to access internet
feature apps when not in a Wi-Fi zone.
Contact your operator for more information
of data plans.
Shortcut Keys
From the Home Screen, you can use
shortcut keys to easily jump to certain useful
functions. Press the left navigation key to
access these shortcuts on your home screen.
Transferring Media
Transfer your favorite music and pictures
between your TT240 and PC. Connect your
device to a PC with the USB power cable and
go to Menu/Settings/Storage/USB Storage
and select‘Enabled’.
Your device will be displayed as a removable
device, showing the phone’s internal storage.
If a memory card is inserted,the microSD card
details will also be visible. Copy the chosen
les to the device.
To Lock and Unlock the Keypad
In order to prevent accidental dialling, the
phone is set to auto lock the keypad after
60 seconds of no use. To unlock the keypad
press and hold the Star key for 3 seconds.
If you wish to lock the keypad manually
again hold down the star key for 3 seconds.
To adjust the length of the auto lock go to
Menu/Settings/Personalisation/Display/
Screen Timeout.
KaiOS Account
Register and Log in to your KaiOS account to
set up the anti-theft feature, this allows you
to lock and erase your phone remotely if lost
or stolen.
Go to Menu/Settings/Account/KaiOS
Account/Create Account and follow the on
screen instructions.
Messages (SMS)
Test messaging is easy with the TT240
keypad, simply press a key repeatedly until
the desired letter is shown. Type 0 for a space.
Special characters or punctuation by pressing
*. To switch between lower and upper case
press #. To enter a number, press and hold
a number key. Writing methods can vary
between dierent applications.
Writing and Sending a Message
Go to Menu/Messages and select NEW. In
the“To” eld press the # key three times to
be able to enter numbers, or select add to
choose a contact from your contact list. Write
the message using the keypad, the end key
will delete the last character. Select SEND.
Contacts
Store all your contact information in the phone
book and easily access all your friends and
family. Go to Menu/Contacts or use the shortcut
pressing the right soft key on the home screen.
1. Select NEW and choose to save your
contact on the phone or the sim card
2. Enter the name and phone number of the
contact
3. press SAVE
Transfer Contacts from your old phone
To add contacts from your Gmail or outlook
account or your memory card go to Contacts/
Options/Settings/Import Contacts.
Sort contacts
You can either sort your contacts by rst or last
name. Contacts/Options/Settings/Sort Contacts.
Speed dial settings
Set speed dial numbers to the keypad
numbers keys. Press and hold down a
Network Signal Status
WiFi Network
Battery Status
Battery is charging
Bluetooth
Missed Call
New Text Message
Alarm
Aeroplane mode
Silent mode
Handset mode
New Email Message
Headphones are connected
Upcoming event
Data is syncing
Problem with sign in or sync
Downloading data
Microphone muted
Vibrate mode
New Unread Notices
Remove the Back Cover
Open the battery cover carefully by prising open from the
bottom left corner where you will nd a small notch.
Install the SIM card and battery.
For availability and information about using SIM card
services, contact your SIM card vendor. This may be the
service provider, network operator, or other vendor.
Note: The SIM card and its contacts are easily damaged
by scratches or bending, so please be careful when
handling, inserting, or removing the card.
Note: Keep all SIM cards out of the reach of
small children.
1. Ensure the phone is switched o
and the charger is disconnected
before removing the
battery.
2. With the back cover
removed, install the
SIM card by sliding it
into the nest and under
the metal holding plate.
Ensure the angled corner
is on the upper left hand
side. (To remove the SIM card,
gently press on it and slide it
out of its nest.) Please note you
can only use a standard SIM card
and not a Micro and Nano SIM. You
can also install a micro SD memory
card into the slot above the SIM slot.
3. Install the battery into the battery
slot, ensuring that the three metallic
stripes on the battery align with the three
metallic prongs in the battery slot.
4. Put on the battery cover. Ensure the cover is
completely closed and the matching sound
(click) could be heard.
5. Plug the phone in to charge it fully.
Micro SD
SIM Card
TT240 User Manual We reserve the right to upgrade the software and
product and/or to make changes to this user manual
without prior notice. The icons in this user manual
may slightly dier from your phone, depending on
the phone you purchased. All rights reserved.
www.ttfone.com
Safety Instructions
Your Phone Getting started
This user manual includes important safety
information. Please read below instructions
carefully. It may be dangerous or illegal if you do
not follow these instructions.
Pay attention to Trac Safety
Obey local trac laws and do not use the phone
while driving. Using a cell phone while driving is
dangerous and it is illegal in some areas. Radio
frequency (RF) signals may aect improperly
installed or inadequately shielded electronic
systems in motor vehicles such as electronic fuel
injection systems, electronic antiskid (antilock)
braking systems, electronic speed control systems,
and air bag systems. For more information, check
with the manufacturer of your vehicle for any
equipment that has been added. Do not place
objects, including installed or portable wireless
equipment in the area over the air bag or in the air
bag deployment area.
Pacemaker Interference
Pacemaker manufacturers recommend that a
minimum separation of 15.3 centimeters (6 inches)
be maintained between a wireless phone and a
pacemaker in order to avoid potential interference
with the pacemaker.
Turn O Your Cell Phone in Medical and Health
Care Facilities.
Switch o your device in health care facilities when
any regulations posted in these areas instruct you
to do so. Hospitals or health care facilities may
be using equipment that could be sensitive to
external RF energy.
Switch O on Airplanes
Using your device while ying in aircraft is
prohibited. Switch o your device before boarding
an aircraft. The use of wireless devices in an aircraft
may be dangerous to the operation of the aircraft,
disrupt the wireless telephone network, and may
be illegal.
Accessories and Batteries
Use only the approved accessories and batteries.
Please do not try to use with any product that
was not manufactured for use with this phone.
Please be sure the phone has been switched o
before taking out the battery. Please dispose of
scrap batteries properly according to the local
regulations.
Cell Phone Should Be Turned O Near Sites of
Explosion.
Potentially explosive atmospheres include areas
where you would normally be advised to turn o
your vehicle engine. Sparks in such areas could
cause an explosion or re resulting in bodily injury
or even death. Switch o the device at refueling
points such as near gas pumps at service stations
and in any area with a potentially explosive
atmosphere and obey all signs and instructions.
Observe restrictions on the use of radio equipment
in fuel depots, storage, chemical plants or where
blasting operations are in progress.
Using the Phone Correctly
Please use this phone in its normal intended
position. Do not let children use the phone
without supervision. Your phone contains small
parts such as SIM card, which can be accidentally
swallowed by a child.
Your Phone is Not Waterproof
This phone is not waterproof. Please do not expose
your phone to wet weather or environment (such
as rain, snow, seawater, etc.).
1. Navigation key: press to navigate
the Menu or press and hold to
use Google Voice Assistant.
2. Left soft key: Press the left soft
key to see your notications and
conrm menu actions.
3. Call key: Press to access call logs
or enter a number and press the
call key to make the call.
4. Right soft key: press to access
the contacts phone book.
5. End key: Press and hold to turn
on and o the phone, press to
end calls, press to go back and
exit menus.
6. Number keys: Press to input
numbers, hold down for speed
dial. Press and hold number 1
key for voicemail.
7. Star key: Hold down the star
key for 3 seconds to unlock the
keypad, press twice to input +
symbol for international calls.
8. Hash key: Press and hold to
activate Silent mode.
4
2
1
5
3
8
6
7
Set up your phone for the rst time
The rst time you power on the phone, you
should set the following options:
• Select the phone’s language, then press the
Right soft key to go next.
• Select an enabled Wi-Fi, then press Right
soft key to go next.
Even if no SIM card is installed, your phone
will still power on and you will be able to
connect to a Wi-Fi network and use some of
the phone’s features.
Power o your phone
To turn your phone o, hold down the Back/
End key and select Power o.
Charging the Battery
The battery can be charged when the phone
is either on or o. Please ensure the battery is
inserted into the phone before charging. The
charging time is three hours.
To connect the charger:
1. Insert the cord into its port on the bottom
panel of the phone
2. Plug the other end of the cable into either a
computer USB socket or use any USB mains
charger that runs at 240V.
To disconnect the charger:
1. Unplug the wall charger.
2. Remove the cord from the phone.
Status bar and Notices
The Status Bar appears at the top of the
screen. This displays notication icons, such
as missed calls or received messages (on the
left) and phone status icons, such as battery
status (on the right), along with the current
time.
The Notices Panel will display notications
when you miss calls, receive new messages or
have upcoming events.
From the home screen press the left soft
key and use the navigation keys to scroll to
highlight a notice, press SELECT to view it.
Wi-Fi
Switch on Wi-Fi by going to Settings/Network
& Connectivity/Wi-Fi select the available
network and enter the password (if needed)
press CONNECT when done.
The TT240 can be used as a WiFi hotspot
by navigating to Settings/Network &
Connectivity/Internet Sharing (will only work
if you have mobile data).
KaiOS Store
Use the KaiOS store to search for and
download games and applications to your
TT240 phone. You will need a KaiOS login, a
data connection or Wi and enough spare
memory space.
Battery Level Indication
EMPTY FULL
Low Battery Alert
The phone will sound an alert when the
battery is low and display a message of low
battery on the screen.
PLEASE NOTE: The TTfone TT240 does not
come with a charger, you can use any USB
mains plug or plug the cable into your PC
or Laptop to charge the phone. If you do
not have one of these you can purchase a
charger from www.ttfone.com
Making/Receiving Phone Calls
To Make Calls
1. Enter a number and press the call key to call.
• To delete a digit, press the End key.
• To clear the screen, hold the end key once.
You can also make calls directly from the
contact list by going to Menu/Contacts select
your contact, select phone number and the
press CALL.
Call Log
Access the call log to see your last dialed,
missed and incoming calls go to menu/
Call Log, use the Navigation key to select a
numbers and press CALL to call that number.
To Answer Calls
When your phone rings, press the Call key
once to answer the call.
To End a Call
To end a call, press the end key.
To Reject a Call
To reject the call without answering, press the
end key when your phone rings.
To Redial a Number
1. Press the Call key, this will take you to all
your recently dialed call list
2. Select the number you want to dial then
press the Call key to call.
Conference Calling
You can create a third call connection during a
call. During your call with the rst participant,
press Right Soft Key Options/Add call. You
can either enter the phone number of the
third participant, or press the Right Soft Key
(Contacts) to select a contact from your Contact
list. The rst call will be automatically placed
on hold.
• This feature is network dependent.
Making International Calls
1. Press the star key twice until a“+” character
appears on the screen.
2. Enter the country code, area code and
phone number as instructed by your long
distance network service carrier.
3. Press the Call key to call.
Changing the Volume during a Call
To change the volume during a call press
the up or down navigation key. To change
the volume of your media apps, ringtones,
alerts and alarms, go to Menu/Settings/
Personalisation/Sound/Volume.
Ringtone volume
You can adjust the ringtone volume in Menu/
Settings/Personalisation/Sound/Volume. From
here you adjust the volumes for the : Media,
Ringtones & Alerts and Alarm.
Silent Mode
Simply go to Menu/Settings/Personalisation/
Sound/Volume and change Ringtones & Alerts
to Silent or on your home screen hold down
the hash (#) key until silent mode appears.
Vibration
Simply go to Menu/Settings/Personalisation/
Sound/Volume and change Ringtones & Alerts
to Vibrate or on your home screen hold down
the hash (#) key until vibrate mode appears.
Aeroplane Mode
Some locations may require you to switch o
data connections. Instead of turning o your
device, you can set it to Aeroplane Mode.
From the Home Screen press the Navigation
Key Up to display the shortcuts menu select
the aeroplane symbol and press SELECT.
Flight mode will disconnect all your network
data, Wi-Fi and connectivity connections.
You can also access through Menu/Settings/
Network & Connectivity/Aeroplane Mode.
Data Roaming
With a mobile data plan from your network
2
54
3
6
operator you will be able to access internet
feature apps when not in a Wi-Fi zone.
Contact your operator for more information
of data plans.
Shortcut Keys
From the Home Screen, you can use
shortcut keys to easily jump to certain useful
functions. Press the left navigation key to
access these shortcuts on your home screen.
Transferring Media
Transfer your favorite music and pictures
between your TT240 and PC. Connect your
device to a PC with the USB power cable and
go to Menu/Settings/Storage/USB Storage
and select ‘Enabled’.
Your device will be displayed as a removable
device, showing the phone’s internal storage.
If a memory card is inserted,the microSD card
details will also be visible. Copy the chosen
les to the device.
To Lock and Unlock the Keypad
In order to prevent accidental dialling, the
phone is set to auto lock the keypad after
60 seconds of no use. To unlock the keypad
press and hold the Star key for 3 seconds.
If you wish to lock the keypad manually
again hold down the star key for 3 seconds.
To adjust the length of the auto lock go to
Menu/Settings/Personalisation/Display/
Screen Timeout.
KaiOS Account
Register and Log in to your KaiOS account to
set up the anti-theft feature, this allows you
to lock and erase your phone remotely if lost
or stolen.
Go to Menu/Settings/Account/KaiOS
Account/Create Account and follow the on
screen instructions.
Messages (SMS)
Test messaging is easy with the TT240
keypad, simply press a key repeatedly until
the desired letter is shown. Type 0 for a space.
Special characters or punctuation by pressing
*. To switch between lower and upper case
press #. To enter a number, press and hold
a number key. Writing methods can vary
between dierent applications.
Writing and Sending a Message
Go to Menu/Messages and select NEW. In
the“To”eld press the # key three times to
be able to enter numbers, or select add to
choose a contact from your contact list. Write
the message using the keypad, the end key
will delete the last character. Select SEND.
Contacts
Store all your contact information in the phone
book and easily access all your friends and
family. Go to Menu/Contacts or use the shortcut
pressing the right soft key on the home screen.
1. Select NEW and choose to save your
contact on the phone or the sim card
2. Enter the name and phone number of the
contact
3. press SAVE
Transfer Contacts from your old phone
To add contacts from your Gmail or outlook
account or your memory card go to Contacts/
Options/Settings/Import Contacts.
Sort contacts
You can either sort your contacts by rst or last
name. Contacts/Options/Settings/Sort Contacts.
Speed dial settings
Set speed dial numbers to the keypad
numbers keys. Press and hold down a
Network Signal Status
WiFi Network
Battery Status
Battery is charging
Bluetooth
Missed Call
New Text Message
Alarm
Aeroplane mode
Silent mode
Handset mode
New Email Message
Headphones are connected
Upcoming event
Data is syncing
Problem with sign in or sync
Downloading data
Microphone muted
Vibrate mode
New Unread Notices

Remove the Back Cover
Open the battery cover carefully by prising open from the
bottom left corner where you will nd a small notch.
Install the SIM card and battery.
For availability and information about using SIM card
services, contact your SIM card vendor. This may be the
service provider, network operator, or other vendor.
Note: The SIM card and its contacts are easily damaged
by scratches or bending, so please be careful when
handling, inserting, or removing the card.
Note: Keep all SIM cards out of the reach of
small children.
1. Ensure the phone is switched o
and the charger is disconnected
before removing the
battery.
2. With the back cover
removed, install the
SIM card by sliding it
into the nest and under
the metal holding plate.
Ensure the angled corner
is on the upper left hand
side. (To remove the SIM card,
gently press on it and slide it
out of its nest.) Please note you
can only use a standard SIM card
and not a Micro and Nano SIM. You
can also install a micro SD memory
card into the slot above the SIM slot.
3. Install the battery into the battery
slot, ensuring that the three metallic
stripes on the battery align with the three
metallic prongs in the battery slot.
4. Put on the battery cover. Ensure the cover is
completely closed and the matching sound
(click) could be heard.
5. Plug the phone in to charge it fully.
Micro SD
SIM Card
TT240 User Manual We reserve the right to upgrade the software and
product and/or to make changes to this user manual
without prior notice. The icons in this user manual
may slightly dier from your phone, depending on
the phone you purchased. All rights reserved.
www.ttfone.com
Safety Instructions
Your Phone Getting started
This user manual includes important safety
information. Please read below instructions
carefully. It may be dangerous or illegal if you do
not follow these instructions.
Pay attention to Trac Safety
Obey local trac laws and do not use the phone
while driving. Using a cell phone while driving is
dangerous and it is illegal in some areas. Radio
frequency (RF) signals may aect improperly
installed or inadequately shielded electronic
systems in motor vehicles such as electronic fuel
injection systems, electronic antiskid (antilock)
braking systems, electronic speed control systems,
and air bag systems. For more information, check
with the manufacturer of your vehicle for any
equipment that has been added. Do not place
objects, including installed or portable wireless
equipment in the area over the air bag or in the air
bag deployment area.
Pacemaker Interference
Pacemaker manufacturers recommend that a
minimum separation of 15.3 centimeters (6 inches)
be maintained between a wireless phone and a
pacemaker in order to avoid potential interference
with the pacemaker.
Turn O Your Cell Phone in Medical and Health
Care Facilities.
Switch o your device in health care facilities when
any regulations posted in these areas instruct you
to do so. Hospitals or health care facilities may
be using equipment that could be sensitive to
external RF energy.
Switch O on Airplanes
Using your device while ying in aircraft is
prohibited. Switch o your device before boarding
an aircraft. The use of wireless devices in an aircraft
may be dangerous to the operation of the aircraft,
disrupt the wireless telephone network, and may
be illegal.
Accessories and Batteries
Use only the approved accessories and batteries.
Please do not try to use with any product that
was not manufactured for use with this phone.
Please be sure the phone has been switched o
before taking out the battery. Please dispose of
scrap batteries properly according to the local
regulations.
Cell Phone Should Be Turned O Near Sites of
Explosion.
Potentially explosive atmospheres include areas
where you would normally be advised to turn o
your vehicle engine. Sparks in such areas could
cause an explosion or re resulting in bodily injury
or even death. Switch o the device at refueling
points such as near gas pumps at service stations
and in any area with a potentially explosive
atmosphere and obey all signs and instructions.
Observe restrictions on the use of radio equipment
in fuel depots, storage, chemical plants or where
blasting operations are in progress.
Using the Phone Correctly
Please use this phone in its normal intended
position. Do not let children use the phone
without supervision. Your phone contains small
parts such as SIM card, which can be accidentally
swallowed by a child.
Your Phone is Not Waterproof
This phone is not waterproof. Please do not expose
your phone to wet weather or environment (such
as rain, snow, seawater, etc.).
1. Navigation key: press to navigate
the Menu or press and hold to
use Google Voice Assistant.
2. Left soft key: Press the left soft
key to see your notications and
conrm menu actions.
3. Call key: Press to access call logs
or enter a number and press the
call key to make the call.
4. Right soft key: press to access
the contacts phone book.
5. End key: Press and hold to turn
on and o the phone, press to
end calls, press to go back and
exit menus.
6. Number keys: Press to input
numbers, hold down for speed
dial. Press and hold number 1
key for voicemail.
7. Star key: Hold down the star
key for 3 seconds to unlock the
keypad, press twice to input +
symbol for international calls.
8. Hash key: Press and hold to
activate Silent mode.
4
2
1
5
3
8
6
7
Set up your phone for the rst time
The rst time you power on the phone, you
should set the following options:
• Select the phone’s language, then press the
Right soft key to go next.
• Select an enabled Wi-Fi, then press Right
soft key to go next.
Even if no SIM card is installed, your phone
will still power on and you will be able to
connect to a Wi-Fi network and use some of
the phone’s features.
Power o your phone
To turn your phone o, hold down the Back/
End key and select Power o.
Charging the Battery
The battery can be charged when the phone
is either on or o. Please ensure the battery is
inserted into the phone before charging. The
charging time is three hours.
To connect the charger:
1. Insert the cord into its port on the bottom
panel of the phone
2. Plug the other end of the cable into either a
computer USB socket or use any USB mains
charger that runs at 240V.
To disconnect the charger:
1. Unplug the wall charger.
2. Remove the cord from the phone.
Status bar and Notices
The Status Bar appears at the top of the
screen. This displays notication icons, such
as missed calls or received messages (on the
left) and phone status icons, such as battery
status (on the right), along with the current
time.
The Notices Panel will display notications
when you miss calls, receive new messages or
have upcoming events.
From the home screen press the left soft
key and use the navigation keys to scroll to
highlight a notice, press SELECT to view it.
Wi-Fi
Switch on Wi-Fi by going to Settings/Network
& Connectivity/Wi-Fi select the available
network and enter the password (if needed)
press CONNECT when done.
The TT240 can be used as a WiFi hotspot
by navigating to Settings/Network &
Connectivity/Internet Sharing (will only work
if you have mobile data).
KaiOS Store
Use the KaiOS store to search for and
download games and applications to your
TT240 phone. You will need a KaiOS login, a
data connection or Wi and enough spare
memory space.
Battery Level Indication
EMPTY FULL
Low Battery Alert
The phone will sound an alert when the
battery is low and display a message of low
battery on the screen.
PLEASE NOTE: The TTfone TT240 does not
come with a charger, you can use any USB
mains plug or plug the cable into your PC
or Laptop to charge the phone. If you do
not have one of these you can purchase a
charger from www.ttfone.com
Making/Receiving Phone Calls
To Make Calls
1. Enter a number and press the call key to call.
• To delete a digit, press the End key.
• To clear the screen, hold the end key once.
You can also make calls directly from the
contact list by going to Menu/Contacts select
your contact, select phone number and the
press CALL.
Call Log
Access the call log to see your last dialed,
missed and incoming calls go to menu/
Call Log, use the Navigation key to select a
numbers and press CALL to call that number.
To Answer Calls
When your phone rings, press the Call key
once to answer the call.
To End a Call
To end a call, press the end key.
To Reject a Call
To reject the call without answering, press the
end key when your phone rings.
To Redial a Number
1. Press the Call key, this will take you to all
your recently dialed call list
2. Select the number you want to dial then
press the Call key to call.
Conference Calling
You can create a third call connection during a
call. During your call with the rst participant,
press Right Soft Key Options/Add call. You
can either enter the phone number of the
third participant, or press the Right Soft Key
(Contacts) to select a contact from your Contact
list. The rst call will be automatically placed
on hold.
• This feature is network dependent.
Making International Calls
1. Press the star key twice until a“+”character
appears on the screen.
2. Enter the country code, area code and
phone number as instructed by your long
distance network service carrier.
3. Press the Call key to call.
Changing the Volume during a Call
To change the volume during a call press
the up or down navigation key. To change
the volume of your media apps, ringtones,
alerts and alarms, go to Menu/Settings/
Personalisation/Sound/Volume.
Ringtone volume
You can adjust the ringtone volume in Menu/
Settings/Personalisation/Sound/Volume. From
here you adjust the volumes for the : Media,
Ringtones & Alerts and Alarm.
Silent Mode
Simply go to Menu/Settings/Personalisation/
Sound/Volume and change Ringtones & Alerts
to Silent or on your home screen hold down
the hash (#) key until silent mode appears.
Vibration
Simply go to Menu/Settings/Personalisation/
Sound/Volume and change Ringtones & Alerts
to Vibrate or on your home screen hold down
the hash (#) key until vibrate mode appears.
Aeroplane Mode
Some locations may require you to switch o
data connections. Instead of turning o your
device, you can set it to Aeroplane Mode.
From the Home Screen press the Navigation
Key Up to display the shortcuts menu select
the aeroplane symbol and press SELECT.
Flight mode will disconnect all your network
data, Wi-Fi and connectivity connections.
You can also access through Menu/Settings/
Network & Connectivity/Aeroplane Mode.
Data Roaming
With a mobile data plan from your network
2
54
3
6
operator you will be able to access internet
feature apps when not in a Wi-Fi zone.
Contact your operator for more information
of data plans.
Shortcut Keys
From the Home Screen, you can use
shortcut keys to easily jump to certain useful
functions. Press the left navigation key to
access these shortcuts on your home screen.
Transferring Media
Transfer your favorite music and pictures
between your TT240 and PC. Connect your
device to a PC with the USB power cable and
go to Menu/Settings/Storage/USB Storage
and select ‘Enabled’.
Your device will be displayed as a removable
device, showing the phone’s internal storage.
If a memory card is inserted,the microSD card
details will also be visible. Copy the chosen
les to the device.
To Lock and Unlock the Keypad
In order to prevent accidental dialling, the
phone is set to auto lock the keypad after
60 seconds of no use. To unlock the keypad
press and hold the Star key for 3 seconds.
If you wish to lock the keypad manually
again hold down the star key for 3 seconds.
To adjust the length of the auto lock go to
Menu/Settings/Personalisation/Display/
Screen Timeout.
KaiOS Account
Register and Log in to your KaiOS account to
set up the anti-theft feature, this allows you
to lock and erase your phone remotely if lost
or stolen.
Go to Menu/Settings/Account/KaiOS
Account/Create Account and follow the on
screen instructions.
Messages (SMS)
Test messaging is easy with the TT240
keypad, simply press a key repeatedly until
the desired letter is shown. Type 0 for a space.
Special characters or punctuation by pressing
*. To switch between lower and upper case
press #. To enter a number, press and hold
a number key. Writing methods can vary
between dierent applications.
Writing and Sending a Message
Go to Menu/Messages and select NEW. In
the“To”eld press the # key three times to
be able to enter numbers, or select add to
choose a contact from your contact list. Write
the message using the keypad, the end key
will delete the last character. Select SEND.
Contacts
Store all your contact information in the phone
book and easily access all your friends and
family. Go to Menu/Contacts or use the shortcut
pressing the right soft key on the home screen.
1. Select NEW and choose to save your
contact on the phone or the sim card
2. Enter the name and phone number of the
contact
3. press SAVE
Transfer Contacts from your old phone
To add contacts from your Gmail or outlook
account or your memory card go to Contacts/
Options/Settings/Import Contacts.
Sort contacts
You can either sort your contacts by rst or last
name. Contacts/Options/Settings/Sort Contacts.
Speed dial settings
Set speed dial numbers to the keypad
numbers keys. Press and hold down a
Network Signal Status
WiFi Network
Battery Status
Battery is charging
Bluetooth
Missed Call
New Text Message
Alarm
Aeroplane mode
Silent mode
Handset mode
New Email Message
Headphones are connected
Upcoming event
Data is syncing
Problem with sign in or sync
Downloading data
Microphone muted
Vibrate mode
New Unread Notices
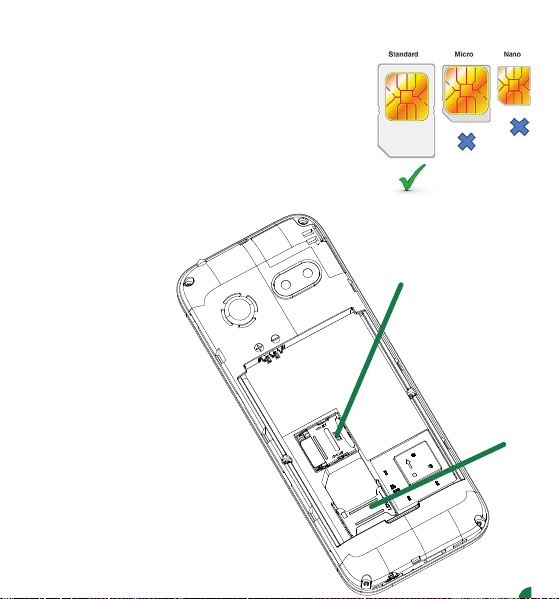
Remove the Back Cover
Open the battery cover carefully by prising open from the
bottom left corner where you will nd a small notch.
Install the SIM card and battery.
For availability and information about using SIM card
services, contact your SIM card vendor. This may be the
service provider, network operator, or other vendor.
Note: The SIM card and its contacts are easily damaged
by scratches or bending, so please be careful when
handling, inserting, or removing the card.
Note: Keep all SIM cards out of the reach of
small children.
1. Ensure the phone is switched o
and the charger is disconnected
before removing the
battery.
2. With the back cover
removed, install the
SIM card by sliding it
into the nest and under
the metal holding plate.
Ensure the angled corner
is on the upper left hand
side. (To remove the SIM card,
gently press on it and slide it
out of its nest.) Please note you
can only use a standard SIM card
and not a Micro and Nano SIM. You
can also install a micro SD memory
card into the slot above the SIM slot.
3. Install the battery into the battery
slot, ensuring that the three metallic
stripes on the battery align with the three
metallic prongs in the battery slot.
4. Put on the battery cover. Ensure the cover is
completely closed and the matching sound
(click) could be heard.
5. Plug the phone in to charge it fully.
Micro SD
SIM Card
TT240 User Manual We reserve the right to upgrade the software and
product and/or to make changes to this user manual
without prior notice. The icons in this user manual
may slightly dier from your phone, depending on
the phone you purchased. All rights reserved.
www.ttfone.com
Safety Instructions
Your Phone Getting started
This user manual includes important safety
information. Please read below instructions
carefully. It may be dangerous or illegal if you do
not follow these instructions.
Pay attention to Trac Safety
Obey local trac laws and do not use the phone
while driving. Using a cell phone while driving is
dangerous and it is illegal in some areas. Radio
frequency (RF) signals may aect improperly
installed or inadequately shielded electronic
systems in motor vehicles such as electronic fuel
injection systems, electronic antiskid (antilock)
braking systems, electronic speed control systems,
and air bag systems. For more information, check
with the manufacturer of your vehicle for any
equipment that has been added. Do not place
objects, including installed or portable wireless
equipment in the area over the air bag or in the air
bag deployment area.
Pacemaker Interference
Pacemaker manufacturers recommend that a
minimum separation of 15.3 centimeters (6 inches)
be maintained between a wireless phone and a
pacemaker in order to avoid potential interference
with the pacemaker.
Turn O Your Cell Phone in Medical and Health
Care Facilities.
Switch o your device in health care facilities when
any regulations posted in these areas instruct you
to do so. Hospitals or health care facilities may
be using equipment that could be sensitive to
external RF energy.
Switch O on Airplanes
Using your device while ying in aircraft is
prohibited. Switch o your device before boarding
an aircraft. The use of wireless devices in an aircraft
may be dangerous to the operation of the aircraft,
disrupt the wireless telephone network, and may
be illegal.
Accessories and Batteries
Use only the approved accessories and batteries.
Please do not try to use with any product that
was not manufactured for use with this phone.
Please be sure the phone has been switched o
before taking out the battery. Please dispose of
scrap batteries properly according to the local
regulations.
Cell Phone Should Be Turned O Near Sites of
Explosion.
Potentially explosive atmospheres include areas
where you would normally be advised to turn o
your vehicle engine. Sparks in such areas could
cause an explosion or re resulting in bodily injury
or even death. Switch o the device at refueling
points such as near gas pumps at service stations
and in any area with a potentially explosive
atmosphere and obey all signs and instructions.
Observe restrictions on the use of radio equipment
in fuel depots, storage, chemical plants or where
blasting operations are in progress.
Using the Phone Correctly
Please use this phone in its normal intended
position. Do not let children use the phone
without supervision. Your phone contains small
parts such as SIM card, which can be accidentally
swallowed by a child.
Your Phone is Not Waterproof
This phone is not waterproof. Please do not expose
your phone to wet weather or environment (such
as rain, snow, seawater, etc.).
1. Navigation key: press to navigate
the Menu or press and hold to
use Google Voice Assistant.
2. Left soft key: Press the left soft
key to see your notications and
conrm menu actions.
3. Call key: Press to access call logs
or enter a number and press the
call key to make the call.
4. Right soft key: press to access
the contacts phone book.
5. End key: Press and hold to turn
on and o the phone, press to
end calls, press to go back and
exit menus.
6. Number keys: Press to input
numbers, hold down for speed
dial. Press and hold number 1
key for voicemail.
7. Star key: Hold down the star
key for 3 seconds to unlock the
keypad, press twice to input +
symbol for international calls.
8. Hash key: Press and hold to
activate Silent mode.
4
2
1
5
3
8
6
7
Set up your phone for the rst time
The rst time you power on the phone, you
should set the following options:
• Select the phone’s language, then press the
Right soft key to go next.
• Select an enabled Wi-Fi, then press Right
soft key to go next.
Even if no SIM card is installed, your phone
will still power on and you will be able to
connect to a Wi-Fi network and use some of
the phone’s features.
Power o your phone
To turn your phone o, hold down the Back/
End key and select Power o.
Charging the Battery
The battery can be charged when the phone
is either on or o. Please ensure the battery is
inserted into the phone before charging. The
charging time is three hours.
To connect the charger:
1. Insert the cord into its port on the bottom
panel of the phone
2. Plug the other end of the cable into either a
computer USB socket or use any USB mains
charger that runs at 240V.
To disconnect the charger:
1. Unplug the wall charger.
2. Remove the cord from the phone.
Status bar and Notices
The Status Bar appears at the top of the
screen. This displays notication icons, such
as missed calls or received messages (on the
left) and phone status icons, such as battery
status (on the right), along with the current
time.
The Notices Panel will display notications
when you miss calls, receive new messages or
have upcoming events.
From the home screen press the left soft
key and use the navigation keys to scroll to
highlight a notice, press SELECT to view it.
Wi-Fi
Switch on Wi-Fi by going to Settings/Network
& Connectivity/Wi-Fi select the available
network and enter the password (if needed)
press CONNECT when done.
The TT240 can be used as a WiFi hotspot
by navigating to Settings/Network &
Connectivity/Internet Sharing (will only work
if you have mobile data).
KaiOS Store
Use the KaiOS store to search for and
download games and applications to your
TT240 phone. You will need a KaiOS login, a
data connection or Wi and enough spare
memory space.
Battery Level Indication
EMPTY FULL
Low Battery Alert
The phone will sound an alert when the
battery is low and display a message of low
battery on the screen.
PLEASE NOTE: The TTfone TT240 does not
come with a charger, you can use any USB
mains plug or plug the cable into your PC
or Laptop to charge the phone. If you do
not have one of these you can purchase a
charger from www.ttfone.com
Making/Receiving Phone Calls
To Make Calls
1. Enter a number and press the call key to call.
• To delete a digit, press the End key.
• To clear the screen, hold the end key once.
You can also make calls directly from the
contact list by going to Menu/Contacts select
your contact, select phone number and the
press CALL.
Call Log
Access the call log to see your last dialed,
missed and incoming calls go to menu/
Call Log, use the Navigation key to select a
numbers and press CALL to call that number.
To Answer Calls
When your phone rings, press the Call key
once to answer the call.
To End a Call
To end a call, press the end key.
To Reject a Call
To reject the call without answering, press the
end key when your phone rings.
To Redial a Number
1. Press the Call key, this will take you to all
your recently dialed call list
2. Select the number you want to dial then
press the Call key to call.
Conference Calling
You can create a third call connection during a
call. During your call with the rst participant,
press Right Soft Key Options/Add call. You
can either enter the phone number of the
third participant, or press the Right Soft Key
(Contacts) to select a contact from your Contact
list. The rst call will be automatically placed
on hold.
• This feature is network dependent.
Making International Calls
1. Press the star key twice until a“+”character
appears on the screen.
2. Enter the country code, area code and
phone number as instructed by your long
distance network service carrier.
3. Press the Call key to call.
Changing the Volume during a Call
To change the volume during a call press
the up or down navigation key. To change
the volume of your media apps, ringtones,
alerts and alarms, go to Menu/Settings/
Personalisation/Sound/Volume.
Ringtone volume
You can adjust the ringtone volume in Menu/
Settings/Personalisation/Sound/Volume. From
here you adjust the volumes for the : Media,
Ringtones & Alerts and Alarm.
Silent Mode
Simply go to Menu/Settings/Personalisation/
Sound/Volume and change Ringtones & Alerts
to Silent or on your home screen hold down
the hash (#) key until silent mode appears.
Vibration
Simply go to Menu/Settings/Personalisation/
Sound/Volume and change Ringtones & Alerts
to Vibrate or on your home screen hold down
the hash (#) key until vibrate mode appears.
Aeroplane Mode
Some locations may require you to switch o
data connections. Instead of turning o your
device, you can set it to Aeroplane Mode.
From the Home Screen press the Navigation
Key Up to display the shortcuts menu select
the aeroplane symbol and press SELECT.
Flight mode will disconnect all your network
data, Wi-Fi and connectivity connections.
You can also access through Menu/Settings/
Network & Connectivity/Aeroplane Mode.
Data Roaming
With a mobile data plan from your network
2
54
3
6
operator you will be able to access internet
feature apps when not in a Wi-Fi zone.
Contact your operator for more information
of data plans.
Shortcut Keys
From the Home Screen, you can use
shortcut keys to easily jump to certain useful
functions. Press the left navigation key to
access these shortcuts on your home screen.
Transferring Media
Transfer your favorite music and pictures
between your TT240 and PC. Connect your
device to a PC with the USB power cable and
go to Menu/Settings/Storage/USB Storage
and select ‘Enabled’.
Your device will be displayed as a removable
device, showing the phone’s internal storage.
If a memory card is inserted,the microSD card
details will also be visible. Copy the chosen
les to the device.
To Lock and Unlock the Keypad
In order to prevent accidental dialling, the
phone is set to auto lock the keypad after
60 seconds of no use. To unlock the keypad
press and hold the Star key for 3 seconds.
If you wish to lock the keypad manually
again hold down the star key for 3 seconds.
To adjust the length of the auto lock go to
Menu/Settings/Personalisation/Display/
Screen Timeout.
KaiOS Account
Register and Log in to your KaiOS account to
set up the anti-theft feature, this allows you
to lock and erase your phone remotely if lost
or stolen.
Go to Menu/Settings/Account/KaiOS
Account/Create Account and follow the on
screen instructions.
Messages (SMS)
Test messaging is easy with the TT240
keypad, simply press a key repeatedly until
the desired letter is shown. Type 0 for a space.
Special characters or punctuation by pressing
*. To switch between lower and upper case
press #. To enter a number, press and hold
a number key. Writing methods can vary
between dierent applications.
Writing and Sending a Message
Go to Menu/Messages and select NEW. In
the“To”eld press the # key three times to
be able to enter numbers, or select add to
choose a contact from your contact list. Write
the message using the keypad, the end key
will delete the last character. Select SEND.
Contacts
Store all your contact information in the phone
book and easily access all your friends and
family. Go to Menu/Contacts or use the shortcut
pressing the right soft key on the home screen.
1. Select NEW and choose to save your
contact on the phone or the sim card
2. Enter the name and phone number of the
contact
3. press SAVE
Transfer Contacts from your old phone
To add contacts from your Gmail or outlook
account or your memory card go to Contacts/
Options/Settings/Import Contacts.
Sort contacts
You can either sort your contacts by rst or last
name. Contacts/Options/Settings/Sort Contacts.
Speed dial settings
Set speed dial numbers to the keypad
numbers keys. Press and hold down a
Network Signal Status
WiFi Network
Battery Status
Battery is charging
Bluetooth
Missed Call
New Text Message
Alarm
Aeroplane mode
Silent mode
Handset mode
New Email Message
Headphones are connected
Upcoming event
Data is syncing
Problem with sign in or sync
Downloading data
Microphone muted
Vibrate mode
New Unread Notices

Remove the Back Cover
Open the battery cover carefully by prising open from the
bottom left corner where you will nd a small notch.
Install the SIM card and battery.
For availability and information about using SIM card
services, contact your SIM card vendor. This may be the
service provider, network operator, or other vendor.
Note: The SIM card and its contacts are easily damaged
by scratches or bending, so please be careful when
handling, inserting, or removing the card.
Note: Keep all SIM cards out of the reach of
small children.
1. Ensure the phone is switched o
and the charger is disconnected
before removing the
battery.
2. With the back cover
removed, install the
SIM card by sliding it
into the nest and under
the metal holding plate.
Ensure the angled corner
is on the upper left hand
side. (To remove the SIM card,
gently press on it and slide it
out of its nest.) Please note you
can only use a standard SIM card
and not a Micro and Nano SIM. You
can also install a micro SD memory
card into the slot above the SIM slot.
3. Install the battery into the battery
slot, ensuring that the three metallic
stripes on the battery align with the three
metallic prongs in the battery slot.
4. Put on the battery cover. Ensure the cover is
completely closed and the matching sound
(click) could be heard.
5. Plug the phone in to charge it fully.
Micro SD
SIM Card
TT240 User Manual We reserve the right to upgrade the software and
product and/or to make changes to this user manual
without prior notice. The icons in this user manual
may slightly dier from your phone, depending on
the phone you purchased. All rights reserved.
www.ttfone.com
Safety Instructions
Your Phone Getting started
This user manual includes important safety
information. Please read below instructions
carefully. It may be dangerous or illegal if you do
not follow these instructions.
Pay attention to Trac Safety
Obey local trac laws and do not use the phone
while driving. Using a cell phone while driving is
dangerous and it is illegal in some areas. Radio
frequency (RF) signals may aect improperly
installed or inadequately shielded electronic
systems in motor vehicles such as electronic fuel
injection systems, electronic antiskid (antilock)
braking systems, electronic speed control systems,
and air bag systems. For more information, check
with the manufacturer of your vehicle for any
equipment that has been added. Do not place
objects, including installed or portable wireless
equipment in the area over the air bag or in the air
bag deployment area.
Pacemaker Interference
Pacemaker manufacturers recommend that a
minimum separation of 15.3 centimeters (6 inches)
be maintained between a wireless phone and a
pacemaker in order to avoid potential interference
with the pacemaker.
Turn O Your Cell Phone in Medical and Health
Care Facilities.
Switch o your device in health care facilities when
any regulations posted in these areas instruct you
to do so. Hospitals or health care facilities may
be using equipment that could be sensitive to
external RF energy.
Switch O on Airplanes
Using your device while ying in aircraft is
prohibited. Switch o your device before boarding
an aircraft. The use of wireless devices in an aircraft
may be dangerous to the operation of the aircraft,
disrupt the wireless telephone network, and may
be illegal.
Accessories and Batteries
Use only the approved accessories and batteries.
Please do not try to use with any product that
was not manufactured for use with this phone.
Please be sure the phone has been switched o
before taking out the battery. Please dispose of
scrap batteries properly according to the local
regulations.
Cell Phone Should Be Turned O Near Sites of
Explosion.
Potentially explosive atmospheres include areas
where you would normally be advised to turn o
your vehicle engine. Sparks in such areas could
cause an explosion or re resulting in bodily injury
or even death. Switch o the device at refueling
points such as near gas pumps at service stations
and in any area with a potentially explosive
atmosphere and obey all signs and instructions.
Observe restrictions on the use of radio equipment
in fuel depots, storage, chemical plants or where
blasting operations are in progress.
Using the Phone Correctly
Please use this phone in its normal intended
position. Do not let children use the phone
without supervision. Your phone contains small
parts such as SIM card, which can be accidentally
swallowed by a child.
Your Phone is Not Waterproof
This phone is not waterproof. Please do not expose
your phone to wet weather or environment (such
as rain, snow, seawater, etc.).
1. Navigation key: press to navigate
the Menu or press and hold to
use Google Voice Assistant.
2. Left soft key: Press the left soft
key to see your notications and
conrm menu actions.
3. Call key: Press to access call logs
or enter a number and press the
call key to make the call.
4. Right soft key: press to access
the contacts phone book.
5. End key: Press and hold to turn
on and o the phone, press to
end calls, press to go back and
exit menus.
6. Number keys: Press to input
numbers, hold down for speed
dial. Press and hold number 1
key for voicemail.
7. Star key: Hold down the star
key for 3 seconds to unlock the
keypad, press twice to input +
symbol for international calls.
8. Hash key: Press and hold to
activate Silent mode.
4
2
1
5
3
8
6
7
Set up your phone for the rst time
The rst time you power on the phone, you
should set the following options:
• Select the phone’s language, then press the
Right soft key to go next.
• Select an enabled Wi-Fi, then press Right
soft key to go next.
Even if no SIM card is installed, your phone
will still power on and you will be able to
connect to a Wi-Fi network and use some of
the phone’s features.
Power o your phone
To turn your phone o, hold down the Back/
End key and select Power o.
Charging the Battery
The battery can be charged when the phone
is either on or o. Please ensure the battery is
inserted into the phone before charging. The
charging time is three hours.
To connect the charger:
1. Insert the cord into its port on the bottom
panel of the phone
2. Plug the other end of the cable into either a
computer USB socket or use any USB mains
charger that runs at 240V.
To disconnect the charger:
1. Unplug the wall charger.
2. Remove the cord from the phone.
Status bar and Notices
The Status Bar appears at the top of the
screen. This displays notication icons, such
as missed calls or received messages (on the
left) and phone status icons, such as battery
status (on the right), along with the current
time.
The Notices Panel will display notications
when you miss calls, receive new messages or
have upcoming events.
From the home screen press the left soft
key and use the navigation keys to scroll to
highlight a notice, press SELECT to view it.
Wi-Fi
Switch on Wi-Fi by going to Settings/Network
& Connectivity/Wi-Fi select the available
network and enter the password (if needed)
press CONNECT when done.
The TT240 can be used as a WiFi hotspot
by navigating to Settings/Network &
Connectivity/Internet Sharing (will only work
if you have mobile data).
KaiOS Store
Use the KaiOS store to search for and
download games and applications to your
TT240 phone. You will need a KaiOS login, a
data connection or Wi and enough spare
memory space.
Battery Level Indication
EMPTY FULL
Low Battery Alert
The phone will sound an alert when the
battery is low and display a message of low
battery on the screen.
PLEASE NOTE: The TTfone TT240 does not
come with a charger, you can use any USB
mains plug or plug the cable into your PC
or Laptop to charge the phone. If you do
not have one of these you can purchase a
charger from www.ttfone.com
Making/Receiving Phone Calls
To Make Calls
1. Enter a number and press the call key to call.
• To delete a digit, press the End key.
• To clear the screen, hold the end key once.
You can also make calls directly from the
contact list by going to Menu/Contacts select
your contact, select phone number and the
press CALL.
Call Log
Access the call log to see your last dialed,
missed and incoming calls go to menu/
Call Log, use the Navigation key to select a
numbers and press CALL to call that number.
To Answer Calls
When your phone rings, press the Call key
once to answer the call.
To End a Call
To end a call, press the end key.
To Reject a Call
To reject the call without answering, press the
end key when your phone rings.
To Redial a Number
1. Press the Call key, this will take you to all
your recently dialed call list
2. Select the number you want to dial then
press the Call key to call.
Conference Calling
You can create a third call connection during a
call. During your call with the rst participant,
press Right Soft Key Options/Add call. You
can either enter the phone number of the
third participant, or press the Right Soft Key
(Contacts) to select a contact from your Contact
list. The rst call will be automatically placed
on hold.
• This feature is network dependent.
Making International Calls
1. Press the star key twice until a“+” character
appears on the screen.
2. Enter the country code, area code and
phone number as instructed by your long
distance network service carrier.
3. Press the Call key to call.
Changing the Volume during a Call
To change the volume during a call press
the up or down navigation key. To change
the volume of your media apps, ringtones,
alerts and alarms, go to Menu/Settings/
Personalisation/Sound/Volume.
Ringtone volume
You can adjust the ringtone volume in Menu/
Settings/Personalisation/Sound/Volume. From
here you adjust the volumes for the : Media,
Ringtones & Alerts and Alarm.
Silent Mode
Simply go to Menu/Settings/Personalisation/
Sound/Volume and change Ringtones & Alerts
to Silent or on your home screen hold down
the hash (#) key until silent mode appears.
Vibration
Simply go to Menu/Settings/Personalisation/
Sound/Volume and change Ringtones & Alerts
to Vibrate or on your home screen hold down
the hash (#) key until vibrate mode appears.
Aeroplane Mode
Some locations may require you to switch o
data connections. Instead of turning o your
device, you can set it to Aeroplane Mode.
From the Home Screen press the Navigation
Key Up to display the shortcuts menu select
the aeroplane symbol and press SELECT.
Flight mode will disconnect all your network
data, Wi-Fi and connectivity connections.
You can also access through Menu/Settings/
Network & Connectivity/Aeroplane Mode.
Data Roaming
With a mobile data plan from your network
2
54
3
6
operator you will be able to access internet
feature apps when not in a Wi-Fi zone.
Contact your operator for more information
of data plans.
Shortcut Keys
From the Home Screen, you can use
shortcut keys to easily jump to certain useful
functions. Press the left navigation key to
access these shortcuts on your home screen.
Transferring Media
Transfer your favorite music and pictures
between your TT240 and PC. Connect your
device to a PC with the USB power cable and
go to Menu/Settings/Storage/USB Storage
and select ‘Enabled’.
Your device will be displayed as a removable
device, showing the phone’s internal storage.
If a memory card is inserted,the microSD card
details will also be visible. Copy the chosen
les to the device.
To Lock and Unlock the Keypad
In order to prevent accidental dialling, the
phone is set to auto lock the keypad after
60 seconds of no use. To unlock the keypad
press and hold the Star key for 3 seconds.
If you wish to lock the keypad manually
again hold down the star key for 3 seconds.
To adjust the length of the auto lock go to
Menu/Settings/Personalisation/Display/
Screen Timeout.
KaiOS Account
Register and Log in to your KaiOS account to
set up the anti-theft feature, this allows you
to lock and erase your phone remotely if lost
or stolen.
Go to Menu/Settings/Account/KaiOS
Account/Create Account and follow the on
screen instructions.
Messages (SMS)
Test messaging is easy with the TT240
keypad, simply press a key repeatedly until
the desired letter is shown. Type 0 for a space.
Special characters or punctuation by pressing
*. To switch between lower and upper case
press #. To enter a number, press and hold
a number key. Writing methods can vary
between dierent applications.
Writing and Sending a Message
Go to Menu/Messages and select NEW. In
the“To”eld press the # key three times to
be able to enter numbers, or select add to
choose a contact from your contact list. Write
the message using the keypad, the end key
will delete the last character. Select SEND.
Contacts
Store all your contact information in the phone
book and easily access all your friends and
family. Go to Menu/Contacts or use the shortcut
pressing the right soft key on the home screen.
1. Select NEW and choose to save your
contact on the phone or the sim card
2. Enter the name and phone number of the
contact
3. press SAVE
Transfer Contacts from your old phone
To add contacts from your Gmail or outlook
account or your memory card go to Contacts/
Options/Settings/Import Contacts.
Sort contacts
You can either sort your contacts by rst or last
name. Contacts/Options/Settings/Sort Contacts.
Speed dial settings
Set speed dial numbers to the keypad
numbers keys. Press and hold down a
Network Signal Status
WiFi Network
Battery Status
Battery is charging
Bluetooth
Missed Call
New Text Message
Alarm
Aeroplane mode
Silent mode
Handset mode
New Email Message
Headphones are connected
Upcoming event
Data is syncing
Problem with sign in or sync
Downloading data
Microphone muted
Vibrate mode
New Unread Notices
Remove the Back Cover
Open the battery cover carefully by prising open from the
bottom left corner where you will nd a small notch.
Install the SIM card and battery.
For availability and information about using SIM card
services, contact your SIM card vendor. This may be the
service provider, network operator, or other vendor.
Note: The SIM card and its contacts are easily damaged
by scratches or bending, so please be careful when
handling, inserting, or removing the card.
Note: Keep all SIM cards out of the reach of
small children.
1. Ensure the phone is switched o
and the charger is disconnected
before removing the
battery.
2. With the back cover
removed, install the
SIM card by sliding it
into the nest and under
the metal holding plate.
Ensure the angled corner
is on the upper left hand
side. (To remove the SIM card,
gently press on it and slide it
out of its nest.) Please note you
can only use a standard SIM card
and not a Micro and Nano SIM. You
can also install a micro SD memory
card into the slot above the SIM slot.
3. Install the battery into the battery
slot, ensuring that the three metallic
stripes on the battery align with the three
metallic prongs in the battery slot.
4. Put on the battery cover. Ensure the cover is
completely closed and the matching sound
(click) could be heard.
5. Plug the phone in to charge it fully.
Micro SD
SIM Card
TT240 User Manual We reserve the right to upgrade the software and
product and/or to make changes to this user manual
without prior notice. The icons in this user manual
may slightly dier from your phone, depending on
the phone you purchased. All rights reserved.
www.ttfone.com
Safety Instructions
Your Phone Getting started
This user manual includes important safety
information. Please read below instructions
carefully. It may be dangerous or illegal if you do
not follow these instructions.
Pay attention to Trac Safety
Obey local trac laws and do not use the phone
while driving. Using a cell phone while driving is
dangerous and it is illegal in some areas. Radio
frequency (RF) signals may aect improperly
installed or inadequately shielded electronic
systems in motor vehicles such as electronic fuel
injection systems, electronic antiskid (antilock)
braking systems, electronic speed control systems,
and air bag systems. For more information, check
with the manufacturer of your vehicle for any
equipment that has been added. Do not place
objects, including installed or portable wireless
equipment in the area over the air bag or in the air
bag deployment area.
Pacemaker Interference
Pacemaker manufacturers recommend that a
minimum separation of 15.3 centimeters (6 inches)
be maintained between a wireless phone and a
pacemaker in order to avoid potential interference
with the pacemaker.
Turn O Your Cell Phone in Medical and Health
Care Facilities.
Switch o your device in health care facilities when
any regulations posted in these areas instruct you
to do so. Hospitals or health care facilities may
be using equipment that could be sensitive to
external RF energy.
Switch O on Airplanes
Using your device while ying in aircraft is
prohibited. Switch o your device before boarding
an aircraft. The use of wireless devices in an aircraft
may be dangerous to the operation of the aircraft,
disrupt the wireless telephone network, and may
be illegal.
Accessories and Batteries
Use only the approved accessories and batteries.
Please do not try to use with any product that
was not manufactured for use with this phone.
Please be sure the phone has been switched o
before taking out the battery. Please dispose of
scrap batteries properly according to the local
regulations.
Cell Phone Should Be Turned O Near Sites of
Explosion.
Potentially explosive atmospheres include areas
where you would normally be advised to turn o
your vehicle engine. Sparks in such areas could
cause an explosion or re resulting in bodily injury
or even death. Switch o the device at refueling
points such as near gas pumps at service stations
and in any area with a potentially explosive
atmosphere and obey all signs and instructions.
Observe restrictions on the use of radio equipment
in fuel depots, storage, chemical plants or where
blasting operations are in progress.
Using the Phone Correctly
Please use this phone in its normal intended
position. Do not let children use the phone
without supervision. Your phone contains small
parts such as SIM card, which can be accidentally
swallowed by a child.
Your Phone is Not Waterproof
This phone is not waterproof. Please do not expose
your phone to wet weather or environment (such
as rain, snow, seawater, etc.).
1. Navigation key: press to navigate
the Menu or press and hold to
use Google Voice Assistant.
2. Left soft key: Press the left soft
key to see your notications and
conrm menu actions.
3. Call key: Press to access call logs
or enter a number and press the
call key to make the call.
4. Right soft key: press to access
the contacts phone book.
5. End key: Press and hold to turn
on and o the phone, press to
end calls, press to go back and
exit menus.
6. Number keys: Press to input
numbers, hold down for speed
dial. Press and hold number 1
key for voicemail.
7. Star key: Hold down the star
key for 3 seconds to unlock the
keypad, press twice to input +
symbol for international calls.
8. Hash key: Press and hold to
activate Silent mode.
4
2
1
5
3
8
6
7
Set up your phone for the rst time
The rst time you power on the phone, you
should set the following options:
• Select the phone’s language, then press the
Right soft key to go next.
• Select an enabled Wi-Fi, then press Right
soft key to go next.
Even if no SIM card is installed, your phone
will still power on and you will be able to
connect to a Wi-Fi network and use some of
the phone’s features.
Power o your phone
To turn your phone o, hold down the Back/
End key and select Power o.
Charging the Battery
The battery can be charged when the phone
is either on or o. Please ensure the battery is
inserted into the phone before charging. The
charging time is three hours.
To connect the charger:
1. Insert the cord into its port on the bottom
panel of the phone
2. Plug the other end of the cable into either a
computer USB socket or use any USB mains
charger that runs at 240V.
To disconnect the charger:
1. Unplug the wall charger.
2. Remove the cord from the phone.
Status bar and Notices
The Status Bar appears at the top of the
screen. This displays notication icons, such
as missed calls or received messages (on the
left) and phone status icons, such as battery
status (on the right), along with the current
time.
The Notices Panel will display notications
when you miss calls, receive new messages or
have upcoming events.
From the home screen press the left soft
key and use the navigation keys to scroll to
highlight a notice, press SELECT to view it.
Wi-Fi
Switch on Wi-Fi by going to Settings/Network
& Connectivity/Wi-Fi select the available
network and enter the password (if needed)
press CONNECT when done.
The TT240 can be used as a WiFi hotspot
by navigating to Settings/Network &
Connectivity/Internet Sharing (will only work
if you have mobile data).
KaiOS Store
Use the KaiOS store to search for and
download games and applications to your
TT240 phone. You will need a KaiOS login, a
data connection or Wi and enough spare
memory space.
Battery Level Indication
EMPTY FULL
Low Battery Alert
The phone will sound an alert when the
battery is low and display a message of low
battery on the screen.
PLEASE NOTE: The TTfone TT240 does not
come with a charger, you can use any USB
mains plug or plug the cable into your PC
or Laptop to charge the phone. If you do
not have one of these you can purchase a
charger from www.ttfone.com
Making/Receiving Phone Calls
To Make Calls
1. Enter a number and press the call key to call.
• To delete a digit, press the End key.
• To clear the screen, hold the end key once.
You can also make calls directly from the
contact list by going to Menu/Contacts select
your contact, select phone number and the
press CALL.
Call Log
Access the call log to see your last dialed,
missed and incoming calls go to menu/
Call Log, use the Navigation key to select a
numbers and press CALL to call that number.
To Answer Calls
When your phone rings, press the Call key
once to answer the call.
To End a Call
To end a call, press the end key.
To Reject a Call
To reject the call without answering, press the
end key when your phone rings.
To Redial a Number
1. Press the Call key, this will take you to all
your recently dialed call list
2. Select the number you want to dial then
press the Call key to call.
Conference Calling
You can create a third call connection during a
call. During your call with the rst participant,
press Right Soft Key Options/Add call. You
can either enter the phone number of the
third participant, or press the Right Soft Key
(Contacts) to select a contact from your Contact
list. The rst call will be automatically placed
on hold.
• This feature is network dependent.
Making International Calls
1. Press the star key twice until a“+” character
appears on the screen.
2. Enter the country code, area code and
phone number as instructed by your long
distance network service carrier.
3. Press the Call key to call.
Changing the Volume during a Call
To change the volume during a call press
the up or down navigation key. To change
the volume of your media apps, ringtones,
alerts and alarms, go to Menu/Settings/
Personalisation/Sound/Volume.
Ringtone volume
You can adjust the ringtone volume in Menu/
Settings/Personalisation/Sound/Volume. From
here you adjust the volumes for the : Media,
Ringtones & Alerts and Alarm.
Silent Mode
Simply go to Menu/Settings/Personalisation/
Sound/Volume and change Ringtones & Alerts
to Silent or on your home screen hold down
the hash (#) key until silent mode appears.
Vibration
Simply go to Menu/Settings/Personalisation/
Sound/Volume and change Ringtones & Alerts
to Vibrate or on your home screen hold down
the hash (#) key until vibrate mode appears.
Aeroplane Mode
Some locations may require you to switch o
data connections. Instead of turning o your
device, you can set it to Aeroplane Mode.
From the Home Screen press the Navigation
Key Up to display the shortcuts menu select
the aeroplane symbol and press SELECT.
Flight mode will disconnect all your network
data, Wi-Fi and connectivity connections.
You can also access through Menu/Settings/
Network & Connectivity/Aeroplane Mode.
Data Roaming
With a mobile data plan from your network
2
54
3
6
operator you will be able to access internet
feature apps when not in a Wi-Fi zone.
Contact your operator for more information
of data plans.
Shortcut Keys
From the Home Screen, you can use
shortcut keys to easily jump to certain useful
functions. Press the left navigation key to
access these shortcuts on your home screen.
Transferring Media
Transfer your favorite music and pictures
between your TT240 and PC. Connect your
device to a PC with the USB power cable and
go to Menu/Settings/Storage/USB Storage
and select ‘Enabled’.
Your device will be displayed as a removable
device, showing the phone’s internal storage.
If a memory card is inserted,the microSD card
details will also be visible. Copy the chosen
les to the device.
To Lock and Unlock the Keypad
In order to prevent accidental dialling, the
phone is set to auto lock the keypad after
60 seconds of no use. To unlock the keypad
press and hold the Star key for 3 seconds.
If you wish to lock the keypad manually
again hold down the star key for 3 seconds.
To adjust the length of the auto lock go to
Menu/Settings/Personalisation/Display/
Screen Timeout.
KaiOS Account
Register and Log in to your KaiOS account to
set up the anti-theft feature, this allows you
to lock and erase your phone remotely if lost
or stolen.
Go to Menu/Settings/Account/KaiOS
Account/Create Account and follow the on
screen instructions.
Messages (SMS)
Test messaging is easy with the TT240
keypad, simply press a key repeatedly until
the desired letter is shown. Type 0 for a space.
Special characters or punctuation by pressing
*. To switch between lower and upper case
press #. To enter a number, press and hold
a number key. Writing methods can vary
between dierent applications.
Writing and Sending a Message
Go to Menu/Messages and select NEW. In
the“To” eld press the # key three times to
be able to enter numbers, or select add to
choose a contact from your contact list. Write
the message using the keypad, the end key
will delete the last character. Select SEND.
Contacts
Store all your contact information in the phone
book and easily access all your friends and
family. Go to Menu/Contacts or use the shortcut
pressing the right soft key on the home screen.
1. Select NEW and choose to save your
contact on the phone or the sim card
2. Enter the name and phone number of the
contact
3. press SAVE
Transfer Contacts from your old phone
To add contacts from your Gmail or outlook
account or your memory card go to Contacts/
Options/Settings/Import Contacts.
Sort contacts
You can either sort your contacts by rst or last
name. Contacts/Options/Settings/Sort Contacts.
Speed dial settings
Set speed dial numbers to the keypad
numbers keys. Press and hold down a
Network Signal Status
WiFi Network
Battery Status
Battery is charging
Bluetooth
Missed Call
New Text Message
Alarm
Aeroplane mode
Silent mode
Handset mode
New Email Message
Headphones are connected
Upcoming event
Data is syncing
Problem with sign in or sync
Downloading data
Microphone muted
Vibrate mode
New Unread Notices

Remove the Back Cover
Open the battery cover carefully by prising open from the
bottom left corner where you will nd a small notch.
Install the SIM card and battery.
For availability and information about using SIM card
services, contact your SIM card vendor. This may be the
service provider, network operator, or other vendor.
Note: The SIM card and its contacts are easily damaged
by scratches or bending, so please be careful when
handling, inserting, or removing the card.
Note: Keep all SIM cards out of the reach of
small children.
1. Ensure the phone is switched o
and the charger is disconnected
before removing the
battery.
2. With the back cover
removed, install the
SIM card by sliding it
into the nest and under
the metal holding plate.
Ensure the angled corner
is on the upper left hand
side. (To remove the SIM card,
gently press on it and slide it
out of its nest.) Please note you
can only use a standard SIM card
and not a Micro and Nano SIM. You
can also install a micro SD memory
card into the slot above the SIM slot.
3. Install the battery into the battery
slot, ensuring that the three metallic
stripes on the battery align with the three
metallic prongs in the battery slot.
4. Put on the battery cover. Ensure the cover is
completely closed and the matching sound
(click) could be heard.
5. Plug the phone in to charge it fully.
Micro SD
SIM Card
TT240 User Manual We reserve the right to upgrade the software and
product and/or to make changes to this user manual
without prior notice. The icons in this user manual
may slightly dier from your phone, depending on
the phone you purchased. All rights reserved.
www.ttfone.com
Safety Instructions
Your Phone Getting started
This user manual includes important safety
information. Please read below instructions
carefully. It may be dangerous or illegal if you do
not follow these instructions.
Pay attention to Trac Safety
Obey local trac laws and do not use the phone
while driving. Using a cell phone while driving is
dangerous and it is illegal in some areas. Radio
frequency (RF) signals may aect improperly
installed or inadequately shielded electronic
systems in motor vehicles such as electronic fuel
injection systems, electronic antiskid (antilock)
braking systems, electronic speed control systems,
and air bag systems. For more information, check
with the manufacturer of your vehicle for any
equipment that has been added. Do not place
objects, including installed or portable wireless
equipment in the area over the air bag or in the air
bag deployment area.
Pacemaker Interference
Pacemaker manufacturers recommend that a
minimum separation of 15.3 centimeters (6 inches)
be maintained between a wireless phone and a
pacemaker in order to avoid potential interference
with the pacemaker.
Turn O Your Cell Phone in Medical and Health
Care Facilities.
Switch o your device in health care facilities when
any regulations posted in these areas instruct you
to do so. Hospitals or health care facilities may
be using equipment that could be sensitive to
external RF energy.
Switch O on Airplanes
Using your device while ying in aircraft is
prohibited. Switch o your device before boarding
an aircraft. The use of wireless devices in an aircraft
may be dangerous to the operation of the aircraft,
disrupt the wireless telephone network, and may
be illegal.
Accessories and Batteries
Use only the approved accessories and batteries.
Please do not try to use with any product that
was not manufactured for use with this phone.
Please be sure the phone has been switched o
before taking out the battery. Please dispose of
scrap batteries properly according to the local
regulations.
Cell Phone Should Be Turned O Near Sites of
Explosion.
Potentially explosive atmospheres include areas
where you would normally be advised to turn o
your vehicle engine. Sparks in such areas could
cause an explosion or re resulting in bodily injury
or even death. Switch o the device at refueling
points such as near gas pumps at service stations
and in any area with a potentially explosive
atmosphere and obey all signs and instructions.
Observe restrictions on the use of radio equipment
in fuel depots, storage, chemical plants or where
blasting operations are in progress.
Using the Phone Correctly
Please use this phone in its normal intended
position. Do not let children use the phone
without supervision. Your phone contains small
parts such as SIM card, which can be accidentally
swallowed by a child.
Your Phone is Not Waterproof
This phone is not waterproof. Please do not expose
your phone to wet weather or environment (such
as rain, snow, seawater, etc.).
1. Navigation key: press to navigate
the Menu or press and hold to
use Google Voice Assistant.
2. Left soft key: Press the left soft
key to see your notications and
conrm menu actions.
3. Call key: Press to access call logs
or enter a number and press the
call key to make the call.
4. Right soft key: press to access
the contacts phone book.
5. End key: Press and hold to turn
on and o the phone, press to
end calls, press to go back and
exit menus.
6. Number keys: Press to input
numbers, hold down for speed
dial. Press and hold number 1
key for voicemail.
7. Star key: Hold down the star
key for 3 seconds to unlock the
keypad, press twice to input +
symbol for international calls.
8. Hash key: Press and hold to
activate Silent mode.
4
2
1
5
3
8
6
7
Set up your phone for the rst time
The rst time you power on the phone, you
should set the following options:
• Select the phone’s language, then press the
Right soft key to go next.
• Select an enabled Wi-Fi, then press Right
soft key to go next.
Even if no SIM card is installed, your phone
will still power on and you will be able to
connect to a Wi-Fi network and use some of
the phone’s features.
Power o your phone
To turn your phone o, hold down the Back/
End key and select Power o.
Charging the Battery
The battery can be charged when the phone
is either on or o. Please ensure the battery is
inserted into the phone before charging. The
charging time is three hours.
To connect the charger:
1. Insert the cord into its port on the bottom
panel of the phone
2. Plug the other end of the cable into either a
computer USB socket or use any USB mains
charger that runs at 240V.
To disconnect the charger:
1. Unplug the wall charger.
2. Remove the cord from the phone.
Status bar and Notices
The Status Bar appears at the top of the
screen. This displays notication icons, such
as missed calls or received messages (on the
left) and phone status icons, such as battery
status (on the right), along with the current
time.
The Notices Panel will display notications
when you miss calls, receive new messages or
have upcoming events.
From the home screen press the left soft
key and use the navigation keys to scroll to
highlight a notice, press SELECT to view it.
Wi-Fi
Switch on Wi-Fi by going to Settings/Network
& Connectivity/Wi-Fi select the available
network and enter the password (if needed)
press CONNECT when done.
The TT240 can be used as a WiFi hotspot
by navigating to Settings/Network &
Connectivity/Internet Sharing (will only work
if you have mobile data).
KaiOS Store
Use the KaiOS store to search for and
download games and applications to your
TT240 phone. You will need a KaiOS login, a
data connection or Wi and enough spare
memory space.
Battery Level Indication
EMPTY FULL
Low Battery Alert
The phone will sound an alert when the
battery is low and display a message of low
battery on the screen.
PLEASE NOTE: The TTfone TT240 does not
come with a charger, you can use any USB
mains plug or plug the cable into your PC
or Laptop to charge the phone. If you do
not have one of these you can purchase a
charger from www.ttfone.com
Making/Receiving Phone Calls
To Make Calls
1. Enter a number and press the call key to call.
• To delete a digit, press the End key.
• To clear the screen, hold the end key once.
You can also make calls directly from the
contact list by going to Menu/Contacts select
your contact, select phone number and the
press CALL.
Call Log
Access the call log to see your last dialed,
missed and incoming calls go to menu/
Call Log, use the Navigation key to select a
numbers and press CALL to call that number.
To Answer Calls
When your phone rings, press the Call key
once to answer the call.
To End a Call
To end a call, press the end key.
To Reject a Call
To reject the call without answering, press the
end key when your phone rings.
To Redial a Number
1. Press the Call key, this will take you to all
your recently dialed call list
2. Select the number you want to dial then
press the Call key to call.
Conference Calling
You can create a third call connection during a
call. During your call with the rst participant,
press Right Soft Key Options/Add call. You
can either enter the phone number of the
third participant, or press the Right Soft Key
(Contacts) to select a contact from your Contact
list. The rst call will be automatically placed
on hold.
• This feature is network dependent.
Making International Calls
1. Press the star key twice until a“+” character
appears on the screen.
2. Enter the country code, area code and
phone number as instructed by your long
distance network service carrier.
3. Press the Call key to call.
Changing the Volume during a Call
To change the volume during a call press
the up or down navigation key. To change
the volume of your media apps, ringtones,
alerts and alarms, go to Menu/Settings/
Personalisation/Sound/Volume.
Ringtone volume
You can adjust the ringtone volume in Menu/
Settings/Personalisation/Sound/Volume. From
here you adjust the volumes for the : Media,
Ringtones & Alerts and Alarm.
Silent Mode
Simply go to Menu/Settings/Personalisation/
Sound/Volume and change Ringtones & Alerts
to Silent or on your home screen hold down
the hash (#) key until silent mode appears.
Vibration
Simply go to Menu/Settings/Personalisation/
Sound/Volume and change Ringtones & Alerts
to Vibrate or on your home screen hold down
the hash (#) key until vibrate mode appears.
Aeroplane Mode
Some locations may require you to switch o
data connections. Instead of turning o your
device, you can set it to Aeroplane Mode.
From the Home Screen press the Navigation
Key Up to display the shortcuts menu select
the aeroplane symbol and press SELECT.
Flight mode will disconnect all your network
data, Wi-Fi and connectivity connections.
You can also access through Menu/Settings/
Network & Connectivity/Aeroplane Mode.
Data Roaming
With a mobile data plan from your network
2
54
3
6
operator you will be able to access internet
feature apps when not in a Wi-Fi zone.
Contact your operator for more information
of data plans.
Shortcut Keys
From the Home Screen, you can use
shortcut keys to easily jump to certain useful
functions. Press the left navigation key to
access these shortcuts on your home screen.
Transferring Media
Transfer your favorite music and pictures
between your TT240 and PC. Connect your
device to a PC with the USB power cable and
go to Menu/Settings/Storage/USB Storage
and select ‘Enabled’.
Your device will be displayed as a removable
device, showing the phone’s internal storage.
If a memory card is inserted,the microSD card
details will also be visible. Copy the chosen
les to the device.
To Lock and Unlock the Keypad
In order to prevent accidental dialling, the
phone is set to auto lock the keypad after
60 seconds of no use. To unlock the keypad
press and hold the Star key for 3 seconds.
If you wish to lock the keypad manually
again hold down the star key for 3 seconds.
To adjust the length of the auto lock go to
Menu/Settings/Personalisation/Display/
Screen Timeout.
KaiOS Account
Register and Log in to your KaiOS account to
set up the anti-theft feature, this allows you
to lock and erase your phone remotely if lost
or stolen.
Go to Menu/Settings/Account/KaiOS
Account/Create Account and follow the on
screen instructions.
Messages (SMS)
Test messaging is easy with the TT240
keypad, simply press a key repeatedly until
the desired letter is shown. Type 0 for a space.
Special characters or punctuation by pressing
*. To switch between lower and upper case
press #. To enter a number, press and hold
a number key. Writing methods can vary
between dierent applications.
Writing and Sending a Message
Go to Menu/Messages and select NEW. In
the“To”eld press the # key three times to
be able to enter numbers, or select add to
choose a contact from your contact list. Write
the message using the keypad, the end key
will delete the last character. Select SEND.
Contacts
Store all your contact information in the phone
book and easily access all your friends and
family. Go to Menu/Contacts or use the shortcut
pressing the right soft key on the home screen.
1. Select NEW and choose to save your
contact on the phone or the sim card
2. Enter the name and phone number of the
contact
3. press SAVE
Transfer Contacts from your old phone
To add contacts from your Gmail or outlook
account or your memory card go to Contacts/
Options/Settings/Import Contacts.
Sort contacts
You can either sort your contacts by rst or last
name. Contacts/Options/Settings/Sort Contacts.
Speed dial settings
Set speed dial numbers to the keypad
numbers keys. Press and hold down a
Network Signal Status
WiFi Network
Battery Status
Battery is charging
Bluetooth
Missed Call
New Text Message
Alarm
Aeroplane mode
Silent mode
Handset mode
New Email Message
Headphones are connected
Upcoming event
Data is syncing
Problem with sign in or sync
Downloading data
Microphone muted
Vibrate mode
New Unread Notices
Remove the Back Cover
Open the battery cover carefully by prising open from the
bottom left corner where you will nd a small notch.
Install the SIM card and battery.
For availability and information about using SIM card
services, contact your SIM card vendor. This may be the
service provider, network operator, or other vendor.
Note: The SIM card and its contacts are easily damaged
by scratches or bending, so please be careful when
handling, inserting, or removing the card.
Note: Keep all SIM cards out of the reach of
small children.
1. Ensure the phone is switched o
and the charger is disconnected
before removing the
battery.
2. With the back cover
removed, install the
SIM card by sliding it
into the nest and under
the metal holding plate.
Ensure the angled corner
is on the upper left hand
side. (To remove the SIM card,
gently press on it and slide it
out of its nest.) Please note you
can only use a standard SIM card
and not a Micro and Nano SIM. You
can also install a micro SD memory
card into the slot above the SIM slot.
3. Install the battery into the battery
slot, ensuring that the three metallic
stripes on the battery align with the three
metallic prongs in the battery slot.
4. Put on the battery cover. Ensure the cover is
completely closed and the matching sound
(click) could be heard.
5. Plug the phone in to charge it fully.
Micro SD
SIM Card
TT240 User Manual We reserve the right to upgrade the software and
product and/or to make changes to this user manual
without prior notice. The icons in this user manual
may slightly dier from your phone, depending on
the phone you purchased. All rights reserved.
www.ttfone.com
Safety Instructions
Your Phone Getting started
This user manual includes important safety
information. Please read below instructions
carefully. It may be dangerous or illegal if you do
not follow these instructions.
Pay attention to Trac Safety
Obey local trac laws and do not use the phone
while driving. Using a cell phone while driving is
dangerous and it is illegal in some areas. Radio
frequency (RF) signals may aect improperly
installed or inadequately shielded electronic
systems in motor vehicles such as electronic fuel
injection systems, electronic antiskid (antilock)
braking systems, electronic speed control systems,
and air bag systems. For more information, check
with the manufacturer of your vehicle for any
equipment that has been added. Do not place
objects, including installed or portable wireless
equipment in the area over the air bag or in the air
bag deployment area.
Pacemaker Interference
Pacemaker manufacturers recommend that a
minimum separation of 15.3 centimeters (6 inches)
be maintained between a wireless phone and a
pacemaker in order to avoid potential interference
with the pacemaker.
Turn O Your Cell Phone in Medical and Health
Care Facilities.
Switch o your device in health care facilities when
any regulations posted in these areas instruct you
to do so. Hospitals or health care facilities may
be using equipment that could be sensitive to
external RF energy.
Switch O on Airplanes
Using your device while ying in aircraft is
prohibited. Switch o your device before boarding
an aircraft. The use of wireless devices in an aircraft
may be dangerous to the operation of the aircraft,
disrupt the wireless telephone network, and may
be illegal.
Accessories and Batteries
Use only the approved accessories and batteries.
Please do not try to use with any product that
was not manufactured for use with this phone.
Please be sure the phone has been switched o
before taking out the battery. Please dispose of
scrap batteries properly according to the local
regulations.
Cell Phone Should Be Turned O Near Sites of
Explosion.
Potentially explosive atmospheres include areas
where you would normally be advised to turn o
your vehicle engine. Sparks in such areas could
cause an explosion or re resulting in bodily injury
or even death. Switch o the device at refueling
points such as near gas pumps at service stations
and in any area with a potentially explosive
atmosphere and obey all signs and instructions.
Observe restrictions on the use of radio equipment
in fuel depots, storage, chemical plants or where
blasting operations are in progress.
Using the Phone Correctly
Please use this phone in its normal intended
position. Do not let children use the phone
without supervision. Your phone contains small
parts such as SIM card, which can be accidentally
swallowed by a child.
Your Phone is Not Waterproof
This phone is not waterproof. Please do not expose
your phone to wet weather or environment (such
as rain, snow, seawater, etc.).
1. Navigation key: press to navigate
the Menu or press and hold to
use Google Voice Assistant.
2. Left soft key: Press the left soft
key to see your notications and
conrm menu actions.
3. Call key: Press to access call logs
or enter a number and press the
call key to make the call.
4. Right soft key: press to access
the contacts phone book.
5. End key: Press and hold to turn
on and o the phone, press to
end calls, press to go back and
exit menus.
6. Number keys: Press to input
numbers, hold down for speed
dial. Press and hold number 1
key for voicemail.
7. Star key: Hold down the star
key for 3 seconds to unlock the
keypad, press twice to input +
symbol for international calls.
8. Hash key: Press and hold to
activate Silent mode.
4
2
1
5
3
8
6
7
Set up your phone for the rst time
The rst time you power on the phone, you
should set the following options:
• Select the phone’s language, then press the
Right soft key to go next.
• Select an enabled Wi-Fi, then press Right
soft key to go next.
Even if no SIM card is installed, your phone
will still power on and you will be able to
connect to a Wi-Fi network and use some of
the phone’s features.
Power o your phone
To turn your phone o, hold down the Back/
End key and select Power o.
Charging the Battery
The battery can be charged when the phone
is either on or o. Please ensure the battery is
inserted into the phone before charging. The
charging time is three hours.
To connect the charger:
1. Insert the cord into its port on the bottom
panel of the phone
2. Plug the other end of the cable into either a
computer USB socket or use any USB mains
charger that runs at 240V.
To disconnect the charger:
1. Unplug the wall charger.
2. Remove the cord from the phone.
Status bar and Notices
The Status Bar appears at the top of the
screen. This displays notication icons, such
as missed calls or received messages (on the
left) and phone status icons, such as battery
status (on the right), along with the current
time.
The Notices Panel will display notications
when you miss calls, receive new messages or
have upcoming events.
From the home screen press the left soft
key and use the navigation keys to scroll to
highlight a notice, press SELECT to view it.
Wi-Fi
Switch on Wi-Fi by going to Settings/Network
& Connectivity/Wi-Fi select the available
network and enter the password (if needed)
press CONNECT when done.
The TT240 can be used as a WiFi hotspot
by navigating to Settings/Network &
Connectivity/Internet Sharing (will only work
if you have mobile data).
KaiOS Store
Use the KaiOS store to search for and
download games and applications to your
TT240 phone. You will need a KaiOS login, a
data connection or Wi and enough spare
memory space.
Battery Level Indication
EMPTY FULL
Low Battery Alert
The phone will sound an alert when the
battery is low and display a message of low
battery on the screen.
PLEASE NOTE: The TTfone TT240 does not
come with a charger, you can use any USB
mains plug or plug the cable into your PC
or Laptop to charge the phone. If you do
not have one of these you can purchase a
charger from www.ttfone.com
Making/Receiving Phone Calls
To Make Calls
1. Enter a number and press the call key to call.
• To delete a digit, press the End key.
• To clear the screen, hold the end key once.
You can also make calls directly from the
contact list by going to Menu/Contacts select
your contact, select phone number and the
press CALL.
Call Log
Access the call log to see your last dialed,
missed and incoming calls go to menu/
Call Log, use the Navigation key to select a
numbers and press CALL to call that number.
To Answer Calls
When your phone rings, press the Call key
once to answer the call.
To End a Call
To end a call, press the end key.
To Reject a Call
To reject the call without answering, press the
end key when your phone rings.
To Redial a Number
1. Press the Call key, this will take you to all
your recently dialed call list
2. Select the number you want to dial then
press the Call key to call.
Conference Calling
You can create a third call connection during a
call. During your call with the rst participant,
press Right Soft Key Options/Add call. You
can either enter the phone number of the
third participant, or press the Right Soft Key
(Contacts) to select a contact from your Contact
list. The rst call will be automatically placed
on hold.
• This feature is network dependent.
Making International Calls
1. Press the star key twice until a“+” character
appears on the screen.
2. Enter the country code, area code and
phone number as instructed by your long
distance network service carrier.
3. Press the Call key to call.
Changing the Volume during a Call
To change the volume during a call press
the up or down navigation key. To change
the volume of your media apps, ringtones,
alerts and alarms, go to Menu/Settings/
Personalisation/Sound/Volume.
Ringtone volume
You can adjust the ringtone volume in Menu/
Settings/Personalisation/Sound/Volume. From
here you adjust the volumes for the : Media,
Ringtones & Alerts and Alarm.
Silent Mode
Simply go to Menu/Settings/Personalisation/
Sound/Volume and change Ringtones & Alerts
to Silent or on your home screen hold down
the hash (#) key until silent mode appears.
Vibration
Simply go to Menu/Settings/Personalisation/
Sound/Volume and change Ringtones & Alerts
to Vibrate or on your home screen hold down
the hash (#) key until vibrate mode appears.
Aeroplane Mode
Some locations may require you to switch o
data connections. Instead of turning o your
device, you can set it to Aeroplane Mode.
From the Home Screen press the Navigation
Key Up to display the shortcuts menu select
the aeroplane symbol and press SELECT.
Flight mode will disconnect all your network
data, Wi-Fi and connectivity connections.
You can also access through Menu/Settings/
Network & Connectivity/Aeroplane Mode.
Data Roaming
With a mobile data plan from your network
2
54
3
6
operator you will be able to access internet
feature apps when not in a Wi-Fi zone.
Contact your operator for more information
of data plans.
Shortcut Keys
From the Home Screen, you can use
shortcut keys to easily jump to certain useful
functions. Press the left navigation key to
access these shortcuts on your home screen.
Transferring Media
Transfer your favorite music and pictures
between your TT240 and PC. Connect your
device to a PC with the USB power cable and
go to Menu/Settings/Storage/USB Storage
and select ‘Enabled’.
Your device will be displayed as a removable
device, showing the phone’s internal storage.
If a memory card is inserted,the microSD card
details will also be visible. Copy the chosen
les to the device.
To Lock and Unlock the Keypad
In order to prevent accidental dialling, the
phone is set to auto lock the keypad after
60 seconds of no use. To unlock the keypad
press and hold the Star key for 3 seconds.
If you wish to lock the keypad manually
again hold down the star key for 3 seconds.
To adjust the length of the auto lock go to
Menu/Settings/Personalisation/Display/
Screen Timeout.
KaiOS Account
Register and Log in to your KaiOS account to
set up the anti-theft feature, this allows you
to lock and erase your phone remotely if lost
or stolen.
Go to Menu/Settings/Account/KaiOS
Account/Create Account and follow the on
screen instructions.
Messages (SMS)
Test messaging is easy with the TT240
keypad, simply press a key repeatedly until
the desired letter is shown. Type 0 for a space.
Special characters or punctuation by pressing
*. To switch between lower and upper case
press #. To enter a number, press and hold
a number key. Writing methods can vary
between dierent applications.
Writing and Sending a Message
Go to Menu/Messages and select NEW. In
the“To”eld press the # key three times to
be able to enter numbers, or select add to
choose a contact from your contact list. Write
the message using the keypad, the end key
will delete the last character. Select SEND.
Contacts
Store all your contact information in the phone
book and easily access all your friends and
family. Go to Menu/Contacts or use the shortcut
pressing the right soft key on the home screen.
1. Select NEW and choose to save your
contact on the phone or the sim card
2. Enter the name and phone number of the
contact
3. press SAVE
Transfer Contacts from your old phone
To add contacts from your Gmail or outlook
account or your memory card go to Contacts/
Options/Settings/Import Contacts.
Sort contacts
You can either sort your contacts by rst or last
name. Contacts/Options/Settings/Sort Contacts.
Speed dial settings
Set speed dial numbers to the keypad
numbers keys. Press and hold down a
Network Signal Status
WiFi Network
Battery Status
Battery is charging
Bluetooth
Missed Call
New Text Message
Alarm
Aeroplane mode
Silent mode
Handset mode
New Email Message
Headphones are connected
Upcoming event
Data is syncing
Problem with sign in or sync
Downloading data
Microphone muted
Vibrate mode
New Unread Notices

Remove the Back Cover
Open the battery cover carefully by prising open from the
bottom left corner where you will nd a small notch.
Install the SIM card and battery.
For availability and information about using SIM card
services, contact your SIM card vendor. This may be the
service provider, network operator, or other vendor.
Note: The SIM card and its contacts are easily damaged
by scratches or bending, so please be careful when
handling, inserting, or removing the card.
Note: Keep all SIM cards out of the reach of
small children.
1. Ensure the phone is switched o
and the charger is disconnected
before removing the
battery.
2. With the back cover
removed, install the
SIM card by sliding it
into the nest and under
the metal holding plate.
Ensure the angled corner
is on the upper left hand
side. (To remove the SIM card,
gently press on it and slide it
out of its nest.) Please note you
can only use a standard SIM card
and not a Micro and Nano SIM. You
can also install a micro SD memory
card into the slot above the SIM slot.
3. Install the battery into the battery
slot, ensuring that the three metallic
stripes on the battery align with the three
metallic prongs in the battery slot.
4. Put on the battery cover. Ensure the cover is
completely closed and the matching sound
(click) could be heard.
5. Plug the phone in to charge it fully.
Micro SD
SIM Card
TT240 User Manual We reserve the right to upgrade the software and
product and/or to make changes to this user manual
without prior notice. The icons in this user manual
may slightly dier from your phone, depending on
the phone you purchased. All rights reserved.
www.ttfone.com
Safety Instructions
Your Phone Getting started
This user manual includes important safety
information. Please read below instructions
carefully. It may be dangerous or illegal if you do
not follow these instructions.
Pay attention to Trac Safety
Obey local trac laws and do not use the phone
while driving. Using a cell phone while driving is
dangerous and it is illegal in some areas. Radio
frequency (RF) signals may aect improperly
installed or inadequately shielded electronic
systems in motor vehicles such as electronic fuel
injection systems, electronic antiskid (antilock)
braking systems, electronic speed control systems,
and air bag systems. For more information, check
with the manufacturer of your vehicle for any
equipment that has been added. Do not place
objects, including installed or portable wireless
equipment in the area over the air bag or in the air
bag deployment area.
Pacemaker Interference
Pacemaker manufacturers recommend that a
minimum separation of 15.3 centimeters (6 inches)
be maintained between a wireless phone and a
pacemaker in order to avoid potential interference
with the pacemaker.
Turn O Your Cell Phone in Medical and Health
Care Facilities.
Switch o your device in health care facilities when
any regulations posted in these areas instruct you
to do so. Hospitals or health care facilities may
be using equipment that could be sensitive to
external RF energy.
Switch O on Airplanes
Using your device while ying in aircraft is
prohibited. Switch o your device before boarding
an aircraft. The use of wireless devices in an aircraft
may be dangerous to the operation of the aircraft,
disrupt the wireless telephone network, and may
be illegal.
Accessories and Batteries
Use only the approved accessories and batteries.
Please do not try to use with any product that
was not manufactured for use with this phone.
Please be sure the phone has been switched o
before taking out the battery. Please dispose of
scrap batteries properly according to the local
regulations.
Cell Phone Should Be Turned O Near Sites of
Explosion.
Potentially explosive atmospheres include areas
where you would normally be advised to turn o
your vehicle engine. Sparks in such areas could
cause an explosion or re resulting in bodily injury
or even death. Switch o the device at refueling
points such as near gas pumps at service stations
and in any area with a potentially explosive
atmosphere and obey all signs and instructions.
Observe restrictions on the use of radio equipment
in fuel depots, storage, chemical plants or where
blasting operations are in progress.
Using the Phone Correctly
Please use this phone in its normal intended
position. Do not let children use the phone
without supervision. Your phone contains small
parts such as SIM card, which can be accidentally
swallowed by a child.
Your Phone is Not Waterproof
This phone is not waterproof. Please do not expose
your phone to wet weather or environment (such
as rain, snow, seawater, etc.).
1. Navigation key: press to navigate
the Menu or press and hold to
use Google Voice Assistant.
2. Left soft key: Press the left soft
key to see your notications and
conrm menu actions.
3. Call key: Press to access call logs
or enter a number and press the
call key to make the call.
4. Right soft key: press to access
the contacts phone book.
5. End key: Press and hold to turn
on and o the phone, press to
end calls, press to go back and
exit menus.
6. Number keys: Press to input
numbers, hold down for speed
dial. Press and hold number 1
key for voicemail.
7. Star key: Hold down the star
key for 3 seconds to unlock the
keypad, press twice to input +
symbol for international calls.
8. Hash key: Press and hold to
activate Silent mode.
4
2
1
5
3
8
6
7
Set up your phone for the rst time
The rst time you power on the phone, you
should set the following options:
• Select the phone’s language, then press the
Right soft key to go next.
• Select an enabled Wi-Fi, then press Right
soft key to go next.
Even if no SIM card is installed, your phone
will still power on and you will be able to
connect to a Wi-Fi network and use some of
the phone’s features.
Power o your phone
To turn your phone o, hold down the Back/
End key and select Power o.
Charging the Battery
The battery can be charged when the phone
is either on or o. Please ensure the battery is
inserted into the phone before charging. The
charging time is three hours.
To connect the charger:
1. Insert the cord into its port on the bottom
panel of the phone
2. Plug the other end of the cable into either a
computer USB socket or use any USB mains
charger that runs at 240V.
To disconnect the charger:
1. Unplug the wall charger.
2. Remove the cord from the phone.
Status bar and Notices
The Status Bar appears at the top of the
screen. This displays notication icons, such
as missed calls or received messages (on the
left) and phone status icons, such as battery
status (on the right), along with the current
time.
The Notices Panel will display notications
when you miss calls, receive new messages or
have upcoming events.
From the home screen press the left soft
key and use the navigation keys to scroll to
highlight a notice, press SELECT to view it.
Wi-Fi
Switch on Wi-Fi by going to Settings/Network
& Connectivity/Wi-Fi select the available
network and enter the password (if needed)
press CONNECT when done.
The TT240 can be used as a WiFi hotspot
by navigating to Settings/Network &
Connectivity/Internet Sharing (will only work
if you have mobile data).
KaiOS Store
Use the KaiOS store to search for and
download games and applications to your
TT240 phone. You will need a KaiOS login, a
data connection or Wi and enough spare
memory space.
Battery Level Indication
EMPTY FULL
Low Battery Alert
The phone will sound an alert when the
battery is low and display a message of low
battery on the screen.
PLEASE NOTE: The TTfone TT240 does not
come with a charger, you can use any USB
mains plug or plug the cable into your PC
or Laptop to charge the phone. If you do
not have one of these you can purchase a
charger from www.ttfone.com
Making/Receiving Phone Calls
To Make Calls
1. Enter a number and press the call key to call.
• To delete a digit, press the End key.
• To clear the screen, hold the end key once.
You can also make calls directly from the
contact list by going to Menu/Contacts select
your contact, select phone number and the
press CALL.
Call Log
Access the call log to see your last dialed,
missed and incoming calls go to menu/
Call Log, use the Navigation key to select a
numbers and press CALL to call that number.
To Answer Calls
When your phone rings, press the Call key
once to answer the call.
To End a Call
To end a call, press the end key.
To Reject a Call
To reject the call without answering, press the
end key when your phone rings.
To Redial a Number
1. Press the Call key, this will take you to all
your recently dialed call list
2. Select the number you want to dial then
press the Call key to call.
Conference Calling
You can create a third call connection during a
call. During your call with the rst participant,
press Right Soft Key Options/Add call. You
can either enter the phone number of the
third participant, or press the Right Soft Key
(Contacts) to select a contact from your Contact
list. The rst call will be automatically placed
on hold.
• This feature is network dependent.
Making International Calls
1. Press the star key twice until a“+”character
appears on the screen.
2. Enter the country code, area code and
phone number as instructed by your long
distance network service carrier.
3. Press the Call key to call.
Changing the Volume during a Call
To change the volume during a call press
the up or down navigation key. To change
the volume of your media apps, ringtones,
alerts and alarms, go to Menu/Settings/
Personalisation/Sound/Volume.
Ringtone volume
You can adjust the ringtone volume in Menu/
Settings/Personalisation/Sound/Volume. From
here you adjust the volumes for the : Media,
Ringtones & Alerts and Alarm.
Silent Mode
Simply go to Menu/Settings/Personalisation/
Sound/Volume and change Ringtones & Alerts
to Silent or on your home screen hold down
the hash (#) key until silent mode appears.
Vibration
Simply go to Menu/Settings/Personalisation/
Sound/Volume and change Ringtones & Alerts
to Vibrate or on your home screen hold down
the hash (#) key until vibrate mode appears.
Aeroplane Mode
Some locations may require you to switch o
data connections. Instead of turning o your
device, you can set it to Aeroplane Mode.
From the Home Screen press the Navigation
Key Up to display the shortcuts menu select
the aeroplane symbol and press SELECT.
Flight mode will disconnect all your network
data, Wi-Fi and connectivity connections.
You can also access through Menu/Settings/
Network & Connectivity/Aeroplane Mode.
Data Roaming
With a mobile data plan from your network
2
54
3
6
operator you will be able to access internet
feature apps when not in a Wi-Fi zone.
Contact your operator for more information
of data plans.
Shortcut Keys
From the Home Screen, you can use
shortcut keys to easily jump to certain useful
functions. Press the left navigation key to
access these shortcuts on your home screen.
Transferring Media
Transfer your favorite music and pictures
between your TT240 and PC. Connect your
device to a PC with the USB power cable and
go to Menu/Settings/Storage/USB Storage
and select ‘Enabled’.
Your device will be displayed as a removable
device, showing the phone’s internal storage.
If a memory card is inserted,the microSD card
details will also be visible. Copy the chosen
les to the device.
To Lock and Unlock the Keypad
In order to prevent accidental dialling, the
phone is set to auto lock the keypad after
60 seconds of no use. To unlock the keypad
press and hold the Star key for 3 seconds.
If you wish to lock the keypad manually
again hold down the star key for 3 seconds.
To adjust the length of the auto lock go to
Menu/Settings/Personalisation/Display/
Screen Timeout.
KaiOS Account
Register and Log in to your KaiOS account to
set up the anti-theft feature, this allows you
to lock and erase your phone remotely if lost
or stolen.
Go to Menu/Settings/Account/KaiOS
Account/Create Account and follow the on
screen instructions.
Messages (SMS)
Test messaging is easy with the TT240
keypad, simply press a key repeatedly until
the desired letter is shown. Type 0 for a space.
Special characters or punctuation by pressing
*. To switch between lower and upper case
press #. To enter a number, press and hold
a number key. Writing methods can vary
between dierent applications.
Writing and Sending a Message
Go to Menu/Messages and select NEW. In
the“To”eld press the # key three times to
be able to enter numbers, or select add to
choose a contact from your contact list. Write
the message using the keypad, the end key
will delete the last character. Select SEND.
Contacts
Store all your contact information in the phone
book and easily access all your friends and
family. Go to Menu/Contacts or use the shortcut
pressing the right soft key on the home screen.
1. Select NEW and choose to save your
contact on the phone or the sim card
2. Enter the name and phone number of the
contact
3. press SAVE
Transfer Contacts from your old phone
To add contacts from your Gmail or outlook
account or your memory card go to Contacts/
Options/Settings/Import Contacts.
Sort contacts
You can either sort your contacts by rst or last
name. Contacts/Options/Settings/Sort Contacts.
Speed dial settings
Set speed dial numbers to the keypad
numbers keys. Press and hold down a
Network Signal Status
WiFi Network
Battery Status
Battery is charging
Bluetooth
Missed Call
New Text Message
Alarm
Aeroplane mode
Silent mode
Handset mode
New Email Message
Headphones are connected
Upcoming event
Data is syncing
Problem with sign in or sync
Downloading data
Microphone muted
Vibrate mode
New Unread Notices
Remove the Back Cover
Open the battery cover carefully by prising open from the
bottom left corner where you will nd a small notch.
Install the SIM card and battery.
For availability and information about using SIM card
services, contact your SIM card vendor. This may be the
service provider, network operator, or other vendor.
Note: The SIM card and its contacts are easily damaged
by scratches or bending, so please be careful when
handling, inserting, or removing the card.
Note: Keep all SIM cards out of the reach of
small children.
1. Ensure the phone is switched o
and the charger is disconnected
before removing the
battery.
2. With the back cover
removed, install the
SIM card by sliding it
into the nest and under
the metal holding plate.
Ensure the angled corner
is on the upper left hand
side. (To remove the SIM card,
gently press on it and slide it
out of its nest.) Please note you
can only use a standard SIM card
and not a Micro and Nano SIM. You
can also install a micro SD memory
card into the slot above the SIM slot.
3. Install the battery into the battery
slot, ensuring that the three metallic
stripes on the battery align with the three
metallic prongs in the battery slot.
4. Put on the battery cover. Ensure the cover is
completely closed and the matching sound
(click) could be heard.
5. Plug the phone in to charge it fully.
Micro SD
SIM Card
TT240 User Manual We reserve the right to upgrade the software and
product and/or to make changes to this user manual
without prior notice. The icons in this user manual
may slightly dier from your phone, depending on
the phone you purchased. All rights reserved.
www.ttfone.com
Safety Instructions
Your Phone Getting started
This user manual includes important safety
information. Please read below instructions
carefully. It may be dangerous or illegal if you do
not follow these instructions.
Pay attention to Trac Safety
Obey local trac laws and do not use the phone
while driving. Using a cell phone while driving is
dangerous and it is illegal in some areas. Radio
frequency (RF) signals may aect improperly
installed or inadequately shielded electronic
systems in motor vehicles such as electronic fuel
injection systems, electronic antiskid (antilock)
braking systems, electronic speed control systems,
and air bag systems. For more information, check
with the manufacturer of your vehicle for any
equipment that has been added. Do not place
objects, including installed or portable wireless
equipment in the area over the air bag or in the air
bag deployment area.
Pacemaker Interference
Pacemaker manufacturers recommend that a
minimum separation of 15.3 centimeters (6 inches)
be maintained between a wireless phone and a
pacemaker in order to avoid potential interference
with the pacemaker.
Turn O Your Cell Phone in Medical and Health
Care Facilities.
Switch o your device in health care facilities when
any regulations posted in these areas instruct you
to do so. Hospitals or health care facilities may
be using equipment that could be sensitive to
external RF energy.
Switch O on Airplanes
Using your device while ying in aircraft is
prohibited. Switch o your device before boarding
an aircraft. The use of wireless devices in an aircraft
may be dangerous to the operation of the aircraft,
disrupt the wireless telephone network, and may
be illegal.
Accessories and Batteries
Use only the approved accessories and batteries.
Please do not try to use with any product that
was not manufactured for use with this phone.
Please be sure the phone has been switched o
before taking out the battery. Please dispose of
scrap batteries properly according to the local
regulations.
Cell Phone Should Be Turned O Near Sites of
Explosion.
Potentially explosive atmospheres include areas
where you would normally be advised to turn o
your vehicle engine. Sparks in such areas could
cause an explosion or re resulting in bodily injury
or even death. Switch o the device at refueling
points such as near gas pumps at service stations
and in any area with a potentially explosive
atmosphere and obey all signs and instructions.
Observe restrictions on the use of radio equipment
in fuel depots, storage, chemical plants or where
blasting operations are in progress.
Using the Phone Correctly
Please use this phone in its normal intended
position. Do not let children use the phone
without supervision. Your phone contains small
parts such as SIM card, which can be accidentally
swallowed by a child.
Your Phone is Not Waterproof
This phone is not waterproof. Please do not expose
your phone to wet weather or environment (such
as rain, snow, seawater, etc.).
1. Navigation key: press to navigate
the Menu or press and hold to
use Google Voice Assistant.
2. Left soft key: Press the left soft
key to see your notications and
conrm menu actions.
3. Call key: Press to access call logs
or enter a number and press the
call key to make the call.
4. Right soft key: press to access
the contacts phone book.
5. End key: Press and hold to turn
on and o the phone, press to
end calls, press to go back and
exit menus.
6. Number keys: Press to input
numbers, hold down for speed
dial. Press and hold number 1
key for voicemail.
7. Star key: Hold down the star
key for 3 seconds to unlock the
keypad, press twice to input +
symbol for international calls.
8. Hash key: Press and hold to
activate Silent mode.
4
2
1
5
3
8
6
7
Set up your phone for the rst time
The rst time you power on the phone, you
should set the following options:
• Select the phone’s language, then press the
Right soft key to go next.
• Select an enabled Wi-Fi, then press Right
soft key to go next.
Even if no SIM card is installed, your phone
will still power on and you will be able to
connect to a Wi-Fi network and use some of
the phone’s features.
Power o your phone
To turn your phone o, hold down the Back/
End key and select Power o.
Charging the Battery
The battery can be charged when the phone
is either on or o. Please ensure the battery is
inserted into the phone before charging. The
charging time is three hours.
To connect the charger:
1. Insert the cord into its port on the bottom
panel of the phone
2. Plug the other end of the cable into either a
computer USB socket or use any USB mains
charger that runs at 240V.
To disconnect the charger:
1. Unplug the wall charger.
2. Remove the cord from the phone.
Status bar and Notices
The Status Bar appears at the top of the
screen. This displays notication icons, such
as missed calls or received messages (on the
left) and phone status icons, such as battery
status (on the right), along with the current
time.
The Notices Panel will display notications
when you miss calls, receive new messages or
have upcoming events.
From the home screen press the left soft
key and use the navigation keys to scroll to
highlight a notice, press SELECT to view it.
Wi-Fi
Switch on Wi-Fi by going to Settings/Network
& Connectivity/Wi-Fi select the available
network and enter the password (if needed)
press CONNECT when done.
The TT240 can be used as a WiFi hotspot
by navigating to Settings/Network &
Connectivity/Internet Sharing (will only work
if you have mobile data).
KaiOS Store
Use the KaiOS store to search for and
download games and applications to your
TT240 phone. You will need a KaiOS login, a
data connection or Wi and enough spare
memory space.
Battery Level Indication
EMPTY FULL
Low Battery Alert
The phone will sound an alert when the
battery is low and display a message of low
battery on the screen.
PLEASE NOTE: The TTfone TT240 does not
come with a charger, you can use any USB
mains plug or plug the cable into your PC
or Laptop to charge the phone. If you do
not have one of these you can purchase a
charger from www.ttfone.com
Making/Receiving Phone Calls
To Make Calls
1. Enter a number and press the call key to call.
• To delete a digit, press the End key.
• To clear the screen, hold the end key once.
You can also make calls directly from the
contact list by going to Menu/Contacts select
your contact, select phone number and the
press CALL.
Call Log
Access the call log to see your last dialed,
missed and incoming calls go to menu/
Call Log, use the Navigation key to select a
numbers and press CALL to call that number.
To Answer Calls
When your phone rings, press the Call key
once to answer the call.
To End a Call
To end a call, press the end key.
To Reject a Call
To reject the call without answering, press the
end key when your phone rings.
To Redial a Number
1. Press the Call key, this will take you to all
your recently dialed call list
2. Select the number you want to dial then
press the Call key to call.
Conference Calling
You can create a third call connection during a
call. During your call with the rst participant,
press Right Soft Key Options/Add call. You
can either enter the phone number of the
third participant, or press the Right Soft Key
(Contacts) to select a contact from your Contact
list. The rst call will be automatically placed
on hold.
• This feature is network dependent.
Making International Calls
1. Press the star key twice until a“+” character
appears on the screen.
2. Enter the country code, area code and
phone number as instructed by your long
distance network service carrier.
3. Press the Call key to call.
Changing the Volume during a Call
To change the volume during a call press
the up or down navigation key. To change
the volume of your media apps, ringtones,
alerts and alarms, go to Menu/Settings/
Personalisation/Sound/Volume.
Ringtone volume
You can adjust the ringtone volume in Menu/
Settings/Personalisation/Sound/Volume. From
here you adjust the volumes for the : Media,
Ringtones & Alerts and Alarm.
Silent Mode
Simply go to Menu/Settings/Personalisation/
Sound/Volume and change Ringtones & Alerts
to Silent or on your home screen hold down
the hash (#) key until silent mode appears.
Vibration
Simply go to Menu/Settings/Personalisation/
Sound/Volume and change Ringtones & Alerts
to Vibrate or on your home screen hold down
the hash (#) key until vibrate mode appears.
Aeroplane Mode
Some locations may require you to switch o
data connections. Instead of turning o your
device, you can set it to Aeroplane Mode.
From the Home Screen press the Navigation
Key Up to display the shortcuts menu select
the aeroplane symbol and press SELECT.
Flight mode will disconnect all your network
data, Wi-Fi and connectivity connections.
You can also access through Menu/Settings/
Network & Connectivity/Aeroplane Mode.
Data Roaming
With a mobile data plan from your network
2
54
3
6
operator you will be able to access internet
feature apps when not in a Wi-Fi zone.
Contact your operator for more information
of data plans.
Shortcut Keys
From the Home Screen, you can use
shortcut keys to easily jump to certain useful
functions. Press the left navigation key to
access these shortcuts on your home screen.
Transferring Media
Transfer your favorite music and pictures
between your TT240 and PC. Connect your
device to a PC with the USB power cable and
go to Menu/Settings/Storage/USB Storage
and select ‘Enabled’.
Your device will be displayed as a removable
device, showing the phone’s internal storage.
If a memory card is inserted,the microSD card
details will also be visible. Copy the chosen
les to the device.
To Lock and Unlock the Keypad
In order to prevent accidental dialling, the
phone is set to auto lock the keypad after
60 seconds of no use. To unlock the keypad
press and hold the Star key for 3 seconds.
If you wish to lock the keypad manually
again hold down the star key for 3 seconds.
To adjust the length of the auto lock go to
Menu/Settings/Personalisation/Display/
Screen Timeout.
KaiOS Account
Register and Log in to your KaiOS account to
set up the anti-theft feature, this allows you
to lock and erase your phone remotely if lost
or stolen.
Go to Menu/Settings/Account/KaiOS
Account/Create Account and follow the on
screen instructions.
Messages (SMS)
Test messaging is easy with the TT240
keypad, simply press a key repeatedly until
the desired letter is shown. Type 0 for a space.
Special characters or punctuation by pressing
*. To switch between lower and upper case
press #. To enter a number, press and hold
a number key. Writing methods can vary
between dierent applications.
Writing and Sending a Message
Go to Menu/Messages and select NEW. In
the“To”eld press the # key three times to
be able to enter numbers, or select add to
choose a contact from your contact list. Write
the message using the keypad, the end key
will delete the last character. Select SEND.
Contacts
Store all your contact information in the phone
book and easily access all your friends and
family. Go to Menu/Contacts or use the shortcut
pressing the right soft key on the home screen.
1. Select NEW and choose to save your
contact on the phone or the sim card
2. Enter the name and phone number of the
contact
3. press SAVE
Transfer Contacts from your old phone
To add contacts from your Gmail or outlook
account or your memory card go to Contacts/
Options/Settings/Import Contacts.
Sort contacts
You can either sort your contacts by rst or last
name. Contacts/Options/Settings/Sort Contacts.
Speed dial settings
Set speed dial numbers to the keypad
numbers keys. Press and hold down a
Network Signal Status
WiFi Network
Battery Status
Battery is charging
Bluetooth
Missed Call
New Text Message
Alarm
Aeroplane mode
Silent mode
Handset mode
New Email Message
Headphones are connected
Upcoming event
Data is syncing
Problem with sign in or sync
Downloading data
Microphone muted
Vibrate mode
New Unread Notices

number key to call the saved phone number.
Go to Contacts/Options/Settings/Set Speed
Dial Contacts.
In Case of Emergency contacts or ICE
You can add up to 5 ICE contacts. Contacts/
Options/Settings/Set ICE Contacts. ICE Contacts
will be displayed at the top of your contact list,
so these can be accessed very easily
APPS
Please note some of the following apps need
an internet connection to use their services.
It is recommended to use Wi-Fi connections
when available to reduce costs for data trac.
Contact your service provider for detailed
subscription costs. To access the APPS from
the home screen press the center key to
display the app tray, use the navigation key to
select your chosen app.
Internet
The TT240 comes with a simplied Internet
browser you can use to access your favourite
websites. Go to Menu/Browser select
SEARCH, enter the web address and select
GO. The navigation key will act as a mouse
you can control with the pointer on the
screen
WhatsApp
Navigate to WhatsApp application and set up
your account, you will need Wi or Data and a
phone number to set up and use WhatsApp.
For help setting up visit www.ttfone.com/
support. Currently, voice and video calls are
not supported in WhatsApp.
Facebook
Navigate to Facebook application and set up
your account, you will need Wi or Data and
Facebook login to set up and use the app.
For help setting up visit www.ttfone.com/
support.
Google Assistant
Google Assistant is Google’s voice controlled
smart assistant that allows you to search
for information online, open apps on your
phone, send messages, etc. To access Google
Assistant press and hold the Center soft key
for 3 seconds. Speak into the microphone of
the device clearly and follow the on screen
instructions.
News
You can gain access to a tailored feed of
relevant news based on your location and
category, go to Menu/News.
KaiWeather
Stay up-to-date with reliable weather
forecasts. Simply go to Menu/KaiWeather and
set your city.
QR Reader
The app will automatically recognise the QR
code and takes you where you need to go.
Google
This is a quick access to google browser to
get your needed information on-line.
Games
You can have access to a multiples kind of
games on the KAIOS store, section“Games”.
YouTube
YouTube is an online video-sharing
application where users can upload, view,
and share videos. Available content includes
video clips, TV clips, music videos, and other
content such as video blogging, short original
videos, and educational videos. It supports
a streaming function that allows you to start
with a 4 digit code of your choice. Follow the
on screen instructions for each menu.
Change Ringtones
Change ringtones by going to Settings/
Personalisation/Sound/Tones/Ringtones.
Change Wallpaper
Change Wallpaper of the home screen by
going to Settings/Personalisation/Display/
Wallpaper.
Screen Timeout
If your device is idle for a period of time, the
screen will turn o to save battery power.
To set a longer or shorter time go to Menu/
Settings/Personalisation/Display/Screen
Timeout.
Memory
The TT240 has 4GB internal memory. For
extra memory space you can install a micro
SD card (which is sold separately) no larger
than 32GB.
Accessibility Options
Navigate to Menu/Settings/Device/
Accessibility to nd helpful features like
colour invert, captions, mono audio, volume
balance and hearing aid compatibility.
Restore Settings
Go to Menu/Settings/ Device/Device
Information/Reset Phone to restore the
phone back to factory settings. If you restore
the factory data, your device will reset to
the settings that were congured at the
factory. All of your personal data from the
internal device storage, including account
information, the system and application
settings, and any downloaded applications
will be erased. Resetting your device does not
erase any system software updates that have
been downloaded or any les on a microSD
card, such as music or photos.
Troubleshooting
Before contacting the service Centre, you
are advised to follow the instructions below:
You are advised to fully charge the battery
for optimal operation. Avoid storing large
amounts of data in your phone as this
may aect its performance. Use the FOTA
(Firmware Over The Air) Upgrade tool to
update your phone’s software. To access
Update phone, press Settings\Device\Device
Information\Software Update
My phone can’t be switched on or is frozen
1. Check the battery contacts, remove and
reinstall your battery, then turn your phone
on.
2. Check the battery power level, charge for at
least 20 minutes.
My phone has not responded for several
minutes
1. Restart your phone by pressing and
holding the Back/End Key
2. Remove the battery and re-insert it, then
restart the phone.
My phone turns o by itself
1. Check whether your phone is locked
when not in use, and make sure you don’t
accidentally turn o your phone when
locking it by pressing the Back/End Key
2. Check the battery charge level.
My phone can’t charge properly
1. Make sure you are using a TTfone battery
and the charger cable from the box.
2. Make sure your battery is inserted properly and
clean the battery contact if it’s dirty. It must be
inserted before plugging in the charger.
Calendar
Use Calendar to create and manage events,
meetings and appointments. Depending on
your synchronisation settings, the calendar
on the device remains synchronised with the
calendar on the web.
Open the calendar by going to Menu/
Calendar and press the left soft key to start
adding a new event. Set the time and date
and event details then press SAVE.
Notes
This is where you can make short text notes
by going to Menu/Note.
Calculator
The Calculator can perform basic
mathematical operations. Go to Menu/
Calculator to open the app.
Unit Converter
It is a smart, simple and easy to use interface
to convert various units. Go to Menu/Unit
Conv.
Todo
Mange your time and list of activities to plan
your day ahead and increase productivity, go
to Menu/Todo.
Horoscope
You can get your daily horoscope.
File Manager
Manage the contents and properties of
les. You can open, delete, move, copy and
rename les.
Settings
Setting the date and Time
When you rst turn on your device, there
is an option to update the date and time
automatically using the time provided
by your network. You can’t set the date,
time, and time zone manually if using the
automatic option.
To manually adjust the date and time settings
go to Menu/Settings/Personalisation/Date
& Time.
Display Settings
Go to Menu/Settings/Personalisation/
Display/Brightness to adjust the screen
brightness levels.
Over-the-air Upgrade
Using the Over-the-air Upgrade tool you
can update your phone’s software. To access
Update phone select Settings/Device/Device
Information/Software Update. If you want to
update the system, select Download, after it
is done please select Install to complete the
upgrade. Now your phone’s software will be
the latest version. You should turn on data
connection before searching for updates.
Settings for auto-check intervals is also
available once you restart the phone. If you
have chosen auto-check, when the system
discovers the new version, the notication
also will show in status bar.
Bluetooth®
Use Bluetooth® on the TT240 to connect to
your headset, car or to transfer les from
one phone to another. Navigate to Menu/
Settings/Network & Connectivity/Bluetooth®
Switch on Bluetooth® and pair your
devices, make sure the other device is set to
discoverable mode.
Privacy & Security
Menu/Settings/Privacy & Security in this menu
you can check app permissions, manage
Internet privacy settings and set a screen lock
I am unable to add a contact in my contacts
Make sure that your SIM card contacts are not
full; delete some les or save the les in the
phone contacts.
I can’t access my voicemail
1. Make sure your operator’s voicemail
number is correctly entered.
2. Try later if the network is busy.
SIM card PIN locked
Contact your network operator to obtain the
PUK code (Personal Unblocking Key).
The phone can’t be detected by others via
Bluetooth
1. Make sure that Bluetooth is turned on and
your phone is visible to other users.
2. Make sure that the two phones are within
Bluetooth’s detection range.
Radio Frequency (RF) Exposure
and SAR
This device meets international guidelines
for exposure to radio waves. Your mobile
device is a radio transmitter and receiver. It is
designed and manufactured not to exceed
the limits for exposure to radio frequency
(RF) radiation recommended by international
guidelines (ICNIRP). These limits are part of the
comprehensive guidelines and establish the
permitted levels of RF energy for the general
population. The guidelines were developed by
independent scientic organizations through
periodic and thorough evaluation of scientic
studies. The exposure standard for mobile
devices employs a unit of measurement known
as the Specic Absorption Rate, or SAR. Although
the SAR is determined at the highest certied
power level, the actual SAR of the device while
operating can be well below the maximum
value. This is because the device is designed to
operate at multiple power levels so as to use
only the power required to reach the network. In
general, the closer you are to a base station, the
lower the power output of the device. SAR values
may vary depending on national reporting and
testing requirements and the network band.
Use of device accessories and enhancements
may result in dierent SAR values. The SAR limit
for mobile devices used by the public is 2.0 w/
kg (watts per kilogram) averaged over 10 grams
of body tissue. The guidelines incorporate a
substantial margin of safety to give additional
protection for the public and to account for any
variations in measurements. The highest SAR
Value - 1.790 w/kg.
Some features of the product and its accessories
described herein rely on the software installed,
capacities and settings of local network, and
may not be activated or may be limited by local
network operators or network service providers.
Therefore, the descriptions in this manual may
not exactly match the purchased product or its
accessories.
The manufacturer reserves the right to change
or modify any information or specications
contained in this manual without prior notice or
obligation.
The manufacturer is not responsible for the
legitimacy and quality of any products that
you upload or download through this device
including text, pictures, music, movies, and non-
built-in software with copyright protection. Any
consequences arising from the installation or
usage of the preceding products on this device is
accountable to you.
Check out our other fantastic range
of products at www.ttfone.com
watching videos almost as soon as they begin
downloading from the internet.
Maps
Google Maps oers satellite imagery, road
condition, topographic map and route
planning for traveling by foot, car, or public
transportation. By using this application, you
can get your own location, search for a place,
and get suggested route planning for your
trips.
Email
You can use the TT240 to read and send email
messages. Add an email account by going to
Menu/Email and follow the instructions. Write
an email by going to Menu/Email and select
COMPOSE, in the“To”eld type the email
address, add your subject and email content
and press SEND. You can also add attachments,
reply and forward emails and even search for
emails using the options menu.
Camera
Your mobile phone is tted with a camera for
taking photos and shooting videos:
• Store them in your“My les”.
• Send them in a whatsapp message to a
mobile phone.
• Customise your Home screen.
• Transfer them by data cable or memory card
to your computer.
To take a picture navigate to Menu/Camera
and press the center key to capture the image.
The TT240 is also tted with a front camera
for taking seles and using for video calls. To
change the camera to the front press the right
soft key for Options and select which Camera
you want to use.
Take pictures with a timer by selecting
Options/Self Timer in the camera app.
To view the photos you have taken go to
Menu/Gallery.
Video
Take videos by going to Menu/Camera and
then press the right navigation key. Use the
center key to start and stop recording. To view
the video recordings go to Menu/Video.
Recorder
Use the sound recorder to record voice notes
and messages by going to Menu/Recorder.
FM radio
Play your favourite FM radio stations, using a
wired headphone will give better reception.
Go to Menu/FM Radio and click TURN ON,
press the right soft key to scan for available
stations. To turn o the FM Radio press the
back button and then press TURN OFF.
Music
Music les can be transferred from a PC
onto your TT240 so you can listen to music
wherever you are. Ensure that the USB storage
has been enabled Settings/Storage tab/USB
Storage/Enabled, then connect your phone to
a PC using the USB cable. On the PC navigate
to the USB drive and copy your music across.
Gallery
This is where you can view and manage your
saved pictures by going to Menu/Gallery.
Torch
A handy torch light can be found at the top
of the TT240. When on the home screen hold
down the 0 key for 3 seconds to turn on the
torch, hold it down again to switch o.
Clock
You can add more than 10 Alarms and you can also
access timer and stopwatch. Go to Menu/Clock.
3. Make sure that your battery is not completely
discharged; if battery power is empty for a long
time, it may take around 20 minutes to display
the battery charger indicator on the screen.
4. Make sure charging is carried out under
normal conditions (0°C to +40°C).
5. When abroad, check that the voltage input
is compatible.
My phone can’t connect to a network or“No
service” is displayed
1. Try connecting in another location.
2. Verify the network coverage with your
operator.
3. Check with your operator that your SIM card
is valid.
4. Try selecting the available network(s)
manually.
5. Try connecting at a later time if the network
is overloaded.
My phone can’t connect to the Internet
1. Make sure that the internet access service of
your SIM card is available.
2. Check your phone’s Internet connecting
settings.
3. Make sure you are in a place with network
coverage.
4. Try connecting at a later time or another
location.
Invalid SIM card
1. Make sure the SIM card has been correctly
inserted.
2. Make sure the chip on your SIM card is not
damaged or scratched.
3. Make sure the service of your SIM card is
available.
Unable to make outgoing calls
1. Make sure you have dialled a valid number
and have pressed the call button.
2. For international calls, check the country and
area codes.
3. Make sure your phone is connected to a
network, and the network is not overloaded
or unavailable.
4. Check your subscription status with your
operator (credit, SIM card valid, etc.).
5. Make sure you have not barred outgoing calls.
6. Make sure that your phone is not in
aeroplane mode.
Unable to receive incoming calls
1. Make sure your phone is switched on
and connected to a network (check for
overloaded or unavailable network).
2. Check your subscription status with your
operator (credit, SIM card valid, etc.).
3. Make sure you have not forwarded
incoming calls.
4. Make sure that you have not barred certain
calls.
5. Make sure that your phone is not in
Aeroplane mode.
I can’t nd my contacts
1. Make sure your SIM card is not broken.
2. Make sure your SIM card is inserted properly.
3. Import all contacts stored in SIM card to phone.
The sound quality of the calls is poor
1. You can adjust the volume during a call by
pressing the Volume Up/down key.
2. Check the network strength
3. Make sure that the receiver, connector or
speaker on your phone is clean.
When I select a number from my contacts,
the number can’t be dialled
1. Make sure that you have correctly recorded
the number in your le.
2. Make sure that you have selected the country
prex when calling a foreign country.
11
8
10
7
12
9
www.ttfone.com
number key to call the saved phone number.
Go to Contacts/Options/Settings/Set Speed
Dial Contacts.
In Case of Emergency contacts or ICE
You can add up to 5 ICE contacts. Contacts/
Options/Settings/Set ICE Contacts. ICE Contacts
will be displayed at the top of your contact list,
so these can be accessed very easily
APPS
Please note some of the following apps need
an internet connection to use their services.
It is recommended to use Wi-Fi connections
when available to reduce costs for data trac.
Contact your service provider for detailed
subscription costs. To access the APPS from
the home screen press the center key to
display the app tray, use the navigation key to
select your chosen app.
Internet
The TT240 comes with a simplied Internet
browser you can use to access your favourite
websites. Go to Menu/Browser select
SEARCH, enter the web address and select
GO. The navigation key will act as a mouse
you can control with the pointer on the
screen
WhatsApp
Navigate to WhatsApp application and set up
your account, you will need Wi or Data and a
phone number to set up and use WhatsApp.
For help setting up visit www.ttfone.com/
support. Currently, voice and video calls are
not supported in WhatsApp.
Facebook
Navigate to Facebook application and set up
your account, you will need Wi or Data and
Facebook login to set up and use the app.
For help setting up visit www.ttfone.com/
support.
Google Assistant
Google Assistant is Google’s voice controlled
smart assistant that allows you to search
for information online, open apps on your
phone, send messages, etc. To access Google
Assistant press and hold the Center soft key
for 3 seconds. Speak into the microphone of
the device clearly and follow the on screen
instructions.
News
You can gain access to a tailored feed of
relevant news based on your location and
category, go to Menu/News.
KaiWeather
Stay up-to-date with reliable weather
forecasts. Simply go to Menu/KaiWeather and
set your city.
QR Reader
The app will automatically recognise the QR
code and takes you where you need to go.
Google
This is a quick access to google browser to
get your needed information on-line.
Games
You can have access to a multiples kind of
games on the KAIOS store, section “Games”.
YouTube
YouTube is an online video-sharing
application where users can upload, view,
and share videos. Available content includes
video clips, TV clips, music videos, and other
content such as video blogging, short original
videos, and educational videos. It supports
a streaming function that allows you to start
with a 4 digit code of your choice. Follow the
on screen instructions for each menu.
Change Ringtones
Change ringtones by going to Settings/
Personalisation/Sound/Tones/Ringtones.
Change Wallpaper
Change Wallpaper of the home screen by
going to Settings/Personalisation/Display/
Wallpaper.
Screen Timeout
If your device is idle for a period of time, the
screen will turn o to save battery power.
To set a longer or shorter time go to Menu/
Settings/Personalisation/Display/Screen
Timeout.
Memory
The TT240 has 4GB internal memory. For
extra memory space you can install a micro
SD card (which is sold separately) no larger
than 32GB.
Accessibility Options
Navigate to Menu/Settings/Device/
Accessibility to nd helpful features like
colour invert, captions, mono audio, volume
balance and hearing aid compatibility.
Restore Settings
Go to Menu/Settings/ Device/Device
Information/Reset Phone to restore the
phone back to factory settings. If you restore
the factory data, your device will reset to
the settings that were congured at the
factory. All of your personal data from the
internal device storage, including account
information, the system and application
settings, and any downloaded applications
will be erased. Resetting your device does not
erase any system software updates that have
been downloaded or any les on a microSD
card, such as music or photos.
Troubleshooting
Before contacting the service Centre, you
are advised to follow the instructions below:
You are advised to fully charge the battery
for optimal operation. Avoid storing large
amounts of data in your phone as this
may aect its performance. Use the FOTA
(Firmware Over The Air) Upgrade tool to
update your phone’s software. To access
Update phone, press Settings\Device\Device
Information\Software Update
My phone can’t be switched on or is frozen
1. Check the battery contacts, remove and
reinstall your battery, then turn your phone
on.
2. Check the battery power level, charge for at
least 20 minutes.
My phone has not responded for several
minutes
1. Restart your phone by pressing and
holding the Back/End Key
2. Remove the battery and re-insert it, then
restart the phone.
My phone turns o by itself
1. Check whether your phone is locked
when not in use, and make sure you don’t
accidentally turn o your phone when
locking it by pressing the Back/End Key
2. Check the battery charge level.
My phone can’t charge properly
1. Make sure you are using a TTfone battery
and the charger cable from the box.
2. Make sure your battery is inserted properly and
clean the battery contact if it’s dirty. It must be
inserted before plugging in the charger.
Calendar
Use Calendar to create and manage events,
meetings and appointments. Depending on
your synchronisation settings, the calendar
on the device remains synchronised with the
calendar on the web.
Open the calendar by going to Menu/
Calendar and press the left soft key to start
adding a new event. Set the time and date
and event details then press SAVE.
Notes
This is where you can make short text notes
by going to Menu/Note.
Calculator
The Calculator can perform basic
mathematical operations. Go to Menu/
Calculator to open the app.
Unit Converter
It is a smart, simple and easy to use interface
to convert various units. Go to Menu/Unit
Conv.
Todo
Mange your time and list of activities to plan
your day ahead and increase productivity, go
to Menu/Todo.
Horoscope
You can get your daily horoscope.
File Manager
Manage the contents and properties of
les. You can open, delete, move, copy and
rename les.
Settings
Setting the date and Time
When you rst turn on your device, there
is an option to update the date and time
automatically using the time provided
by your network. You can’t set the date,
time, and time zone manually if using the
automatic option.
To manually adjust the date and time settings
go to Menu/Settings/Personalisation/Date
& Time.
Display Settings
Go to Menu/Settings/Personalisation/
Display/Brightness to adjust the screen
brightness levels.
Over-the-air Upgrade
Using the Over-the-air Upgrade tool you
can update your phone’s software. To access
Update phone select Settings/Device/Device
Information/Software Update. If you want to
update the system, select Download, after it
is done please select Install to complete the
upgrade. Now your phone’s software will be
the latest version. You should turn on data
connection before searching for updates.
Settings for auto-check intervals is also
available once you restart the phone. If you
have chosen auto-check, when the system
discovers the new version, the notication
also will show in status bar.
Bluetooth®
Use Bluetooth® on the TT240 to connect to
your headset, car or to transfer les from
one phone to another. Navigate to Menu/
Settings/Network & Connectivity/Bluetooth®
Switch on Bluetooth® and pair your
devices, make sure the other device is set to
discoverable mode.
Privacy & Security
Menu/Settings/Privacy & Security in this menu
you can check app permissions, manage
Internet privacy settings and set a screen lock
I am unable to add a contact in my contacts
Make sure that your SIM card contacts are not
full; delete some les or save the les in the
phone contacts.
I can’t access my voicemail
1. Make sure your operator’s voicemail
number is correctly entered.
2. Try later if the network is busy.
SIM card PIN locked
Contact your network operator to obtain the
PUK code (Personal Unblocking Key).
The phone can’t be detected by others via
Bluetooth
1. Make sure that Bluetooth is turned on and
your phone is visible to other users.
2. Make sure that the two phones are within
Bluetooth’s detection range.
Radio Frequency (RF) Exposure
and SAR
This device meets international guidelines
for exposure to radio waves. Your mobile
device is a radio transmitter and receiver. It is
designed and manufactured not to exceed
the limits for exposure to radio frequency
(RF) radiation recommended by international
guidelines (ICNIRP). These limits are part of the
comprehensive guidelines and establish the
permitted levels of RF energy for the general
population. The guidelines were developed by
independent scientic organizations through
periodic and thorough evaluation of scientic
studies. The exposure standard for mobile
devices employs a unit of measurement known
as the Specic Absorption Rate, or SAR. Although
the SAR is determined at the highest certied
power level, the actual SAR of the device while
operating can be well below the maximum
value. This is because the device is designed to
operate at multiple power levels so as to use
only the power required to reach the network. In
general, the closer you are to a base station, the
lower the power output of the device. SAR values
may vary depending on national reporting and
testing requirements and the network band.
Use of device accessories and enhancements
may result in dierent SAR values. The SAR limit
for mobile devices used by the public is 2.0 w/
kg (watts per kilogram) averaged over 10 grams
of body tissue. The guidelines incorporate a
substantial margin of safety to give additional
protection for the public and to account for any
variations in measurements. The highest SAR
Value - 1.790 w/kg.
Some features of the product and its accessories
described herein rely on the software installed,
capacities and settings of local network, and
may not be activated or may be limited by local
network operators or network service providers.
Therefore, the descriptions in this manual may
not exactly match the purchased product or its
accessories.
The manufacturer reserves the right to change
or modify any information or specications
contained in this manual without prior notice or
obligation.
The manufacturer is not responsible for the
legitimacy and quality of any products that
you upload or download through this device
including text, pictures, music, movies, and non-
built-in software with copyright protection. Any
consequences arising from the installation or
usage of the preceding products on this device is
accountable to you.
Check out our other fantastic range
of products at www.ttfone.com
watching videos almost as soon as they begin
downloading from the internet.
Maps
Google Maps oers satellite imagery, road
condition, topographic map and route
planning for traveling by foot, car, or public
transportation. By using this application, you
can get your own location, search for a place,
and get suggested route planning for your
trips.
Email
You can use the TT240 to read and send email
messages. Add an email account by going to
Menu/Email and follow the instructions. Write
an email by going to Menu/Email and select
COMPOSE, in the “To”eld type the email
address, add your subject and email content
and press SEND. You can also add attachments,
reply and forward emails and even search for
emails using the options menu.
Camera
Your mobile phone is tted with a camera for
taking photos and shooting videos:
• Store them in your“My les”.
• Send them in a whatsapp message to a
mobile phone.
• Customise your Home screen.
• Transfer them by data cable or memory card
to your computer.
To take a picture navigate to Menu/Camera
and press the center key to capture the image.
The TT240 is also tted with a front camera
for taking seles and using for video calls. To
change the camera to the front press the right
soft key for Options and select which Camera
you want to use.
Take pictures with a timer by selecting
Options/Self Timer in the camera app.
To view the photos you have taken go to
Menu/Gallery.
Video
Take videos by going to Menu/Camera and
then press the right navigation key. Use the
center key to start and stop recording. To view
the video recordings go to Menu/Video.
Recorder
Use the sound recorder to record voice notes
and messages by going to Menu/Recorder.
FM radio
Play your favourite FM radio stations, using a
wired headphone will give better reception.
Go to Menu/FM Radio and click TURN ON,
press the right soft key to scan for available
stations. To turn o the FM Radio press the
back button and then press TURN OFF.
Music
Music les can be transferred from a PC
onto your TT240 so you can listen to music
wherever you are. Ensure that the USB storage
has been enabled Settings/Storage tab/USB
Storage/Enabled, then connect your phone to
a PC using the USB cable. On the PC navigate
to the USB drive and copy your music across.
Gallery
This is where you can view and manage your
saved pictures by going to Menu/Gallery.
Torch
A handy torch light can be found at the top
of the TT240. When on the home screen hold
down the 0 key for 3 seconds to turn on the
torch, hold it down again to switch o.
Clock
You can add more than 10 Alarms and you can also
access timer and stopwatch. Go to Menu/Clock.
3. Make sure that your battery is not completely
discharged; if battery power is empty for a long
time, it may take around 20 minutes to display
the battery charger indicator on the screen.
4. Make sure charging is carried out under
normal conditions (0°C to +40°C).
5. When abroad, check that the voltage input
is compatible.
My phone can’t connect to a network or“No
service” is displayed
1. Try connecting in another location.
2. Verify the network coverage with your
operator.
3. Check with your operator that your SIM card
is valid.
4. Try selecting the available network(s)
manually.
5. Try connecting at a later time if the network
is overloaded.
My phone can’t connect to the Internet
1. Make sure that the internet access service of
your SIM card is available.
2. Check your phone’s Internet connecting
settings.
3. Make sure you are in a place with network
coverage.
4. Try connecting at a later time or another
location.
Invalid SIM card
1. Make sure the SIM card has been correctly
inserted.
2. Make sure the chip on your SIM card is not
damaged or scratched.
3. Make sure the service of your SIM card is
available.
Unable to make outgoing calls
1. Make sure you have dialled a valid number
and have pressed the call button.
2. For international calls, check the country and
area codes.
3. Make sure your phone is connected to a
network, and the network is not overloaded
or unavailable.
4. Check your subscription status with your
operator (credit, SIM card valid, etc.).
5. Make sure you have not barred outgoing calls.
6. Make sure that your phone is not in
aeroplane mode.
Unable to receive incoming calls
1. Make sure your phone is switched on
and connected to a network (check for
overloaded or unavailable network).
2. Check your subscription status with your
operator (credit, SIM card valid, etc.).
3. Make sure you have not forwarded
incoming calls.
4. Make sure that you have not barred certain
calls.
5. Make sure that your phone is not in
Aeroplane mode.
I can’t nd my contacts
1. Make sure your SIM card is not broken.
2. Make sure your SIM card is inserted properly.
3. Import all contacts stored in SIM card to phone.
The sound quality of the calls is poor
1. You can adjust the volume during a call by
pressing the Volume Up/down key.
2. Check the network strength
3. Make sure that the receiver, connector or
speaker on your phone is clean.
When I select a number from my contacts,
the number can’t be dialled
1. Make sure that you have correctly recorded
the number in your le.
2. Make sure that you have selected the country
prex when calling a foreign country.
11
8
10
7
12
9
www.ttfone.com
number key to call the saved phone number.
Go to Contacts/Options/Settings/Set Speed
Dial Contacts.
In Case of Emergency contacts or ICE
You can add up to 5 ICE contacts. Contacts/
Options/Settings/Set ICE Contacts. ICE Contacts
will be displayed at the top of your contact list,
so these can be accessed very easily
APPS
Please note some of the following apps need
an internet connection to use their services.
It is recommended to use Wi-Fi connections
when available to reduce costs for data trac.
Contact your service provider for detailed
subscription costs. To access the APPS from
the home screen press the center key to
display the app tray, use the navigation key to
select your chosen app.
Internet
The TT240 comes with a simplied Internet
browser you can use to access your favourite
websites. Go to Menu/Browser select
SEARCH, enter the web address and select
GO. The navigation key will act as a mouse
you can control with the pointer on the
screen
WhatsApp
Navigate to WhatsApp application and set up
your account, you will need Wi or Data and a
phone number to set up and use WhatsApp.
For help setting up visit www.ttfone.com/
support. Currently, voice and video calls are
not supported in WhatsApp.
Facebook
Navigate to Facebook application and set up
your account, you will need Wi or Data and
Facebook login to set up and use the app.
For help setting up visit www.ttfone.com/
support.
Google Assistant
Google Assistant is Google’s voice controlled
smart assistant that allows you to search
for information online, open apps on your
phone, send messages, etc. To access Google
Assistant press and hold the Center soft key
for 3 seconds. Speak into the microphone of
the device clearly and follow the on screen
instructions.
News
You can gain access to a tailored feed of
relevant news based on your location and
category, go to Menu/News.
KaiWeather
Stay up-to-date with reliable weather
forecasts. Simply go to Menu/KaiWeather and
set your city.
QR Reader
The app will automatically recognise the QR
code and takes you where you need to go.
Google
This is a quick access to google browser to
get your needed information on-line.
Games
You can have access to a multiples kind of
games on the KAIOS store, section“Games”.
YouTube
YouTube is an online video-sharing
application where users can upload, view,
and share videos. Available content includes
video clips, TV clips, music videos, and other
content such as video blogging, short original
videos, and educational videos. It supports
a streaming function that allows you to start
with a 4 digit code of your choice. Follow the
on screen instructions for each menu.
Change Ringtones
Change ringtones by going to Settings/
Personalisation/Sound/Tones/Ringtones.
Change Wallpaper
Change Wallpaper of the home screen by
going to Settings/Personalisation/Display/
Wallpaper.
Screen Timeout
If your device is idle for a period of time, the
screen will turn o to save battery power.
To set a longer or shorter time go to Menu/
Settings/Personalisation/Display/Screen
Timeout.
Memory
The TT240 has 4GB internal memory. For
extra memory space you can install a micro
SD card (which is sold separately) no larger
than 32GB.
Accessibility Options
Navigate to Menu/Settings/Device/
Accessibility to nd helpful features like
colour invert, captions, mono audio, volume
balance and hearing aid compatibility.
Restore Settings
Go to Menu/Settings/ Device/Device
Information/Reset Phone to restore the
phone back to factory settings. If you restore
the factory data, your device will reset to
the settings that were congured at the
factory. All of your personal data from the
internal device storage, including account
information, the system and application
settings, and any downloaded applications
will be erased. Resetting your device does not
erase any system software updates that have
been downloaded or any les on a microSD
card, such as music or photos.
Troubleshooting
Before contacting the service Centre, you
are advised to follow the instructions below:
You are advised to fully charge the battery
for optimal operation. Avoid storing large
amounts of data in your phone as this
may aect its performance. Use the FOTA
(Firmware Over The Air) Upgrade tool to
update your phone’s software. To access
Update phone, press Settings\Device\Device
Information\Software Update
My phone can’t be switched on or is frozen
1. Check the battery contacts, remove and
reinstall your battery, then turn your phone
on.
2. Check the battery power level, charge for at
least 20 minutes.
My phone has not responded for several
minutes
1. Restart your phone by pressing and
holding the Back/End Key
2. Remove the battery and re-insert it, then
restart the phone.
My phone turns o by itself
1. Check whether your phone is locked
when not in use, and make sure you don’t
accidentally turn o your phone when
locking it by pressing the Back/End Key
2. Check the battery charge level.
My phone can’t charge properly
1. Make sure you are using a TTfone battery
and the charger cable from the box.
2. Make sure your battery is inserted properly and
clean the battery contact if it’s dirty. It must be
inserted before plugging in the charger.
Calendar
Use Calendar to create and manage events,
meetings and appointments. Depending on
your synchronisation settings, the calendar
on the device remains synchronised with the
calendar on the web.
Open the calendar by going to Menu/
Calendar and press the left soft key to start
adding a new event. Set the time and date
and event details then press SAVE.
Notes
This is where you can make short text notes
by going to Menu/Note.
Calculator
The Calculator can perform basic
mathematical operations. Go to Menu/
Calculator to open the app.
Unit Converter
It is a smart, simple and easy to use interface
to convert various units. Go to Menu/Unit
Conv.
Todo
Mange your time and list of activities to plan
your day ahead and increase productivity, go
to Menu/Todo.
Horoscope
You can get your daily horoscope.
File Manager
Manage the contents and properties of
les. You can open, delete, move, copy and
rename les.
Settings
Setting the date and Time
When you rst turn on your device, there
is an option to update the date and time
automatically using the time provided
by your network. You can’t set the date,
time, and time zone manually if using the
automatic option.
To manually adjust the date and time settings
go to Menu/Settings/Personalisation/Date
& Time.
Display Settings
Go to Menu/Settings/Personalisation/
Display/Brightness to adjust the screen
brightness levels.
Over-the-air Upgrade
Using the Over-the-air Upgrade tool you
can update your phone’s software. To access
Update phone select Settings/Device/Device
Information/Software Update. If you want to
update the system, select Download, after it
is done please select Install to complete the
upgrade. Now your phone’s software will be
the latest version. You should turn on data
connection before searching for updates.
Settings for auto-check intervals is also
available once you restart the phone. If you
have chosen auto-check, when the system
discovers the new version, the notication
also will show in status bar.
Bluetooth®
Use Bluetooth® on the TT240 to connect to
your headset, car or to transfer les from
one phone to another. Navigate to Menu/
Settings/Network & Connectivity/Bluetooth®
Switch on Bluetooth® and pair your
devices, make sure the other device is set to
discoverable mode.
Privacy & Security
Menu/Settings/Privacy & Security in this menu
you can check app permissions, manage
Internet privacy settings and set a screen lock
I am unable to add a contact in my contacts
Make sure that your SIM card contacts are not
full; delete some les or save the les in the
phone contacts.
I can’t access my voicemail
1. Make sure your operator’s voicemail
number is correctly entered.
2. Try later if the network is busy.
SIM card PIN locked
Contact your network operator to obtain the
PUK code (Personal Unblocking Key).
The phone can’t be detected by others via
Bluetooth
1. Make sure that Bluetooth is turned on and
your phone is visible to other users.
2. Make sure that the two phones are within
Bluetooth’s detection range.
Radio Frequency (RF) Exposure
and SAR
This device meets international guidelines
for exposure to radio waves. Your mobile
device is a radio transmitter and receiver. It is
designed and manufactured not to exceed
the limits for exposure to radio frequency
(RF) radiation recommended by international
guidelines (ICNIRP). These limits are part of the
comprehensive guidelines and establish the
permitted levels of RF energy for the general
population. The guidelines were developed by
independent scientic organizations through
periodic and thorough evaluation of scientic
studies. The exposure standard for mobile
devices employs a unit of measurement known
as the Specic Absorption Rate, or SAR. Although
the SAR is determined at the highest certied
power level, the actual SAR of the device while
operating can be well below the maximum
value. This is because the device is designed to
operate at multiple power levels so as to use
only the power required to reach the network. In
general, the closer you are to a base station, the
lower the power output of the device. SAR values
may vary depending on national reporting and
testing requirements and the network band.
Use of device accessories and enhancements
may result in dierent SAR values. The SAR limit
for mobile devices used by the public is 2.0 w/
kg (watts per kilogram) averaged over 10 grams
of body tissue. The guidelines incorporate a
substantial margin of safety to give additional
protection for the public and to account for any
variations in measurements. The highest SAR
Value - 1.790 w/kg.
Some features of the product and its accessories
described herein rely on the software installed,
capacities and settings of local network, and
may not be activated or may be limited by local
network operators or network service providers.
Therefore, the descriptions in this manual may
not exactly match the purchased product or its
accessories.
The manufacturer reserves the right to change
or modify any information or specications
contained in this manual without prior notice or
obligation.
The manufacturer is not responsible for the
legitimacy and quality of any products that
you upload or download through this device
including text, pictures, music, movies, and non-
built-in software with copyright protection. Any
consequences arising from the installation or
usage of the preceding products on this device is
accountable to you.
Check out our other fantastic range
of products at www.ttfone.com
watching videos almost as soon as they begin
downloading from the internet.
Maps
Google Maps oers satellite imagery, road
condition, topographic map and route
planning for traveling by foot, car, or public
transportation. By using this application, you
can get your own location, search for a place,
and get suggested route planning for your
trips.
Email
You can use the TT240 to read and send email
messages. Add an email account by going to
Menu/Email and follow the instructions. Write
an email by going to Menu/Email and select
COMPOSE, in the“To”eld type the email
address, add your subject and email content
and press SEND. You can also add attachments,
reply and forward emails and even search for
emails using the options menu.
Camera
Your mobile phone is tted with a camera for
taking photos and shooting videos:
• Store them in your“My les”.
• Send them in a whatsapp message to a
mobile phone.
• Customise your Home screen.
• Transfer them by data cable or memory card
to your computer.
To take a picture navigate to Menu/Camera
and press the center key to capture the image.
The TT240 is also tted with a front camera
for taking seles and using for video calls. To
change the camera to the front press the right
soft key for Options and select which Camera
you want to use.
Take pictures with a timer by selecting
Options/Self Timer in the camera app.
To view the photos you have taken go to
Menu/Gallery.
Video
Take videos by going to Menu/Camera and
then press the right navigation key. Use the
center key to start and stop recording. To view
the video recordings go to Menu/Video.
Recorder
Use the sound recorder to record voice notes
and messages by going to Menu/Recorder.
FM radio
Play your favourite FM radio stations, using a
wired headphone will give better reception.
Go to Menu/FM Radio and click TURN ON,
press the right soft key to scan for available
stations. To turn o the FM Radio press the
back button and then press TURN OFF.
Music
Music les can be transferred from a PC
onto your TT240 so you can listen to music
wherever you are. Ensure that the USB storage
has been enabled Settings/Storage tab/USB
Storage/Enabled, then connect your phone to
a PC using the USB cable. On the PC navigate
to the USB drive and copy your music across.
Gallery
This is where you can view and manage your
saved pictures by going to Menu/Gallery.
Torch
A handy torch light can be found at the top
of the TT240. When on the home screen hold
down the 0 key for 3 seconds to turn on the
torch, hold it down again to switch o.
Clock
You can add more than 10 Alarms and you can also
access timer and stopwatch. Go to Menu/Clock.
3. Make sure that your battery is not completely
discharged; if battery power is empty for a long
time, it may take around 20 minutes to display
the battery charger indicator on the screen.
4. Make sure charging is carried out under
normal conditions (0°C to +40°C).
5. When abroad, check that the voltage input
is compatible.
My phone can’t connect to a network or“No
service” is displayed
1. Try connecting in another location.
2. Verify the network coverage with your
operator.
3. Check with your operator that your SIM card
is valid.
4. Try selecting the available network(s)
manually.
5. Try connecting at a later time if the network
is overloaded.
My phone can’t connect to the Internet
1. Make sure that the internet access service of
your SIM card is available.
2. Check your phone’s Internet connecting
settings.
3. Make sure you are in a place with network
coverage.
4. Try connecting at a later time or another
location.
Invalid SIM card
1. Make sure the SIM card has been correctly
inserted.
2. Make sure the chip on your SIM card is not
damaged or scratched.
3. Make sure the service of your SIM card is
available.
Unable to make outgoing calls
1. Make sure you have dialled a valid number
and have pressed the call button.
2. For international calls, check the country and
area codes.
3. Make sure your phone is connected to a
network, and the network is not overloaded
or unavailable.
4. Check your subscription status with your
operator (credit, SIM card valid, etc.).
5. Make sure you have not barred outgoing calls.
6. Make sure that your phone is not in
aeroplane mode.
Unable to receive incoming calls
1. Make sure your phone is switched on
and connected to a network (check for
overloaded or unavailable network).
2. Check your subscription status with your
operator (credit, SIM card valid, etc.).
3. Make sure you have not forwarded
incoming calls.
4. Make sure that you have not barred certain
calls.
5. Make sure that your phone is not in
Aeroplane mode.
I can’t nd my contacts
1. Make sure your SIM card is not broken.
2. Make sure your SIM card is inserted properly.
3. Import all contacts stored in SIM card to phone.
The sound quality of the calls is poor
1. You can adjust the volume during a call by
pressing the Volume Up/down key.
2. Check the network strength
3. Make sure that the receiver, connector or
speaker on your phone is clean.
When I select a number from my contacts,
the number can’t be dialled
1. Make sure that you have correctly recorded
the number in your le.
2. Make sure that you have selected the country
prex when calling a foreign country.
11
8
10
7
12
9
www.ttfone.com

number key to call the saved phone number.
Go to Contacts/Options/Settings/Set Speed
Dial Contacts.
In Case of Emergency contacts or ICE
You can add up to 5 ICE contacts. Contacts/
Options/Settings/Set ICE Contacts. ICE Contacts
will be displayed at the top of your contact list,
so these can be accessed very easily
APPS
Please note some of the following apps need
an internet connection to use their services.
It is recommended to use Wi-Fi connections
when available to reduce costs for data trac.
Contact your service provider for detailed
subscription costs. To access the APPS from
the home screen press the center key to
display the app tray, use the navigation key to
select your chosen app.
Internet
The TT240 comes with a simplied Internet
browser you can use to access your favourite
websites. Go to Menu/Browser select
SEARCH, enter the web address and select
GO. The navigation key will act as a mouse
you can control with the pointer on the
screen
WhatsApp
Navigate to WhatsApp application and set up
your account, you will need Wi or Data and a
phone number to set up and use WhatsApp.
For help setting up visit www.ttfone.com/
support. Currently, voice and video calls are
not supported in WhatsApp.
Facebook
Navigate to Facebook application and set up
your account, you will need Wi or Data and
Facebook login to set up and use the app.
For help setting up visit www.ttfone.com/
support.
Google Assistant
Google Assistant is Google’s voice controlled
smart assistant that allows you to search
for information online, open apps on your
phone, send messages, etc. To access Google
Assistant press and hold the Center soft key
for 3 seconds. Speak into the microphone of
the device clearly and follow the on screen
instructions.
News
You can gain access to a tailored feed of
relevant news based on your location and
category, go to Menu/News.
KaiWeather
Stay up-to-date with reliable weather
forecasts. Simply go to Menu/KaiWeather and
set your city.
QR Reader
The app will automatically recognise the QR
code and takes you where you need to go.
Google
This is a quick access to google browser to
get your needed information on-line.
Games
You can have access to a multiples kind of
games on the KAIOS store, section“Games”.
YouTube
YouTube is an online video-sharing
application where users can upload, view,
and share videos. Available content includes
video clips, TV clips, music videos, and other
content such as video blogging, short original
videos, and educational videos. It supports
a streaming function that allows you to start
with a 4 digit code of your choice. Follow the
on screen instructions for each menu.
Change Ringtones
Change ringtones by going to Settings/
Personalisation/Sound/Tones/Ringtones.
Change Wallpaper
Change Wallpaper of the home screen by
going to Settings/Personalisation/Display/
Wallpaper.
Screen Timeout
If your device is idle for a period of time, the
screen will turn o to save battery power.
To set a longer or shorter time go to Menu/
Settings/Personalisation/Display/Screen
Timeout.
Memory
The TT240 has 4GB internal memory. For
extra memory space you can install a micro
SD card (which is sold separately) no larger
than 32GB.
Accessibility Options
Navigate to Menu/Settings/Device/
Accessibility to nd helpful features like
colour invert, captions, mono audio, volume
balance and hearing aid compatibility.
Restore Settings
Go to Menu/Settings/ Device/Device
Information/Reset Phone to restore the
phone back to factory settings. If you restore
the factory data, your device will reset to
the settings that were congured at the
factory. All of your personal data from the
internal device storage, including account
information, the system and application
settings, and any downloaded applications
will be erased. Resetting your device does not
erase any system software updates that have
been downloaded or any les on a microSD
card, such as music or photos.
Troubleshooting
Before contacting the service Centre, you
are advised to follow the instructions below:
You are advised to fully charge the battery
for optimal operation. Avoid storing large
amounts of data in your phone as this
may aect its performance. Use the FOTA
(Firmware Over The Air) Upgrade tool to
update your phone’s software. To access
Update phone, press Settings\Device\Device
Information\Software Update
My phone can’t be switched on or is frozen
1. Check the battery contacts, remove and
reinstall your battery, then turn your phone
on.
2. Check the battery power level, charge for at
least 20 minutes.
My phone has not responded for several
minutes
1. Restart your phone by pressing and
holding the Back/End Key
2. Remove the battery and re-insert it, then
restart the phone.
My phone turns o by itself
1. Check whether your phone is locked
when not in use, and make sure you don’t
accidentally turn o your phone when
locking it by pressing the Back/End Key
2. Check the battery charge level.
My phone can’t charge properly
1. Make sure you are using a TTfone battery
and the charger cable from the box.
2. Make sure your battery is inserted properly and
clean the battery contact if it’s dirty. It must be
inserted before plugging in the charger.
Calendar
Use Calendar to create and manage events,
meetings and appointments. Depending on
your synchronisation settings, the calendar
on the device remains synchronised with the
calendar on the web.
Open the calendar by going to Menu/
Calendar and press the left soft key to start
adding a new event. Set the time and date
and event details then press SAVE.
Notes
This is where you can make short text notes
by going to Menu/Note.
Calculator
The Calculator can perform basic
mathematical operations. Go to Menu/
Calculator to open the app.
Unit Converter
It is a smart, simple and easy to use interface
to convert various units. Go to Menu/Unit
Conv.
Todo
Mange your time and list of activities to plan
your day ahead and increase productivity, go
to Menu/Todo.
Horoscope
You can get your daily horoscope.
File Manager
Manage the contents and properties of
les. You can open, delete, move, copy and
rename les.
Settings
Setting the date and Time
When you rst turn on your device, there
is an option to update the date and time
automatically using the time provided
by your network. You can’t set the date,
time, and time zone manually if using the
automatic option.
To manually adjust the date and time settings
go to Menu/Settings/Personalisation/Date
& Time.
Display Settings
Go to Menu/Settings/Personalisation/
Display/Brightness to adjust the screen
brightness levels.
Over-the-air Upgrade
Using the Over-the-air Upgrade tool you
can update your phone’s software. To access
Update phone select Settings/Device/Device
Information/Software Update. If you want to
update the system, select Download, after it
is done please select Install to complete the
upgrade. Now your phone’s software will be
the latest version. You should turn on data
connection before searching for updates.
Settings for auto-check intervals is also
available once you restart the phone. If you
have chosen auto-check, when the system
discovers the new version, the notication
also will show in status bar.
Bluetooth®
Use Bluetooth® on the TT240 to connect to
your headset, car or to transfer les from
one phone to another. Navigate to Menu/
Settings/Network & Connectivity/Bluetooth®
Switch on Bluetooth® and pair your
devices, make sure the other device is set to
discoverable mode.
Privacy & Security
Menu/Settings/Privacy & Security in this menu
you can check app permissions, manage
Internet privacy settings and set a screen lock
I am unable to add a contact in my contacts
Make sure that your SIM card contacts are not
full; delete some les or save the les in the
phone contacts.
I can’t access my voicemail
1. Make sure your operator’s voicemail
number is correctly entered.
2. Try later if the network is busy.
SIM card PIN locked
Contact your network operator to obtain the
PUK code (Personal Unblocking Key).
The phone can’t be detected by others via
Bluetooth
1. Make sure that Bluetooth is turned on and
your phone is visible to other users.
2. Make sure that the two phones are within
Bluetooth’s detection range.
Radio Frequency (RF) Exposure
and SAR
This device meets international guidelines
for exposure to radio waves. Your mobile
device is a radio transmitter and receiver. It is
designed and manufactured not to exceed
the limits for exposure to radio frequency
(RF) radiation recommended by international
guidelines (ICNIRP). These limits are part of the
comprehensive guidelines and establish the
permitted levels of RF energy for the general
population. The guidelines were developed by
independent scientic organizations through
periodic and thorough evaluation of scientic
studies. The exposure standard for mobile
devices employs a unit of measurement known
as the Specic Absorption Rate, or SAR. Although
the SAR is determined at the highest certied
power level, the actual SAR of the device while
operating can be well below the maximum
value. This is because the device is designed to
operate at multiple power levels so as to use
only the power required to reach the network. In
general, the closer you are to a base station, the
lower the power output of the device. SAR values
may vary depending on national reporting and
testing requirements and the network band.
Use of device accessories and enhancements
may result in dierent SAR values. The SAR limit
for mobile devices used by the public is 2.0 w/
kg (watts per kilogram) averaged over 10 grams
of body tissue. The guidelines incorporate a
substantial margin of safety to give additional
protection for the public and to account for any
variations in measurements. The highest SAR
Value - 1.790 w/kg.
Some features of the product and its accessories
described herein rely on the software installed,
capacities and settings of local network, and
may not be activated or may be limited by local
network operators or network service providers.
Therefore, the descriptions in this manual may
not exactly match the purchased product or its
accessories.
The manufacturer reserves the right to change
or modify any information or specications
contained in this manual without prior notice or
obligation.
The manufacturer is not responsible for the
legitimacy and quality of any products that
you upload or download through this device
including text, pictures, music, movies, and non-
built-in software with copyright protection. Any
consequences arising from the installation or
usage of the preceding products on this device is
accountable to you.
Check out our other fantastic range
of products at www.ttfone.com
watching videos almost as soon as they begin
downloading from the internet.
Maps
Google Maps oers satellite imagery, road
condition, topographic map and route
planning for traveling by foot, car, or public
transportation. By using this application, you
can get your own location, search for a place,
and get suggested route planning for your
trips.
Email
You can use the TT240 to read and send email
messages. Add an email account by going to
Menu/Email and follow the instructions. Write
an email by going to Menu/Email and select
COMPOSE, in the“To”eld type the email
address, add your subject and email content
and press SEND. You can also add attachments,
reply and forward emails and even search for
emails using the options menu.
Camera
Your mobile phone is tted with a camera for
taking photos and shooting videos:
• Store them in your“My les”.
• Send them in a whatsapp message to a
mobile phone.
• Customise your Home screen.
• Transfer them by data cable or memory card
to your computer.
To take a picture navigate to Menu/Camera
and press the center key to capture the image.
The TT240 is also tted with a front camera
for taking seles and using for video calls. To
change the camera to the front press the right
soft key for Options and select which Camera
you want to use.
Take pictures with a timer by selecting
Options/Self Timer in the camera app.
To view the photos you have taken go to
Menu/Gallery.
Video
Take videos by going to Menu/Camera and
then press the right navigation key. Use the
center key to start and stop recording. To view
the video recordings go to Menu/Video.
Recorder
Use the sound recorder to record voice notes
and messages by going to Menu/Recorder.
FM radio
Play your favourite FM radio stations, using a
wired headphone will give better reception.
Go to Menu/FM Radio and click TURN ON,
press the right soft key to scan for available
stations. To turn o the FM Radio press the
back button and then press TURN OFF.
Music
Music les can be transferred from a PC
onto your TT240 so you can listen to music
wherever you are. Ensure that the USB storage
has been enabled Settings/Storage tab/USB
Storage/Enabled, then connect your phone to
a PC using the USB cable. On the PC navigate
to the USB drive and copy your music across.
Gallery
This is where you can view and manage your
saved pictures by going to Menu/Gallery.
Torch
A handy torch light can be found at the top
of the TT240. When on the home screen hold
down the 0 key for 3 seconds to turn on the
torch, hold it down again to switch o.
Clock
You can add more than 10 Alarms and you can also
access timer and stopwatch. Go to Menu/Clock.
3. Make sure that your battery is not completely
discharged; if battery power is empty for a long
time, it may take around 20 minutes to display
the battery charger indicator on the screen.
4. Make sure charging is carried out under
normal conditions (0°C to +40°C).
5. When abroad, check that the voltage input
is compatible.
My phone can’t connect to a network or“No
service” is displayed
1. Try connecting in another location.
2. Verify the network coverage with your
operator.
3. Check with your operator that your SIM card
is valid.
4. Try selecting the available network(s)
manually.
5. Try connecting at a later time if the network
is overloaded.
My phone can’t connect to the Internet
1. Make sure that the internet access service of
your SIM card is available.
2. Check your phone’s Internet connecting
settings.
3. Make sure you are in a place with network
coverage.
4. Try connecting at a later time or another
location.
Invalid SIM card
1. Make sure the SIM card has been correctly
inserted.
2. Make sure the chip on your SIM card is not
damaged or scratched.
3. Make sure the service of your SIM card is
available.
Unable to make outgoing calls
1. Make sure you have dialled a valid number
and have pressed the call button.
2. For international calls, check the country and
area codes.
3. Make sure your phone is connected to a
network, and the network is not overloaded
or unavailable.
4. Check your subscription status with your
operator (credit, SIM card valid, etc.).
5. Make sure you have not barred outgoing calls.
6. Make sure that your phone is not in
aeroplane mode.
Unable to receive incoming calls
1. Make sure your phone is switched on
and connected to a network (check for
overloaded or unavailable network).
2. Check your subscription status with your
operator (credit, SIM card valid, etc.).
3. Make sure you have not forwarded
incoming calls.
4. Make sure that you have not barred certain
calls.
5. Make sure that your phone is not in
Aeroplane mode.
I can’t nd my contacts
1. Make sure your SIM card is not broken.
2. Make sure your SIM card is inserted properly.
3. Import all contacts stored in SIM card to phone.
The sound quality of the calls is poor
1. You can adjust the volume during a call by
pressing the Volume Up/down key.
2. Check the network strength
3. Make sure that the receiver, connector or
speaker on your phone is clean.
When I select a number from my contacts,
the number can’t be dialled
1. Make sure that you have correctly recorded
the number in your le.
2. Make sure that you have selected the country
prex when calling a foreign country.
11
8
10
7
12
9
www.ttfone.com
number key to call the saved phone number.
Go to Contacts/Options/Settings/Set Speed
Dial Contacts.
In Case of Emergency contacts or ICE
You can add up to 5 ICE contacts. Contacts/
Options/Settings/Set ICE Contacts. ICE Contacts
will be displayed at the top of your contact list,
so these can be accessed very easily
APPS
Please note some of the following apps need
an internet connection to use their services.
It is recommended to use Wi-Fi connections
when available to reduce costs for data trac.
Contact your service provider for detailed
subscription costs. To access the APPS from
the home screen press the center key to
display the app tray, use the navigation key to
select your chosen app.
Internet
The TT240 comes with a simplied Internet
browser you can use to access your favourite
websites. Go to Menu/Browser select
SEARCH, enter the web address and select
GO. The navigation key will act as a mouse
you can control with the pointer on the
screen
WhatsApp
Navigate to WhatsApp application and set up
your account, you will need Wi or Data and a
phone number to set up and use WhatsApp.
For help setting up visit www.ttfone.com/
support. Currently, voice and video calls are
not supported in WhatsApp.
Facebook
Navigate to Facebook application and set up
your account, you will need Wi or Data and
Facebook login to set up and use the app.
For help setting up visit www.ttfone.com/
support.
Google Assistant
Google Assistant is Google’s voice controlled
smart assistant that allows you to search
for information online, open apps on your
phone, send messages, etc. To access Google
Assistant press and hold the Center soft key
for 3 seconds. Speak into the microphone of
the device clearly and follow the on screen
instructions.
News
You can gain access to a tailored feed of
relevant news based on your location and
category, go to Menu/News.
KaiWeather
Stay up-to-date with reliable weather
forecasts. Simply go to Menu/KaiWeather and
set your city.
QR Reader
The app will automatically recognise the QR
code and takes you where you need to go.
Google
This is a quick access to google browser to
get your needed information on-line.
Games
You can have access to a multiples kind of
games on the KAIOS store, section “Games”.
YouTube
YouTube is an online video-sharing
application where users can upload, view,
and share videos. Available content includes
video clips, TV clips, music videos, and other
content such as video blogging, short original
videos, and educational videos. It supports
a streaming function that allows you to start
with a 4 digit code of your choice. Follow the
on screen instructions for each menu.
Change Ringtones
Change ringtones by going to Settings/
Personalisation/Sound/Tones/Ringtones.
Change Wallpaper
Change Wallpaper of the home screen by
going to Settings/Personalisation/Display/
Wallpaper.
Screen Timeout
If your device is idle for a period of time, the
screen will turn o to save battery power.
To set a longer or shorter time go to Menu/
Settings/Personalisation/Display/Screen
Timeout.
Memory
The TT240 has 4GB internal memory. For
extra memory space you can install a micro
SD card (which is sold separately) no larger
than 32GB.
Accessibility Options
Navigate to Menu/Settings/Device/
Accessibility to nd helpful features like
colour invert, captions, mono audio, volume
balance and hearing aid compatibility.
Restore Settings
Go to Menu/Settings/ Device/Device
Information/Reset Phone to restore the
phone back to factory settings. If you restore
the factory data, your device will reset to
the settings that were congured at the
factory. All of your personal data from the
internal device storage, including account
information, the system and application
settings, and any downloaded applications
will be erased. Resetting your device does not
erase any system software updates that have
been downloaded or any les on a microSD
card, such as music or photos.
Troubleshooting
Before contacting the service Centre, you
are advised to follow the instructions below:
You are advised to fully charge the battery
for optimal operation. Avoid storing large
amounts of data in your phone as this
may aect its performance. Use the FOTA
(Firmware Over The Air) Upgrade tool to
update your phone’s software. To access
Update phone, press Settings\Device\Device
Information\Software Update
My phone can’t be switched on or is frozen
1. Check the battery contacts, remove and
reinstall your battery, then turn your phone
on.
2. Check the battery power level, charge for at
least 20 minutes.
My phone has not responded for several
minutes
1. Restart your phone by pressing and
holding the Back/End Key
2. Remove the battery and re-insert it, then
restart the phone.
My phone turns o by itself
1. Check whether your phone is locked
when not in use, and make sure you don’t
accidentally turn o your phone when
locking it by pressing the Back/End Key
2. Check the battery charge level.
My phone can’t charge properly
1. Make sure you are using a TTfone battery
and the charger cable from the box.
2. Make sure your battery is inserted properly and
clean the battery contact if it’s dirty. It must be
inserted before plugging in the charger.
Calendar
Use Calendar to create and manage events,
meetings and appointments. Depending on
your synchronisation settings, the calendar
on the device remains synchronised with the
calendar on the web.
Open the calendar by going to Menu/
Calendar and press the left soft key to start
adding a new event. Set the time and date
and event details then press SAVE.
Notes
This is where you can make short text notes
by going to Menu/Note.
Calculator
The Calculator can perform basic
mathematical operations. Go to Menu/
Calculator to open the app.
Unit Converter
It is a smart, simple and easy to use interface
to convert various units. Go to Menu/Unit
Conv.
Todo
Mange your time and list of activities to plan
your day ahead and increase productivity, go
to Menu/Todo.
Horoscope
You can get your daily horoscope.
File Manager
Manage the contents and properties of
les. You can open, delete, move, copy and
rename les.
Settings
Setting the date and Time
When you rst turn on your device, there
is an option to update the date and time
automatically using the time provided
by your network. You can’t set the date,
time, and time zone manually if using the
automatic option.
To manually adjust the date and time settings
go to Menu/Settings/Personalisation/Date
& Time.
Display Settings
Go to Menu/Settings/Personalisation/
Display/Brightness to adjust the screen
brightness levels.
Over-the-air Upgrade
Using the Over-the-air Upgrade tool you
can update your phone’s software. To access
Update phone select Settings/Device/Device
Information/Software Update. If you want to
update the system, select Download, after it
is done please select Install to complete the
upgrade. Now your phone’s software will be
the latest version. You should turn on data
connection before searching for updates.
Settings for auto-check intervals is also
available once you restart the phone. If you
have chosen auto-check, when the system
discovers the new version, the notication
also will show in status bar.
Bluetooth®
Use Bluetooth® on the TT240 to connect to
your headset, car or to transfer les from
one phone to another. Navigate to Menu/
Settings/Network & Connectivity/Bluetooth®
Switch on Bluetooth® and pair your
devices, make sure the other device is set to
discoverable mode.
Privacy & Security
Menu/Settings/Privacy & Security in this menu
you can check app permissions, manage
Internet privacy settings and set a screen lock
I am unable to add a contact in my contacts
Make sure that your SIM card contacts are not
full; delete some les or save the les in the
phone contacts.
I can’t access my voicemail
1. Make sure your operator’s voicemail
number is correctly entered.
2. Try later if the network is busy.
SIM card PIN locked
Contact your network operator to obtain the
PUK code (Personal Unblocking Key).
The phone can’t be detected by others via
Bluetooth
1. Make sure that Bluetooth is turned on and
your phone is visible to other users.
2. Make sure that the two phones are within
Bluetooth’s detection range.
Radio Frequency (RF) Exposure
and SAR
This device meets international guidelines
for exposure to radio waves. Your mobile
device is a radio transmitter and receiver. It is
designed and manufactured not to exceed
the limits for exposure to radio frequency
(RF) radiation recommended by international
guidelines (ICNIRP). These limits are part of the
comprehensive guidelines and establish the
permitted levels of RF energy for the general
population. The guidelines were developed by
independent scientic organizations through
periodic and thorough evaluation of scientic
studies. The exposure standard for mobile
devices employs a unit of measurement known
as the Specic Absorption Rate, or SAR. Although
the SAR is determined at the highest certied
power level, the actual SAR of the device while
operating can be well below the maximum
value. This is because the device is designed to
operate at multiple power levels so as to use
only the power required to reach the network. In
general, the closer you are to a base station, the
lower the power output of the device. SAR values
may vary depending on national reporting and
testing requirements and the network band.
Use of device accessories and enhancements
may result in dierent SAR values. The SAR limit
for mobile devices used by the public is 2.0 w/
kg (watts per kilogram) averaged over 10 grams
of body tissue. The guidelines incorporate a
substantial margin of safety to give additional
protection for the public and to account for any
variations in measurements. The highest SAR
Value - 1.790 w/kg.
Some features of the product and its accessories
described herein rely on the software installed,
capacities and settings of local network, and
may not be activated or may be limited by local
network operators or network service providers.
Therefore, the descriptions in this manual may
not exactly match the purchased product or its
accessories.
The manufacturer reserves the right to change
or modify any information or specications
contained in this manual without prior notice or
obligation.
The manufacturer is not responsible for the
legitimacy and quality of any products that
you upload or download through this device
including text, pictures, music, movies, and non-
built-in software with copyright protection. Any
consequences arising from the installation or
usage of the preceding products on this device is
accountable to you.
Check out our other fantastic range
of products at www.ttfone.com
watching videos almost as soon as they begin
downloading from the internet.
Maps
Google Maps oers satellite imagery, road
condition, topographic map and route
planning for traveling by foot, car, or public
transportation. By using this application, you
can get your own location, search for a place,
and get suggested route planning for your
trips.
Email
You can use the TT240 to read and send email
messages. Add an email account by going to
Menu/Email and follow the instructions. Write
an email by going to Menu/Email and select
COMPOSE, in the “To”eld type the email
address, add your subject and email content
and press SEND. You can also add attachments,
reply and forward emails and even search for
emails using the options menu.
Camera
Your mobile phone is tted with a camera for
taking photos and shooting videos:
• Store them in your“My les”.
• Send them in a whatsapp message to a
mobile phone.
• Customise your Home screen.
• Transfer them by data cable or memory card
to your computer.
To take a picture navigate to Menu/Camera
and press the center key to capture the image.
The TT240 is also tted with a front camera
for taking seles and using for video calls. To
change the camera to the front press the right
soft key for Options and select which Camera
you want to use.
Take pictures with a timer by selecting
Options/Self Timer in the camera app.
To view the photos you have taken go to
Menu/Gallery.
Video
Take videos by going to Menu/Camera and
then press the right navigation key. Use the
center key to start and stop recording. To view
the video recordings go to Menu/Video.
Recorder
Use the sound recorder to record voice notes
and messages by going to Menu/Recorder.
FM radio
Play your favourite FM radio stations, using a
wired headphone will give better reception.
Go to Menu/FM Radio and click TURN ON,
press the right soft key to scan for available
stations. To turn o the FM Radio press the
back button and then press TURN OFF.
Music
Music les can be transferred from a PC
onto your TT240 so you can listen to music
wherever you are. Ensure that the USB storage
has been enabled Settings/Storage tab/USB
Storage/Enabled, then connect your phone to
a PC using the USB cable. On the PC navigate
to the USB drive and copy your music across.
Gallery
This is where you can view and manage your
saved pictures by going to Menu/Gallery.
Torch
A handy torch light can be found at the top
of the TT240. When on the home screen hold
down the 0 key for 3 seconds to turn on the
torch, hold it down again to switch o.
Clock
You can add more than 10 Alarms and you can also
access timer and stopwatch. Go to Menu/Clock.
3. Make sure that your battery is not completely
discharged; if battery power is empty for a long
time, it may take around 20 minutes to display
the battery charger indicator on the screen.
4. Make sure charging is carried out under
normal conditions (0°C to +40°C).
5. When abroad, check that the voltage input
is compatible.
My phone can’t connect to a network or“No
service” is displayed
1. Try connecting in another location.
2. Verify the network coverage with your
operator.
3. Check with your operator that your SIM card
is valid.
4. Try selecting the available network(s)
manually.
5. Try connecting at a later time if the network
is overloaded.
My phone can’t connect to the Internet
1. Make sure that the internet access service of
your SIM card is available.
2. Check your phone’s Internet connecting
settings.
3. Make sure you are in a place with network
coverage.
4. Try connecting at a later time or another
location.
Invalid SIM card
1. Make sure the SIM card has been correctly
inserted.
2. Make sure the chip on your SIM card is not
damaged or scratched.
3. Make sure the service of your SIM card is
available.
Unable to make outgoing calls
1. Make sure you have dialled a valid number
and have pressed the call button.
2. For international calls, check the country and
area codes.
3. Make sure your phone is connected to a
network, and the network is not overloaded
or unavailable.
4. Check your subscription status with your
operator (credit, SIM card valid, etc.).
5. Make sure you have not barred outgoing calls.
6. Make sure that your phone is not in
aeroplane mode.
Unable to receive incoming calls
1. Make sure your phone is switched on
and connected to a network (check for
overloaded or unavailable network).
2. Check your subscription status with your
operator (credit, SIM card valid, etc.).
3. Make sure you have not forwarded
incoming calls.
4. Make sure that you have not barred certain
calls.
5. Make sure that your phone is not in
Aeroplane mode.
I can’t nd my contacts
1. Make sure your SIM card is not broken.
2. Make sure your SIM card is inserted properly.
3. Import all contacts stored in SIM card to phone.
The sound quality of the calls is poor
1. You can adjust the volume during a call by
pressing the Volume Up/down key.
2. Check the network strength
3. Make sure that the receiver, connector or
speaker on your phone is clean.
When I select a number from my contacts,
the number can’t be dialled
1. Make sure that you have correctly recorded
the number in your le.
2. Make sure that you have selected the country
prex when calling a foreign country.
11
8
10
7
12
9
www.ttfone.com
number key to call the saved phone number.
Go to Contacts/Options/Settings/Set Speed
Dial Contacts.
In Case of Emergency contacts or ICE
You can add up to 5 ICE contacts. Contacts/
Options/Settings/Set ICE Contacts. ICE Contacts
will be displayed at the top of your contact list,
so these can be accessed very easily
APPS
Please note some of the following apps need
an internet connection to use their services.
It is recommended to use Wi-Fi connections
when available to reduce costs for data trac.
Contact your service provider for detailed
subscription costs. To access the APPS from
the home screen press the center key to
display the app tray, use the navigation key to
select your chosen app.
Internet
The TT240 comes with a simplied Internet
browser you can use to access your favourite
websites. Go to Menu/Browser select
SEARCH, enter the web address and select
GO. The navigation key will act as a mouse
you can control with the pointer on the
screen
WhatsApp
Navigate to WhatsApp application and set up
your account, you will need Wi or Data and a
phone number to set up and use WhatsApp.
For help setting up visit www.ttfone.com/
support. Currently, voice and video calls are
not supported in WhatsApp.
Facebook
Navigate to Facebook application and set up
your account, you will need Wi or Data and
Facebook login to set up and use the app.
For help setting up visit www.ttfone.com/
support.
Google Assistant
Google Assistant is Google’s voice controlled
smart assistant that allows you to search
for information online, open apps on your
phone, send messages, etc. To access Google
Assistant press and hold the Center soft key
for 3 seconds. Speak into the microphone of
the device clearly and follow the on screen
instructions.
News
You can gain access to a tailored feed of
relevant news based on your location and
category, go to Menu/News.
KaiWeather
Stay up-to-date with reliable weather
forecasts. Simply go to Menu/KaiWeather and
set your city.
QR Reader
The app will automatically recognise the QR
code and takes you where you need to go.
Google
This is a quick access to google browser to
get your needed information on-line.
Games
You can have access to a multiples kind of
games on the KAIOS store, section“Games”.
YouTube
YouTube is an online video-sharing
application where users can upload, view,
and share videos. Available content includes
video clips, TV clips, music videos, and other
content such as video blogging, short original
videos, and educational videos. It supports
a streaming function that allows you to start
with a 4 digit code of your choice. Follow the
on screen instructions for each menu.
Change Ringtones
Change ringtones by going to Settings/
Personalisation/Sound/Tones/Ringtones.
Change Wallpaper
Change Wallpaper of the home screen by
going to Settings/Personalisation/Display/
Wallpaper.
Screen Timeout
If your device is idle for a period of time, the
screen will turn o to save battery power.
To set a longer or shorter time go to Menu/
Settings/Personalisation/Display/Screen
Timeout.
Memory
The TT240 has 4GB internal memory. For
extra memory space you can install a micro
SD card (which is sold separately) no larger
than 32GB.
Accessibility Options
Navigate to Menu/Settings/Device/
Accessibility to nd helpful features like
colour invert, captions, mono audio, volume
balance and hearing aid compatibility.
Restore Settings
Go to Menu/Settings/ Device/Device
Information/Reset Phone to restore the
phone back to factory settings. If you restore
the factory data, your device will reset to
the settings that were congured at the
factory. All of your personal data from the
internal device storage, including account
information, the system and application
settings, and any downloaded applications
will be erased. Resetting your device does not
erase any system software updates that have
been downloaded or any les on a microSD
card, such as music or photos.
Troubleshooting
Before contacting the service Centre, you
are advised to follow the instructions below:
You are advised to fully charge the battery
for optimal operation. Avoid storing large
amounts of data in your phone as this
may aect its performance. Use the FOTA
(Firmware Over The Air) Upgrade tool to
update your phone’s software. To access
Update phone, press Settings\Device\Device
Information\Software Update
My phone can’t be switched on or is frozen
1. Check the battery contacts, remove and
reinstall your battery, then turn your phone
on.
2. Check the battery power level, charge for at
least 20 minutes.
My phone has not responded for several
minutes
1. Restart your phone by pressing and
holding the Back/End Key
2. Remove the battery and re-insert it, then
restart the phone.
My phone turns o by itself
1. Check whether your phone is locked
when not in use, and make sure you don’t
accidentally turn o your phone when
locking it by pressing the Back/End Key
2. Check the battery charge level.
My phone can’t charge properly
1. Make sure you are using a TTfone battery
and the charger cable from the box.
2. Make sure your battery is inserted properly and
clean the battery contact if it’s dirty. It must be
inserted before plugging in the charger.
Calendar
Use Calendar to create and manage events,
meetings and appointments. Depending on
your synchronisation settings, the calendar
on the device remains synchronised with the
calendar on the web.
Open the calendar by going to Menu/
Calendar and press the left soft key to start
adding a new event. Set the time and date
and event details then press SAVE.
Notes
This is where you can make short text notes
by going to Menu/Note.
Calculator
The Calculator can perform basic
mathematical operations. Go to Menu/
Calculator to open the app.
Unit Converter
It is a smart, simple and easy to use interface
to convert various units. Go to Menu/Unit
Conv.
Todo
Mange your time and list of activities to plan
your day ahead and increase productivity, go
to Menu/Todo.
Horoscope
You can get your daily horoscope.
File Manager
Manage the contents and properties of
les. You can open, delete, move, copy and
rename les.
Settings
Setting the date and Time
When you rst turn on your device, there
is an option to update the date and time
automatically using the time provided
by your network. You can’t set the date,
time, and time zone manually if using the
automatic option.
To manually adjust the date and time settings
go to Menu/Settings/Personalisation/Date
& Time.
Display Settings
Go to Menu/Settings/Personalisation/
Display/Brightness to adjust the screen
brightness levels.
Over-the-air Upgrade
Using the Over-the-air Upgrade tool you
can update your phone’s software. To access
Update phone select Settings/Device/Device
Information/Software Update. If you want to
update the system, select Download, after it
is done please select Install to complete the
upgrade. Now your phone’s software will be
the latest version. You should turn on data
connection before searching for updates.
Settings for auto-check intervals is also
available once you restart the phone. If you
have chosen auto-check, when the system
discovers the new version, the notication
also will show in status bar.
Bluetooth®
Use Bluetooth® on the TT240 to connect to
your headset, car or to transfer les from
one phone to another. Navigate to Menu/
Settings/Network & Connectivity/Bluetooth®
Switch on Bluetooth® and pair your
devices, make sure the other device is set to
discoverable mode.
Privacy & Security
Menu/Settings/Privacy & Security in this menu
you can check app permissions, manage
Internet privacy settings and set a screen lock
I am unable to add a contact in my contacts
Make sure that your SIM card contacts are not
full; delete some les or save the les in the
phone contacts.
I can’t access my voicemail
1. Make sure your operator’s voicemail
number is correctly entered.
2. Try later if the network is busy.
SIM card PIN locked
Contact your network operator to obtain the
PUK code (Personal Unblocking Key).
The phone can’t be detected by others via
Bluetooth
1. Make sure that Bluetooth is turned on and
your phone is visible to other users.
2. Make sure that the two phones are within
Bluetooth’s detection range.
Radio Frequency (RF) Exposure
and SAR
This device meets international guidelines
for exposure to radio waves. Your mobile
device is a radio transmitter and receiver. It is
designed and manufactured not to exceed
the limits for exposure to radio frequency
(RF) radiation recommended by international
guidelines (ICNIRP). These limits are part of the
comprehensive guidelines and establish the
permitted levels of RF energy for the general
population. The guidelines were developed by
independent scientic organizations through
periodic and thorough evaluation of scientic
studies. The exposure standard for mobile
devices employs a unit of measurement known
as the Specic Absorption Rate, or SAR. Although
the SAR is determined at the highest certied
power level, the actual SAR of the device while
operating can be well below the maximum
value. This is because the device is designed to
operate at multiple power levels so as to use
only the power required to reach the network. In
general, the closer you are to a base station, the
lower the power output of the device. SAR values
may vary depending on national reporting and
testing requirements and the network band.
Use of device accessories and enhancements
may result in dierent SAR values. The SAR limit
for mobile devices used by the public is 2.0 w/
kg (watts per kilogram) averaged over 10 grams
of body tissue. The guidelines incorporate a
substantial margin of safety to give additional
protection for the public and to account for any
variations in measurements. The highest SAR
Value - 1.790 w/kg.
Some features of the product and its accessories
described herein rely on the software installed,
capacities and settings of local network, and
may not be activated or may be limited by local
network operators or network service providers.
Therefore, the descriptions in this manual may
not exactly match the purchased product or its
accessories.
The manufacturer reserves the right to change
or modify any information or specications
contained in this manual without prior notice or
obligation.
The manufacturer is not responsible for the
legitimacy and quality of any products that
you upload or download through this device
including text, pictures, music, movies, and non-
built-in software with copyright protection. Any
consequences arising from the installation or
usage of the preceding products on this device is
accountable to you.
Check out our other fantastic range
of products at www.ttfone.com
watching videos almost as soon as they begin
downloading from the internet.
Maps
Google Maps oers satellite imagery, road
condition, topographic map and route
planning for traveling by foot, car, or public
transportation. By using this application, you
can get your own location, search for a place,
and get suggested route planning for your
trips.
Email
You can use the TT240 to read and send email
messages. Add an email account by going to
Menu/Email and follow the instructions. Write
an email by going to Menu/Email and select
COMPOSE, in the“To”eld type the email
address, add your subject and email content
and press SEND. You can also add attachments,
reply and forward emails and even search for
emails using the options menu.
Camera
Your mobile phone is tted with a camera for
taking photos and shooting videos:
• Store them in your“My les”.
• Send them in a whatsapp message to a
mobile phone.
• Customise your Home screen.
• Transfer them by data cable or memory card
to your computer.
To take a picture navigate to Menu/Camera
and press the center key to capture the image.
The TT240 is also tted with a front camera
for taking seles and using for video calls. To
change the camera to the front press the right
soft key for Options and select which Camera
you want to use.
Take pictures with a timer by selecting
Options/Self Timer in the camera app.
To view the photos you have taken go to
Menu/Gallery.
Video
Take videos by going to Menu/Camera and
then press the right navigation key. Use the
center key to start and stop recording. To view
the video recordings go to Menu/Video.
Recorder
Use the sound recorder to record voice notes
and messages by going to Menu/Recorder.
FM radio
Play your favourite FM radio stations, using a
wired headphone will give better reception.
Go to Menu/FM Radio and click TURN ON,
press the right soft key to scan for available
stations. To turn o the FM Radio press the
back button and then press TURN OFF.
Music
Music les can be transferred from a PC
onto your TT240 so you can listen to music
wherever you are. Ensure that the USB storage
has been enabled Settings/Storage tab/USB
Storage/Enabled, then connect your phone to
a PC using the USB cable. On the PC navigate
to the USB drive and copy your music across.
Gallery
This is where you can view and manage your
saved pictures by going to Menu/Gallery.
Torch
A handy torch light can be found at the top
of the TT240. When on the home screen hold
down the 0 key for 3 seconds to turn on the
torch, hold it down again to switch o.
Clock
You can add more than 10 Alarms and you can also
access timer and stopwatch. Go to Menu/Clock.
3. Make sure that your battery is not completely
discharged; if battery power is empty for a long
time, it may take around 20 minutes to display
the battery charger indicator on the screen.
4. Make sure charging is carried out under
normal conditions (0°C to +40°C).
5. When abroad, check that the voltage input
is compatible.
My phone can’t connect to a network or“No
service” is displayed
1. Try connecting in another location.
2. Verify the network coverage with your
operator.
3. Check with your operator that your SIM card
is valid.
4. Try selecting the available network(s)
manually.
5. Try connecting at a later time if the network
is overloaded.
My phone can’t connect to the Internet
1. Make sure that the internet access service of
your SIM card is available.
2. Check your phone’s Internet connecting
settings.
3. Make sure you are in a place with network
coverage.
4. Try connecting at a later time or another
location.
Invalid SIM card
1. Make sure the SIM card has been correctly
inserted.
2. Make sure the chip on your SIM card is not
damaged or scratched.
3. Make sure the service of your SIM card is
available.
Unable to make outgoing calls
1. Make sure you have dialled a valid number
and have pressed the call button.
2. For international calls, check the country and
area codes.
3. Make sure your phone is connected to a
network, and the network is not overloaded
or unavailable.
4. Check your subscription status with your
operator (credit, SIM card valid, etc.).
5. Make sure you have not barred outgoing calls.
6. Make sure that your phone is not in
aeroplane mode.
Unable to receive incoming calls
1. Make sure your phone is switched on
and connected to a network (check for
overloaded or unavailable network).
2. Check your subscription status with your
operator (credit, SIM card valid, etc.).
3. Make sure you have not forwarded
incoming calls.
4. Make sure that you have not barred certain
calls.
5. Make sure that your phone is not in
Aeroplane mode.
I can’t nd my contacts
1. Make sure your SIM card is not broken.
2. Make sure your SIM card is inserted properly.
3. Import all contacts stored in SIM card to phone.
The sound quality of the calls is poor
1. You can adjust the volume during a call by
pressing the Volume Up/down key.
2. Check the network strength
3. Make sure that the receiver, connector or
speaker on your phone is clean.
When I select a number from my contacts,
the number can’t be dialled
1. Make sure that you have correctly recorded
the number in your le.
2. Make sure that you have selected the country
prex when calling a foreign country.
11
8
10
7
12
9
www.ttfone.com
Table of contents
Other ttfone Cell Phone manuals

ttfone
ttfone Neptune User manual

ttfone
ttfone TT200 Mercury 2 User manual

ttfone
ttfone TITAN TT950 User manual

ttfone
ttfone TT970 User manual

ttfone
ttfone Jupiter User manual

ttfone
ttfone TT140 User manual

ttfone
ttfone TT26 User manual

ttfone
ttfone TT130 User manual

ttfone
ttfone TT31 Venus 2 User manual

ttfone
ttfone TT20 User manual


