manuals.online logo
Brands
  1. Home
  2. •
  3. Brands
  4. •
  5. Tyco Electronics
  6. •
  7. Crimping Tools
  8. •
  9. Tyco Electronics PRO-CRIMPER III User manual

Tyco Electronics PRO-CRIMPER III User manual

Instruction Sheet
PRO-CRIMPER* III Han
Tool Assembly 58551-1 408-4090
LOC B
1
of 3
E
2009 Tyco Electronics Corporation, Harrisburg, PA
All International ights eserved
TE logo and Tyco Electronics are trademarks.
*Trademark. Other products, logos, and company names used are the property of their respective owners.
TOOLING ASSISTANCE CENTE 1-800-722-1111
P ODUCT INFO MATION 1-800-522-6752 This controlled document is subject to change.
For latest revision and egional Customer Service,
visit our website at
www.tycoelectronics.com
16 JAN 09 ev A
an Die Assembly 58552-1
PROPER USE GUIDELINES
CumulativeTrauma Disorderscanresultfromthe prolongeduseofmanuallypowered handtools.Handtoolsare intendedforoccasionaluseand lowvolume
applications. A wide selection of powered application equipment for extended-use, production operations is available.
Figure 1
Crimper Die
(Stationary)
Anvil Die
(Movable)
PRO-CRIMPER III
Fra e Asse bly
58532-1
Cri ping Die
Asse bly 58552-1
1. INTRODUCTION
This instruction sheet provides application and
maintenance procedures for PRO–CRIMPER III Hand
Tool Assembly 58551–1 and Crimping Die Assembly
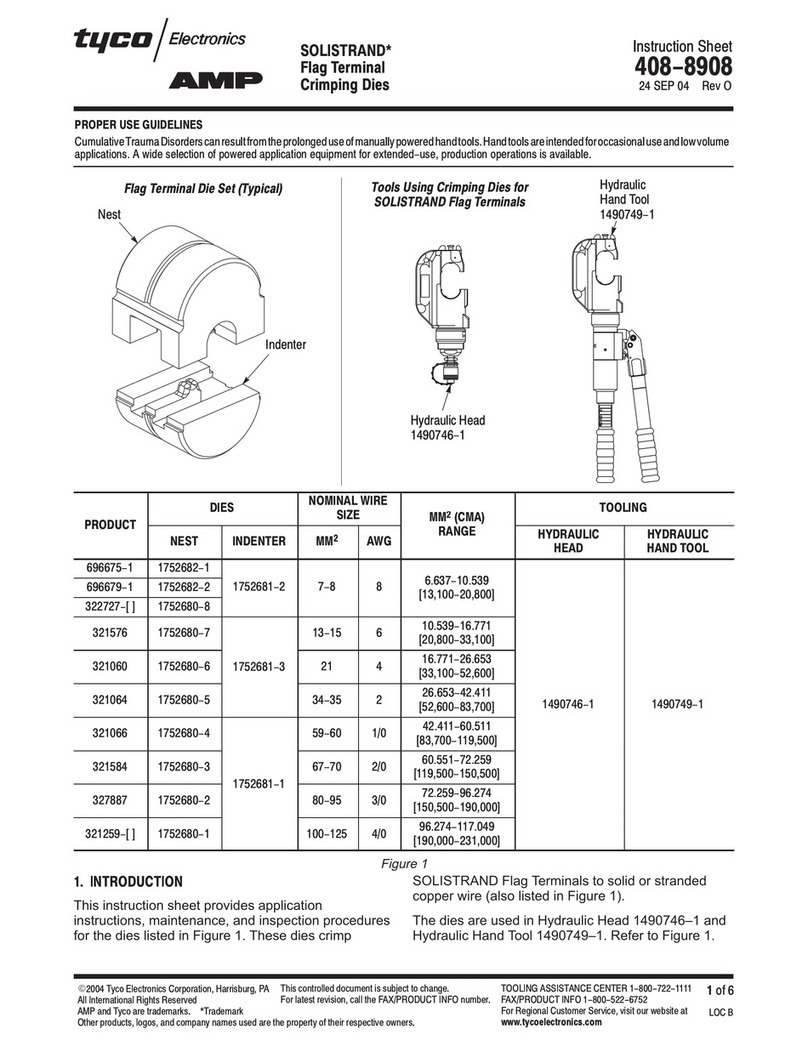
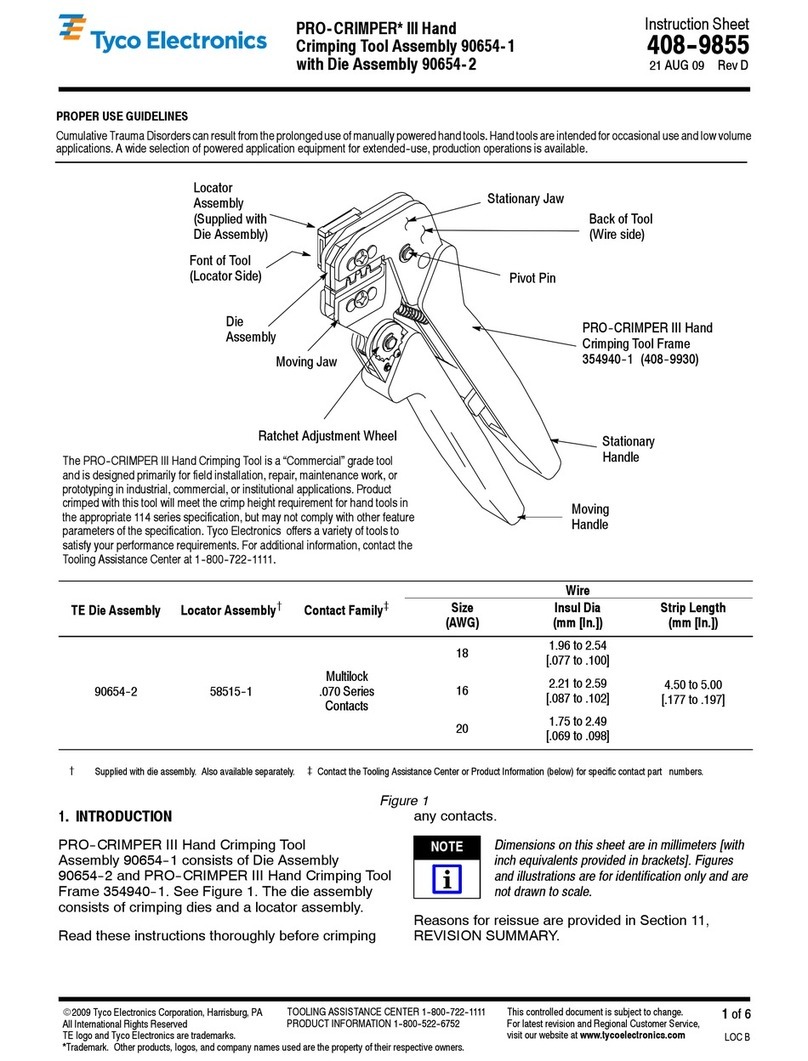
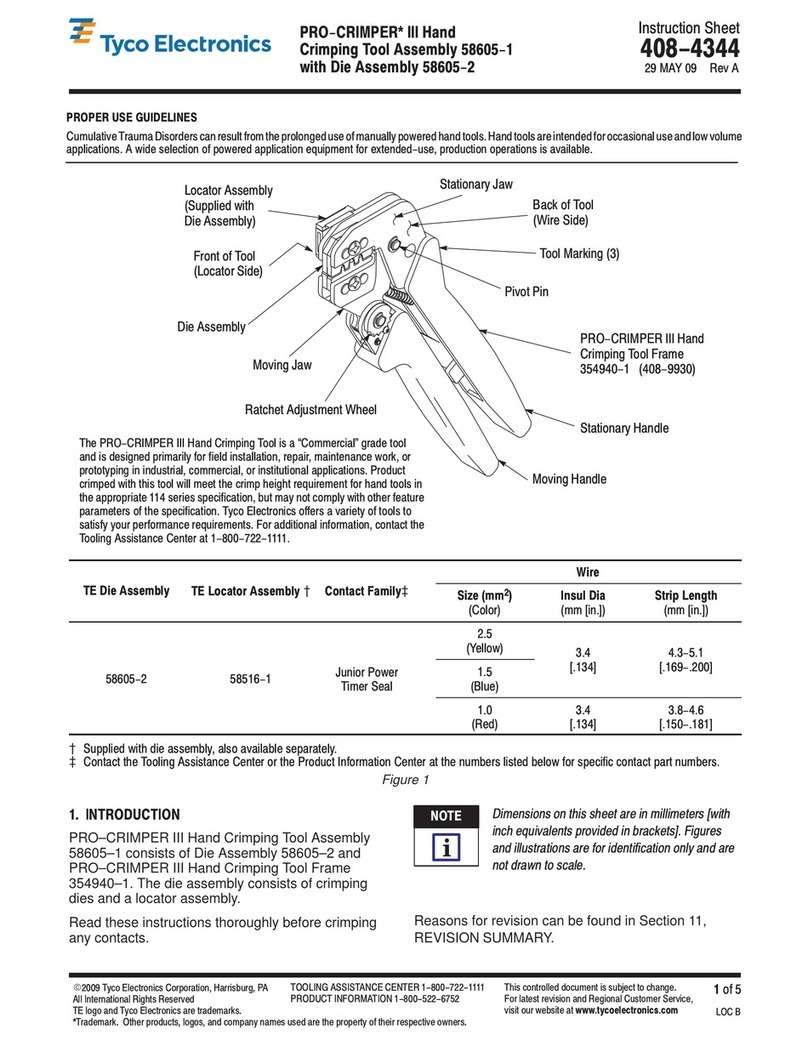
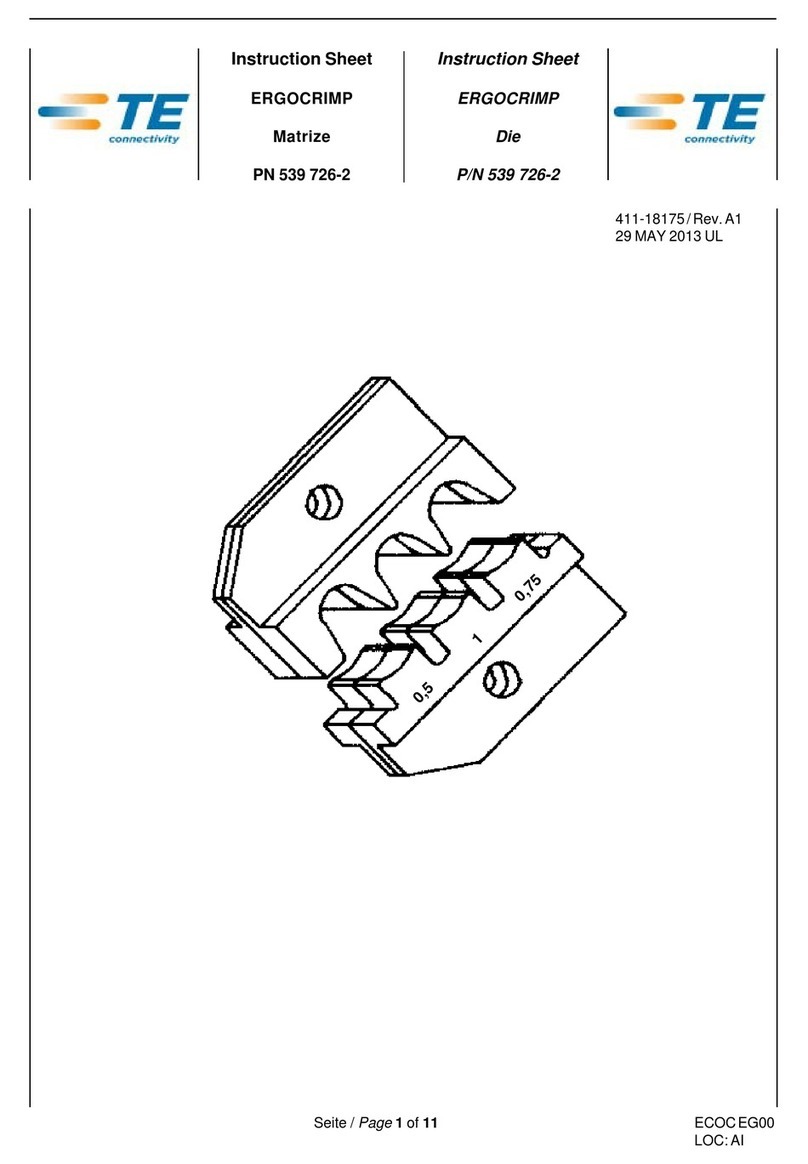
58552–1. See Figure 1. The hand tool consists of the
die assembly and PRO–CRIMPER III Hand Tool
Frame Assembly 58532–1, and crimps STC Fiber
Optic Connectors. The die assembly can be
purchased separately, or purchased with the hand
tool.
The information on connector part numbers and
connector assembly procedures, refer to the
appropriate instruction sheet packaged with the
connector.
All di ensions in this docu ent are in illi eters
[with inches in brackets]. Figures and Illustrations
are for reference only and are not drawn to scale.
Refer to Instruction Sheet 408–4020 for information
concerning the use and maintenance of Hand Tool
Frame Assembly 58532–1. Read these and all
referenced materials before using the die assemblies.
Reasons for reissue are provided in Section 7,
REVISION SUMMARY.
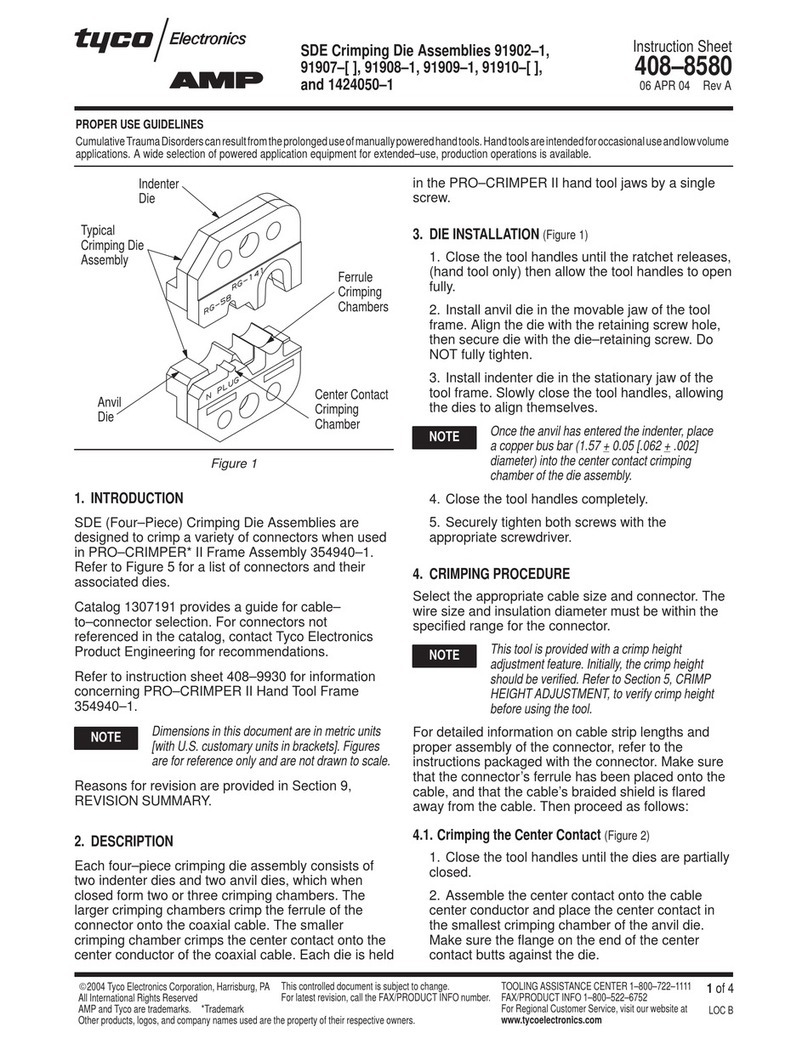
2. DESCRIPTION
The die assembly features an anvil die and a crimper
die. When closed, the dies produce four crimping
chambers that crimp the ferrule of the connector onto
the fiber–optic cable. Each die is held in the tool jaws
with a single die–retaining screw. See Figure 2.
3. DIE INSTALLATION
(Figure 2)
1. Close the tool handles until the ratchet releases;
then allow the tool handles to open FULLY.
2. Install anvil die in the moving jaw of the hand
tool. Align the die with the retaining screw hole;
then secure die with the button head cap screw. Do
NOT fully tighten.
3. Install crimper die in the stationary jaw of the
hand tool. Slowly close the tool handles, allowing
the die to align itself with the upper die. When dies
are properly aligned, securely tighten both screws.
NOTE
i
408-4090
PRO-CRIMPER III Hand Tool Ass mbly 58551-1
Rev
A2
of 3 Tyco Elec ronics Corpora ion
Figure 2
S a ionary Jaw
Crimper Die
(S a ionary)
Anvil Die
(Movable) Moving
Jaw Ra che
Die Re aining
Screws
4. CRIMPING PROCEDURE
(Figure 3)
Prepare connector and cable according to the
instructions packaged with the connector, and
proceed as follows:
1. Close the tool handles until the ratchet releases;
then allow the tool handles to open FULLY.
2. Place connector in the appropriate crimping
section of dies as shown in Figure 3.
3. Close the tool handles until the ratchet releases;
then open the tool handles to remove the crimped
connector.
5. MAINTENANCE/INSPECTION
5.1. Maint nanc
1. Remove dust, moisture, and other contaminants
with a clean, soft brush, or a clean, soft, lint–free
cloth. Do NOT use any objects that could damage
the dies or tool.
2. Make sure that the proper die–retaining screws
are properly secured.
3. When the dies are not in use, store them in a
clean, dry area.
4. Store the tool with the tool handles closed to
prevent objects from becoming lodged within the
jaws.
5.2. Insp ction
1. Remove all lubrication and accumulated film
from the dies by immersing the dies in a suitable
commercial degreaser.
2. Make certain that all die–retaining screws and
die components are properly secured.
Cable
Connec or
Body
Ra che
Figure 3
3. Inspect the crimping surfaces for flattened,
chipped, worn, or cracked areas. If damage is
evident, the dies must be replaced. Refer to
Section 6, REPLACEMENT.
5.3. M asuring Di Op ning
The die assembly will perform correctly as long as:
(1) the product specified is correct for the application,
(2) the specific die assembly is used, (3) the die
assembly has been measured to ensure that the
openings are correct, and (4) the tool has been
adjusted correctly. Figure 5 provides information on
die openings.
408-4090
PRO-CRIMPER III Han Tool Assembly 58551-1
3
of 3Rev
A
Tyco Electronics Corporation
Screwdriver
Ratc et
Adjustment
W eel
Lockscrew (Typ)
Figure 4
5.4. Ratchet A justment
(Figure 4)
The tool frame assembly ratchet mechanism features
an adjustment wheel with eight settings. If the crimp
is not acceptable, adjust the ratchet as follows:
1. Remove the lockscrew from the ratchet
adjustment wheel.
2. With a screwdriver, adjust the ratchet wheel
from the opposite side of the tool.
3. Observe the ratchet adjustment wheel. If a
tighter crimp is required, rotate the adjustment
wheel COUNTERCLOCKWISE to a
higher–numbered setting. If a looser crimp is
required, rotate the adjustment wheel
CLOCKWISE to a lower–numbered setting.
4. Replace the lockscrew.
5. Make a sample crimp and measure the crimp
height. If the crimp is acceptable, replace and
secure the lockscrew. If the dimension is
unacceptable, continue to adjust the ratchet, and
again measure a sample crimp.
6. REPLACEMENT
PRO–CRIMPER III Hand Tool Assembly 58551–1
and Die Assembly 58552–1 are inspected before
shipment. Tyco Electronics recommends that the dies
be inspected immediately upon arrival at your facility
to ensure that the dies have not been damaged
during shipment.
Order replacements through your Tyco Electronics
Representative, or call 1–800–526–5142, or send a
facsimile of your purchase order to 1–717–986–7605,
or write to:
CUSTOMER SERVICE (38–35)
TYCO ELECTRONICS CORPORATION
P.O. BOX 3608
HARRISBURG, PA 17105–3608
7. REVISION SUMMARY
S
Updated document to corporate requirements
S
New format
Figure 5
10.16 [.400]
Ref
3.84 +0.10
[.151 +.004]
3.25 +0.10
[.128 +.004]
4.37 +0.10
[.172 +.004]
5.18 +0.10
[.204 +.004]

This manual suits for next models

2

Other Tyco Electronics Crimping Tools manuals

Tyco Electronics PRO-CRIMPER III User manual
Tyco Electronics

Tyco Electronics PRO-CRIMPER III User manual

Tyco Electronics PRO-CRIMPER III User manual

Tyco Electronics

Tyco Electronics PRO-CRIMPER III User manual

Tyco Electronics 9-1478246-0 User manual

Tyco Electronics

Tyco Electronics 9-1478246-0 User manual

Tyco Electronics 46073 User manual

Tyco Electronics

Tyco Electronics 46073 User manual

Tyco Electronics PRO-CRIMPER III User manual

Tyco Electronics

Tyco Electronics PRO-CRIMPER III User manual

Tyco Electronics 58649-1 User manual

Tyco Electronics

Tyco Electronics 58649-1 User manual

Tyco Electronics 2-1579004-9 User manual

Tyco Electronics

Tyco Electronics 2-1579004-9 User manual

Tyco Electronics DYNA-CRIMP User manual

Tyco Electronics

Tyco Electronics DYNA-CRIMP User manual

Tyco Electronics 2063195-1 User manual

Tyco Electronics

Tyco Electronics 2063195-1 User manual

Tyco Electronics 58613-1 User manual

Tyco Electronics

Tyco Electronics 58613-1 User manual

Tyco Electronics PRO-CRIMPER III User manual

Tyco Electronics

Tyco Electronics PRO-CRIMPER III User manual

Tyco Electronics AMP SDE PEW 12 User manual

Tyco Electronics

Tyco Electronics AMP SDE PEW 12 User manual

Tyco Electronics 0-0654174-1 User manual

Tyco Electronics

Tyco Electronics 0-0654174-1 User manual

Tyco Electronics PRO-CRIMPER III User manual

Tyco Electronics

Tyco Electronics PRO-CRIMPER III User manual

Tyco Electronics 58591-1 User manual

Tyco Electronics

Tyco Electronics 58591-1 User manual

Tyco Electronics 3-1579002-1 User manual
Tyco Electronics

Tyco Electronics 3-1579002-1 User manual

Tyco Electronics PRO-CRIMPER III User manual

Tyco Electronics

Tyco Electronics PRO-CRIMPER III User manual
Tyco Electronics 58571-1 User manual

Tyco Electronics

Tyco Electronics 58571-1 User manual

Tyco Electronics PIDG STRATO-THERM 1-576778-0 User manual

Tyco Electronics

Tyco Electronics PIDG STRATO-THERM 1-576778-0 User manual

Tyco Electronics PRO-CRIMPER III 58564-1 User manual

Tyco Electronics

Tyco Electronics PRO-CRIMPER III 58564-1 User manual

Tyco Electronics PRO-CRIMPER III User manual

Tyco Electronics

Tyco Electronics PRO-CRIMPER III User manual

Tyco Electronics 69067 User manual

Tyco Electronics

Tyco Electronics 69067 User manual

Tyco Electronics 58605-1 User manual

Tyco Electronics

Tyco Electronics 58605-1 User manual

Tyco Electronics 45449 User manual

Tyco Electronics

Tyco Electronics 45449 User manual

Popular Crimping Tools manuals by other brands

Emerson Klauke ESG 105RMCCFM manual

Emerson

Emerson Klauke ESG 105RMCCFM manual

Parker Parkrimp 2 - 83CE-083U instruction manual

Parker

Parker Parkrimp 2 - 83CE-083U instruction manual

TE Connectivity PDT-48-00 instruction sheet

TE Connectivity

TE Connectivity PDT-48-00 instruction sheet

molex 63823-7570 Specification sheet

molex

molex 63823-7570 Specification sheet

ZURN QickClamp QCRTQCRM Operation instructions

ZURN

ZURN QickClamp QCRTQCRM Operation instructions

Klauke TEXTRON K502 instruction manual

Klauke TEXTRON

Klauke TEXTRON K502 instruction manual

molex 63811-5700 quick start guide

molex

molex 63811-5700 quick start guide

Panduit MSPT-1.3 quick start guide

Panduit

Panduit MSPT-1.3 quick start guide

koban KEB-611 manual

koban

koban KEB-611 manual

molex 207129 Series Specification sheet

molex

molex 207129 Series Specification sheet

Elpress V611 Directions for use

Elpress

Elpress V611 Directions for use

Hilti NURON NCR 120-22 manual

Hilti

Hilti NURON NCR 120-22 manual

Greenlee GATOR EK1230 instruction manual

Greenlee

Greenlee GATOR EK1230 instruction manual

DMC AF8 Guide

DMC

DMC AF8 Guide

Klauke ESSGL instruction manual

Klauke

Klauke ESSGL instruction manual

Staubli PV-CZM operating instructions

Staubli

Staubli PV-CZM operating instructions

Cembre HT131-C Operation and maintenance manual

Cembre

Cembre HT131-C Operation and maintenance manual

molex 63827-1600 manual

molex

molex 63827-1600 manual

manuals.online logo
manuals.online logoBrands
  • About & Mission
  • Contact us
  • Privacy Policy
  • Terms and Conditions

Copyright 2025 Manuals.Online. All Rights Reserved.