TypeS BT56208 User manual

Important, retain for future reference:
Read carefully
Quick Connect Wireless Backup Cam
BT56208-50
& Use Instructions
BT56208

TABLE OF CONTENTS
1. Introduction ...............................................................................................................................................................................1
2. Package Contents ...................................................................................................................................................................2
3. Product Specications ..........................................................................................................................................................3
4. Installation Guide ....................................................................................................................................................................3
5. Settings and Operation ........................................................................................................................................................9
6. Safety Information ................................................................................................................................................................12
7. Maintenance & Warranty ....................................................................................................................................................14
8. General Information ............................................................................................................................................................19

1
Please read all of the installation instructions carefully before installing the product. Improper
installation will void manufacturer’s warranty. The installation instructions do not apply to all types
of vehicles, and are written as guidelines to assist in installing the system.
Consult an experienced technician if you are not comfortable installing the product. You can also
contact Winplus at 866.294.9244 to speak to one of our installation specialists if you have any
specic questions regarding the Quick Connect Wireless Backup Cam
BEFORE using the Quick Connect Wireless Backup Cam, please read the safety information
provided in this user manual. ALWAYS use the product as outlined in this user manual.
Please make sure to read and understand all local laws and regulations regarding cameras and their
use in a vehicle. Laws vary by state.
1. INTRODUCTION

2
1. 5” Dash Monitor
2. Quick Connect Wireless
Backup Cam
3. 12V/24V Power Adapter for Monitor
4. Hardwire Cable for Monitor
5. Suction Cup Mount for Monitor
6. Install Kit
7. USB Cable for Charge License
Plate Power
8. User’s Manual
9. Quick Install Guide
2. PACKAGE CONTENTS
7.
8.
9.
6.1.
2.
3.
4.
5.

3
1. Frequency: 2.4GHz
2. Operating Voltage: Monitor DC 12V/24V. License Plate Backup Camera DC 5V
3. Operating Temperature: -20~+50°C
4. Maximum Signal Range: 30 feet/10Metres
(without Interference or Obstruction)
5. Camera Water Resistance: IP65 rating
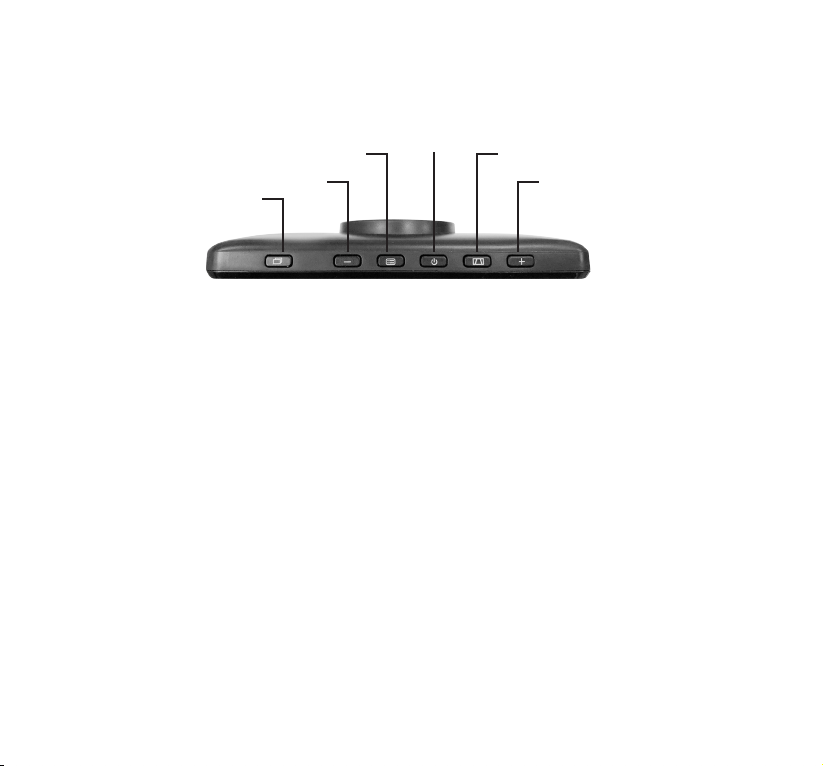
DASH MONITOR INSTALLATION
1. Stick the Suction Cup Mount on the windshield and adjust to your desired position.
2. Magnetic the Dash Monitor on to the windshield mount.
3. Remove the Type S Dash Monitor protective overlay.
4. Now power the monitor:
Take the 12V/24V Power Adapter and plug adapter into the right side of the TypeS Dash Monitor.
Plug the other end into 12V/24V power port in your car.
5. At this time, the Type S Dash Monitor is ready to be powered on by motion trigger when you
wave your hand in front of monitor or press the wakeup button on the top left of monitor.
Warning: Many vehicles provide constant power to the 12V outlet. If your outlet provides constant
power, please remember to unplug the monitor when not in use to avoid draining the vehicle
battery.
3. PRODUCT SPECIFICATIONS
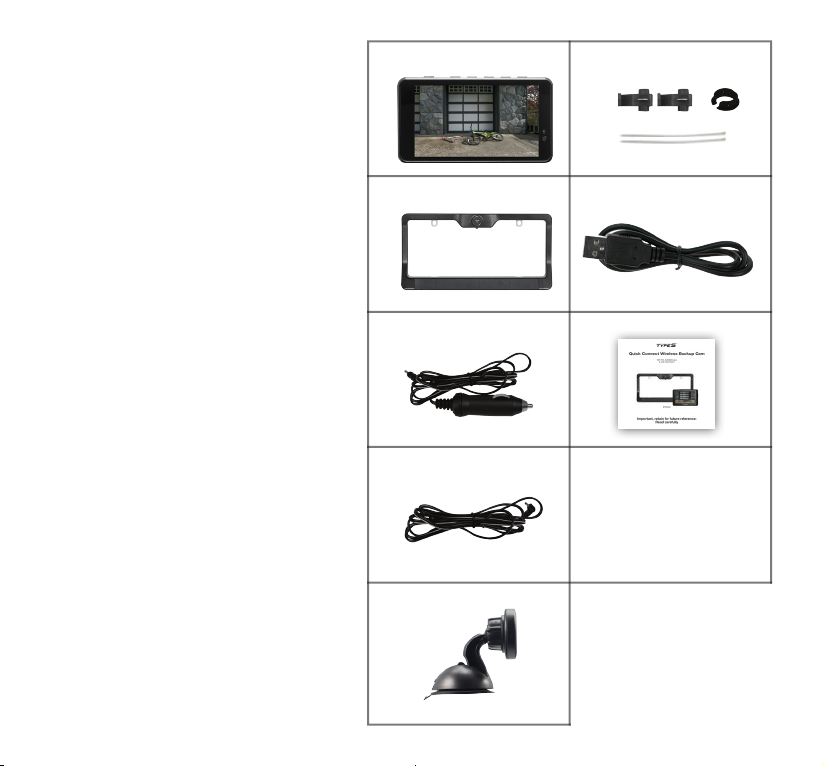
4. INSTALLATION GUIDE

4
QUICK CONNECT WIRELESS BACKUP CAM INSTALLATION
1. Remove your license plate
2. Once license plate and Camera are secure, you can adjust the vertical angle of the Camera to
your specic need.
3. As a last check, note the position of the view from the Camera when you place the vehicle in
reverse. Adjust the angle of the Camera as necessary to achieve the best rear view.

5
WARNING:
Do not attach the 12/24V Direct Power Adapter to the Hardwire Adapter at any time. Only one
power option can be used with the Camera.
DIESEL INSTRUCTION:
Temporarily connect the Camera following the wiring instructions above. Then check the Camera
image for rolling lines with vehicle running. If there are no rolling lines, permanently install the
components and wiring. If rolling lines occur you will need to run a power wire directly to the
battery post instead of using the reverse lights. Then the power line will need to be cut and run to
a switch near the driver so the Camera can be switched on/o. Without a switch the Camera would
drain the battery and possibly burn out the Camera. Be sure to use a fuse when connecting to the
battery post.
4. Remove your license plate.
*Please follow your local laws and regulations regarding constant monitoring while driving. It is
recommended that you glance at the image only when in reverse, and use as an aid. Do not rely
solely on the camera view to back up.
*By using the power button on the Monitor, the image can be shut o while driving. Please
remember to turn back on once the vehicle is stopped and ready to reverse.
12V/24V Power
Adapter for Camera
Hardwire cable
for Camera

6
POWER ON/OFF
• The Dash Monitor will automatically turn ON when it is connected to a power source.
• Hold the power button to turn ON/OFF the unit if necessary.
• Press the Power button to back to last page if in the menu setting page.
PARKING AID LINE
• You can turn ON/OFF the Parking Aid Line by pressing the Parking Aid Line button when the
reverse image appears on screen.
• You can adjust the parking aid line that appears in your monitor. When the Parking Aid Line is
engaged, press and hold the Parking Aid Line button for 3 seconds, then press the “+” or “-” to
adjust up or down on the monitor. There are a total of 10 adjustments that can be made.
• You can go into the setting function page when you press the Parking Aid Line in the menu.
Then you can congure the setting function when you press Parking Aid Line in any setting
page.
BRIGHTNESS AND CONTRAST
You can adjust the contrast and brightness of the Monitor according to your desired level.
Note: Contrast and Brightness setting ONLY works while the camera image is on the screen.
Power Parking Aid Line / Enter
Up
Menu
Down
Wake-up Button
5. SETTINGS AND OPERATION

7
TO ADJUST BRIGHTNESS
1. Press “MENU”
2. Go to “Brightness” by pressing “– “
3. Press“Parking Aid Line”to enter
4. Press“+ “ or “– “ to adjust the contrast level
5. Press“Parking Aid Line”to conrm and exit
TO ADJUST CONTRAST
1. Press “MENU”
2. Go to “Contrast” by pressing “– “
3. Press“Parking Aid Line”to enter
4. Press“+ “ or “– “ to adjust the contrast level
5. Press“Parking Aid Line”to conrm and exit

8
PAIRING
The Quick Connect Wireless Backup Cam included is already paired with the monitor. If you can not
see the Camera image, pair the Camera with the following steps:
1. Turn o License Plate power
2. Press and hold the License Plate power key more than 5 seconds. And License plate camera LED
twinkle blue light that means License Plate go into pairing mode for one minute pairing period.
3. On the monitor:
Press “Menu”
Go to “Pair Camera”
Press “Parking Aid line” to conrm
The unit is now in pair mode - if the monitor is able to connect with the camera, the display
will show “Pair OK”.
If no camera is found, then the display will show “Pair Fail”. If you receive a “Pair Fail” message,
please call our technical support to assist in troubleshooting.

9
WARNING: A failure to read and follow these warnings and instructions may result in a serious
accident, including damaged property or a serious injury, including loss of life.
• The Quick Connect Wireless Backup Cam is designed as an aid to the driver in detecting large
stationary objects to help avoid damaging the vehicle. However, you, the driver, must use it
safely and properly. Use of the Backup Camera is not a substitute for safe, proper and legal
driving.
• Never back up while looking only at the screen. You should always check behind and around
the vehicle when backing up just as you would if the vehicle did not have the Backup Camera.
Always make sure your intended path is clear. If you back up while looking only at the monitor,
you may hit a vehicle, pedestrian, bicyclist, child, pet or other object resulting in injury or death.
Always back up slowly.
• Never depend on the Quick Connect Wireless Backup Cam entirely when backing up. The image
on the screen is dierent from actual conditions. Objects viewed in the rear view monitor dier
from actual distance because a wide-angle lens is used. Objects in the rear view monitor will
appear visually opposite than when viewed in the rear view and outside mirrors. Use the inside
mirror or glance over your shoulder to properly judge distances to other objects.
• The Quick Connect Wireless Backup Cam “night vision” feature that is high performance
brightness with colorful image is an aid to a driver but is limited. Always use your own eyes to
conrm the vehicle’s surroundings, as the displayed image may be faint or dark, distorted, or
not entirely visible. Always check behind and all around the vehicle visually with mirrors before
proceeding.
• The area displayed by the Quick Connect Wireless Backup Cam is limited. The Backup Camera
does not display objects that are close to or below the bumper, underneath the vehicle, or
objects out of the Camera’s eld of view. The area displayed on the screen may vary according
to vehicle orientation or road conditions.
• Be sure to check the Camera’s position and mounting angle before each use.
• Make sure the trunk, hatch, or backdoor is completely and securely closed when backing up.
• If the back of the vehicle is hit, the position and mounting angle of the Backup Camera may
change.
• When washing the vehicle with high pressure water, be sure not to spray it around the Camera.
6. SAFETY INFORMATION

10
Otherwise, water may enter the Camera unit causing water condensation on the lens, a
malfunction, re or an electric shock.
• Do not strike the Camera. It is a precision instrument. Otherwise, it may malfunction or cause
damage resulting in a re or an electric shock.
• This product will only provide images of items that are within the eld of view of the Camera.
Thus, it is imperative that the Camera should be kept clean and unobstructed, and should be
mounted so that its eld of view includes the entire area behind your vehicle.
• Adhere to all applicable trac laws and motor vehicle regulations applicable to the device.
• Consult local laws and regulations for any restrictions on installation or use.
• Never allow children to play with the device. Small parts may be a choking hazard.
• If you replace the tires, the area displayed on the monitor may change and you may need to
adjust the Camera.
• There is a plastic cover over the Camera. Do not scratch the cover when cleaning dirt or snow
from the cover.
• The Camera has a water resistant construction. Do not detach, disassemble or modify it. This
may cause incorrect operation. Camera is waterproof.
• Do not submerge Camera in water, which can cause internal damage to the Camera.
• If the temperature changes rapidly, such as when hot water is poured on the vehicle in cold
weather, the system may not operate normally. The Digital Camera can withstand the eects of
rain, snow, and inclement weather.
• When strong light directly enters a camera, objects may not be displayed clearly.
• The screen may icker under uorescent light.
• The colors of objects on the rear view monitor may dier somewhat from those of the actual
object.
• If dirt, rain or snow attaches to the Camera, the monitor may not clearly display objects. If water
droplets, snow or mud adhere to the Camera lens, rinse with water and wipe with a dry cloth.
• Do not use alcohol, benzene or thinner to clean the Camera. This will cause discoloration. To
clean the Camera, wipe with a clean cloth dampened with mild cleaner diluted with water and
then wipe with a dry cloth.
• Will work up to 30 feet.
• ALWAYS engage Parking/Emergency/Hand Brakes of the vehicle when testing the system.

11
CLEANING
• If dirt, rain or snow attaches to the Camera, the monitor may not clearly display objects. If water
droplets, snow or mud adhere to the Camera lens, rinse with water and wipe with a dry cloth.
• Do not use alcohol, benzene or thinner to clean the Camera. This will cause discoloration. To
clean the Camera, wipe with a clean cloth dampened with mild cleaner diluted with water and
then wipe with a dry cloth.
WARRANTY
• WINPLUS NORTH AMERICA
LIMITED WARRANTY
Winplus North America warrants, to the original purchaser, that its products are free from
SAFETY AROUND AND BEHIND OTHER VEHICLES
Using a Backup Camera is not enough to completely overcome a vehicle’s blind spot. Many
preventable injuries and deaths occur in driveways or parking lots when drivers do not see children,
pets, or others near their vehicles. Here are a few safety tips that will help you to avoid a back-over
accident:
• Walk completely around your vehicle before getting in. Check for kids, toys, and pets before
entering the vehicle and starting the engine.
• Know where children are. Have children stand in a place where they are in full view.
• Be aware of young children. Young children are small and hard to see.
• Parents, caregivers and all adults need to be vigilant in supervising children, especially when
children are in the yard, driveway or parking lot playing near parked cars.
• Roll down your window so you will be able to hear what is happening outside your vehicle.
• Owners of SUVs, trucks, and vans need to take extra care to avoid hitting or running over a child.
• Teach children to move away from a vehicle whenever it is started.
7. MAINTENANCE & WARRANTY

12
defects in material and workmanship for 1 year from the date of original purchase. Where
permitted by law, Winplus North America’s liability shall be limited to that set forth in this limited
express warranty. This limited express warranty shall be the exclusive remedy of the purchaser
and Winplus North America makes no other warranty of any kind aside from the limited express
warranty stated above.
NOTE: Warranty only applies for North American customers of purchases made in North
America.
CONDITIONS OF WARRANTY
If during the 1 year warranty period your new product is found to be defective, Winplus North
America will repair such defect, or replace the product, without charge for parts or labor subject
to the following conditions:
1. All repairs must be performed by Winplus North America.
2. All warranty claims must be accompanied by a copy of the sales receipt or bill of sale.
3. The equipment must not have been altered or damaged through negligence, accident,
improper operation, or failure to follow the product instructions for installation, use, or
care.
4. The replacement of parts is excluded from the warranty when replacement is necessary
due to normal wear and tear.
5. Repair or replacement parts supplied by Winplus North America under this warranty are
protected only for the unexpired portion of the original warranty.
6. This is a “repair or replace” warranty only, and does not cover the costs incurred for the
installation, removal or reinstallation of the product, or damage to any mobile phone
device or vehicle.
OWNER’S RESPONSIBILITIES:
Winplus North America will make every eort to provide warranty service within a reasonable
period of time. SHOULD YOU HAVE ANY QUESTIONS ABOUT SERVICE RECEIVED OR IF YOU
WOULD LIKE ASSISTANCE IN OBTAINING SERVICE, PLEASE CALL TOLL FREE 1.866.294.9244
DURING REGULAR BUSINESS HOURS MONDAY THROUGH FRIDAY 9:00 AM TO 5:00PM.

13
NOTE: Toll Free # is for North America Customers ONLY. See Customer service section for
customer contact numbers for other regions/oces.
For customer service and technical support, please call us at 1.866.294.9244 or email us at
customercare@winplususa.com. If at that time it is determined that a replacement unit is
needed, the support representative will issue a Return Authorization and instruct on how to get
a new unit.
Winplus North America makes no other warranty of any kind aside from the limited express
warranty stated herein.
DISCLAIMER OF WARRANTIES, INCLUDING WARRANTY OF MERCHANTABILITY AND WARRANTY
OF FITNESS FOR PARTICULAR PURPOSE: EXCEPT AS SPECIFICALLY SET FORTH HEREIN, NO
WARRANTY OR REPRESENTATION, EXPRESS OR IMPLIES, IS MADE AS TO THE REARVIEW MIRROR
BACKUP CAMERA. EXCEPT AS EXPRESSLY SET FORTH HEREIN, WINPLUS NORTH AMERICA AND/
OR ITS AFFILIATES EXPRESSLY DISCLAIMS, WITHOUT LIMITATION, ANY STATUTORY WARRANTIES
AND ALL IMPLIED WARRANTIES, INCLUDING ANY IMPLIED WARRANTY OF MERCHANTABILITY OR
FITNESS FOR A PARTICULAR PURPOSE.
Winplus North America and/or its aliates do not guarantee or promise that the user of Quick
Connect Wireless Backup Cam will not be in an accident or otherwise not collide with an object
and/or person. Our Quick Connect Wireless Backup Cam is not intended in any way to be a
substitute for careful and cautious driving or for the consistent adherence to all applicable trac
laws and motor vehicle safety regulations.
The Backup Camera is not intended to be a substitute for rearview mirrors or for any other motor
vehicle equipment mandated by law. Even when properly installed, our Backup Camera has a
limited eld of vision and does not provide a comprehensive view of the rear area of the vehicle.
You should always look around outside your vehicle and use your mirrors to conrm rearward
clearance and that your vehicle can back up safely.
Winplus North America and/or its aliates are not responsible for a user’s intended or actual

14
use of the Backup Camera. In no event shall Winplus North America and/or its aliates have
any liability for any losses (whether direct or indirect, in contract, tort or otherwise) incurred in
connection with the Backup Camera, including but not limited to damaged property, personal
injury and/or loss of life. Neither shall Winplus North America and/or its aliates have any
liability for any decision, action or inaction taken by any person in reliance on the Backup
Camera, or for any delays, inaccuracies and /or errors in connection with the Backup Camera and
its functioning.
Winplus North America and/or its aliates shall have no responsibility or liability for damage
and/or injury resulting from accidents occurring with vehicles having the installed, and Winplus
North America and/or its aliates, the manufacturer, distributor and seller shall not be liable for
any injury, loss or damage, incidental or consequential, arising out of the use or intended use of
the product.
• WINPLUS EUROPE
LIMITED WARRANTY
Winplus warrants, to the original purchaser, that its products are free from defects in material
and workmanship for 12 months from the date of original purchase. Where permitted by law,
Winplus liability shall be limited to that set forth in this limited express warranty. This limited
express warranty shall be the exclusive remedy of the purchaser and Winplus makes no other
warranty of any kind aside from the limited express warranty stated above.
OWNER’S RESPONSIBILITIES:
In order to provide you with the proper warranty service, we request that you adhere to the
following procedure:
1. Include a copy of your sales receipt or bill of sale with your unit when it is returned for
warranty service.

15
2. If it is necessary to return your product for service, please return it securely packed,
preferably in the original shipping box, and freight and insurance prepaid to the
following address:
ATTN: WINPLUS BLUETOOTH PRODUCTS RETURNS
Unit 4, Two Counties Estate, Falconer Road, Haverhill, Suolk CB9 7XZ, UK
3. Please include a detailed explanation of the problem you are having.
4. If your product is found by Winplus to have a defect in material or workmanship, within the
warranty period, it will be repaired or replaced at no charge and returned to you prepaid.
Winplus makes no other warranty of any kind aside from the limited express warranty stated herein.
•WINPLUS AUSTRALIA/HONG KONG
LIMITED WARRANTY
This Yada product is warranted against faulty workmanship for a period of 2 years from date
of purchase. Liability is limited to replacement of the product and claims for associated or
consequential loss or damage will not be accepted. Warranty is void and does not apply if the
product has been damaged or rendered faulty by accident, abuse, misuse, incorrect application
or if the product has been modied or tampered with. Proof of purchase is required to validate
warranty claims. If this product is faulty, simply return it to the place of purchase with your
receipt for a replacement product. No refunds of credits will be issued. Replacement is limited
to a Yada product of the same or similar model.

16
CUSTOMER SERVICE/CONTACT
For questions or issues regarding the product, please visit www.letsyada.com or contact Winplus in
your area/region to speak to our customer service representative:
Winplus North America Tel.: 866-294-9244
Tel.: 909-752-3074
Winplus Europe Tel.: 44-1440-7138888
Winplus Australia Tel.: 61-3-8727-7600
Winplus New Zealand Tel.: 64-9-5254575
Winplus Asia Tel.: 852-2798-8932
You can also contact us online by visiting www.winplus.com for more information about the product.
IF YOU ARE EXPERIENCING ANY ISSUES WITH THE PRODUCT DURING OPERATION, DO NOT RETURN
THE PRODUCT TO THE STORE. CONTACT WINPLUS DIRECTLY FOR INSTRUCTIONS ON HOW TO
RETURN/EXCHANGE THE PRODUCT.
This device complies with Part 15 of the FCC rules and Industry Canada license-exempt RSS
standard(s). Operation is subject to the following two conditions: (1) This device may not cause
harmful interference, and (2) this device must accept any interference received, including
interference that may cause undesired operation.
Warning: Changes or modications to this unit not expressly approved by the
party responsible for compliance could void the user’s authority to operate the
equipment.
8. GENERAL INFORMATION

17
The manufacturer is not responsible for any radio or TV interference caused by
unauthorized modications or change to this equipment. Such modications or
change could void the user’s authority to operate the equipment.
NOTE: This equipment has been tested and found to comply with the limits
for Class B digital device, pursuant to part 15 of the FCC Rules. These limits are
designed to provide reasonable protection against harmful interference in a
residential installation. This equipment generates, uses and can radiate radio
frequency energy and, if not installed and used in accordance with the instructions,
may cause harmful interference to radio or television reception, which can be
determined by turning the equipment o and on, the user is encouraged to try to
correct the interference by one or more of the following measures:
- Reorient or relocate the receiving antenna.
- Increase the separation between the equipment and the receiver.
- Connect the equipment into an outlet on a circuit dierent from that to
which the receiver is connected.
- Consult the dealer or an experienced radio/TV technician for help.
License Plate Backup Camera
BT56208
Responsible Party:
Winplus North America Inc.
820 South Wanamaker Avenue, Ontario, CA 91761
Tel: 866-294-9244

18
ICStatement
This device complies with Industry Canada licence-exempt RSS standard(s). Operation is subject to
the following two conditions: (1) this device may not cause interference, and (2) this device must accept
any interference, including interference that may cause undesired operation of the device.
Le présent appareil est conforme aux CNR d'Industrie Canada applicables aux appareils radio exempts
de licence. L'exploitation est autorisée aux deux conditions suivantes : (1) l'appareil ne doit pas
produire de brouillage, et (2) l'utilisateur de l'appareil doit accepter tout brouillage radioélectrique subi,
même si le brouillage est susceptible d'en compromettre le fonctionnement.
This manual suits for next models
1
Table of contents
Other TypeS Automobile Accessories manuals

TypeS
TypeS TERRA PRO LM57170 Guide

TypeS
TypeS Formula DRIFT PSL PRO Series Original instructions

TypeS
TypeS Formula DRIFT Pro Series Original instructions

TypeS
TypeS BT56485F Guide

TypeS
TypeS Plug and Glow User manual

TypeS
TypeS SC533475 User manual

TypeS
TypeS BT56485 Guide

TypeS
TypeS MICRO LIGHT KIT User manual

TypeS
TypeS Plug & Glow LM55879-1 User manual

TypeS
TypeS BT530034 Guide