U-Line BROTHER P-TOUCH D400AD User manual

PAGE 1 OF 9 0418 IH-5135
πH-5135
BROTHER®P-TOUCH®
D400AD DESKTOP PRINTER
1-800-295-5510
uline.com
OVERVIEW OF CONTROLS
LCD DISPLAY AND KEYBOARD
#DESCRIPTION
1Caps Mode
2-5 Style Guidance
6Tape Length
7Line Number
8 Start Line
9Cursor
10 End Line
11 Return Mark
12 Cursor Selection
13 Font
14 Label
15 Frame
16 Symbol
17 Sample Labels
18 Preview
19 Print
#DESCRIPTION
20 Clear
21 Backspace
22 Cursor
23 OK
24 Escape
25 Enter
26 Accent
27 Space
28 Bar Code
29 File
30 Shift
31 Caps
32 Tab
33 Letter
34 Power
35 Menu
CONTROL PANEL PARTS
1
8 9 10 11
7
23 4 5 6 12
13 14 15 16 17
35
34
33
32
31
30
29 28 27 26 25 24
23
19
18
20
21
22
NOTE: The text entered can be up to 80
characters in length.
• Use
Shift
in combination with the letter and number
keys to type uppercase letters or symbols indicated
on the upper-right corner of the keys.
• Use with
Shift
to go to top of the text. Use with
Shift
to go to end of the text.
• While selecting the settings, press
Space
to go
back to the default item.
• To cancel any operation, press
Esc
.
• Label length shown on LCD may slightly differ from
the actual label length when printed.

PAGE 2 OF 9 0418 IH-5135
NOTE: When using AC adapter (AD-E001):
• Insert the plug on the adapter cord into the
AC adapter jack on the side of the machine.
• Insert the plug into the nearest electrical
outlet. For memory backup, we recommend
using AA alkaline batteries (LR6) or Ni-MH
batteries (HR6) together when using the
AC adapter.
• To safeguard and backup the printer's memory,
when the AC adapter is unplugged, it is
recommended to have AA alkaline batteries (LR6) or
Ni-MH batteries (HR6) installed in the printer.
• When power is disconnected for more than two
minutes, all text and format settings will be cleared.
Any text files stored in the memory will also be
cleared.
WARNING! Using a combination of different batteries (such as Ni-MH and alkaline), may result in an
explosion. Dispose of used batteries according to the instructions.
INSERTING A TAPE CASSETTE
Figure 2
Tape Compartment Cover
Tape Cutter Lever
Printhead
Tape Cassette
Compartment
Release Lever
Tape Cutter
Tape Exit Slot
LCD Display
Keyboard
NOTE: When inserting the tape cassette,
make sure that the tape and ink ribbon do
not catch on the printhead. (See Figure 2)
• If you cannot close the tape compartment
cover, check to ensure the release lever in
the up position. If not, lift the lever and then
close the cover.
Battery Compartment
Cover
Battery Case AC Adapter Jack
Figure 1
POWER SUPPLY AND TAPE CASSETTE
Insert six new AA alkaline
batteries (LR6) or fully
charged Ni-MH batteries
(HR6), making sure that their
poles point in the correct
directions. To remove
the batteries, reverse the
installation procedure.
(See Figure 1)
SETUP

PAGE 3 OF 9 0418 IH-5135
EDITING A LABEL
ENTERING AND EDITING TEXT
ADDING A NEW LINE
Move cursor to end of the current line and press .
(See Figure 3)
NOTE: There is a maximum number of lines
that can be entered for each tape width. A
maximum of five lines for 18 mm tape, three
lines for 12 mm tape, two lines for 9 mm and
6 mm tape, and one line for 3.5 mm tape.
DELETING TEXT
By pressing , the letters will be deleted one by one.
To delete all text:
➔ ▲/▼[Text Only] ➔
OK
or .
To delete all text and format settings:
➔ ▲/▼[Text&Format] ➔
OK
or .
INSERTING A TAB
To insert a tab:
➔ ▲/▼[Tab] ➔
OK
or .
NOTE: You can also set a tab by pressing .
To change tab length:
➔ ▲/▼[Tab Length] ➔ / [0.0"-4.0 (0-100 mm)] ➔
OK
or .
ENTERING SYMBOLS
ENTERING SYMBOLS USING THE SYMBOL FUNCTION
➔ ▲/▼Select Category ➔
OK
or ➔
▲/▼/ / Choose a symbol ➔
OK
or .
SETTING SYMBOL HISTORY
Up to 15 recently used symbols are added to [History].
The default setting is [On].
➔ ▲/▼[Symbol History] ➔
OK
or ➔ ▲/▼
[On/Off] ➔
OK
or ➔ .
Figure 3
Line 1 Line 2 Label Image
TURNING POWER ON/OFF
Press to turn printer on.
Press to turn printer off.
FEEDING TAPE
To feed the tape, press the
Shift
+ keys.
SETTING LCD DISPLAY
LCD CONTRAST
The default setting is [0].
➔ ▲/▼[Adjustment] ➔
OK
or ➔ ▲/▼
[LCD Contrast] ➔ / [-2 - +2] ➔
OK
or .
SETTING UNIT AND LANGUAGE
UNIT
The default setting is [inch].
➔ ▲/▼[Unit] ➔
OK
or ➔ ▲/▼ [inch/mm] ➔
OK
or .
LANGUAGE
The default setting is [English].
➔ ▲/▼[Language] ➔
OK
or ➔ ▲/▼
[English/Español/Français/Hrvatski/Magyar/Nederlands/
Norsk/Polski/Português/Português (Brasil)/Română/
Slovenski/Slovenský/Suomi/Svenska/Türkçe/Čeština/
Dansk/Deutsch] ➔
OK
or .
SETUP CONTINUED

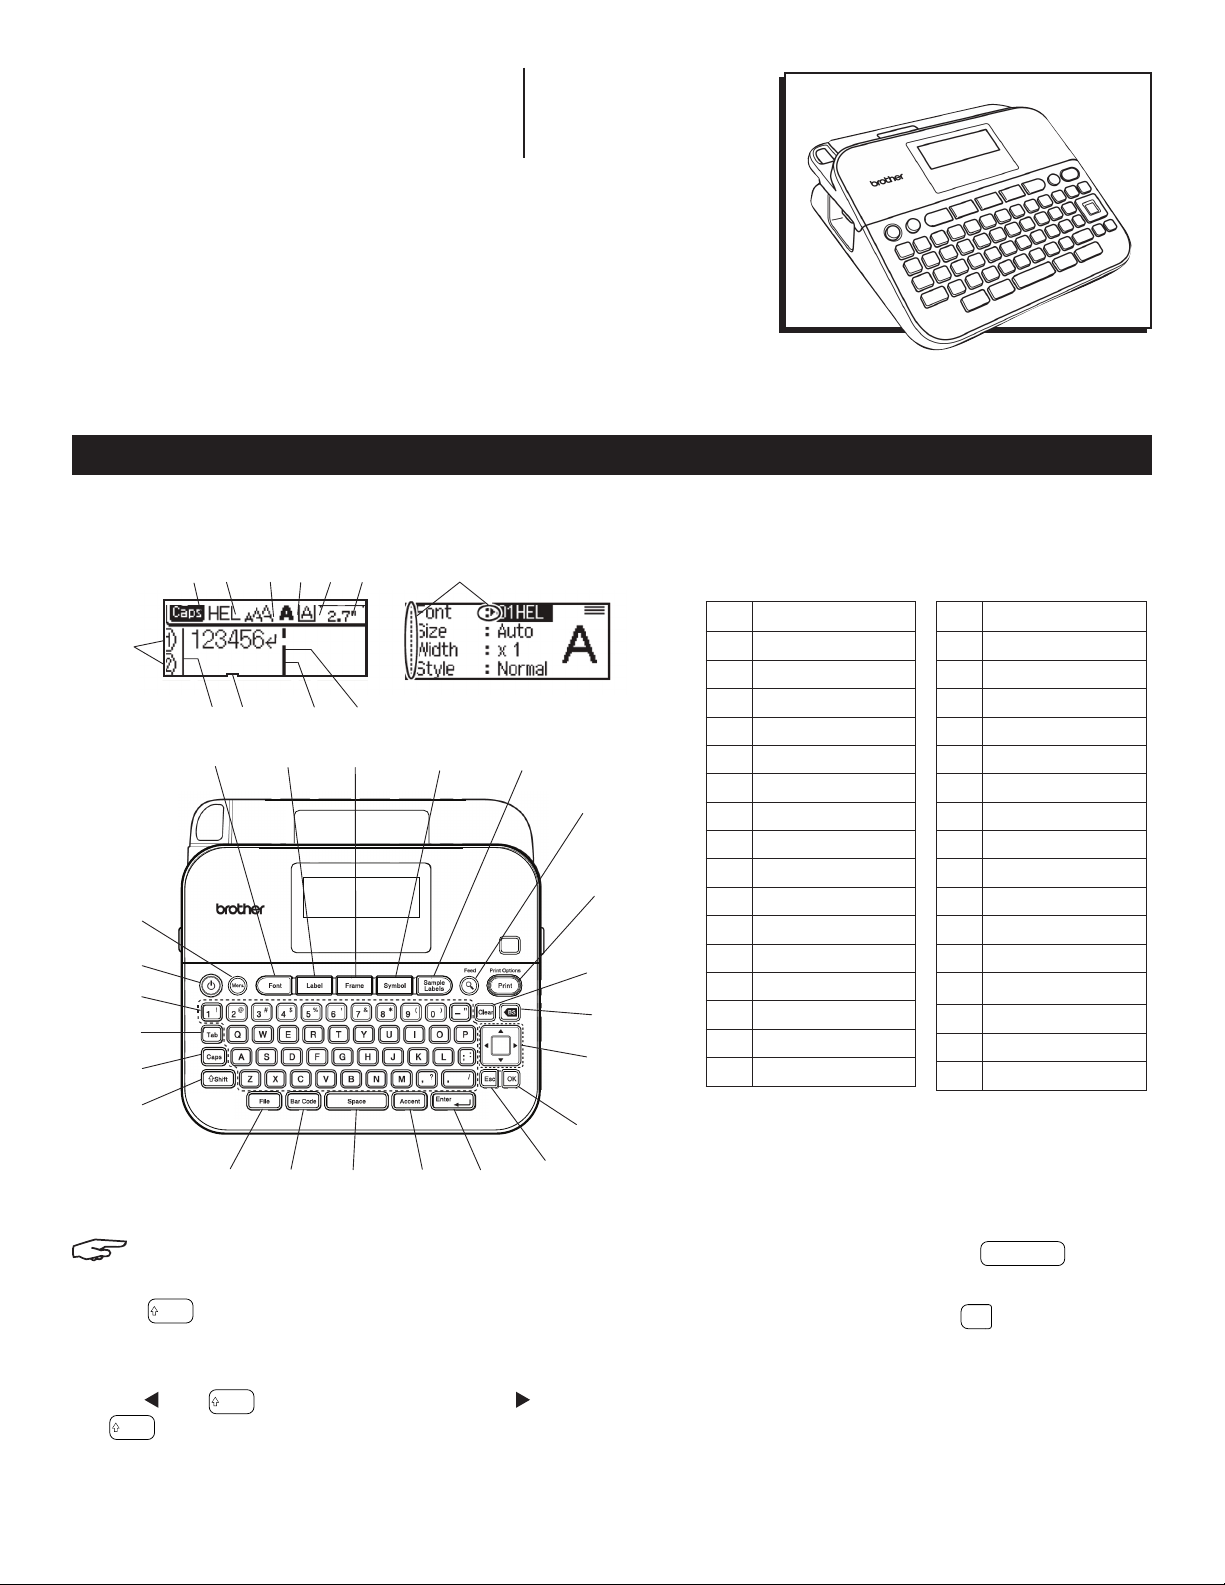
PAGE 4 OF 9 0418 IH-5135
EDITING A LABEL CONTINUED
ENTERING ACCENTED CHARACTERS
Enter the character ➔ ➔ / Select accented
character ➔
OK
or .
NOTE: Caps mode can be used with Accent
function.
SETTING CHARACTER ATTRIBUTES ([FONT]/
[SIZE]/[WIDTH]/[STYLE]/[LINE]/[ALIGN])
You can set character attributes by label or by each line
both before and after entering text.
SETTING CHARACTER ATTRIBUTES BY LABEL
➔ ▲/▼Select an attribute ➔ / Select a value
for that attribute ➔
OK
or .
SETTING CHARACTER ATTRIBUTES BY EACH LINE
1. Using ▲/▼, move the cursor to the line you wish to
change the character attribute.
2. Press
Shift
and to display the attributes.
NOTE: (A) on the screen indicates that you are
now applying the attribute for that specific line
only.
• When different value of an attribute is set for each
line, the value will be displayed as ***** when user
presses . When user changes the setting on this
screen by using or , the same change will be
applied to all lines of the label.
• When different value of attribute is set for each line,
the line numbers on the text entry screen will be
displayed as white text on a black background.
• The actual printed font size depends on the tape
width, number of characters and number of input
lines. Once characters reach a minimum size, the
selected font will default to a custom font, which is
based on the Helsinki style. This allows labels to print
using the smallest text possible on narrow or multi-
line labels.
• The 6 point font only prints in Helsinki, no other font style.
• When [Size] is set to [Auto] and all the text is entered
in uppercase, the text is automatically adjusted to
print in the largest font size possible for each tape
width. The font size is larger than the largest font size
available in the font settings for each tape width.
SETTING AUTO FIT STYLE
When [Size] is set to [Auto] and [Length] is set to specific
length, user can select the way of reducing the text size
to fit within the label length. When [Text Size] is selected,
the total text size is modified to fit within the label. When
[Text Width] is selected, the text width will be reduced to
the size of x1/2 setting.
➔ ▲/▼[Auto Fit Style] ➔
OK
or ➔ ▲/▼ [Text
Size/Text Width] ➔
OK
or .
SETTING FRAMES
➔ ▲/▼Select Category ➔
OK
or ➔ ▲/▼/
/ Select a frame ➔
OK
or .
SETTING LABEL ATTRIBUTES
([LENGTH]/[MARGIN]/[TAB LENGTH])
(Refer to "Adjusting the Label Length" on page 14,
"Setting Margin" on page 13 and "To change tab length:"
on page 5.)
➔ ▲/▼Select an attribute ➔ /
OK
or
➔ ▲/▼ Set a value for that attribute ➔
OK
or .
NOTE: [Length] can be set within the range
1.2"-12.0". When [Auto] is selected, the length
of the label is automatically adjusted based
the amount of the text entered.
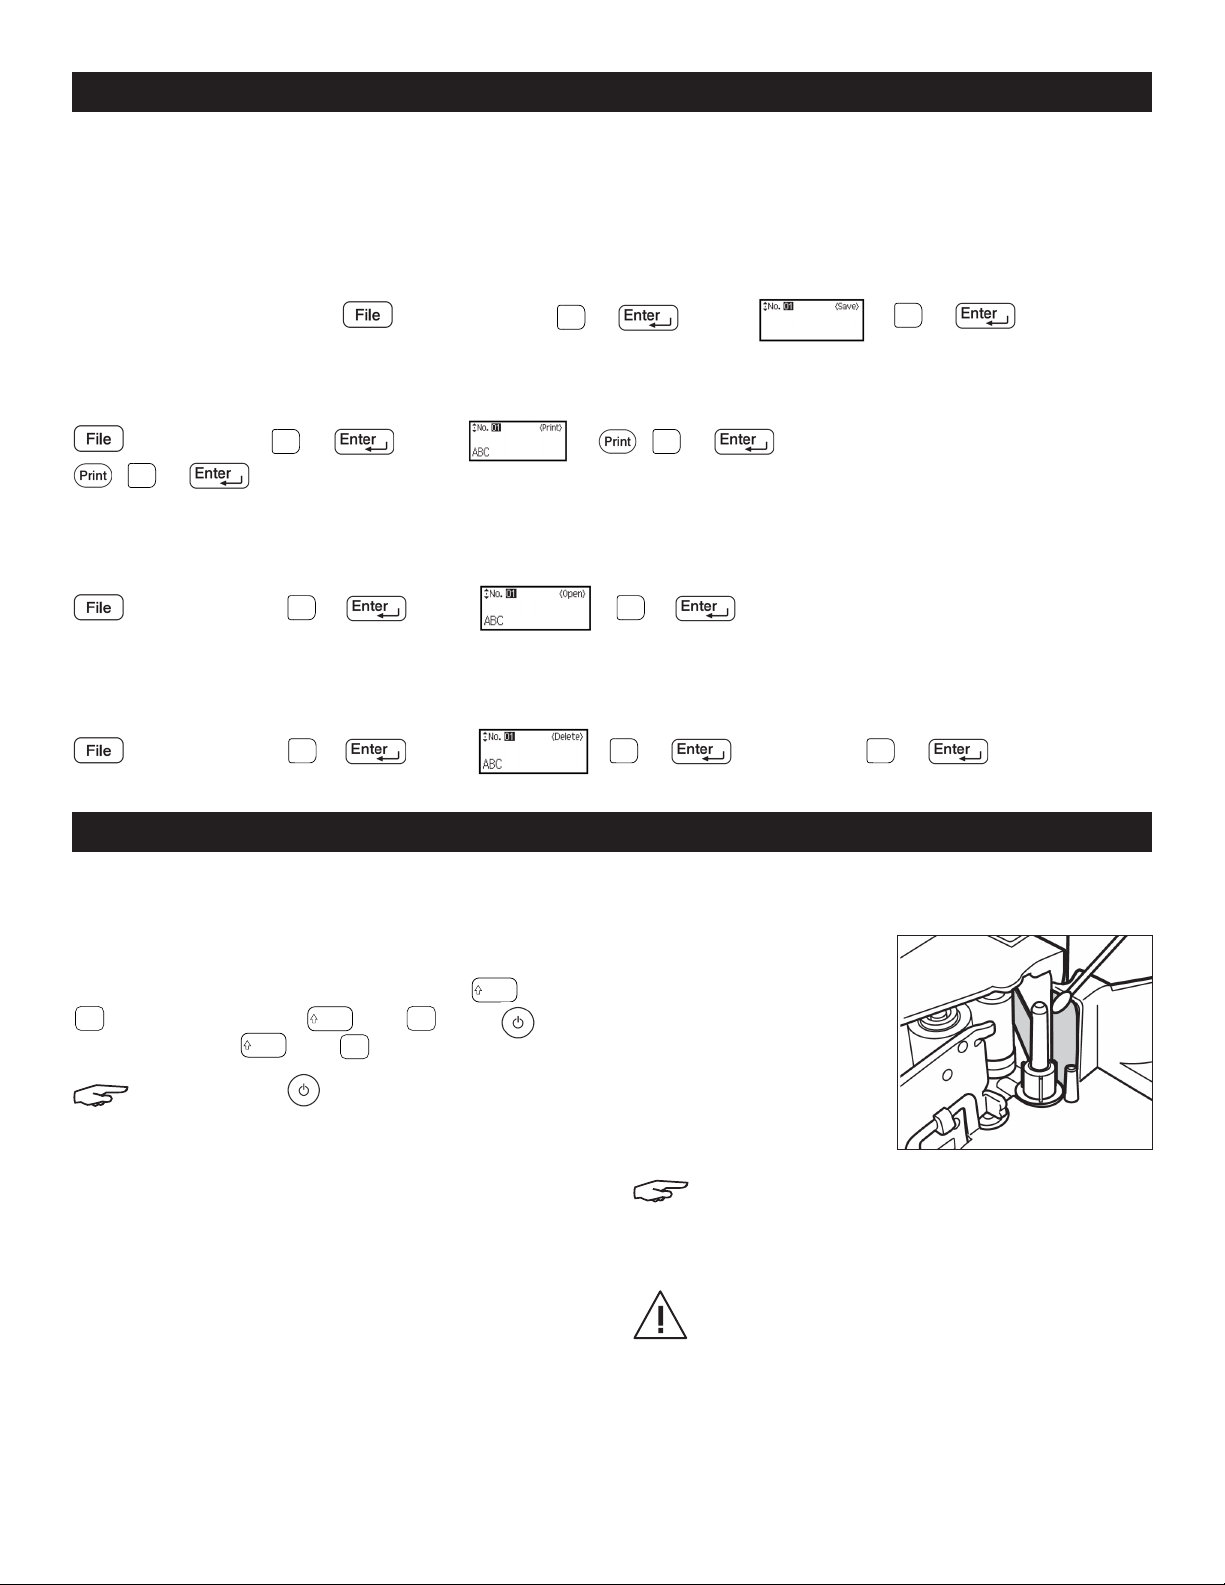
CREATING A BAR CODE LABEL
NOTE: The printer is not designed exclusively for
creating bar code labels. Always check that bar
code labels can be read by the bar code reader.
• For best results, print bar code labels in black ink
on white tape. Some bar code readers may not be
able to read bar code labels created using colored
tape or inks.
• Use the [Large] setting for [Width] whenever possible.
Some bar code readers may not be able to read
bar code labels created using the [Small] setting.
• Continuously printing a large number of labels with
bar codes can overheat the printhead, which may
affect printing quality.

PAGE 5 OF 9 0418 IH-5135
EDITING A LABEL CONTINUED
PRINTING A LABEL
SETTING BAR CODE PARAMETERS
ENTERING BAR CODE DATA
➔ ▲/▼Select an attribute ➔ / Set a value
for that attribute ➔
OK
or ➔ Type in the bar
code data ➔ ➔ ▲/▼Select a character ➔
OK
or
➔
OK
or .
NOTE: Symbols are only available for the
CODE39, CODE128, CODABAR or GS1-128
protocols. When not using symbols, after typing
in the bar code data, press
OK
or .
to insert the bar code in the label.
• The "C.Digit" (Check Digit) attribute in only available
for the CODE39, I-2/5 and CODABAR protocols.
• Only one bar code can be printed on a label.
EDITING AND DELETING A BAR CODE
To edit bar code parameters and bar code data,
position the cursor beneath the bar code mark on
the data entry screen, and then open the Bar Code.
Setup screen by pressing or pressing and
selecting [Bar Code Setup] with ▲/▼. To delete a bar
code from a label, position the cursor to the right of the
bar code mark on the data entry screen and press .
LABEL PREVIEW
To preview the text before printing, press .
Press or to scroll the preview to the left or right.
Press ▲ or ▼ to change the magnification of the
preview.
PRINTING LABELS
To cut off the label, press the tape cutter lever on the
upper left corner of the machine.
SINGLE AND MULTIPLE COPY PRINTING
➔ ▲/▼Change the number of copies ➔ ,
OK
or .
NOTE: If you need only one copy of the label,
press ,
OK
or without selecting the
number of copies.
• The number of copies can also be specified by
pressing a number key.
CABLE FLAG PRINTING
Shift
+ ➔ ▲/▼[Cable] ➔
OK
or ➔ ,
OK
or
. (See Figure 4).
NUMBERING PRINTING
Shift
+ ➔ ▲/▼[Numbering] ➔
OK
or ➔
/ Select start point ➔
OK
or ➔ / Select
end point ➔
OK
or ➔ ▲/▼ Select the number of
labels to be printed ➔ ,
OK
or . (See Figure 5).
Select the highest number you wish to be printed when
setting the number.
MIRROR PRINTING
Use clear tape in [Mirror],
so the labels can be read
correctly from the opposite
side when attached on glass,
windows or other transparent
surfaces. (See Figure 6)
Shift
+ ➔ ▲/▼[Mirror] ➔
OK
or ➔
,
OK
or .
Figure 5
Figure 5
0123 0124 0125
AC
AB
AA
J.SMITH
Figure 6

PAGE 6 OF 9 0418 IH-5135
PRINTING A LABEL CONTINUED
SETTING MARGIN [FULL]/[HALF]/[NARROW]
➔ ▲/▼[Margin] ➔ ▲/▼[Full/Half/Narrow]
OK
or
➔ ▲/▼Select the number of copies ➔,
OK
or . (See Figure 7)
NOTE: Cut along the printed dots (:) with scissors
so the text is centered in the label.
[CHAIN]
Use this setting when printing several labels with minimal
margins. (See Figure 8)
Enter text (ABC) ➔ ➔ ▲/▼[Margin] ➔ / [Chain]
➔
OK
or ➔ ➔ ▲/▼Select the number of
copies ➔ ,
OK
or ➔ The message [OK to
Feed?] appears ➔
Esc
➔ Clear the text and enter text
for the next label (DEF) ➔ ➔ ▲/▼Select the number
of copies ➔,
OK
or ➔ The message [OK to
Feed?] appears ➔
OK
or to feed the tape.
NOTE: When [Chain] is set, feed the tape before
using the cutter otherwise a part of the text may
be cut off. Refer to "Feeding Tape" on page 3.
• The value XX displayed on the upper right corner of
the LCD display indicates the label length XX shown
on the label images below. (See Figure 9)
NOTE: Do not pull the tape, since this may
damage the tape cassette.
ADJUSTING THE LABEL LENGTH
➔ ▲/▼[Adjustment] ➔
OK
or ➔ ▲/▼
[Label Length] ➔ / [-5 - +5] ➔
OK
or .
NOTE: Approximately 1% of the total label
length will be adjusted by one level.
USING SAMPLE LABELS TO CREATE AND
PRINT LABELS FROM PRE-DESIGNED
TEMPLATES
Example:
➔ ▲/▼➔
OK
or ➔ ➔
Move the cursor to the first line and edit the text ➔
➔Move the cursor to the second line and edit
the text ➔ ➔ ➔ ▲/▼Select the number
of copies ➔ ,
OK
or .
NOTE: When a sample label consists of two
lines of text, removing the second line also
removes the character attributes of the
second line.
• To recover the original character attributes of the
deleted second line, cancel the currently selected
sample label by pressing and select the same
sample label again.
• To delete all text at once on a line only, move the
cursor to the line you wish to delete all text, then
press
Shift
and .
Figure 8
0.37"
(9.5 mm)
Figure 9
LCD Display Label Image
Full
Half
Narrow
XX" (XX mm)
XX" (XX mm)
XX" (XX mm)
Full Half Narrow
0.94" 0.94" 0.47" 0.47" 0.16" 0.16"
(23.9 mm) (23.9 mm) (12 mm) (12 mm) (4 mm) (4 mm)
Figure 7

PAGE 7 OF 9 0418 IH-5135
SAVING LABEL FILES
User can save up to 50 labels and recall them for printing at a later date. A maximum of 80 characters can be saved per
file. User can also edit and overwrite the stored label.
SAVE
Type text and format label ➔➔ ▲/▼[Save] ➔
OK
or ➔ ▲/▼ ➔
OK
or .
PRINT
➔ ▲/▼[Print] ➔
OK
or ➔ ▲/▼ ➔ ,
OK
or ➔ ▲/▼Select the number of copies ➔
,
OK
or .
OPEN
➔ ▲/▼[Open] ➔
OK
or ➔ ▲/▼ ➔
OK
or .
DELETE
➔ ▲/▼[Delete] ➔
OK
or ➔ ▲/▼ ➔
OK
or ➔ [Delete?] ➔
OK
or .
USING THE FILE MEMORY
RESETTING THE P-TOUCH LABELER
RESETTING THE DATA TO FACTORY SETTINGS
Turn off the machine. Press and hold down
Shift
and
R
. While holding down
Shift
and
R
, press once
and then release
Shift
and
R
.
NOTE: Release before releasing the other
key. All text, format settings, option settings
and stored label files are cleared when you
reset the printer. Language and unit settings
will also be cleared.
CLEANING THE TAPE CUTTER
Tape adhesive can build
up on the cutter blade
after repeated use, taking
the edge off the blade
which may result tape
jamming in the cutter.
NOTE: About once every year, carefully
wipe the cutter blade using a cotton swab
moistened with isopropyl alcohol (rubbing
alcohol). (See Figure 10)
CAUTION! Do not touch the cutter blade
directly with your bare hands.
RESETTING AND MAINTENANCE
Figure 10

PAGE 8 OF 9 0418 IH-5135
TROUBLESHOOTING
OPERATING ISSUE RECOMMENDATIONS
The screen "locks" or the
printer does not respond
normally.
Refer to "Resetting the P-touch Labeler" above to reset the internal
memory to the initial settings. If resetting the printer does not solve the
problem, disconnect the AC adapter and remove the batteries for
more than 10 minutes.
The display remains blank
after turning on the power.
Check that the batteries are correctly installed and that the AC adapter
designed exclusively for printer is correctly connected. Check that
the rechargeable battery is fully charged.
The LCD messages are
displayed in a foreign
language.
Refer to "Setting Unit and Language" on page 4 to select desired
language.
The label is not printed
after pressing the Print key. Check that text has been entered and that the tape cassette in
installed correctly with sufficient tape remaining.
If the tape is bent, cut off the bent section and thread the tape
through the tape exit slot.
If the tape is jammed, remove the tape cassette and then pull out
the jammed tape and cut it. Check that the end of the tape passes
through the tape guide before reinstalling the tape cassette.
The label is not printed
correctly. Remove the tape cassette and reinstall it, pressing it firmly until it
clicks into place.
If the printhead is dirty, clean it with a cotton swab or optional print
head cleaning cassette (TZe-CL4).
The ink ribbon is separated
from the ink roller.
If the ink ribbon is broken, replace the tape
cassette. If not, leave the tape uncut and
remove the tape cassette; then, wind the loose
ink ribbon onto the spool as shown.
The printer stops while
printing a label. Replace the tape cassette if striped tape is visible, as this indicates
that you have reached the end of the tape.
Replace all batteries or connect the AC adapter directly to the
printer.
Label files saved previously
are now empty. All files stored in the internal memory are deleted if the batteries are
weak or the AC adapter was disconnected.
A tape jam which cannot
be cleared keeps
occurring.
Contact Uline Customer Service at 1-800-295-5510.
Spool

PAGE 9 OF 9 0418 IH-5135
TROUBLESHOOTING CONTINUED
WHEN AN ERROR MESSAGE APPEARS ON THE DISPLAY
When an error message appears on the display, follow the directions provided below.
MESSAGE CAUSE/REMEDY
Check # of Digits
Entered!
The number of digits entered in the bar code data does not match
the number of digits set in the bar code parameters.
Cutter Error! The tape cutter has been closed when user tried to print or feed tape.
Turn the printer off and then on again before continuing. The tape is
tangled in the cutter, remove the tape.
Length Limit! The length of the label to be printed using the text entered is longer
than 39.97" (1 m). Edit the text so that the length of the label is less
than 39.97" (1 m).
Text Too High! The text size is too large.
Text Too Long! The length of the label to be printed using the text entered is longer
than the length setting.
System Error XX Contact Uline Customer Service at 1-800-295-5510.
πCHICAGO • ATLANTA • DALLAS • LOS ANGELES • MINNEAPOLIS • NYC/PHILA • SEATTLE • MEXICO • CANADA
1-800-295-5510
uline.com
This manual suits for next models
1
Table of contents
Other U-Line Printer manuals