Uberhaus 70005009 User manual


2
DANGER
If you smell gas:
1. Shut off gas to the appliance.
2. Extinguish any open flame.
3. Open lid.
4. If the odour continues, keep away from the appliance and immediately call your gas
supplier or local fire department.
Failure to follow these instructions could result in fire or explosion, which could cause
property damage, personal injury or death
1. Never operate this appliance unattended
2. Never operate this appliance within 10 ft (3 m) of any structure, combustible
material or other gas cylinder
3. Never operate this appliance within 25 ft (7.5 m) of any flammable liquid
4. Never allow oil or grease to get hotter that 400ºF (200ºC).If the temperature
exceeds 400ºF (200ºC), or if oil begins to smoke, immediately turn the burner or
gas supply OFF.
5. Heated liquids remain at scalding temperatures long after the cooking process.
Never touch cooking appliance until liquids have cooled to 115ºF (45ºC) or less.
6. If a fire should occur, keep away from the appliance and immediately call your fire
department. Do not attempt to extinguish an oil or grease fire with water
DANGER
Failure to follow these instructions could result in fire, explosion or burn hazard, which
Could cause property damage, personal injury or death
TABLE OF CONTENTS
Safety warnings………...…………………..2
Safety Information………………….........3-5
Package Contents List……………………..5
Preparation………………………….……....5
Assembly Instructions…………...…………6
Operation Instructions……………………..7-8
Care and maintenance……………………... 9
Troubleshooting……..……………………...10
Replacement Parts List…………..…..........11
Warranty……….………………………….…12

3
SAFETY INFORMATION
1. The installation must conform with local codes or, in the absence of local codes, with the National Fuel
Gas Codes, ANSI Z223.1/NFPA 54, Storage and Handling of Liquefied Petroleum Gases, ANSI/NFPA
58, or the Standard for Recreational Vehicles, ANSI A119.2/NFPA 1192, and the Recreational Vehicle
Code, CSA Z240 RV, as applicable.
2. Table top grill is for outdoor use only. Grill should be operated in a well-ventilated space. Never operate
in an enclosed space, garage or building. Your grill is not intended to be installed in or on recreational
vehicles and / or boats .
3. Heated liquids remain at scalding temperatures long after the cooking
process. Do not touch the cooking appliance until liquids have cooled to
115°F (45°C) or less.
4. Do not install or use grill within 10 ft (3 m) of combustible
materials from back and sides of grill. Grill shall not be located under
overhead surfaces (closed carport, garage, porch, patio) that can catch fire.
5. Never attempt to attach this grill to the self-contained LP gas system of a camper trailer or motor home.
6. It is the responsibility of the assembler/owner to assemble, install and maintain gas grill. Do not let
children and pets play near your table top grill. Failure to follow these instructions could result in serious
personal injury and/ or property damage.
7. Remove lid before lighting grill. When grill is not in use, turn off control knob on regulator.
8. Carefully follow instructions in this manual for proper assembly and leak testing of your grill. Do not use
grill until leak checked. If leak is detected at any time, it must be stopped and corrected before using
grill further.
9. Appliance area should be kept clear and free from combustible materials, gasoline, bottled gas in any
from and other flammable vapours and liquids. Do not obstruct flow of combustion and ventilation air.
10. Ensure proper bottle position prior to lighting your grill. Bottle should always be placed vertically.
11. Never try to light grill with lid closed! Buildup of gases is very dangerous and could cause an explosion
12. Keep fuel supply hose away from any heated surfaces
13. Propane is a flammable gas and improper handling may result in explosion and/or fire and serious
accident or injury.
14. Do not allow oil or grease to get hotter than 400°F (200°C.) If oil begins to smoke, immediately turn the
burner or gas supply “OFF” and wait for the temperature to decrease to less than 350°F (175°C).
15. This appliance will be hot during and after use. Use insulated oven mitts or gloves for protection from
hot surfaces or splatter from cooking liquids
16. Do not leave your grill unattended while in operation
17. Do not use while under the influence of drugs or alcohol.
18. Do not store any spare LP (propane) cylinder, full or empty, under or near your grill.
19. Appliance is not intended for commercial use or rental
20. The cylinder must be disconnected when the appliance is not in use
Please read the following instructions carefully before attempting to assemble, operate or install the product.
Failure to follow these instructions may result in serious bodily injury and/or property damage. If you have
questions regarding the product please call customer service at 1-866-206-0888, 8 AM - 8 PM, EST,Monday-
Friday.
LP- gas supply cylinder to be used must be constructed and marked in accordance with the specifications for
LP-gas cylinders of the National Standard of Canada, CAN-B339, Cylinders, Spheres and Tubes for the
Transportation of Dangerous Goods
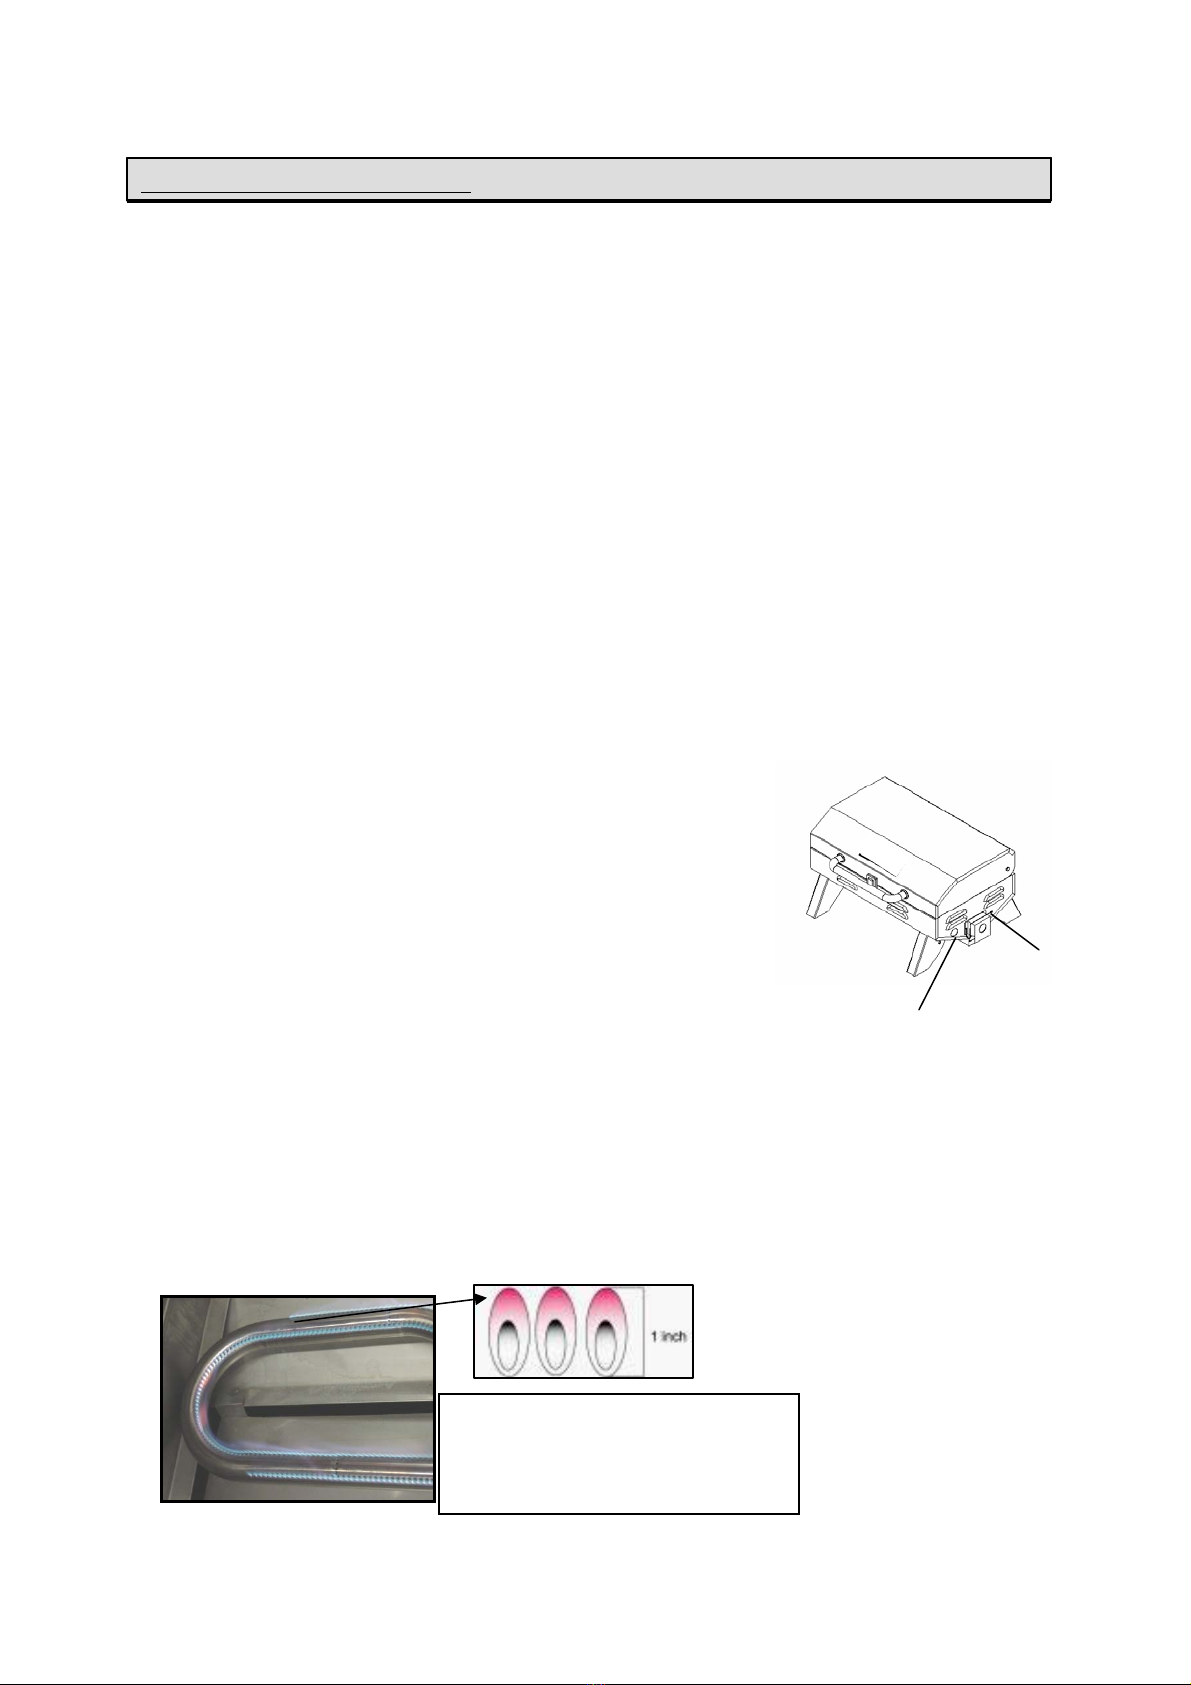
NATURAL HAZARD • SPIDERS
FACT: Sometimes spiders and other small insects climb into the burner tube. The spiders spin
webs, build nests and lay eggs. The webs or nests can be very small, but they are very strong
and can block the flow of gas. Clean burner prior to use after storing, at the beginning of
grilling season or after a period of one month not being used
TM

4
SAFETY INFORMATION
The Fuel System
Gas grills are used safely by millions of people when following simple safety precautions.
The items in the fuel system are designed for operation with this grill. They must not be replaced with any
other brand. (See parts list for replacement items.)
GAS BURNER: The gas burner is constructed of tubular stainless steel and should not require
maintenance other than inspection for insects/nests inside the air intake slots.
BURNER VALVE/REGULATOR: The burner control is actually a regulator/valve assembly. The
regulator attaches directly to the end of the burner, which extends out of the right end of the grill by, a 1-
pound propane cylinder threads into the regulator. Only a factory supplied gas valve/regulator must be
used. (See parts list for replacement items.)
LP GAS REGULATOR CAUTION
The gas pressure regulator provided with this appliance must be used. This regulator is equipped with the
required orifice and is set for the required outlet pressure for this appliance. This combination of orifice
size and pressure regulation specifications provides the cooking performance intended for this tabletop
BBQ.Substitution of regulator by any other device or any other manufacturer is dangerous and could result
in serious injury.
LP GAS REGULATOR
The gas pressure regulator is shipped loose and must be installed prior to operating your grill. This is a
“slip-fit”~ requiring no tools. See assembly instructions on page 6 for proper installation. The regulator
may be removed from the grill after use. Turn the regulator control knob to the “OFF” position; disconnect
the LP cylinder and allow the grill to cool for at least 30 minutes prior to removing regulator.
Care should be taken to store the regulator in a clean, secure location when the grill is not in use. The
threaded cylinder connection area should be kept clean and free of dust, dirt, sand or any foreign materials.
Clean both the regulator and LP cylinder threaded areas prior to connecting cylinder to regulator.
PROPANE FUEL: Warning - propane is a flammable gas. Improper handling may result in an
explosion and/or fire and serious accident or injury. Your grill is designed to operate with propane (LP) gas
only and is equipped with the proper orifice for propane gas.
Caution:Do not connect this grill with any gas supply other than propane. Propane gas is heavier than
air and settles in lower areas. Make certain adequate ventilation is available when using your grill. The
gas cylinder may be stored outside in a well-ventilated area out of the reach of children when the grill is not
in use.
LP GAS CYLINDER: This grill is designed and intended to be used with a disposable propane cylinder
with a nominal fuel weight of 1 lb. Such a cylinder is approximately 4“ diameter and 7” long. The tabletop
BBQ does not include an LP gas cylinder. This must be purchased separately and be found at most
hardware stores. The cylinder used must be constructed in accordance with the specifications for LP
cylinders of the U.S. Department of Transportation (DOT) DOT-39 NRC232/290 MllIO.

5
The LP gas cylinder shall be used only outdoors in a well-ventilated space and not in a building, garage, or
any other enclosed area. The tabletop BBQ may be stored indoors if the LP gas cylinder is removed and
stored outdoors.The LP gas cylinder (not included) is threaded for connection directly to the gas regulator
supplied with this appliance. Care should be taken when threading the cylinder to the regulator to engage
threads correctly to achieve the proper and intended connection. When disconnecting or connecting the gas
cylinder, be careful that the regulator does not strike the grill, the ground, or any other surfaces. Replace the
protective cap over the threaded cylinder connection when removed from grill. If any difficulty occurs when
connecting or disconnecting the cylinder to the regulator assembly, contact your local gas supplier for
assistance.
When re-connecting the LP gas cylinder to the regulator, be sure to hand-tighten until snug. This connection
should be inspected for damage and leak tested after each re-connection.
To leak test, make a soap solution of one part liquid detergent and one part water. You will need a spray
bottle, brush, or rag to apply the solution to the fitting. Bubbles indicate leaks.
SAFETY INFORMATION
PACKAGE CONTENTS
Part Description Quantity
1 Grill 1 set
2 Regulator 1 set
12
PREPARATION
Before beginning assembly, installation or operation of product, make sure all parts are present.
Compare parts with package contents list and diagram above. If any part is missing or damaged, do not
attempt to assemble, install or operate the product. Contact customer service at 1-866-206-0888 for
replacement parts.
Your UBERHAUS tabletop BBQ is sold pre-assembled. The only assembly required is to connect the
gas regulator into the grill.
Estimated Assembly Time: 5-8 minutes
Tools Required for Assembly: Wrench

6
ASSEMBLY INSTRUCTIONS
1. Locate the gas regulator (1-1). Grasp the regulator (1-1) with
the knob (1-2) facing directly up. Line up the collar on the
regulator (1-1) with the open end of the burner tube (1-3) as
shown in fig. 1.
Fig. 1
(1-3)
(1-1)
(1-2)
2. Screw the regulator (2-1) into the open end of burner (2-2)
as shown in fig. 2. Fig. 2
(2-2) (2-1)
3. Once the regulator is in as far as it will go, tighten with a
wrench. Turn the regulator so that the knob is facing forward.
4. Note: Always make sure the regulator is secured in the fully
lock-in position before attaching propane cylinder.
5. (3-2)Be sure the gas control knob (3-1) is in the “OFF”
position. Check to make sure threaded areas on cylinder
and regulator are clean. Screw the propane cylinder (3-2)
onto the regulator (3-3) making sure to engage threads
correctly to achieve proper connection. To remove the
propane cylinder (3-2) unthread the cylinder from the
regulator (3-3) as shown in fig.3.
Fig. 3
(3-2)
(3-3)
(3-1)

7
OPERATION INSTRUCTIONS
BURNER VALVE / REGULATOR
The burner control operates in the following positions indicated by the pointer at the top of the
regulator as installed on the grill:
OFF – This stops the flow of gas to the burner.
PUSH TO TURN ON – Push “IN” on the knob to release the knob from the locked “OFF”
position.
HIGH – This position provides the highest gas flow and the hottest cooking temperatures.
MED – This position provides cooking temperatures between HIGH and LOW.
LOW – This position provides the lowest cooking temperatures.
COOKING TEMPERATURE SETTINGS
HIGH – Approximately 450°F
MED – Approximately 400°F
LOW – Approximately 350°F
Note: A disposable 1 lb. propane cylinder “NEAR EMPTY” can significantly reduce internal
pressure and may affect the regulator’s capability to accurately control gas flow. As the
propane cylinder reaches empty, this may cause “hotter-than-normal” cooking temperatures
during the final minutes of use.
Note: A disposable 1 lb. propane cylinder will provide approximately 4-6 hours of cooking time
with this tabletop BBQ.
LIGHTING THE GRILL
1. Make sure the regulator is properly secured into the
burner end.
2. Make sure the propane cylinder is tightly treaded into
the regulator (hand tighten only).
3. Place the legs in up position.
4. Open lid. Always open lid when lighting.
5. Locate the lighting rod (4-1) on the right side of the
grill as shown in fig. 4. Insert a match through the access
hole (4-2) next to the burner tube. Keep flame next to the
burner while actuating the gas control knob on the regulator.
6. Push the gas burner control knob “IN” and turn the control knob counterclockwise to the
“lighting Position” while watching burner flame.
7. If ignition does not occur in 3-5 seconds, turn the control knob “OFF”. Wait 5 minutes before
attempting to re-light the grill. If the grill fails to ignite after the second attempt, call customer
service at 1-866-206-0888 for assistance.
8. With burner lit, gently close the lid and allow the grill to warm up for 20-30 minutes prior to
use. Note: If the burner should go out for any reason, turn the control knob to
the “OFF” position. Wait 5 minutes before attempting to re-light.
Visually check the burner flames prior to
each use, the flames should look like the
image above picture, If flames look
different,refer to the burner maintenance
section in this manual.
Fig.4
(4-2)
(4-1)

8
OPERATION INSTRUCTIONS
TURNING THE GRILL OFF
1. Open the lid.
2. Turn the regulator control knob to the “OFF” position. Caution: Do not attempt to re-light the grill
without following all the lighting instructions.
3. Allow the grill body to cool at least 30 minutes before attempting to move or transport.
FLAME CHARACTERISTICS
Flames should be blue and stable with no yellow tips, excessive noise or lifting. Yellow flames
indicate insufficient air. Noisy flames or flames that lift away from the burner indicate too much air.
Also, check to see if the air shutter or burner ports are blocked by dirt, debris, spider webs, etc.
Typical flame pattern and proper flame height is shown in fig. 5
To adjust for proper flame, use a Philips screwdriver to loosen the
screw (6-1) located in the main igniter gas collector (6-2). Turn the
screw clockwise to close the air shutter, and counterclockwise to
open the air shutter as shown in fig. 6. After adjusting, tighten the
screw to affix the air shutter.
USING THE GRILL
1. Find a level, stable surface to place your tabletop BBQ.
2. Allow the grill to warm up with the lid closed for 20-30 minutes prior to cooking.
3. The tabletop BBQ is equipped with and adjustable HIGH/MED/LOW control knob, which allows for
complete flexibility in cooking temperatures.
HIGH – Approximately 450°F
MED – Approximately 400°F
LOW – Approximately 350°F
4. You may cook on the grill in any weather. If the temperature is extremely cold or hot, the cooking times
will be slightly increased or decreased. Keep the grill out of excessive winds when operating.
5. The cooking times listed below are only suggestions. Cooking times vary depending on thickness of
meats and the desired degree of preparation.
MEAT GRILLING TIMES
• Steak – (T-Bone), thick cut, medium doneness: grill 10 minutes on each side on MED setting.
• Chicken – (Quarters), average size fryer: grill 30 minutes per side on MED setting. Check for doneness.
• Pork – (Ribs/chops): grill 10-20 minutes per side on MED setting. Check for doneness.
• Fish – grill 20-30 minutes on LOW setting.
• Turkey - (Breast): grill 10 minutes per pound or until internal temperature reaches 170°F on
MED setting.
Fig. 5
Fig. 6
(6-1)
(6-2)

9
CARE AND MAINTENANCE
There is very little care and maintenance needed.The UBERHAUS tabletop BBQ is designed and made of
materials that will last many years with normal use. Following these instructions will improve the longevity
and quality of cooking. To ensure safe operation of your grill, the area of cooking should always be kept
free of combustible materials of any type, such as gasoline or other flammable vapours or liquids.
• Outside Grill Parts - These parts are made of stainless steel. It can be cleaned easily with warm soapy
water or any stainless steel cleaner.
• Cooking Grid and Grease Tray – The cooking grid is made of high quality porcelain-coated steel. The
cooking grid should be brushed with a steel brush immediately after cooking, while the grill is still warm.
The grease tray is also porcelain-coated steel and can be cleaned with a flat scraper such as a putty knife.
Caution: The grease tray must be kept clean and free of heavy buildup for the grill to perform properly
and to eliminate flare-ups.
• Firebox - Use warm soapy water to clean this area. Do not allow grease to build up.
• Drain Hole – The drain hole must be kept clear of grease and food particles to allow drippings to drain
properly into the grease tray. This must be done to maintain proper operation of your grill.
• General - This grill, like all equipment, will look better and last longer if kept out of the weather when not in
use. Caution: Do not store propane cylinders in enclosed areas. When using a cover or moving the grill,
always wait until the grill has cooled for at least 30 minutes.
• Not obstructing the flow of combustion and ventilation air.
• A clogged tube can lead to a fire beneath the appliance.
This unit must be kept in an area free from combustible materials, gasoline and other flammable
vapours and liquids.
Make sure all openings into the grill body are free of blockages or debris and there are no objects or
materials blocking the flow of combustion or ventilation. Make sure the legs are in the up position
when using the grill.
Check burner air inlet openings (behind the inlet guard on the right end of the grill body) for insect
nests or blockages. Make sure the slots in the burner tube are clear.
When the grill is not in use, turn the control knob to the “OFF” position and remove the propane
cylinder from the regulator. Remove the regulator from the burner.
For outdoor use only, if stored indoors, detach propane cylinder and store outdoors. Propane
cylinders must be stored out of reach of children.
Important
First-time use: It is important that the grill be lit and allowed to heat up for at least 30 minutes before
any food is placed on the cooking grid. It is normal for some smoke to appear during the initial
operation of the grill. After initial heating, the grill is ready for use. A cooking spray can be used on
the cooking grids to allow easier clean up.
THIS COOKING APPLIANCE IS FOR OUTDOOR USE ONLY AND SHALL NOT BE USED IN A
BUILDING, GARAGE OR ANY OTHER ENCLOSED AREA.
MOVING INSTRUCTIONS
Caution: Never move the grill with burner lit.
Make sure control knob is in the “OFF” position. Disconnect the propane cylinder from the regulator.
Remove the regulator from the grill. Be sure the grill has completely cooled for at least 30 minutes.
Close the lid and secure the latch. Place the legs in the down position. Use the handle to carry the
grill.
Note: It is best to leave the grease tray in place attached to the bottom of the grill-some grease may
continue to drip from drain hole during transport.

10
TROUBLESHOOTING
WARNING Spiders and insects can nest inside the burners of the grill and disrupt gas flow. This very
dangerous condition could cause a fire behind the valve panel, thereby damaging the grill and making it
unsafe for operation. Inspect the grill at least twice a year.
When to Look for Spiders
You should inspect the burners at least twice a year or immediately after any of the following conditions occur:
1. The smell of gas in conjunction with burner flames appearing yellow.
2. The grill does not reach desired temperature.
3. The grill heats unevenly.
4. The burners make popping noises.
BEFORE CALLING FOR SERVICE
Problems What To Do
Grill will not light. Check to see if the liquid propane cylinder is empty.
Check burner ports for any blockage. Use a soft
wire brush to clear plugged ports.
Check the gas orifice on the burner for an
obstruction. If orifice is blocked, clean with a needle
or thin wire. NEVER USE A WOODEN
TOOTHPICK.
Burner flame is yellow or orange in conjunction with
gas odour. Check for spiders and insects
Call customer service at 1-800-913-8999.
Low heat with the control knob on the HIGH setting. Make sure the grill area is clear of dust.
Make sure the burner and orifice are clean.
Check for spiders and insects.
Is there adequate gas supply available?
Is the grill being preheated for 15 minutes?
If the grill does not function properly, use the following checklist before contacting your
dealer for service.

11
REPLACEMENT PARTS LIST
For replacement parts, call our customer service department at 1-866-206-0888, 8 AM.-8 PM, EST, Monday-
Friday.
01
02
03
04
05
06
05
04
02 07
08
09
10
15
11
12
13
16
17
17
17
17 14 18
Part Description Part # Part Description Part #
1 Main Lid 1 set 11 Grease Tray Latch 1 pc
2 Main Lid Screw 2 pc 12 Grease Collector Box 1 pc
3 Logo 1 pc 13 Lighting Rod 1 pc
4Main Lid Handle Heat
Insulating Spacer 2 pc 14 Grease Tray 1 pc
5 Main Lid Handle Seat 2 pc 15 Main Burner Bowl
Assembly 1 pc
6 Main Lid Handle 1 set 16 Latch 1 set
7 Cooking Grid 1 set 17 Foldable Leg 4 set
8 Flame Tamer 1 pc 18 Regulator, LP 1 pc
9 Main Burner 1 pc 19 Manual 1 pc
10 Firebox Heat Shield 1 pc 20 Wrench 1 pc
20

12
Warranty
Thank you for purchasing this UBERHAUS product. These products have been made to demanding,
high-quality standards and are guaranteed for domestic use against manufacturing faults for a period
of 2 years from the date of purchase. This warranty does not affect your statutory rights.
This guarantee does not affect your statutory rights. In case of any malfunction of your UBERHAUS
product (failure, missing part, etc.), please contact one of our service technician at our toll-free
service line at 1-866-206-0888 from 8 AM to 8 PM, Monday to Friday, Eastern time. RONA reserves
the right to repair or replace the defective product, at its discretion.
Normal wear and tear, including accessory wear, is not covered under this warranty. The product is
guaranteed for 2 years if used for normal trade purposes, and is valid for the original buyer only. Any
warranty is deemed invalid if the product has been overloaded or used improperly, or subject to
neglect or attempted repairs other than by an authorized agent. Heavy-duty, daily professional or hire
usage are not guaranteed. RONA is not responsible for any costs related to labour, injuries or any
other loss incurred during the product installation, repair or replacement, including any indirect or
consequential damages.
Due to continuous product improvement, we reserve the right to change the product specifications
without prior notice.

2
DANGER
Sivoussentezuneodeurdegaz:
1.Fermezlegaz l'appareil.
2. Éteigneztouteflammenue.
3.Ouvrezlecouvercle.
4.Sil'odeurpersiste, éloignez-vousdel'appareiletappelezimmédiatementvotrefournisseurde
gazouleservice d'incendielocal.
Le non respect decesinstructionspeutentra nerun incendieouuneexplosion, cequipourraitcauserdes
dommagesmatériels,desblessuresoulamort.
1.Nejamaisutilisercetappareilsanssurveillance
2.Nejamaisfairefonctionnercetappareil àmoinsde 10pi(3m)de toutestructure,
desmatièrescombustiblesoud'autresbouteillesde gaz
3.Nejamaisfairefonctionnercetappareil àmoinsde 25pi(7,5m)de toutliquide
inflammable
4.Nejamaislaisserl'huileoulagraissedevenirpluschaudeque400 ºF(200 ºC). Si
latempératureexcède400 ºF(200 ºC), ousil'huilecommence àfumer, arrêter
immédiatementlebrûleuroul’approvisionnementde gaz.
5.Lesliquideschaudsrestentbrûlantslongtempsaprèslacuisson. Nejamais
toucherl'appareildecuissonjusqu'àcequelesliquidessontrefroidis à115 ºF
(45 ºC)oumoins.
Siun incendieseproduit, s'éloignerde l'appareilet appelerimmédiatementles
pompiers. Nepastenterd'éteindreunfeud'huileoude graisseavecde l'eau
DANGER
Le non respectde cesinstructionspeutentra nerunincendie, uneexplosion oudes
brûlures, cequipourraitcauserdesdommagesde propriété,desblessuresoulamort
TABLEDES MATIÈRES
Consignesdesécurité... ... ... ... ... ... ... ..2
Informationssurla
sécurité... ... ... ... ... ... ...... ........... ....... 3-5
Listeducontenude l'emballage... ... ... .. 5
Préparation... ... ... ... ... ... ... ... ... .... ... .5
Instructionsd‘assemblage... ... ... ... ... ... 6
Mode d'emploi... ... ... ... ... ... ... ... .. . .7-8
Entretien. . . . ... ... ... ... ... ...... ... .........9
Dépannage... ... .. ... ... ... ... ... ... ... ...10
Listedespiècesde
rechange... ... ... ... .. ... .......................11
Garantie... ... .... ... ... ... ... ... ...... ... ..12
PDF 件使用 "pdfFactory Pro" 试用版本创建 www.fineprint.com.cn

3
CONSIGNESDESÉCURITÉ
1.L'installationdoit êtreconformeauxcodeslocauxou,enl'absencedecodeslocaux, avecleNationalFuel GasCode,ANSI
Z223.1/NFPA54,stockageet manutentiondesgazdepétroleliquéfiés,ANSI/ NFPA58,oulanormepourlesvéhicules
récréatifs,ANSIA119.2/NFPA1192,etleCodedevéhiculesrécréatifs, CSAZ240 RV,commeapplicable.
2.Lebarbecueportatif estconçupourunusage àl‘extérieurseulement.Legrildevrait êtreutilisédansunespacebienventilé. Ne
jamaisutiliserdansunespaceclos,ungarageouunbâtiment.Votregriln’estpasdestinéàêtreinstallédansousurles
véhiculesrécréatifset/oudesbateaux. Lesliquideschaudsrestentbrûlantslongtempsaprèslacuisson.
3.Nepastoucherl'appareildecuissonjusqu'àcequelesliquidesontrefroidi à1150F(450C)oumoins.
4.Nepasinstallerouutiliserlebarbecue àmoinsde10pi(3m)desmatériauxcombustibles
del'arrièreetdescôtésdu gril.Lebarbecuenedoitpas êtreplacésousdesinstallationsinflammables(abridegarage,
terrasseetc)
5.Nejamaistenterdebranchercebarbecueausystèmeautonomedepropaned'uneroulotteoud'unvéhiculerécréatif.
6.Ilestlaresponsabilitédel'assembleur/propriétairedemonter,installeretmaintenircebarbecue.
Nepaslaisserlesenfantsetlesanimauxjouer àproximitédevotrebarbecue.
7.Retirerlecouvercleavantd'allumerlegril.Lorsquelebarbecuen'estpasutilisé,
fermerleboutondecommandesurlerégulateur.
8.Suivrelesinstructionsdecemanuelpourl’assemblageetlestestsdefuitesdugril. Nepasutiliserlebarbecuejusqu'àce
contrôled'étanchéité.Siunefuiteestdétectéeàtoutmoment,lebarbecuedoit êtreferméimmédiatement et leproblèmeréparé
avantdel'utiliser ànouveau.
9.Lazonedoit êtregardéepropreetexemptdematériauxcombustibles,del’essence,dugazenbouteilleetlesautresvapeurset
liquidesinflammables.
10.Nepasobstruerl'aération àl'intérieuretautourdubarbecue.
11.Placerlabouteilledepropanecorrectement avantd'allumerlebarbecue. Labouteilledoit êtreplacée àlaverticale.
12.Nejamaisessayerd’allumerlegrilaveclecouverclefermé!L'accumulationdegazesttrèsdangereuseetpeutprovoquerune
explosion
13.Garderlestuyauxd'alimentationen gaz éloignésdetoutesurfacechauffée
14.Lepropaneestungazinflammableetunemanipulation nonadéquatepeutprovoqueruneexplosion,unincendie,des
accidentset/ou desblessuresgraves.
15.Nejamaislaisserl'huileoulagraissedevenirpluschaudeque400ºF (200ºC). Silatempératureexcède400ºF (200ºC),ousi
l'huilecommence àfumer,arrêterimmédiatementlebrûleuroul’approvisionnementdegaz.
16.Cetappareilserachaudpendant etaprèsl’utilisation. Utiliserdesgantsdefourisolésoudesgantspourlaprotectiondes
surfaceschaudesoulesprojectionsdeliquidesdecuisson
17.Nepaslaisserlebarbecuesanssurveillancelorsqu'ilestenfonctionnement
18.Nepasutilisersousl'influencededroguesoud'alcool.
19.Nepasstockertoutebouteillesupplémentairedegazpropane,pleineouvide,sousouprèsdugril.L’appareiln'estpasdestinéà
unusagecommercialou àlalocation
20.Labouteilledoit êtredéconnectélorsquel'appareiln'estpasutilisé
Lireattentivementlesinstructionssuivantesavantd'essayerdemonter,utiliserouinstallerleproduit.Le non
respect de cesinstructionspeutentra nerdesblessurescorporellesgraveset/oudesdommages
matériels.Sivousavezdesquestionsconcernantleproduitveuillezcommuniqueravecleservice àclientèle
au 1-866-206-0888,de 8h à20h (HNE)dulundiau vendredi.
La bouteilledegazdoit êtrefabriquéeet marquéeconformémentauxspécifications
desbouteillesde gazdelaNormenationaleduCanada, CAN-B339,Bouteillessphèreset tubespourle
transport desmarchandisesdangereuses
ATTENTION •ARAIGNÉES
ATTENTION:Lesaraignéesetles petitsinsectespeuventtisserdestoilesouconstruiredes nidsdansles tubes
des brûleursdugrilaucoursdutransportoudel’entreposage.Cestoilespeuventobstruerledébitdugaz,cequi
peutentraînerun incendiedansles tubesdesbrûleursouautour.
Pourréduirelesrisques,vousdeveznettoyerlestubesdebrûleuraumoinsunefoisparmois, lafindel'étéou
audébutdel'automne.Nettoyez égalementlestubes debrûleurlorsquevotregriln’apasservipourunepériode
prolongée.Untubeobstruépeutentraînerun incendiesouslegril.
TM
PDF 件使用 "pdfFactory Pro" 试用版本创建 www.fineprint.com.cn

4
CONSIGNESDESÉCURITÉ
Lesystèmedegaz
Lesbarbecuesau gazsontutilisésen toutesécuritépardesmillionsdepersonnesen suivantles
consignesde sécuritésimples.
Les élémentsdusystèmede gazsontconçuspourfonctionneraveccegril.Ilsnedoiventpas être
remplacésparde élémentsd'uneautremarqueouconçuspourun autremodèle.(Voirlistedespièces
pourdesarticlesde remplacement.)
Brûleur àgaz:Le brûleur àgazestfaitenacierinoxydabletubulaireet nedevraitpasnécessiterd'entretien
autresquel'inspectiondesinsectes/nidsdanslesfentesd'admissiond'air.
VALVEDU BRÛLEUR /RÉGULATEUR
Le réglagedu brûleurestenfait unrégulateur/valve.Lerégulateursefixedirectement àlafindubrûleur,
quiressort du côtédroitdu barbecueetseconnecte àune bouteille depropanede 1lb.
Utilisezuniquementlerégulateurfourni parlefabricantdu barbecue.(Voirlistedespiècespourdesarticles
de remplacement.)
ATTENTIONRÉGULATEUR DEGAZ
Le régulateurde pressionde gazfourniaveccetappareildoit êtreutilisé.Cerégulateurest équipéde
l'orificenécessaireetestréglépourlapressiondesortie requisepourcetappareil.Cettecombinaisonde
tailledel'orificeetlesspécificationsde régulationdepressionfournitlaperformancedecuissondestinésà
cebarbecueportatif. Toutesubstitution de régulateurpartout autredispositifoutout autrefabricant est
dangereuxet peutentra nerdesblessuresgraves.
RÉGULATEURDEGAZPROPANE
Le régulateurde pressionde gazestlivrénonassembléetdoit êtreinstalléavantd'utiliservotrebarbecue.
Faites-leglisseren placesimplementpourl'installer, aucun outiln'est nécessaire.Voirlesinstructions
d’assemblage àlapage6pouruneinstallation correcte. Lerégulateurpeut êtreretirédugrilaprès
l’utilisation.Tournerleboutondecommandedu régulateur àlaposition «OFF»; débrancherlabouteilleet
laisserlegrilrefroidirpendant aumoins30 minutesavantderetirerlerégulateur.
Desprécautionsdoivent êtreprisespourrangerlerégulateurdansun endroitpropreetsûrlorsquelegril
n'estpasutilisé. Lazonederaccordementfiletédoit êtrepropreetexempt depoussière, desaleté,de
sableoutout autrecorps étranger. Nettoyerlerégulateuretlesorificesfiletésderaccordementdu gaz
avantde connecterlecylindreau régulateur.
Propane:avertissement-lepropaneestungazinflammable. Unemauvaisemanipulation peutentra ner
uneexplosion ouunincendieet unaccident ouuneblessuregrave. Lebarbecue estconçupour
fonctionneraveclepropaneseulementetest équipéd'un orificeappropriépourlegazpropane.
Attention: Ne pasbranchercegrilavectouteautresourcede gaz.Legazpropane estpluslourdquel'airet
s'accumuleradansdesrégionsplusbasses. Assureruneventilationadéquatelorsquevousutilisezle
barbecue.La bouteillede gazpeut êtreentreposéeàl'extérieurdansunendroitbienaéréhorsde laportée
desenfantslorsquelegriln'estpasutilisé.
Bouteillede propane:Cegrilestconçupour êtreutiliséavecunebouteilledepropane àusage unique avec
unemassede carburant nominalede 1lb.Cettebouteilleestd'environ4pode diamètreet7podelong.
Le barbecuen'estpasvenduavecunebouteillede gaz.Cettebouteilledoit êtreachetéeséparémentet
sontdisponiblessurlaplupartdesquincailleries.La bouteilledoit êtreconstruiteconformémentaux
spécificationspourlesbouteillesde propanedel'USDepartmentofTransportation(DOT)MllIODOT-39
NRC232/290.
PDF 件使用 "pdfFactory Pro" 试用版本创建 ÿwww.fineprint.com.cn

5
La bouteilledegazpropanenedoit êtreutiliséequ'àl'extérieurdansunespacebienaéréet nondansun
bâtiment, ungarageoutout autreendroitfermé. Lebarbecue peut êtrerangéàl'intérieursilabouteillede
gazestenlevéeet entreposéeàl'extérieur.Labouteillede gaz(nonincluse)estfiletéepourleraccordement
directementaurégulateurdu gazfourniaveccetappareil.Vissezlabouteilleaurégulateuravecsoin, en
vousassurant quelefiletagedelabouteilleetceluidu régulateurcorrespondent.Pourdébrancherou
raccorderlabouteillede gaz, veiller àcequelerégulateurne frappepaslegril,lesol, outouteautresurface.
Replacerlecapuchondeprotection surleraccordfiletélorsdeleurretraitdugril.Siunedifficultésurvient
lorsquevousbranchezoudébranchezlabouteilleau régulateur,communiquezavecvotrefournisseurde
gazlocal pourde l'aide.
Quandvousrebranchezla bouteillede gazaurégulateur, s’assurerde laserrer àlamain.Cetteconnexion
doit êtrevérifiéepourun essaid'étanchéitéaprèschaquere-connexion.
Pourfaireuntestde fuite, préparezunesolutionavecunepartiede détergentliquideet unepartied'eau.
Vousaurezbesoind'unflaconpulvérisateur,unebrosseouunchiffonpourappliquerlasolutionsurles
raccords.Desbullessignalentlesfuites.
CONSIGNES DESÉCURITÉ
CONTENU DU PAQUET
PartieDescriptionQuantité
1Gril1
2Régulateur1
12
PRÉPARATION
Avantdecommencerle montage,l'installationoulefonctionnementduproduit, s’assurerquetoutesles
partiessontprésentes. Comparerlespièces àlalistedepiècesetaudiagrammeci-dessus. Siune
partieestmanquanteouendommagée,ne pasessayerde monter,installerouutiliserleproduit.
Communiqueravecleservice àlaclientèleau1-866-206-0888 pourdespiècesde rechange.
•Le barbecue portatif UBERHAUSestvendudéjàassemblé.Le seulassemblagerequisestde laconnexion
durégulateurde gazdanslegril.
•Estimationdeladuréed‘assemblage:5-8minutes
•Outilsrequispourl'assemblage: Clé
PDF 件使用 "pdfFactory Pro" 试用版本创建 ÿwww.fineprint.com.cn

6
INSTRUCTIONSD’ASSEMBLAGE
1.Localiserlerégulateurde gaz(1-1).Saisirlerégulateur(1-1)
aveclebouton(1-2)facedirectementverslehaut.Alignerle
colliersurlerégulateur(1-1)avecl'extrémitéouvertedu
tube dubrûleur(1-3)telqu'indiquéàlafig.1.
Fig. 1
(1-3)
(1-1)
(1-2)
2.Visserlerégulateur(2-1)dansl'extrémitéouvertedu brûleur
(2-2)telqu'indiquéàlafig. 2. Fig. 2
(2-2) (2-1)
3.Unefoisquelerégulateurestvisséau maximum,serrer
avecuneclé.Tournerlerégulateurdesortequelebouton
soittournéversl'avant.
4.Note:Toujourss'assurerquele régulateurestfermement
visséen placeavantde brancherlabouteilledepropane.
5.(3-2)S'assurerqueleboutonde commandede gaz(3-1)est
en position «OFF».S'assurerqueleszonesfiletéessurle
cylindreetlerégulateursontpropres.Visserlabouteillede
propane (3-2)surlerégulateur(3-3)enveillant àengager
lesfiletscorrectementpouratteindrelabonneconnexion.
Pourretirerlepropane(3-2)dévisserlecylindredu
régulateur(3-3)conformément àlafig.3.
Fig. 3
(3-2)
(3-3)
(3-1)
PDF 件使用 "pdfFactory Pro" 试用版本创建 Íwww.fineprint.com.cn

7
MODEDEFONCTIONNEMENT
VALVE/RÉGULATEUR DU BRÛLEUR
Leréglagedu brûleurfonctionnedanslespositionssuivantes,telqu'indiquéparlepointeurenhautdu
régulateurtelqu'ilestinstallésurlegril:
OFF-Celaarrêtelefluxdegazau brûleur.
PUSHTOTURN ON-Appuyersurleboutonpourlibérerleboutondeverrouillagedelaposition «OFF».
HIGH –pourledébitleplus élevédugazetlestempératureslesplushautesdecuisson.
MED –pourdestempératuresdecuissonentreHIGHet LOW.
LOW –pourlestempératureslesplusbassesdecuisson.
RÉGLAGESDETEMPÉRATURE
HIGH(élevée):environ450ºF
MED(moyenne):environ400ºF
LOW(faible):environ 350ºF
Note: Unebouteillede1lbdepropane «presquevide»,peutréduireconsidérablementlapression
interneet peutaffecterlacapacitédurégulateurdecontrôleravecprécisionledébitdegaz.Lorsquela
bouteilledepropaneestpresquevide, celapeutprovoquer des températuresdecuissonplus élevées
durantlesdernièresminutes.
Note: Unebouteilledepropane àusageuniquede1lbfourniraapproximativement 4-6heuresde
cuisson aveccebarbecueportatif.
ALLUMAGEDU GRIL
S’assurerquelerégulateurestbienfixédansl’extrémitédubrûleur.
S’assurerquelabouteilledepropaneestbienvisséesur
lerégulateur(serrer àlamainseulement).
Placerlespattesdu barebecueenbonneposition.
Ouvrirlecouvercle.Toujourstenirlecouvercleouvertlorsdel'allumage.
Localiserlatiged’allumage(4-1)surlecôtédroitdugrilcommeillustrésur
lafigure.4. Insérerunealumetteparletroud'accès(4-2) àcôtédu tubedubrûleur.
Garderlaflammeàcôtédubrûleurtout enactionnantleboutondecommandedegazsurle
régulateur. Pousserleboutondecontrôledebrûleurettournerleboutondecommandedanslesens
antihoraire àlapositiond‘allumage tout enregardantlaflammedu brûleur.
Sil'allumageneseproduitpasdans3-5secondes,tournerleboutondecommandesur"OFF".
Attendre5minutesavantdetenterderallumerlebarbecue.Silegrilnes'allumepasaprèsla
deuxièmetentative,appelerleservice àlaclientèleau1-866-206-0888pourassistance.
Unefoislebrûleurallumé,fermerdoucementlecouvercleetlaisserlegrilréchaufferpendant20-30
minutesavantl’utilisation. Note: Silebrûleurs'éteintpouruneraisonquelconque,tournerlebouton
decontrôle àlaposition «OFF». Attendre5minutesavantdetenterde lerallumer.
Vérifiervisuellementlesflammesdu
brûleuravantchaqueutilisation;les
flammesdevraientressembler àl'image
ci-dessus,Silesflammessont
différentes,reportez-vous àlasection
d'entretiendubrûleurdanscemanuel.
Fig.4
(4-2)
(4-1)
1pouce
(4-2)
PDF 件使用 "pdfFactory Pro" 试用版本创建 ÿwww.fineprint.com.cn

8
MODEDEFONCTIONNEMENT
ÉTEINDRELEBARBECUE
1.Ouvrirlecouvercle.
2.Tournerleboutondecommandedu régulateur laposition «OFF».Attention:Ne pas tenter
derallumerlebarbecuesanssuivretoutesles instructionsd‘allumage.
3.Laisserlegrilrefroidirau moins30 minutes avantdetenterdeledéplaceroudele
transporter.
CARACTÉRISTIQUESDEFLAMME
Les flames doivent êtrebleuesetstables,sanspointes jaunes,bruitexcessifoulevage. Des
flammesjaunesindiquentdel’airinsuffisant.Des flammesbruyantesoudesflammesquise
détachentdubrûleurindiquenttropd'air.
Aussi, vérifiersil'obturateurdel'airoulesportsdubrûleursontbloquéspar lasaleté,les
débris,lestoilesd'araignée, etc
Lemodèleetlahauteurdeflammecorrecteestreprésentésurlafigure.5
Pourréglerlaflamme,utiliseruntourneviscruciformepourdesserrerla
vis(6-1)situéedansl'allumageducollecteurdegazprincipal (6-2).Tournerlavisversladroite
pourfermerl'obturateurdel'air, etverslagauchepourouvrirl'obturateur
commelemontrelafig.6.Aprèsleréglage,serrerlesvispourfixer
l'obturateurdel'air.
Utilisationdugril
1.Trouverunesurfaceplaneetstablepour
placervotrebarbecue.
2.Laisserlegrilréchaufferavec lecouverclefermépendant20-30 minutesavantlacuisson.
Lebarbecueestmunid'un réglageHIGH/MED/LOW, cequipermetuneflexibilitétotaledans
les températuresdecuisson.
HIGH(élevée):environ 450ºF
MED(moyenne): environ400ºF
LOW(faible): environ350ºF
3.Vouspouvezutiliser lebarbecuedanstouteslestempératures.S’ilfaittrèsfroidouchaud,le
tempsdecuissonseralégèrementaugmentéoudiminué. Tenirlebarbecue éloignédesvents
excessifspendantlefonctionnement.
4.Les tempsdecuissonci-dessoussontquedessuggestions.Les tempsdecuissonvarient
selonl'épaisseurdelaviandeetledegrésouhaitédepréparation.
Duréedecuissondelaviande
Steak -(T-Bone),trèsépais,cuissonmoyenne:10 minutes dechaquecôté réglagemoyen(MED).
Poulet-(Quartiers),taillemoyenne:30minutesparcôté réglagemoyen(MED).Vérifierla
cuisson.
Porc-(Côtes/côtelettes): 10-20 minutes dechaquecôté réglagemoyen(MED).Vérifierla
cuisson.
Poissons-20-30 minutes faibleréglage.
Dindon-(poitrine): 10minutesparlivreoujusqu' cequelatempératureinterneatteigne1700F
réglagemoyen(MED).
Fig. 5
Fig. 6 (6-1) (6-2)
PDF 件使用 "pdfFactory Pro" 试用版本创建 www.fineprint.com.cn
This manual suits for next models
1
Table of contents
Languages:
Other Uberhaus Grill manuals