Ultra Reef UKS-160 User manual

ULTRA REEF
www.ultrareef.it
1
MANUALE ISTRUZIONI
INSTRUCTIONS MANUAL
V.2017.07
UKS-160, UKS-180, UKS-200
ITALIANO - ENGLISH

ULTRA REEF
www.ultrareef.it
2

ULTRA REEF
www.ultrareef.it
3

ULTRA REEF
www.ultrareef.it
4
MANUALE ISTRUZIONI
Manuale originale. Il prodotto è conforme alla
Direttiva 2006/42/CE.
Questo schiumatoio è un sistema filtrante che
permette la rimozione dei surfactanti dall’acqua
marina. Pompa acqua marina e bolle d'aria in una
camera di miscelazione. Sfruttando le proprietà della
pellicola di tensione superficiale tra aria e acqua,
genera una schiuma che straborda dalla camera
principale accumulando i surfactanti estratti in
un bicchiere di raccolta.
Attenzione: L’utilizzo del prodotto implica la lettura, la
comprensione e l’accettazione di tutte le condizioni
riportate nel manuale “Sicurezza” allegato. Se non
trovate detto manuale contattate immediatamente i
nostri uffici!
Risciacquate attentamente con acqua e aceto (diluito
al 10%) ogni componente che andrà in contatto con
l’acqua. Prodotti a base di alcool o solventi possono
danneggiare l’acrilico.
INTRODUZIONE
1- Coperchio
2- Bicchiere
3- Collo
4- Scarico bicchiere
5- Corpo
6- Diffusore
7- Pompa
8- Venturi
9- Vite saracinesca
10- Vite regolazione aria
11- Silenziatore
12- Tubazione aria
Attenzione: Lo schiumatoio è progettato per
funzionare solo con acqua salata (salinità 35%).
Posizionate lo schiumatoio all’interno della vasca
sump in una posizione comoda e facilmente
raggiungibile
Attenzione: Regolate il livello acqua in sump a circa
22cm.
Il livello dell’acqua andrà tenuto costante mediante
l’uso di paratie a tracimazione o tramite un
osmoregolatore di qualità. Verificate che il livello non
cambi in caso di black-out.
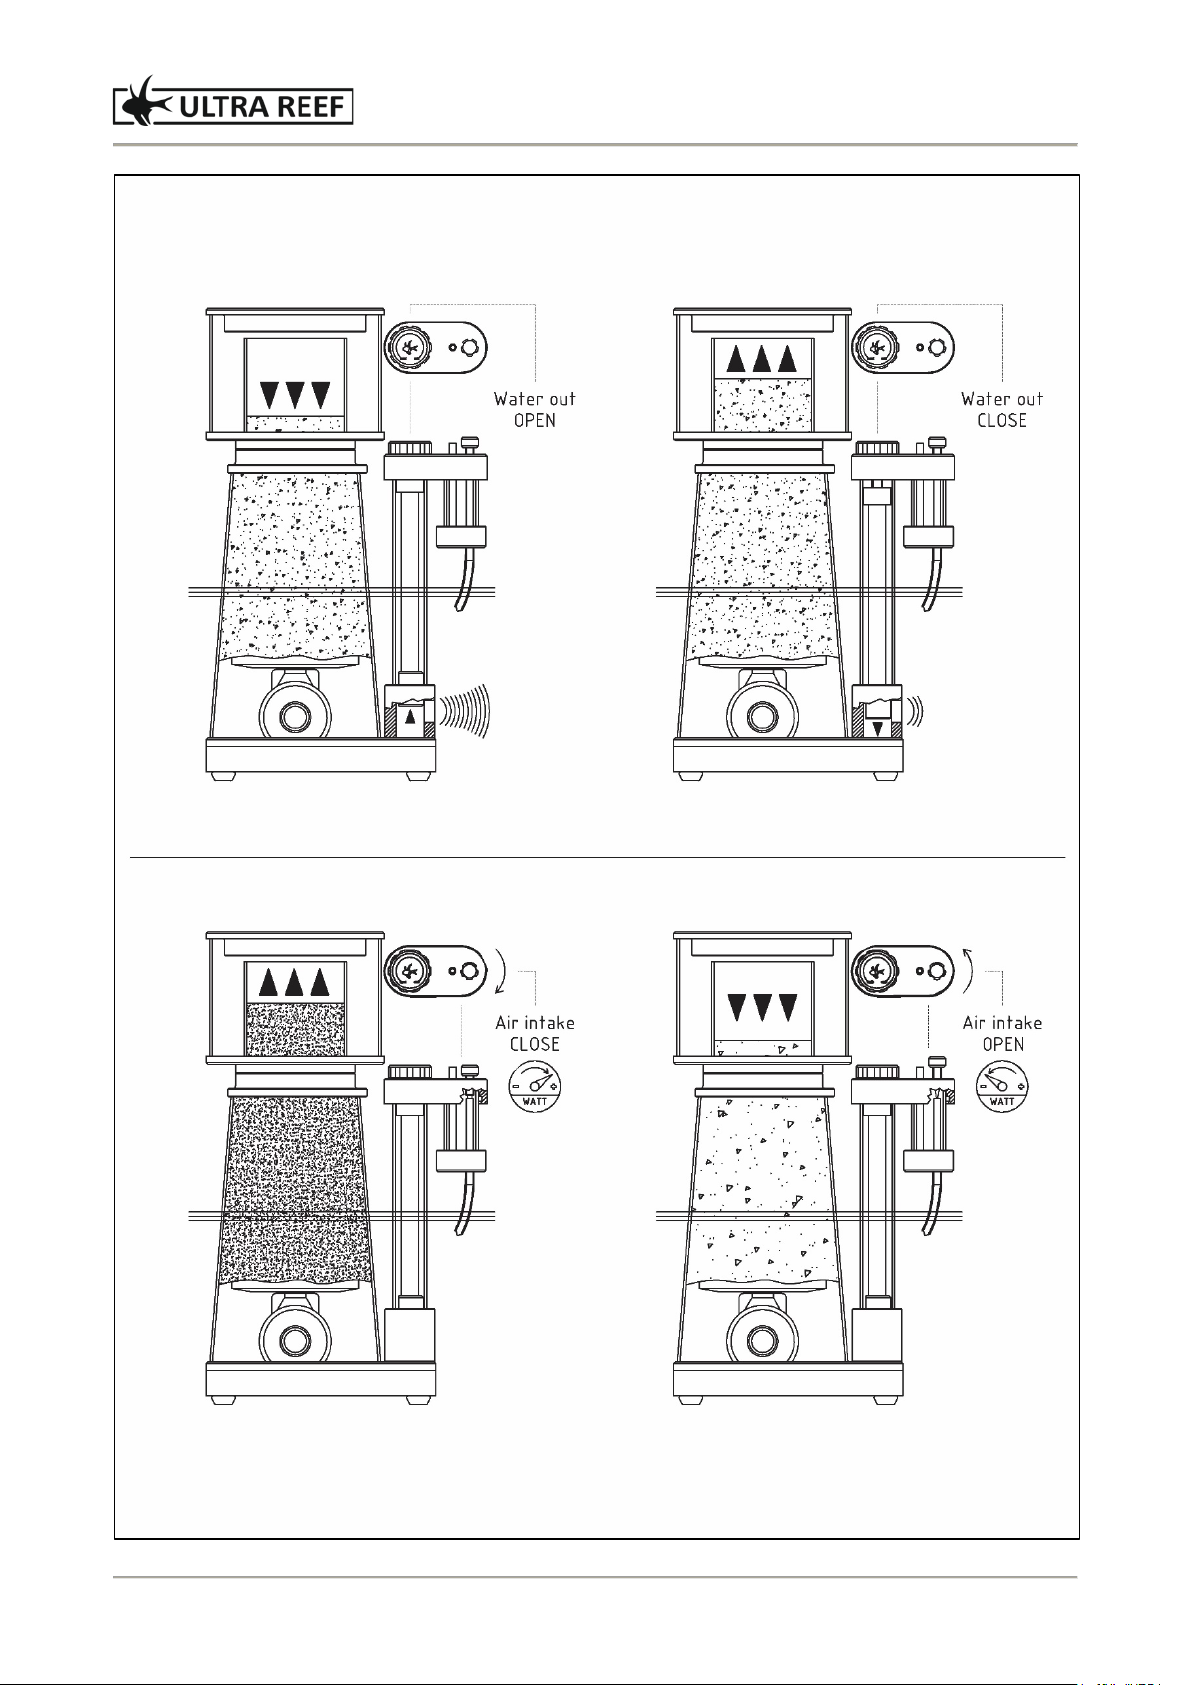
Aprite completamente la saracinesca di scarico tramite
la vite di regolazione e rimuovete il bicchiere.
Attenzione: In caso di inceppamento della saracinesca,
rimuovere il supporto della vite di regolazione ed
individuare l’origine del problema.
Aprite la vite di regolazione dell’aria fino a che la vite
sporga di cica 25 mm. In questa posizione l’aria è
completamente aperta. Una regolazione sbagliata
potrebbe danneggiare seriamente la pompa.
AVVIO
Accendete la pompa e verificate il funzionamento del
prodotto
Continuate a far funzionare lo schiumatoio senza il
bicchiere ed attendete la formazione di uno strato di
schiuma di circa 1-2cm sufficientemente compatto
nella parte alta del corpo.
Attenzione: Un’emissione d’aria consistente dallo
scarico è perfettamente normale. Potrebbero essere
necessarie alcune ore o giorni per stabilizzare lo
schiumatoio al primo avvio.
Per aumentare o diminuire il livello della schiuma
aprite o chiudete la saracinesca come indicato sulla
vite di regolazione.
Attenzione: La regolazione deve avvenire con piccole
variazioni nel tempo. Lasciar passare almeno 30 minuti
dopo ogni giro completo della vite di regolazione.
Chiudete la saracinesca fino a che la schiuma non
raggiunge la parte alta dello schiumatoio senza
traboccare.
Rimontate il bicchiere ed il coperchio. Per la prima
settimana il bicchiere si riempirà velocemente ed i
residui raccolti saranno di colore chiaro.
Dopo circa una settimana il liquido raccolto dovrebbe
diventare decisamente più scuro e dovrebbe
accumularsi più lentamente.
Attenzione: In vasche appena allestite lo schiumatoio
potrebbe non produrre schiuma per alcune settimane.
Questa inibizione è dovuta ai residui degli oli utilizzati
per la realizzazione delle tubazioni flessibili (tubi in
gomma).

ULTRA REEF
www.ultrareef.it
5
REGOLAZIONE
Gli schiumatoi sono spesso soggetti a
malfunzionamenti legati alla situazione della vasca.
Questi fenomeni sono normali e solitamente non
comportano rischi per le vasche.
Attenzione: Per la soluzione di eventuali problemi
durante l’uso, contattate il venditore o il distributore
dove avete comprato il prodotto.
Aumentate il livello (chiudete la saracinesca) per
accelerare la schiumazione se la quantità di liquido
raccolta nel bicchiere è troppo densa o insufficiente.
Questa operazione viene definita anche “schiumare
più bagnato”.
Viceversa diminuite il livello (aprite la saracinesca) per
ridurre la schiumazione se il bicchiere si riempie
troppo rapidamente ed il liquido accumulato è troppo
chiaro. Questa operazione viene definita “schiumare
più secco”.
Attenzione: Trovare il giusto punto di schiumazione è
estremamente difficile e richiede una certa
esperienza. Per i primi tempi è normale avere difficoltà
nel regolare il prodotto.
E’ inoltre possibile agire sulla vite di regolazione
dell’aria per aumentare o diminuire la quantità d’aria
trattata.
Attenzione: non collegare tubazioni, filtri o altri sistemi
sulla linea di aspirazione dell’aria. Ogni modifica
potrebbe compromettere il funzionamento dello
schiumatoio
Ruotando la vite di regolazione in senso orario si
diminuisce l’aspirazione dell’aria. Viceversa ruotando
la vite di regolazione in senso anti-orario si aumenta
l’aspirazione dell’aria.
Attenzione: la regolazione dell’aria è consigliata solo
ad utilizzatori ESPERTI, una regolazione errata
potrebbe limitare le performance dello schiumatoio o
danneggiare seriamente la pompa.
Si consiglia di svuotare il bicchiere non appena il livello
del liquido raccolto raggiunge i 2-3cm, il che dovrebbe
verificarsi con frequenza almeno settimanale.
MANUTENZIONE
Attenzione: Un aumento della rumorosità o delle
vibrazioni del prodotto sono causate da un’occlusione
sull’aspirazione dell’aria o da una girante usurata E’
necessario intervenire immediatamente per risolvere il
problema.
Prima di procedere alla manutenzione scollegate la
presa dalla rete. Non utilizzate prodotti abrasivi, tossici
e non idonei nella pulizia del prodotto.
Ogni giorno:Controllate visivamente il regolare
funzionamento del prodotto. Se necessario svuotate il
bicchiere raccolta.
Ogni 7 giorni:Controllate che il silenziatore sia libero
da incrostazioni di sale e che il foro aria del venturi
non sia ostruito da alghe o sporco.
Attenzione: I componenti metallici potrebbero essere
soggetti ad ossidazione superficiale, pulite ogni segno
di ossidazione.
Ogni 60 giorni: Eseguite un controllo completo
rimuovendo lo schiumatoio dalla sump e
smontandolo. Controllate attentamente lo stato
d’usura della pompa.
IL PRODUTTORE
ULTRA POMPE S.r.l.
Via Goldoni 37 | CAP/ZIP 20090
Trezzano sul Naviglio (MI) | ITALY
Phone ++39 (0)2.48.46.45.52
Info@ultrapompe.it

ULTRA REEF
www.ultrareef.it
6
INSTRUCTION MANUAL
Original manual. The product complies with Directive
2006/42/CE.
This skimmer is a filtering system that allows the
removal of the surfactants from seawater. It pumps
seawater and air bubbles into a mixing chamber. By
exploiting the properties of the film surface tension
between air and water, it generates a foam
overflowing from the main chamber accumulating
surfactants extracted into a collection cup.
Warning: The use of the product involves reading,
understanding and acceptance of all conditions set
forth in the "Safety" manual attached. If you do not
find that manual immediately, contact our office!
Clean thoroughly with water and vinegar (diluted to
10%) each component that will go into contact with
water. Products that contains alcohol or solvents can
damage the acrylic.
OVERVIEW
1- Cover
2- Cup
3- Neck
4- Cup drain
5- Body
6- Diffusor
7- Pump
8- Venturi
9- Flow valve screw
10- Air regulation screw
11- Silencer
12- Air hose
Warning: The skimmer is designed to work only with
salt water (salinity 35%).
Place the skimmer inside the sump tank in a
comfortable and easily accessible position.
Warning: Adjust the water level in the sump to about
22cm.
Keep stable water level by use the use of bulkheads
overflow or through high quality osmocontroller.
Make sure the level will not change in case of a
blackout.
Fully open the flow valve rotating the regulation screw
and remove the collection cup.
Warning: In case of flow valve jam, remove discharge
screw support and identify the source of the problem.
Open the air screw until the screw protrudes
approximately 25 mm. In this position, the air is
completely open. A wrong adjustment could seriously
damage the pump.
START UP
Turn on the pump and check the operation of the
product.
Continue to operate the skimmer without the cup and
wait for the formation of a foam layer of about 1-2cm
sufficiently compact in the upper part of the body.
Warning: Consistent emission of air from the exhaust
is perfectly normal. It may take several hours or days
to stabilize the skimmer at first start.
To increase or decrease the foam level open or close
the flow valve as shown on the regulation screw.
Warning: The adjustment must be done with little
variation over time. Allow at least 30 minutes after
each full turn of the regulation screw.
Close the flow valve until the foam reaches the top of
the skimmer without overflowing.
Replace the cup and cover. For the first week, the cup
will fill up quickly and debris collected will be light in
colour.
After about a week, the collected liquid should
become definitely darker and should accumulate more
slowly.
Warning: In just set up tanks, the skimmer may not
produce foam for a few weeks. This inhibition is due to
the residues of the oils used for the realization of the
hoses (rubber hoses).
SETTING
Skimmers are often subject to malfunctions related to
the situation of the tank. These phenomena are
normal and usually does not pose a risk to the tanks.
Warning: To solve of any problems during use, contact
the retailer or the distributors where you have
purchase the product.

ULTRA REEF
www.ultrareef.it
7
Increase the level (close the valve) to accelerate the
skimming if the amount of liquid collected in the cup is
too dense or insufficient. This is commonly referred to
as "wet skimming".
Conversely, decreased the level (open the gate) to
reduce the skimming if the glass is filled too quickly
and the accumulated fluid is too light. This is
commonly referred to as "dry skimming".
Warning: Finding the right point of skimming is
extremely difficult and requires some experience. For
the first time it is normal to have difficulty regulating
the product.
It is possible to act on the air adjustment screw to
increase or decrease the amount of air treated.
Warning: Do not connect pipes, filters or other
systems to the air suction line. Any modification could
compromise the operation of the skimmer
Rotate the adjusting screw clockwise to decrease the
intake of air. Otherwise, rotate the adjusting screw in
an anti-clockwise to increase the air intake.
Warning: air regulation recommended only for
EXPERTS users, an improper adjustment may limit the
performance of the skimmer or seriously damage the
pump.
It is advisable to empty the glass as soon as the liquid
level reaches 2-3cm harvest, which should occur at
least weekly.
MAINTENANCE
Warning: An increase in the noise or vibration of the
product are caused by occlusion on the air intake or
from a worn impeller. You must take immediate action
to solve the problem.
Before performing any maintenance, disconnect the
product from power supply. Do not use abrasive
products, toxic and unsuitable for cleaning operation.
Every day: Visually check the functioning of the
product. If necessary, empty the collection cup.
Every 7 days:Check that the silencer is free from salt
encrustation and dirt or algae do not block the venturi
air connection.
Warning: The metal components may be subject to
surface oxidation, clean every sign of oxidation.
Every 60 days: Perform complete control by removing
the skimmer from the sump and taking it apart.
Carefully check the state of wear of the pump.
THE PRODUCER
ULTRA POMPE S.r.l.
Via Goldoni 37 | CAP/ZIP 20090
Trezzano sul Naviglio (MI) | ITALY
Phone ++39 (0)2.48.46.45.52
Info@ultrapompe.it

ULTRA REEF
www.ultrareef.it
8
Other manuals for UKS-160
3
This manual suits for next models
2
Table of contents
Languages:
Other Ultra Reef Other manuals
Popular Other manuals by other brands

Isokern
Isokern IBV-36 Installation operation & maintenance

Dremel
Dremel PC10 Operating/safety instructions

Porter-Cable
Porter-Cable PCL180CD instruction manual

Nilfisk-Advance
Nilfisk-Advance Advance Retriever 2060 Service manual

WEG
WEG DWA-160 Assembly instructions

THRUSH
THRUSH 89021 installation instructions