Uniden UH5045 User manual

UH5045
UHF CB Transceiver
For more exciting new products please visit our website:
Australia: www.uniden.com.au

Introduction
Features 3
Preventive Maintenance 4
Troubleshooting 4
Controls / Connectors 5
Indicators 9
Included with Your UHF CB Transceiver 10
Optional Accessories 11
Slide Mount Bracket 12
Connecting the Microphone 14
Mounting the MIC Hanger 15
Operation
Turning on the Power 17
Setting the Volume 17
Setting the Manual Squelch 18
Setting the Auto Squelch 18
Monitor 19
Selecting a Channel 19
Programming the Instant Priority Channel 20
Recalling the Instant Channel 20
Transmitting 20
Call Function 20
Dual Watch 20
Using Repeater Channels 21
Operating the UHF CB Radio in Duplex Mode 22
Scanning 22
Open Scan (OS) Mode 23
Group Scan (GS) Mode 23
Priority Watch 24
Add/Remove Channels from SCAN Memory 24
50 RX Channels 25
Manual Programming 25
Deleting a programmed RX Channel frequency 25
Selecting the Call tone 26
Busy Channel Lockout 26
Roger Beep 27
Beep On/Off 27
CTCSS (Continuous Tone Coded Squelch System) 28
DCS (Digitally Coded Squelch) 28
Volume Sync 29
Backlight Colours 29
Backlight Brightness 30
LCD Contrast for Remote SPK/MIC 30
UHF CB Channel Guidelines 31
CTCSS & DCS Code List 34
Warranty 38
Contents
2
UNIDEN UH5045 UHF CB Transceiver

The Uniden UH5045 is designed to provide you with years of trouble free service. Its
rugged components and materials are capable of withstanding harsh environments.
Please read this Operating Manual carefully to ensure you gain the optimum
performance of the unit.
NOTE
The citizen band radio service is licenced in Australia by ACMA
Radio-communications (Citizen Band Radio Stations) Class Licence
and in New Zealand by MBIE General User Licence for Citizen Band
Radio and operation is subject to conditions contained in those licenses.
Features
• NarrowBand(NB)80ChannelRadio*
• TransmissionPower5W
• 50ProgrammableReceivechannels
(450 - 520MHz in 12.5khz steps)
• Built-inAVSCircuitry†
• LCDDisplaywithBacklight
• LCDBacklightbrightnesscontrol
(“off”, “01”, “02”, “03”)
• CompactSize
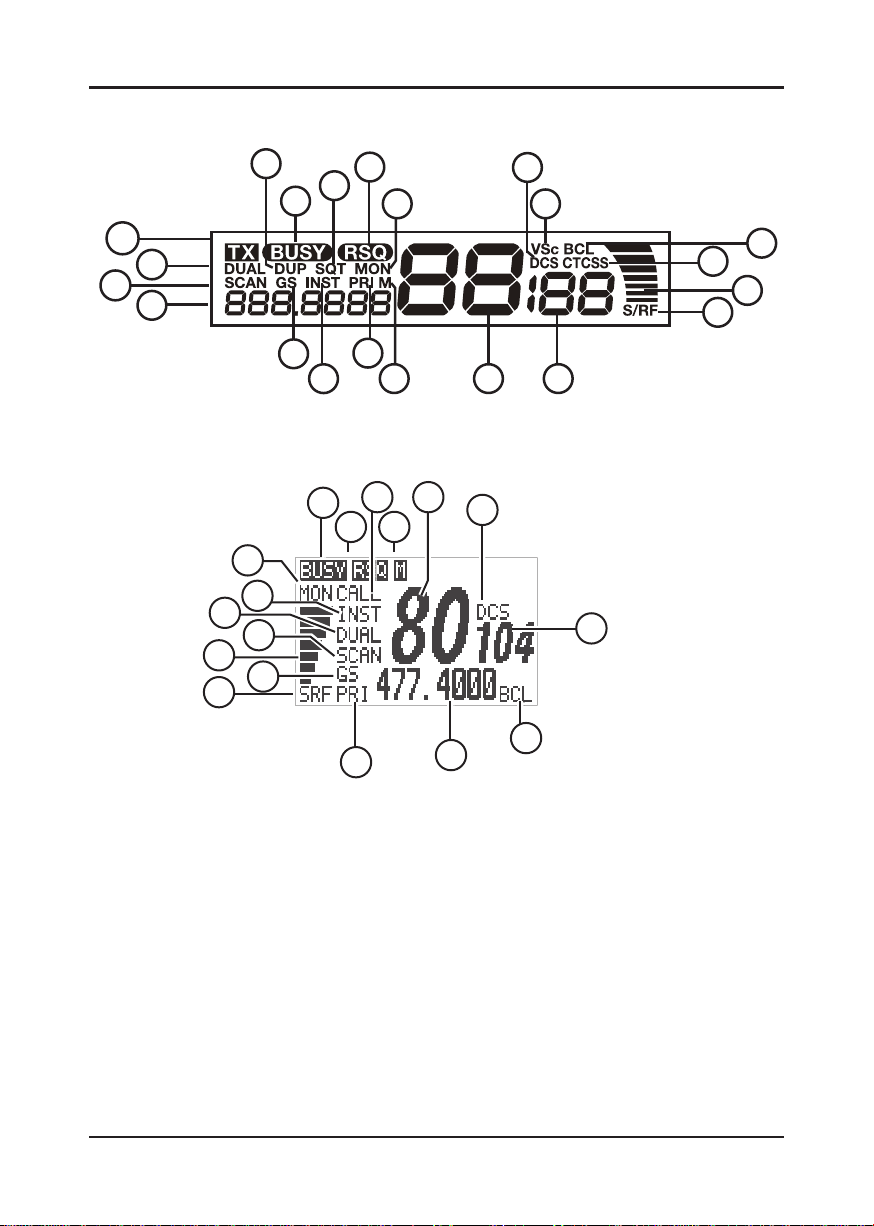
• SignalStrength/PowerMeter
• InstantChannelProgramming
• OnetouchInstantChannelrecalling
• DualWatchwithInstantChannel
• DuplexCapability(fromCH01-CH08
and CH41 - CH48 per channel)
• GroupScanandPriorityChannel
Watch
• OpenScan
• ScanChannelMemoryOn/Off
separately with Open Scan, Group
Scan
• RotaryChannelSelect
• BusyChannelLock-outFunction
• RogerBeepFunctionOn/Off
• 5DifferentCallTones
• 38Built-inCTCSS(ContinuousTone
Coded Squelch System) and 104
additional DCS (Digital Coded Squelch)
codes that are user selectable
• VolumeControlwithPowerOn/Off
Push Switch
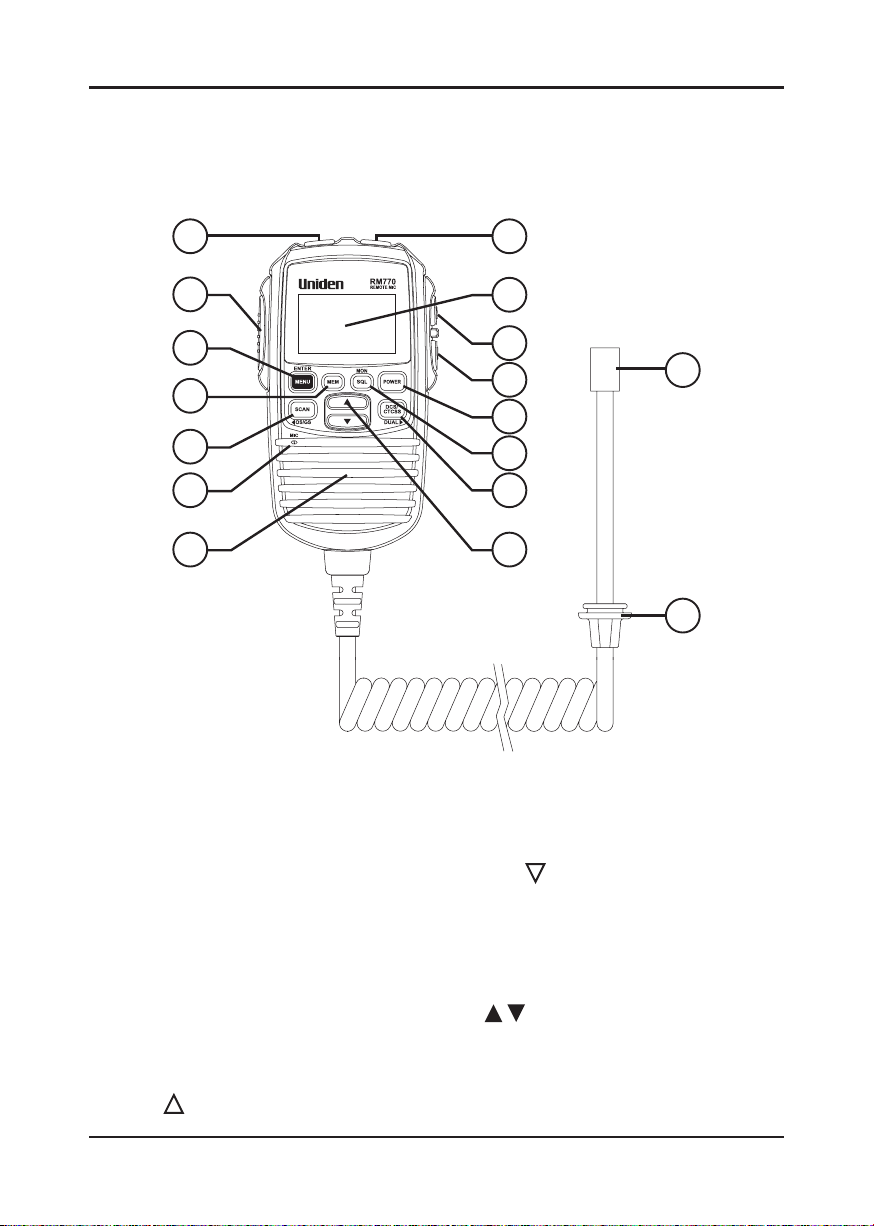
• OptionalRemoteLCDSpeaker
Microphone (Remote SPK/MIC) and
Extension Cable
• FrontandRearMICJacksfor
increased mounting options
• VariableSquelchLeveladjustorAuto
Squelch with optional Remote SPK/
MIC
* Refertop.31-p.33forchannel
information
†AVS - Automatic Volume Stabilizer
detects and manages incoming
audio to comparable levels.
Introduction
3
UNIDEN UH5045 UHF CB Transceiver

Preventive Maintenance
The following system checks should be made every six to twelve months:
• ChecktheStandingWaveRatio(SWR).
• Inspectthetightnessofallelectricalconnections.
• Inspecttheantennacoaxialcableforwearorbreaksontheshielding.
• Inspectthetightnessofallscrewsandothermountinghardware.
Troubleshooting
Should the unit malfunction or perform poorly, follow these procedures:
If the transceiver is completely inoperative: Check the power cord and fuse.
If there is trouble with receiving: Check the VOLUME control setting. Be sure the
SQUELCH is adjusted properly. Possibly the radio is over-squelched.
If there is trouble with transmitting: Check that the transmission line (coaxial cable)
is securely connected to the ANTENNA connector. Check that the antenna is fully
extended for proper operation. Check that all transmission line (coaxial cable)
connections are secure and free of corrosion.
NOTE
Blackening may occur on the Liquid Crystal Display if the UHF CB
Radio or optional Remote SPK/MIC has been subjected to extreme high
temperature (above 60°C). This is not a fault. Normal LCD operation
resumes when the temperature stabilizes back to standard operating
condition (0-55°C).
Introduction
4
UNIDEN UH5045 UHF CB Transceiver

UH5045 Front View
Controls/Connectors
5
UNIDEN UH5045 UHF CB Transceiver
Controls and Connectors
1 Rotary CHANNEL Selector
2 MENU/ENTER - Menu and Select
Button
3 DUAL - Dual Watch
MON - Monitor Button
4 DCS/CTCSS - DCS and CTCSS
Tone Button
5 MEM - Memory Scan Channels
6 SCAN - Scan On/Off
OS/GS - Open or Group Scan
7 Liquid Crystal Display (LCD)
8 SQ - Rotary Squelch control
VOL - Rotary Volume control
ON/OFF - On/Off PUSH control
9 MIC-FrontMicrophoneJack
234 5 6
7
8
9
1

Controls/Connectors
6
UNIDEN UH5045 UHF CB Transceiver
UH5045 Rear View
Connectors
11 RearMICJack
12 UHF Antenna Connection
13 Power Input Connection (13.8VDC)
14 Ext.SpeakerJack
11 1312 14

Controls/Connectors
7
UNIDEN UH5045 UHF CB Transceiver
15
16
17 30
31
21
Standard Microphone
Controls and Connectors
15 CALL - Call Tone Button
16 INST - Instant Channel Button
17 PTT - Push To Talk Button
21 MICROPHONE
30 RJ45typeplug
31 FrontMICJackCover

Controls/Connectors
8
UNIDEN UH5045 UHF CB Transceiver
Remote LCD Speaker Microphone (Remote SPK/MIC)
(Optional)
Controls and Connectors
15 CALL - Call Tone Button
16 INST - Instant Channel Button
17 PTT - Push To Talk Button
18 MENU/ENTER - Menu and Select Button
19 MEM - Memory Scan Channel
20 SCAN - Scan Button
OS/GS - Open Scan/Group Scan
21 MICROPHONE
22 SPEAKER
23 Liquid Crystal Display (LCD)
24 VOL - Volume Up Button
25 VOL - Volume Down Button
26 POWER - Power ON/OFF Button
27 SQL - Auto Squelch
MON - Monitor Button
28 DCS/CTCSS -- DCS & CTCSS Button
DUAL - Dual Watch Button
29 Select Up and Down Buttons
30 RJ45typeplug
31 FrontMICJackCover
15
17
24
18
25
19
26
30
31
20 27
28
29
23
16
21
22

Indicators
9
UNIDEN UH5045 UHF CB Transceiver
UH5045
Optional Remote MIC LCD
1
5
6
7
9
10
2
3
4
14
13
12
11
21
20
19 16
15
17
18
8
7414
17
2
11
10
20
18
22 16
9
8
6
12
5
3
Indicators
1. TX - Transmit
2. DUAL - Dual Watch
3. SCAN - Scan mode
4. Channel Frequency
5. GS - Group Scan
6. INST - Instant Channel
7. PRI - Priority Channel
8. M - Channel in Memory
9. Channel Number
10. DCS/CTCSS Code Number
11. S/RF- Receive Signal or Transmit
12. Signal Power Level
13. CTCSS -Continuous Tone
Coded Squelch System
14. BCL - Busy Channel Lockout
15. VSc - Volume Synch
16. DCS - Digital Coded Squelch
17. MON - Monitor
18. RSQ - Remote Mic Squelch
19. SQT - Tight Squelch Level
20. BUSY - Channel Active
21. DUP - Duplex Channel
22. CALL - Call Tone
1
2
3
4
5
6
7
8 9 10
11
12
13
14
15
16
17
18
19
20
21

Included with your UHF CB Transceiver
10
UNIDEN UH5045 UHF CB Transceiver
Standard Microphone UHF CB Transceiver
Owners Manual
Microphone Hanger
with Screws/Washers
andMicrophoneJack
Rubber Cover
Mounting Bracket,
Mounting Screws, Washer
Stars And Screws
Slide Mount Bracket,
Guide Rails and Screws
DC Power Cord with fuse
UH5045
UHF CB Transceiver
For more exciting new products please visit our website:
Australia: www.uniden.com.au

Optional Accessories
11
UNIDEN UH5045 UHF CB Transceiver
DIN Mounting Kit (DMK7740)
for compact models
Remote LCD Speaker
Microphone (RM770)
External Speaker
(MS100)
DECT Wireless
Speaker Microphone
(MK800W)
Extension cable kit for Remote
LCD Speaker Microphone
(EC770)andMicrophoneJack
Rubber Cover

12
UNIDEN UH5045 UHF CB Transceiver
Slide Mount Bracket
How to attach Slide Mount Bracket?
When you unpack the box, ensure that you have the slide mount bracket, guide rails
and the screws.
Align the guide rails along the side of the base and insert them into the slots provided.
Then use the screws to lock them securely in position.

13
UNIDEN UH5045 UHF CB Transceiver
Slide Mount Bracket
Slide the bracket along the guide rails to attach the bracket to the unit.
Under the BASE unit
Over the BASE unit

Connecting the Microphone
14
UNIDEN UH5045 UHF CB Transceiver
Front MIC Jack
Push the MIC plug at the end of the microphone into the MIC jack until the connection
locks into place. Gently tug the MIC cord to test that the connection is locked. Use the
FrontMICJackcoverwhichisthreadedontotheMICcordtosealtheMICjackentry
from dust.
Disconnecting the MIC from the Front MIC Jack
Pullawaythethreadedrubbercollarandmoveitdownalongthecord.Usingtheat
blade of a screwdriver or similar object carefully press the lock tab at the left side of the
MIC plug and push it to the right. At the same time tug on the MIC cord to draw back
the MIC plug.
Rear MIC Jack
UsetheRearMICJackifthemainbaseismountedwhereafrontMICconnectionis
intrusive or if you wish to use the Remote LCD Speaker MIC with an optional extension
cable.
Peel the dust cover from the rear MIC jack. Push the MIC plug at the end of the
microphone into the MIC jack until the connection locks into place. An optional 2m
extension cable kit is available to enable mounting the main base in a hidden location.
NOTE
TheFrontandRearMICJACKscannotbeusedatthesametime.
UH5045

Mounting the MIC Hanger
15
UNIDEN UH5045 UHF CB Transceiver
The Microphone Hanger comes in two parts. How and where you mount the MIC
hanger will determine which parts to use.
Conventional Mounting with Screws
Use the front part of the MIC Hanger only.
Locate a suitable mounting position and mark
and drill two 3mm holes.
Fix the MIC Hanger into place with screws.
Conventional Mounting with Double Sided Tape (not supplied)
High quality Double-Sided tape can be found at good retail stores.
Secure the front and back pieces of the MIC Hanger using the supplied binding screws.
Locate a suitable mounting position.
ApplyhighqualityDouble-SidedtapeontotheatareaoftheMICHangerbackpiece
andthenpressrmlytothemountingposition.

Mounting the MIC Hanger for Remote SPK/MIC
16
UNIDEN UH5045 UHF CB Transceiver
The plug of the extension cable connects to the Radio. The socket end of the extension
cable connects with the microphone plug.
1. The rubber collar (dust cover) on the microphone cable is not required
and can be cut away or pushed out of the way along the cable.
2. Drill a 13mm hole at the MIC hanger location.
3. Thread the microphone plug through the hole and connect with the
extension cable.
4. Mount the MIC Hanger over the hole and cable.
5. AttheRadio:ConnecttheextensioncableplugtotherearMICJack.
Fit the rubber bushing over the front MIC jack.
Microphone
Radio
Extension Cable
2
1
5
4
3
Microphone
Extension Cable
Radio
Microphone
Radio
Extension Cable
2
1
5
4
3

Operation
17
UNIDEN UH5045 UHF CB Transceiver
Turning on the Power
Press and hold the ON/OFF control at the
base or the [POWER] button on the optionall
Remote SPK/MIC.
Setting the Volume
Turn the volume control at the base or press the volume on the side of the
optional Remote SPK/MIC to adjust the volume. The base volume is composed of 42
steps and the optional Remote SPK/MIC is 7 steps.
See Volume Sync on page 27 to synchronize the volume control when the optional
Remote SPK/MIC is connected.

Operation
18
UNIDEN UH5045 UHF CB Transceiver
Setting the Auto Squelch
The Auto Squelch feature is available only when the
optional Remote SPK/MIC is connected. It has an Off
setting and 3 preset squelch levels:
oFF - Auto Squelch OFF
1 - max sensitivity (min squelch)
2 - med sensitivity (med squelch)
3 - min sensitivity (max/tight squelch)
It requires no adjustment.
1. Press [SQL/MON] ontheRemoteSPK/MIC.Thesquelchsettingashes.
2. Rotate the channel knob at the base or press on the Remote SPK/MIC to
change the setting. RSQ icon displays when Auto Squelch is active. If tight squelch
isselectedSQTiconwillalsoash.
3. Press [MENU/ENTER] to store the setting.
Think of the squelch control
as a gate. If you turn Squelch
fully clockwise it raises the
‘Squelch gate’ so high that no
signals get through.
Think of the squelch control
as a gate. If you turn Squelch
fully clockwise it raises the
‘Squelch gate’ so high that no
signals get through.
To set the ‘Squelch Gate’
to the desired level,
turn the squelch knob
counterclockwise until you
hear noise. Then carefully
turn the Squelch knob
clockwise until the noise
fades. Now only strong
signals get through.
Setting the Manual Squelch
Turn the outer ring of the SQ control at the base to adjust the Squelch.
NOTE
You must select a channel which is not in use before setting the
SQUELCH control. (see p.19 for “Selecting a Channel”).

Operation
19
UNIDEN UH5045 UHF CB Transceiver
Monitor
Press and hold [DUAL/MON] at the base or
[SQL/MON] on the optional Remote SPK/MIC to
open the squelch and receive all weak signals.
Press and hold [DUAL/MON] at the base or
[SQL/MON] on the Remote SPK/MIC again
to cancel.
Selecting a Channel
Turn the Rotary Channel Selector at the base
or press on the optional Remote SPK/MIC to
select the desired channel.
NOTE
For your reference a list of the available channels, corresponding
frequencies and guidelines for their use is printed on page 31. For
Australia, Channels 05 and 35 are reserved for Emergency Calls.

Operation
20
UNIDEN UH5045 UHF CB Transceiver
Programming the Instant Priority Channel
Turn the Rotary Channel Selector at the base or press
on the optional Remote SPK/MIC to select the Priority Channel
you prefer.
Press and hold [INST] button on the microphone for 3
seconds to store the new setting. INST icon appears.
Recalling the Instant Channel
Momentarily press the [INST] button on the microphone at
any time to return to the Instant Channel.
Transmitting
The UHF CB Radio uses the UHF-CB Channels.
NOTE
For your reference a list of the available channels, corresponding
frequencies and guidelines for their use and selection is printed on p.31 -
p.33. For Australia, Channels 05 and 35 are reserved for Emergency Calls.
Select the desired channel. Press the microphone’s [PTT] button and speak normally
into the microphone. Hold it approx. 7cm from your mouth. Release the [PTT] button to
end the transmission and listen for a reply.
Call Function
Press the microphone [CALL] Button. A three second ringing tone
will be transmitted.
You may select from 5 types of tones (see p.26).
NOTE
Current regulations require calling tones to be restricted to one
transmission per minute. If a second transmission is attempted within
one minute then an error tone will sound.
DUAL Watch
Dual watch monitors the current channel and the Instant channel. (See Programming
the Instant Priority Channel above).
Press [DUAL/MON] on the base or press and hold [DCS/CTCSS/DUAL] on the
Remote SPK/MIC. DUAL icon appears and a short tone beep is heard.
To cancel DUAL Watch press [DUAL/MON] on the base or press and hold
[DCS/CTCSS/DUAL] on the Remote SPK/MIC. DUAL icon disappears.
PTT
CALL INST
Table of contents
Other Uniden Transceiver manuals

Uniden
Uniden UH9080 User manual

Uniden
Uniden Jackson UT-547C User manual

Uniden
Uniden UH037SX-2 User manual

Uniden
Uniden UH5060 User manual

Uniden
Uniden SPH 51DT User manual

Uniden
Uniden UH8055S User manual

Uniden
Uniden UH7700NB User manual

Uniden
Uniden BearTracker 885 User manual

Uniden
Uniden UH076 User manual

Uniden
Uniden MHS127 User manual

Uniden
Uniden GRANT XL User manual

Uniden
Uniden UH750 User manual

Uniden
Uniden UH7760NB User manual

Uniden
Uniden UH9000 User manual

Uniden
Uniden UH820 Series User manual

Uniden
Uniden UH8010S+ANT User manual

Uniden
Uniden 2020 User manual

Uniden
Uniden UH037SX-2NB User manual

Uniden
Uniden UH8050S User manual

Uniden
Uniden UH220 Series User manual