Unior 266B Series User manual

Unior d.d., Kovaška cesta 10, 3214 Zreče, Slovenia, +386 3 757 81 00, bike@unior.com, www.unior-bike.com
www.unior-bike.com
266B
EN
SLO
Electronic torque wrench
Ključ momentni,
elektronski
Bike tools

2
Thank you for purchasing Unior Electronic torque wrench.
This manual will help you understand and use all the features
of your new digital torque wrench. Before operating the
torque wrench, please read this manual completely, and
keep it at hand for future reference.
MAIN FEATURES & SPECIFICATIONS
• Digital torque value readout
• CW (clockwise) and CCW (counterclockwise) operation
• Peak hold and track mode operation mode
• Buzzer and LED indicator
• Units selection N-m, ft-lb, in-lb, kg-cm
• Auto power o after about 5 minutes idle
• Compatible with rechargeable batteries
• Battery: 1 x AAA
• Operating temperature: -10°C - 60°C
• Storage temperature: -20°C - 70°C
Code Model Range
(Nm)
Square
drive Accuracy
627785 266B 4.3 – 85 1/2” +/- 3 % CW
+/- 4 % CCW
627784 266B 1 – 20 1/4”
UNIOR ELECTRONIC TORQUE WRENCH EXPLAINED
1. Ratchet head
2. Direction lever
3. Communication port
4. LCD display
5. LED indicator
6. Anti-slip handle
7. Battery cover
8. Square drive
9. Buzzer
10. Calibration mark
11. Buttons
12. Torque Value
13. Peak/Track mode
14. Units
USING TORQUE WRENCH FOR THE FIRST TIME
BATTERY INSTALLATION
• Remove the battery cover
• Insert one AAA battery and orientate the poles of battery
according to the gure below.
• Install the battery cover and fasten it tightly according to
the following gure.
EN

3
POWER ON AND RESETTING THE WRENCH
• Press Cto power on the torque wrench.
• Press Cto reset the digital torque wrench before using
it.
RESETTING TORQUE WRENCH
In case electronic torque wrench doesn´t work normally,
remove the battery cover and install it back on.
ATTENTION:
If an external force is applied to the torque wrench during
power-on period, an initial torque oset will be recorded in
the memory.
CPower on/clear
U/S Unit selection/Setting
^Adjust torque value up
^
Adjust torque value down
STEP 1: UNIT SELECTION
Pre-set unit: N-m
Unit selection: in-lb
Unit selection: ft-lb
Unit selection: kg-cm
Press U/S
Press U/S
Press U/S

4
STEP 2: SET TARGET TORQUE
Setting target torque
Increase torque value
Decrease torque value
STEP 3: PEAK HOLD /TRACK MODE SELECTION
Track mode
Set Peak/Track mode
Set Peak/Track mode
Communication
Peak Hold Mode
NOTE:
Communication function is used for calibration of the torque
wrench. Please contact your local dealer for more information.
Press ^
Press
^
Press U/S
Press U/S
Long Press U/S
Press ^
^
for selection
^
Communication
(Exit)
U/S

5
TRACK MODE OPERATION
START
Setting target torque
Current torque value
((...((... ...))...)) ((...((... ...))...))
((...((... ...))...)) ((...((... ...))...))
NOTE:
1. If appears, that means this wrench has been
applied with more than 110% of torque of the spec.
2. When 90% of the target torque is reached, the green
LED will begin to ash and the alarm tone will beep
intermittently.
3. When 99.5% of the target torque has been reached, the
alarm will change to a steady tone and the green LED will
stop ashing and stay on. The red LED will also illuminate.
Apply torque
Buzzer
Buzzer
Green LED
Reach 90% of target torque
Red LED
Approached target torque
Reach 90% of target torque
Reach target torque
C

6
PEAK HOLD MODE OPERATION
START
Setting target torque
Current
max. value
(Peak Hold)
((...((... ...))...)) ((...((... ...))...))
((...((... ...))...)) ((...((... ...))...))
NOTE:
1. If appears, that means this wrench has been
applied with more than 110% of torque of the spec.
2. When 90% of the target torque is reached, the green
LED will begin to ash and the alarm tone will beep
intermittently.
3. When 99.5% of the target torque has been reached, the
alarm will change to a steady tone and the green LED will
stop ashing and stay on. The red LED will also illuminate.
MAINTENANCE AND STORAGE
ATTENTION:
One-year periodic recalibration is necessary to maintain
accuracy.
Please contact your local dealer for calibration.
Apply torque
Flashing
Released
Apply
torque
Reach 90% of target torque
C
Buzzer Green LED
Reach 90% of target torque
Reach target torque
Buzzer Red LED
Approached target torque

7
CAUTION:
1. Over-torque (110% of max. torque range) could cause
breakage or lose accuracy.
2. Do not shake violently or drop wrench.
3. Do not use this wrench as a hammer.
4. Do not leave this wrench in any place exposed to
excessive heat, humidity, or direct sunlight.
5. Do not use this apparatus in water as it is not waterproof.
6. If the wrench gets wet, wipe it with a dry towel as soon as
possible. The salt in seawater can be especially damaging.
7. Do not use organic solvents, such as alcohol or paint
thinner when cleaning the wrench.
8. Keep this wrench away from magnets.
9. Do not expose this wrench to dust or sand as this could
cause serious damage.
10. Do not apply excessive force to the LCD panel.
11. Apply torque slowly and grasp the center of the handle.
Do not apply load to the end of handle.
BATTERY MAINTENANCE
1. When the wrench is not used for an extended period of
time, remove the battery
2. Keep a spare battery on hand when going on a long trip
or to cold areas
3. Sweat, oil and water can prevent a battery’s terminal
from making electrical contact. To avoid this, wipe both
terminals before loading a battery.
4. Dispose batteries in a designated disposal area or
containers
5. Do not throw batteries into a re
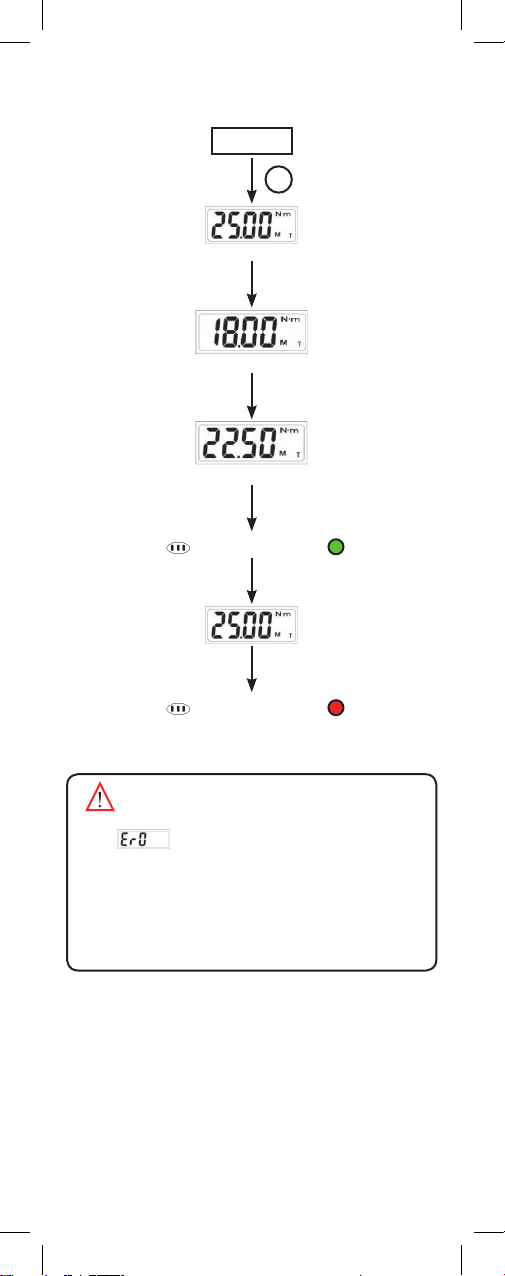
SLO
Hvala, da ste se odločili za nakup Uniorjevega elektronskega
momentnega ključa. Navodila vam bodo pomagala razumeti
funkcije vašega novega elektronskega momentnega ključa.
Pred uporabo v celoti preberete navodila in jih shranite za
kasnejši vpogled.
GLAVNE ZNAČILNOSTI IN SPECIFIKACIJE
• Digitalni izpis vrednosti momenta
• Delovanje v obe smeri - v desno in v levo
• Način delovanja Peak in Track
• Zvočni in LED indikator
• Izbira enote N-m, ft-lb, in-lb, kg-cm
• Samodejni izklop po petih minutah mirovanja
• Združljiv s polnilnimi baterijami
• Baterija: 1 x AAA
• Temperatura delovanja: -10 °C do 60 °C
• Temperatura za shranjevanje: -20 °C do 70 °C
Koda Naziv Razpon
(Nm)
Velikost
štirikota Natančnost
627785 266B 4.3– 85 1/2” +/- 3 % D
+/- 4 % L
627784 266B 1 – 20 1/4”

8
RAZLAGA FUNKCIJ UNIORJEVEGA ELEKTRONSKEGA
MOMENTNEGA KLJUČA
1. Raglja
2. Gumb za spreminjanje smeri vijačenja
3. Komunikacijska vrata
4. LCD zaslon
5. LED opozorilne lučke
6. Nedrseč ročaj
7. Pokrov baterije
8. Štirikot
9. Zvočni opozorilnik (brenčač)
10. Kalibracijska točka
11. Gumbi
12. Prikaz vrednosti momenta
13. Način delovanja Peak/Track
14. Prikaz izbrane enote
PRED PRVO UPORABO
NAMESTITEV BATERIJE
• Odstranite pokrov baterije.
• Vstavite baterijo velikosti AAA (1 kos) s poloma
orientiranima kot prikazuje spodnja skica.
• Namestite pokrov baterije in ga privijte kot prikazuje
spodnja skica.
PRIŽIGANJE IN PONASTAVLJENJE MOMENTNEGA KLJUČA
• Pritisnite C, da prižgete momentni ključ.
• Pritisnite C, da ponastavite momentni ključ pred
uporabo.

9
POZOR:
Če bo v času prižiganja momentnega ključa nanj delovala sila,
se lahko ta zamik začetnega navora zabeleži v spomin.
AVTOMATSKI IZKLOP
Momentni ključ se bo po petih minutah mirovanja
samodejno izklopil. Za ponoven vklop pritisnite C.
PONASTAVLJENJE MOMENTNEGA KLJUČA
Če momentni ključ ne deluje normalno, odstranite pokrov
baterije in ga ponovno namestite.
CVklop/ponastavitev
U/S Izbira enot/nastavitev
^Nastavljanje vrednosti navora navzgor
^
Nastavljanje vrednosti navora navzdol
1. KORAK: IZBIRA ENOT
Izbrana enota: N-m
Izbrana enota: in-lb
Izbrana enota: ft-lb
Izbrana enota: kg-cm
2. KORAK: NASTAVITEV CILJNE VREDNOSTI MOMENTA
Nastavljanje ciljne vrednosti momenta
Povišana nastavitev ciljne vrednosti momenta
Nižja nastavitev ciljne vrednosti momenta
Pritisnite U/S
Pritisnite U/S
Pritisnite U/S
Pritisnite ^
Pritisnite
^

10
3. KORAK: NAČIN DELOVANJA PEAK/TRACK
Način delovanja Track
Izberite način delovanja Peak ali Track
Nastavite način delovanja Peak ali Track
Povezovanje
Izbran način delovanja Peak
OPOZORILO:
Komuniciranje je namenjeno zgolj za kalibracijo elektronskega
momentnega ključa. Za več informacij o kalibraciji kontaktirajte
vašega prodajalca.
Pritisnite U/S
Pritisnite U/S
Pritisnite in držite U/S
Pritisnite ^
^
za izbiro
^
Povezovanje
(Izhod)
U/S

11
NAČIN DELOVANJA TRACK
START
Nastavljena vrednost momenta
Trenutna vrednost mometna
Trenutna vrednost momenta
((...((... ...))...)) ((...((... ...))...))
((...((... ...))...)) ((...((... ...))...))
POMEMBNO:
1. Če se na ekranu pojavi , to pomeni da je bil
moment apliciran na ključ večji o
2. Ko dosežete 90 % nastavljene vrednosti momenta bo
začela utripati zelena LED lučka, hkrati pa boste zaslišali
tudi prekinjajoč zvočni signal.
3. Ko dosežete 99,5 % nastavljene vrednosti momenta se
sproži neprekinjen zvočni signal, zelena LED lučka bo
svetila neprekinjeno, prižgala pa se bo tudi rdeča LED
lučka.
Privijajte
Zvok
Zvok
Zelena LED lučka
Ko dosežete 90 % nastavljene
vrednosti momenta
Rdeča LED lučka
Dosežena nastavljena
vrednost momenta
Ko dosežete 90 %
nastavljene vrednosti
Privijajte dokler ne
dosežete nastavljene
vrednosti momenta
C

12
NAČIN DELOVANJA PEAK
START
Nastavite ciljno vrednost momenta
Trenutna najvišja
vrednost (Peak)
((...((... ...))...)) ((...((... ...))...))
((...((... ...))...)) ((...((... ...))...))
POMEMBNO:
1. Če se na ekranu pojavi , to pomeni da je bil
moment apliciran na ključ večji od 110 % maksimalnega
momenta ključa.
2. Ko dosežete 90 % nastavljene vrednosti momenta bo
začela utripati zelena LED lučka, hkrati pa boste zaslišali
tudi prekinjajoč zvočni signal.
3. Ko dosežete 99,5 % nastavljene vrednosti momenta se
sproži neprekinjen zvočni signal, zelena LED lučka bo
svetila neprekinjeno, prižgala pa se bo tudi rdeča LED
lučka.
VZDRŽEVANJE IN SHRANJEVANJE
OPOZORILO:
Za ohranjanje natančnosti momentnega ključa je treba ključ
enkrat letno kalibrirati.
Več informacij o kalibraciji boste dobili pri svojem trgovcu.
Rdeča LED lučka
Dosežena nastavljena
vrednost momenta
Ko dosežete 90 %
nastavljene vrednosti
Ko dosežete 90 %
nastavljene vrednosti
Privijajte
Utripanje
Prenehajte s
privijanjem
Nadaljujte s
privijanjem
C
Zvok Zelena LED lučka
Ko dosežete 90 % nastavljene
vrednosti momenta
Zvok

13
PREVIDNO:
1. Preobremenitev (nad 110 % najvišje vrednosti
momenta) lahko povzroči uničenje ali netočnost
momentnega ključa.
2. Ključa ne tresite ali mečite.
3. Momentnega ključa ne uporabljajte kot kladivo.
4. Momentnega ključa ne pustite izpostavljenega viru
toplote, vlage ali direktni sončni svetlobi.
5. Momentni ključ ni vodotesen, ne uporabljajte ga v vodi.
6. V kolikor se momentni ključ zmoči ga takoj obrišite
s suho krpo in osušite. Še posebej škodljiva sta sol in
morska voda.
7. Za čiščenje momentnega ključa ne uporabljajte redčil za
barve ali alkohola.
8. Pazite, da momentni ključ ne pride v stik z magnetom.
9. Ključa ne izpostavljajte prahu ali pesku, saj ga lahko s tem
resno poškodujete.
10. Na LCD zaslon ne pritiskajte premočno.
11. Privijajte počasi, momentni ključ pa vedno držite na
sredini ročaja. Med privijanjem nikoli ne držite za konec
ročaja.
VZDRŽEVANJE BATERIJE
1. Kadar momentnega ključa dalj časa ne uporabljate
odstranite baterijo.
2. Za daljše potovanje ali uporabo momentnega ključa v
mrzlem okolju imejte s seboj rezervno baterijo.
3. Znoj, olje in voda lahko preprečujejo dober stik baterije
s kontakti ključa. Pred vstavljanjem baterije obrišite vse
kontakte.
4. Izrabljene baterije odložite v zato namenjene
zabojnike ali zbirališča.
5. Baterije nikoli ne vrzite v ogenj.

14

15

Unior d.d.
Kovaška cesta 10
3214 Zreče, Slovenia
+386 3 757 81 00
bike@unior.com
www.unior-bike.com
Table of contents
Languages:
Other Unior Power Tools manuals