Read these instructions carefully before installing, operating,
servicing or repairing this tool. Keep these instructions in a safe
accessible place.
Important
Includes - Foreseen Use, Work Stations, Putting Into Service, Operating,
Dismantling, Assembly and Safety Rules
Operator Instructions
Manufacturer/Supplier Product Type RPM
Cycles Per Min
Model No/Nos Serial No
Product Nett Weight
lbs
Kg
Recommended Use Of
Balancer Or Support
Recommended Hose Bore
Size - Minimum
Recommended Max.
Hose Length
Ins M/M Ft M
No
Page No 1
Spray Gun - Gravity Fed
Cup capacity 600 cc
UT58A-14 1.4mm
UT58A-17 1.7mm
Nozzle Size
1.32
0.60 5/16 8 30 10
N/A
Universal Air Tool Company Limited
Unit 8
Lane End Industrial Park
High Wycombe
Bucks
HP14 3BY
Work Stations
The spray gun should only be used as a handheld hand-operated
device. It is always recommended that the spray gun is used when
standing on the solid floor. It can be used in other positions provided the
spray gun is kept near vertical and the operator has a firm grip and
footing. Any work station must take account that the liquid being
sprayed should not be breathed in and the liquid can be highly
flammable and spraying should never be undertaken near naked flames
or hot surfaces. Do not smoke. It
should also takeaccount that not all of
the liquid being sprayed will be
applied to the object being sprayed
and account must be taken that this
surplus, i.e. “over spray” will be
deposited in the surrounding area.
Foreseen Use of Tool
This tool is an external mix, high capacity spray gun, designed for high
quality production spraying of paint and other finishing material from a
gravity plastic cup.
The material inlet is located directly on the top of the spray gun and the
air inlet is located at the bottom of the spray gun handle.
The fluid control knob and the air control knob are both located at the
rear of the spray gun, the pattern control knob is located at the left side
of the spray gun.
Tel No Fax No(01494) 883300 (01494) 883237
Noise Level Sound Pressure Level TBA dB(A)
Test Method Tested in accordance with ISO
Standard 3744
Sound Power Level TBA dB(A)
N/A
Vibration Level
Test Method Vibration testing not required for a
spray gun
N/A Metres / Sec²
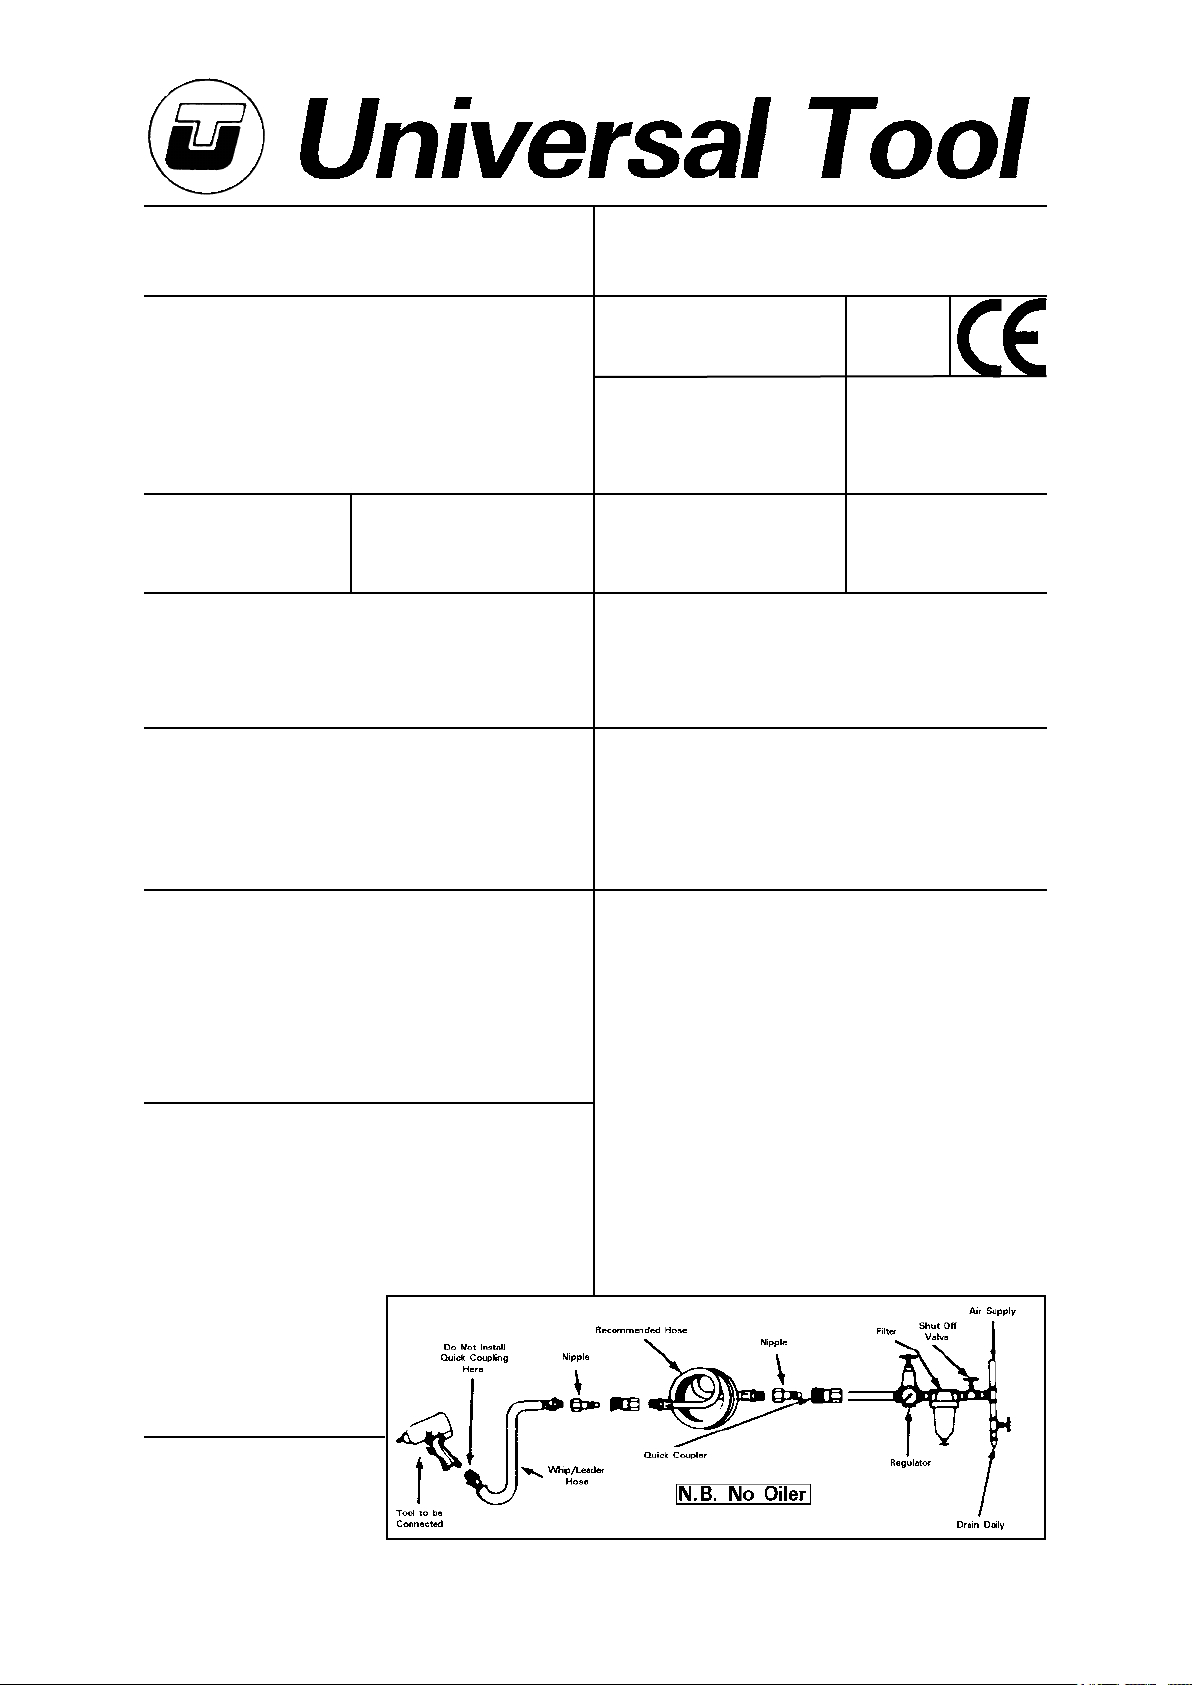
Operating
Prior to shipment, this gun was
treated with an anti corrosive agent,
before using this gun make sure that it is carefully flushed with thinners.
To use the gun, tighten the air cap with its stamping number in an
upward direction. Attach material cup to the gun. Attach an air supply
line to the ¼” BSP air inlet. Check for the correct tightening of nut (4) so
that no air will escape but air valve stem (13) still slides. Caution:
Never point spray gun at yourself or any other person. Accidental
discharge of material may result in serious injury. Adjust air pressure to
spray gun. Caution: Do Not exceed 100 psi. Depress spray gun
trigger to spray material. To adjust the amount of material released
(density of fan spray), turn the fluid control knob (15) (counter clockwise
to increase, or clockwise to decrease). To adjust the width of fan spray,
turn the pattern control knob (7) (counter clockwise to increase, or
clockwise to decrease). To adjust the air quality turn the Air Volume
control knob (18) (counter clockwise to increase, or clockwise to
decrease). Note: Care should be exercised when handling spray gun
to avoid damage to the orifice of the air cap and tip of fluid nozzle,
damage to these parts will result in irregular spray patterns
Personal Safety Equipment
Use - Safety Glasses
Yes
Use - Safety Gloves
Yes
Use - Safety Boots
Use - Breathing Masks
Yes
Use - Ear Protectors
Air Pressure
Recommended Working 4.14 bar 60 psi
Recommended Minimum n/a bar n/a psi
Maximum 4.83 bar 70 psi


