manuals.online logo
Brands
  1. Home
  2. •
  3. Brands
  4. •
  5. URIDAN
  6. •
  7. Bathroom Fixture
  8. •
  9. URIDAN CREW GR2400-10 User manual

URIDAN CREW GR2400-10 User manual

Installation Instructions
Montageanleitung
Parts List | Lieferumfang
Fitting Kit:
5 x screws No. 8
5 x Beschlag Nr. 8
1x fitting No. 14
1x Beschlag Nr. 14
2 x screws fitting No. 14
2x Schraube Beschlag Nr. 14
1 x uriLOCK 0,3 L
1 x uriCLEAN 0,5 L
1x uriCLOTH
1 x Cover
1 x Deckel
1x suction device
1 x Saugnapf
Note | Hinweis:
EN If you retrofitting existing flushing urinals with uridan waterless urinals, please ensure that the sewer line is jetted and clean of uric
scale before installation. The uridan urinals work without water, and therefore should only be connected with ø 50 mm drainpipes.
Installation should be carried out by authorized plumbers.
DE Abwasserleitungen, die vorher von wassergespülten Urinalen benutzt wurden, müssen vor der Montage der uridan-
Urinale gereinigt werden. Es muss sichergestellt sein, dass der Urinstein und andere Ablagerungen, die sich durch die
Wasserspülung gebildet haben, beseitigt sind, bevor uridan-Urinale montiert werden. Ein Durchspülen der Rohre genügt
nicht. uridan-Urinale funktionieren ohne Wasserspülung. Sie müssen daher nur an ein Abwasserrohr mit Ø 50 mm
angeschlossen werden. Die Montage darf nur von zugelassenen Installateuren nach den geltenden gesetzlichen Vorschriften
im jeweiligen Land ausgeführt werden.
14 x screws fitting No. 8
14 x Schrauben Beschlag Nr. 8
Installation Instructions
Montageanleitung
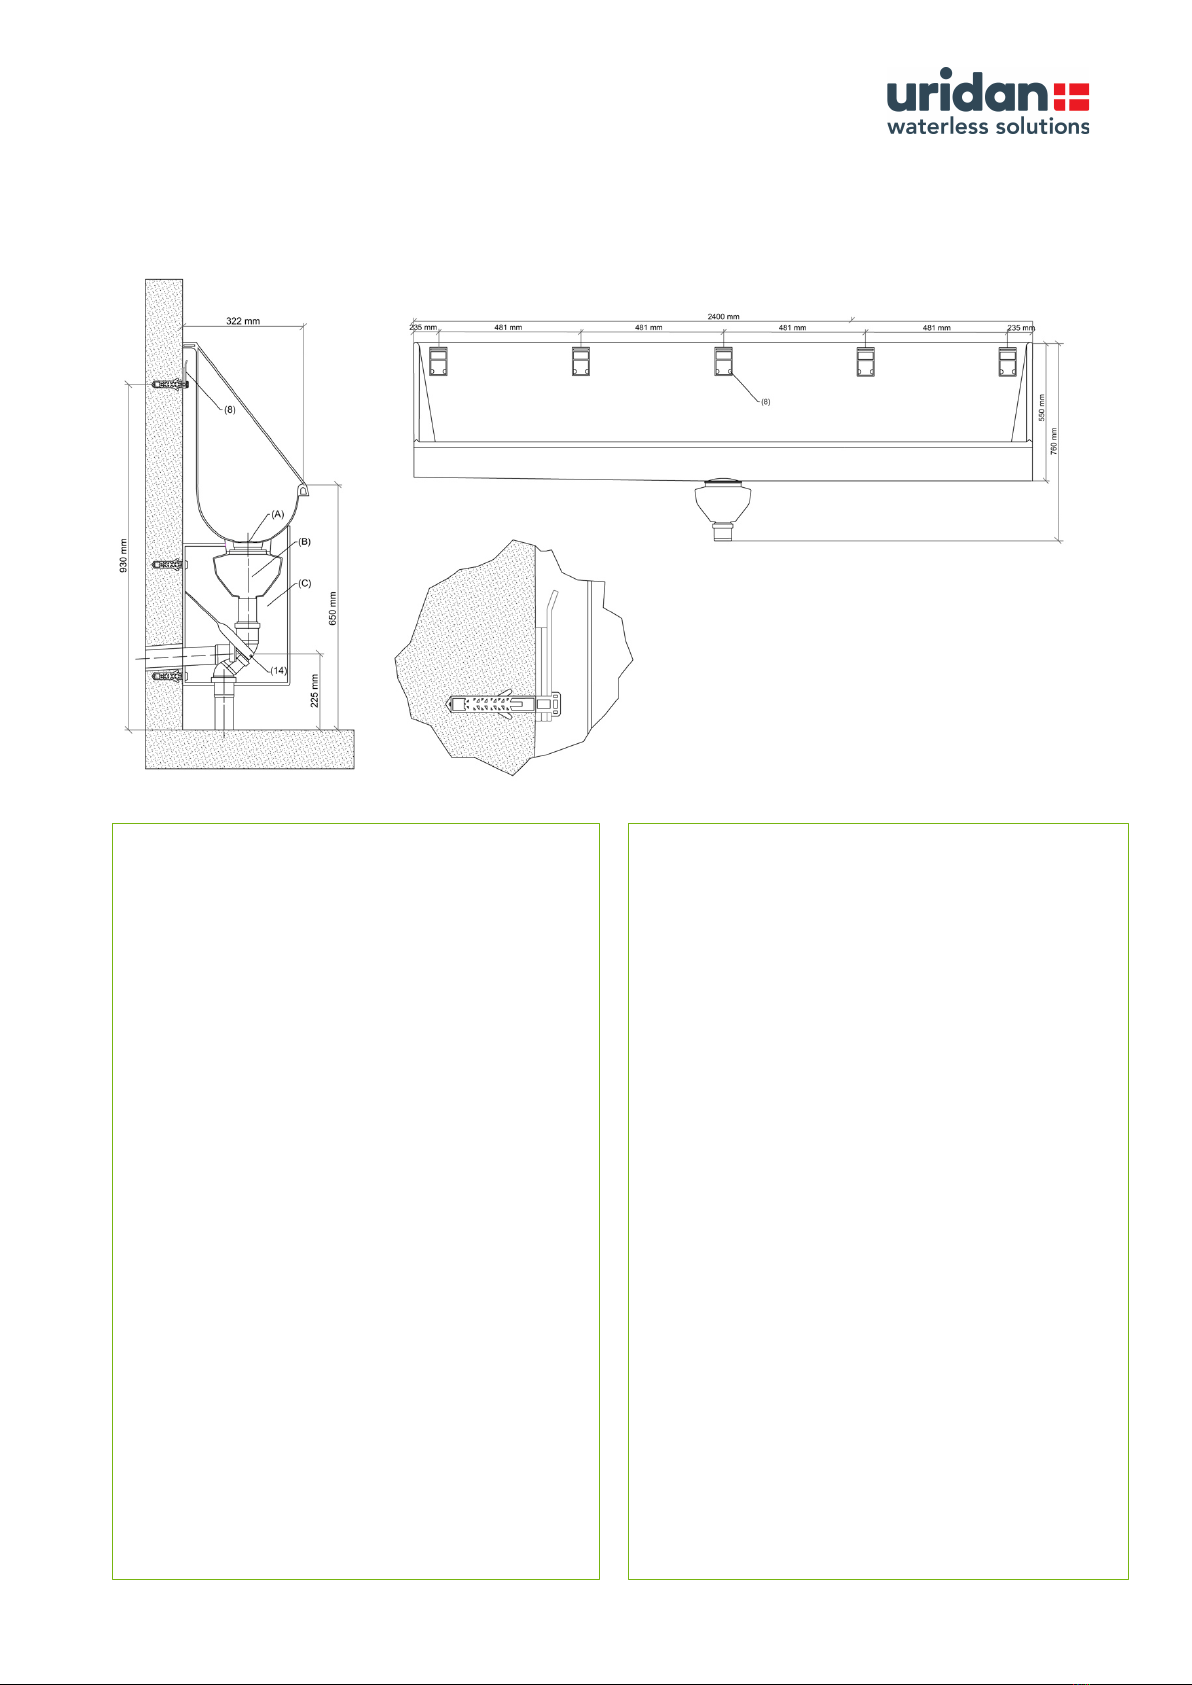
CREW 240 cm GR2400-10
Glass fibre reinforced plastic (GFP) | glasfaserverstärkter Kunststoff (GFK) | horizontal/vertical | horizontal/vertikal
EN
1. Mark holes for fittings No. (8) and install them.
2. Hold the urinal against the wall and press firmly onto the
fittings No. (8) and the waste pipe.
3. Adjust fitting no. (14), mark holes, drill holes and
mount fitting no. (14).
Please note that fitting no. (14) only has to be
mounted with a horizontal connection!
4. Install screen Pos.(C) by using the included screws.
5. Fill the waste trap Pos. (B) full with water.
6. Insert the stainless steel cover Pos. (A).
7. Pour 1 bottle uriLOCK ( 0,3 liter) over the cover.
8. Seal the gap between the wall and the urinal with
silicone.
The uridan urinal is now ready for use!
Please leave customer care booklet, cleaning and
maintenance instructions and suction device with customer.
DE
1. Löcher für Beschläge Nr. (8) bohren und montieren.
2. Rinne an die Wand halten und fest auf Beschläge Nr. (8)
und Abflussrohr drücken.
3. Beschlag Nr. (14) anpassen, Bohrungen anreißen, Löcher
bohren und Beschlag Nr. (14) montieren.
Bitte beachten Sie, dass Beschlag Nr. (14) nur bei einem
horizontalem Anschluss montiert werden muss!
4. Abdeckung Pos.(C) mit beigelegten Schrauben montieren.
5. Geruchsverschluss Pos. (B) mit Wasser auffüllen
6. Deckel Pos. (A) einsetzen.
7. Eine 0,3 l Flasche uriLOCK einfüllen.
8. Fuge zwischen Wand und Rinne mit Silikon abdichten.
Ihr uridan-Urinal ist nun funktionsbereit!
Übergeben Sie bitte dem Kunden die im Verpackungskarton
beiliegende Reinigungs- und Wartungsvorschrift sowie den
beiligenden Saugnapf, und weisen Sie das Reinigungspersonal
anhand dieser Unterlagen ein.

Other URIDAN Bathroom Fixture manuals

URIDAN COMPASS GY-10 User manual

URIDAN

URIDAN COMPASS GY-10 User manual

URIDAN CREW GR1200-10 User manual

URIDAN

URIDAN CREW GR1200-10 User manual

URIDAN CREW GR1800-10 User manual

URIDAN

URIDAN CREW GR1800-10 User manual

URIDAN ADMIRAL KH-10 User manual

URIDAN

URIDAN ADMIRAL KH-10 User manual

Popular Bathroom Fixture manuals by other brands

Kohler Mira Sport Max J03G Installation and user guide

Kohler

Kohler Mira Sport Max J03G Installation and user guide

Moen 186117 Series installation guide

Moen

Moen 186117 Series installation guide

Hans Grohe Raindance Showerpipe 27235000 Instructions for use/assembly instructions

Hans Grohe

Hans Grohe Raindance Showerpipe 27235000 Instructions for use/assembly instructions

Signature Hardware ROUND SWIVEL BODY SPRAY 948942 Install

Signature Hardware

Signature Hardware ROUND SWIVEL BODY SPRAY 948942 Install

fine fixtures AC3TH installation manual

fine fixtures

fine fixtures AC3TH installation manual

LIXIL HP50 Series quick start guide

LIXIL

LIXIL HP50 Series quick start guide

KOLO ATOL PLUS installation manual

KOLO

KOLO ATOL PLUS installation manual

Hans Grohe PuraVida 15073000 Instructions for use/assembly instructions

Hans Grohe

Hans Grohe PuraVida 15073000 Instructions for use/assembly instructions

Toto TS111B8 Installation and owner's manual

Toto

Toto TS111B8 Installation and owner's manual

Kohler K-1158-H2 Homeowner's guide

Kohler

Kohler K-1158-H2 Homeowner's guide

Coram Showers OFFSET QUADRANT manual

Coram Showers

Coram Showers OFFSET QUADRANT manual

baliv DU-2010 manual

baliv

baliv DU-2010 manual

odass OD-1710 instruction manual

odass

odass OD-1710 instruction manual

Oxygenics Evolution Easy installation instructions

Oxygenics

Oxygenics Evolution Easy installation instructions

Bradley Express SS Series installation instructions

Bradley

Bradley Express SS Series installation instructions

Helvex TH-974 installation guide

Helvex

Helvex TH-974 installation guide

DURAVIT C.1 C15240 0090 Instructions for mounting and use

DURAVIT

DURAVIT C.1 C15240 0090 Instructions for mounting and use

Sunshower PURE SOLO manual

Sunshower

Sunshower PURE SOLO manual

manuals.online logo
manuals.online logoBrands
  • About & Mission
  • Contact us
  • Privacy Policy
  • Terms and Conditions

Copyright 2025 Manuals.Online. All Rights Reserved.