urmet domus Bitron Home 902010/21 Instruction manual

DS902010-001B LBT90351
902010/21
MAGNETKONTAKT
MIT ZUSÄTZLICHEM EINGANG
MAGNETIC CONTACT
WITH WIRED INPUT
SCHNELLSTART ANLEITUNG
LEISTUNGSMERKMALE UND INBETRIEBNAHME
QUICKSTART MANUAL
FEATURES AND INSTALLATION

2DS902010-001B
Abb. / Fig. 1 Abb. / Fig. 2 Abb. / Fig. 3
Vielen Dank, dass Sie sich für ein Qualitätsprodukt von Bitron Home, einer Handelsmarke der Urmet
Gruppe, entschieden haben. Bitron Home Produkte wurden speziell für die Verwendung mit der QIVICON
Plattform entwickelt und für diese freigegeben. Mit QIVICON steuern und kontrollieren Sie Ihr Smart Home
auf ganz einfache Art mit einer Applikation auf Ihrem PC, Tablet oder Smartphone und verschaffen sich
immer und überall Zugriff auf alle angeschlossenen Geräte.
MONTAGE
Sie können den Magnetkontakt sowie den Magneten entweder mit Schrauben oder per Klebestreifen
befestigen. Für einen zuverlässigen Betrieb empfehlen wir, zumindest den Magnetkontakt fest zu
montieren. Schrauben, Dübel und Klebestreifen befinden sich im Lieferumfang. Bei Bedarf können Sie den
mitgelieferten Abstandshalter für die Installation des Magneten verwenden.
Bitte achten Sie darauf, dass der Magnet im geschlossenen Zustand nicht weiter als 25 mm von dem mit 2
Strichen gekennzeichneten Bereich entfernt ist.
INBETRIEBNAHME UND WARTUNG
Dieser Schritt setzt voraus, dass Sie über eine mit einem QIVICON ZigBee Funkstick ausgestattete
QIVICON Home Base verfügen.
1. Ziehen Sie die Lasche, die Batterie während des Transports schützt, heraus (Abb. 1).
2. Folgen Sie den Anweisungen des Verbindungsassistenten zum Hinzufügen neuer Geräte, der sich in der
App oder Weboberfläche Ihres QIVICON Systems befindet. Weitere Informationen zum
Registrierungsprozess finden Sie unter http://support.bitronhome.eu.
Zur Verwendung des Sensors an einer anderen Home ist es ausreichend, die Prozedur zum Hinzufügen
neuer Geräte Ihres Systems zu befolgen. Sobald der Installationsprozess erfolgreich abgeschlossen
wurde, wird sich der Sensor nicht mehr mit dem System, an dem er zuvor registriert war, verbinden.
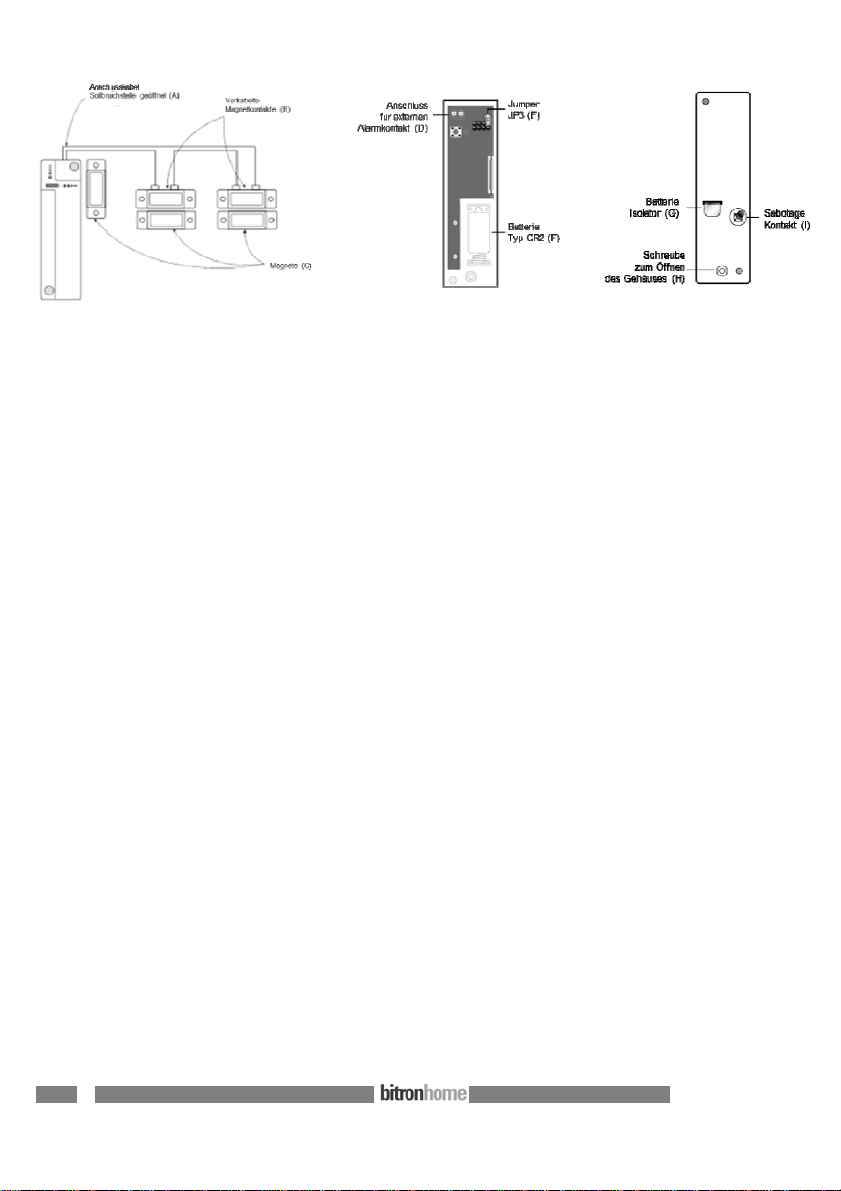
Sie haben Sie Möglichkeit, den Magnetkontakt zum Anschluss externer Alarmkontakte zu verwenden. Dies
können verkabelte Magnetkontakte aber auch beliebige andere Alarmsensoren sein, die einen
normalerweise geschlossenen Kontakt schalten können. Öffnen Sie hierzu den Magnetkontakt durch
Öffnen der Schraube (Abb. 6/H) und verbinden Sie die Kabel mit dem Anschluss (Abb. 5/D). Wenn der
Jumper JP3 (Abb. 5/E) geschlossen ist, wird nur der Status des externen Anschlusses übermittelt, wenn
JP3 geöffnet ist, werden auch die Signale des eingebauten Kontakts übertragen (Abb. 4). Nach Änderung
der Jumperkonfiguration ist ein Neustart des Sensors (Batterie entfernen und einsetzen) erforderlich.
Zum Austausch der Batterie öffnen den Magnetkontakt (Abb. 6/H), tauschen Sie die Batterie durch ein
Modell gleichen Typs (Lithium CR2 3V) aus und schließen Sie ihn wieder. Eine Neuregistrierung ist nicht
erforderlich.

3DS902010-001B
Abb. / Fig. 4 Abb. / Fig. 5 Abb. / Fig. 6
Thank you for having chosen a quality product of Bitron Home, an Urmet Group brand. Bitron Home
products have been specifically designed for use with the QIVICON platform for which they are approved.
QIVICON enables you to manage and control you smart phone in a really easy way: applications for PC,
tablet and smartphone let you manage all connected devise, at any time and from anywhere.
MOUNTING
You can install the magnetic contact and the magnet either by screws or using adhesive strips. In order to
ensure a reliable and safe operation we suggest a fixed mounting of the magnetic contact. Screws, dowels
and double-sided adhesive tape are included in the packaging of the product. If required you may use the
spacers included to adjust the magnet’s position.
Please make sure that the distance between the magnet and the ribbed side-surface of the magnetic
contact does not exceed 25 mm in closed state.
SET-UP AND OPERATION
This step requires that you have a QIVICON Home Base equipped with a QIVICON ZigBee radio dongle.
1. Remove plastic cover, which protects the battery during transport on the back of the device (Fig. 1).
2. Follow the indications for the addition of new devices of the installation wizard, which can be found in
the app or in the web interface of your QIVICON system. For further information on the registration
process, please consult http://support.bitronhome.eu.
If you wish to associate the device to a different home base, it is sufficient to repeat the procedure of your
system for the addition of new devices. Once successfully concluded the installation process, the sensor
will not communicate with the system, to which it has been previously registered, anymore.
You can use the magnetic contact in order to connect external alarm contacts. Such contacts could be
wired door and window contacts or any other sensor, which signals its status through normally closed
contact. In order to connect the external contact, open the magnetic contact by removing the screw (Fig.
6/H) and connect the cable to the terminal connector (Fig. 5/D). If jumper JP3 (Fig. 5/E) is closed, only the
status of the external contact will be transmitted. If JP3 is open, also the status of the internal contact will
be considered (Fig. 4). After changing the jumper configuration, a restart of the sensor is required (unplug
and re-insert battery).
In order to replace the battery, open the magnetic contact (Fig. 6/H) and replace the battery (Fig. 5/F) by a
model of identic type (Lithium CR2 3V). It is not necessary to register the contact again.

4DS902010-001B
BITRON HOME
http://www.bitronhome.eu
Subject to modifications and mistakes.
TECHNISCHE DATEN
Funkstandard: ZigBee HA 1.2 - 2,4 GHz
Verschlüsselte Kommunikation, regelmäßiger
Verbindungstest, Batteriestandswarnung
Stromversorgung: Lithium Batterie CR2 3V
Batterielebensdauer: ca. 4 Jahre bei 4 Aktivierungen/Tag
Betriebstemperatur: -10°C bis +50°C
Luftfeuchtigkeit: bis zu 85% nicht kondensierend
Abmessungen (h x b x t): 107x32x22 mm
TECHNICAL CHARACTERISTICS
Radio system: ZigBee HA 1.2 - 2.4 GHz
Encrypted communication, regular connectivity test,
battery level warning
Power supply: Lithium battery CR2 3V
Battery lifetime: ca. 4 years @ 4 activations per day
Operating temperature: -10°C to +50°C
Humidity: up to 85% non-condensing
Dimensions (h x w x d): 107x32x22 mm
Bei Verbindungsproblemen empfehlen wir die Verwendung von
Smart Plugs zur Vergrößerung der Reichweite des ZigBee
Funknetzes. Für weitere Informationen und für Support zum
Produkt besuchen Sie bitte http://support.bitronhome.eu.
KONFORMITÄTSERKLÄRUNG DER RICHTLINIE 1999/5/EG
Hiermit erklärt URMET S.p.A, dass sich die MAGNETKONTAKT
MIT ZUSÄTZLICHEM EINGANG (902010/21) in Übereinstimmung
mit den grundlegenden Anforderungen und den übrigen
einschlägigen Bestimmungen der Richtlinie 1999/5/EG befindet.
Die Konformitätserklärungen finden Sie auf unserer Internetseite
support.bitronhome.eu und Sie können diese über unseren Support
anfordern.
In case of connection problems we advise to use smart plugs in
order to increase the range of the ZigBee radio network. For further
information and for product support, please consult
http://support.bitronhome.eu.
DECLARATION OF CONFORMITY TO DIRECTIVE 1999/5/EC
Hereby Urmet S.p.A., declares that the MAGNETIC CONTACT
WITH WIRED INPUT mod. 902010/21 is in compliance with the
essential requirements and other relevant provisions of Directive
1999/5/EC. You may download the declaration of conformity at
support.bitronhome.eu or request a copy through our support.
Urmet S.p.A.
Via Bologna 188/C - 10154 Torino - Italy
MADE IN TAIWAN
Table of contents
Languages:
Other urmet domus Home Automation manuals