Urrea UD80 User manual

UD80
ATENCIÓN: Lea, entienda y siga las instrucciones de seguridad contenidas
en este documento, antes de operar esta herramienta.
WARNING: Read, understand and follow the safety rules in this document,
before operating this tool.
Termómetro Infrarojo
Infrared Thermometer
Manual de Usuario y Garantía
User’s Manual and Warranty

2
ESPAÑOL
1. INTRODUCCIÓN AL PRODUCTO
El termómetro infrarrojo es un instrumento de medición de
temperatura sin contacto. Dentro de sus características incluye una
pantalla LCD de 4 dígitos, funciones de escaneado/conservación de
datos/modo automático y auto apagado (6 segundos).
Para medir una temperatura, apunte la unidad al objeto, tire del gatillo
y manténgalo hasta el final del disparo. Asegúrese de que el área es
mayor que el tamaño del punto de la unidad.
1.1 Características
• Alto desempeño, propósitos generales.
• Emisividad 0.95.
• Ultra bajo consumo de energía en modo apagado.
• Confiabilidad de la medición de gran duración.
• Señal de encendido o apagado del láser.
• Pantalla de LCD iluminada.
• Selección de ºC o ºF.
• Seguro electrónico de gatillo.
• Almacenamiento de datos de temperatura.
• Alarmas audibles.
1.2 Aplicaciones
• Problemas eléctricos.
• Mantenimiento y reparación automotriz.
• Aire acondicionado.
• Experimentos científicos.
• Procesos de manufactura con tecnología de semiconductores.
• Terminales de prueba en circuitos.
• Seguridad y procesamiento de alimentos.
• Auditorias en el desempeño de energía de alto voltaje (HVAC).
2. INFORMACIÓN DE SEGURIDAD
Lea y entienda cuidadosamente la siguiente información antes de
operar el termómetro. Sólo personal calificado deberá reparar o dar
mantenimiento lo no cubierto en este manual.
Precauciones:

3
ESPAÑOL
• Nunca apunte el láser al ojo humano, manténgalo fuera del alcance
de los niños.
• Nunca sumerja la unidad en el agua.
• Este producto no está diseñado para usarse en evaluaciones médicas.
Puede ser usado para medir la temperatura del cuerpo sólo como
referencia, es decir, para propósitos industriales y científicos.
2.1 Símbolos de seguridad
Este instrumento cumple con las siguientes normas:
EN61326: Equipo eléctrico para medición, control y uso de laboratorio.
IEC61000-4-2: Prueba de inmunidad a descargas eléctricas.
IEC61000-4-2: Prueba de inmunidad a campos magnéticos de radiación,
radiofrecuencia.
IEC61000-4-8: Prueba de inmunidad a campos magnéticos de
frecuencia de potencia.
Las pruebas fueron conducidas usando un rango de frecuencia de 80 a
1000 MHz con el instrumento en tres orientaciones.
El promedio de error para las tres orientaciones es ±0.5ºC (±1.0ºF) a 3
V/m a través del espectro.
Sin embargo, entre 781-1000 MHz a 3 V/m, el instrumento puede no
mantener su precisión.
3. ESPECIFICACIÓN
Distancia y tamaño del punto 12:1
Rango de temperatura -50 - 999 °C (-58 - 1830 °F)
Precisión
(a una operación en temperatura ambiente de 25° C / 77° F)
± 3° C (± 5° F) de -50~-20° C (-58 ~ -4° F)
± 2° C (± 3° F) de -20~100° C (-4 ~ 212° F)
± 2% de 100 ~ 999° C (212 ~ 1830° F)
Termopila 8~14µn
Repetibilidad ± 1° C (± 2° F)
Resolución 0.1° C (0.1° F)
Tiempo de respuesta 500 ms
Temperatura de operación
0 ~ 50° C (32 ~ 122° F), 10 ~ 90%HR
Apagado automático

4
ESPAÑOL
Automáticamente después de 6 segundos
Emisividad 0.95
Interruptor °C / °F Si
Luz Si
Señal láser Si
Max/Min/Promedio/ ∆T Si
Auto medición Si
Memoria de 10 puntos Si
Alarma audible Si
Tipo de batería 9V,IEC6F22, NEDA 1604
Dimensiones 6.69” x 5.23” x 1.71” (170 x 133 x 45 mm)
Peso 187g aproximadamente
Accesorios Estuche, manual, batería 9V
4. OPERATION OF INSTRUMENT
4.1 Inicio rápido
Para medir una temperatura, apunte la unidad al objetivo que desea
medir, jale el gatillo manteniéndolo hasta el final del disparo. En modo
SCAN, la pantalla de LCD mostrara cualquiera de las dos temperaturas
Fahrenheit o Celsius.
La unidad le mantendrá la ultima lectura alrededor de 6 segundos
después de soltar el gatillo; la palabra HOLD aparecerá. Asegurese de
considerar que el área del objetivo este dentro del ángulo de la visión
del instrumento. El punto del láser es usado solo como mira.
4.2 Diagrama de la Unidad
1. Pantalla.
2. Señal del laser.
3. Ventana de medición.
4. Gatillo de medición.
5. Compartimiento de baterías
6. Indicador modo Scan/Hold/Auto
7. Indicador de encendido o apagado del Láser
8. Indicador de memoria Max / Min / promedio / ∆T
9. Emisividad / Alarma alta / Indicador de alarma baja.
10. Botón para disminuir valores y botón para aumentar valores.
11. Botón de funciones.

5
ESPAÑOL
12. Indicador de la memoria de datos.
13. Indicador de unidades °C / °F
14. Indicador de temperatura.
15. Batería Baja.
16. Selector de °C / °F
17. Selector de encendido o apagado del láser
18. Batería de 9V.
1
2
3
4
5
6
7
8
9
11
10
15
14
13
12
16
17
18
4.3 °C / °F y cambio de baterías
La unidad es energizada por una batería de 9V y muestra cualquiera
de las dos temperaturas °C / °F. El usuario debe remplazar la batería
cuando el voltaje desciende y se encuentra por debajo del voltaje
confiable y al mismo tiempo aparecerá el símbolo de batería baja.
Para cambiar la batería de 9V, abra la empuñadura de la unidad,
usando un dedo. Cambiar la batería de 9V por una nueva y presione la
empuñadura de regreso.
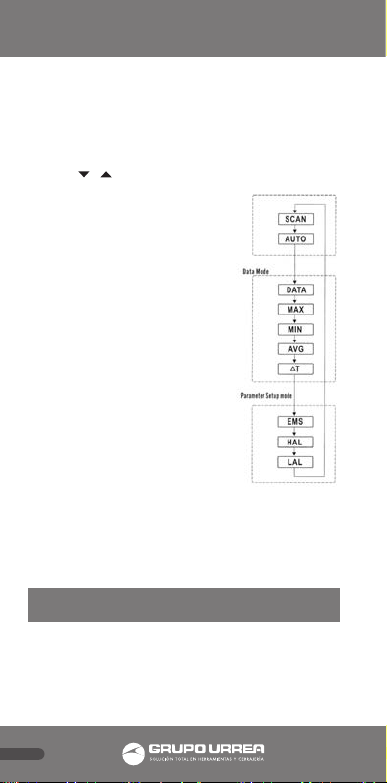
4.4 Funciones avanzadas
• Para operar más funciones avanzadas. Es simple usando el botón
“F” para cambiar. La secuencia operacional y su correspondiente
explicación se muestra en el siguiente tabla de flujos.
• Busca y muestra la temperatura durante la medición.
• Mide y muestra continuamente la temperatura sin jalar el gatillo.
• Activa la función de guardado de datos cuando se presiona el gatillo
y llama la memoria guardada usando el botón o . (Nota:
Mientras se presiona el gatillo para guardar datos, el nuevo dato
remplaza al existente en el siguiente espacio.)
• La temperatura Máxima dentro de un disparo de medición.
• La temperatura Mínima dentro de un disparo de medición.
6
ESPAÑOL
• La temperatura promedio dentro de un disparo de medición.
• Diferencia de la temperatura mayor y menor dentro de un disparo
de medición.
• Ajuste de emisividad para mayor precisión sobre todas las superficies.
• Fijación de la alarma Alta.
• Fijación de la alarma Baja. (Los parámetros son ajustados usando los
botones o ).
4.5 Observaciones.
• No importa si presionas el gatillo o no,
cuando están encendidas la unidad, tu
puedes cambiar las funciones o ajustar los
parámetros.
• Para evitar operaciones erroneas, la
función a desempeñar debe ser fijada,
solo después de que la unidad se acciono
por el gatillo para hacer la operación
correcta.
• Para evitar accionamientos descuidados,
deberán diseñarse e implementarse
algunas medidas.
• Función Auto permite medir
continuamente la temperatura del
objetivo y sin mantener presionado el
gatillo todo el tiempo.
• Función Auto se puede fijar solo cuando
el gatillo y el botón de funciones F son
presionados al mismo tiempo ambos.
• La unidad esta totalmente apagada, no se requiere más para
guardarse, para preservar la batería mucho tiempo.
5. TÉCNICAS DEL TERMÓMETRO
INFRAROJO
5.1 Proporción campo de vista
(FOV)=proporción de la distancia al diámetro (DS)
El campo de vista es el ángulo de visión al cual el instrumento opera, es
determinado por la óptica de la únidad. El FOV es la proporción de la

7
ESPAÑOL
distancia de el objetivo y el diámetro del objetivo. Mientras más chico el
objetivo, más cerca deberá de estar. Cuando el diámetro del objetivo es
pequeño, es importante acercar el termómetro al objetivo asegurando
que solo el objetivo es medido, descartando sus alrededores.
5.2 Emisividad
La emisividad es la capacidad de un cuerpo para emitir o absorber
energía. El emisor perfecto tiene una emisividad de 1, emitiendo un
suceso 100% de energía. Un objeto con emisividad de 0.8 absorberá
el 80% y reflejará el 20% de energía. La emisividad es definida por la
proporción de energía radiada por un objeto a una temperatura dada
a la energía emitida por un radiador perfecto a la misma temperatura.
Todos los valores de emisividad caen entre 0.1 y 1.0.
Los sensores de temperatura sin contacto miden la energía infraroja
emitida por el objetivo, tienen respuesta rápida y son comúnmente
usados para medir objetivos en movimiento o en intermitencia,
objetivos en vacío, y objetivos que son inaccesibles debido al medio
hóstil, limitaciones de geometría o riesgo.
6. MANTENIMIENTO
Limpieza del lente: Sople las partículas sueltas usando aire comprimido
limpio con un cepillo de cabello de camello suavemente cepillar
retirando los residuos remanentes. Cuidadosamente enjuague con un
trozo de tela de algodón húmedo, la tela se humedece con agua.
Nota: NO usar solventes para limpiar el lente.
Limpieza de la carcaza: Use jabón y agua en una esponja o tela suave.

8
ESPAÑOL
1. PRODUCT INTRODUCTION
The infrared thermometer is non-contact infrared temperature
measuring instruments. Features include a 4 digits backlit LCD, scan/
hold/auto funtion and auto power off (6 seconds). To measure a
temperature, point the unit at the object, pull the measuring trigger
and hold on till the end of shot. Make sure the target area is larger
than the unit´s spot size.
1.1 Features
• New series includes high performance, general purpose.
• Emissivity 0.95.
• Ultra low power consumption in shutdown mode.
• Extended long time measuring reliability.
• Laser sighting ON/OFF is switchable.
• Backlit LCD display.
• °C or °F selectable.
• Electronic trigger lock.
• Temperature data storage.
• Audible alarms.
1.2 Aplications
• Electrical troublesshooting.
• Automotive repair and maintenance.
• Air conditioner.
• Manufacturing processes of semicnductor technology.
• Test terminals on circuits.
• Food safety and processing.
• Perform HVAC energy audits.
2. SAFETY INFORMATION
Read the following safety information carefully before attempting to
operate or service the meter. Only qualified personnel should perform
repairs or servicing not covered in this manual.
Cautions:
• Do not aim laser spot directly at human eye, keep it away from the
children.

9
ESPAÑOL
• Do noto submerge the unit in water.
• This product is not designed for use in medical evaluations. The
product can only be used to measure body temperature simply for
reference. They are meant for industrial and scientific purposes.
2.1 Safety symbols
This instrument conforms to the following standards:
EN61326: Electrical equipment for measurement, control and
laboratory use.
IEC61000-4-2: Electrostatic discharge immunity test.
IEC61000-4-3: Radiated, radio-frecuency, electromagnetic field
immunity test.
IEC61000-4-8: Power frecuency magnetic field immunity teste.
Tests were conducted using a frequency range of 80-1000MHz with the
instrument in three orientations.
The average error for the three orientations is ± 0.5° C (± 1.0° F) at3V/m
throughout the spectrum. However, between 781-1000MHz at 3V/m,
the instrument may not meet its stated accuracy.
3. SPECIFICATIONS
Distance/spot ratio 12:1
Temperature range
-50 - 999 °C (-58 - 1830 °F)
Accuracy
(assumes operation ambient temperature of 25° C / 77° F)
± 3° C (± 5° F) de -50~-20° C (-58 ~ -4° F)
± 2° C (± 3° F) de -20~100° C (-4 ~ 212° F)
± 2% de 100 ~ 999° C (212 ~ 1830° F)
Thermopile
8~14µn
Repeatability ±1°C (±2°F)
Resolution 0.1°C (0.1°F)
Response time 500 ms
Operation temperature
0 ~ 50° C (32 ~ 122° F), 10 ~ 90%HR
Auto power off
Automaticaly after 6 seconds
Emissivity 0.95
°C / °F Switchble Yes

10
ESPAÑOL
Backlight Yes
Laser sight switchable Yes
Max/Min/Avg./∆T Yes
Auto-measuring Yes
10 point memory Yes
Audio alarm Yes
Battery type 9V, IEC6F22, NEDA 1604
Dimensions 6.69” x 5.23” x 1.71” (170 x 133 x 45 mm)
Weight 187g approx
Accessories 9V battery, instruction manual, carrying
4. OPERATION OF INSTRUMENT
4.1 Quick start
To measure a temperature, point the unit at the target you want to
measure, pull the trigger and hold on till the end of shot. In SCAN
mode, the LCD displays either the current temperature in celsius or
fahrenheit. The unit will HOLD the last reading for about 6 seconds
after the trigger is released, the word HOLD appears. Be sure to
consider the target area inside the angle of vision of this instrument.
The single spot of laser is used for aiming only.
4.2 Unit diagram
1. Display screen.
2. Laser sighting.
3. Measuring window.
4. Measuring trigger.
5. Battery and cover.
6. Scan/Hold/Auto mode indication.
7. Laser ON/OFF indication.
8. Data Max/Min/Ave/∆T.
9. Emissivity/High alarm/Low alarm adjustment indication.
10. Down value button and Up value button.
11. Function button.
12. Data memory indication.
13. °C / °F unit indication.
14. Temperature indication.
15. Low battery.
Table of contents
Languages:
Other Urrea Thermometer manuals


