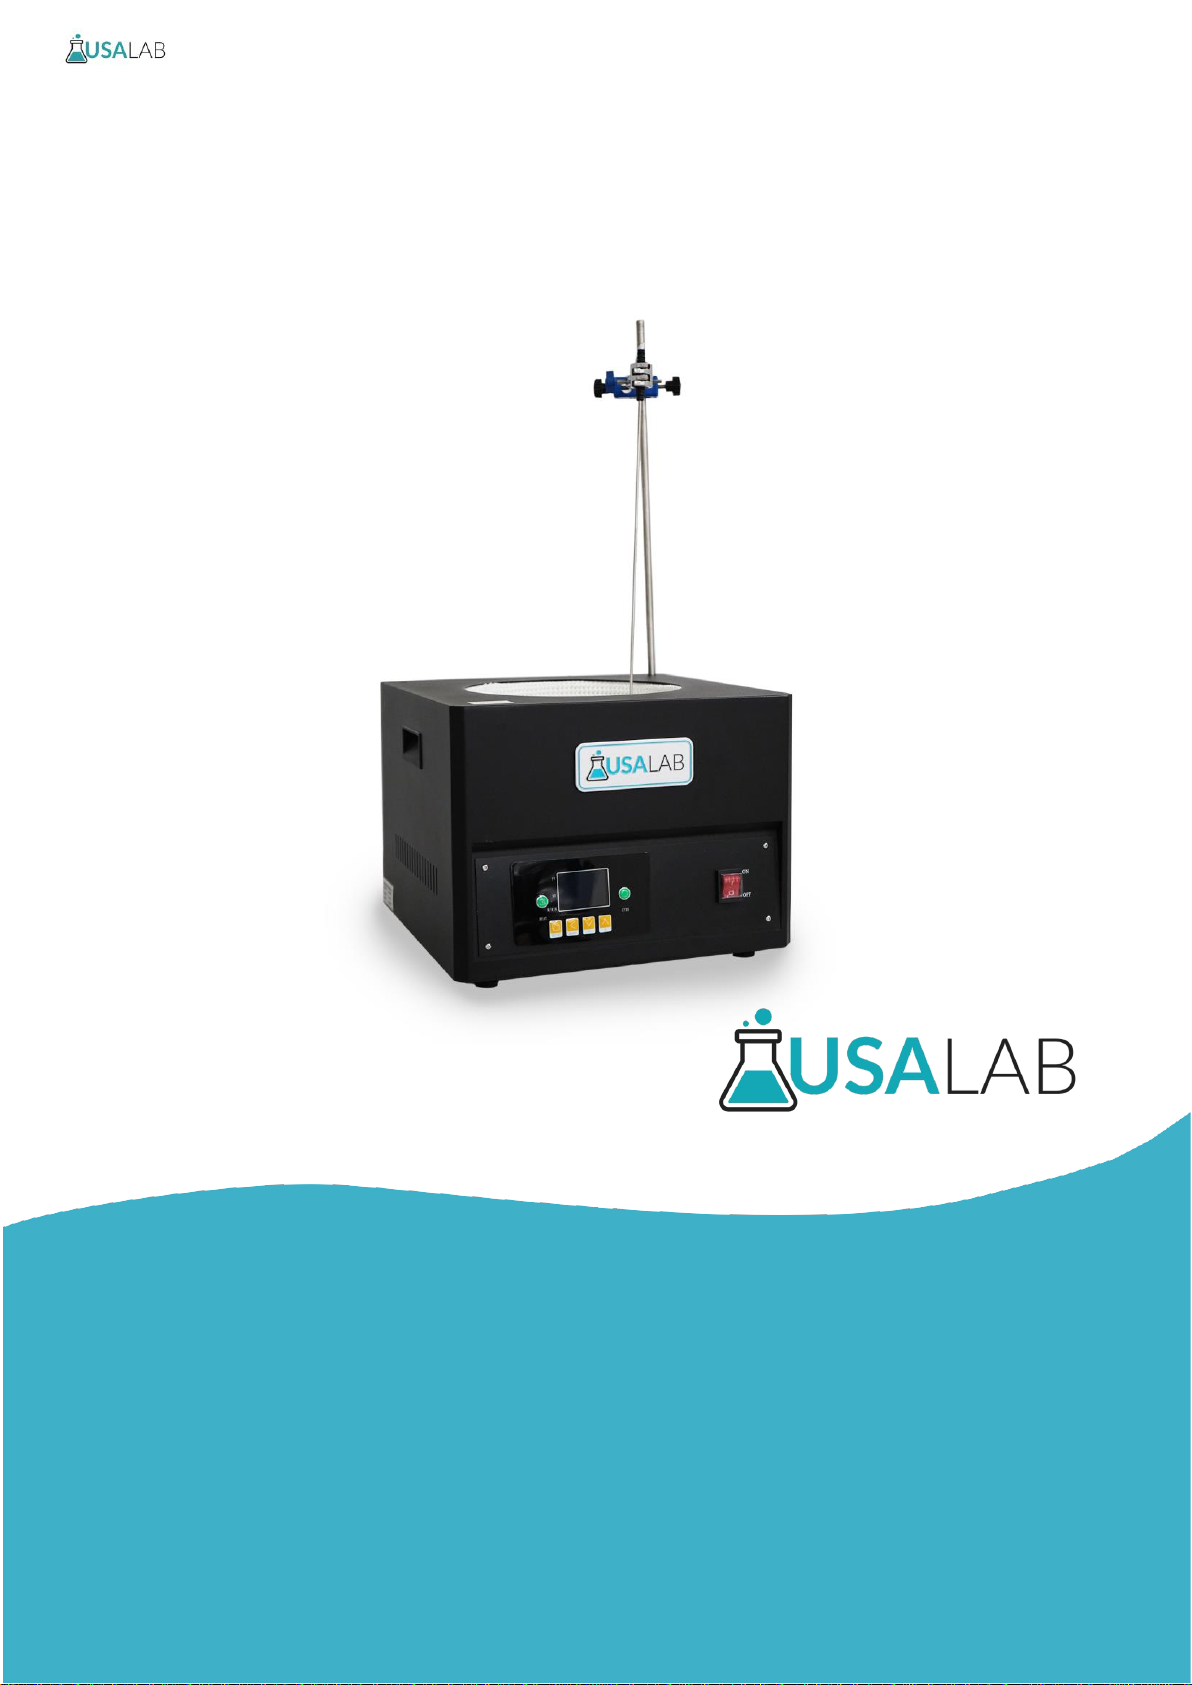
USA Lab HeatPro USA-XHM-2L User manual

USA LAB HeatPro™Mantle Manual
USA-XHM-2L, USA-XHM-5L, USA-XHM-10L, USA-XHM-20L

Safety Precautions and Explanations
At USA Lab, safety is our number one priority. The following information provides
guidelines for safety when using USA Lab equipment. Any piece of machinery can
become dangerous to personnel when improperly operated or poorly maintained.
ALL employees operating and maintaining USA Lab equipment should be familiar
with its operation, thoroughly trained, and Instructed on the best safety practices.
Most industry accidents are preventable through safety awareness.
Training
It is the responsibility of the customer to ensure that all personnel who will be
expected to operate or maintain the equipment. Participate in training and
instruction sessions to become trained operators. All personnel operating, inspecting,
servicing, or cleaning this equipment must be properly trained in the operation and
machine safety. BEFORE operating this equipment, read the operating instructions in
this equipment manual. Become thoroughly familiar with the machinery and its
controls.

Safety
•Never leave the equipment running unattended and use this equipment only for its
intended purpose.
•Ensure that all power sources are turned off when the machine is not in use. This
encompasses electrical and pneumatic power.
•Read the manual for any special operational instructions for each piece of equipment. All
USA Lab authored manuals are typically included with each device as well as posted online.
•Know how the equipment functions and understand the operating and halting processes.
•Wear the appropriate personal protective equipment for the task.
•When working on or around all equipment, avoid wearing loose clothing, jewelry,
unrestrained long hair, loose ties, belts, scarves, or articles that may be caught in moving
parts. Keep all extremities away from moving parts. Entanglement can cause death or
severe injury.
•For new equipment, check input voltage and compare with the equipment voltage rating.
DO NOT supply the incorrect power to any equipment for any reason whatsoever.
Electrical specifications for your machine are printed on the machine tag. A properly
grounded receptacle is required for safe operation regardless of voltage requirements.
•Keep the equipment operating zone free of obstacles that could cause a person to trip or
fall toward an operating machine. Keep fingers, hands, or any part of the body out of the
machine and away from moving parts when the machine is operating.
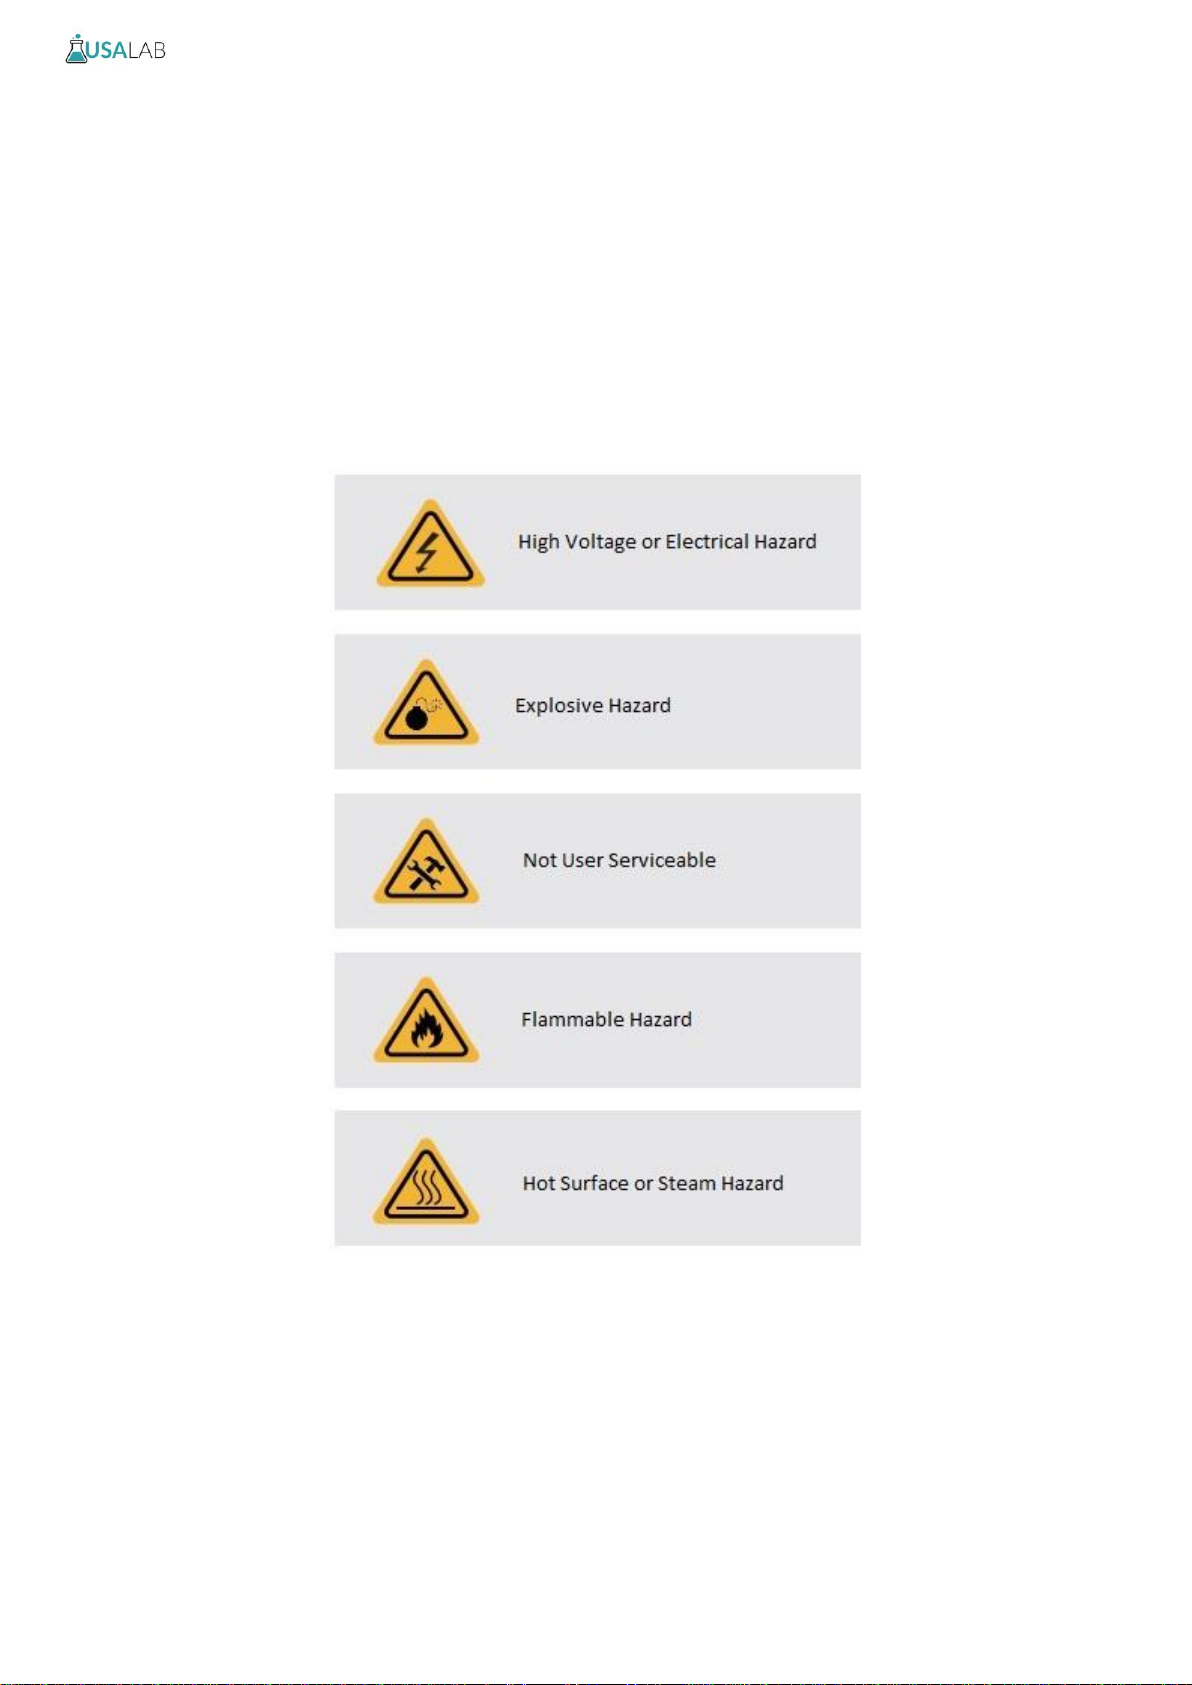
•Any machine with moving parts and/or electrical components can be potentially dangerous
no matter how many safety features it contains. Stay alert and think clearly while operating
or servicing the equipment. Be aware of operations and personnel in your surroundings. Be
attentive to indicator lights, warning lights, and/or operator interface screens displayed on
the machine and know how to respond.
•Do not operate machinery if you are fatigued, emotionally distressed, or under the
influence of drugs or alcohol.
•Know where the FIRST AID SAFETY STATION is located.
•Know where the FIRE EXTINGUISHING EQUIPMENT is located.
•Never sit or stand on the machine or on anything that might cause you to fall against the
machine.
•Rotating and moving parts are dangerous. Keep clear of the operating area. Never put any
foreign object into the operating area.
•Use proper lifting and transporting devices for heavy equipment. Some types of equipment
can be extremely heavy. An appropriate lifting device should be used.
•Use caution when moving portable equipment. In some cases, the machinery can be heavy
and/or may be top heavy. Portable equipment can gain momentum during transport and
must always be controlled.

Symbols and Warnings
Below are examples of commonly used symbols and what they mean.
Understand them and their potential consequences.

Product Features
1. 300°C Maximum operating temperature.
2. PID heater control algorithm.
3. Auto-tuning / Auto-calibration.
4. Temperature probe fault detection.
5. Capacities from 2L-20L.
6. Brushless DC stirring motor.
7. Digital RPM display.
8. Over-temperature protection.
9. Internal and external probes.
Warnings
1. Verify that the unit is properly grounded.
2. Do not use heating without the stirrer function enabled.
3. You must use a magnetic stir bar inside the flask.
4. When shutting down the mantle, first disable the heating function. Leave the stirrer on
until cooled, a minimum of 20 minutes.
5. All surfaces of the mantle can become hot. Use caution when touching any part.
6. On the first use, smoke and smells can come from the bowl. This is known as burn-in.
7. After burn-in, the bowl will become discolored. This is normal.
8. Perform burn-in in a well-ventilated area such as a fume hood or outdoors.
9. 5L, 10L, and 20L will make creaking and cracking noises when heating up. This is normal.
10. DO NOT USE with wet hands, in high humidity, or if something spills inside the bath.
11. If the unit does not power on, check the rear fuse. Replace if necessary.
12. If the unit is not going to be used for an extended period. Clean the unit and store it in a
dry place away from corrosive gases.
Specifications
SPECIFICATIONS
Capacity
2L
5L
10L
20L
Overall
Dimensions
416*282*203
380*380*275
420*420*315
494*494*315
16.4" x 11.10"
x 8"
15" x 15" x
10.8"
16.5" x 16.5" x
12.4"
19.44" x 19.44" x
12.4"
Power
110V-120V,
650W 5.9A
110V-120V,
1100W 10A
110V-120V,
2100W 19.1A
220V-240V,
3000W 13.6A
Motor
24V 40W
24V 40W
24V 40W
24V 40W
Gross
Weight
22lbs.
33lbs.
48.5lbs.
55lbs.
Max Temp
300℃
300℃
300℃
300℃
Max RPM
2500RPM
2500RPM
2500RPM
2500RPM

Stand Assembly
1. Install the vertical pole into the top of the mantle on the rear half. (left or right side)
2. Open and adjust the blue boss clamp. Attach loosely.
3. Attach finger clamp to the horizontal side of the blue boss clamp.
4. Adjust boss clamp and finger clamp to center of the flask neck and tighten.
Operation
*Verify that the unit is plugged in to the correct power supply voltage*
Control panel
A - Heating On/Off
B - Stirring On/Off
C - Settings / Hold for Auto-tune
D - Shift / Move cursor
E - Lower / Reduce
F - Higher / Raise
G - Current temperature reading (PV)
H - Set Temperature (SV)
I - Current stirrer RPM
Using the unit:
•Press the heating button (A) and the stirring button (B).
•Hold Set (C) for 3 seconds.
•Adjust the SV (H) value using the Lower (E) and Higher (F) buttons as needed. Use Shift (D)
to make large changes.
•Press Set (C) to adjust the stirrer RPM (I).
•Adjust the RPM (I) value using the Lower (E) and Higher (F) buttons as needed. Use Shift (D)
to make large changes.
•Hold Set (C) for 3 seconds to set the changes.
Now the heating and stirring are set for operation. Repeat the steps above to adjust settings while
running the unit. Ramp up the temperature slowly over time.

Auto-tune / Auto-calibration
Only perform this tuning at the desired running temperature, stirrer speed, fluid type, and fluid
volume.
Hold Shift (D) for 8-10 seconds to enter the Auto-tune menu. Change the value to “0001”and then
press Set (C). An “AT”symbol will flash on the screen while Auto-tune is running. The indicator will
disappear when it has been completed. During the process the mantle will heat and cool in three
cycles.
Internal Probe
The included accessories contain a small black plug. This part is used in the probe socket to use the
internal probe instead of the external probe. To use it, unplug the external probe and replace it
with the black plug.
Probe Fault
If the probe breaks an alarm will sound and the display will read “Er-1”. If this happens the probe
will need to be replaced.
Jumping Stir Bar
If the stir bar is not stirring the fluid and is instead jumping around. Reduce the speed to a very low
value. Turn the stirring function off. Wait for a minute or two. Then turn it back on. Gradually
increase the speed over time.
Burn-in Instructions
This process may produce excessive smoking and discoloration of the glass fiber bowl. This is due
to leftover oils from the manufacturing process.
1. Plug unit in, in a very well-ventilated area.
2. Plug in the black jumper into the probe port
3. Turn on the mantle
4. Set the temperature to 40°C
5. Once the temperature reaches the set point, increase
the setting by 15°C.
(Repeat this process until 250°C is reached.)
6. Turn off the mantle and let it cool to room
temperature.
Troubleshooting
If you are experiencing any issues with the mantle. Please contact our Technical Department.
or
Call (734) 855-4890 Ask for a Technician
V1.0 XHM OPERATORS MANUAL –© USALAB 2023 –Policies available at www.usalab.com/policies/
This manual suits for next models
3
Table of contents
Other USA Lab Laboratory Equipment manuals
Popular Laboratory Equipment manuals by other brands

Scientifica
Scientifica UMS Setup and operation manual

Agilent Technologies
Agilent Technologies Cary 8454 installation guide

HAVER & BOECKER
HAVER & BOECKER HAVER EML 200 Premium operating instructions

Analytik Jena
Analytik Jena InnuPure C96 user manual

Buehler
Buehler SimpliMet XPS1 instructions

Omron
Omron ZUV Series user manual