V-Show T911 Pioneer User manual

T911 Pioneer
User Manual

1. Safety Instructions
Please read the instruction carefully which includes important
information about
the installation, usage and maintenance.
Please keep this User Guide for future consultation. If you sell the unit to
another user, be sure that they also receive this instruction manual.
Important:
Damages caused by the disregard of this user manual are not subject to
warranty. The dealer will not accept liability for any resulting defects or
problems.
Unpack and check carefully to ensure that there is no transportation damage
before using the unit.
This product is for indoor use only. Use only in a dry location.
DO install and operate by qualified operator.
DO NOT allow children to operate the fixture.
Use safety chain when fixing the unit. Handle the unit by carrying its base
instead of head only.
The unit must be installed in a location with adequate ventilation, at least
50cm from adjacent surfaces.
Be sure that no ventilation slots is blocked, otherwise the unit will be
overheated.
Before operation, ensure that you are connecting this product to the proper
voltage in accordance with the specifications in this manual or on the product’s
specification label.
It’s important to ground the yellow/green conductor to earth in order to avoid
electric shock.
Minimum ambient temperature TA: 0℃. Maximum ambient temperature TA:
40℃. Do not operate this product at a lower or higher temperature.
DO NOT connect the device to any dimmer pack.
During initial start-up some smoke or smell may arise. This is a normal process
and does not necessarily mean that the device is defective, and it will decrease
gradually within 15 minutes.
Keep flammable materials away from the fixture while operating to avoid fire
hazard. Make sure the power cord is not crimped or damaged; replace it
immediately if damaged.
Unit’s surface temperature may reach up to 85℃. DO NOT touch the housing
bare-handed during its operation

Avoid any flammable liquids, water or metal from entering the unit. Once it
happens, cut off the mains power immediately.
DO NOT operate in a dirty or dusty environment. DO clean the fixture regularly.
DO NOT touch any wire during operation as there might be a hazard of electric
shock.
Avoid entanglement of the power cord with other wires.
The minimum distance to objects/surface must be more than 12 meters.
Disconnect mains power before fuse/lamp replacement or servicing.
Replace fuse/lamp only with the same type.
In the event of serious operating problem, stop using the unit immediately.
Never turn on and off the unit time after time.
The housing, the lenses, or the ultraviolet filter must be replaced if they are
visibly damaged.
DO NOT open the housing as there are no user serviceable parts inside.
DO NOT attempt to operate this unit if it becomes damaged. DO NOT attempt
any repairs
yourself. Repairs carried out by unskilled people can lead to damage or
malfunction. Please contact the nearest authorized technical assistance center
if needed.
Disconnect this product from its power source before servicing.
DO use the original packaging if the device is to be transported.
Hot lamp explosion hazard. DO NOT open the unit within 15 minutes after
switching off.
DO replace the bulb once it is damaged, deformed or life-expired.
Avoid direct eye exposure to the light source while the product is on.
Never touch bulb with bare fingers, as it is very hot after using.
DO NOT operate this product if you see damage on the housing, shields, or
cables. Have the damaged parts replaced by an authorized technician at once
Installation:
The fixture should be fixed on the clamp. Always ensure that the unit is firmly
fixed to avoid vibration and slipping off during operation. Ensure that the
trussing or area of installation must be able to hold 10 times the weight without
any deformation. Always install a safety cable that can hold at least 12 times
the weight of the fixture when installing.DO install and operate by qualified
operator. It must be installed in a place where there is out of the reach of
people.

2.INSTALLATIONS
installations Note: In order to increase protection, please install the lamp on
the sidewalk, outside the seating area, or an area where unauthorized persons
may touch the lamp
Before installing the fixture on any surface, make sure that the installation area
can bear the minimum point load above 10 points of the weight of the
equipment. The installation of the fixing device must always be fixed with
auxiliary safety accessories (such as a suitable safety rope)
Do not stand directly under the equipment when installing, removing, or
servicing fixtures
From the ceiling or set on a flat surface (see the picture below). Ensure that
this fixture is kept at least 0.5m (1.5 feet) away from any flammable materials
(decorations, etc.)
Be sure to use and install the supplied safety rope to ensure safety and
prevent accidental damage and/or injury in case the fixture is damaged
Installation point: Overhead installation requires a wealth of experience,
including calculation of working load limits, in-depth understanding of the
installation materials used, and regular safety inspections of all installation
materials and fixtures. If you do not have these qualifications, please do not try
to install it yourself. Improper installation can cause personal injury
Before connecting the main power cord to an appropriate wall outlet, make
sure to complete all assembly and installation procedures
Lamp installation: LED shaking head provides a unique mounting bracket
assembly, which integrates the bottom of the base and the fixing point of the
safety cable into one unit (see the figure below). When installing the fixture to
the truss, make sure to use the appropriate tools to fix it on the attached
bracket, and use the M10 screw that passes through the center hole of the
"bracket" to fix it. As an additional safety measure, make sure to use at least
one safety cable integrated in the base assembly to connect at least one
appropriately rated safety cable to the fixture.

3. DMX-512 control connections
Connect the provided XLR cable to the female 3-pin XLR output of your
controller and the other side to the male 3-pin XLR input of the moving head.
You can chain multiple
Moving heads be connected together through serial linking. The cable needed
should be two core, screened cable with XLR input and output connectors.
For installations where the DMX cable has to run a long distance or is in an
electrically noisy environment, such as in a discotheque, it is recommended to
use a DMX terminator. This helps in preventing corruption of the digital control
signal by electrical noise. The DMX terminator is simply an XLR plug with a 120
Ω resistor connected between pins 2 and 3,which is then plugged into the
output XLR socket of the last fixture in the chain. Please see illustrations below
1
2
3
PIN 3
PIN 2
120Ω

4.Address code setting
If you use a universal DMX controller to control the units, you have to set DMX
address from 1 to 512 so that the units can receive DMX signal.
Press the MENU button to enter menu mode, select DMX Settings, press the
ENTER button to confirm, use the UP/DOWN button to select DMX Address,
press the ENTER button to confirm, the present address will blink in the display,
use the UP/DOWN button to adjust the address from 001 to 512, press the
ENTER button to store. Press the MENU button back to the last menu or let the
unit idle 30 seconds to exit menu mode.Please refer to the following diagram to
address your DMX512 channel for the first 4 units.
5.Fixture size
6.Illuminance chart:

7. Effect Wheels
COLOR WHLLE
colorful colors WHLLE
STATIC GOBO WHEEL

8.Light Source
PHILIPS MSD Silver 300 LL
Because of its high internal pressure, there might be a risk that the Discharge
lamp would explode during operation. The lamp emits intense UV radiation
which is harmful to the eyes and skin. The high luminance of the arc can cause
severe damage to the retina if you take a close look at the lamp.
To protect the lamp, always turn off the lamp first (via control panel or DMX
controller) and let the unit run at least five minutes to cool down before
switching off the mains supply. Never handle the lamp or luminary when it is
hot.
Do not touch the bulb with bare hands. If this happens, clean the lamp with
denatured alcohol and wipe it with a lint free cloth before installation.
The lamp generates UV radiation. Never operate the lamp without appropriate
shielding.
When lighting up, the lamp operates at high pressure and there is a slight risk of
arc tube rupture. The risk increases with age, temperature and improper
handling of the lamp. Do not use the lamp longer than its lifespan.
Make sure the lamp is located in the center of the reflector for the best
projection.
9.Lamp technical parameters
Input Voltage: 100-240V, 50/60Hz
Output Voltage: V1:36V(Master board), V2:12V(cooling fan) , V3:380V(lamp)
Power consumption: 365 W
Power supply: 550W
Light source: PHILIPS MSD Silver 300 LL (3000 hours)
Color temperature: 7800K
Diameter of optic lens: 145mm
Beam angle: 0.6°-2°
When the beam angle is 2°, the illuminance at 10 meters can reach 432,000
LUX
Color wheel: 1 color wheel, 14 fixed colors plus white, two-way rainbow effect
Static gobo: 16 gobos plus 1 white circle
With fog and colorful effects
Prism: Equipped with 18 prism, and 8+16+24 honeycomb prism, the two
prisms
can be stacked and rotated in both directions
DMX Channel: 18CH
Operate mode: DMX512, self-propelled, master/slave, RDM
Electric focusing system
Outstanding strobe effect with variable speed
0-100% smooth dimming

Control panel: LCD Touch screenOverheating self-energy protection bulbs,
extending lamp life
X-axis rotation angle: 540°
Y-axis rotation angle: 270°
Three phase motor with SY Brand
XY axis magnetic coding positioning is more accurate
Power Outlet: Power Connector Input/Output
Signal Outlet: standard 3 Pin XLR socket(can customized 5 pin XLR socket)
Installation: 2x fast lock (folding clamp can optional)
Fixture size: 338x256x512mm
Net weight: 14KG
Features:
T911BEAM adopts imported light source, which has the characteristics of small
size and high light efficiency. The 2°beam angle can release sharp, bright, full,
strong penetrating power, forming a strong visual impact effect. The rich color
wheel and gobo wheel provide excellent color macro and dynamic effects.
Built-in 8 prisms and 8+16+24 honeycomb prisms can be rotated and
superimposed in both directions, the lines are clear and sharp, and the area is
wide, which can create a brilliant and changeable beam effect, dual-chip strobe,
variable strobe speed, and linear dimming, light body Lightweight design, the
net weight is tight 14KG, the shell is resistant to high temperature and flame
retardant materials, to meet the needs of various places
10.LCD Homepage Instructions
1—Displays the current DMX address in large font
2—Logo display area
3—DMX signal frame rate (FPS)
4—Current channel mode, the displayed number indicates the current
channel number
5—Fan speed display (select whether to display according to the lighting
conditions)
6—Current Mode (Master, Slave)

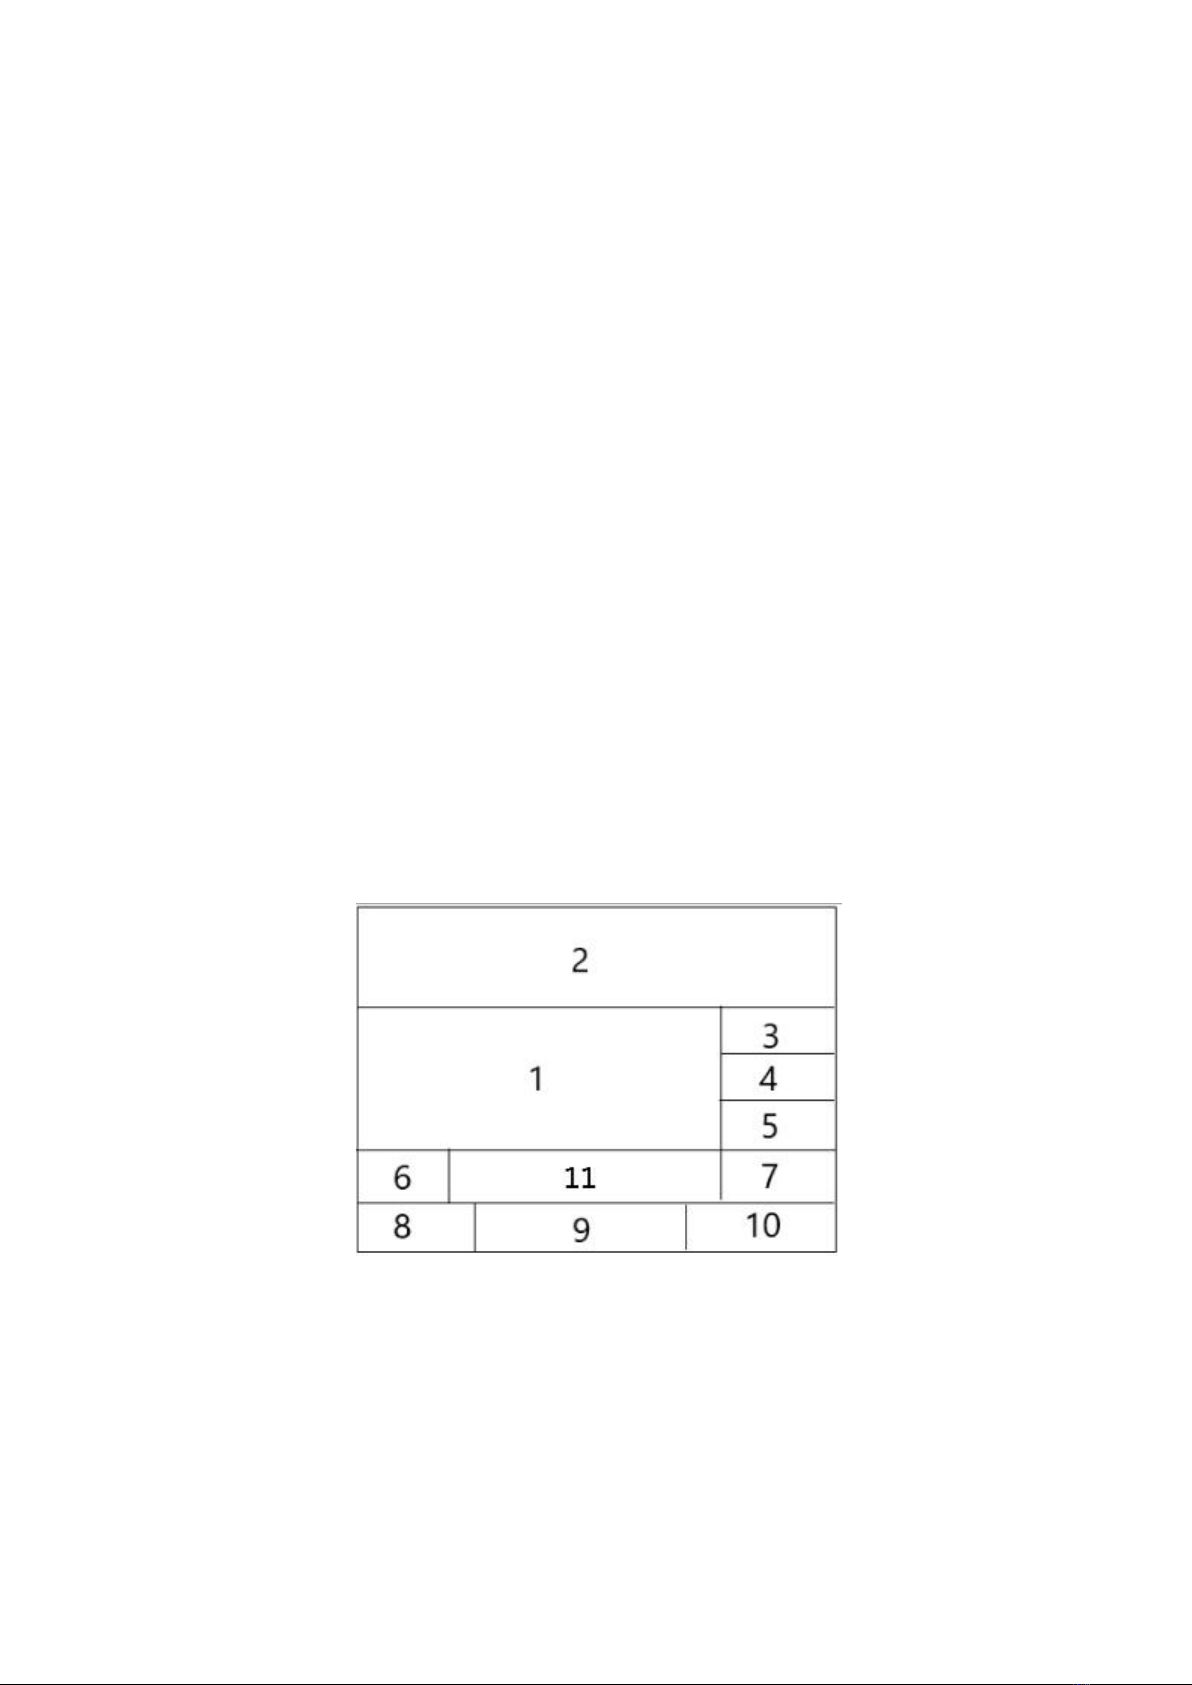
7—Current running mode (DMX512, Auto, User)
8—Error message. If a red band "x" is displayed, the self-test found an error.
(Press down to view specific error message)
9 - temperature display or other content (depending on lamp configuration)
10 —SN term display
11.Display the address code of the next fixture
11.menu operation:
1. DMX address: set the DMX address
2. Channel mode: Set the channel mode, the number of the menu option
indicates the number of channels.
3. Reset operation: reset the motor
Motor power off:
Select "On", all motors are powered off; select "Off", all
motors are powered on and reset. Using this menu, it is possible to plug and
unplug the motor and power-on reset without turning off the main switch.
XY Axis: Reset Pan and Tilt Motors
.......
4.Run: Set the run mode
The description of each menu option is as follows (Note: "Automatic"
mode options may vary according to different product models):
DMX: controlled and run by DMX512 console.
Self-propelled (factory test): run the program set by the manufacturer, this
program is mainly used for factory test.
User program: run user self-programming program. The editing scene can
be set in the [Run Settings] - [Self-Programming] menu.
5.lamp:
Switch the light bulb. After changing the value, it takes about 3 seconds
to work, you can switch the value back within 3 seconds to cancel the
operation. After turning off the light bulb, you must wait 1~2 minutes
before turning it on again. If you operate the menu to turn on the light
bulb within two minutes, the light bulb will not be lit. After the waiting
time is up, it will light up by itself.
If this menu item is "on", the system will first try to light the bulb when
powered on, and wait for the light board to return.
6.Manual: Manually set the value of the channel
7.Operation settings: Operation parameter settings.
Running Cnfg: configuration of Running.
M/S Mode: Slave mode is for receiving external DMX signals and Master
mode is for sending DMX signals to external slave fixtures
XY axis general settings:
X-axis reverse: Select "Yes" to reverse the rotation direction of the
Pan motor, select "No", and follow the rotation direction at the factory.
Y-axis reverse: select "Yes" to reverse the rotation direction of the
Pan motor, select "No", and follow the rotation direction at the factory.

DMX512
When no signal: select the operation mode if no DMX512 signal is detected
When powering on: Only when powering on, if no DMX signal is
detected, the above operation mode will be executed,
Otherwise, the last DMX action will be held
Centered: Except for Pan and Tilt, all other channels are cleared
to zero.
Self-propelled (factory test/pattern/color): Run the program set
by the factory.
User program: run user self-programming program.
Runtime: At any time, as long as the DMX signal is lost, the action
performed
Hold: Hold the DMX value of the last frame.
Shut off: close the shutter
Turn on the light bulb: Select "No", the light will not light after the
power-on reset is completed, select "Yes", the light bulb will be automatically
turned on after the power-on reset is completed.
8. Advanced settings:
Fine-tuning: Factory debugging function, which requires password
authentication to enter.
Display: Menu screen flip setting
Language: Set the system language
Ignore errors: Some error reports may not affect the final use effect,
or for the general purpose of the product, you can choose to turn off some
meaningless error reports
Trim Recovery: After replacing the display board, use this menu to
restore the trim data saved by the motor board to the display board.
9. Information:
DMX value: Display the current received DMX signal value
Channel: Displays the DMX value of the selected channel that
needs to be observed
Error: Display error message (if any item in this menu is wrong, an
exclamation mark will be displayed in the upper right corner of the menu cover)
Storage: Indicates whether the storage is functioning normally. If
the memory is abnormal, the menu information cannot be recorded or read, and
the lamp time record and self-programming data may also be lost.
RAM Error: Chip memory allocation failed, if this error occurs,
please contact the manufacturer.
Bus communication: If there is an error, the motors of various
functions will not operate normally. If this error occurs, please check whether
the communication cables between the boards are in poor contact.
Bulb: The communication between the bulb and the lighting
board. If the communication is wrong, the main control chip cannot correctly
judge whether the light bulb is normally turned off or on, which may cause some

functions to not work properly.
Lighting board: Communication with the light bulb lighting board.
X-axis reset: X-axis reset failed, check whether the magnetic code or motor is
normal.
Y-axis reset: Y-axis reset failed, check whether the magnetic coding
or motor is normal.
Color reset: Color wheel reset failed
Fixed pattern reset: Fixed pattern disk reset failed
Fan stop: The blower stops rotating, and the light bulb will be
automatically turned off after a certain time.
Bulb: Displays the usage time of the bulb
Usage time: Displays the total time the lamp has been on since the
lamp time was reset to zero
Time reset: The total time the bulb is on is reset to 0.
Test Mode: For product testing and temporary use only.
Product Code: The internal code of the product is only for reference in
product production and maintenance.
12.DMX512
CH
DMX Value
Description
1
0-255
Pan
2
0-255
Pan fine
3
0-255
Tilt
4
0-255
Tilt fine
5
Pan/Tilt speed
0
Maximum speed
in speed mode
1-255
speed from fast to slow
in time mode
1-255
Time from 0.1s to 25.5s
6
0-255
dimmer
7
strobe
0-3
closure
4-103
Strobe from slow to fast
104-107
Open
108-207
Fast off and slow on, from fast to slow
208-212
Open
213-251
Random strobe, from slow to fast
252-255
Open
8
color wheel

0-127
Choose a color (see also table)
128-190
Rainbow effect from fast to slow
191-192
rainbow effect stopped
193-255
Rainbow effect from slow to fast
9
Gobo
0-3
Open
4-51
Select gobo (see also table)
52-190
Choose a gobo and dither, from slow to fast (see also
table)
191-201
Open
202-227
The gobo is scrolling forward, from fast to slow
228-229
stop scrolling
230-255
gobo scrolls in reverse, from slow to fast
10
Atomization and colorful
0-19
null
20-137
atomization
138-255
colorful
11
Prism1
0-127
no prism
128-255
Prism 1 Insert
12
Prism 1 Positioning and Rotation
0-127
Prism 1 Positioning and Rotation
128-190
Prism 1 rotates in reverse, from fast to slow
191-192
Prism 1 stops rotating
193-255
Prism 1 rotates forward, from slow to fast
13
Prism2
0-127
no prism
128-255
Prism 2 Insert
14
0-255
focus
15
no function
16
no function
17
reset
To achieve the following effects, push the DMX value
to the corresponding position and stand still for at
least 4 seconds
0-25
null
26-76
effect reset
77-127
Pan/Tilt reset
128-255
reset all
18
reset

Lamp
To achieve the following effects, push the DMX value
to the corresponding position and stand still for at
least 4 seconds
0-25
no effect
26-100
Lamp Off
101-255
Lamp ON
The 8th channel selection color 0-127 value details table
DMX value
Effect
0-4
Color 1 (white light)
5-8
color 1+color 2
9-12
color 2
13-17
color 2+color 3
18-21
color 3
22-25
color 3+color 4
26-29
color 4
30-34
color 4+color 5
35-38
color 5
39-42
color 5+color 6
43-46
color 6
47-51
color 6+color 7
52-55
color 7
56-59
color 7+color 8
60-63
color 8
64-68
color 8+color 9
69-72
color 9
73-76
color 9+color 10
77-81
color 10
82-85
Color 10 + Color 11
86-89
color 11
90-93
Color 11+Color 12
94-98
color 12
99-102
Color 12+Color 13
103-106
color 13
107-110
Color 13+Color 14
111-115
color 14
116-119
Color 14+Color 15
120-123
color 15
124-127
Color 15+Color 1

The 9th channel selects a fixed pattern 0-190. The effect value
is obvious.
DMX value
Effect
0-3
Open (white light hole)
4-6
Gobo 1
7-9
Gobo 2
10-12
Gobo 3
13-15
Gobo 4
16-18
Gobo 5
19-21
Gobo 6
22-24
Gobo 7
25-27
Gobo 8
28-30
Gobo 9
31-33
Gobo 10
34-36
Gobo 11
37-39
Gobo 12
40-42
Gobo 13
43-45
Gobo 14
46-48
Gobo 15
49-54
Gobo 16
55-62
Pattern 1 shaking from slow to fast
63-70
Pattern 2 shaking from slow to fast
71-78
Pattern 3 shaking from slow to fast
79-86
Pattern 4 shaking from slow to fast
87-94
Pattern 5shaking from slow to fast
95-102
Pattern 6shaking from slow to fast
103-110
Pattern 7shaking from slow to fast
111-118
Pattern 8 shaking from slow to fast
119-126
Pattern 9shaking from slow to fast
137-134
Pattern 10 shaking from slow to fast
135-142
Pattern 11 shaking from slow to fast
143-150
Pattern 12 shaking from slow to fast
151-159
Pattern 13 shaking from slow to fast
159-166
Pattern 14 shaking from slow to fast
167-174
Pattern 15 shaking from slow to fast
175-190
Pattern 16 shaking from slow to fast
13. Troubleshooting

The following are some of the problems that often occur when the device is
running, along with some suggestions for troubleshooting:
A. The lamps do not work, there is no light, and the fan does not run
1. Check the power contacts and the fuses are in good condition.
2. Check the voltage.
3. Check the indicator light of the power switch.
B. Not under the control of the console
1. Check whether the DMX signal connector and signal cable are connected
correctly.
2. Check whether the address code is set correctly.
3. If the DMX signal transmission is intermittent, check whether the XLR socket
and the signal cable are well connected.
4. Try it with another controller.
5. Check whether the DMX signal line and the high-voltage line are too close,
which will damage or interfere with the signal circuit.
C. A channel fails
1. The stepper motor or motor leads may be damaged.
2. The drive circuit of the motor may be damaged.
D. Light bulbs come and go
1. The bulb does not light properly. See if the voltage is too high or too low.
2. The internal temperature may be too high. If necessary, replace the cooling
fan
14. Equipment cleaning
Keeping the luminaire clean is absolutely necessary to maintain the best
performance of the luminaire and ensure the best light effect. Lamps must be
cleaned regularly to avoid
Dust, dirt and fume residues accumulate on or inside the luminaire, and the
frequency of cleaning depends on the application environment. If due to
installation and construction
The environment causes dust to enter the lamp, please clean it immediately to
avoid damage to the optical part of the lamp due to excessive dust.
* A soft, lint-free cloth and a good quality glass cleaning solution are
recommended, no solvents should be used under any circumstances.
* Dry the parts carefully.
* Wipe the outside of the lens at least every 20 days. Wipe the inside at least
every 30 days.
Table of contents
Other V-Show Lighting Equipment manuals
Popular Lighting Equipment manuals by other brands

DOTLUX
DOTLUX LINEAcompact user manual

Federal Signal Corporation
Federal Signal Corporation Allegiant ALGT61 Installation maintenance and service manual

Rego
Rego 76403 install guide

Cree
Cree XLamp XR Series Soldering & Handling

Angler
Angler Quick-Open Deep Parabolic Softbox V2 instructions

Vision & Control
Vision & Control TZB38-IR850-HP-24V Instructions for use