V-tech 917ADX User manual

VTECH COMMUNICATIONSLTD.
Distributedinthe
U.S.A
by
VTECH Communications,
8770
SW Nimbus
Avenue/Beaverton,Oregon,97008
Distributed
in
Canada
by
VTECH ElectronicsCanada Ltd.,
200-7671
AlderbridgeWay, Richrnond,B.C.,VGXlZ9
Copyright
1997
for
VTECH COMMUNICATIONSLTD.
9OOMHz
ANALOG CORDLESS PHONE
WITH SPEAKERPHONEAND DUAL KEYPAD
MODELVTECH 917ADX
IMPORTANT:
BEFORE USING YOURNEW PHONE
WE STRONGLY RECOMMEND YOU
1
READ THISMANUAL THOROUGHLY
$
IVTEI
VTECH COMMUNICATIONS
LTD.

Table!
0
f
INTRODUCTION
.........................................................
3
PARTS CHECK LIST
...........................................................
4
IMPORTANT SAFETY INSTRUCTIONS
.....................................
5
THE HANDSET BATTERY PACK
.....................
..
.............
7
GETTING STARTED
.................................................
9
SETTING UP YOUR
VTech
917
ADX
..................................
9
WALL MOUNTING
.......................................................
10
HANDSET FEATURES
...................................................
12
PHONE LED
.................................................................
12
INT.COM LED
...............................................................
12
LOW BATTIMUTE LED
.......................
..
....................
12
PHONE (FLASH) Key
...................................................
12
INT.COM Key
................................................................
12
OFF Key
...........................
..
........................................
12
HOLD Key
....................................................................
12
CHANNEL (CHAN) Key
............................................
13
MUTE Key
....................................................................
13
MEMORY (MEM) Key
..............................................
13
PROGRAMIPRIVACY (PRGIPRV) Key
........................
13
REDIAL Key
.................................................................
13
"TONE Key
....................
..
........
..........
.......................
13
VOLUME CONTROL SWITCH
........................................
13
HEADSET JACK
(2.5
mm)
..........................................
13
BASE UNIT FEATURES
............................................
14
POWER (PWR) LED
................................................
14
IN USE LED
..................................................................
14
CHARGE (CHR) LED
...................................................
14
HOLD LED
....................................................................
14
MUTE LED
...................................................................
14
INTERCOM (INT.COM) LED
....................
..
...............
15
...............................................
SPEAKERPHONE (SPKR) LED
15
........................................................
RINGER SWITCH
15
...............................................
TONEIPULSE SWITCH
15
....................................................................
HOLD Key
15
........................................
...................
FLASH Key
....
15
...................................................................
MUTE Key
15
..................................................
MEMORY (MEM) Key
15
....................................................
PRIVACY (PRV) Key
15
.................................................................
REDIAL Key
16
.........................................
INTERCOM (INT.COM) Key
16
...................................
SPEAKERPHONE (SPKR) Key
16
...........................................................
VOLUME UP Key
16
....................................................
VOLUME DOWN Key'
16
...................................................................
'TONE Key
16
I
I

OPERATING INSTRUCTIONS
......................................
17
MAKING CALLS
............................................................
17
ANSWERING CALLS
..............................................
18
TO PUT A CALL ON HOLD
...........................................
17
THE MUTE FEATURE
.................................................
17
SWITCHING TO THE HANDSET
..................................
17
.....................
SWITCHING TO THE SPEAKERPHONE
19
JOINING A HANDSET CONVERSATION
.....................
19
THE PRIVACY FEATURE
.............................................
19
USING THE INTERCOM
I
HANDSET LOCATOR
......................
20
IFYOUR PHONE RINGS DURINGAN INTERCOM
CONVERSATION
................................................................................
21
USINGTHE INTERCOM DURINGA PHONE CALL
........................
21
TEMPORARY TONE FEATURE
...................................
21
PROGRAMMING THE RINGER TYPE
.........................
21
.....................
TURNING OFF THE HANDSET RINGER
22
...........................................
BASE RINGER CONTROL
22
CHECKING THE HAN,DSET RINGER
...........................
22
MEMORY DIALING
.......................................................
22
.......................
TO STORE A NUMBER INTO MEMORY
22
...........................................
TO DlALANUMBER FROM MEMORY
22
TO CHANGE OR REPLACE A STORED NUMBER
....................
23
STORING PAUSES INMEMORY
................................................
23
.............................................................
USING REDIAL
24
STORING A REDIAL NUMBER IN MEMORY DIAL
......
24
CHANGING CHANNELS
...............................................
24
OPTIONAL HEADSET INSTALLATION AND OPERATING
INSTRUCTIONS
...................................................................................
25
INSTALLATION
........................................................
25
.................................................................
OPERATION
25
MAINTENANCE
.......................................................
27
IN CASE OF DIFFICULTY
............................................
28
WARRANTY STATEMENT
.........................................
30
...................................................
FCC
&
IC REGULATIONS
32
TECHNICAL SPECIFICATIONS
...................................
35
Thank you for purchasinga VTechcordless
telephone. This manual isdesignedto famil-
iarize you with your 917ADX. To get the
maximum use from your new phone, we sug-
gest that you read this Instruction Manual
before operating it.
Your VTech 917ADXis a single line, 900
MHz, analog cordless phone with a Speaker-
phone and second keypad on the Base Unit.
Eachtime the Handset is placed inthe Base
Unit,one of more than 65,000 Digital Security
Codes is randomlyselected. The Handset
and Base Unit recognizeeach other based
upon this security code. This minimizes the
chance of another cordless phone accessing
your telephone line. The Base Unit retains
the current security code and channel in
memory, even if it is unplugged.
Otherspecialfeatures are:
10
Number Speed Dial Memory
10
Channelsof operation
Automatic Channel Select
Manual Channel Change on Handset
Intercombetweenthe Base Unit and
Handset
2.5mm Jack on Handsetfor
optional
Headsetuse
Belt Clip for Handset
REDIALfeature
Automatic release of line from HOLD when
extension is picked up
ProgrammableRingerTypes
Low Battery Detect and Warning indication
Hearing-AidCompatible Handset
EasyAnswer
-
Press any key on the
Handsetto answer (otherthan OFF)
Removable Battery Pack
Tone and Pulsedialing
TemporaryTone feature
Handset
&
SpeakerphoneHOLD and
MUTE
Volume Controlfor Handsetand Speaker-
phone
FLASHfeature
Base Unit Ringercontrol (HIGH, LOW,
OFF)
Three-way conferencing between Caller,
Handsetand Speakerphone
Privacyfeature
Longbattery life
(7
hourstalk time16 days
standby)

Parts
Check
List:
1
Handset
1
Base unit and
AC
adaptor
Telephone linecord
1
Battery pack
H
Wall mountingbracket
1
Belt
clip
HANDSET
BASE
UNIT
BAlTERY
PACK
AC
ADAPTOR
WALL
MOUNTING
BRACKET
BELT
CLIP
TELEPHONE
LINE
CORD
When usingyour telephone,pleasefollow
these basic safety precautionsto reducethe
risk offire, electric shock or injuryto persons:
Readand understandall instructions.
I Followall warnings and instructions
markedon the product.
Unplugthis productfrom the wall outlet
beforecleaning. Donot use liquid clean-
ers or aerosolcleaners. Use a damp cloth
for cleaning.
Do not use this product nearwater (for ex-
ample, near a bathtub, kitchensink, or
swimming pool).
Do not placethis producton an unstable
cart, stand, or table. The product may fall,
causingserious damage to the product.
Slots and openingsinthe cabinet and the
back or bottomare providedfor ventila-
tion. To protectit from overheating,these
openings must not be blockedby placing
the producton a bed, sofa, rug, or other
similarsurface. This productshould never
be placednear or overa radiatoror heat
register. This productshould notbe
placedin a built-ininstallationwhere
properventilationis not provided.
Thisproductshouldbeoperatedonly from
the type of powersource indicatedon the
markinglabel. If you are notsure of the
type of power supply to your home, con-
sult your dealer or localpower company.
Do notallow anythingto rest on the power
cord. Do not locatethis productwhere the
cordwill be abusedby personswalking on
it.
Never pushobjectsof any kind intothis
product through cabinetslots as they may
touch dangerous voltagk pointsor short
out partsthat could res It in
a
riskof fire
or electric shock. Neve spill liquid of any
1
i
kindon the product.
To reduce the riskof electric shock, do not
disassemble thisproduct. If sewice or
repairwork is required,contact VTech
Customer Sewiceat
1-800-595-9511
in
the U.S. and at
1-800-267-7377
in
Canada
.
Openingor removingcabinet
parts otherthan specifiedaccess doors
mayexposeyouto dangerous voltages or
other risks. Incorrectreassemblingcan
causeelectricshock when the appliance
issubsequentlyused.
Do not overloadwall outlets and exten-
sioncords as this can result inthe risk of
fireor electric shock.
Unplugthis productfrom the wall outlet
:
0
When the power supplycord or plug
isdamaged or frayed.
0
If liquidhasbeenspilled intothe
product.
0
If the producthas beenexposedto
rainor water.
0
If the productdoes not operate
normallyby followingthe operating
instructions. Adjust only those
controlsthat are coveredby the
operatinginstructions,because
improper adjustmentof other
controlsmay result indamage and
willoftenrequireextensivework to
restorethe productto normal
operation.
0
If the product hasbeendropped
and the cabinet hasbeendamaged.
0
If
the productexhibits a distinct
changeinperformance.
1
Avoid usinga telephone (otherthan a
cordlesstype) during an electricalstorm.
There may bea remote risk of electric

shockfrom lightning.
1
Donot use the telephone to report a gas
leak inthe vicinity of the leak.
-
,.
,
I
-
_
SAVE
THESE INSTRUCTIONS
THE HANDSET,
Charging the handset batteries
:
The handsetof your 917ADX cordless
telephone is powered by a rechargeable
batterypack.lt charges automaticallywhenever
thehandset is inthe base. You should charge
the battery packfor
16
hours when you first
recieveyour phone.You'll know the battery
pack needs charging when:
0
The phone emits a warningtone when you
pressthe
PHONE
key.
0
The
LOW
BATTIMUTE
LED
is slowly
flashing.
0
The handset seems completely dead, no
lights are evident, and pressing keys does
not generate a beep.
1
To charge the battery pack, place the
handset in the base unit.The charge CHR in-
dicator will light to show the handset isseated
properly and the battery pack is charging. It is
recommendedthat the battery pack be
chargedfor at least
16
hours initiallyand
8
hours for maintenancecharging. You can use
your telephone before that with diminished
capaci-ty, but it is best to chargethe battery
pack fully. Itwill take several rechargecycles
to maximizethe charge capacity of your
battery pack.The maximumbattery life
between charges is 7 hours of continuous
talk time or
6
days of standby.
It's imposibleto overcharge the batterv pack
1
The battery pack can be recharged many
times, but if you get a low-batterysignal even
after
8
hours of maintenancecharging inthe
base cradle, the battery pack should be
replaced.
To purchase replacementbatlery packs;>call
VTECH Communicationsat:
,
;,-
,,
v,,-
,
,
1-800-595-9511.
,.I
I
.<
:
In'
Canada, call VTECH Electronicsat:
1-800-267-7377.

Remove the batterycover by pressing compartment.
The new batterypack must be charged
beforeusingyour telephone. Place the
Handset in the cradle of the Base Unitto
allow itto chargefor
16
hours.
A Word About Rechargeable Batteries
Your Nicadbattery pack recharges whenever
the Handset is returnedto the Base Unit.
To maximizethe life of your batterypack, do
not return your 917ADXHandset to the Base
Unitcradlefor recharginguntil the LOW BAT
LED begins to flash.
Setting UpYour
VTech
917~~~'
on the ridgedlinesand slidingdown-
ward. Choose an area near an electricaloutlet
and a telephone walljack.
PULSE
hours beforeusingyour phonefor the
first time.
AC
TELEPHONE
ELECTRICAL
Q
OUTLET WALL
JACK
Connectthetelephone line cord. Insert
one endof the telephoneline cord into
thejack at the rearof the Base Unit.
Plugthe other end into a telephonewall
jack. Makesure the plugssnap securely
intoplace.
CHECK FOR A DIALTONE. After the
battery pack is charged, raisethe Base
PlugtheAC power adaptor intoan
electricaloutlet and the DC connectorto
the back of the ~aseUnit.
Discard
the
Old
pack. put CAUTION: To reducethe Risk of Fireor Injury
the
Old
batterypack
in
a
trash
to Persons,Readand Followthese Instructions:
or a fire
-
itcould burst.
Useonly VTECH battery.
Do not open or mutilatethe battery. Re-
leasedelectrolyte is corrosiveand may
cause damage to the eyes or skin. It
may betoxic if swallowed.
Exercisecare in handlingthe battery
pack inorder not to short the battery with
conductingmaterialssuch as rings,
bracelets,and keys. The battery or con-
ductor mayoverheat and cause burns.
Do not disposeof the battery in a fire.
The cell may explode.
CAUTION: Use only
the'^^
adaptor shipped
with your 917ADX. This
is
a Class
2
AC
adap-
tor, specifically designed fd;
"irk
with the
917ADX.
";-
>\
i
;:
,>
<
.;a
0-
-
IMPORTANT:;DO
notdispose of this battery in
rn
>
2
*e:,.
>-,
.,,
hobseholdgarbage: For informationon recy-
rn
QC>
,>
,
-
clingor properdisposal, consultyour localsolid
a*:.<
w<*
-
-
waste,@llection ordisposalorganization.
4
-.
.'.
,
,
.
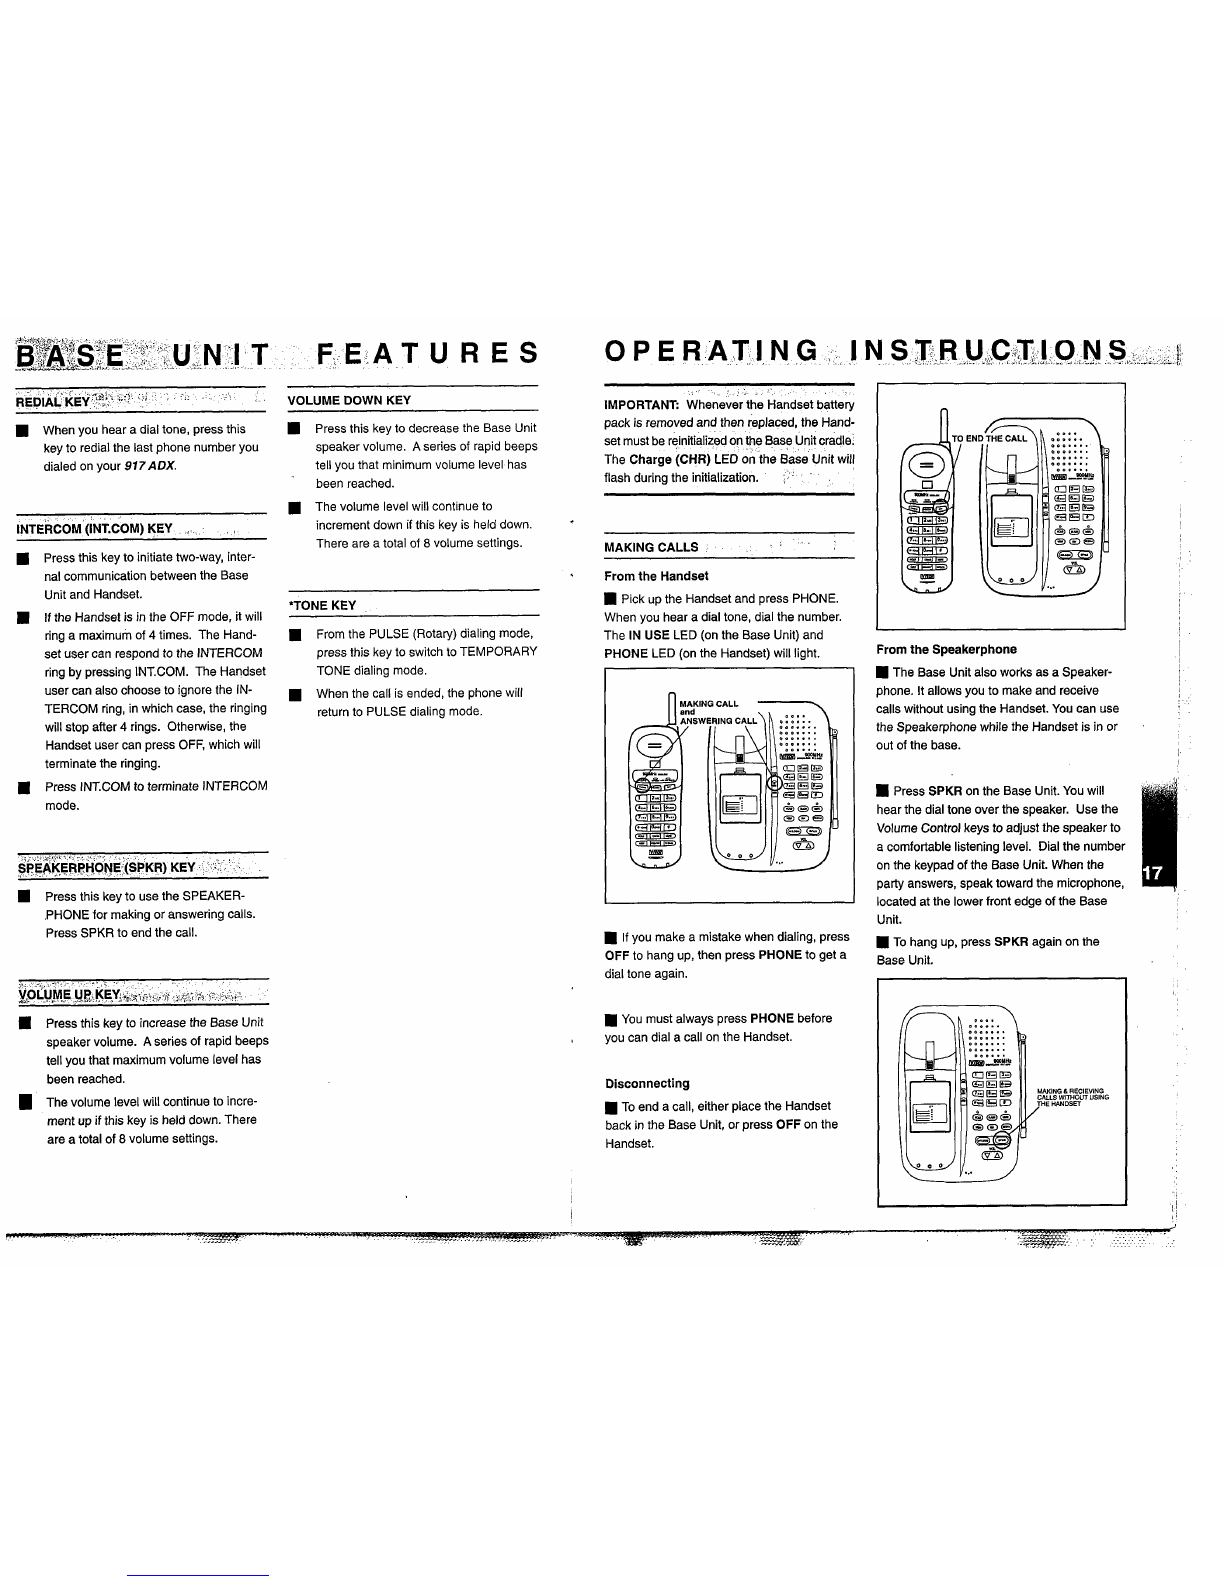
UnitAntenna to an uprightposition.
Then, pick up the Handsetand pressthe
PHONEkey. The INUSE LED (onthe
Base Unit) andthe PHONE LED (onthe
Handset) should light up, and you should
heara dialtone. If not, see INCASE OF
DIFFICULTY.
I
1
Placethe new batterypack inthe battery
compartment. Makesure the metalcon-
rn
'7
NOTE: Connectpower tothe ~asiUnitbefore
placingthe Handset inthe cradle.
tacts on the undersideof the batteryare
alignedwith chargingcontacts in battery Set the TONUPULSEswitch onthe
Base Unit. If you havetouch tone
service on your phone line, setthe
switchto TONE. If you have rotary
service, set the switch to PULSE.
h
PLACE
THE
NEW
BATTERY
Neverinstalltelephonejacks Inwet loca-
tions unlessthe jack lsspecificallyde-
signedfor wet locations.
'
'
'
-
5.
i
,:':C:
Nevertouch,uninsulated telephgoewires
or terminals unlessthetelephoneline
hasbeendi6cdhected atfhe%etwork
intt;rface:?;
t*:S'$C
9LIS
i3efg2.
*$,
<.,,;)-
1:
:.
,:
.
#
i5
i,,\i;:;f
-:,,
,
Usecautionwhen installing?l;rnqdifying
.to,.
rt:
'
tele hone
lines.>.
'
-,-'?,";".,'.?*
y'.;
'
To order replacement batteries,contact
VTech Customer Service at
1-800-595-9511
inthe U.S. and contact VTECH Electronics
at
1-800-267-7377
inCanada.
PACK
INTO
THE
BATTERY
COMPARTMENT
Set the RINGER switchto HIGH, LOW
or OFF on the side of the Base Unit.
PLEASENOTETHECORRECT
POSITIONOFTHEBATTERY
PACKWHEN CHANGING
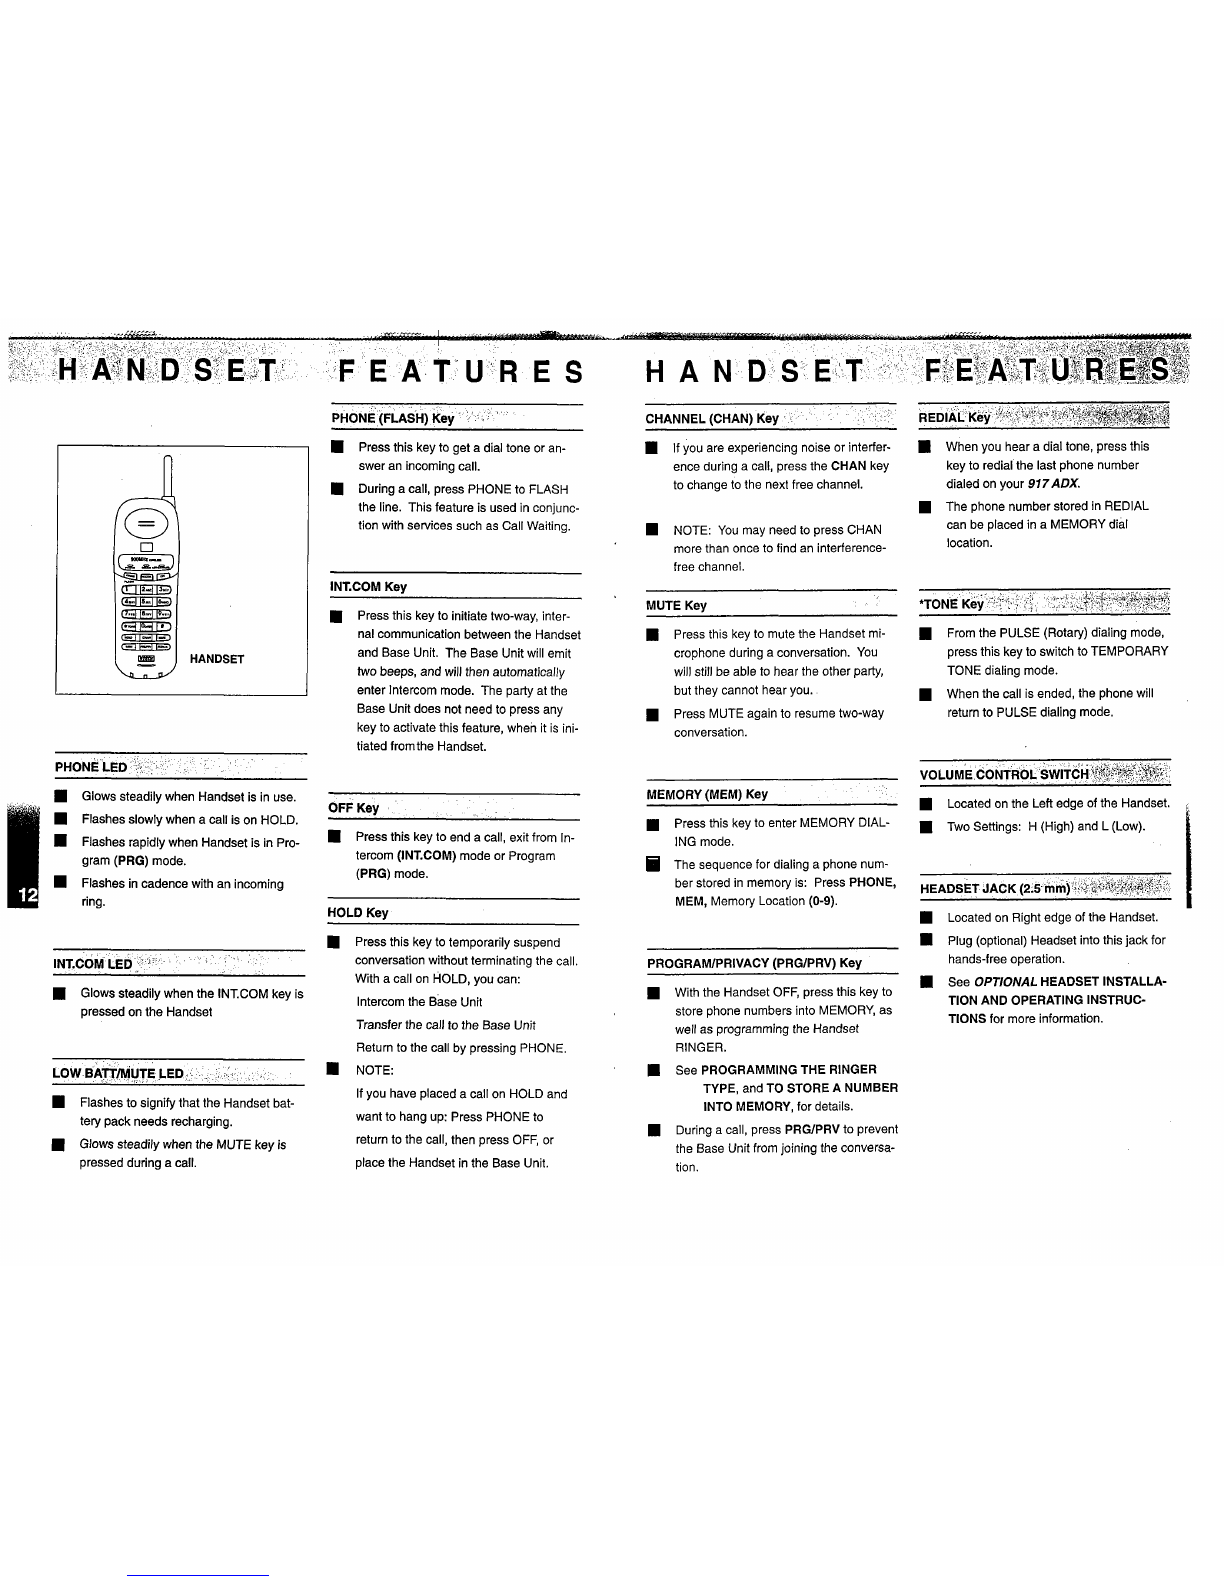
CHARGE THE HANDSET BATTERY
PACK BEFOREUSE. The batterypack
recharges automaticallywhenever the
Handset is inthe Base Unitcradle. The
batterypack shouldbe chargedfor
16

WALL
M
OUNTING
TheWall Mountadaptor isdesigned
tofit onstandardWall Mountplates.
Choose a spot near an
electrical outlet and a
telephone jack.Your phone
requiresamodulartelephonejack
and a standard electrical
outlet(l20v
AC).
The power cord
is six feet long; make sure there
is an electricaloutletwithin reach
of the base.The outlet should not
be controlledby a wall switch. If
the switch is ever turned off, the
phonewill not operate.
I
I
WHEN
I
WALL
MOUNTING
ANDTELEPHONE
JACK
Positionthewallmountadaptor
onthe base. Lineup the tabs on
the wall mount adaptor with the
holes on the bottomof the base.
Snap the wall mount adaptor
firmly inplace.
Mount the base on the wall.
Positionthe baseso the mounting
studs will fit into the holes on the
bottom of the base.Positionthe
power cord to extend down the
wall the phoneis to be mounted
on. Slide the base down on the
mountingstuds until it locks into
place.
INSERTWALL MOUNT
INTOTHE BASE UNIT
Connectthetelephone cord.
The telephoneline cord has a
snap-inplugat each end. Insert
one of the plugs intothe jack on
the bottomof the base. Insert
the other end of the plug intothe
wall jack.
Plug the AC adaptor into an
electrical outlet, and the DC
connector onthe back of the
Base Unit.
JACK
IMPORTANT:
When wall mouting your
917ADX,
you must reversethe handset
hook, locatedinthe charging
cradle.
Otherwiseyour handset may fall
I
from the Base Unitwhen cradled.

PHONELED
-
Glows steadily when Handset is in use.
Flashesslowly when a call is on HOLD.
1
Flashes rapidly when Handset is in Pro-
gram (PRG) mode.
Flashes in cadence with an incoming
ring.
INT.COM LED
.
'
Glows steadily when the INT.COM key is
pressed onthe Handset
LOWBATT/MUTE LED.
.
'
Flashesto signify that the Handsetbat-
tery pack needs recharging.
Glows steadily when the MUTE keyis
pressedduring a call.
F
E
A
T'U'R
E
S
PHONE(FLASH) Key CHANNEL (CHAN) Key
Pressthis key to get a dial tone or an-
swer an incoming call.
During a call, press PHONEto FLASH
the line. This feature is used in conjunc-
tion with services such as Call Waiting.
-
-
-
-
-
-
-
-
INT.COM Key
Pressthis key to initiate two-way, inter-
nal communicationbetween the Handset
and Base Unit. The Base Unit will emit
two beeps, and will then automatically
enter lntercom mode. The party at the
Base Unit does not needto press any
key to activate this feature, when it is ini-
tiated fromthe Handset.
OFF
Key
-~-
---
Pressthis key to end a call, exit from In-
tercom (INT.COM) mode or Program
(PRG)mode.
HOLD Key
Pressthis key to temporarily suspend
conversationwithout terminating the call.
With a call on
HOLD,
you can:
lntercom the ~aseUnit
Transferthe call to the Base Unit
Returnto the call by pressing PHONE.
NOTE:
If you have placed a call on HOLD and
want to hang up: Press PHONEto
returnto the call, then press OFF, or
place the Handset in the Base Unit.
If you are experiencingnoise or interfer-
ence during a call, pressthe CHAN key
to changeto the next free channel.
NOTE: You may needto press CHAN
morethan once to find an interference-
free channel.
--
MUTE Key
Pressthis key to mute the Handset mi-
crophone during a conversation. You
will still be able to hear the other party,
but they cannot hear you.
Press MUTE againto resumetwo-way
conversation.
MEMORY(MEM) Key
Press this key to enter MEMORY DIAL-
ING mode.
The sequencefor dialing a phone num-
ber stored in memory is: Press PHONE,
MEM, MemoryLocation
(0-9).
PROGRAMIPRIVACY(PRGIPRV) Key
With the Handset OFF, pressthis key to
store phone numbers into MEMORY, as
well as programmingthe Handset
RINGER.
See PROGRAMMINGTHE RINGER
TYPE, and TO STOREA NUMBER
INTOMEMORY,for details.
Duringa call, press PRGIPRV to prevent
the Base Unit from joining the conversa-
tion.
When you hear a dial tone, press this
keyto redial the last phone number
dialed on your 917ADX.
The phone number stored in REDIAL
can be placed ina MEMORY dial
location.
Fromthe PULSE (Rotary)dialing mode,
press this key to switch to TEMPORARY
TONE dialing mode.
When the call is ended, the phonewill
returnto PULSE dialing mode.
VOLUME CONTROL
+s~~~~~'~~@.;
Located on the Left edge of the Handset.
Two Settings: H (High)and L (Low).
HEADSETJACK
(2.5
mm)
..y
rt~p,
'
'
Located on Right edge of the Handset.
Plug (optional) Headset into this jack for
hands-freeoperation.
See OPTIONALHEADSET INSTALLA-
TIONAND OPERATINGINSTRUC-
TIONS for more information.

B:A
-
.
L-
S
E
UNIT FEATURES
BASE
UNIT
Transferthe call to the Handset
INTERCOM(INT.COM) LED Returnto the call by pressing SPKR.
Flashesrapidlywhen the INT.COM key
is pressed.
H
NOTE: If you have placed a call on
HOLDand want to hang up:
NOTE:The Handset must be away from
the Base Unit to use the INTERCOM
feature.
Blinkstwice, accompanied by two
beeps, when the Handset initiates the
INTERCOMcall to the Base Unit.
Glows steadily while the Handset and
Base Unit are in INTERCOMmode.
Press SPKR to returnto the call, then
I..
press SPKR again.
i
I.
8
I
FLASHKEY
This key is used in conjunction with
services such as CALL WAITING.
SPEAKER (SPKR) LED
Glows when Base Unit is in SPEAKER-
PHONEmode.
MUTE KEY
Pressthis key to mutethe Handset
microphoneduring a conversation. You
will still be able to hear the other party,
but they cannot hear you.
Press MUTE again to resume two-way
conversation.
BASE
UNIT
RINGER SWITCH
After initialization,the CHR LED will glow
steadily to indicatethat the Handset
battery is being charged.
If the Handset is placed in the Base Unit
without a battery,the CHR LED will flash
rapidly.
POWER IPWR) LED Located on the right edge of the Base
Glows steadily when the AC adaptor is
supplyingpower to the Base Unit. Unit (antennaside)
3
selections: HIGH, LOW, OFF MEMORY (MEM) KEY
H
Pressthis key to enter MEMORY
DIALINGmode.
The sequencefor dialing a phone
numberstored in memory is: Press
SPKR,MEM, Memory Location
(0-9).
TONUPULSE SWITCH
Located next to RINGER switch
Glows steadily when the Handset ison a HOLD LED
call. Select mode compatible with your local
telephoneservice (for most areas,
TONE is the preferred dialing mode).
Duringa phone call, whether using Base
or Handset,thisLED will flash if the call
is placed on HOLD.
Flashes in cadencewith an incoming
ring.
PRIVACY(PRV) KEY
Duringa call, press PRV to preventthe
Handsetfrom joining the conversation.
MUTE LED
Duringa SPEAKERPHONEcall, this
LED will glow if the MUTE key is
pressed.
CHAR.GE (CHR) LED
.
HOLD KEY
H
Pressthis key to temporarily suspend
conversationwithout terminating the call.
With a call on HOLD,you can:
Blinkstwice after placingthe Handset in
the Base Unit to indicatethat initializa-
tion (assigninga new security code) has
occurred.
H
Intercomthe Handset

RkDIAL KEY
':ti,>
-..\
r
VOLUME DOWN KEY
When you hear a dialtone, pressthis Pressthis key to decrease the Base Unit
key to redialthe last phonenumber you speaker volume. A series of rapidbeeps
dialedon your
917ADX.
tellyou that minimumvolume level has
beenreached.
The volume levelwill continueto
INTERCOM(INT.COM) KEY
,
increment down if this key is helddown.
'
There are a total of
8
volume settings.
Press this key to initiatetwo-way, inter-
nalcommunicationbetweenthe Base
Unitand Handset. 'TONE KEY
If the Handset isinthe OFF mode, itwill
ring a maximumof
4
times. The Hand-
rn
Fromthe PULSE (Rotary)dialingmode,
set usercan respondto the INTERCOM pressthis key to switchto TEMPORARY
ringby pressingINT.COM. The Handset TONE dialing mode.
usercan also chooseto ignorethe IN- When the call is ended, the phone will
TERCOM ring, inwhich case, the ringing returnto PULSE dialing mode.
willstop after
4
rings. Otherwise,the
Handsetuser can press OFF, which will
terminatethe ringing.
Press INT.COM to terminateINTERCOM
mode.
Press this keyto use the SPEAKER-
.PHONEfor makingor answeringcalls.
Press SPKR to endthe call.
Pressthis key to increasethe Base Unit
speaker volume.
A
seriesof rapidbeeps
tellyou that maximumvolume levelhas
beenreached.
The volume levelwillcontinueto incre-
ment up if thiskey is helddown. There
are a total of
8
volume settings.
li
OPERATING
INST43,U.,C;J!QNS,
di,-6
IMPORTANT: Whenever the Handsetbattery
pack isremovedandthen replaced, the Hand-
set mustbe reinitializedontheBaseUnitcradle.
The Charge (CHR) LEDon the BaseUnitwill
flash duringthe initialization.
,
MAKINGCALLS
,
-
Fromthe Handset
Pick up the Handsetand press PHONE.
When you hear a dial tone, dial the number.
The IN USE LED (onthe Base Unit) and
PHONELED (on the Handset) will light.
Ifyou make a mistakewhen dialing, press
OFF to hangup, then press PHONEto get a
dialtone again.
You must always press PHONEbefore
you can dial a call on the Handset.
Disconnecting
To end a call, either place the Handset
back in the BaseUnit, or press OFFon the
Handset.
FromtheSpeakerphone
The Base Unitalso works as a Speaker-
phone. Itallows you to make and receive
callswithout usingthe Handset. You can use
the Speakerphonewhile the Handsetisin or
out of the base.
Press SPKR onthe Base Unit. You will
hearthe dial tone over the speaker. Usethe
Volume Control
keys
to adjust the speaker to
a comfortablelisteninglevel. Dialthe number
on the keypadof the Base Unit. When the
partyanswers, speak towardthe microphone,
locatedat the lower front edge of the Base
Unit.
To hangup, press SPKR again on the
BaseUnit.
MAKING
6
REClEVlNG
CALLS
WllHOUTUSING
7,
-Ds=

'0P)ERATING
:-,
-.:--,A
INSTRUCTIONS
Fromthe Handset
The Handset will ring when you have an
incomingcall. You can answer calls on the
Handsetwhether it is inthe base or away
from it. If your phone rings when the Handset
isinthe base,just pick up the Handset.The
call will beconnected automatically,andyou'll
seethat the PHONE LEDon the Handsetand
the INUSELED on the Base Unit are lit. If
the Handset ringswhen it is away from the
base, press any key, except OFF to answer
the call.
FromtheSpeakerphone
The Speakerphonewill also ringto signify
an incomingcall. To answer from the Speak-
erphone, press SPKR. You can nowtalk to
your party hands-free. Usethe Volume Con-
trol keys to adjust the speaker to a comfort-
able listening level.
NOTE: If you are usingyour Speaker-
phonein a noisyenvironment, the conversa-
tion coming from your party may suffer from
dropout. Inthis case, press MUTE on the
Speakerphonewhile your partytalks. Press
MUTE again to deactivatebefore you begin
talking.
While using the Speakerphoneor the
Handset,you can put a call on hold by press-
ing HOLD.The HOLD LED on the Base Unit
andthe PHONE LED onthe Handsetwill
blinkto indlcate a call ison hold.
To returnto the call, press PHONE(onthe
Handset)or SPKR(on the Base Unit).
If your 977ADXhas a call on HOLD, and
a user picks upan extension phone on the
same line,the 917ADXwill take itself off
HOLD and turn OFF.
THE MUTE FEATURE
When you press MUTE (onthe Handsetor
Base Unit),you can hear the caller's voice,
but they can't hear you. While a call is
muted,the LOW BATTIMUTE LED (onthe
Handset)or the MUTE LED (onthe Base
Unit) glows steadily. To go back to the two-
way conversation,press MUTE again.
This feature is useful when the Speaker-
phone is used in a noisy room. Loud back-
ground noise can preventyour caller's voice
from coming over the speaker. Press MUTE
while your caller is speaking. Press MUTE
again when you are ready to speak.
SWITCHINGTO THE HANDSET
Duringa Speakerphonecall, if the Hand-
set is inthe Base Unit,you can automatically
switchfrom the Speakerphoneto the Handset
by picking up the Handset.
OPERATING INSTRUCTIONS
SWITCHINGTO THE SPEAKERPHONE
Press HOLDon the Handset
Press SPKR on the Base Unit to take the
I
call off HOLDand continue a Speakerphone
conversation.
You cannot switch back to the Speaker-
phonejust by returningthe Handsetto the
Base Unit cradle
-
that will disconnectthe
call.
q
NOTE: Placingthe call on HOLD prior to
switchingto or from the Speakerphone
minimizesthe risk of annoying feedback.
JOINING A HANDSET CONVERSATION
If someone is speaking on the Handset,
you can join the conversation on the Speak-
erphone. Just press SPKR on the Base Unit.
The Handsetwill emit a short tone to alert
that the Speakerphonehas been activated.
Either party can then leave the conversation
by pressing OFF (onthe Handset)or SPKR
(onthe Base Unit)
Likewise,if you are usingthe Speaker-
phone, someoneat the Handsetcanjoin the
conversationby pressing PHONE. The Base
Unit will emit a short tone to alert the userthat
the Handsethas been activated.
m~hecall will remainconnected as long as
either the Handset or the Speakerphone
remains on the line.(To disconnectthe call,
boththe Handset and the Base Unit must
hang up
.)
i
I
THE PRIVACYFEATURE
While uslngthe Handset,you can prevent
someonefrom joining the conversation at the
Speakerphoneby pressing PRGIPRV. The
I
Handset must be ONto ut~lizethis feature.
PressingPRGIPRVa second time will
i
I
terminate PRIVACYmode and anyone at
i
the speakerphonecanjoin in.
I
When someone at the speakerphonehas
I
alreadyjoined in, pressing PRGIPRV on
1
handset will turn off the speakerphone.
Likewise,you can preventthe Handset
fromjoining theconversation while using
I
the Speakerphone. While the Speaker-
phone
IS
ON, press PRV.
PressingPRV a second time will terminate
PRIVACYmode, and anyone at the Hand-
I
i
I

set canjoin in.
n
When someone at the handset has al-
readyjoined the conversation,pressing
PRV on the Speakerphonewill turn off the
handset.
You can useyour 917ADXcordless tele-
phoneas a two-way lntercom betweenthe
Base Unit and the Handset.This doesn't tie
upyour telephone line. You canstill receive
calls when using the Intercom.
w~helntercom can beactivated by either the
Handsetor the Base Unit.
lntercomfrom Handsetto BaseUnit
PressINT.COM. onthe Handset
The Base Unit will emit two beeps, and will
then automaticallyenter lntercom mode.
The party at the Base Unit does not need
to press a keyto activate this feature when it
is initiatedfrom the Handset.
Press OFF to terminate INTERCOM
mode.
lntercomfrom Base Unit to Handset
Press INT.COM on the Base Unit.
If the Handset is inthe OFF mode, itwill
ring a maximumof
4
times. The Handset
usercan respondto the INTERCOMring by
pressing INT.COM. The Handset user can
also chooseto ignore the INTERCOM ring, in
which case, the ringingwill stop after
4
rings.
Otherwise, the Handset user can press OFF,
which will terminate the ringing.
Press INT.COM to terminate INTERCOM
mode.
NOTE: If the Handset is ON when INT.COM
ispressed on the Base Unit,the Handsetwill
emit only one ringer tone, and then return to
the originalcall.
Handset Locator
Occasionallyyou may misplaceyour 917
ADXHandset. Use the lntercom feature on
the Base Unit to help locate the missing
Handset. When the INT.COM key is pressed,
the Handset will ring four times.
OPERATING INSTRUCT.IONS
IFYOUR PHONE RINGS DURINGAN calling cards, or other special services.
INTERCOMCONVERSATION First, dial the call normally. Then activate
the TemporaryTone feature by pressing
If you receivea call while using the Inter-
key.
You
can
then
pressthe
numbers
To endthe call, press OFF (on the Hand-
set), or placethe Handset back inthe Base
"ING
THE
INTERCOM
PHONE^
Unitcradle. From Base Unit ~ressSPKR to
CALL
,>
enda call. The phone will automaticallygo
Press HOLDto put the call on hold,then
use the lntercom normally.
To end the lntercom conversation, press
OFF (on the Handset) or INT.COM (onthe
Base Unit).
To returnto the call, press PHONE (on the
Handset)or SPKR (on the Base Unit).
back to rotary (dial-pulse)service.
I
8,
I
The TemporaryTone feature isfor use with
PULSE dialing service only.
The 917ADXcordless phone hasfour dif-
ferent ringingtones available for the Handset.
-
TEMPORARYTONE FEATURE
.
,
.
.
To programthe Handset ringertone:
If you have rotary (dial-pulse)telephone
service, (TONEIPULSEswitch is set to Handsetmust be OFF
PULSE),TemporaryTone allowsyou to enter Press PRGIPRV key on Handset
special codes and tones to access answering
1
Press
#
or
*
key
on
the ~~~d~~t
machines, electronic bankingservices,

OP-ER'ATING INSTRUCTIONS
Press
1,2
3,
or
4
on the Handsetto select
MEMORY
a
ringertype. The Handset will emit the cor- The 917ADXcordless phone can store up
respondingringertone. to10 frequently dialed numbers in memory.
PressOFF on the Handsetto exit pro- Memory Dial numbers must be stored us-
yamming. ing the Handset, but can be recalled from ei-
ther the Base Unit or the Handset.
WRNlNG OFF THE HANDSET RINGER TO STOREA NUMBER INTO MEMORY
The Handset must
)e OFF
I
Press PRGIPRVon
he Handset
I
Press
#
or
'
key on
he Handset
I
Press
5
to turn off
he ringer
I
Press OFF key to
!xit
The Handset must be OFF
Press PRGIPRV on the Handset
TO
PROGRAM
THE
RING
TYPE
MEMORY
DIALING
I
Thiscontrol switch is located onthe right
and edge of Base Unit.
1
Select HIGH, LOW or OFF setting.
:HECKING.THE HANDSET RINGER
'
(
To check the ringertype which iscurrently
rogrammed,do the following:
1
Handsetmust be OFF
I
PressPRWPRV on the Handset
1
Press
#
key on the Handset
1
Press0 onthe Handset. The phone will
ring once to show ringerselected.
1
PressOFF key to exit
.Press the Memory
Location key where the
phone numberwill be
stored (0-9)
.Dial the number you
want to store. The num-
ber can be up to 16
digits long
.Press MEM on the
Handsetto complete
programming
.If programminghas
been successful,a
happytone will be
generated.
If programmingwas unsuccessful,a sad
tone is generated.
If the phone is left unattended in program
mode for longerthan
30
seconds, it will gen-
erate a sad tone and automaticallyexit pro-
gram mode.
Writedown the phone numberyou as-
signed to each Memory Location key on the
directory card inthe Base Unitcradle.
-
-
TO DIALA NUMBER FROM MEMORY
You can Memory Dial from either the
Handset or the Base Unit
.
OPERATING
I
Press PHONE (onthe Handset) or SPKR
(on the Base Unit) to get a dial tone
Press MEM andthe Memory Location key
(0-9)
For example, to dial the number you as-
signed to key
'8',
you would press PHONE,
MEM,
8
(onthe Handset),or SPKR, MEM,
8
(on the Base Unit).
TO CHANGEOR REPLACEA STORED
NUMBER
You can change or replacea stored phone
number by storing a new number inits place.
See TO STOREA NUMBER INTO MEMORY.
TO ERASESTORED NUMBER
FROM MEMORY
The Handset must be OFF.
Press PRGIPRV on the Handset.
Pressthe Memory Location of the phone
number to be erased.
Press MEM on the handset to complete
programming.
STORING PAUSES IN MEMORY
I!
II
NSTRUCTIONS
i,
To insert
a
pause while programming a
Memory Dial number, do the following on the
Handset:
Press PRGIPRVon the Handset
Pressthe Memory Location key where the
phone number will bestored (0-9)
Dial the number you want to store, press-
,
ing HOLDat the appropriate point (to insert a
I
2 second pause). The number can be up to
16digits long. Each press of HOLD is treated
as stored digit.
For longer pauses, press HOLDtwo or
moretimes. Eachpress makesthe pause
2
seconds longer and istreated as a stored
digit.
Press MEM on the Handsetto complete
programming.
For example, if your phone is connected to
a PBX, you can store the PBX access num-
ber and a pause before the phone number.
To store 9-PAUSE-555-1234,in Memory Lo-
cation
8,
you would:
Press PRWPRV
Press
8

~F)E"R.ATING
INSTRUCTIONS
AZ.i&L
-
L.
1
Press
9
Press HOLD
Dial
555-1234
Press MEM
The 917ADXcordless phone automati-
cally storesthe last numberyou dialed in a
special redial memory.
To redialthe last number, press PHONE
(onthe Handset)or SPKR (onthe BaseUnit),
then REDIAL.
L?!z!<v:;aL
%TOURINGA REDIALNUMBER INMEMORY
D,IALw*:.
p
sf
..
I
I
To storethe last number you dialed as a
regular Memory Dialnumber,do the follow-
ing on the Handset:
1
Press PRGIPRV
Pressthe Memory Locationkeywhere the
phone numberwill be stored
(0-9)
Press REDIAL
I
Press MEM
I
If you are experiencingnoiseor interfer-
ence when usingyour Handset, pressthe
CHAN key to switchto a clear channel. This
functionisavailablewhen you are on a call or
intercom.
NOTE:
You may needto press CHAN
more than onceto find an interference-free
channel.
I
OPTIONAL
HEADSETINSTALLATIONAND-OPERATINGINSTRUCTIONS
(1
Your 917ADXcordless telephoneis equip-
ped with a 2.5mm Headset Jack for use with
an
optional
accessory Headsetfor hands-
free operation
1
If youchooseto use the Headset option,
you must do the following:
INSTALLATION
Obtainan optional accessory Headset,
which is compatible
with the 917ADX.
Inthe U.S. pleasecontact VTech Communi-
cationsCustomer Service, toll-free at
1-800-
595-9511,
inCanada callVTech Electronics
at
1-800-267-7377
for dealer informationin
your localarea. You can alsopurchasea
,
compatibleHeadset directlyfrom VTech Com-
municationsCustomer Sewice.
Once you havea compatible2.5mm Head-
set, locatethe HeadsetJack on the Handset
of your 917ADX. Connectthe plugon the
Headsetto the jack on the cordless Handset.
The plugshouldfit securely. Do not force the
connection. See illustration.
CLIP LOCATION
The 917ADXis alsoequippedwitha
detachablebeltclip. Align the pins on the
insideedge of the belt clipwith the notches
on the side of the 917ADXhandset. The belt
i
clip should snap securelyintoplace. Do not
force the connection. See illustration.
1
1
1
NOTE: Whenever a compatibleHeadset
is connectedto the cordless Handset,the mi-
crophoneon the Handset will be MUTED.
1.
This is done to limitthe effect of background
!
i
noise.
The following operationalcharacteristics
I
I
apply to VTech Headsets. The same may
also applyto other (non-VTech)compatible
headsets, but VTech assumes no responsibil-
ityfor their performance.
can wear your Headseton eitherthe left or
right ear, leavingone ear freefor roomcon-
versation
The headbandcan be adjustedto fit the
contourof your head. Using bothhands,

IO~TIONAL
HEADSET INSTALLATIONAND OPERATING INSTRUCTIONS
slidethe headband up or down sothat it rests
comfortablyon your head with the speaker
cushion centered againstyour ear.
For maximumsound quality, the flexible
microphoneshould be positionedat the cor-
nerof your mouth, about one inch from your
mouth.
MAINTE
TAKING CARE OFYOUR TELEPHONE.
Your
VTech
917ADXcordless telephone
contains sophisticated electronic parts so it
must be treated with care.
Avoid roughtreatment
Placethe Handsetdown gently. Savethe
original packing materialsto protect your
telephone if you ever need to ship it.
Avoid water
Your telephone can be damaged if it gets wet.
Do not use the Handset outdoors inthe rain,
or handle it with wet hands. Do not install
your Base Unit near a sink, bathtub or
shower.
Rememberthatelectricalappliancescancause
serious injulyif usedwhenyouarewet orstand-
ing inwater. If your Base Unit should fall into
water, DONOTRETRIEVEITUNTIL YOU
UNPLUG
THE
POWER CORDAND TELE-
PHONELINE
CORDS
FROM
THE
WALL.
Then pull the unit out bythe unpluggedcords.
Electrical storms
Electricalstorms can sometimes cause power
surges harmfulto electronic equipment.
For your own safety, use caution when using
electric appliancesduring storms.
NANCE
Cleaningyour telephone
Your telephone has a durable plastic casing
that should retain its luster for many years.
Clean it only with a soft cloth slightly damp-
ened with water or a mild soap. Do not use
excess water or cleaning solvents of any kind.

If you have difficulty operating your
phone,the suggestions below should solve
the problem. If you still have difficulty after
trying these suggestions, Inthe US call:
VTECH Communications
at
1-800-595-9511
,In Canada call :VTECH
Electronicsat
1-800-267-7377.
THE PHONE DOESN'T WORK AT ALL.
Make sure the power cord is plugged in.
Make sure the telephone line cord is
pluggedfirmly into the Base Unitand the
telephone wall jack.
Makesure the battery pack isproperly
charged. If the LOWBATT LED is on, the
battery pack needs charging. If the INUSE
LED (on the Base Unit) andthe PHONE
LED (on the Handset) do not light when you
press PHONE,you should charge the bat-
tery pack.
4
If you recently installed a new battery
pack, make sure it is installedcorrectly.
NO DIALTONE.
First check allthe suggestions above.
If you still don't hear a dial tone, discon-
nect the Base Unit from the telephonejack
andconnect a different phone. If there is no
dial tone on that phoneeither,the problem is
inyour wiring or local service. Call your lo-
cal telephone company.
YOU GET NOISE, STATIC, OR A WEAK
SIGNAL EVENWHEN YOU'RE
NEAR
THE
BASE UNIT.
Placethe Handset inthe base momen-
tarily to re-setthe security code. Then press
PHONEto get a line.
.Household appliances plugged into the
same circuit as the Base Unit can some-
times cause interference. Try movingthe
appliance or the Base Unit to another outlet.
YOU GET NOISE, STATIC, OR A WEAK SIG-
NALWHEN YOU'RE
AWAY
FROMTHE
BASE UNIT.
You may beout of range. Either move
closeto the base, or relocatethe Base Unit.
The layoutof your home may be limiting
the range. Try movingthe Base Unitto the
secondor third floor, or to some other loca-
tion.
THE HANDSET DOES NOT RINGWHEN
YOU RECEIVEA CALL.
.
Ensurethat the ringer is turned on.
Make sure the telephone line cord is
plugged firmly into the Base Unit and the tele-
phonejack. Make sure the power cord is
plugged in.
You may betoo far from the Base Unit.
4
You may havetoo manyextension phones
on your telephone line to allow all of them to
ring. Try unpluggingsome of the other phon-
es.
THE BASE DOESNOT RING
Make sure the BASE RINGER switch is not
set to off.
There may be too many extension phones
on your line. Try unplugging one of the other
phones.
YOUR CALLER FADESINAND OUT.
You may be nearlyout of range. Move
closer, or relocatethe base.
YOU HEAR OTHER CALLS WHILE USING
YOUR PHONE.
Replacethe Handsetinthe base cradle,
wait a few moments andtry again.Disconnect
your Base Unit from the telephone jack, and
plug in a regulartelephone. If you still hea'r
other calls, the problem is probably in your
wiring or local service. Call your local tele-
phonecompany.
YOU HEAR NOISEINTHE HANDSET,AND
NONE OF THE KEYS OR BUTTONS
WORK.
Makesure the power cord is plugged in.
Your Base Unit and Handset may not be
operating on the same channel or security
code. Place the Handsetin the cradle for a
few momentsto reloadthe securitycode and
resetthe channel.
COMMONCURE FOR ELECTRONIC
EQUIPMENT
Electronics,like people, can sometimes
get confused. If the unit does not seem to be
respondingnormally,then try putting the
Handsetinthe cradle to reinitializethe unit. If
itstill does not seem to respond, performthe
following steps (in the order listed):
1.
Disconnectthe power to the Base Unit.
2.
Removethe Handsetbattery Pack
3.
Wait a few minutes.
4.
Connect powerto the Base Unit.
5.
Installthe Handsetbattery pack.
6.
Putthe Handsetinthe Base Unitcradle
to reinitialize.

WHAT DOES OUR WARRANTY COVER?
Any defect inmaterial or workmanship.
FOR HOW LONGAFTER THE ORIGINAL PURCHASE?
To the original purchaser only
-
ONE YEAR.
WHAT WILL VTECH DO?
At our option, repairor replace your unit.
HOW DO I SEND MY UNIT, IN OR OUT OFWARRANTY?
1
Inthe US.call VTECH Communications customer service for ReturnAuthorization at:
1-800-595-9511.
!
in Canada call VTECH ELECTRONICSat
1-800-267-7377.
I
Properlypack your unit. Includeany cables
&
accessorieswhich were originally provided
with the product. We recommend using the original carton and packing materials.
Includein the package a copy of the sales receipt or other evidence of date of original
I
purchase (if the unit was purchased within the lasttwelve months).
Printyour nameand address, along with a descriptionof the defect, and include this in the
I
package.
1
Include paymentfor any service or repair not covered by warranty, as determined by VTECH
Communications.
Inthe US. Shipthe unit via UPS Insured, or equivalentto:
VTECH COMMUNICATIONS
8770 SW NIMBUSAVENUE
BEAVERTON,OREGON 97008
In Canada Ship the unit via UPS insured, or equivalent to:
VTECH ELECTRONICS
Suite 200 -7671Alderbridge Way
Richmond,B.C. V6X 129
!
I
Productspurchasedmore than 12 months from current date
Units purchasedin "AS IScondition,or units purchasedas "DistressedMerchandise".
,
HOW DOES STATE LAW OR PROVINCIAL LAW RELATETO THIS WARRANTY?
This warranty gives you specific rights. You may also have other rights whichvary from
stateto state or provinceto province
.
VTECH Communicationsassumes no responsibility for units sent withoutprior
Return Authorization.
WHAT DOES OUR WARRANTY NOT COVER?
Batteries
Damagefrom misuse, neglect, or acts of nature (lightning,floods, powersurges, etc.)
Productswhich may have been modified or incorporated into other products
Products purchasedand/or operated outside the USA, its territories, or Canada.
Productsserviced by the owner or a service facility not expressly authorized by VTECH
Communications

installedand used in accordance with the instructions,may cause harmfulinterference to radio
communications. However,there is no guarantee that interferencewill not occur in a particular
This equipmentcomplieswith Parts
15
and
68
of the FederalCommunicationsCommission installation. If this equipment does cause harmful interferenceto radioor television reception,
(FCC) rulesfor the UnitedStates. which can be determined by turning the equipment off and on, the user is encouragedto try and
correctthe interferenceby one or more of the following measures:
4
A
labelis locatedon the undersideof the Base Unitcontainingeitherthe FCC registration
-
Reorientor relocate the receiving antenna.
number and RingerEquivalenceNumber (REN). You must, uponrequsst, providethis informa-
-
Increasethe separation betweenthe equipment and receiver.
tion to your localtelephonecompany.
-
Connectthe equipment into an outlet or on a circuitdifferentfrom that to which the receiver
This equipment iscompatiblewith inductivelycoupledhearingaids. is connected.
-
Consultthe dealer or an experiencedradioflV technicianfor help.
Shouldyou experiencetroublewith this telephone equipment, please contact:
FCC
Part
68
The FCC requiresthat you connect your cordlesstelephoneto the nationwide telephone net-
work through a modular telephone jack (USOC RJ1lC or RJllW).
Your telephonecompany may discontinueyour service if your equipment causes harmto the
telephonenetwork. They will notifyyou inadvance of disconnection,if possible. Duringnotifi-
cation,you will be informed of your rightto file a complaintwith the FCC.
I
Occasionally, your telephone company may make changes in its facilities, equipment,opera-
tion, or proceduresthat could affect the operationof your equipment. If so, you will be given ad-,
,
,
vance notice of the change to give you an opportunityto maintainuninterruptedservice.
for repairlwarranty information. The telephonecompany may ask youto disconnect this
equipment from the line networkuntilthe problemhas beencorrected. The Base Unitcontainsno user serviceableparts. The Handsetcontainsa user replaceable
batterypack.
I!
.
Your 917ADXisdesignedto operateat the maximumpower allowed by the FCC. This
I
meansyour Handsetand BaseUnitcan communicateonly over a certain distance
-
which will Ifit isdeterminedthatyour telephoneequipment is malfunctioning,the FCC requiresthat it
dependonthe locationof the BaseUnit and Handset, weather, and the constructionand layout not be usedand that it be unpluggedfrom the modularjack untilthe problemhas beencor-
of your home or office. rected. Repairs to this telephoneequipment can only be made by the manufacturer or itsau-
thorized agents or by others who may be authorizedby the FCC. For repair procedures, follow
the instructionsoutlinedunder the VTECH LimitedWarranty.
FCC
Part
15
This equipment may not be usedon coinservice providedby the phone company or Party
Warning:
.Changesor modificationsto this unit not expresslyapproved
by
the party responsible Lines.
for compliancescouldvoidthe user's authorityto operatethe equipment.
The REN is usefulin determiningthe number of devices you may connect to your telephone
I
I
The equipment has beentested and found to comply with part 15of the FCC rules. These
I
limitsare designedto provide reasonableprotection against harmfulinterferencein a residential
,
installation. This equipment generates, usesand can radiate radiofrequency energy and, if not
line and stillenable the devices to ringwhen you receivea call. The general rule is thatthe
RENvalue should not exceed
5.0
total; however,contact your localtelephone company for the
specific number in your area.

FCC
&
IC
REGULATIONS
IC(Industry Canada)
Thistelephone is registeredfor use in Canada.
Notice: The lndustryCanadalabelindentifiescertified equipment. This certificationmeans that
theequipmentmeetscertaintelecommunicationsnetwork, protective
,
operationalandsafety
requirements.lndustryCanadadoes not buaranteethe equipment will operateto the user's
1
\
satisfaction.
.
%.*
Beforeinstallingthisequipment,users shouldensure tothefacilities of the localtelecommu-
nicationscompany. The equipment must also be installedusing an acceptablemethodof
connections. The customer shouldbeaware that compliancewith the above conditions may not
preventdegradationof serviec in some situations.
Repairsto certifiedequipment shouldbe made by an authorizedCanadianmaintenance
facility designatedby the supplier. Any repairsor alterationsmade by the user to this equipment,
or equipmentmalfunctions,may give the telecommunicationscompany causeto request the
userto disconnectthe equipment.
Usersshould ensurefor their own protectionthat the electricalground connectionsof the
powerutility, telephone linesand internal metallicwater pipe system, if present,are connected
together. This precaution maybe particularlyimportantin ruralareas.
Caution
:
Usersshouldn,ot attemptto makesuchconnectionsthemselves, but shouldcontact
.'>z',
2%
-
amro~riateelectric ins~ectionauthoritv. or electrician.as amro~riate.
The LoadNumber (LN) assignedto this device denotesthe percentageof the total load to be
connectedto a telephone ollpwhich is used by the device to preventoverloading.The termina-
tion on a loop may consist of any combinationof devices subjectonly to the requirement that
thetotal of the loadnumbersof all devicesdoes not exceed 100.
This device complieswith RSS-210 of lndustry Canada. Operationis subjectto the following
two conditions:(l) this device may not cause interference,and
(2)
this device must accept any
interference,includinginterferencethat maycause undesiredoperationof the device.
TECHNICAL SPECIFICATIONS
FREQUENCYCONTROL
CrystalControlledDual PLL Synthesizer
TRANSMIT FREQUENCY
Handset: 925.05 MHz to 927.75 MHz (All ten channels within this range)
Base: 902.3 MHz to 905.0MHz (All ten channels within this range)
RECEIVEFREQUENCY
Handset: 902.3 MHz to 905.0 MHz (Alltenchannelswithinthis range)
Base: 925.05 MHz to 927.75 MHz (Allten channels within this range)
NOMINALEFFECTIVERANGE
Maximum power allowed by FCC
&
IC.Actual operating range may vary accordingto environ-
mentalconditions at the time of use.
SIZE45fh
Handset: 18.2cm x 6.2cm x 3.8cm
(L
x
W
x
T) maximum
(antennaexcluded)
Base: 21.0cm
x
14.8cm
x
5.5cm
(Lx
W
x
T) maximum
(antenna excluded)
WEIGHT
Handset: 250 grams
Base: 550 grams
POWER REQUIREMENTS
Handset: Self-containednickel-cadmiumrechargeable battery supply, 3.6V nominal,
6OOmAh capacity.
PowerAdaptor: 9V DCQ500mA
SPECIFICATIONSARE TYPICALAND MAY CHANGE WITHOUT NOTICE.
Table of contents
Other V-tech Cordless Telephone manuals

V-tech
V-tech t2326 Setup guide

V-tech
V-tech vt9030 User manual

V-tech
V-tech VTECH LS6425 User manual

V-tech
V-tech TD43996974 - 5.8GHz Accessory Handset User manual

V-tech
V-tech LS6117 User manual

V-tech
V-tech i 5867 User manual

V-tech
V-tech MI6807 User manual

V-tech
V-tech 2431 - VT Cordless Phone User manual

V-tech
V-tech VS150 TWIN User manual

V-tech
V-tech gz 2404 User manual

V-tech
V-tech CS6428-2 User manual

V-tech
V-tech VT20-2481 User manual

V-tech
V-tech VT1923 User manual

V-tech
V-tech i 5871 User manual

V-tech
V-tech CS6629 User manual

V-tech
V-tech CS5211 User manual

V-tech
V-tech PDL GX User manual

V-tech
V-tech PMX-S5410 User manual

V-tech
V-tech 6895 User manual

V-tech
V-tech ip5850 User manual