V-ZUG Unimatic S User manual

Operating instructions
Unimatic S
Washing machine

Thank you for choosing to buy one of our products. Your appliance is made to high
standards and is easy to use. Nevertheless, please take the time to read these operating
instructions in order to familiarize yourself with the appliance and get the best use out of
it.
Please follow the safety precautions.
Modifications
Text, diagrams and data correspond to the technical standard of the appliance at the
time these operating instructions went to press. The right to make technical modifications
for the purpose of the further development of the appliances is reserved.
Validity
The model number corresponds to the first alphanumerics on the identification plate.
These operating instructions apply to:
Model designation Model number Type
Unimatic S 287 WA-US
Variations depending on the model are noted in the text.
© V-ZUG Ltd, CH-6302 Zug, 2021
2

3
Contents
1 Safety precautions 4
1.1 Symbols used......................................................... 4
1.2 General safety precautions.................................. 4
1.3 Appliance-specific safety precautions ............... 4
1.4 Instructions for use................................................ 5
2 Using for the first time 7
3 Appliance description 7
3.1 Your appliance ....................................................... 7
3.2 Appliance construction......................................... 8
3.3 Operating and display elements......................... 9
4 Programme overview 11
4.1 Main wash programmes.....................................11
4.2 Additional programmes......................................12
4.3 Additional functions.............................................13
5 Washing 14
5.1 Preparing the appliance .....................................14
5.2 Loading the appliance ........................................15
5.3 Adding washing detergent.................................15
5.4 Selecting a programme......................................18
5.5 Changing selection .............................................20
5.6 Programme selection with childproof lock
activated ................................................................21
5.7 End of programme ..............................................21
5.8 At the end of the wash day................................22
6 User settings 22
6.1 Adjusting user settings .......................................22
6.2 Childproof lock.....................................................23
6.3 Automatic door opener.......................................24
6.4 Restoring factory settings ..................................24
7 Care and maintenance 24
7.1 Cleaning intervals ................................................24
7.2 Cleaning the detergent dispenser drawer ......25
7.3 Cleaning the water inlet filter.............................25
7.4 Emergency draining ............................................26
7.5 Cleaning the foreign body trap .........................27
8 Trouble-shooting 27
8.1 What to do if …......................................................27
8.2 Unsatisfactory wash results ................................33
8.3 Opening the appliance door in the event of a
power failure ..........................................................35
9 Washing tips 36
9.1 Fabric care symbols.............................................36
9.2 Washing detergent ...............................................36
9.3 General tips ...........................................................36
9.4 Net curtains............................................................36
9.5 Energy and water economy................................36
10 Spare parts 37
11 Technical data 38
11.1 Dimensions ............................................................38
11.2 Plumbing in ............................................................38
11.3 Electrical connection............................................38
11.4 Spin speed.............................................................38
11.5 Note for testing institutes ....................................39
11.6 Consumption values ............................................39
11.7 VAS Vibration Absorbing System ......................40
11.8 Water and energy economy ...............................40
12 Disposal 40
13 Index 41
14 Service & Support 43

4
1 Safety precautions
1.1 Symbols used
Denotes important safety precau-
tions.
Failure to observe said precautions
can result in injury or in damage to
the appliance or fittings!
Information and precautions that
should be observed.
Information on disposal
Information about the Operating In-
structions
▸ Indicates step-by-step instructions.
–Describes how the appliance reacts
to the steps taken.
▪Indicates a list.
1.2 General safety precautions
▪Read the operating instruc-
tions before using the appli-
ance for the first time.
▪This appliance can be used
by children aged 8 and above
and by persons with reduced
physical, sensory or mental
capabilities, or lack of experi-
ence and/or knowledge,
provided they are supervised
or have been instructed on
the safe use of the appliance
and have understood the haz-
ards involved. Children shall
not play with the appliance.
Cleaning and user mainten-
ance shall not be undertaken
by children without supervi-
sion.
▪If an appliance is not
equipped with a mains cable
and a plug or other means for
disconnecting from the mains
with a contact opening on
each pole complying with the
conditions of overvoltage cat-
egory III for full isolation, an
isolating device must be in-
corporated into the perman-
ently installed electrical install-
ation in accordance with the
installation regulations.
▪If the mains cable of this ap-
pliance is damaged, it must
be replaced by the manufac-
turer or its Customer Services
or a similarly qualified person
in order to avoid hazard.
1.3 Appliance-specific safety
precautions
▪Children under 3 years of age
must be kept away unless
constantly supervised.
▪The appliance has a max-
imum dry load capacity of
8kg.

1 Safety precautions
5
1.4 Instructions for use
Before using for the first time
▪The appliance must be installed and
connected to the electricity supply in
accordance with the separate installa-
tion instructions. Have a qualified fitter/
electrician carry out the necessary
work.
▪Ensure access to the place of discon-
nection (e.g. socket outlet, wall switch,
fuse) and the water tap.
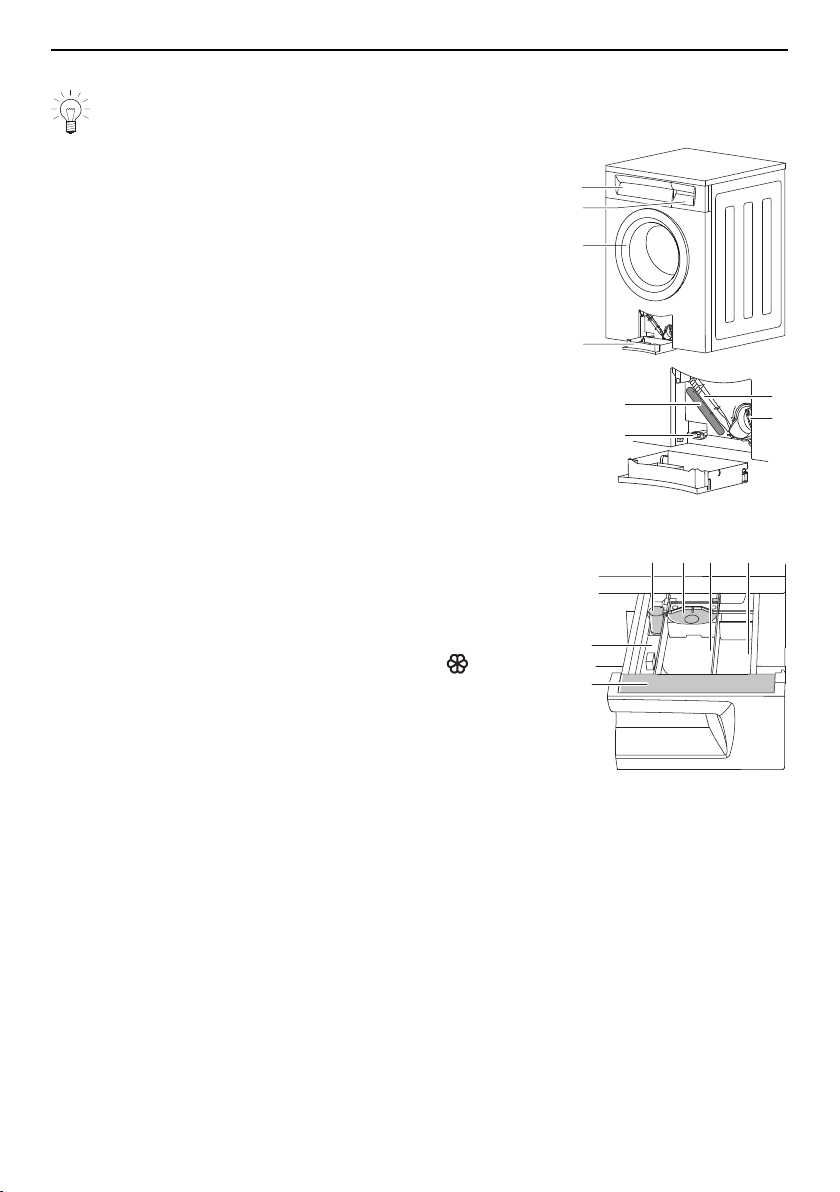
▪The transport lock must be removed.
Failure to remove the transport locks
can result in damage to the appliance
or to the apartment or laundry room fit-
tings.
Correct use
▪The appliance is only suitable for wash-
ing home textiles with water and regular
automatic washing machine detergent.
It is designed for use in the home and
for the above-mentioned purpose only.
No liability is assumed for any damage
caused by improper or incorrect use.
▪Before closing the appliance door and
starting a programme, ensure that there
are no foreign objects or pets in the
washing drum.
Services and support
▪If the appliance is not working properly
or in case a repair is needed, follow the
instructions given in the «Service & Sup-
port» section. Please contact our Cus-
tomer Services if necessary.
▪Any repairs, modifications or manipula-
tions to the appliance, especially any
electrically live parts, may only be car-
ried out by the manufacturer, its Cus-
tomer Services or a similarly qualified
person. Repairs if carried out incorrectly
may cause serious injury, damage to
the appliance and fittings, as well as af-
fect the functioning of the appliance.
▪Any work carried out by an unauthor-
ized service provider as well as the use
of spare parts other than the original
spare parts void the obligations under
the warranty.
Note on use
▪If the appliance is not functioning prop-
erly, disconnect it from the power sup-
ply immediately.
▪To protect your washing, follow the fab-
ric care symbols and the hints and ad-
vice in the «Washing tips» section.
Caution: Burns hazard
▪Textiles that have been cleaned, treated
or soaked with flammable chemicals,
detergents or solvents such as ben-
zene, alcohol, stain remover, oil, paint,
wax, etc. are not to be washed in the
appliance. Fire or explosion hazard!
Wash materials containing such sub-
stances first by hand with water or allow
the solvent to evaporate completely.
Caution: Risk of injury
▪Ensure the washing drum is stationary
before reaching inside. Do not touch
the washing drum while it is still in mo-
tion – risk of serious injury!
▪Disconnect the appliance from the
mains before carrying out maintenance
work.
Caution: Risk to life
▪Packaging material, e.g. plastic film and
polystyrene, can be dangerous for chil-
dren. Danger of suffocation! Keep pack-
aging material away from children.
How to avoid damaging the appliance
▪Close the appliance door carefully.

1 Safety precautions
6
▪Before closing the appliance door and
starting a programme, ensure that there
are no foreign objects or pets in the
washing drum, detergent compartment
or around the foreign body trap. For-
eign objects such as coins, nails, paper
clips, etc. can damage parts of the ap-
pliance as well as the washing.
▪During longer periods of absence, turn
off the water tap before switching off
the power by pulling out the mains
plug. Never pull the mains plug out by
the cable. Please note: The built-in over-
flow protection is rendered inactive
when the power is switched off.
▪When cleaning the appliance make
sure no water gets inside it. Use a mod-
erately damp cloth. Do not spray the
outside or the inside of the appliance
with water. If water gets inside the appli-
ance, it will cause damage.
▪Textiles with metal reinforcements are
not to be washed in the appliance. Risk
of damage.
▪Trainers, diving suits, rucksacks, car-
pets, etc. are not to be washed in the
appliance.

2 Using for the first time
The appliance must be installed and connected to the electricity supply in accordance
with the separate installation instructions. Have a qualified fitter/electrician carry out the
necessary work.
The appliance was tested with water before being shipped. There may therefore
still be traces of water left in the appliance.
Transport lock
Before using the appliance for the first time, the transport lock must be removed (2
screws with washers at the back of the appliance, polystyrene ring in the drum), in
order to avoid damage to the appliance.
Running the first wash cycle without any washing
Run an empty wash cycle to remove any residues from the manufacturing process.
▸ Add a little washing detergent to compartment II.
▸ Select coloureds 60°C.
3 Appliance description
3.1 Your appliance
▪Load capacity: 8kg dry washing
▪8 main wash programmes
▪5 additional programmes
▪5 additional functions
▪Sensors for optimizing the wash cycle
▪Digital display for hints and trouble-shooting
▪Automatic door opener
▪Childproof lock
▪Anti-leak protection
7

3 Appliance description
3.2 Appliance construction
The appliance door can be opened to the left or to the right. Our service depart-
ment can convert the appliance accordingly.
1Operating and display elements
(pivoting panel)
3
4
2
1
6
5
8
7
2Detergent dispenser drawer
3Appliance door
4Drain tray
5Emergency door release tool
6Foreign body trap
7Emergency door release
8Identification plate with serial number (SN)
Detergent dispenser drawer
9Pre-wash detergent, compartment I
13
14
12 11 10 9
10 Main wash detergent, compartment II
11 Flap for liquid detergent
12 Siphon for fabric conditioner (softener)
13 Fabric conditioner (softener), compartment
14 Quick operating instructions
Front: German / French
Back: English / Italian
8

3 Appliance description
3.3 Operating and display elements
Main programmes
Whites 95°C ▪1× Hand wash 20°C
▪2× Woollens 30°C
Coloureds 60°C
Eco programme for
cottons
Appliance hygiene
Coloureds 40°C
Coloureds 20°C
Additional programmes
Easy care Sprint
Pre-wash AquaPlus
Additional functions
Temperature setting Fast forward / End of programme
Spin speed Pause / Door opener
Delayed start
9

3 Appliance description
Programme progress display
The programme progress display shows the stage at which the programme is at.
Pre-wash / Main wash
Rinsing
Final rinse / Conditioning
Spinning
Draining
The corresponding time remaining for the programme is displayed in the digital display.
Indicator lights
The buttons for the main programmes, the additional programmes and certain additional
functions are equipped with an indicator light.
Indicator lights flash
Programmes or functions can be selected.
Indicator lights are illuminated
Programme or function is/are active (running).
Indicator lights are dark
Programmes or functions are switched off.
10

4 Programme overview
4.1 Main wash programmes
Whites 95 °C 1–8 kg
White cottons, linens with the
95
fabric care symbol e.g. bed and table linen,
towels, white or colour-fast underwear.
Coloureds 60 °C 1–8 kg
Coloured cottons with the
60
fabric care symbol e.g. bright blouses, overalls,
shirts, bed linen.
Eco programme 1–8 kg
Most efficient programme. Suitable for washing cotton textiles with the
60
or
40
fabric care symbol together in the same cycle. In order to save energy,
the actual water temperature is lower than the programme temperature dis-
played for this programme. A longer washing time, however, still ensures a
very good washing performance.
Coloureds 40 °C 1–8 kg
Coloured cottons and mixed washing with the
40
fabric care symbol e.g. col-
oured sweatshirts, t-shirts.
Coloureds 20 °C 1–8kg
Energy-saving programme for lightly soiled textiles with fabric care symbols
30
,
40
,
60
or
95
.
Hand wash 20 °C 1–2kg
1× Very gentle wash for items labelled with the fabric care symbol.
Woollens 30 °C 1–2kg
2× Gentle treatment for woollens and other delicate textiles. Only for woollens with
a felt-free finish and labelled as «machine washable».
11

4 Programme overview
Appliance hygiene 0 kg
Without any washing. A small amount of water is heated up to around 80°C
and the steam produced sharply reduces the germ count.
4.2 Additional programmes
Easy care
For washing requiring very gentle treatment
▪Reduced washing action
▪Higher water level during washing and rinsing
▪Reduced spin speed: 800rpm
▪Optimum wash load: max. 3.5kg
Pre-wash
Suitable for heavily soiled washing
▪Programme duration extended: about 15minutes
Sprint
Short programme for lightly soiled washing
▪Programme duration for 2.5kg wash load
+ : 26minutes
+ : 29minutes
+ : 39minutes
▪2 instead of 3 rinsing cycles
▪Optimum wash load: max. 2.5kg
Add a small quantity of washing detergent.
A large washing load or too much washing detergent can significantly lengthen the
programme duration.
AquaPlus
More intensive rinsing
▪Increased water level during rinsing
▪Additional rinsing cycle
Intensive programme
Suitable for heavily soiled washing
▪Significant lengthening of the washing duration
▸ Touch the desired main programme button ( , , or ) 2×.
– appears in the digital display.
12

4 Programme overview
Separate rinsing / Separate spinning
It is possible to skip parts of the programme selected.
▸ Select main programme according to fabric care labels.
▸ Touch the button 1×.
–Rinsing and final spin are selected.
▸ Touch the button 2×.
–Final rinse / Conditioning and final spin are selected.
▸ Touch the button 3×.
–Separate final spin is selected.
4.3 Additional functions
Temperature setting
The temperature can be changed in steps of 10°C or 15°C, allowing slightly
soiled (not stained) textiles to be washed with a saving in energy.
Cold wash: Not heated
Spin speed
The spin speed can be changed in steps of 200 rpm (1200, 1000, 800, 600,
400rpm, stop after rinsing, 1500, 1400 rpm). Delicates can thus be spun at a
low spin speed. However, this increases the drying time (greater energy con-
sumption for tumble drying).
Delayed start
Take advantage of cheap-rate electricity (setting range of up to 24 hours).
When the delayed start time set is reached, the programme starts automatic-
ally.
Fast forward / End of programme
Touch the button to skip individual parts of a programme at any time dur-
ing the programme sequence.
Pause / Door opener
Touching the button 1× when a programme is running will cause the pro-
gramme to pause. Touching the button again will cause the appliance
door to open provided the appliance is in a state that allows this action (de-
pends on the water level, temperature and speed).
Touch the flashing main programme button to end the pause and resume the
programme.
13

5 Washing
5 Washing
5.1 Preparing the appliance
▸ Ensure that the foreign body trap1 is inserted properly.
1
▸ Insert plug into mains socket or turn on at wall switch.
–The appliance switches on.
0
1
▸ Turn on water tap.
▸ Touch the button to open the appliance door.
14

5 Washing
5.2 Loading the appliance
▸ Load dry washing (max. 8 kg).
▪If washing normally soiled whites and coloureds,
fill the washing drum.
▪If washing heavily soiled whites and coloureds,
fill the washing drum max.¾ full.
▪If washing easy care cotton fabrics, white and
coloured synthetic fabrics as well as mixed fab-
rics, fill the washing drum max.½ full.
▪If washing delicates, woollens, silks, polyacrylics
or net curtains, fill the washing drum max.¼ full.
For wet loads, halve these load capacities.
To prevent unbalanced spinning, vibration noise and interrupted spinning action,
avoid loading the washing drum with any one single, heavy item.
▸ Close the appliance door (pushing firmly to)
–The indicator lights for the programme buttons flash
If no programme selection is made within 20seconds, all the displays go out. However,
it is still possible to make a programme selection.
5.3 Adding washing detergent
▸ Pull the detergent dispenser drawer out as far as
it will go.
Powder detergent
If using powder detergent, flap 1 in compartment II
must be open.
▸ Lift flap 1 and push back.
15

5 Washing
Liquid detergent
If using liquid detergent, flap 1 in compartment II
must be closed.
▸ Pull flap 1 to the front and fold down.
Do not fill with liquid detergent past the upper mark.
Liquid detergent can only be used for the main
wash with programmes without a pre-wash. They
are only suitable for temperatures of up to 60°C.
With 95°C programmes, liquid detergents are not
as effective as they do not contain bleach.
1
II
Liquid detergents are best used with the main programmes / and with
programmes with and .
Liquid detergent and a delayed start
If a delayed start has been selected, after loading the washing the liquid detergent
should be added to a dosing aid (e.g. ball). It is important that the liquid detergent does
not spill onto the washing during the delayed start period, otherwise the washing could
be damaged through a possible chemical reaction.
Detergent dosage
Adding too much washing detergent can cause excess foaming, giving a poor
wash result and, in the worst case, causing damage to the appliance.
The amount of detergent required depends on the degree of soiling as well as the wash
load, the hardness of the water and the product being used. Follow the detergent manu-
facturer’s dosing instructions.
The hardness of the water is measured using the French degree of water hardness (°fH)
and is subdivided into three categories:
▪Soft 0°fH to 15°fH
▪Medium 15°fH to 25°fH
▪Hard over 25°fH
(NB Use water softener to reduce amount of washing detergent required.)
The local water authorities can provide information on the level of water hardness in your
area.
16

5 Washing
Compartments
Pre-wash detergent Add to compartmentI
II I
Main wash detergent Add to compartmentII
Fabric conditioner (
softener)
Add to compartment
Fabric conditioner
Do not fill with fabric conditioner past the «MAX» mark.
Dyeing textiles
Textiles can be dyed in the appliance using suitable dyeing agents. Please follow the
manufacturer’s safety instructions and warnings carefully.
Each wash programme starts with brief draining and for this reason liquid dye
components should be added after this.
After adding the washing detergent
▸ Push the detergent dispenser drawer back in.
▸ Select programme.
17

5 Washing
5.4 Selecting a programme
«Press and go»
A main programme can be selected at the touch of a single button. All the necessary
settings for the programme are provided automatically.
Select or deselect any additional programmes or additional functions by touching the
corresponding button.
If no other button is touched within the next 20seconds, the programme selected starts
automatically.
Use the programme overview to determine which programme is the most suitable
for your washing.
Selecting main programme
▸ Close the appliance door.
–The indicator lights for the programme buttons flash.
▸ Touch the desired programme button 1× (or 2× for intensive programmes , ,
and for Woollens ).
–The indicator light for the programme selected illuminates.
–The selected temperature is displayed.
–After a short time the display changes to the likely
duration of the wash programme (hours/minutes).
–The indicator lights for additional programmes that may be selected flash.
A new programme can be selected during this time. All additional programmes se-
lected are cancelled and must be reselected.
–If no other button is touched within the next 20 seconds, the programme selected
starts automatically.
Selecting additional programme
Easy care Sprint
Pre-wash AquaPlus
–The new programme duration is displayed in the digital display.
18

5 Washing
Changing the temperature
▸ Immediately after selecting a programme, touch the button repeatedly until the
desired temperature appears in the digital display.
It is still possible to change the temperature once the programme has started run-
ning.
Changing the spin speed
▸ Immediately after selecting a programme, touch the button repeatedly until the
desired spin speed appears in the digital display.
It is possible to change the current setting while a programme is running.
The recommended and maximum settable spin speeds depend on the programme se-
lected.
With «No spinning / Stop after rinsing», the washing remains lying in the water after the
final rinse. There is no spinning nor intermediate spinning.
Selecting a delayed start
▸ Immediately after programme selection, hold the button depressed or touch re-
peatedly until the required delayed start duration (max. 24 hours) appears in the di-
gital display.
–The digital display goes dark.
–When the delayed start set is up, the programme selected starts automatically.
Washing can be added at any time.
The time remaining to the delayed start can be reduced (in 30-minute intervals) to null by
repeatedly touching the button.
19

5 Washing
Selecting separate rinsing / separate spinning
▸ Select programme.
▪Touch the button 1×: Rinsing
▪Touch the button 2×: Final rinse / Conditioning
▪Touch the button 3×: Final spin
Opening the appliance door during operation
The appliance door can only be opened if the water level and temperature are still low
and there is no spinning in progress. As long as the indicator light for the button is il-
luminated, the appliance door can be opened.
▸ Touch the button 1×.
–The appliance changes over to the «Pause» state.
▸ Touch the button again.
–The appliance door opens.
–The digital display flashes.
▸ Add or unload wash items.
▸ Close the appliance door.
–The programme is resumed.
In the event of a power failure, the appliance door can only be opened using the
emergency door release.
The programme memory ensures that the programme sequence is resumed after
a power failure.
5.5 Changing selection
During programme selection
▸ Touch another programme button.
–All settings are cleared.
After a programme has started
The spin speed and temperature can still be changed. To change any other settings, the
programme must be aborted.
Aborting a programme before time
▸ Touch the button repeatedly until appears in the digital display for drain-
ing.
–This part of the programme cannot be skipped and will be carried out in full.
20
Other manuals for Unimatic S
2
Table of contents
Other V-ZUG Washer manuals

V-ZUG
V-ZUG Unimatic S User manual

V-ZUG
V-ZUG Adora SL User manual

V-ZUG
V-ZUG AdoraWash V2000 User manual

V-ZUG
V-ZUG Adora SL User manual

V-ZUG
V-ZUG Adora SLQ User manual

V-ZUG
V-ZUG Unimatic T User manual

V-ZUG
V-ZUG Adora SLQ WP User manual

V-ZUG
V-ZUG Adora SLQ 267 User manual

V-ZUG
V-ZUG AdorinaDry V200 User manual

V-ZUG
V-ZUG 11025 User manual

V-ZUG
V-ZUG 11001 User manual

V-ZUG
V-ZUG Adora L User manual

V-ZUG
V-ZUG Adora L User manual

V-ZUG
V-ZUG 11023 User manual

V-ZUG
V-ZUG Adora SLQ WP User manual

V-ZUG
V-ZUG Adora L User manual

V-ZUG
V-ZUG AdorinaWash V400 User manual

V-ZUG
V-ZUG Adorina S User manual

V-ZUG
V-ZUG Adora S 266 User manual

V-ZUG
V-ZUG adora s User manual